


一.安装vue3.0
1.安装:
npm install -g @vue/cli
2.创建vue-app项目
vue create vue-app
3.项目配置
一下就是我的配置

- Babel:将ES6编译成ES5
- TypeScript:JS超集,主要是类型检查
- Router和Vuex,路由和状态管理
- Linter/ Formatter:代码检查工具
- CSS Pre-processors:css预编译 (稍后会对这里进行配置)
- Unit Testing:单元测试,开发过程中前端对代码进行自运行测试
1)Use class-style component syntax? (Y/n) y
是否使用Class风格装饰器?
即原本是:home = new Vue()创建vue实例
使用装饰器后:class home extends Vue{}
2)Use Babel alongside TypeScript for auto-detected polyfills? (Y/n) y
使用Babel与TypeScript一起用于自动检测的填充? yes
3)Use history mode for router? (Requires proper server setup for index fallback in production) (Y/n) y
路由使用历史模式? 这种模式充分利用 history.pushState API 来完成 URL 跳转而无须重新加载页面
4)Pick a CSS pre-processor (PostCSS, Autoprefixer and CSS Modules are supported by default):Less
使用什么css预编译器? 我选择的 Less
5)Pick a linter / formatter config:
校验格式
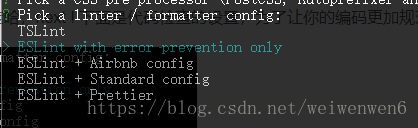
- tslint: typescript格式验证工具
- eslint w…: 只进行报错提醒; 【选这个】
- eslint + A…: 不严谨模式;
- eslint + S…: 正常模式;
- eslint + P…: 严格模式;
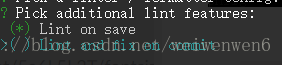
6)Pick additional lint features:
代码检查方式:我选择保存时检查
7)Where do you prefer placing config for Babel, ESLint, etc.? In package.json
vue-cli 一般来讲是将所有的依赖目录放在package.json文件里

8)Save this as a preset for future projects? (y/N) n
是否在以后的项目中使用以上配置?不
二.使用element-ui-plus
1.安装
npm i element-plus
2.main.js里面
import App from './App.vue'
import { createApp } from 'vue'
import ElementPlus from 'element-plus'
import 'element-plus/lib/theme-chalk/index.css'

const app = createApp(App)
app.use(ElementPlus).mount('#app')
3.但在vue3.0 setup中使用
import { getCurrentInstance } from 'vue'
export default {
  name: 'App',
  components: {

  },
  setup(){
    const {proxy} = getCurrentInstance()
    proxy.$message("mesage")
  }
}


 被折叠的 条评论
为什么被折叠?
被折叠的 条评论
为什么被折叠?
 到【灌水乐园】发言


