


 本文介绍了在SSM框架下使用Swagger进行接口API的配置和使用。首先,需要在pom.xml引入Swagger的相关依赖,并注意Spring版本的兼容性问题。接着,配置Swagger的基本信息,创建ApiConfig.java类。然后,在spring-servlet.xml中配置静态资源访问。通过在Controller中添加Swagger注解来定义接口。最后,可以通过Swagger UI测试接口的连通性和参数传递,确保接口的正常工作。
我们的项目时ssm框架。我是在我们web项目测试的:
1.pom 引用
<dependency>

<groupId>com.fasterxml.jackson.core</groupId>

<artifactId>jackson-databind</artifactId>

<version>2.9.5</version>

</dependency>

<!-- swagger2核心依赖 -->

<dependency>

<groupId>io.springfox</groupId>

<artifactId>springfox-swagger2</artifactId>

<version>2.6.1</version>

</dependency>

<!-- swagger-ui为项目提供api展示及测试的界面 -->

<dependency>

<groupId>io.springfox</groupId>

<artifactId>springfox-swagger-ui</artifactId>

<version>2.6.1</version>

</dependency>
经过测试,2.9.2的swagger , spring 4.0.6使用不了,需要进行升级(spring4.3.17可用)。
2.配置一些公共信息。需要新建一个类,这里是ApiConfig.java.(这个可以不用配置,swagger有默认,但是最好设置下接口的公共信息)
import org.springframework.context.annotation.Bean;

import org.springframework.context.annotation.ComponentScan;

import org.springframework.context.annotation.Configuration;

import org.springframework.stereotype.Component;

import org.springframework.web.servlet.config.annotation.EnableWebMvc;

import org.springframework.web.servlet.config.annotation.WebMvcConfigurationSupport;

import springfox.documentation.builders.ApiInfoBuilder;

import springfox.documentation.builders.ParameterBuilder;

import springfox.documentation.builders.PathSelectors;

import springfox.documentation.builders.RequestHandlerSelectors;

import springfox.documentation.schema.ModelRef;

import springfox.documentation.service.ApiInfo;

import springfox.documentation.service.Parameter;

import springfox.documentation.spi.DocumentationType;

import springfox.documentation.spring.web.plugins.Docket;

import springfox.documentation.swagger2.annotations.EnableSwagger2;


import java.util.ArrayList;

import java.util.List;


/**

* @author xyd

* @description swagger使用

 * @date 2019/06/08 11:09

*/

@Configuration

@EnableSwagger2

@ComponentScan(basePackages = {"com.bee.daifu.web"})

@EnableWebMvc

public class ApiConfig extends WebMvcConfigurationSupport {


@Bean

 public Docket customDocket() {

/**

* 设置全局参数(不是必须)

 */

 ParameterBuilder ticketPar = new ParameterBuilder();

List<Parameter> pars = new ArrayList<Parameter>();

ticketPar.name("token").description("令牌").modelRef(new ModelRef("string")).parameterType("header")

.required(false).build(); // header中的token参数非必填,传空也可以

 pars.add(ticketPar.build()); // 根据每个方法名也知道当前方法在设置什么参数


 /**

* 这里有包含正则

 */

 return new Docket(DocumentationType.SWAGGER_2).select().

apis(RequestHandlerSelectors.basePackage("com.bee.daifu"))

.paths(PathSelectors.any())

.build()

// .globalOperationParameters(pars).加载全局参数,如果有的话

 .apiInfo(apiInfo());

}

/**

* 这个是设置大标题小标题

 * @return

 */

 ApiInfo apiInfo() {

return new ApiInfoBuilder().title("swagger测试项目")

.description("java后端接口api文档")

.version("0.1.0")

// .termsOfServiceUrl("http://192.168.1.24:8888/swagger-ui.html")

 .build();

}


}
3.配置静态访问:在spring-servlet中配置如下:
<mvc:default-servlet-handler />
<mvc:resources location="classpath:/META-INF/resources/" mapping="swagger-ui.html"/>
<mvc:resources location="classpath:/META-INF/resources/webjars/" mapping="/webjars/**"/>
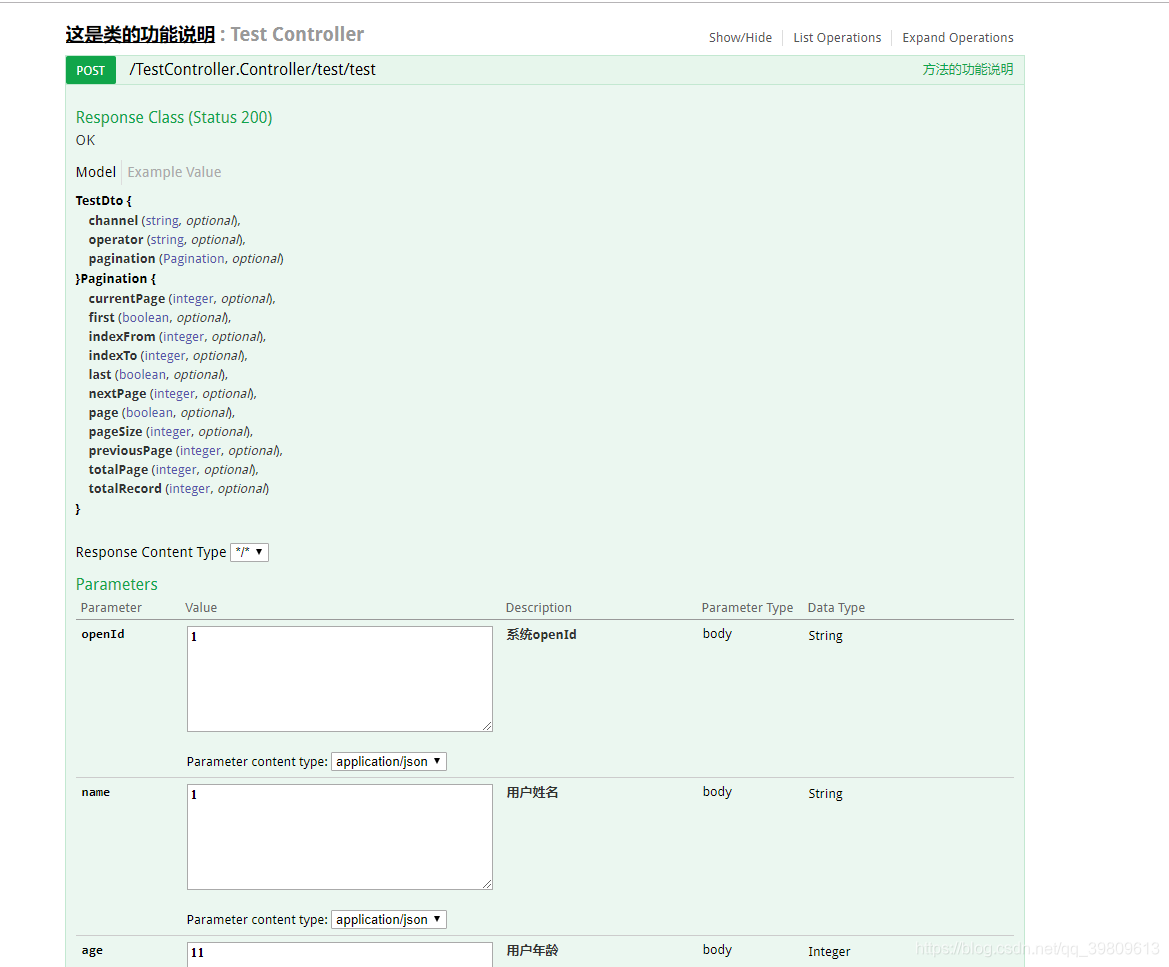
<bean class="com.bee.daifu.web.ApiConfig" />4.开始写接口,这里以TestController举例:
import com.bee.sys.utils.Result;
import io.swagger.annotations.*;
import org.springframework.stereotype.Controller;
import org.springframework.web.bind.annotation.RequestMapping;
import org.springframework.web.bind.annotation.ResponseBody;
import org.springframework.web.bind.annotation.RestController;
/**
* @author xyd
* @description swagger测试
* @date 2019/06/08 11:01
*/
@Api(tags="这是类的功能说明")
@RestController//这个会把出参自动转化为json
@RequestMapping("TestController.Controller")
public class TestController {
@ApiOperation(httpMethod = "POST", value = "方法的功能说明",response = TestDto.class)
@ApiImplicitParams({//入参说明
@ApiImplicitParam(name="openId",value="系统openId",required=true,dataType = "String"),
@ApiImplicitParam(name="name", value = "用户姓名", required = true, dataType = "String"),
@ApiImplicitParam(name="age", value = "用户年龄", required = true, dataType = "Integer")
})
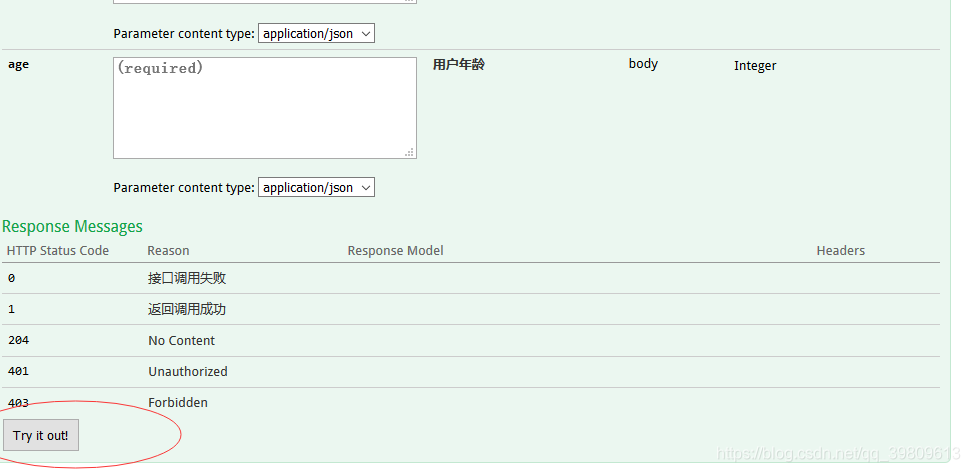
@ApiResponses(value = {//我们系统的出参状态,1成功,0失败
@ApiResponse(code = 1,message = "返回调用成功"),
@ApiResponse(code = 0,message = "接口调用失败")
})
@RequestMapping("test/test")
@ResponseBody
public Result test(String name, String openId,Integer age){
System.out.println("============================================================================");
Result res = new Result();
res.setResultCode("1");
return res;
}
}5.看下效果(注意:这个页面可以测试接口的连通性,输入参数,点击 try it out ,即可看到接口返回)
分享一个转载的:(工作自己使用的,有问题私我删)
Swagger2 的正确玩儿法 :https://mp.weixin.qq.com/s/YUNsVe9KKuGr5PY6Hs2efA


 1486
1486

 被折叠的 条评论
为什么被折叠?
被折叠的 条评论
为什么被折叠?
 到【灌水乐园】发言


