


前言:
说到代码加密可能大家不陌生,代码加密的安全性,换句话说你几十个人团队开发的东西,就简简单单的把源码泄露出去,那对知识产权是有很大损失,所有的努力被白嫖,你想想。
代码安全主要是有如下几点:
1. 保护知识产权
- 防止代码泄漏:软件的源代码包含了开发者的技术和算法,是开发过程中最重要的知识产权。通过加密或混淆代码,可以防止非法访问者盗取或复制代码,保护开发者的创新成果。
- 减少源代码反向工程的风险:加密或混淆后的代码更加难以通过反向工程分析,保护了开发者的商业机密和技术细节。
2. 防止代码篡改与逆向
- 防止篡改:加密代码可以防止攻击者修改或注入恶意代码,例如木马、病毒等。攻击者通过修改加密后的代码来更改软件的功能或行为,这样可以确保软件的完整性。
- 防止逆向工程:代码加密技术可以让攻击者更难以通过反编译工具分析代码的结构和算法,降低被逆向工程的可能性,特别是防止破解和破解后的二次分发。
3. 提升软件安全性
- 防止破解:很多软件,特别是商业软件和游戏,会通过加密代码来防止破解者破解软件的保护机制,避免非法使用和盗版分发。加密代码不仅保护了软件的核心功能,还能防止授权验证机制被绕过。
- 防止调试和分析:加密或混淆代码使得调试变得更加困难,攻击者无法轻易通过调试手段分析出代码的运行逻辑或找出漏洞。
4. 提高商业价值和竞争力
- 保护竞争优势:软件开发商可以通过加密代码,保护自己独特的技术方案或算法,从而在市场上保持竞争优势。特别是在一些涉及核心技术的领域(如金融、加密算法等),加密代码可以防止竞争对手通过逆向分析获取这些技术。
- 保护用户数据:对于处理敏感数据的应用(如金融应用、医疗软件等),加密代码可以确保数据的安全性,避免数据泄露。
5. 防止未授权的使用
- 限制授权许可:一些加密技术可以与授权机制结合使用,确保只有合法授权的用户才能运行软件。这对于商业软件和云服务尤为重要,帮助企业控制软件的分发和使用范围。
- 限制复制和分发:通过代码加密,可以限制软件的复制和分发行为,减少盗版和非法复制的风险。
今天我们要实践的2个方案:
1, YGuard+ maven-antrun-plugin 实现代码混淆加密
2, Allatori + exec-maven-plugin 实现代码混淆加密
一,YGuard+ maven-antrun-plugin 实现代码混淆加密
YGuard:github地址:
https://github.com/yWorks/yGuard/tree/master/examples/processing
官方学习文档地址:Task documentation - yGuard Documentation
(记住一定要去看人家的标签语法,配置一定要按照人家的来配置,这里如果一个标签不对就无法进行打包配置)
下面是我自己实际生成出来的效果,详情的列子可以去看github项目。
pom里面配置:
<dependency>
<groupId>com.yworks</groupId>
<artifactId>yguard</artifactId>
<version>4.1.1</version>
</dependency>
<plugin>
<groupId>org.springframework.boot</groupId>
<artifactId>spring-boot-maven-plugin</artifactId>
<version>2.4.3</version>
<configuration>
<mainClass>com.xyhlw.wechat.WechatApplication</mainClass>
</configuration>
</plugin>
<plugin>
<artifactId>maven-antrun-plugin</artifactId>
<version>1.8</version>
<executions>
<execution>
<phase>package</phase>
<goals>
<goal>run</goal>
</goals>
<id>obfuscate</id>
<configuration>
<tasks>
<!-- 定义路径变量 -->
<property name="project.build.prefix" value="${project.build.directory}/${project.build.finalName}"/>
<property name="project.jar" value="${project.build.prefix}.jar"/>
<property name="project.classes.unobf" value="${project.build.prefix}_classes_unobf.jar"/>
<property name="project.classes.obf" value="${project.build.prefix}_classes_obf.jar"/>
<!-- 检查原始 JAR 文件 -->
<available file="${project.jar}" property="project.jar.exists"/>
<fail unless="project.jar.exists">${project.jar} does not exist.</fail>
<!-- 解压原始 JAR 文件,提取 BOOT-INF/classes -->
<echo message="Extracting BOOT-INF/classes from ${project.jar}..." />
<unzip src="${project.jar}" dest="${project.build.directory}/unobf-classes">
<patternset>
<include name="BOOT-INF/classes/**"/>
</patternset>
</unzip>
<!-- 打包解压后的 classes 文件为 unobf JAR -->
<echo message="Creating ${project.classes.unobf}..." />
<jar destfile="${project.classes.unobf}" basedir="${project.build.directory}/unobf-classes/BOOT-INF/classes"/>
<!-- 配置 YGuard 进行混淆 -->
<property name="runtime.classpath" refid="maven.runtime.classpath"/>
<taskdef name="yguard" classname="com.yworks.yguard.YGuardTask" classpathref="maven.test.classpath"/>
<yguard>
<inoutpair in="${project.classes.unobf}" out="${project.classes.obf}"/>
<externalclasses>
<pathelement path="${runtime.classpath}"/>
</externalclasses>
<rename mainclass="${mainclass}" logfile="${project.build.directory}/${project.build.finalName}_renamelog.xml">
<property name="naming-scheme" value="small"/>
<keep>
<package>
<patternset>
<include name="com.xyhlw.wechat.config.**"/>
<include name="com.xyhlw.wechat.constant.**"/>
<include name="com.xyhlw.wechat.controller.**"/>
<include name="com.xyhlw.wechat.dto.**"/>
<include name="com.xyhlw.wechat.task.**"/>
<include name="com.xyhlw.wechat.utils.**"/>
<include name="com.xyhlw.wechat.vo.**"/>
</patternset>
</package>
</keep>
</rename>
</yguard>
<!-- 重新打包为混淆后的 JAR 文件 -->
<echo message="Packaging obfuscated JAR as ${project.build.prefix}_obf.jar..." />
<zip compress="false" destfile="${project.build.prefix}_obf.jar">
<zipfileset src="${project.jar}">
<include name="**"/>
<exclude name="BOOT-INF/classes/**"/>
</zipfileset>
<zipfileset src="${project.classes.obf}" prefix="BOOT-INF/classes">
<include name="**"/>
<exclude name="META-INF/**"/>
</zipfileset>
</zip>
</tasks>
</configuration>
</execution>
</executions>
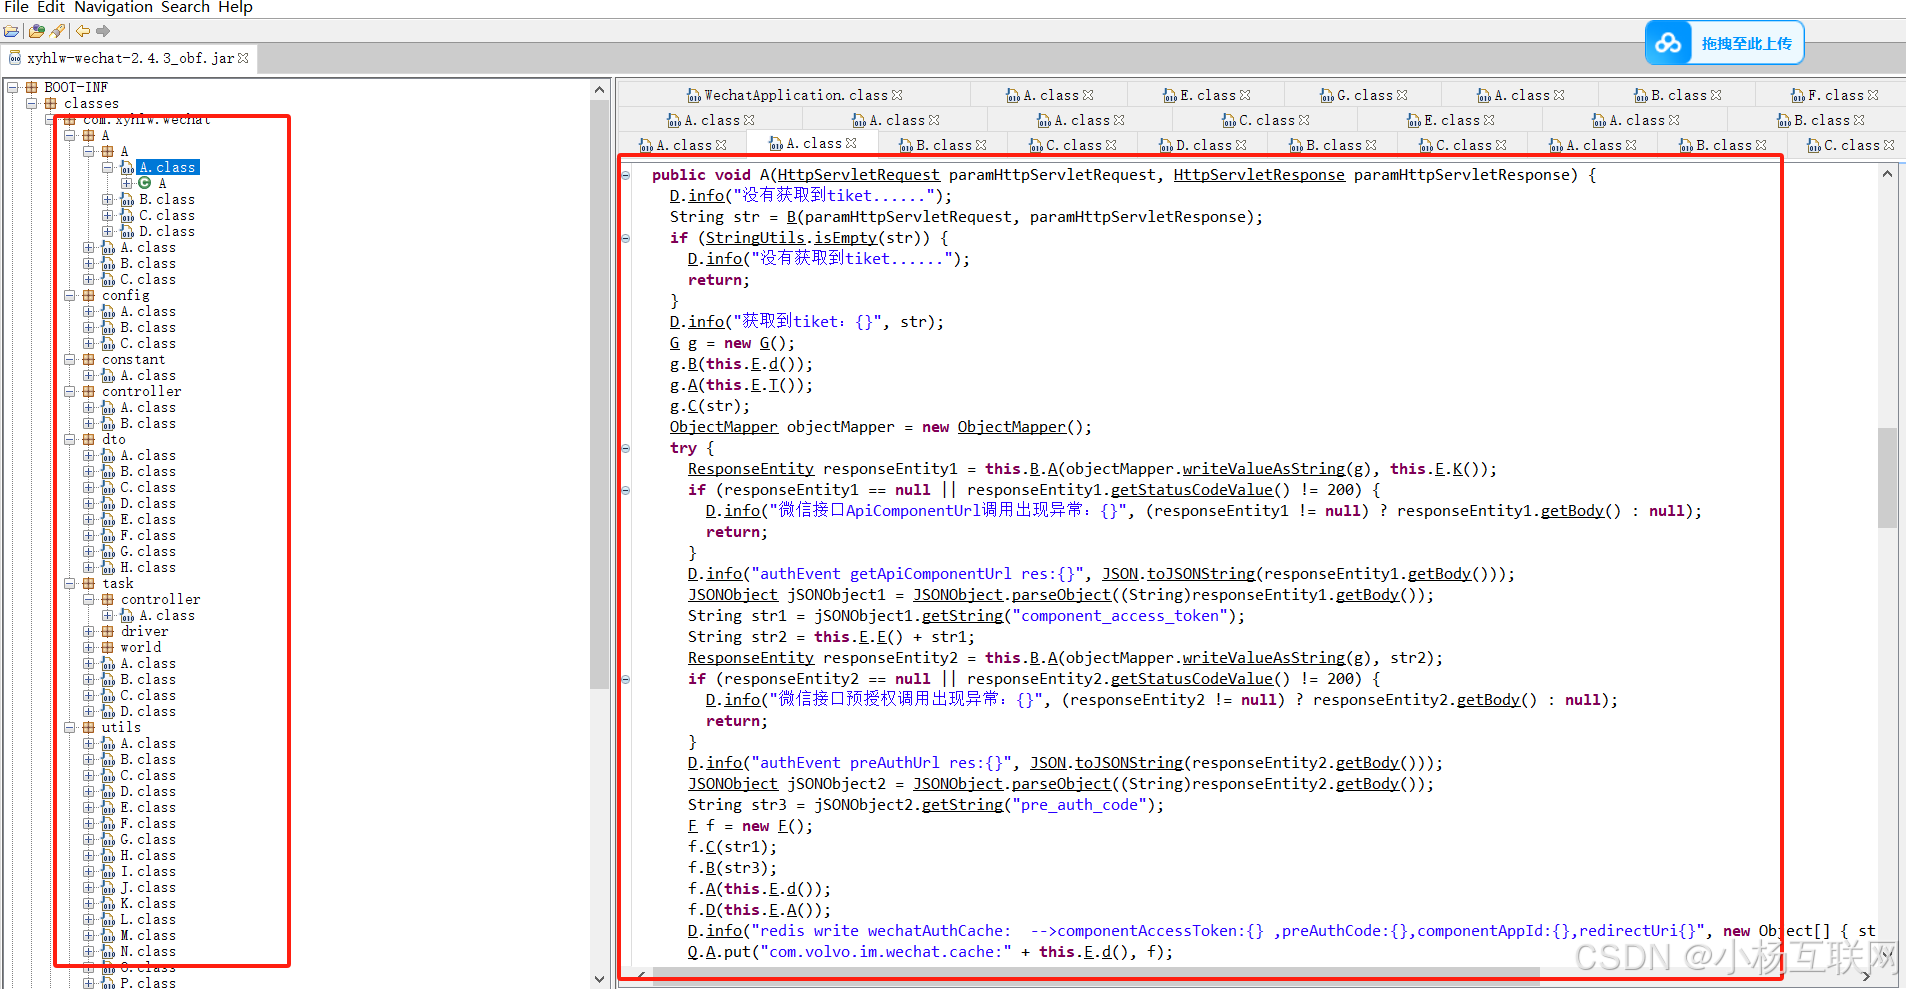
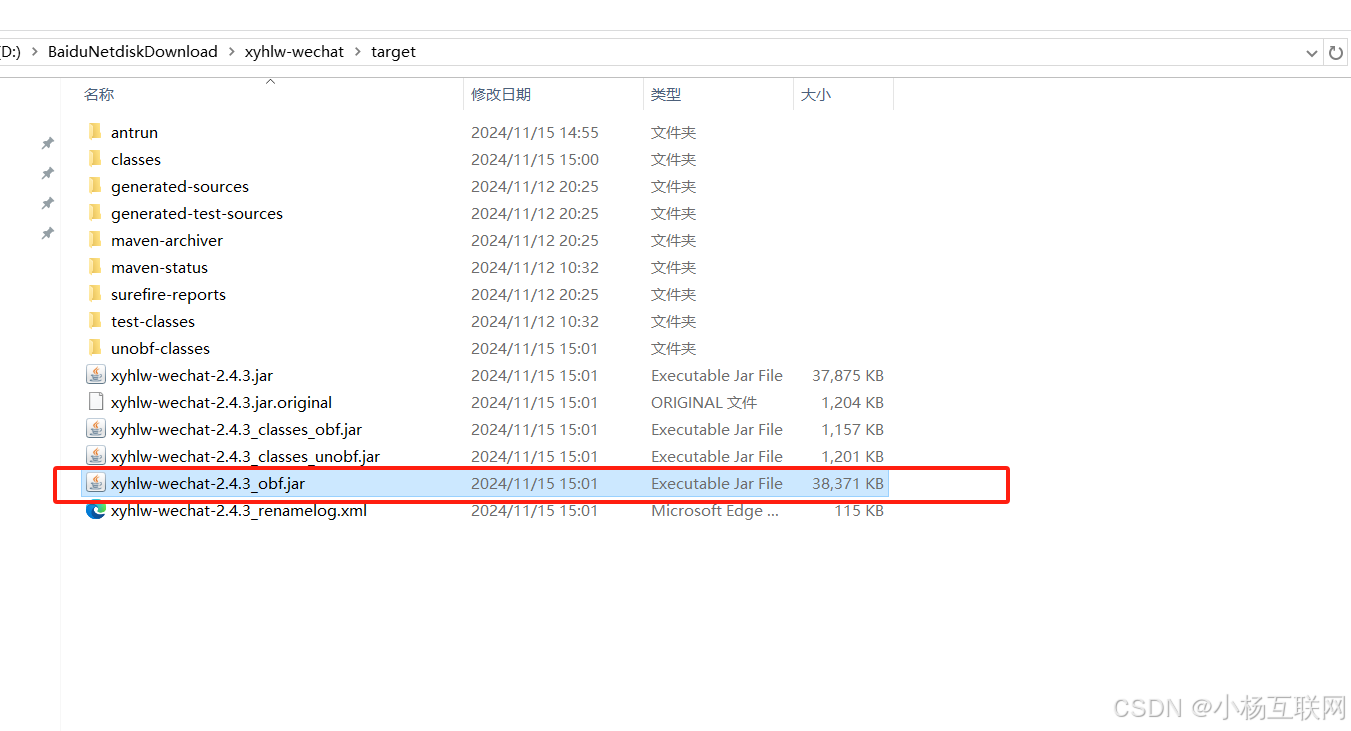
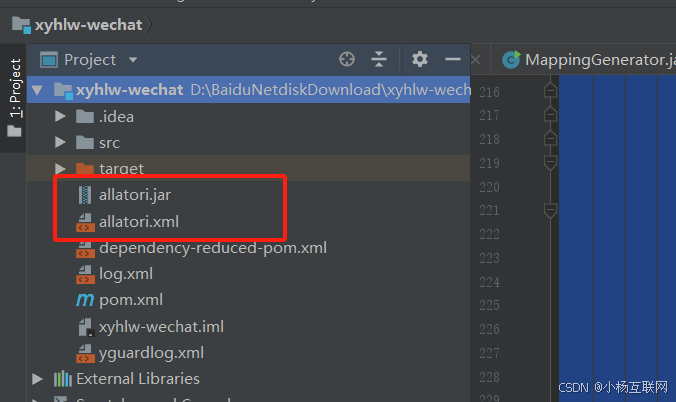
</plugin>只需要配置这个插件和yguard 这个就行了,打包生成的目录xyhlw-wechat-2.4.3_obf.jar就是加密混淆的包了。
看着配置很简单实际上这个配置也搞了一些时间,我说一下这种方式的优缺点:
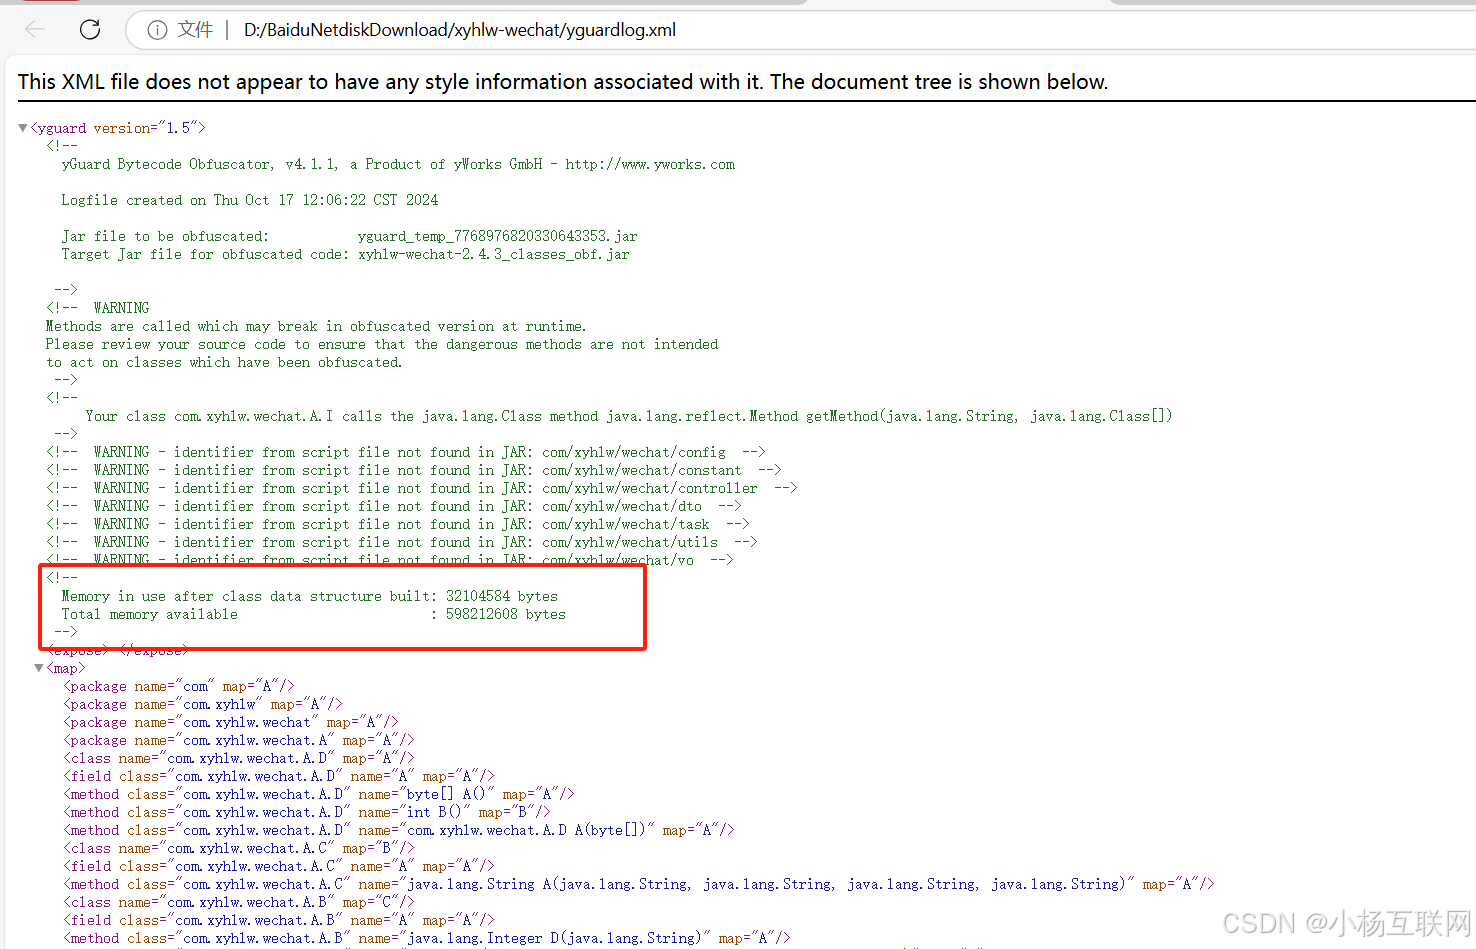
最大的优点是可以快速混淆代码,可以实现简单的混淆加密,配置不复杂,可以溯源生成规则和配置,可以看这个文件我这里只显示部分xml的代码,完整的可以自己去试。
<?xml version="1.0" encoding="UTF-8"?>
<yguard version="1.5">
<!--
  yGuard Bytecode Obfuscator, v4.1.1, a Product of yWorks GmbH - http://www.yworks.com

  Logfile created on Fri Nov 15 15:01:05 CST 2024

  Jar file to be obfuscated:           xyhlw-wechat-2.4.3_classes_unobf.jar
  Target Jar file for obfuscated code: xyhlw-wechat-2.4.3_classes_obf.jar

-->
<!-- WARNING
Methods are called which may break in obfuscated version at runtime.
Please review your source code to ensure that the dangerous methods are not intended
to act on classes which have been obfuscated.
-->
<!--
     Your class com.xyhlw.wechat.utils.CommonUtil calls the java.lang.Class method java.lang.reflect.Method getMethod(java.lang.String, java.lang.Class[])
-->
<!--
  Memory in use after class data structure built: 48772304 bytes
  Total memory available                        : 597688320 bytes
-->
<expose>
  <class name="com.xyhlw.wechat.WechatApplication"/>
  <method class="com.xyhlw.wechat.WechatApplication" name="void main(java.lang.String[])"/>
</expose>
<map>
  <package name="com.xyhlw.wechat.service" map="A"/>
  <package name="com.xyhlw.wechat.service.impl" map="A"/>
  <class name="com.xyhlw.wechat.service.impl.ThirdPartyPlatformWechatAuthEventServiceImpl" map="A"/>
  <field class="com.xyhlw.wechat.service.impl.ThirdPartyPlatformWechatAuthEventServiceImpl" name="restTemplate" map="A"/>
  <field class="com.xyhlw.wechat.service.impl.ThirdPartyPlatformWechatAuthEventServiceImpl" name="httpUtils" map="B"/>
  <field class="com.xyhlw.wechat.service.impl.ThirdPartyPlatformWechatAuthEventServiceImpl" name="threadPoolInvoiceAsyncService" map="C"/>
  <field class="com.xyhlw.wechat.service.impl.ThirdPartyPlatformWechatAuthEventServiceImpl" name="log" map="D"/>
  <field class="com.xyhlw.wechat.service.impl.ThirdPartyPlatformWechatAuthEventServiceImpl" name="wechatConfig" map="E"/>
  <method class="com.xyhlw.wechat.service.impl.ThirdPartyPlatformWechatAuthEventServiceImpl" name="java.lang.String getTiket(javax.servlet.http.HttpServletRequest, javax.servlet.http.HttpServletResponse)" map="B"/>
  <field class="com.xyhlw.wechat.service.impl.ThreadPoolInvoiceAsyncService" name="restTemplate" map="A"/>
  <field class="com.xyhlw.wechat.service.impl.ThreadPoolInvoiceAsyncService" name="httpUtils" map="B"/>
  <field class="com.xyhlw.wechat.service.impl.ThreadPoolInvoiceAsyncService" name="log" map="C"/>
  <field class="com.xyhlw.wechat.service.impl.ThreadPoolInvoiceAsyncService" name="wechatConfig" map="D"/>
  <method class="com.xyhlw.wechat.service.impl.ThreadPoolInvoiceAsyncService" name="com.xyhlw.wechat.utils.R replyTextMsg(com.xyhlw.wechat.vo.WechatTextMessageVO)" map="A"/>
  <method class="com.xyhlw.wechat.service.impl.ThreadPoolInvoiceAsyncService" name="com.xyhlw.wechat.dto.AiResDto getAiResult(java.lang.String, java.lang.String)" map="A"/>
  <method class="com.xyhlw.wechat.service.impl.ThreadPoolInvoiceAsyncService" name="java.lang.String getAccessToken()" map="A"/>
  <class name="com.xyhlw.wechat.service.WechatAuthEventService" map="A"/>
  <method class="com.xyhlw.wechat.service.WechatAuthEventService" name="void handleMessage(javax.servlet.http.HttpServletRequest, javax.servlet.http.HttpServletResponse, java.lang.String)" map="A"/>
  <class name="com.xyhlw.wechat.service.ThirdPartyPlatformWechatAuthEventService" map="B"/>
  <method class="com.xyhlw.wechat.service.ThirdPartyPlatformWechatAuthEventService" name="void handleMessage(javax.servlet.http.HttpServletRequest, javax.servlet.http.HttpServletResponse, java.lang.String)" map="A"/>
  <method class="com.xyhlw.wechat.service.ThirdPartyPlatformWechatAuthEventService" name="com.xyhlw.wechat.utils.R getWechatAuthCache()" map="A"/>
  <method class="com.xyhlw.wechat.service.ThirdPartyPlatformWechatAuthEventService" name="com.xyhlw.wechat.utils.R preauthCallBack(java.lang.String)" map="A"/>
  <method class="com.xyhlw.wechat.service.ThirdPartyPlatformWechatAuthEventService" name="void authEvent(javax.servlet.http.HttpServletRequest, javax.servlet.http.HttpServletResponse)" map="A"/>
  <class name="com.xyhlw.wechat.service.GenderService" map="C"/>

  <method class="TEst" name="void main()" map="A"/>
</map>
</yguard>
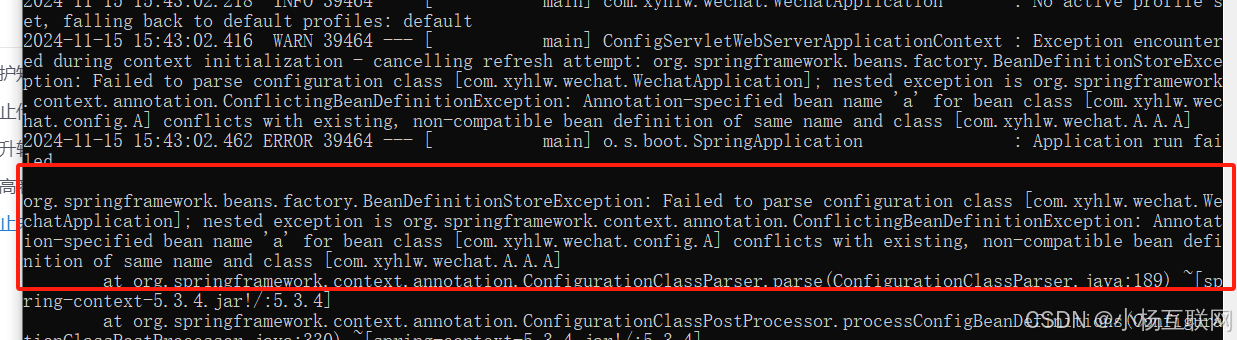
缺点:因为springboot的配置bean 如果都是重名的Bean A,B,C,D这样就会启动报错,这是混淆的通病,你就算用别的也是一样。这种你就要避开他生成的规则自定义。详细的你们自己去研究。
二, Allatori + exec-maven-plugin 实现代码混淆加密
使用 Allatori 不是开源的是收费的,但是demo版本可以使用,demo版本其实可以满足大部分需求,但是还是推荐大家使用正版授权的。
学习地址:https://allatori.com/doc.html#property-classes-naming
话不多说直接上图:

这个方式对代码混淆很友好,可以指定包名,指定配置类进行混淆,包括字符串。

项目也是能够正常启动的唯独就是有水印,毕竟用了人家的。当然这不是最关键的关键的是你代码混淆成功了你要测试能不能调用接口,包括序列化返回是否正常,这里重点说
我们写了一个接口测试:
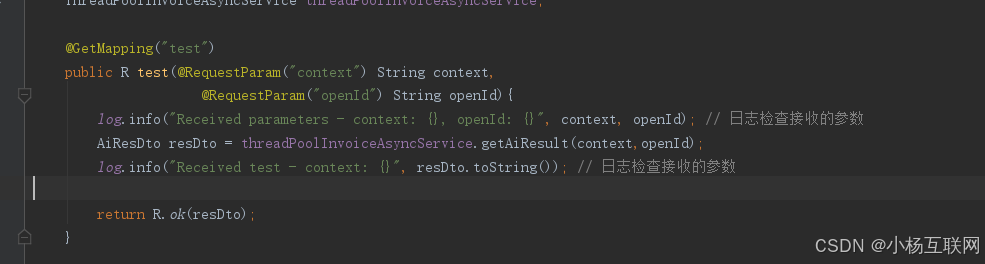
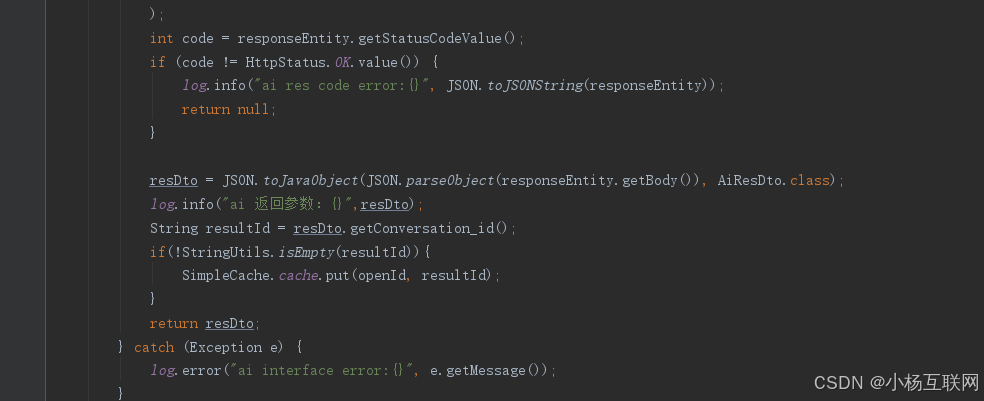
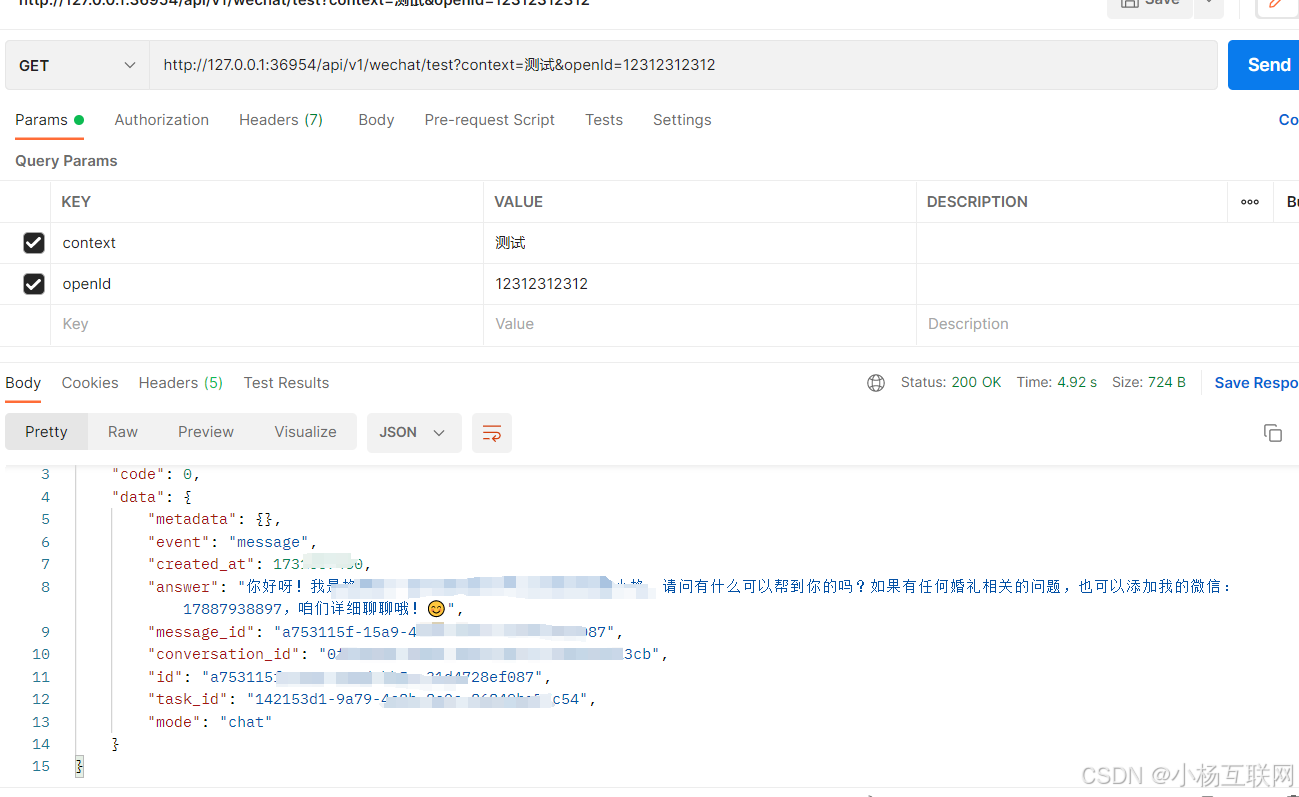

混淆的代码一定要测试序列化和字符串,这里我弄了很久,如果混淆了dto就会返回空json,混淆的时候一定要注意。
核心配置:
<!-- https://allatori.com/doc.html#property-classes-naming   地址-->
<config>
    <!-- Maven properties could be used in Allatori configuration file.

    -->
    <input>
        <jar in="\target\xyhlw-wechat-2.4.3.jar" out="\target\mouse-gestures-1.2-obfuscated.jar"/>
    </input>

    <keep-names>

        <!-- 保留所有带有Spring相关注解的类 -->
        <class template="class org.springframework.boot.context.properties.ConfigurationProperties"/>
        <class template="class org.springframework.context.annotation.Configuration"/>
        <class template="class *@org.springframework.web.bind.annotation.*"/>
        <class template="class *@org.springframework.stereotype.Component"/>
        <class template="class *@org.springframework.stereotype.Service"/>
        <class template="class *@org.springframework.stereotype.Repository"/>
        <class template="class *@org.springframework.web.bind.annotation.RestController"/>
        <class template="class com.xyhlw.wechat.WechatApplication" />
        <class template="class org.springframework.*" />
        <class template="class com.alibaba.fastjson.*" />


        <class template="class com.xyhlw.wechat.controller.*"/>

        <class template="class com.xyhlw.wechat.service.impl.ThreadPoolInvoiceAsyncService" />
        <class template="class com.xyhlw.wechat.config.WechatConfig">
            <field template="*"/>
            <method template="* *(**)"/>
        </class>

        <class template="class com.xyhlw.wechat.dto.AiReqDto">
            <field template="*"/>
            <method template="* *(**)"/>

        </class>
        <class template="class com.xyhlw.wechat.dto.AiResDto">
            <field template="*"/>
            <method template="* *(**)"/>

        </class>
        <class template="class com.xyhlw.wechat.dto.WeChatCustomerSendTextMessageDto">
            <field template="*"/>
            <method template="* *(**)"/>
        </class>
        <class template="class com.xyhlw.wechat.dto.RsChatParmsDTO">
            <field template="*"/>
            <method template="* *(**)"/>
        </class>
        <class template="class com.xyhlw.wechat.dto.WechatAuthCache">
            <field template="*"/>
            <method template="* *(**)"/>
        </class>
        <class template="class com.xyhlw.wechat.dto.Inputs">
            <field template="*"/>
            <method template="* *(**)"/>
        </class>
        <class template="class com.xyhlw.wechat.dto.Usage">
            <field template="*"/>
            <method template="* *(**)"/>
        </class>
        <class template="class com.xyhlw.wechat.constant.*"/>
        <class template="class com.xyhlw.wechat.vo.*"/>
        <class template="class com.xyhlw.wechat.task.*"/>
        <!--<class template="class com.xyhlw.wechat.dto.*"/>-->

        <!-- 保留Spring Boot的JarLauncher类及其依赖的包 -->
        <class template="class org.springframework.boot.loader.*" />
        <!-- Matches classes with the name ending with "Bean" -->
        <class template="class com.xyhlw.wechat.*Bean" stop="true">
            <!-- 保持 getter/setter 方法不变 -->
            <method template="public get*()" keep="true"/>
            <method template="public set*(**)" keep="true"/>
            <!-- 匹配所有字段和方法 -->
            <field access="private+"/>
            <field template="public int *"/>
            <field template="static *"/>
            <field template="protected+ java.lang.String *"/>
            <method template="private+ *(**)"/>
            <method template="private+ get*(**)"/>
            <method template="private+ *(java.lang.String)" parameters="keep"/>
        </class>

        <!-- Matches serialization members -->
        <class template="class * instanceof java.io.Serializable">
            <field template="static final long serialVersionUID"/>
            <method template="void writeObject(java.io.ObjectOutputStream)"/>
            <method template="void readObject(java.io.ObjectInputStream)"/>
            <method template="java.lang.Object writeReplace()"/>
            <method template="java.lang.Object readResolve()"/>
        </class>
        <class template="class com.xyhlw.wechat.utils.R" stop="true"/>

        <class template="class java.lang.String" stop="true"/>
        <class template="class java.lang.StringBuilder" stop="true"/>
        <class template="class java.lang.StringBuffer" stop="true"/>
        <class template="class org.springframework.http.HttpEntity" />
        <class template="class org.springframework.http.ResponseEntity" />
        <class template="class org.springframework.web.client.RestTemplate" />


        <!-- Matches applets -->
        <class template="class * instanceof java.applet.Applet"/>
        <!-- Matches servlets -->
        <class template="class * instanceof javax.servlet.Servlet"/>
        <!-- Matches midlets -->
        <class template="class * instanceof javax.microedition.midlet.MIDlet"/>
    </keep-names>

    <property name="classes-naming-prefix" value="app_"/>
    <property name="classes-naming" value="unique"/>
    <property name="log-file" value="log.xml"/>
</config>
<property name="classes-naming-prefix" value="app_"/> 记住这个配置一定要加,不然会出现bean重复的问题。
也要保留核心框架不被混淆:
<!-- 保留所有带有Spring相关注解的类 -->
<class template="class org.springframework.boot.context.properties.ConfigurationProperties"/>
<class template="class org.springframework.context.annotation.Configuration"/>
<class template="class *@org.springframework.web.bind.annotation.*"/>
<class template="class *@org.springframework.stereotype.Component"/>
<class template="class *@org.springframework.stereotype.Service"/>
<class template="class *@org.springframework.stereotype.Repository"/>
<class template="class *@org.springframework.web.bind.annotation.RestController"/>
<class template="class com.xyhlw.wechat.WechatApplication" />
<class template="class org.springframework.*" />
<class template="class com.alibaba.fastjson.*" />
当然还要序列化的:
<!-- Matches serialization members -->
<class template="class * instanceof java.io.Serializable">
    <field template="static final long serialVersionUID"/>
    <method template="void writeObject(java.io.ObjectOutputStream)"/>
    <method template="void readObject(java.io.ObjectInputStream)"/>
    <method template="java.lang.Object writeReplace()"/>
    <method template="java.lang.Object readResolve()"/>
</class>
pom的配置文件:
  <plugin>
                <groupId>org.apache.maven.plugins</groupId>
                <artifactId>maven-resources-plugin</artifactId>
                <version>2.6</version>
                <executions>
                    <execution>
                        <id>copy-and-filter-allatori-config</id>
                        <phase>package</phase>
                        <goals>
                            <goal>copy-resources</goal>
                        </goals>
                        <configuration>
                            <outputDirectory>${basedir}/target</outputDirectory>
                            <resources>
                                <resource>
                                    <directory>${basedir}/allatori</directory>
                                    <includes>
                                        <include>allatori.xml</include>
                                    </includes>
                                    <filtering>true</filtering>
                                </resource>
                            </resources>
                        </configuration>
                    </execution>
                </executions>
            </plugin>

            <!-- Running Allatori -->
            <plugin>
                <groupId>org.codehaus.mojo</groupId>
                <artifactId>exec-maven-plugin</artifactId>
                <version>1.2.1</version>
                <executions>
                    <execution>
                        <id>run-allatori</id>
                        <phase>package</phase>
                        <goals>
                            <goal>exec</goal>
                        </goals>
                    </execution>
                </executions>
                <configuration>
                    <executable>java</executable>
                    <arguments>

                        <argument>-Xms128m</argument>
                        <argument>-Xmx512m</argument>
                        <argument>-jar</argument>

                        <!-- Copy allatori.jar to 'allatori' directory to use the commented line -->
                        <argument>D:\BaiduNetdiskDownload\xyhlw-wechat\allatori.jar</argument>
                        <!-- <argument>${basedir}/allatori/allatori.jar</argument> -->

                        <argument>D:\BaiduNetdiskDownload\xyhlw-wechat\allatori.xml</argument>
                    </arguments>
                </configuration>
            </plugin>
核心的路径配置一定别放错了不然找不到,我这里写了绝对路径你可以改成相对:
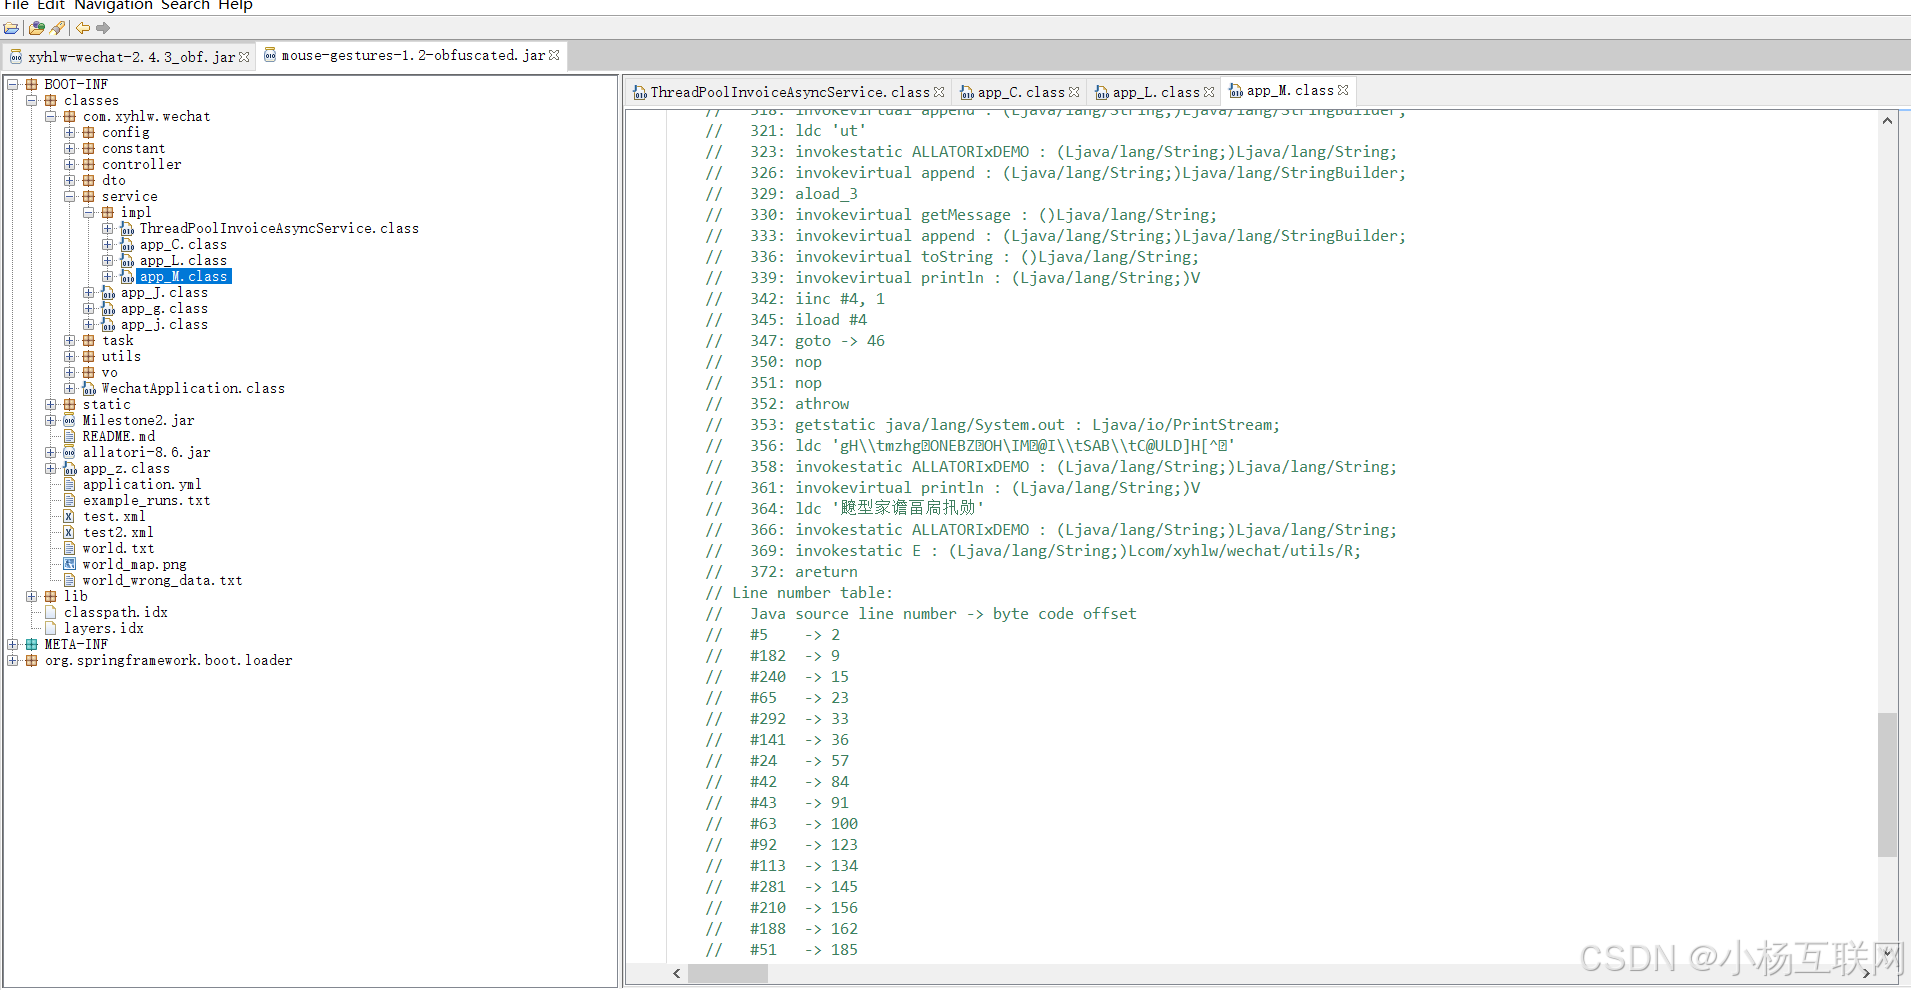
打包完成后的日志文件和Yguard一样。我都怀疑Allatori是不是就是基于Yguard基础改版的。
整体的加密混淆流程就结束了。
说一下Allatori的优缺点,优点是配置隔离开到xml中,可以更好的管理配置,当然Yguard也是支持配置文件读取的,那么allaori给我的感觉就是它配置设置了比yguard更容易生效,如果要配置混淆里面的标签有时候会不生效,导致无法混淆,然后就是这样就得反复打包启动,测接口,整体的耗费时间是特别长的,开源其实更多的是有很多不确定性。缺点的话我感觉demo给的不是很全,配置毕竟简洁,也许人家收费就是这样。
结语:
这俩种加密方式虽然还不太完善,后面我还出一个更完善的加密代码的方式,当然当中我是花了比较多的时间弄这个,中途也遇到到了很多问题,都一一化解了,第一个版本除了好几个版本,包括去看人家的源码和配置:

所以当你尝试去做一件事,只要坚持才会慢慢看到成果,也应了那句话:


 935
935

 被折叠的 条评论
为什么被折叠?
被折叠的 条评论
为什么被折叠?
 到【灌水乐园】发言


