


 本文详细介绍了如何在Qt中使用QTimer创建和管理定时器,包括定时器的创建、启动、停止及与槽函数的关联。通过实例展示了定时器在界面更新中的应用,如显示当前时间和生成随机数。
定时器原理:
1 用QTimer创建定时器
timer=new QTimer(this);
2 开启定时器
timer.start(x)//x=1 代表是1ms 会触发定时器的事件 所以要有一个对应的槽函数和它连接
3 先关联槽函数
connect(timer,&QTimer::timeout,this,&Widget::timerUpdate); //关联timerupdate函数 定是时间到了 就会去那个函数去
4 写槽函数 现在头文件中声明一下 再在CPP文件中写
5 不需要了可以关闭定时器
6 具体例子如下
步骤
在析构函数里创建定时器
timer=new QTimer(this);
connect(timer,&QTimer::timeout,this,&Widget::timerUpdate); //关联timerupdate函数  定是时间到了 就会去那个函数去
qsrand(QTime(0,0,0).secsTo(QTime::currentTime()));//见下面代码的注释
写关联函数
添加按钮 开始计时 计时时候自动在界面显示400以内的随机数
添加按钮 停止计时
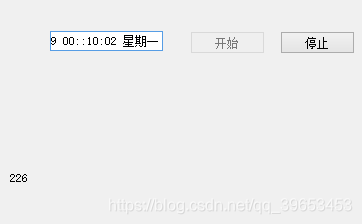
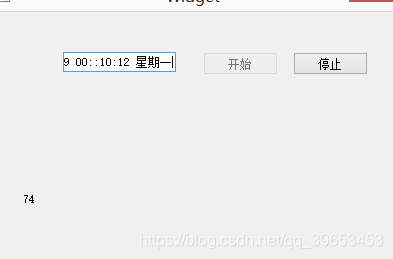
效果图
头文件
#ifndef WIDGET_H
#define WIDGET_H
#include<Qtimer>
#include<Qtime>
#include <QWidget>
namespace Ui {
class Widget;
}
class Widget : public QWidget{
Q_OBJECT
public:
explicit Widget(QWidget *parent = 0);
~Widget();
private:
Ui::Widget *ui;
private slots:
void timerUpdate();
void on_startpushButton_clicked();
void on_stop_pushButton_2_clicked();
private:
QTimer *timer;
};
源文件
#include "widget.h"
#include "ui_widget.h"
#include <QTimer>
#include <QDateTime>
Widget::Widget(QWidget *parent) :
QWidget(parent),
ui(new Ui::Widget)
{
ui->setupUi(this);
timer=new QTimer(this);
//关联定时器溢出信号和相应的槽函数
connect(timer,&QTimer::timeout,this,&Widget::timerUpdate);
qsrand(QTime(0,0,0).secsTo(QTime::currentTime()));
//qrand()%10 产生0-9的随机数
//qrand()%100 产生0-99的随机数
//使用qrand()之前 先用qsrand()设置初值
//否则qrand()在每次程序运行初始 初值相同
//secsTo 表示两个时间点之间所包含的秒数 代码表示从0到当前时间经过的秒数
}
Widget::~Widget()
{
delete ui;
}
void Widget::timerUpdate(){
//获取系统现在的时间
QDateTime time=QDateTime::currentDateTime();
//设置系统时间显示格式
QString str=time.toString("yyyy-MM-dd hh::mm:ss dddd");
//在标签上显示时间
ui->lineEdit->setText(str);
int rand=qrand()%400;//5以内的随机数
ui->label->setText(QString("%1").arg(rand));
}
void Widget::on_startpushButton_clicked()
{
timer->start(1000);
ui->startpushButton->setEnabled(false);
ui->stop_pushButton_2->setEnabled(true);
}
void Widget::on_stop_pushButton_2_clicked()
{
timer->stop();
ui->startpushButton->setEnabled(true);
ui->stop_pushButton_2->setEnabled(false);
}
#endif // WIDGET_H


 173
173

 被折叠的 条评论
为什么被折叠?
被折叠的 条评论
为什么被折叠?
 到【灌水乐园】发言


