


Spring介绍
官网地址:https://spring.io/
概述地址:https://docs.springframework.org.cn/spring-framework/reference/overview.html
太菜了

Jar包讲解
现在还没有学Maven 先从引入Jar包学起吧
Jar包下下载地址:https://repo.spring.io/libs-release-local/org/springframework/spring/
呕吼 GG 以前收藏的jar包地址打不开了
我把压缩包上传到这里吧 我发现上传后别人如果要下载需要开优快云 VIP 有什么办法能直接分享 可以留言
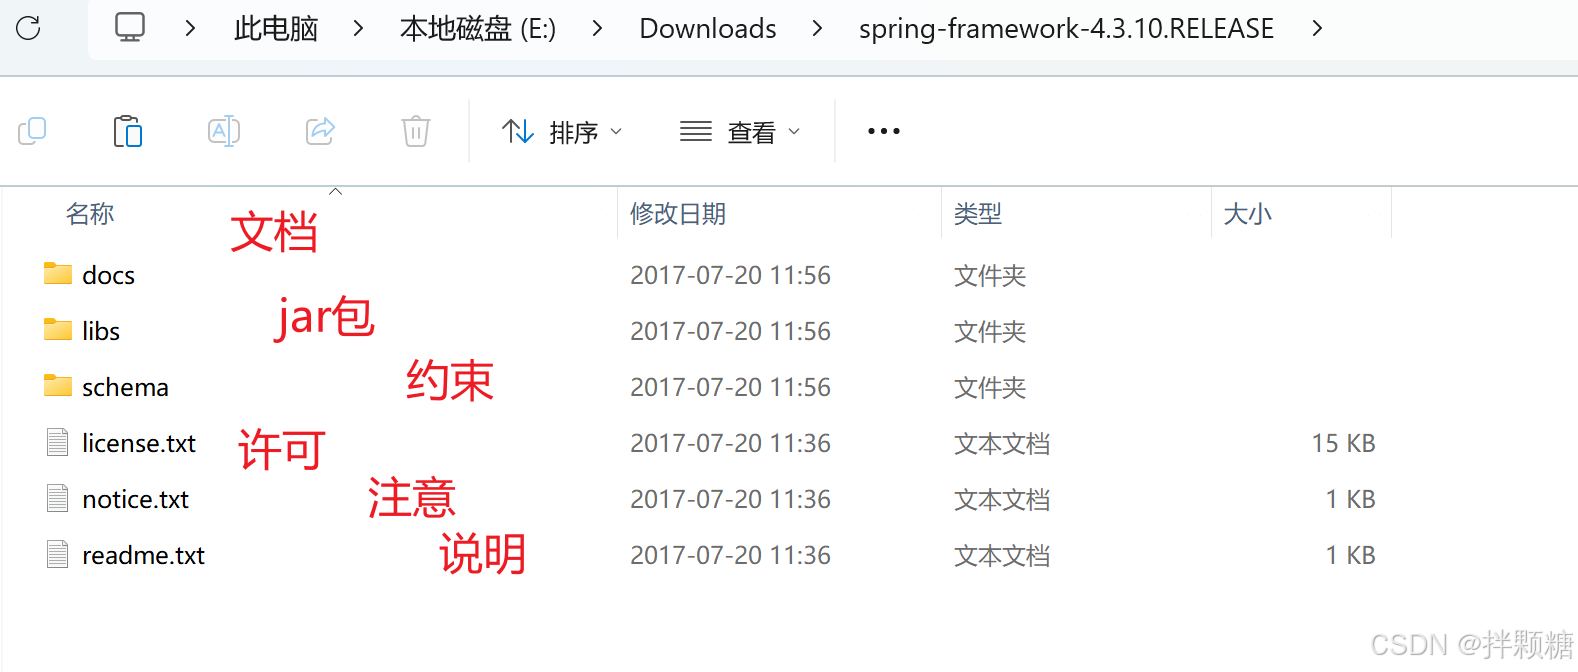
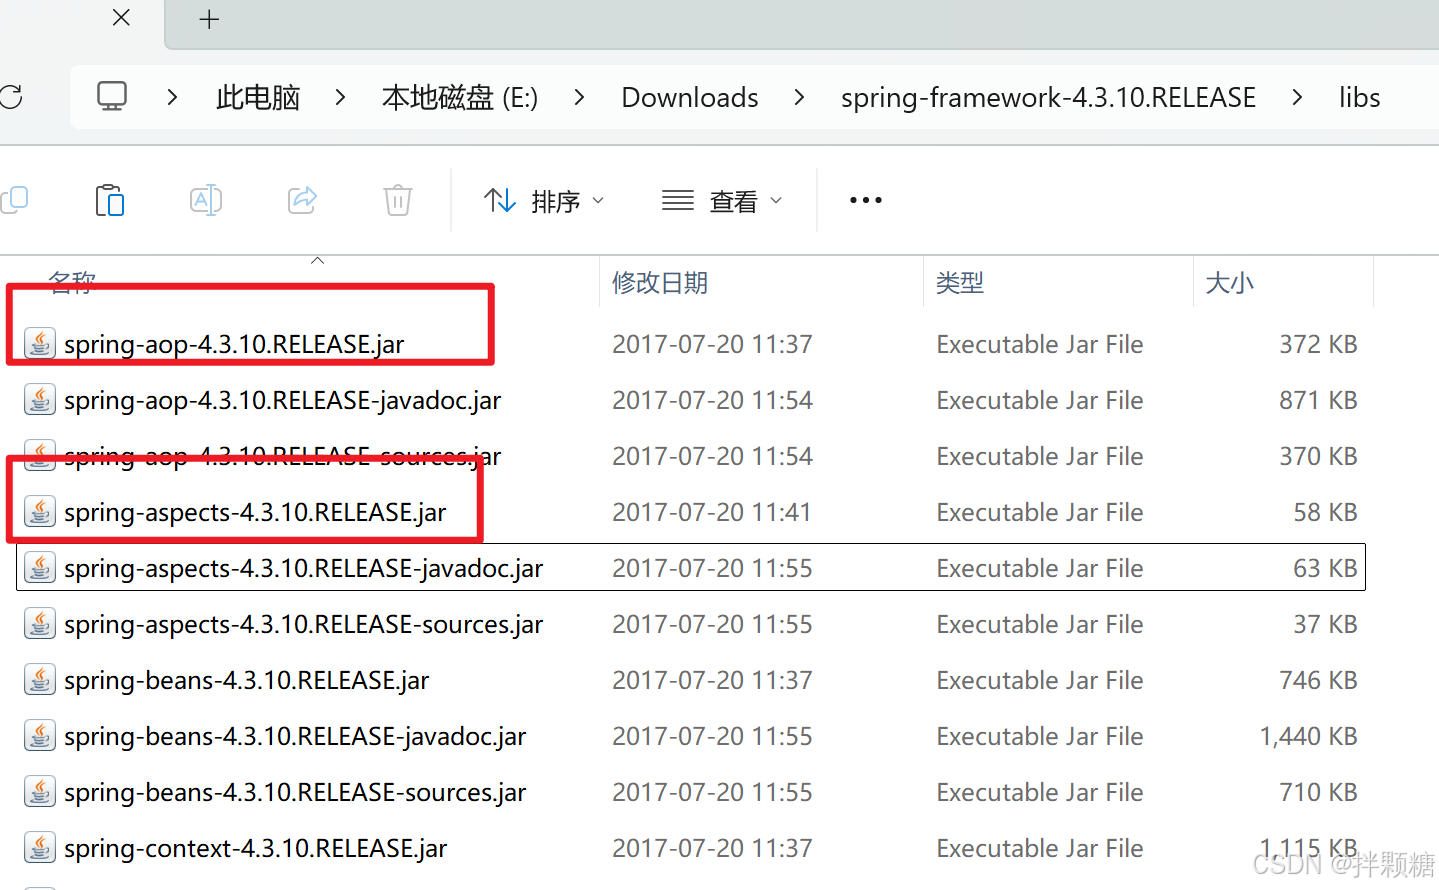
spring-framework-4.3.10.RELEASE
压缩包解压后 内容说明
Spring IOC【Inversion of Control,控制反转】
是一个概念,是一种思想
控制反转就是对对象控制权的转移,从程序代码本身反转到了外部容器
把对象的创建、初始化、销毁等工作交给spring容器来做
由spring容器控制对象的生命周期
例如:
你想吃包子的话,是不是需要自己去包,相当于自己new了一个对象,这样是不是很麻烦
但是spring容器相当于包子铺,包子铺批量化生产包子,你只需要从包子铺买就可以了,相当于由容器帮你new对象
DI 【Dependency Injection,依赖注入】
依赖注入指的是,如果需要调用另一个对象,无需在程序中new 对象,而是由容器创建后传递给程序,这里的容器指的是配置文件
依赖注入的优点:让Bean之间以配置文件的方式组织在一起,而不是以硬编码的方式耦合在一起
IOC 和 DI的关系
IOC是一种思想,DI是这种思想的实现方式之一
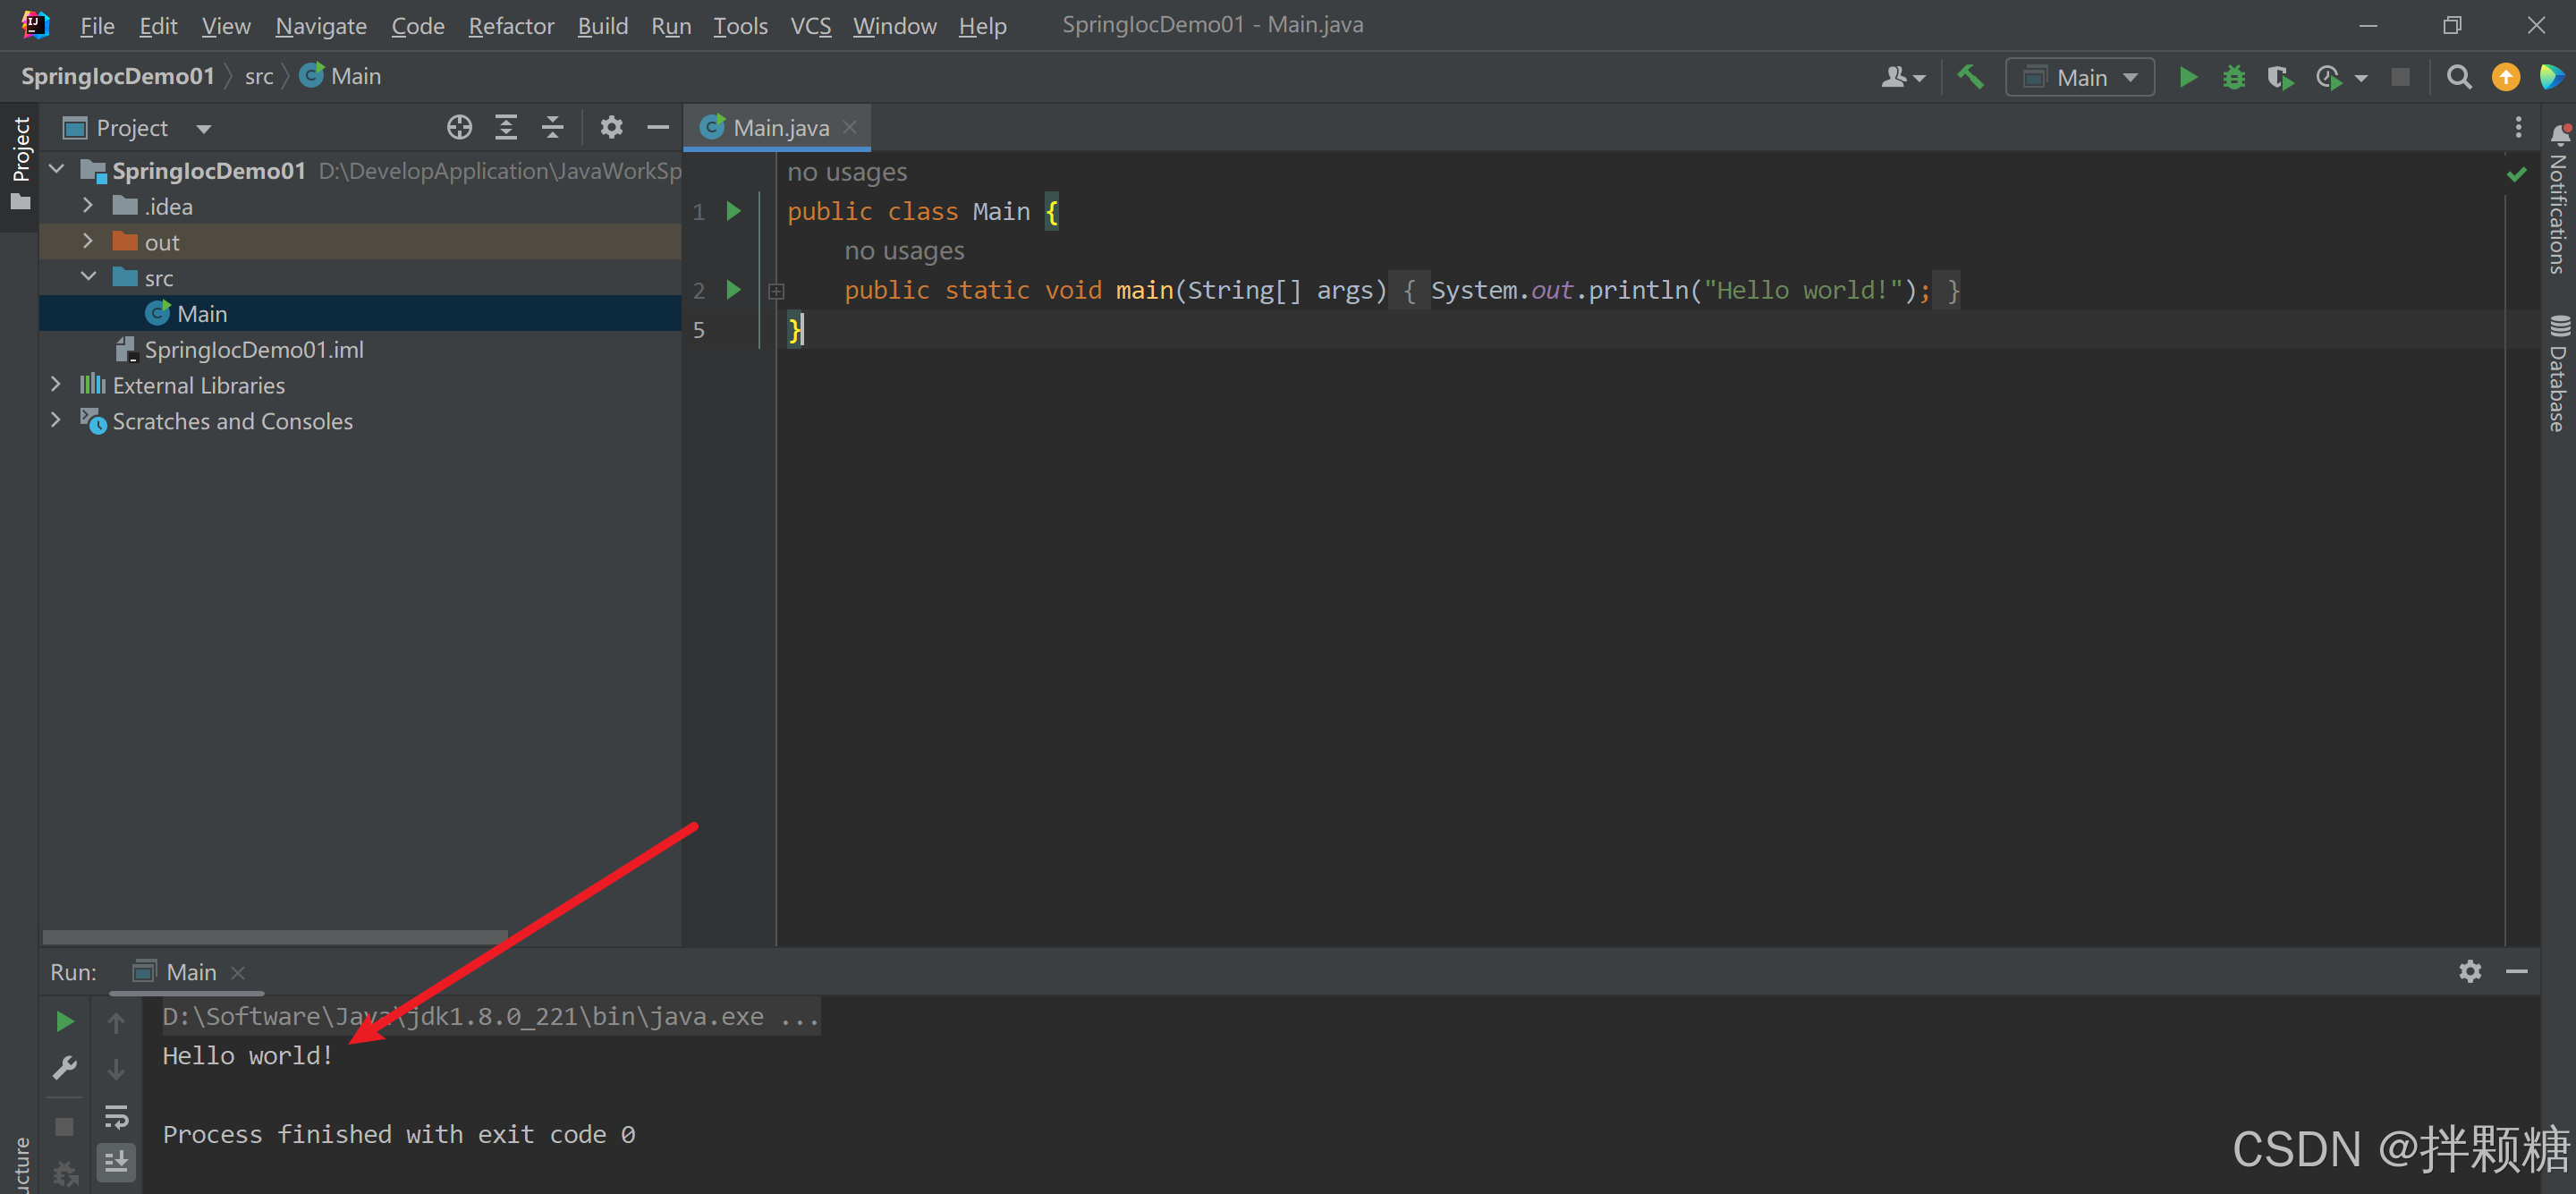
容器获取对象演示
安装JKK和IDE
备注一下:需要提前装好JDK和IDE 就不再演示了哈 网上很多教程
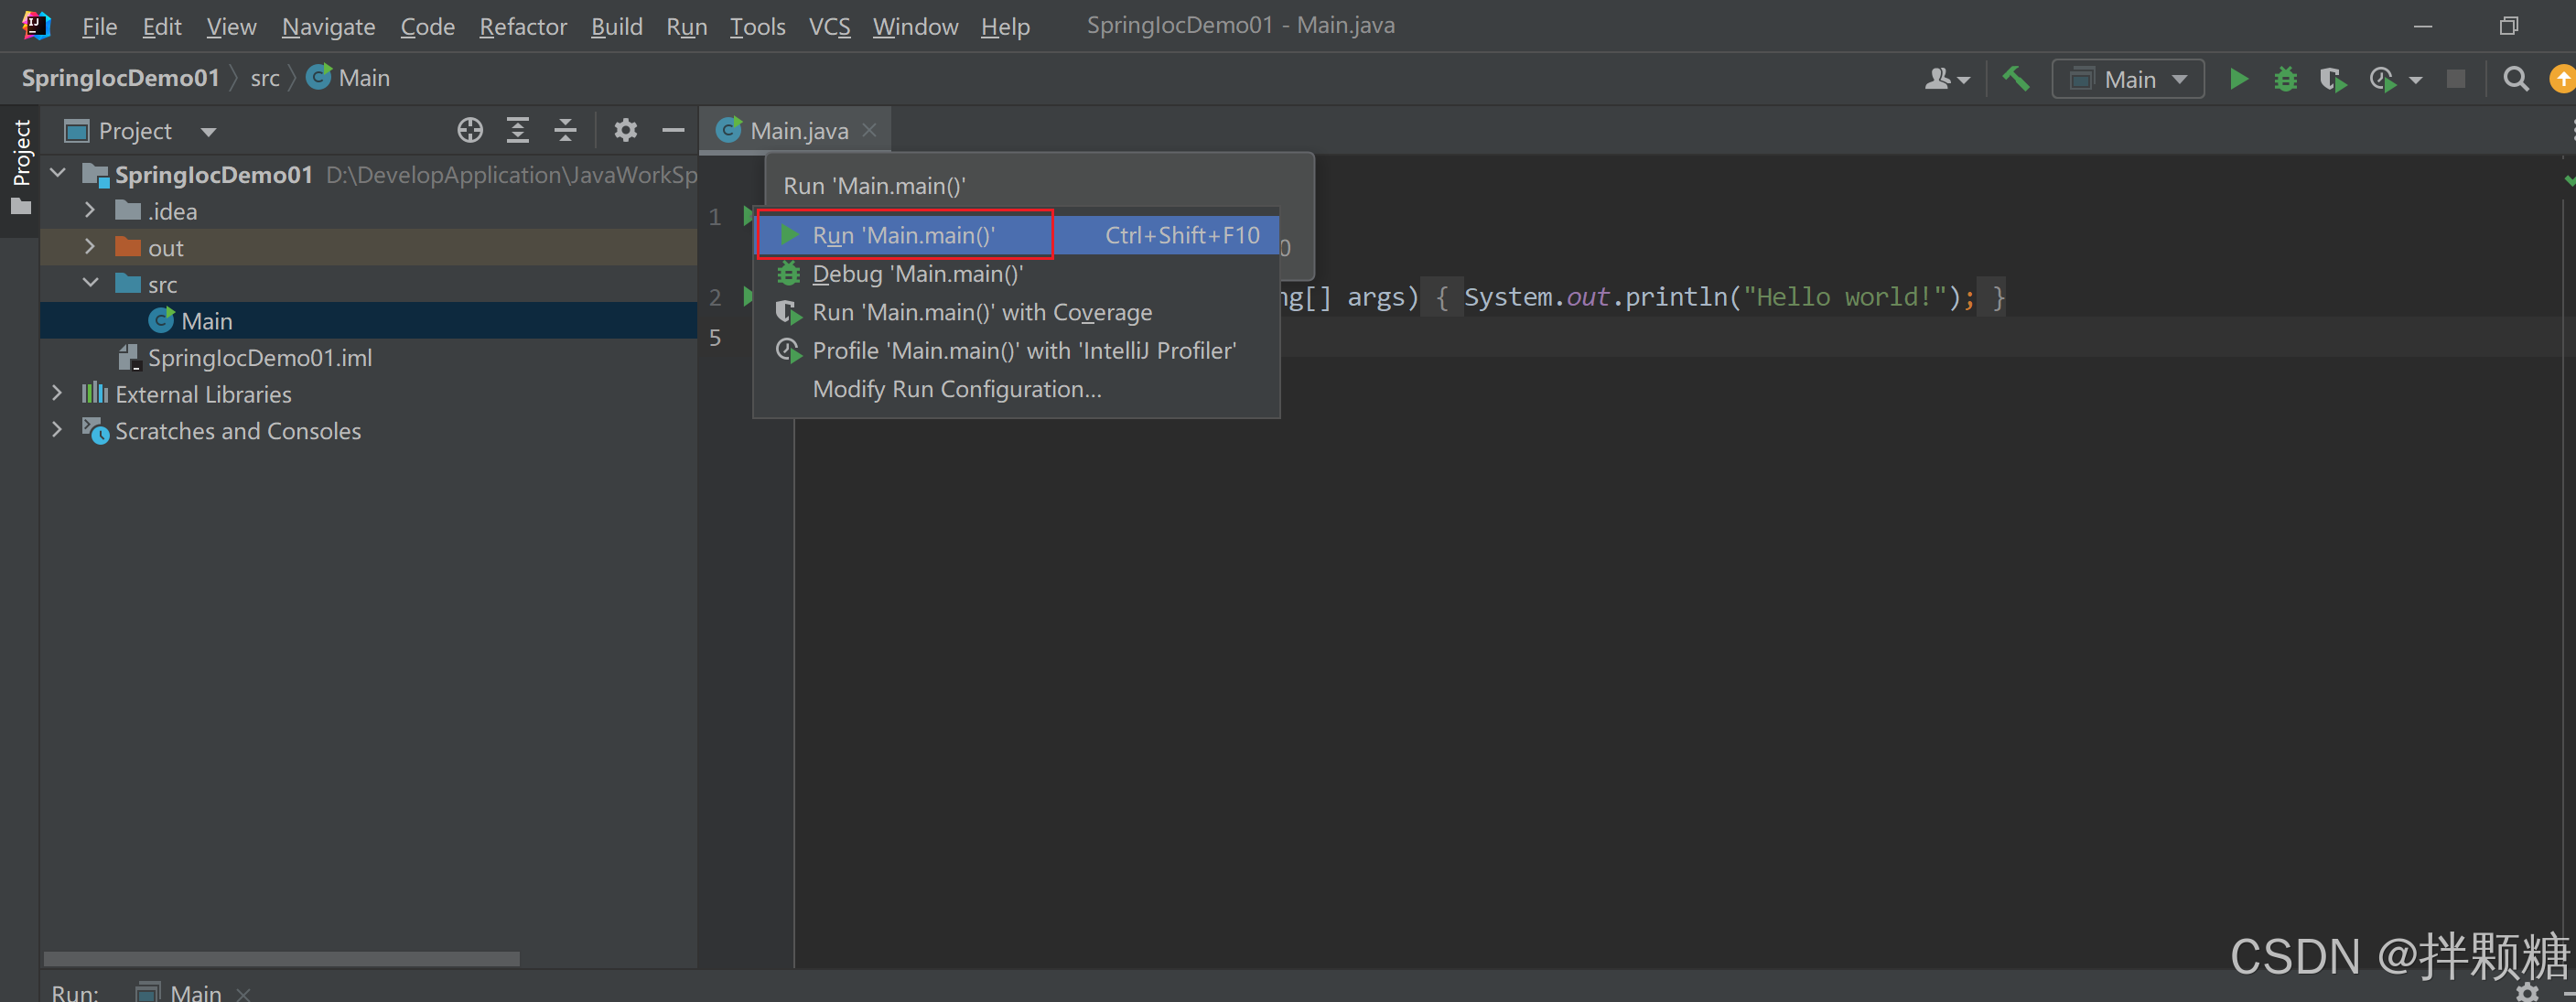
创建项目
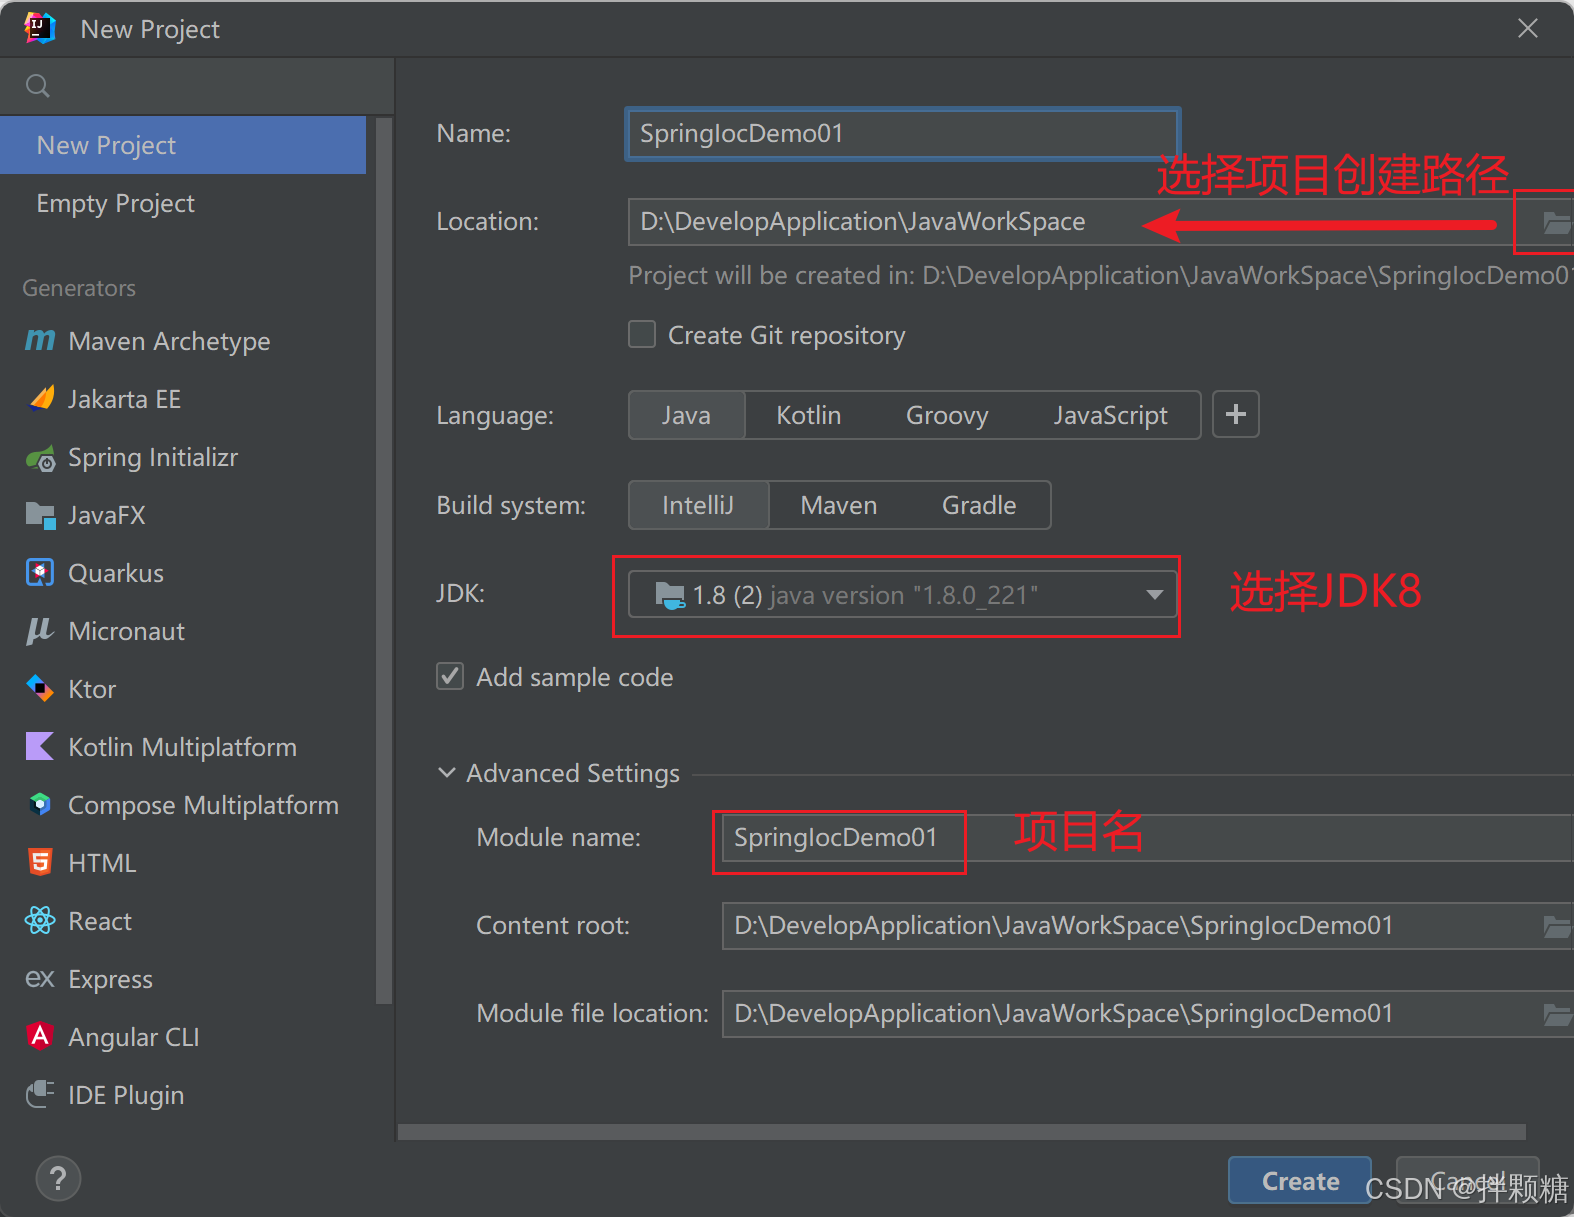
我们跑一下创建好的项目

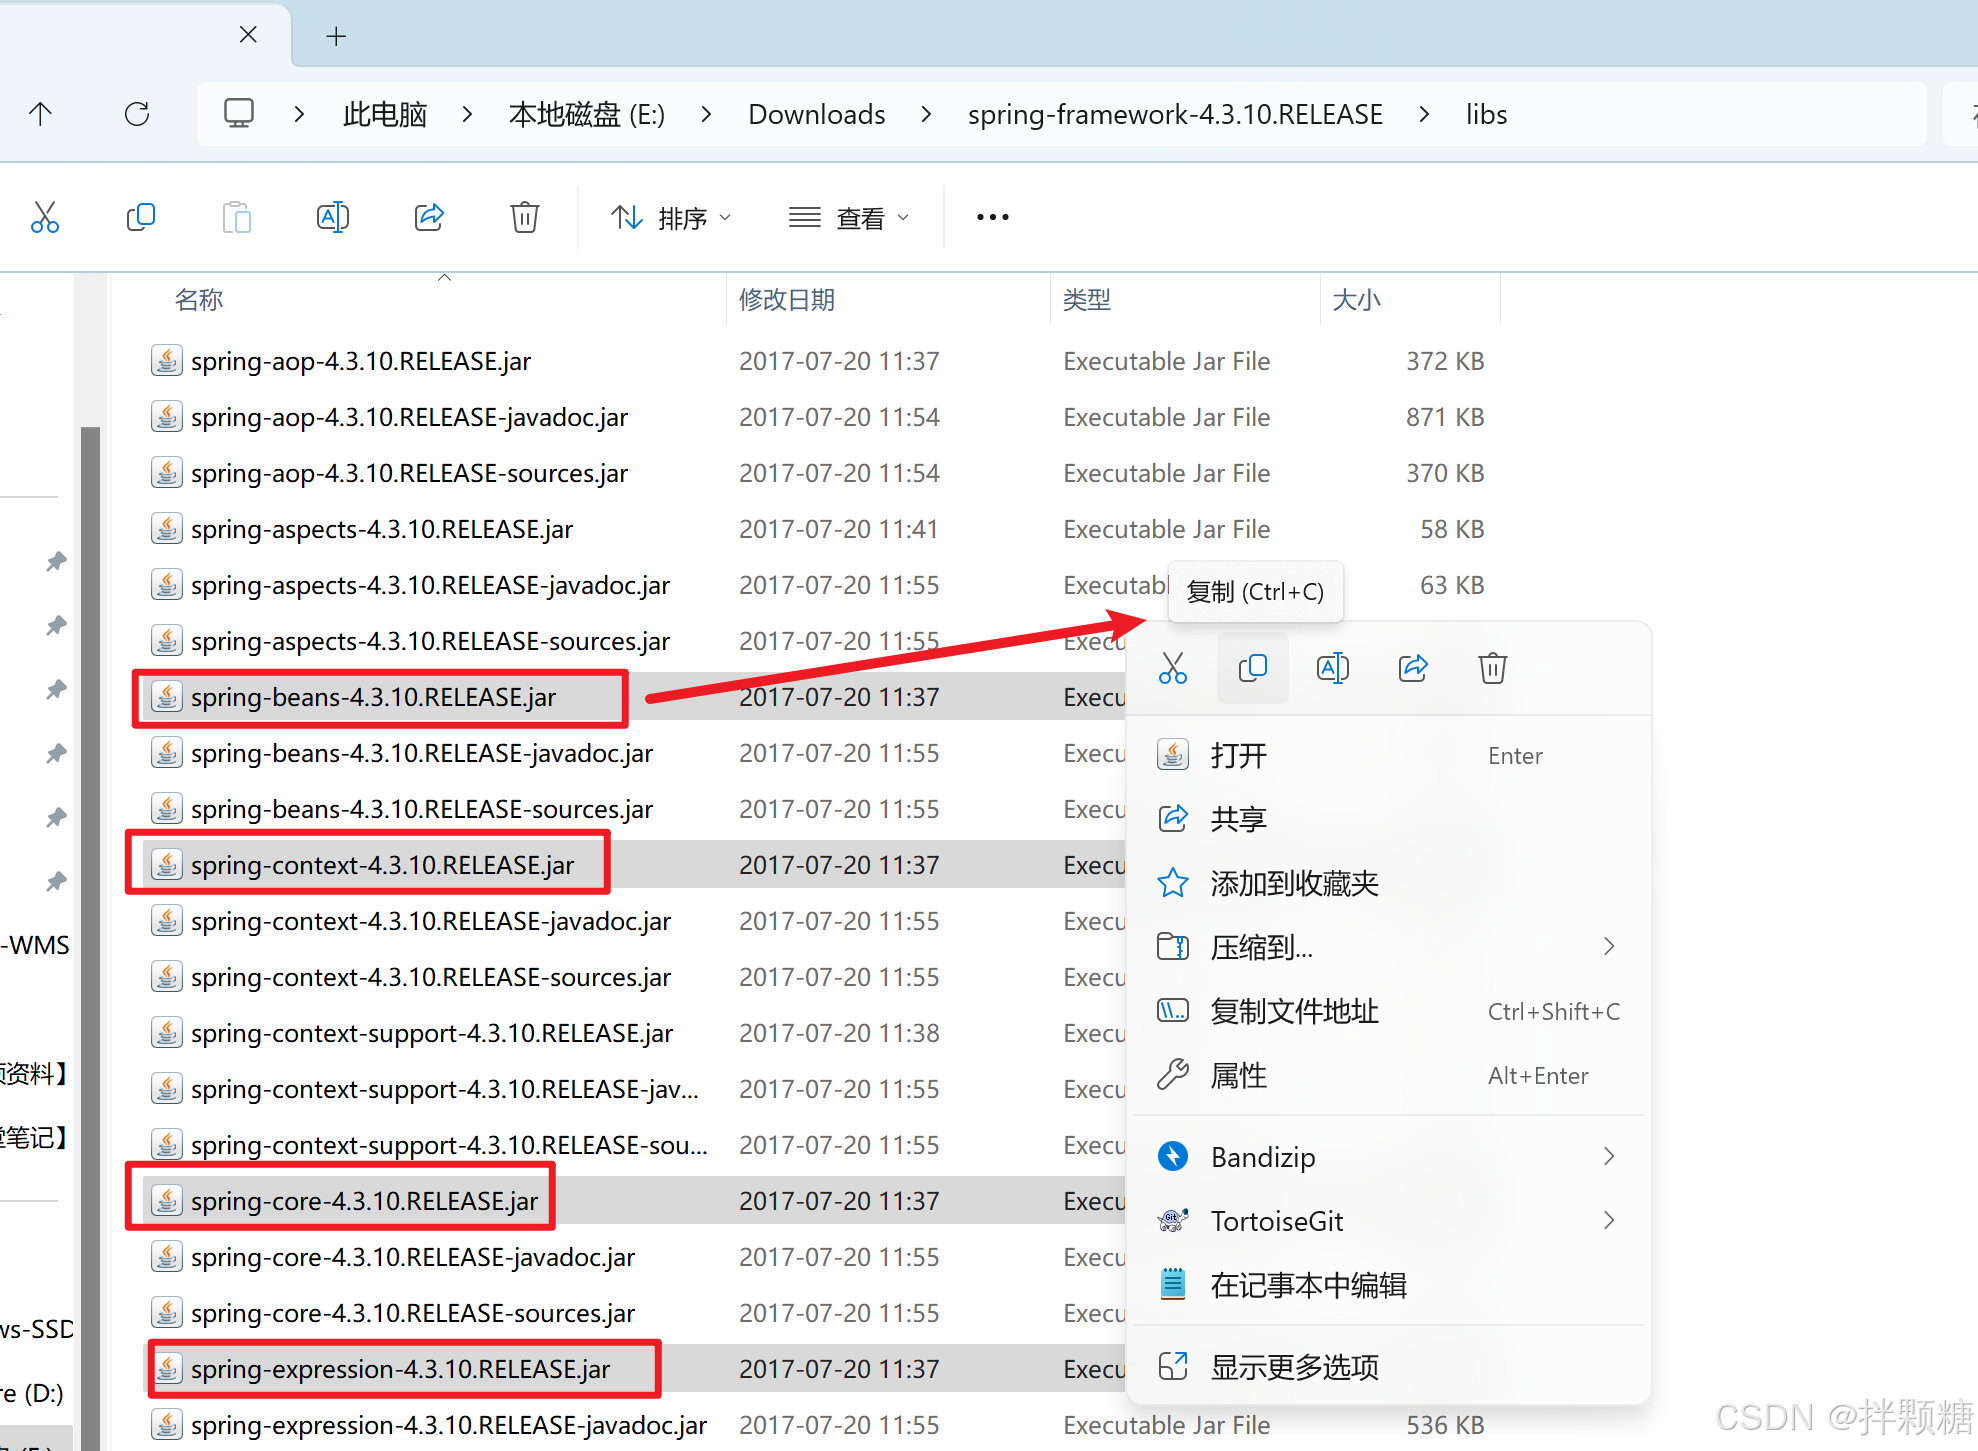
导入jar包
创建完项目后 需导入jar包 导入jar包的依旧是官方文档
文档地址:https://docs.spring.io/spring-framework/docs/4.3.27.RELEASE/spring-framework-reference/htmlsingle/#spring-introduction
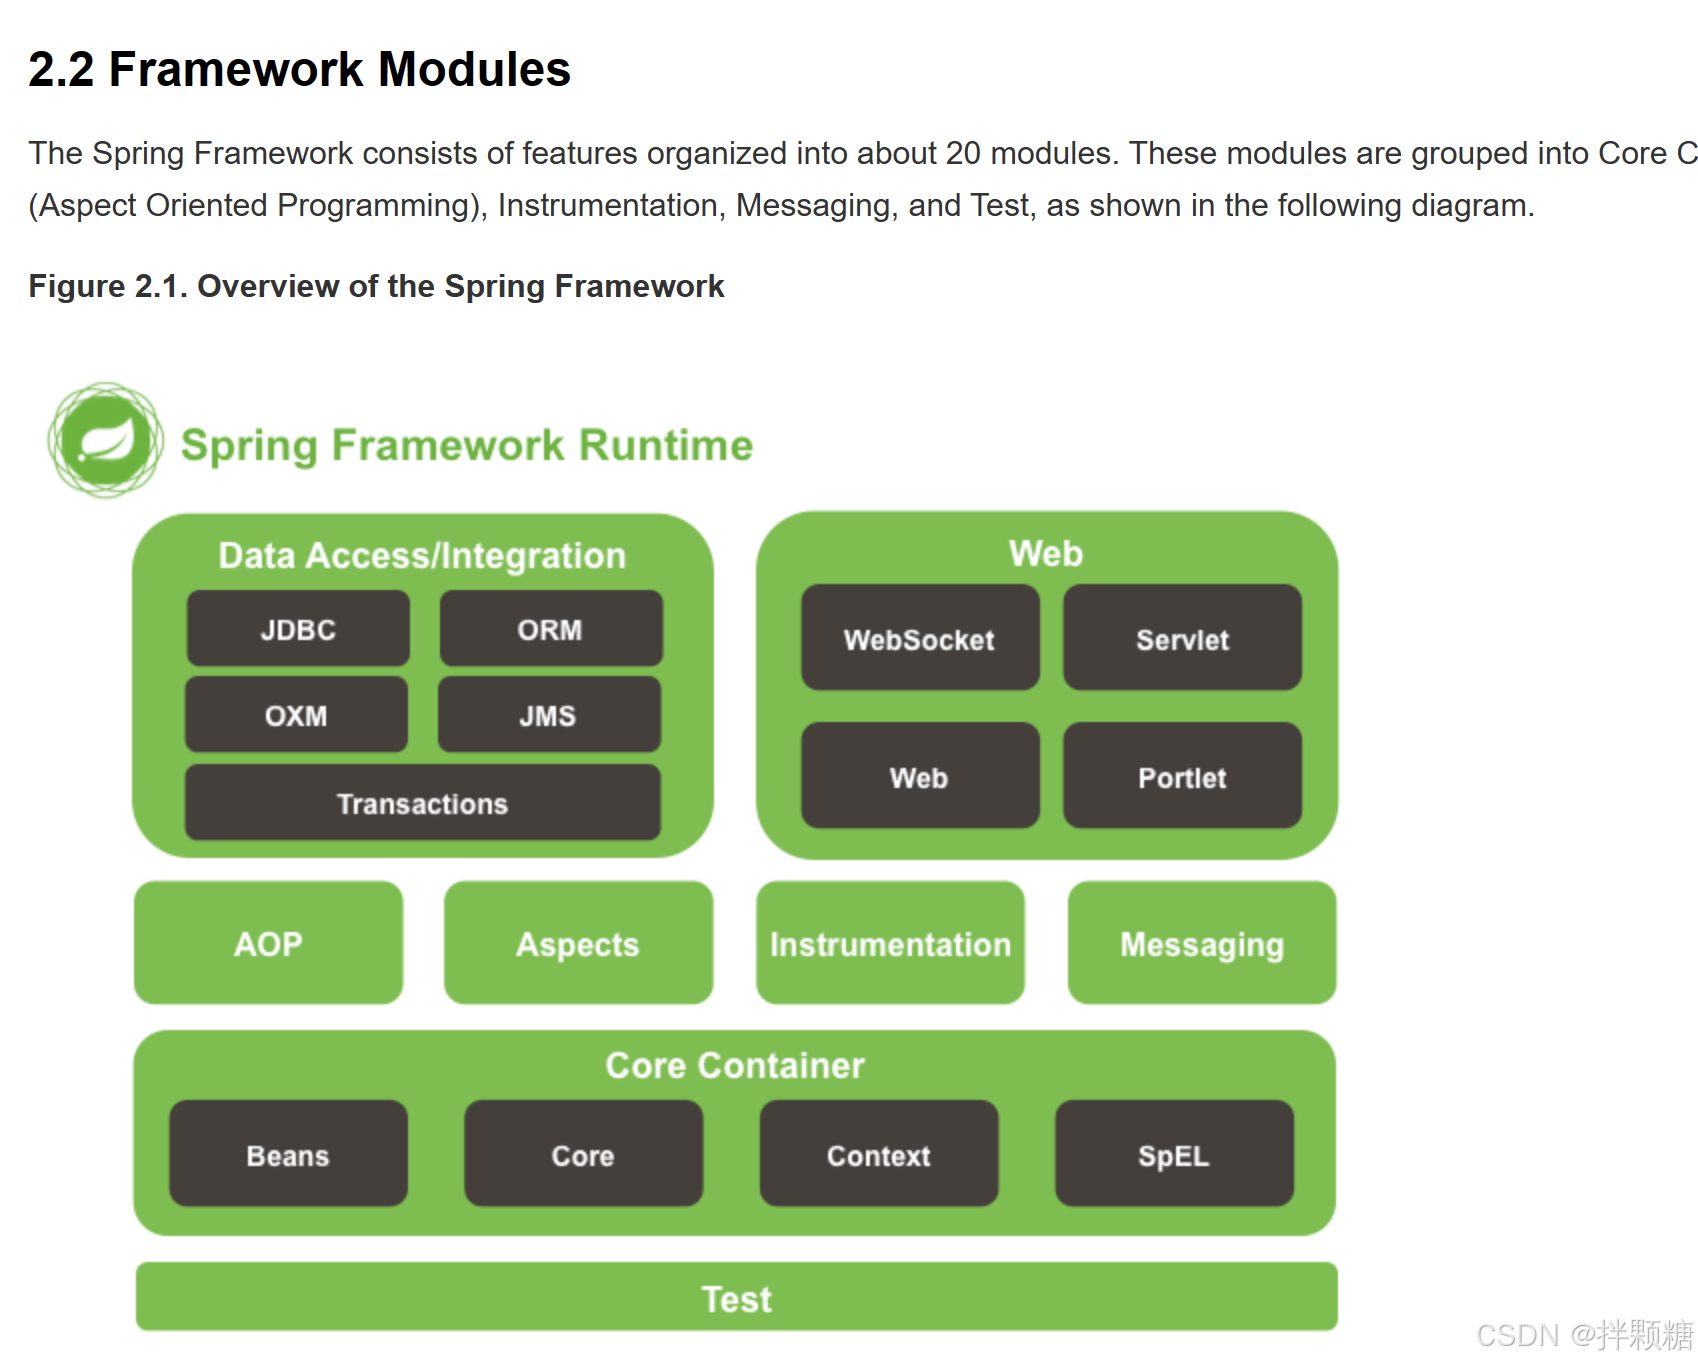
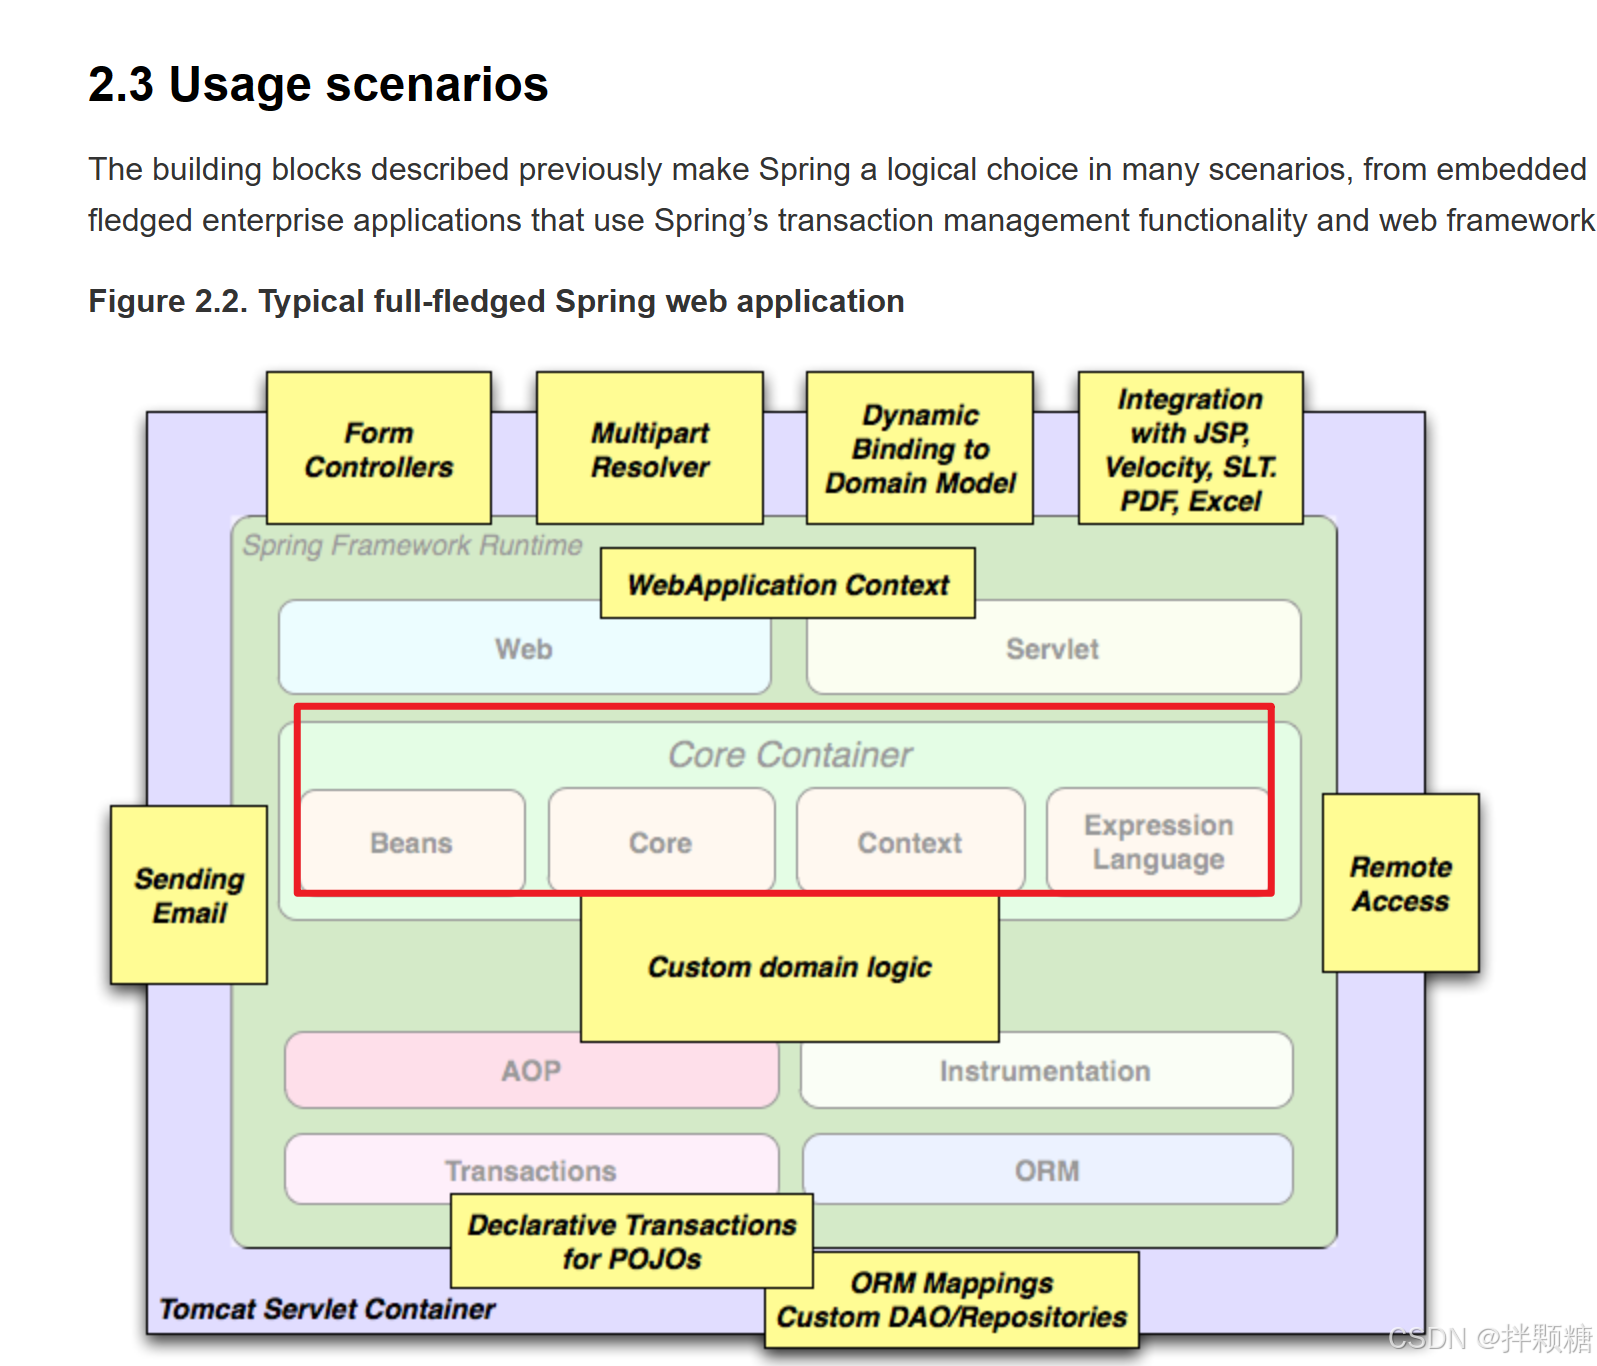
我们可以看到核心容器有4部分
Beans Core Context Expression
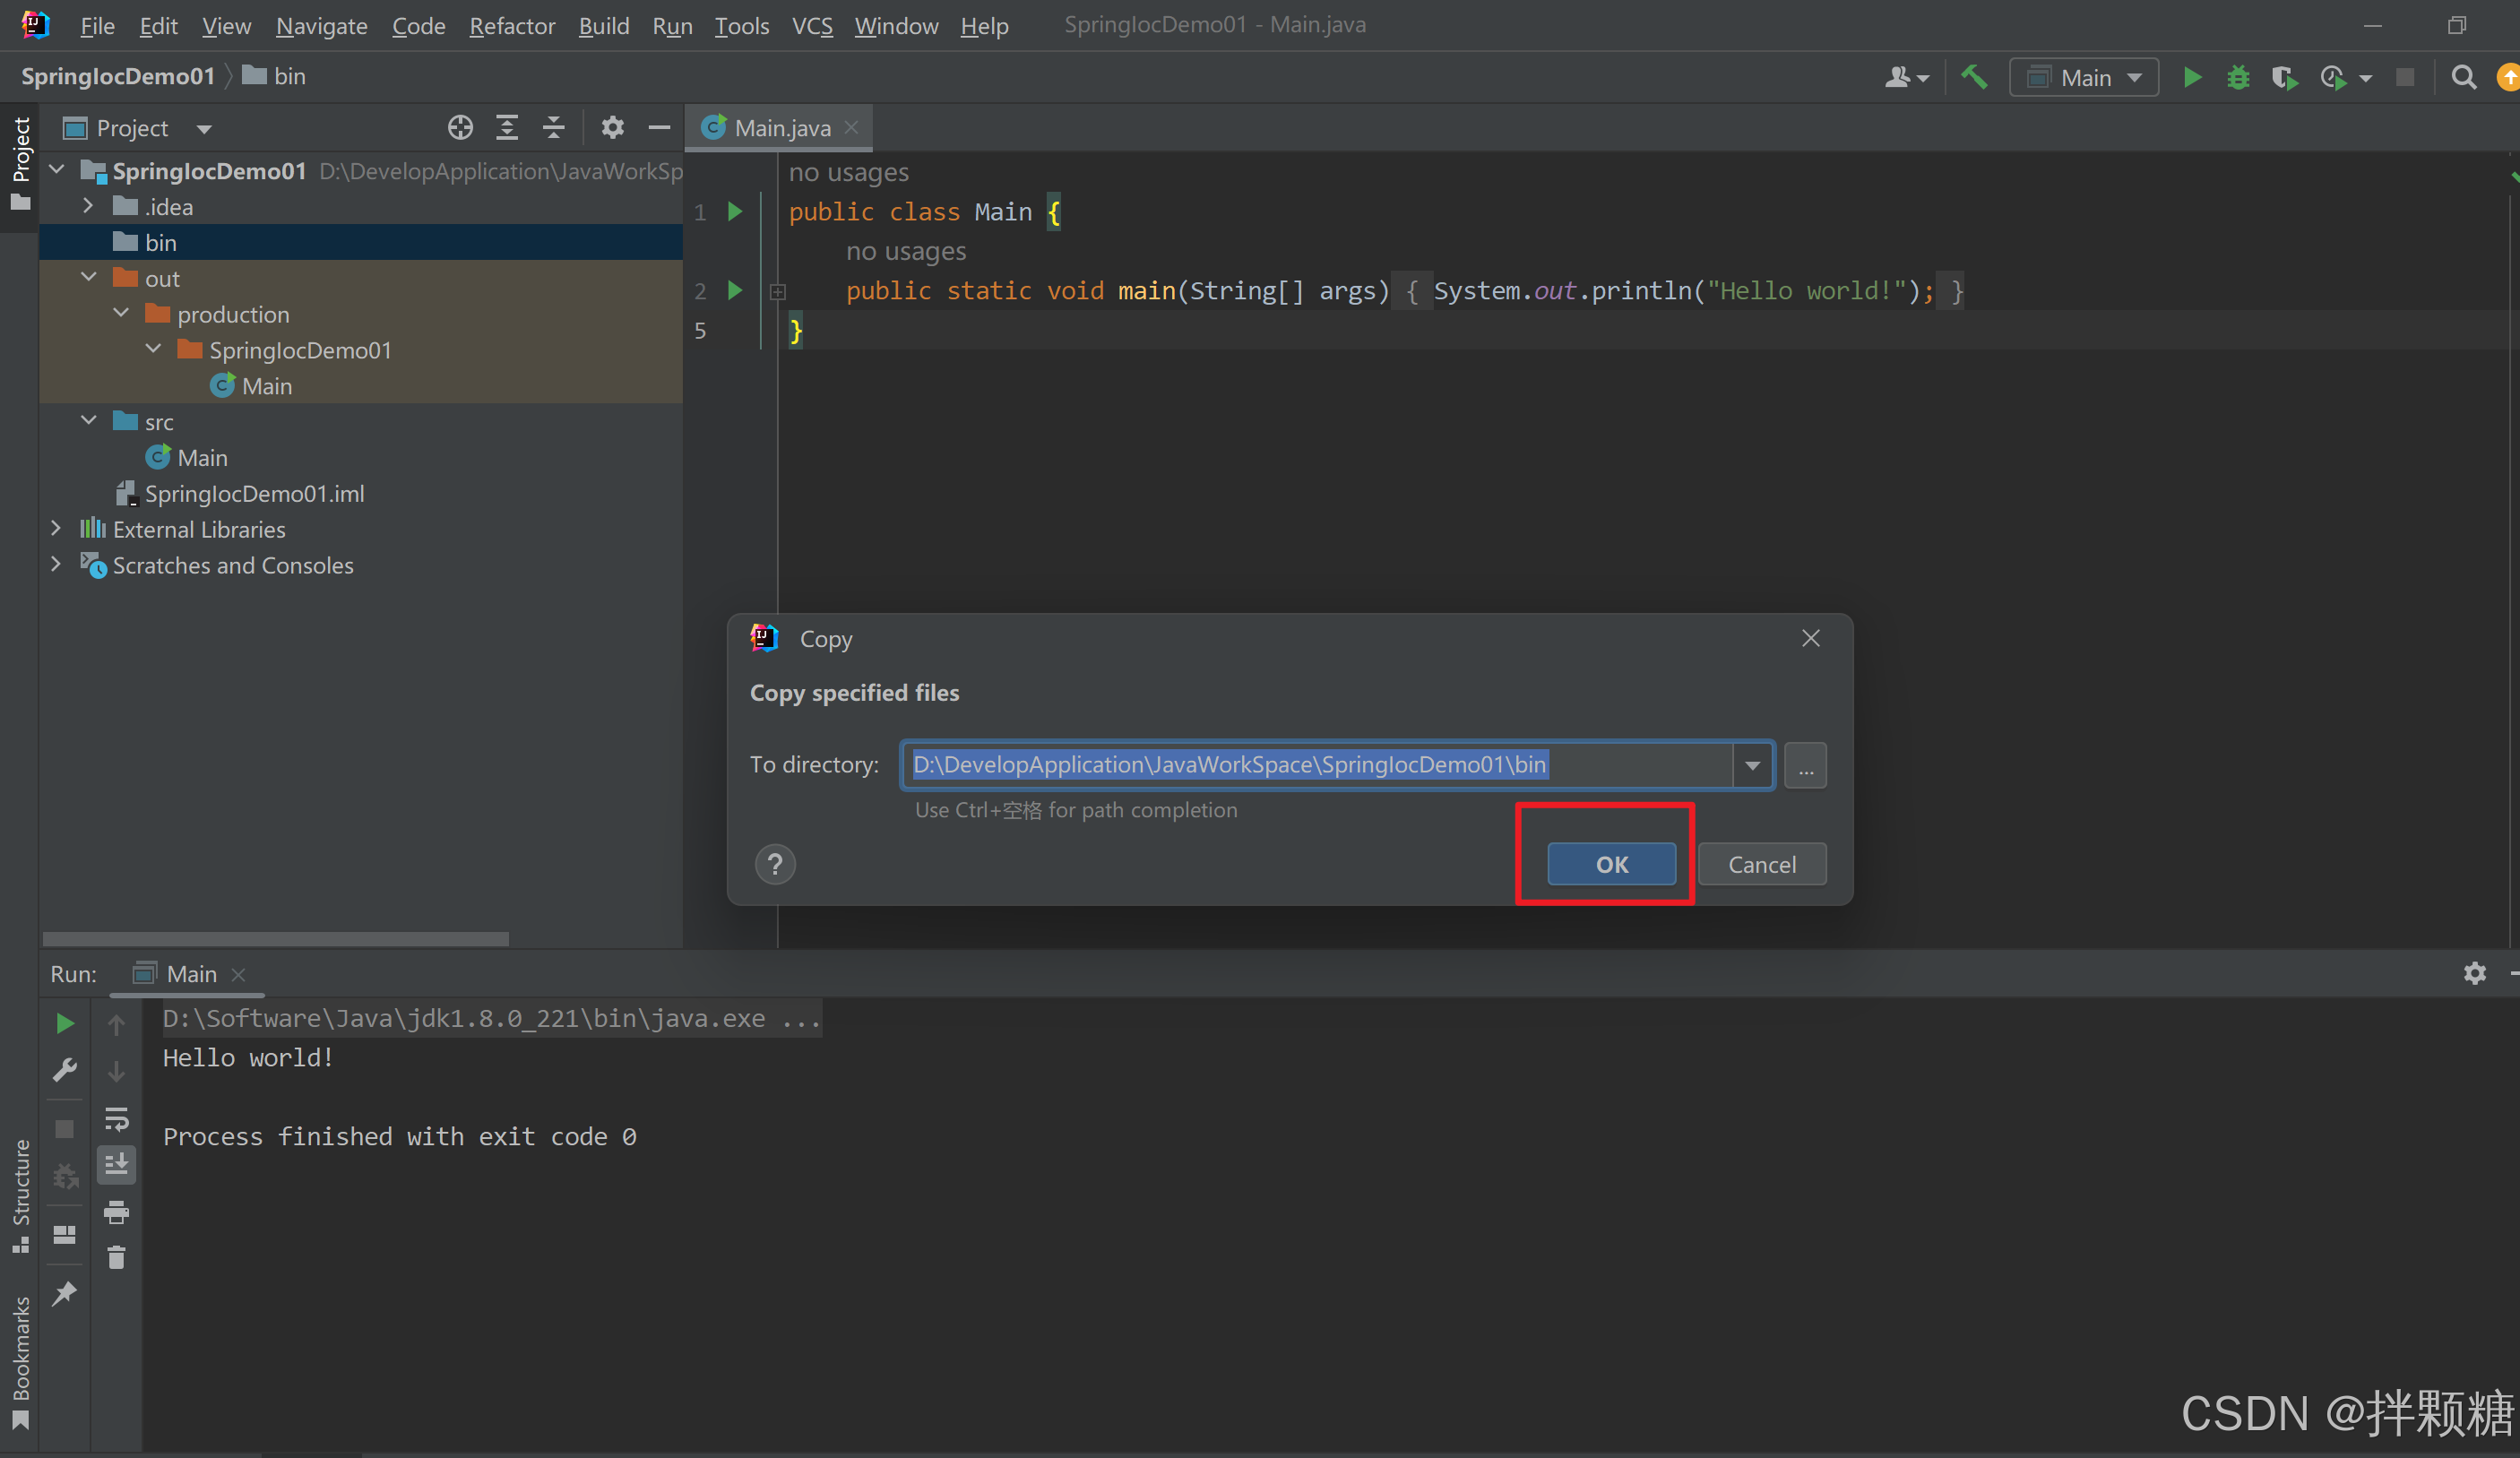
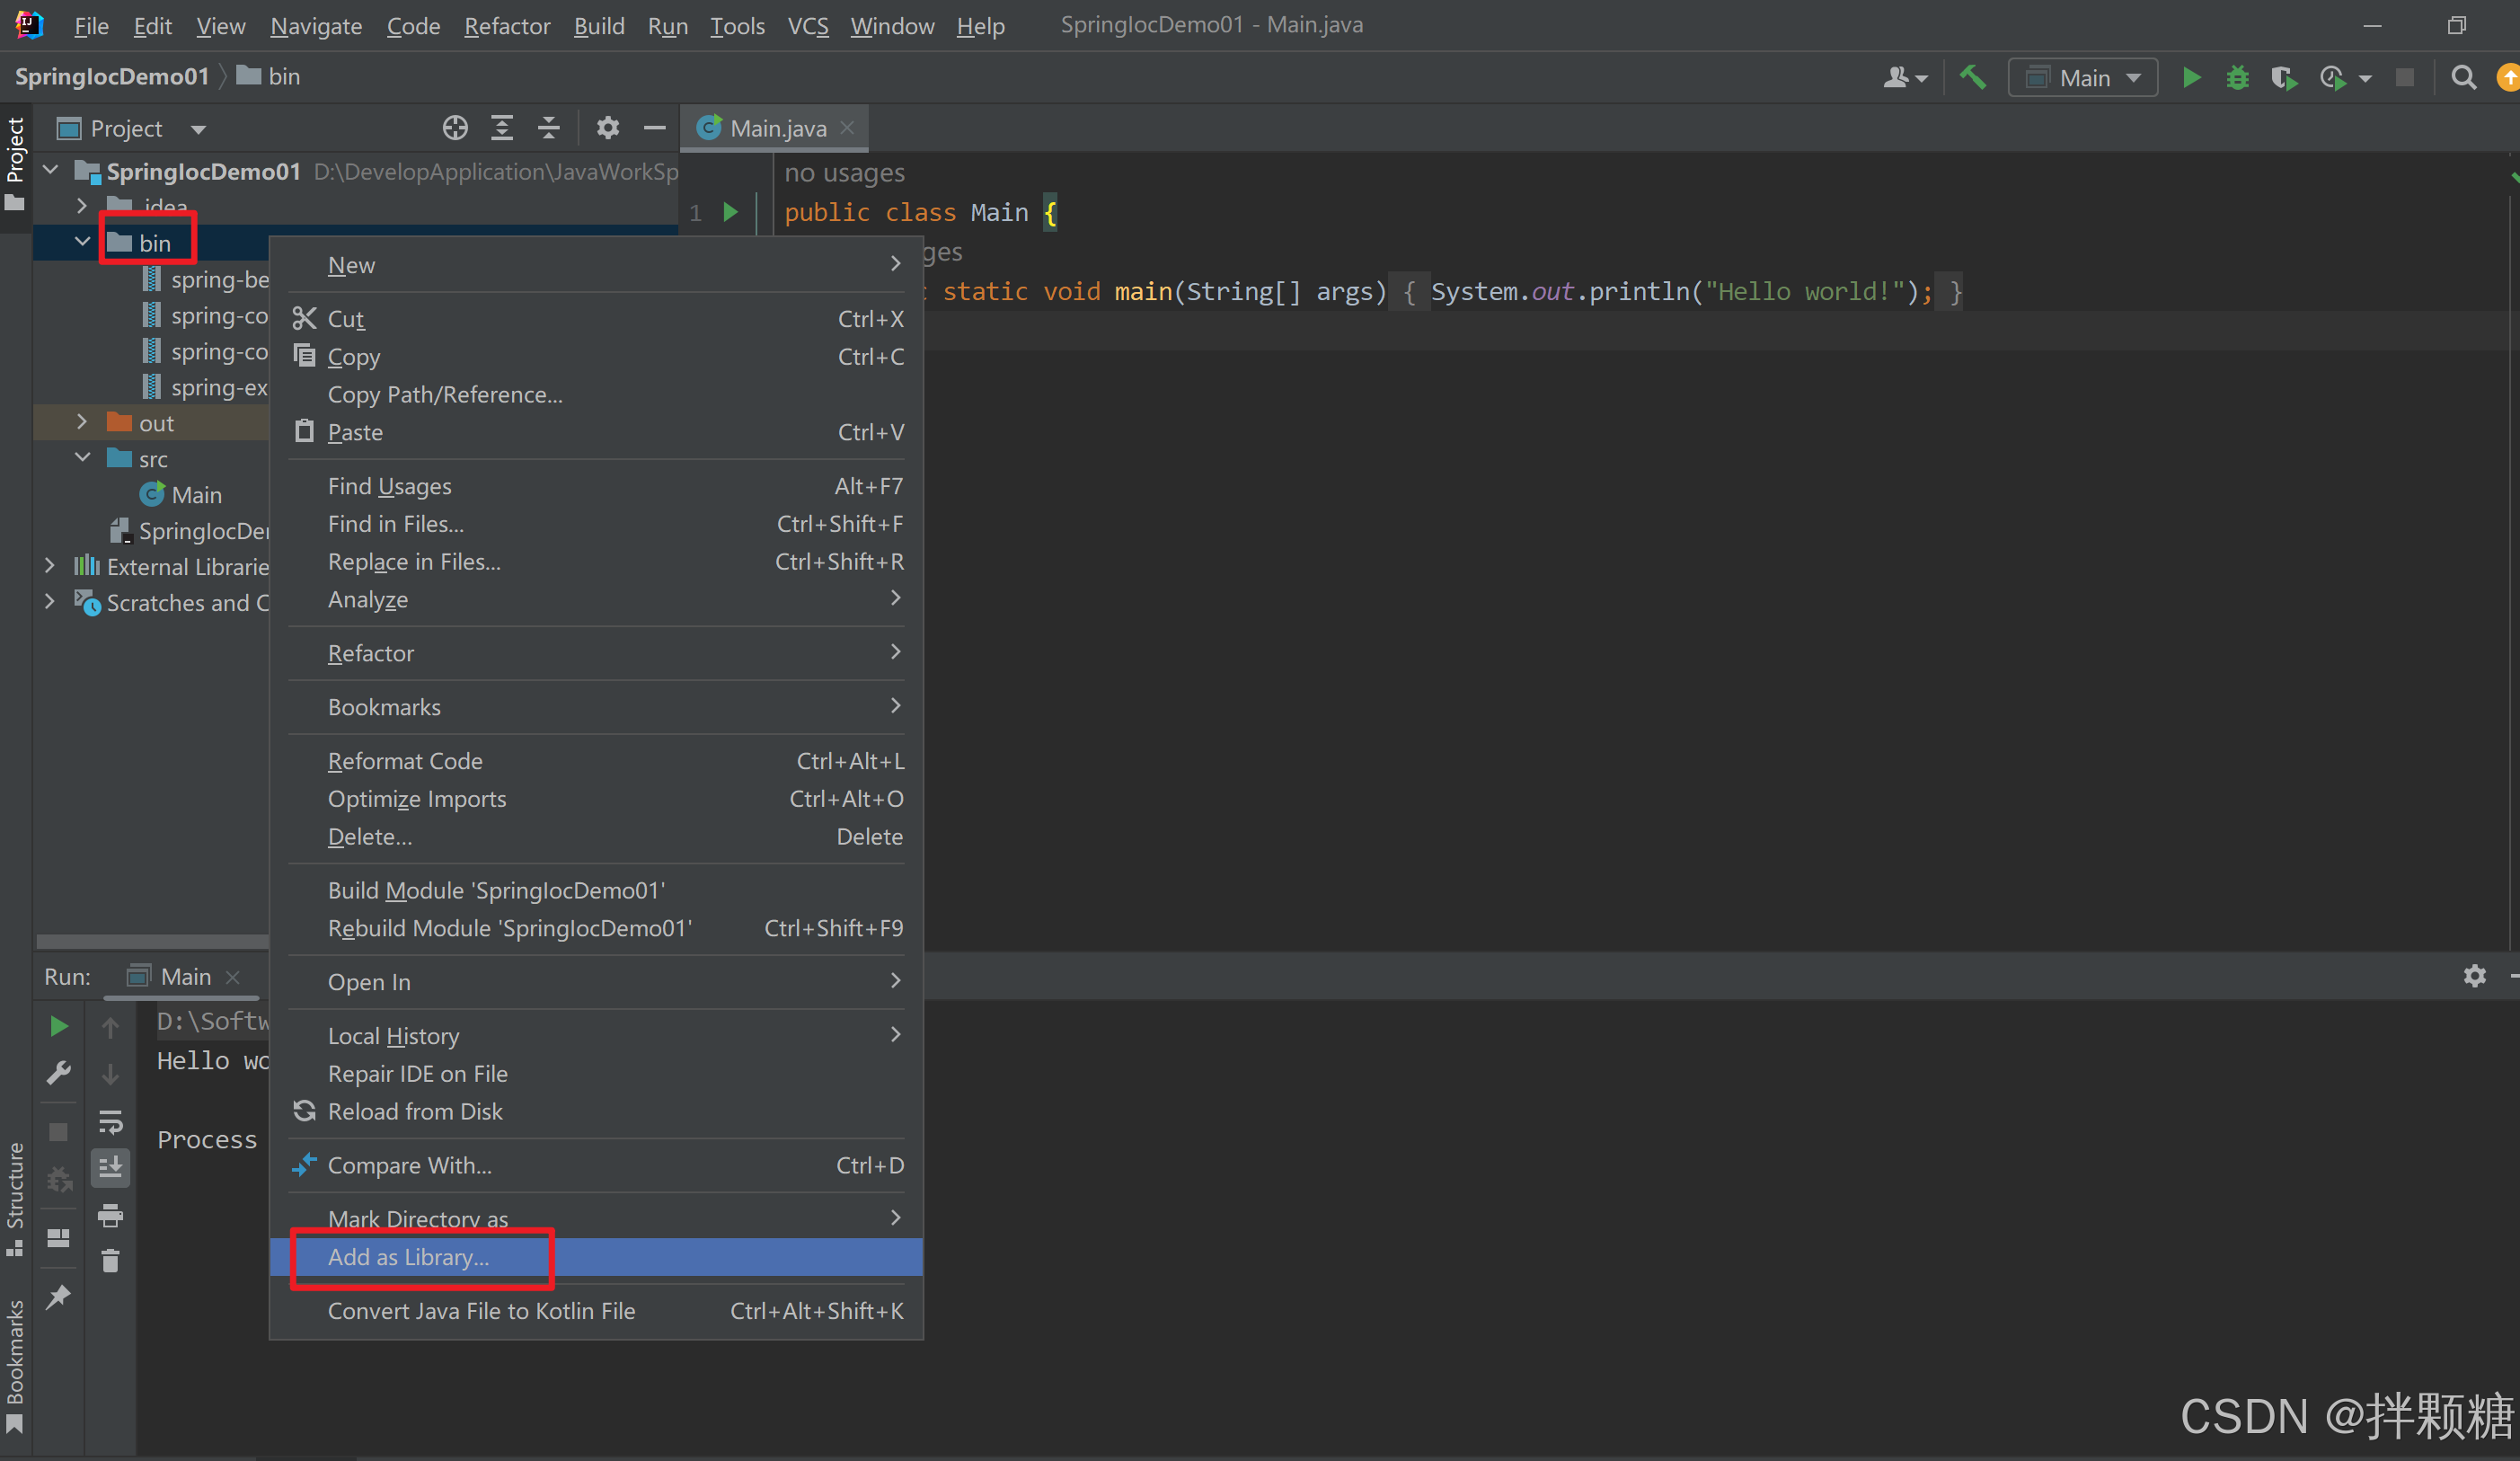
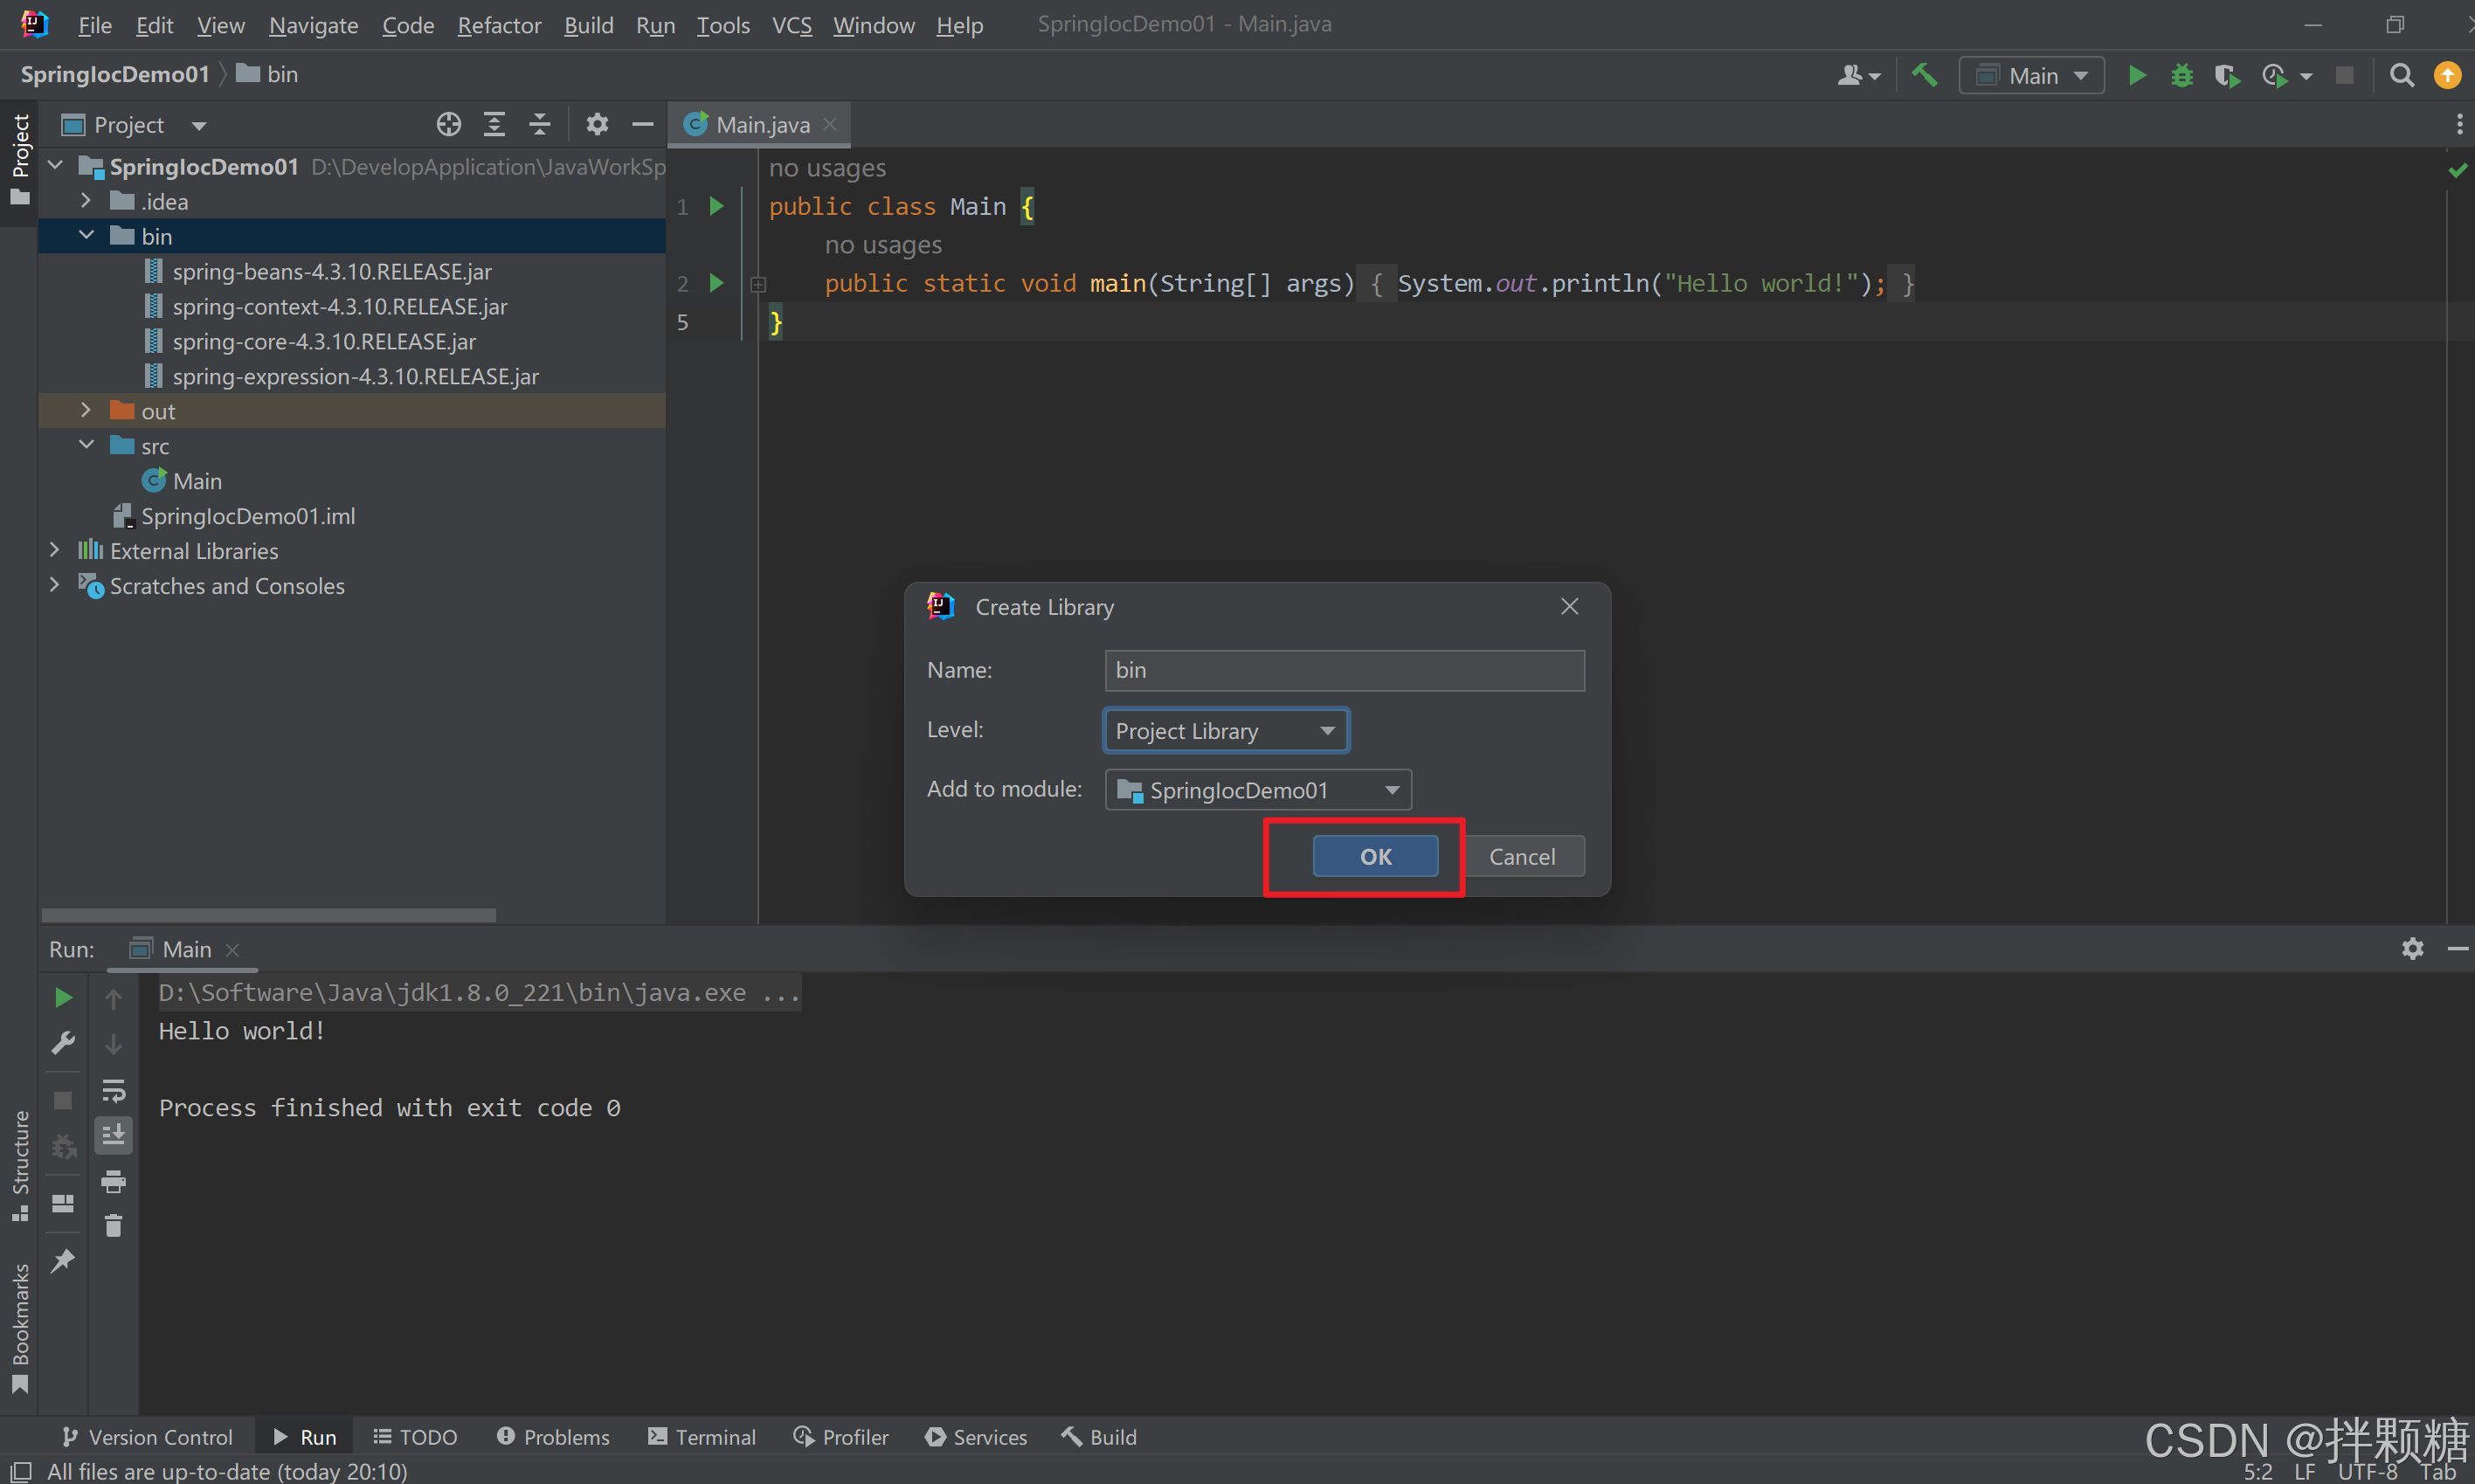
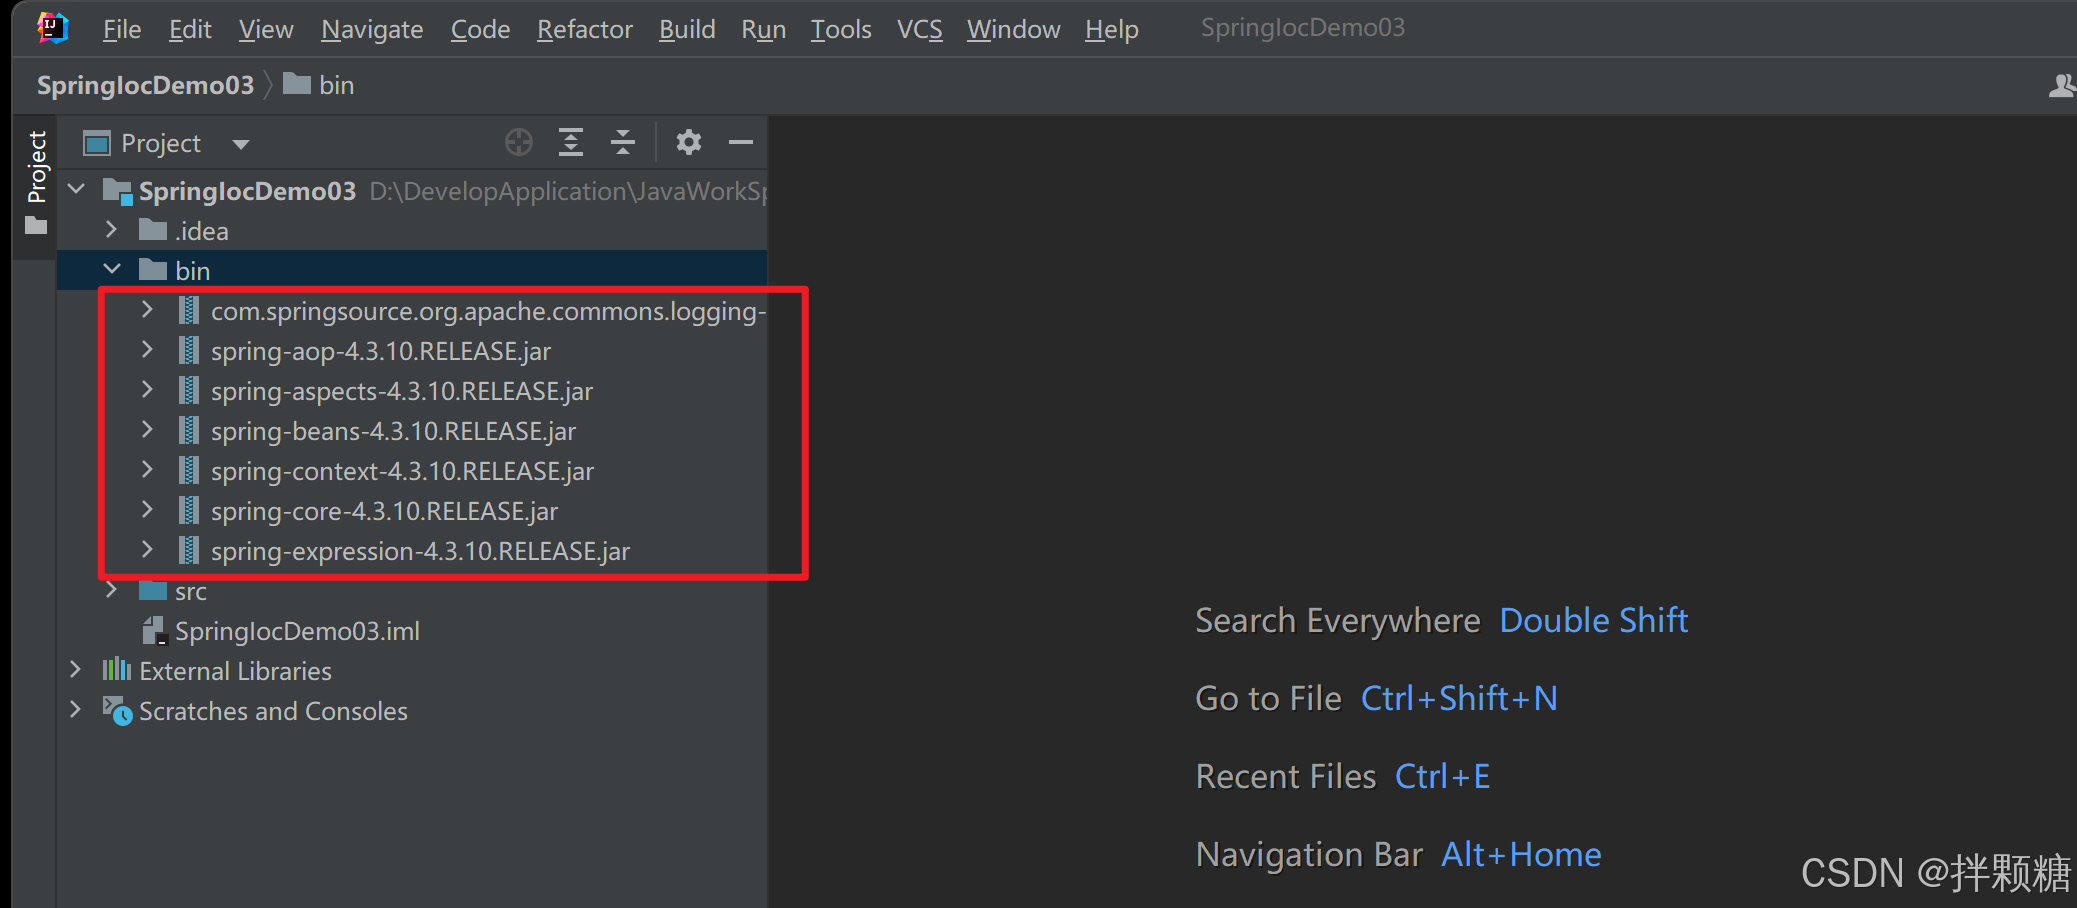
项目中新建文件夹 存放jar包
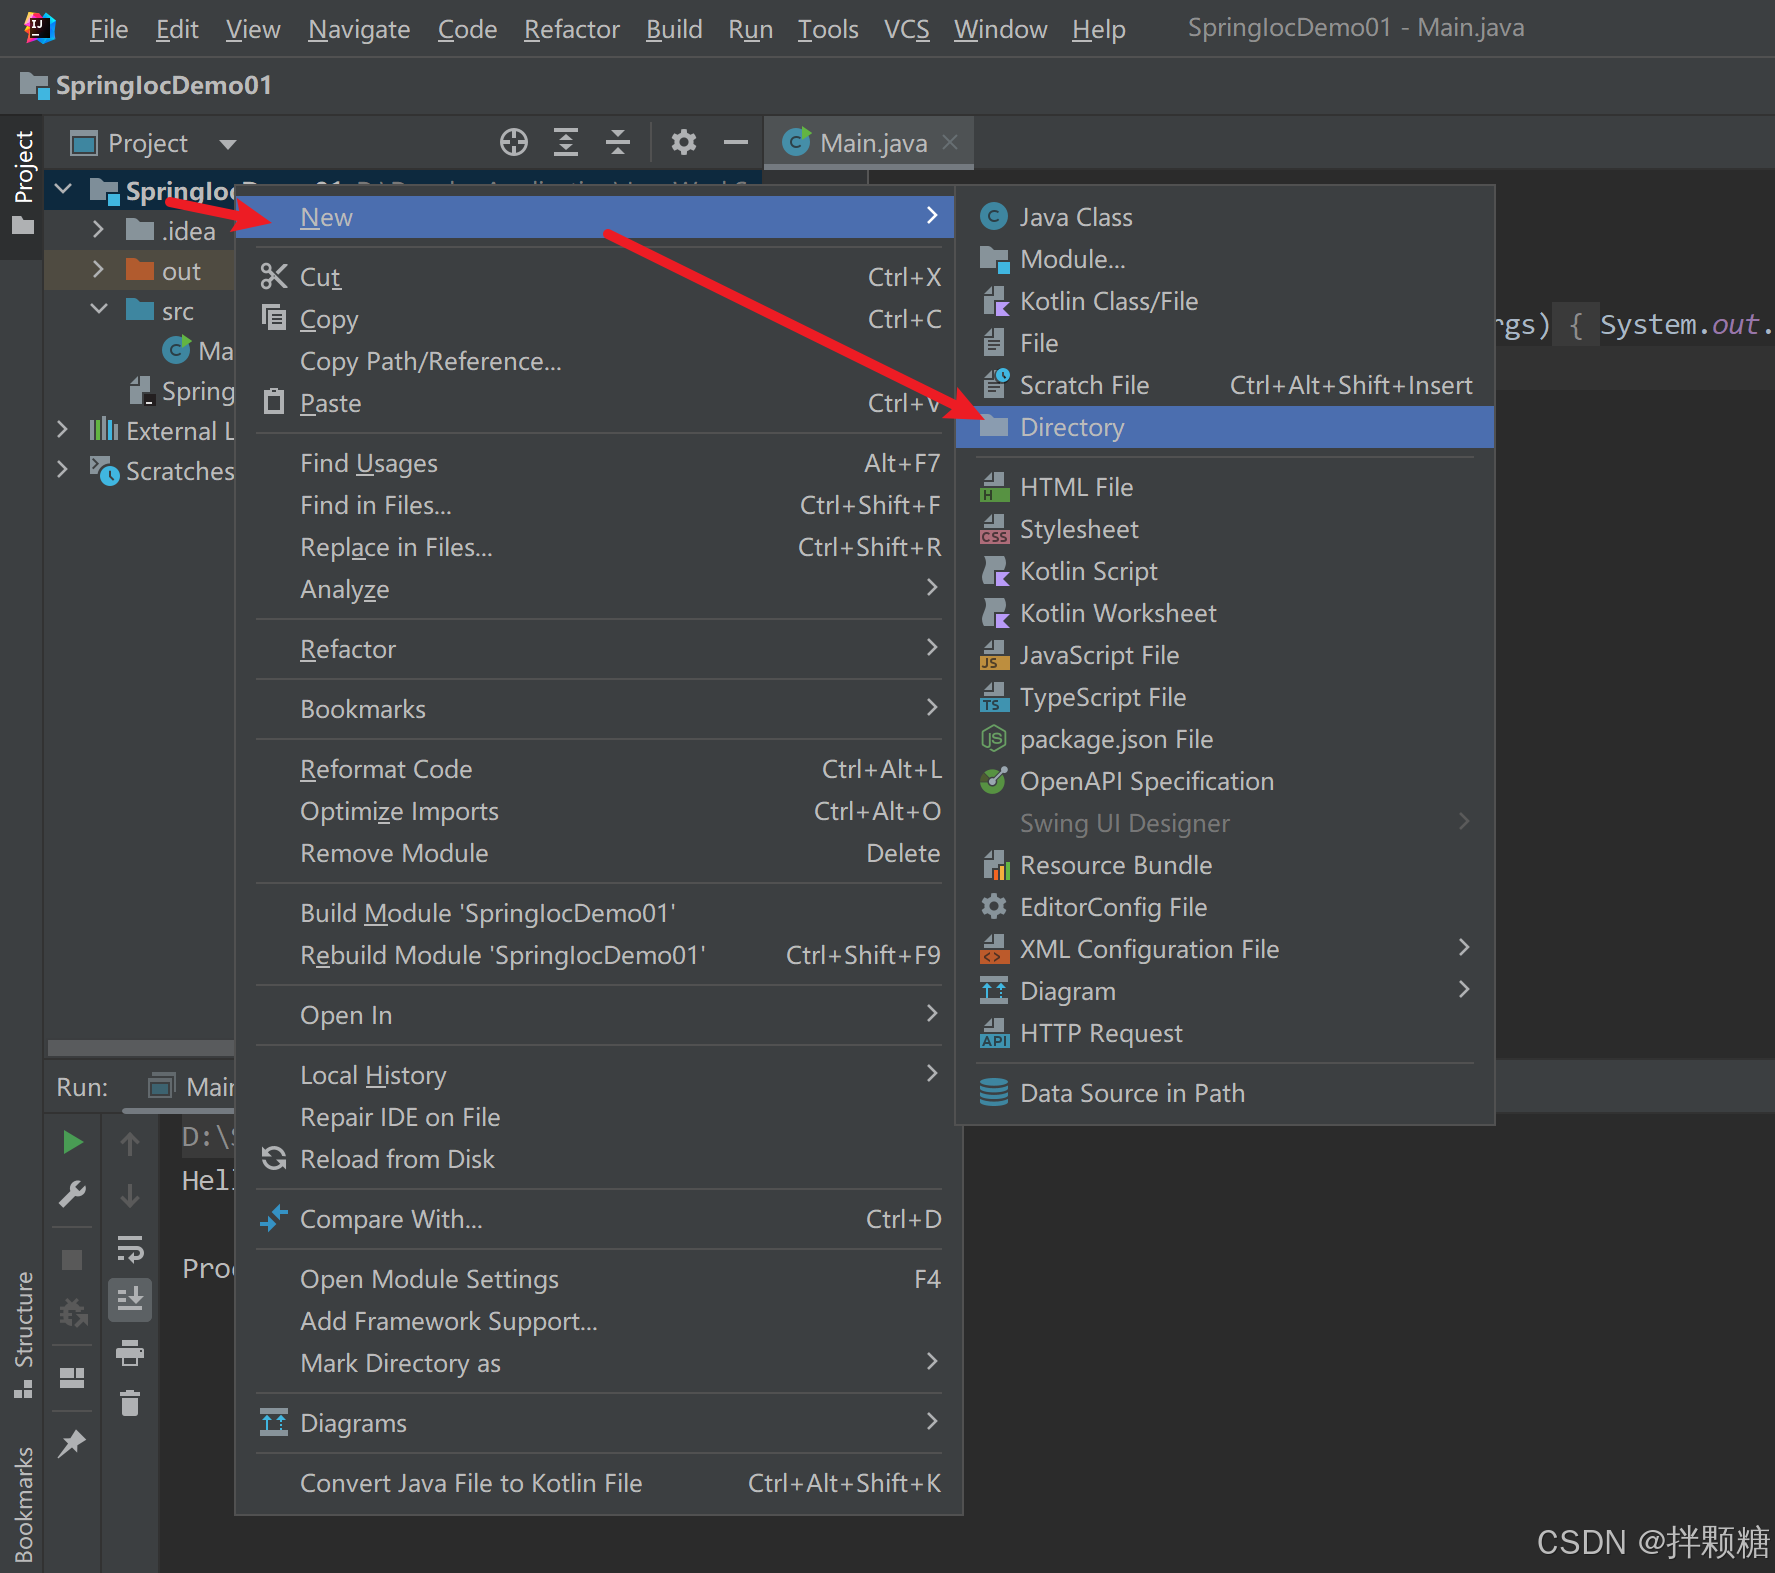
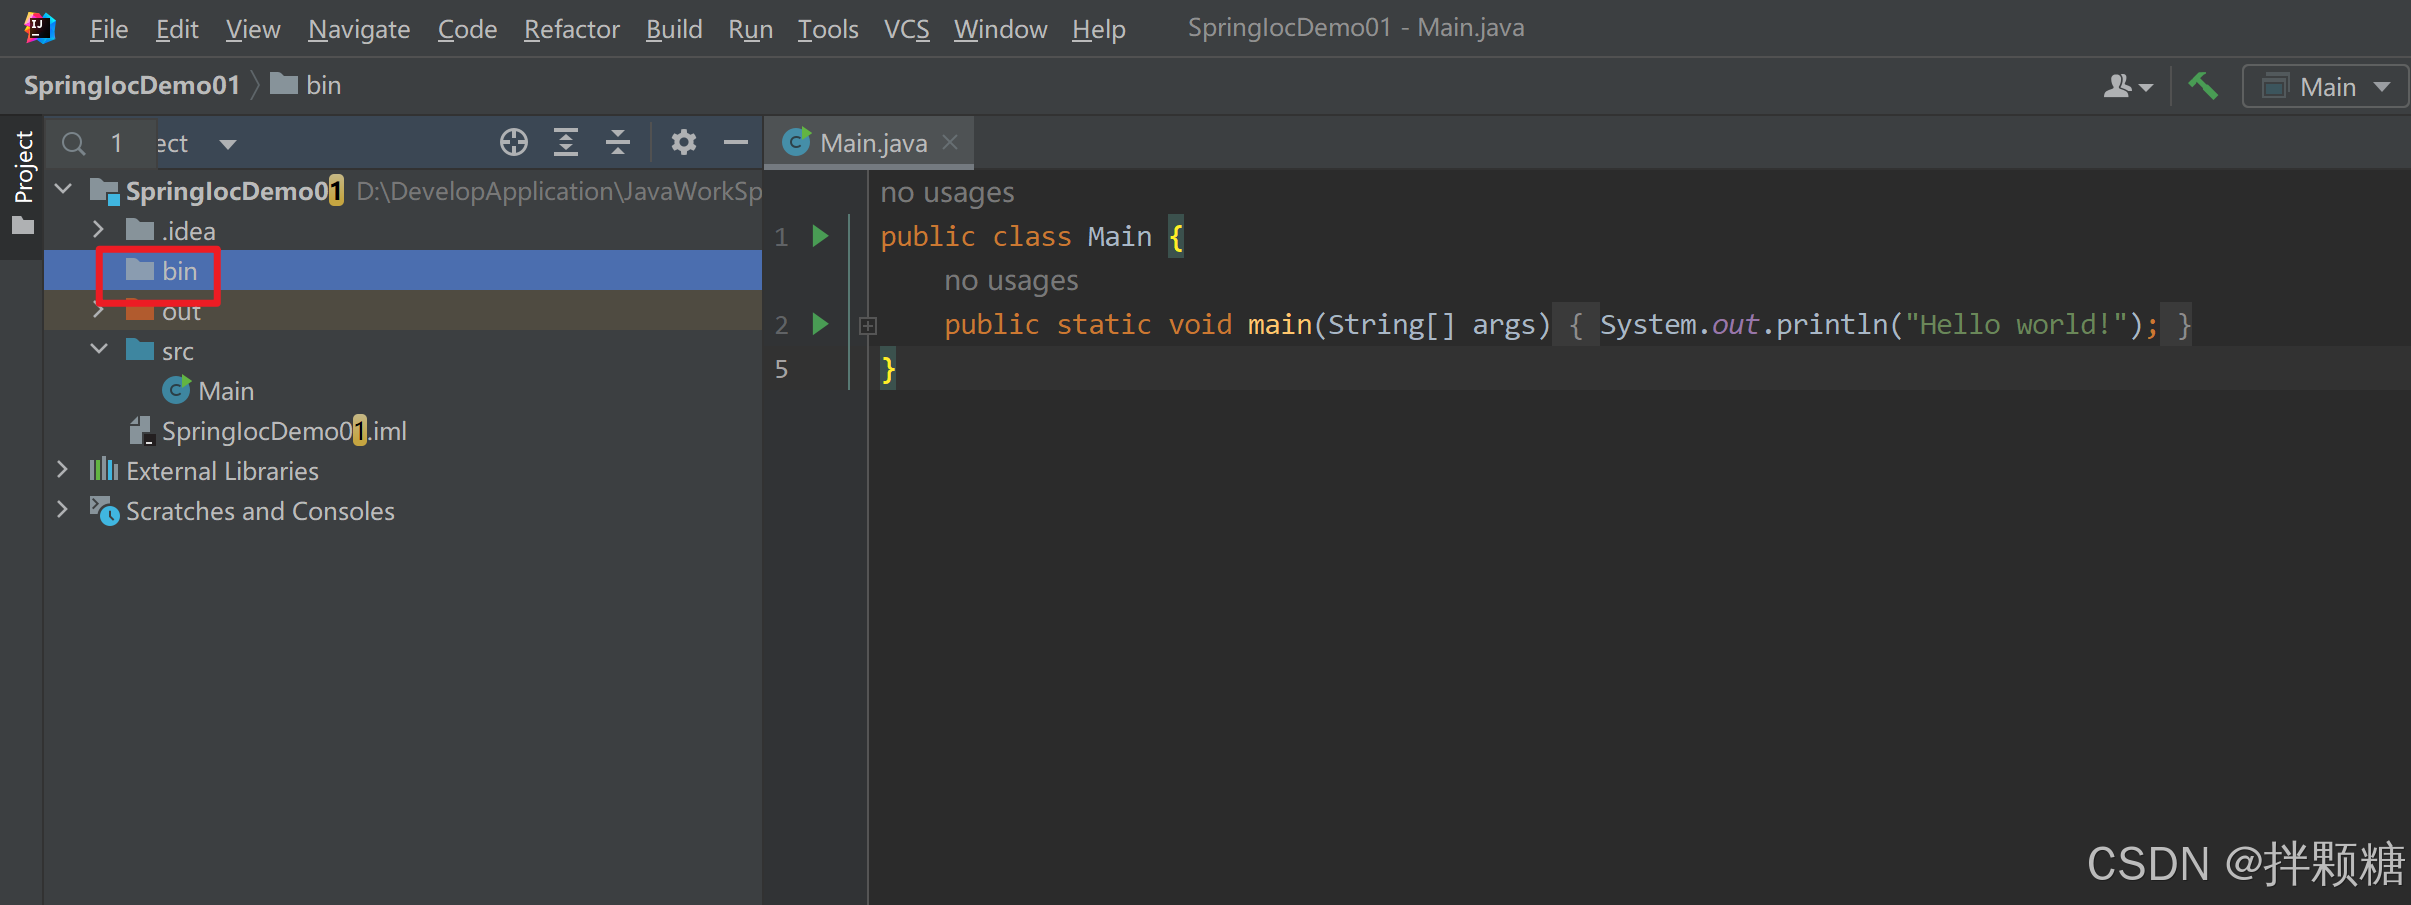
把4个核心jar包拷贝粘贴进去
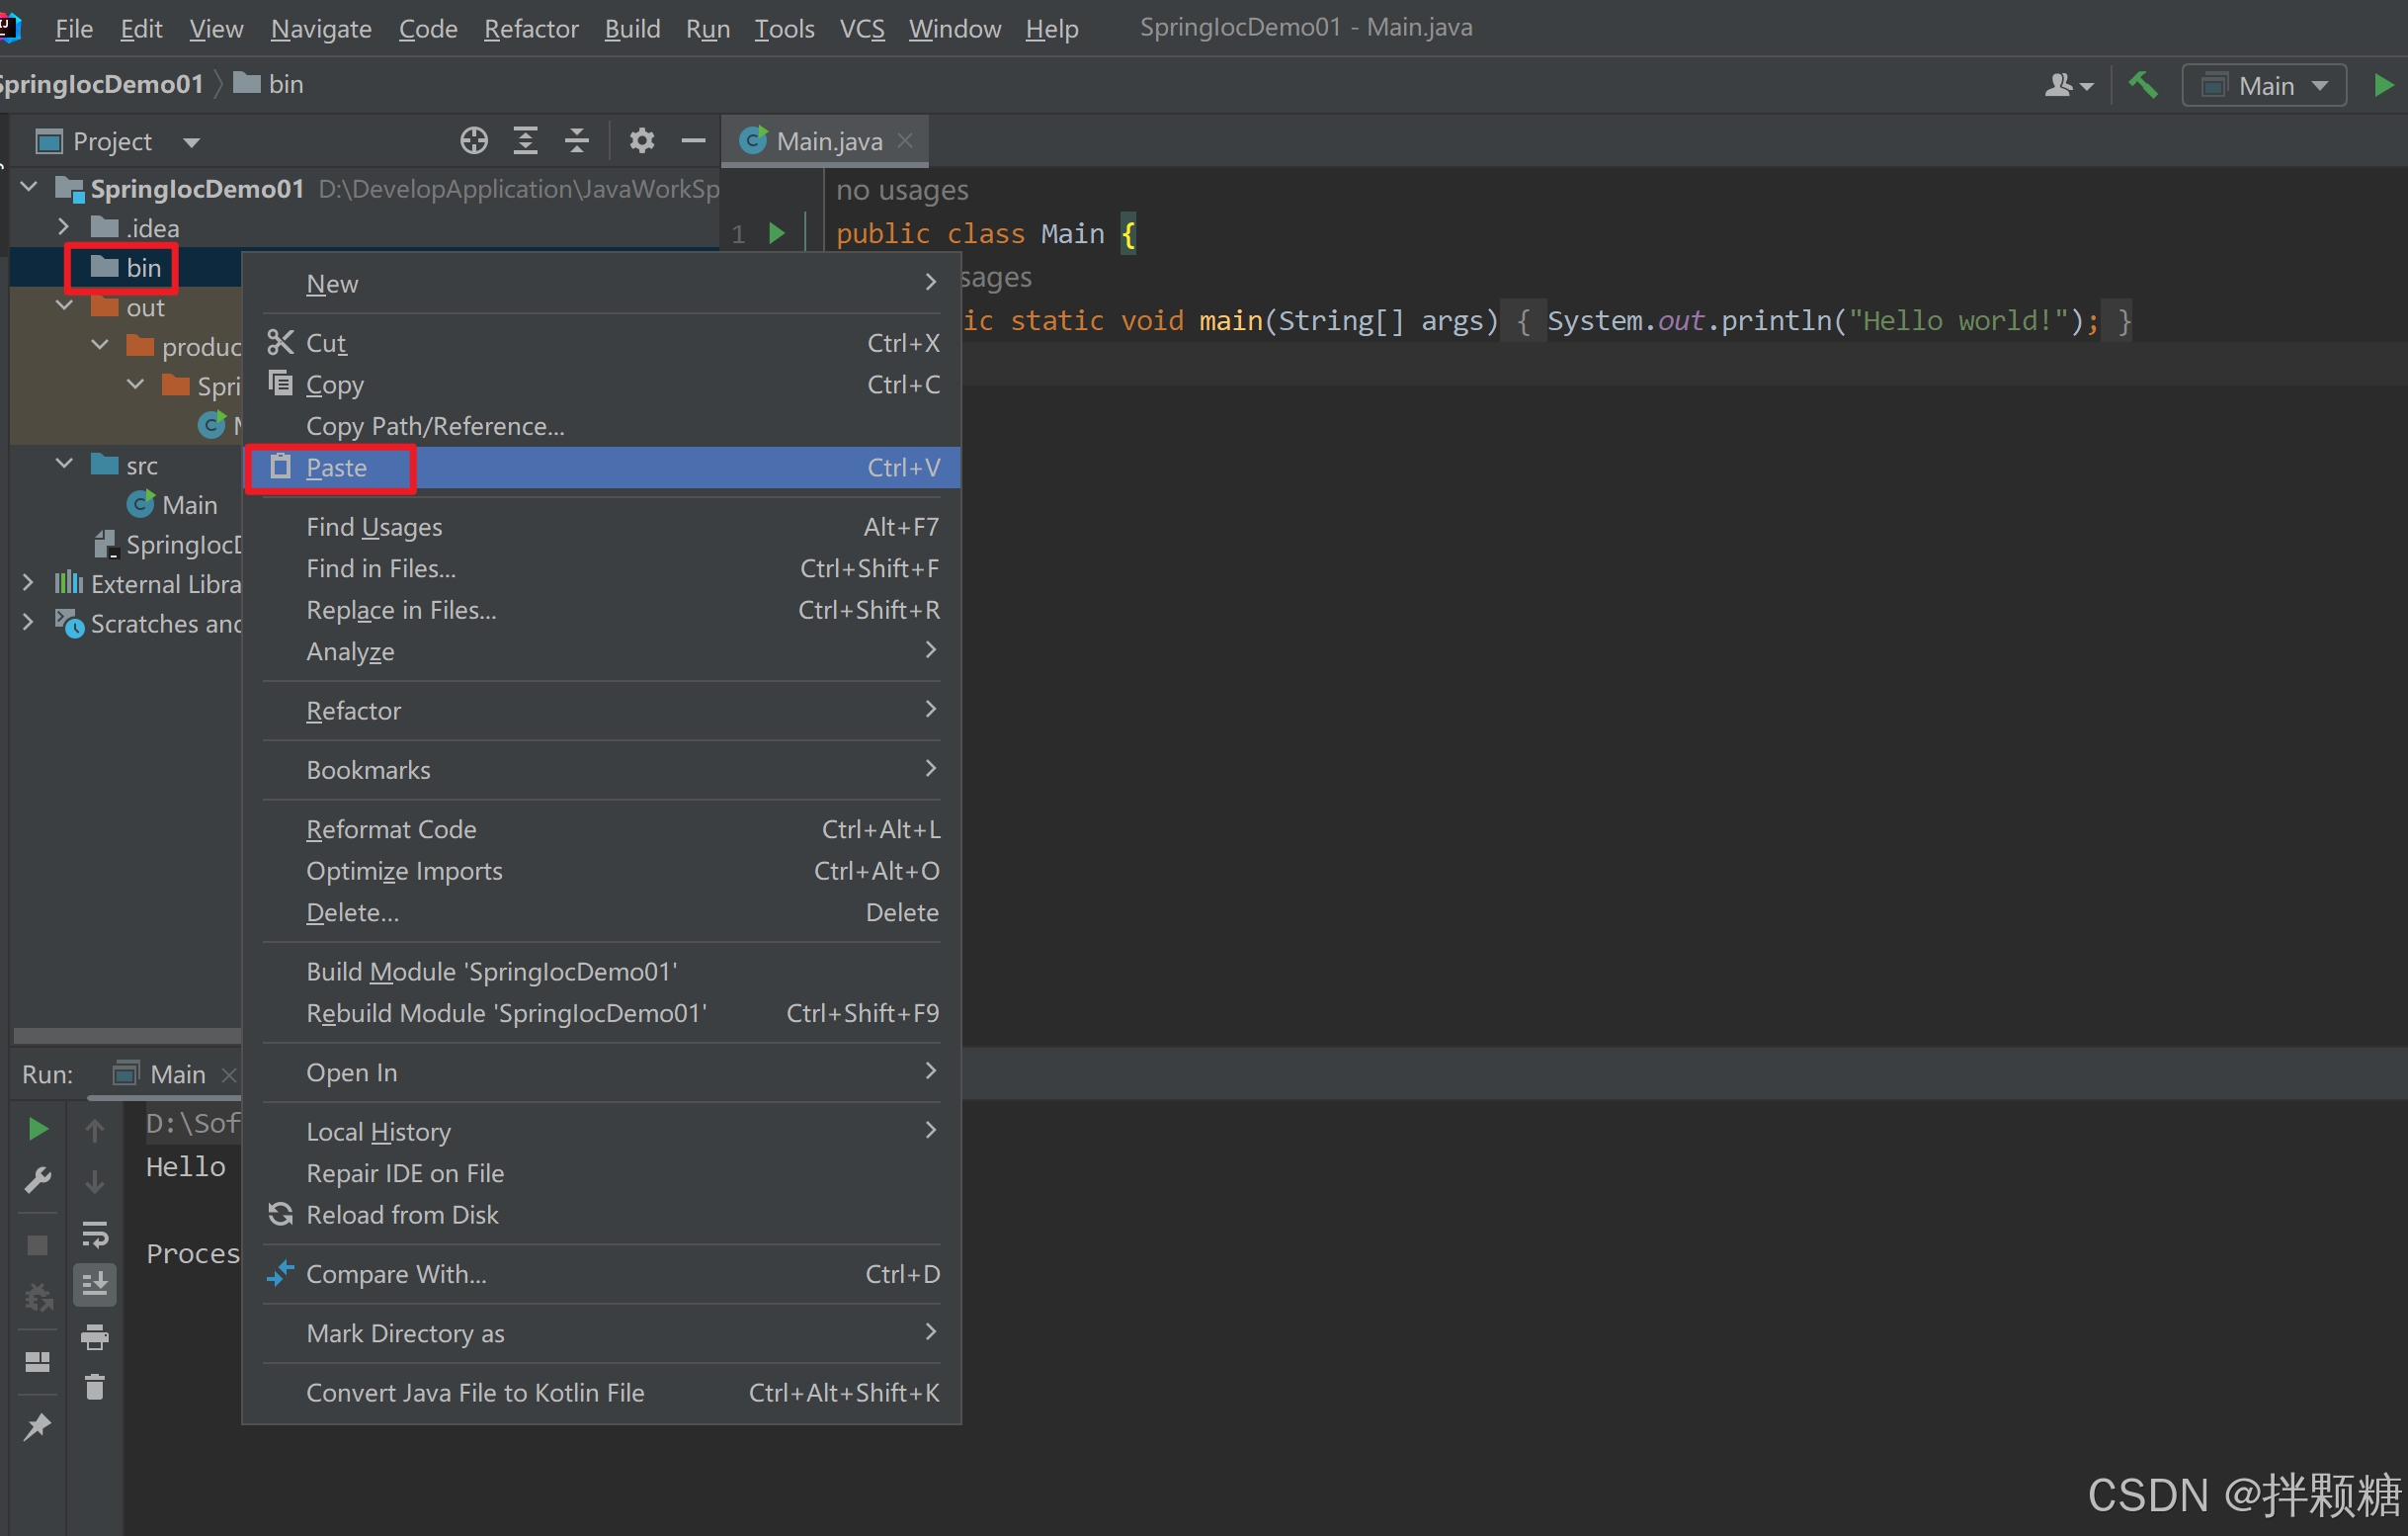

bin目录设置为Library目录
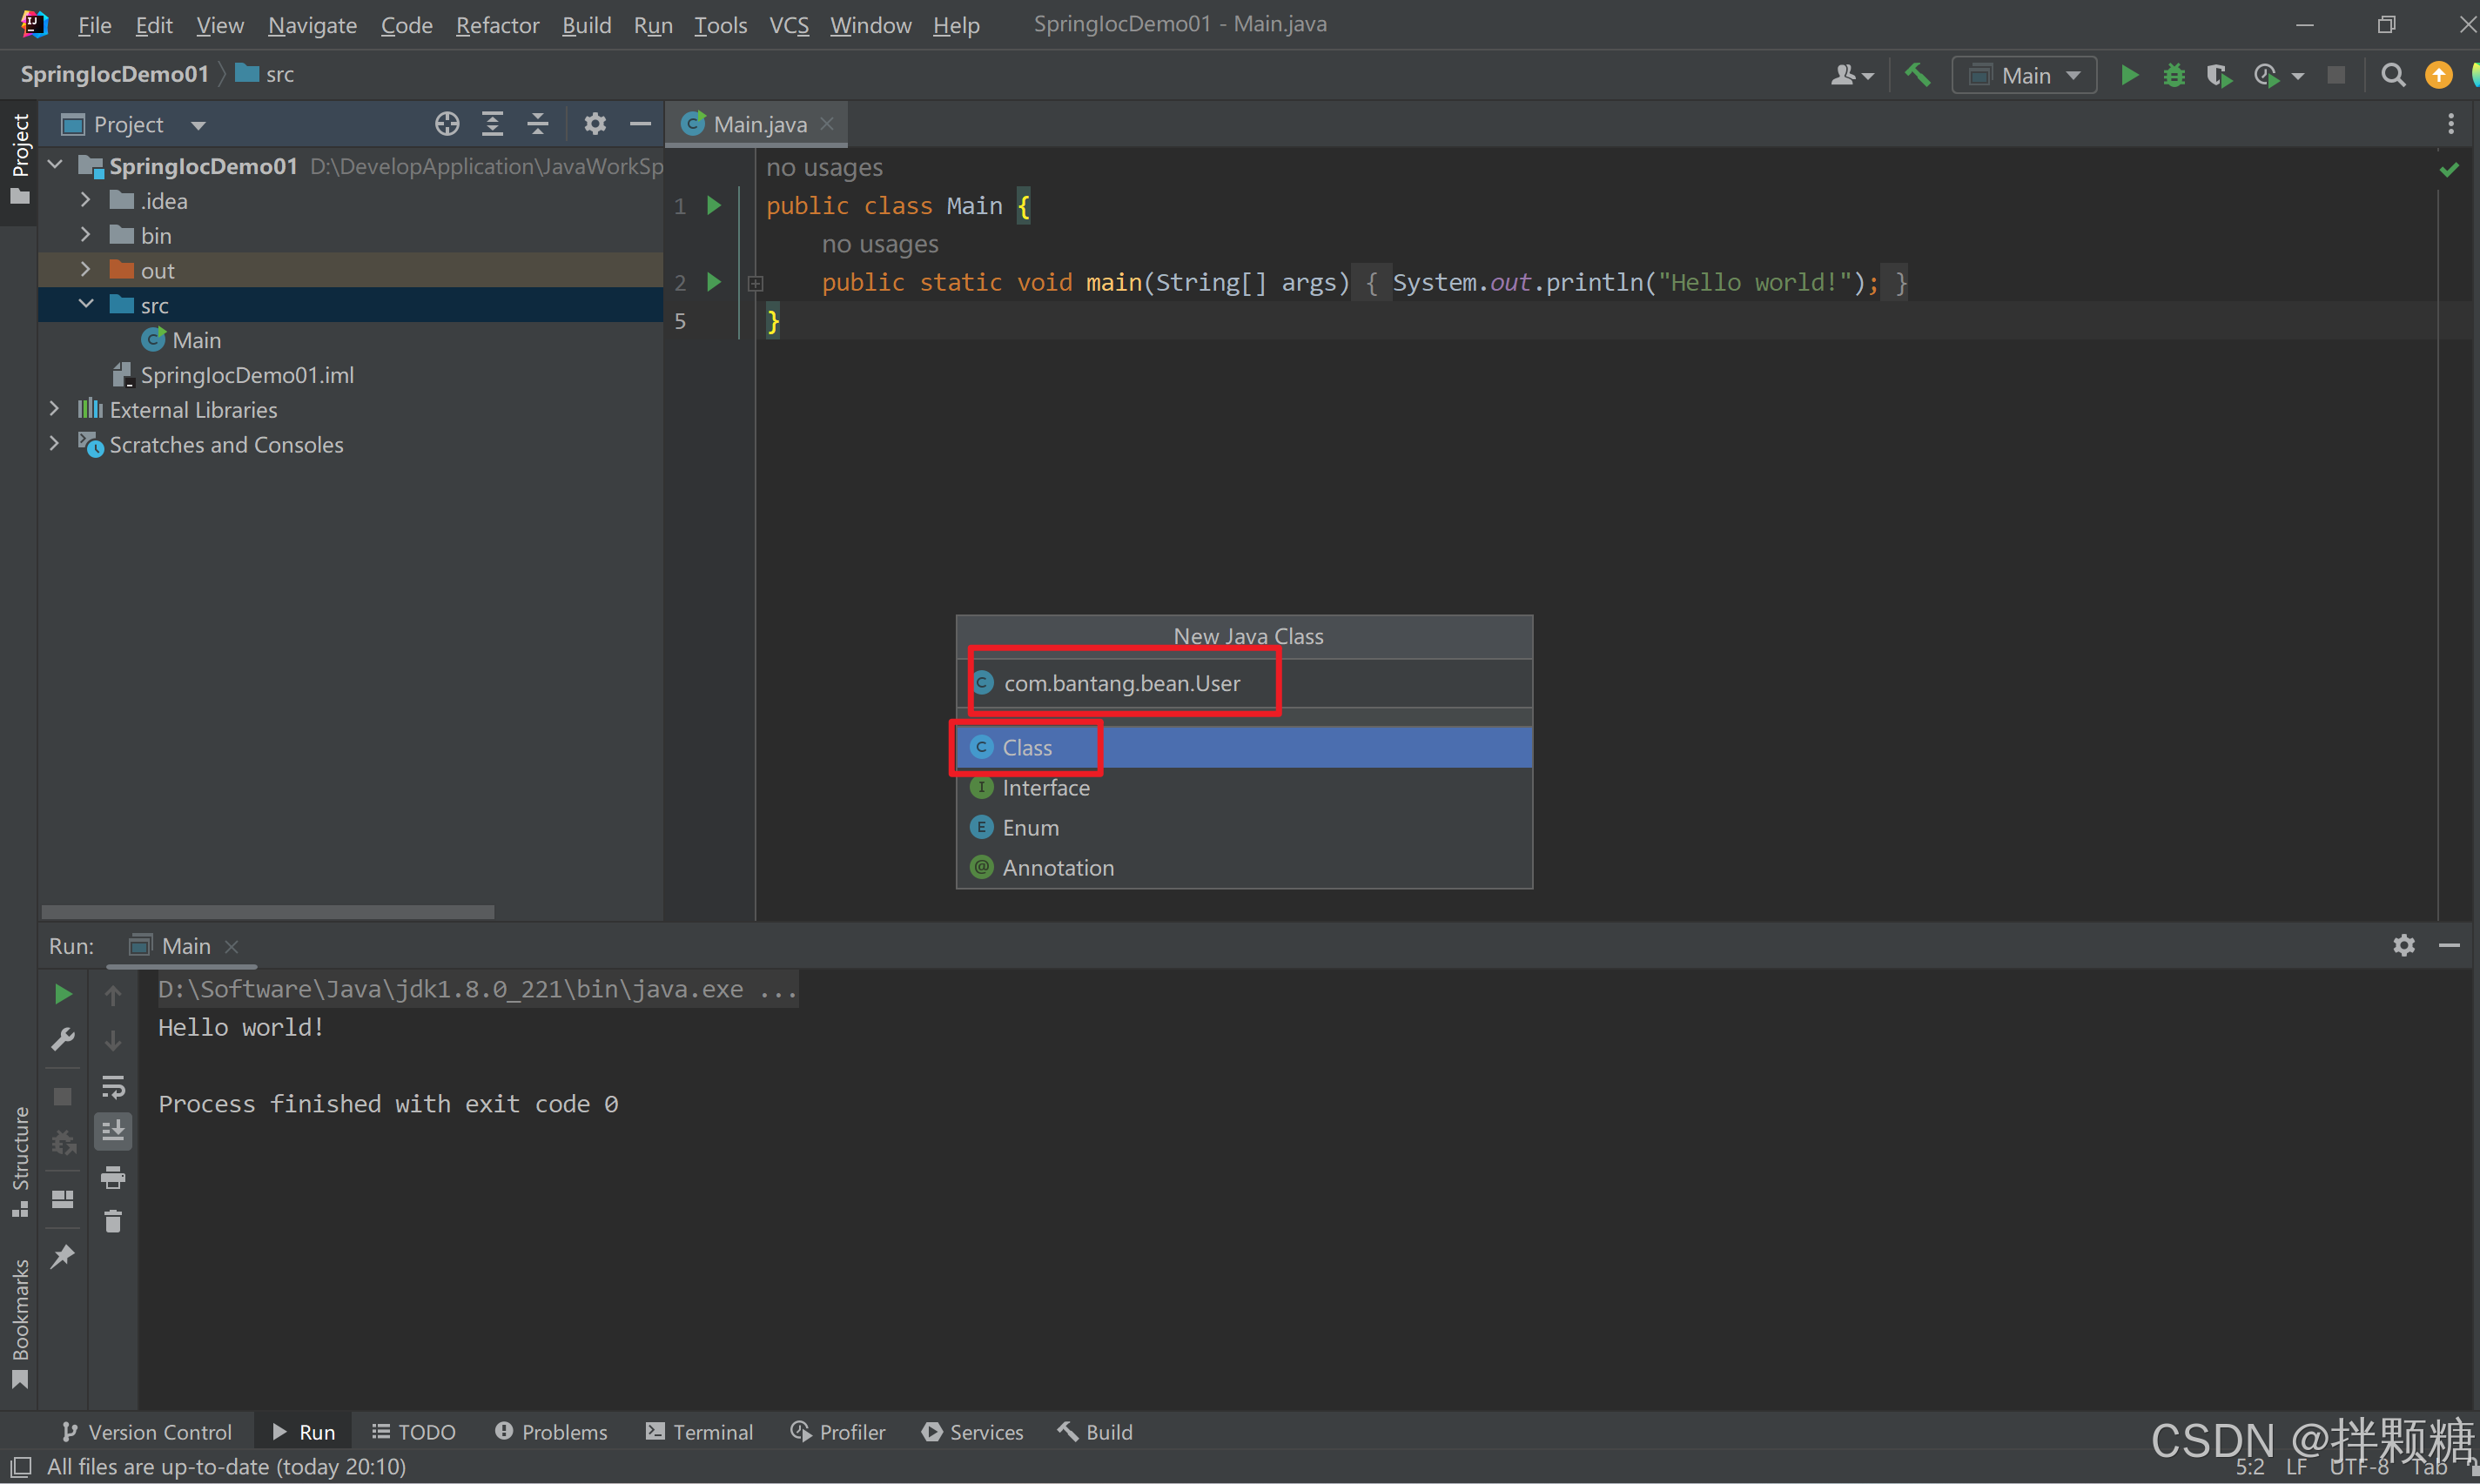
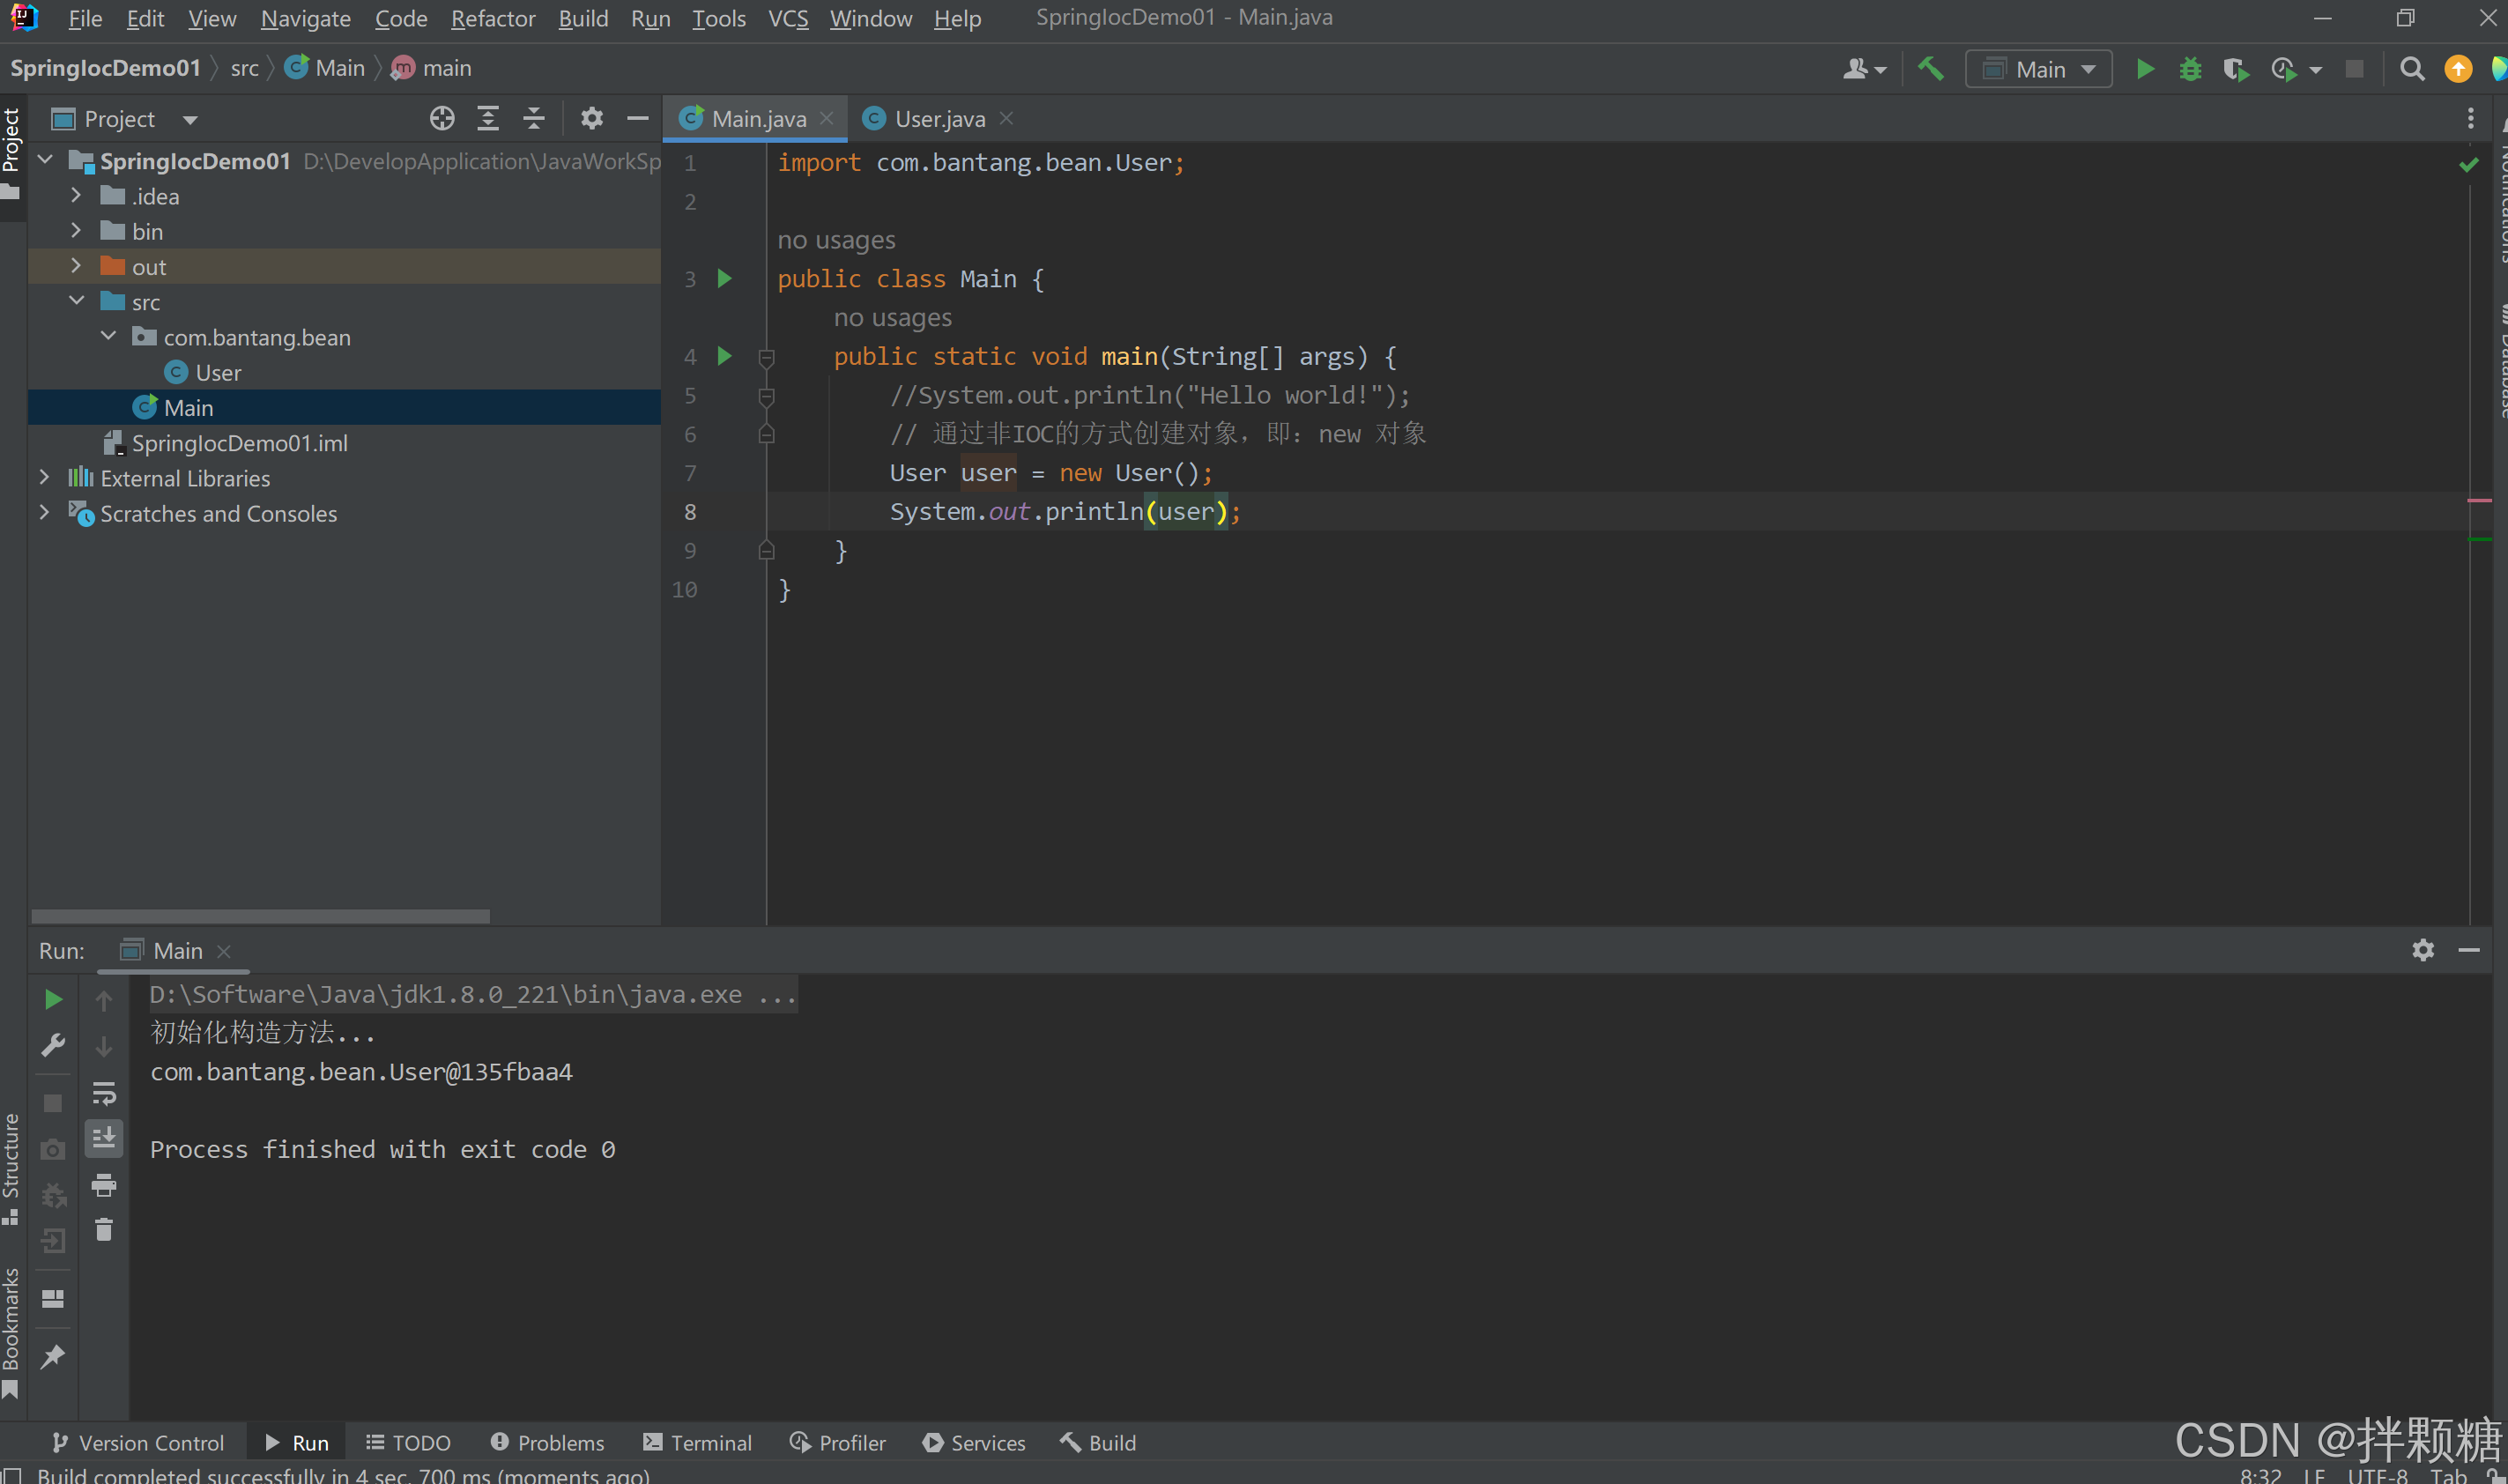
非容器的方式创建对象
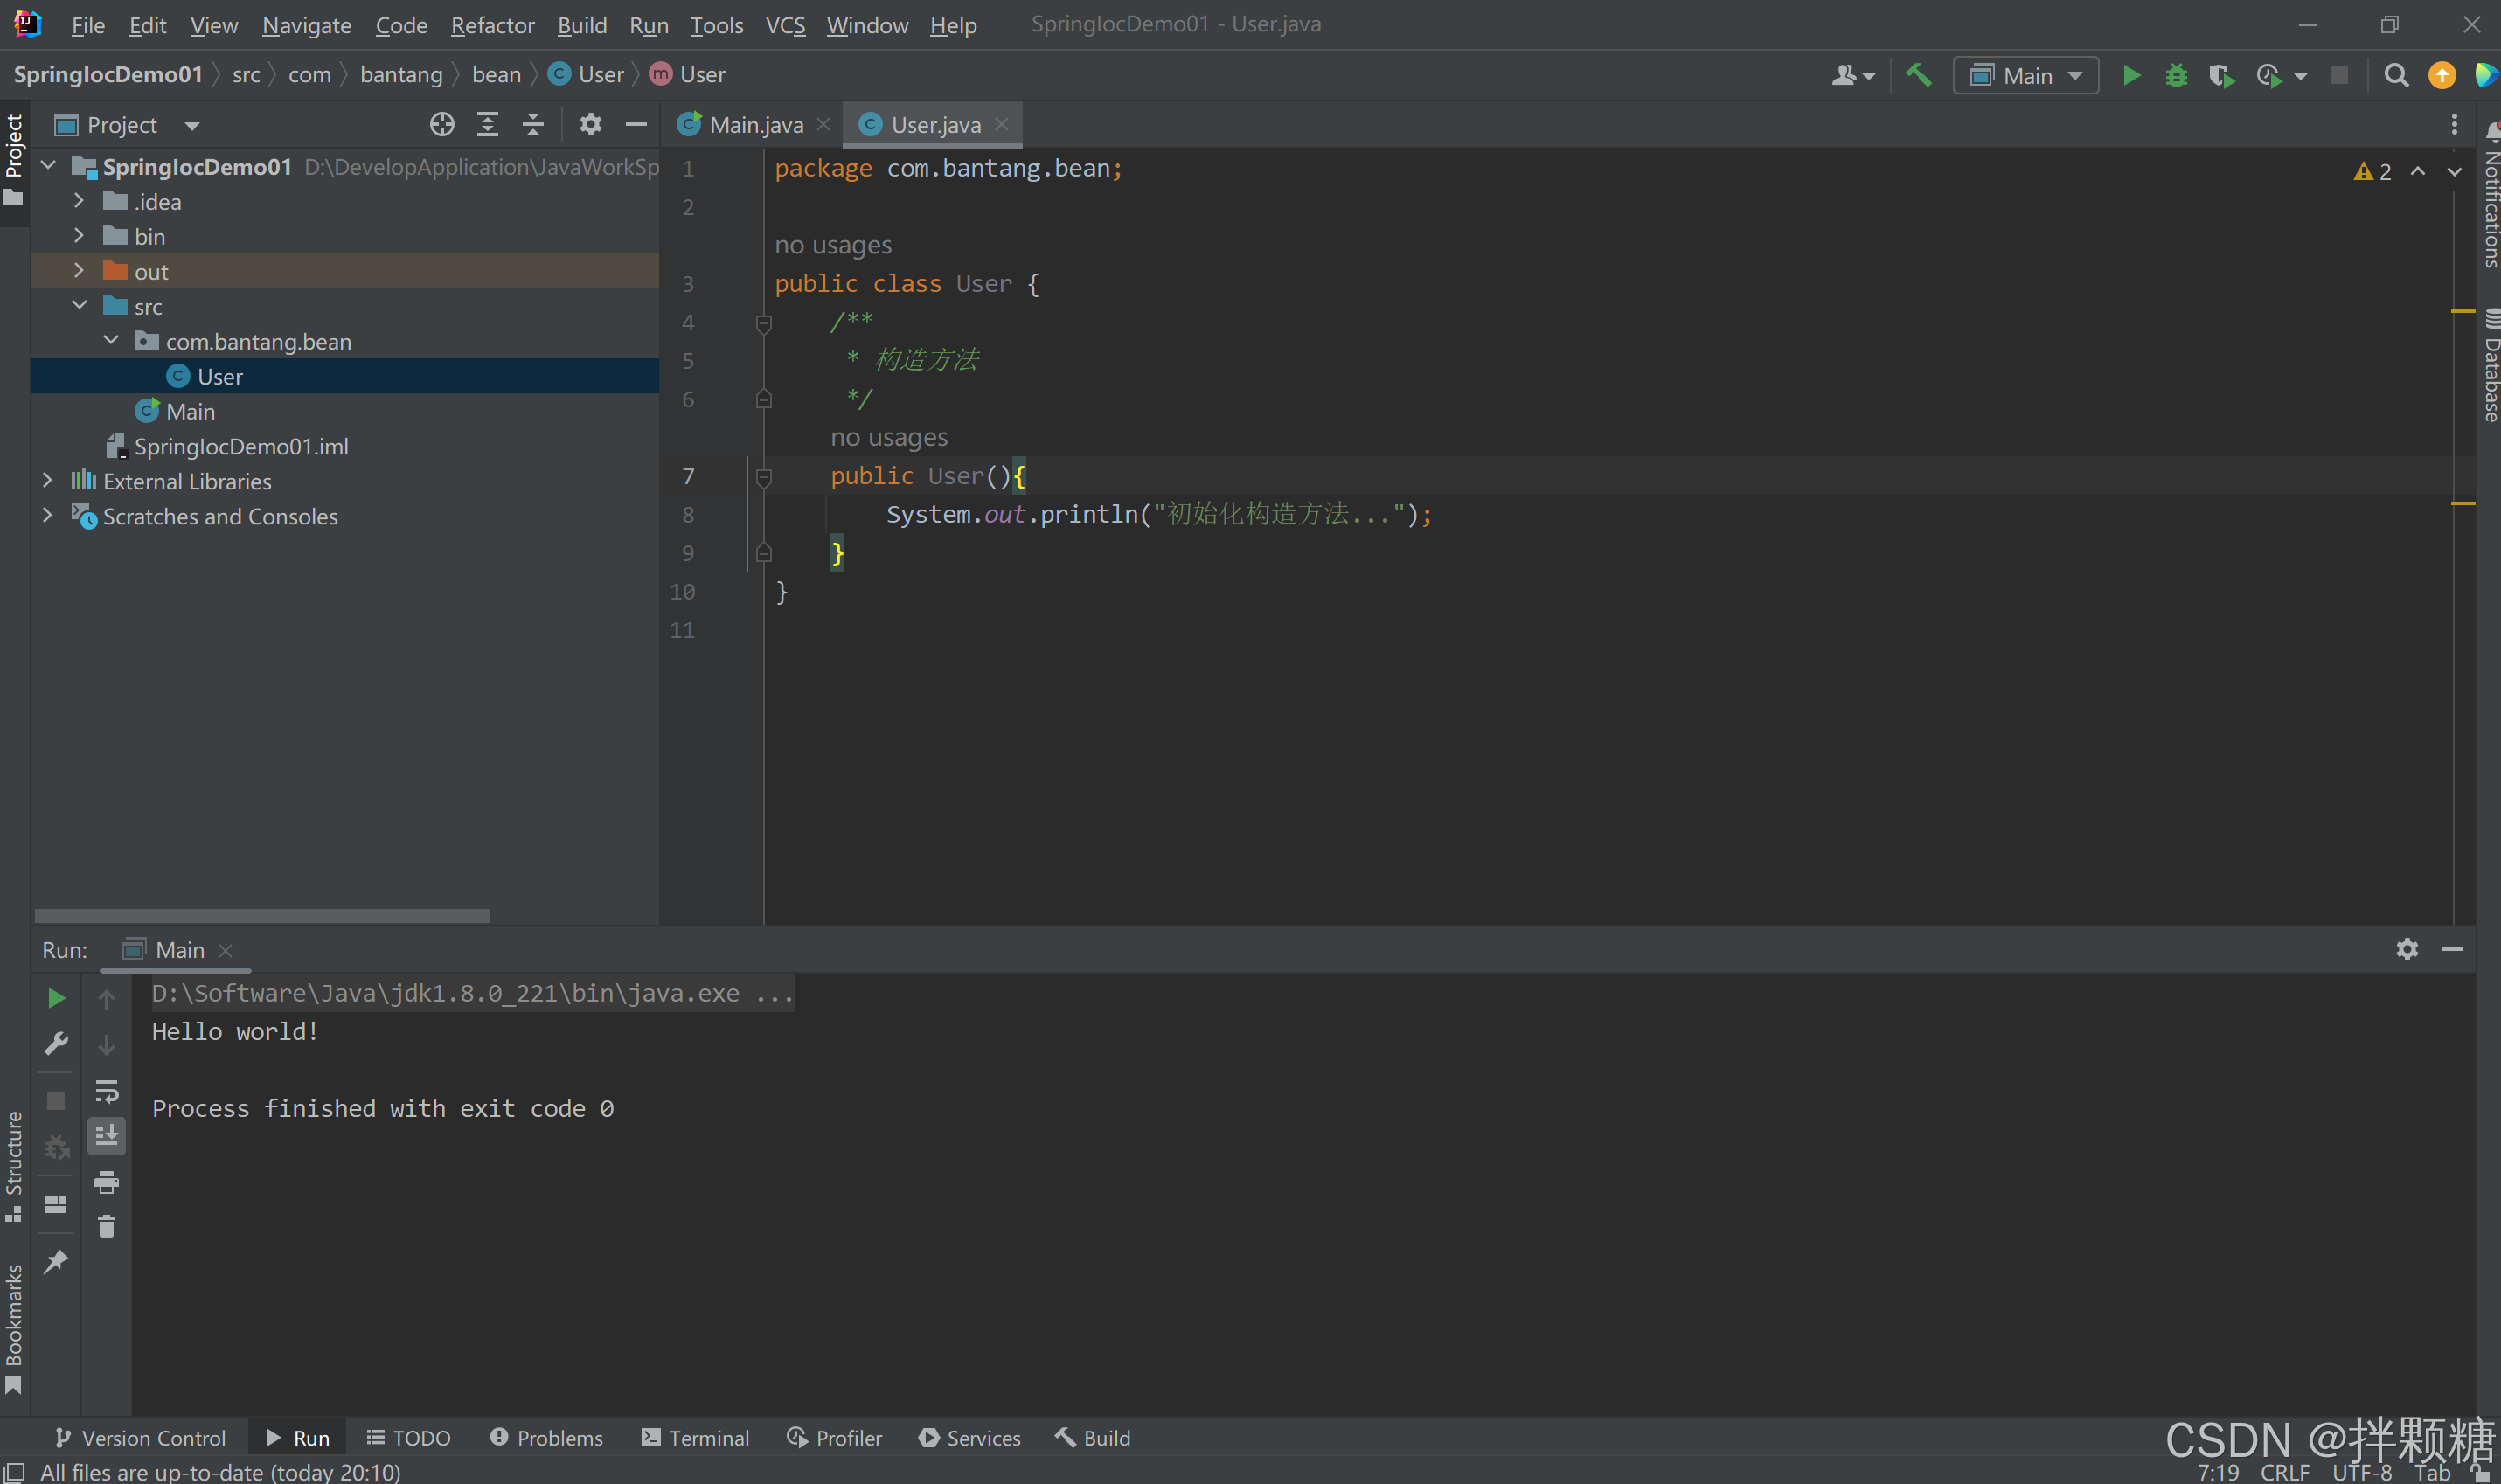
src目录下新建一个bean类

放一个初始化构造方法
注意哈,Idea自带了很多功能强大的快捷代码,如“sout”、“psvm”、“var”等,通过一个视频演示下
psvm快捷代码
var快捷代码
sout快捷代码
如果不用容器,我们要使用其他对象,是不是需要自己去new呀,就像酱
使用容器创建对象
创建IOC容器
容器就是xml配置文件
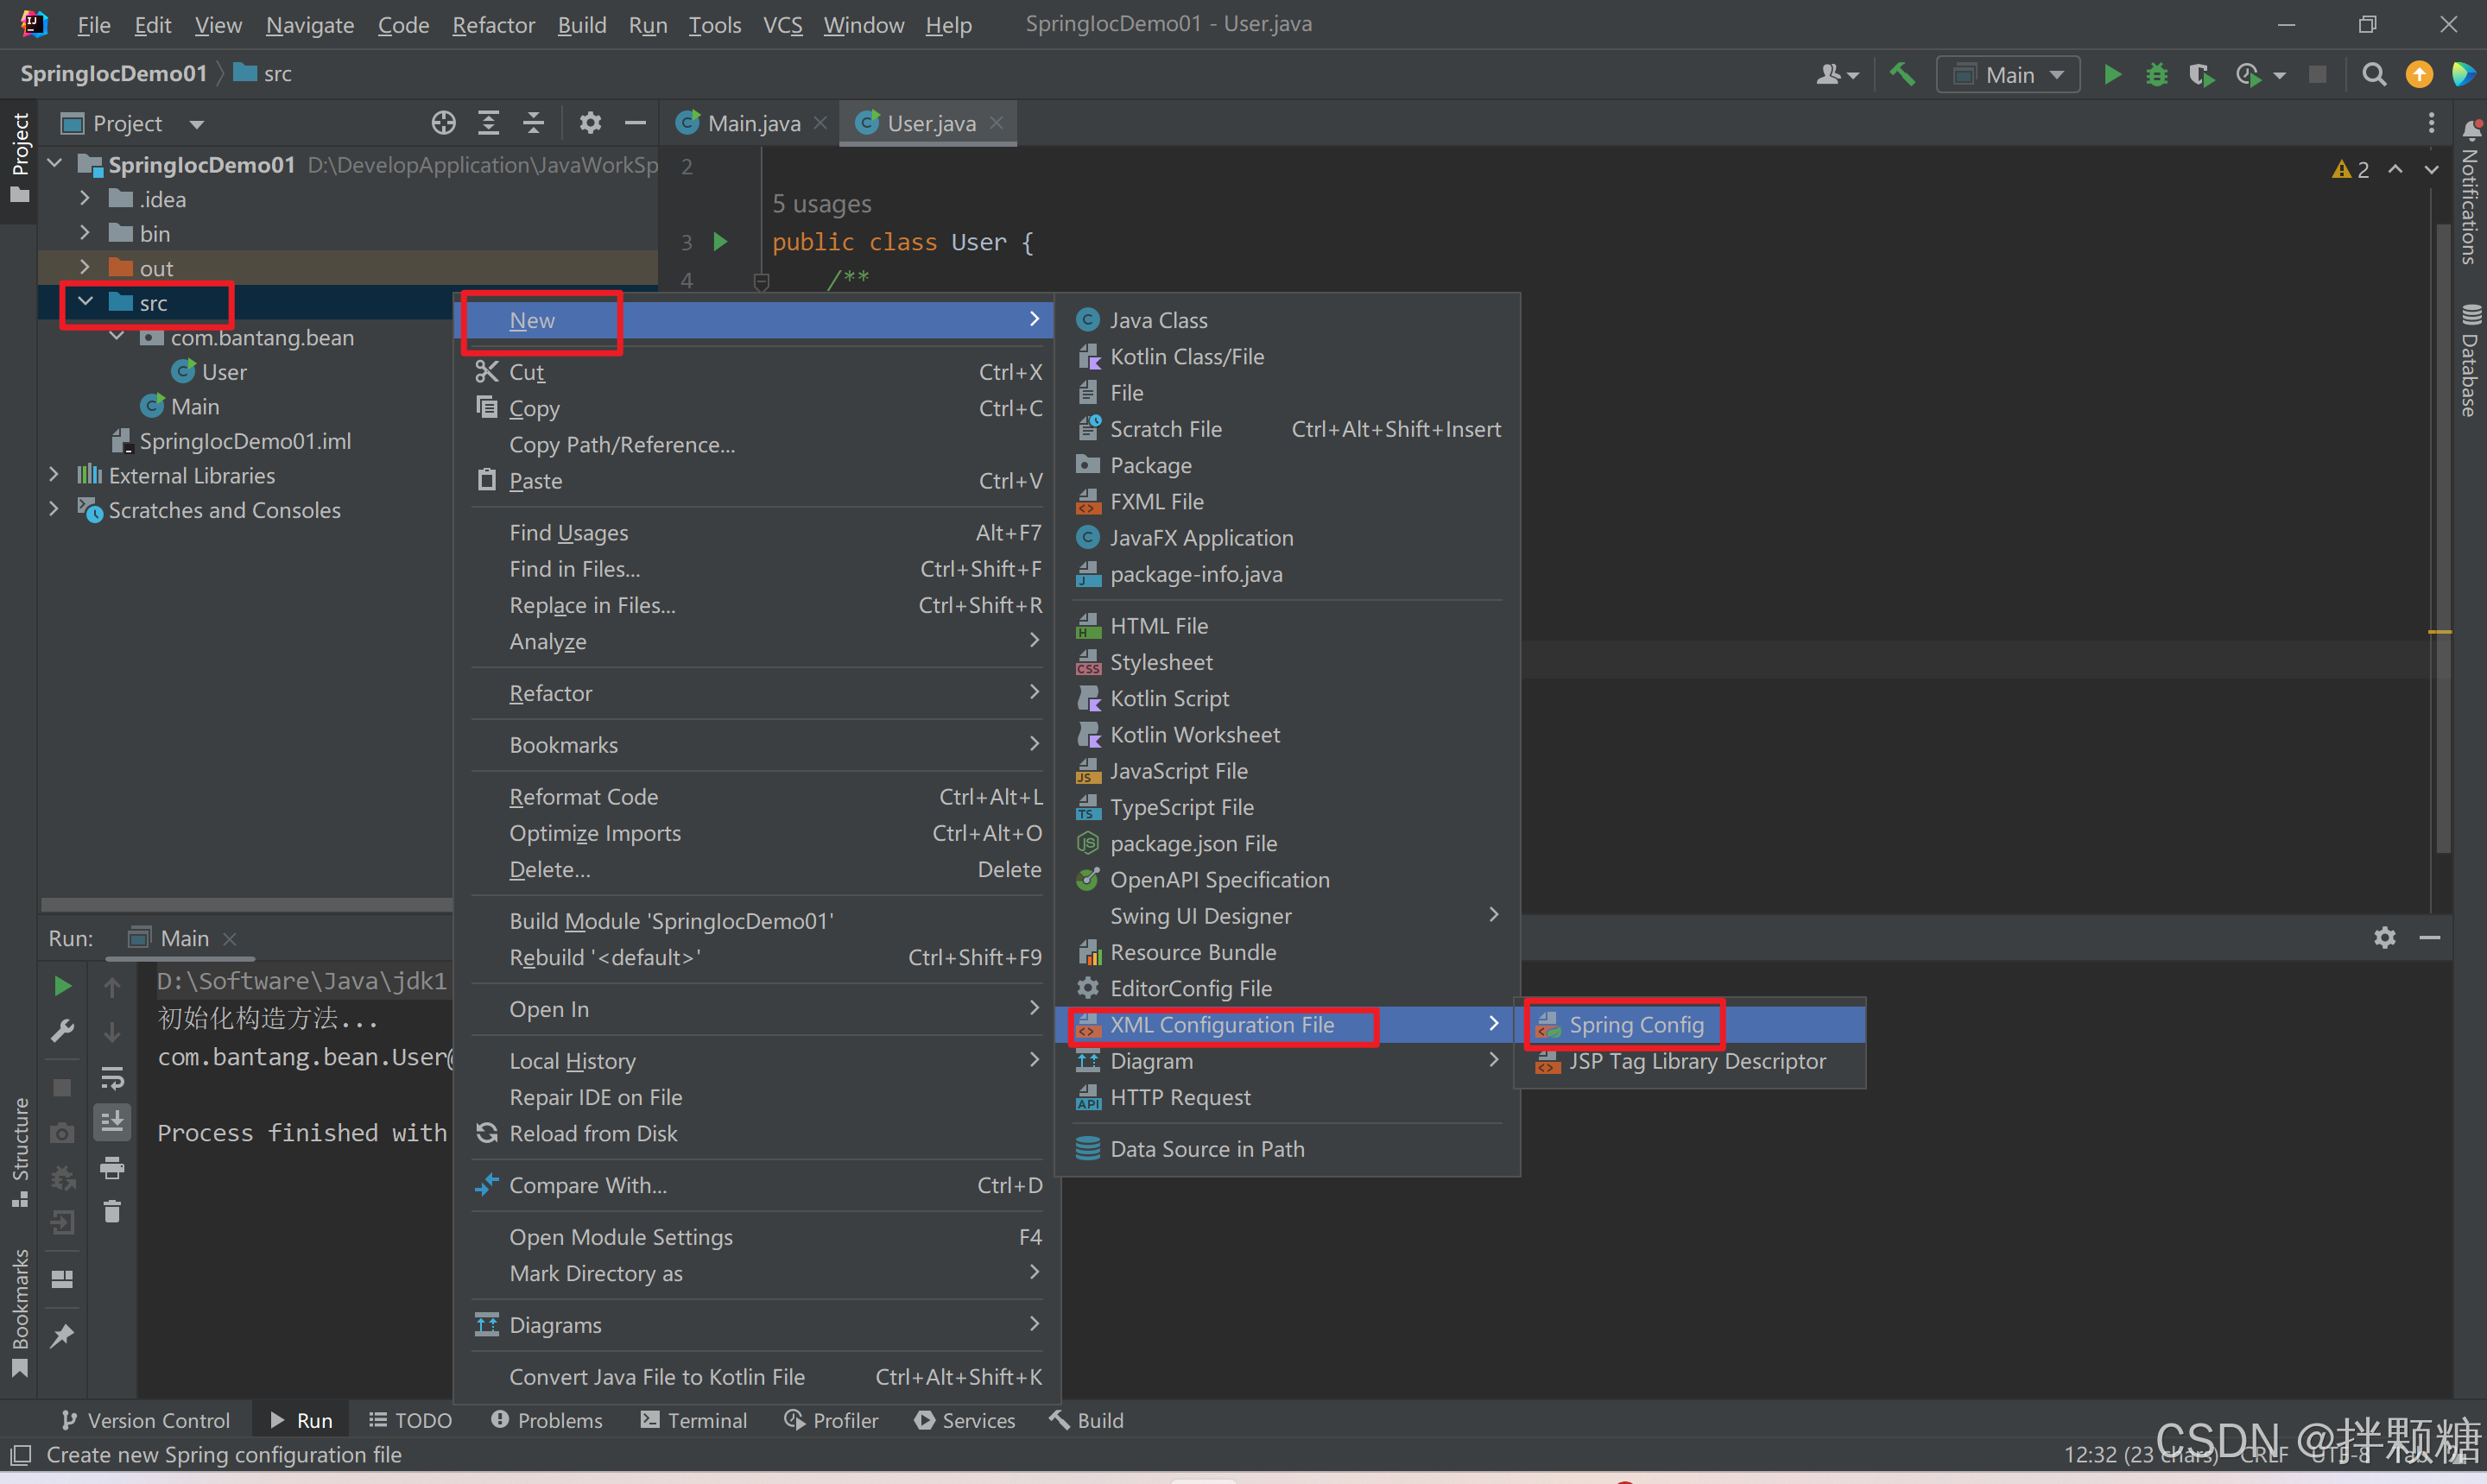
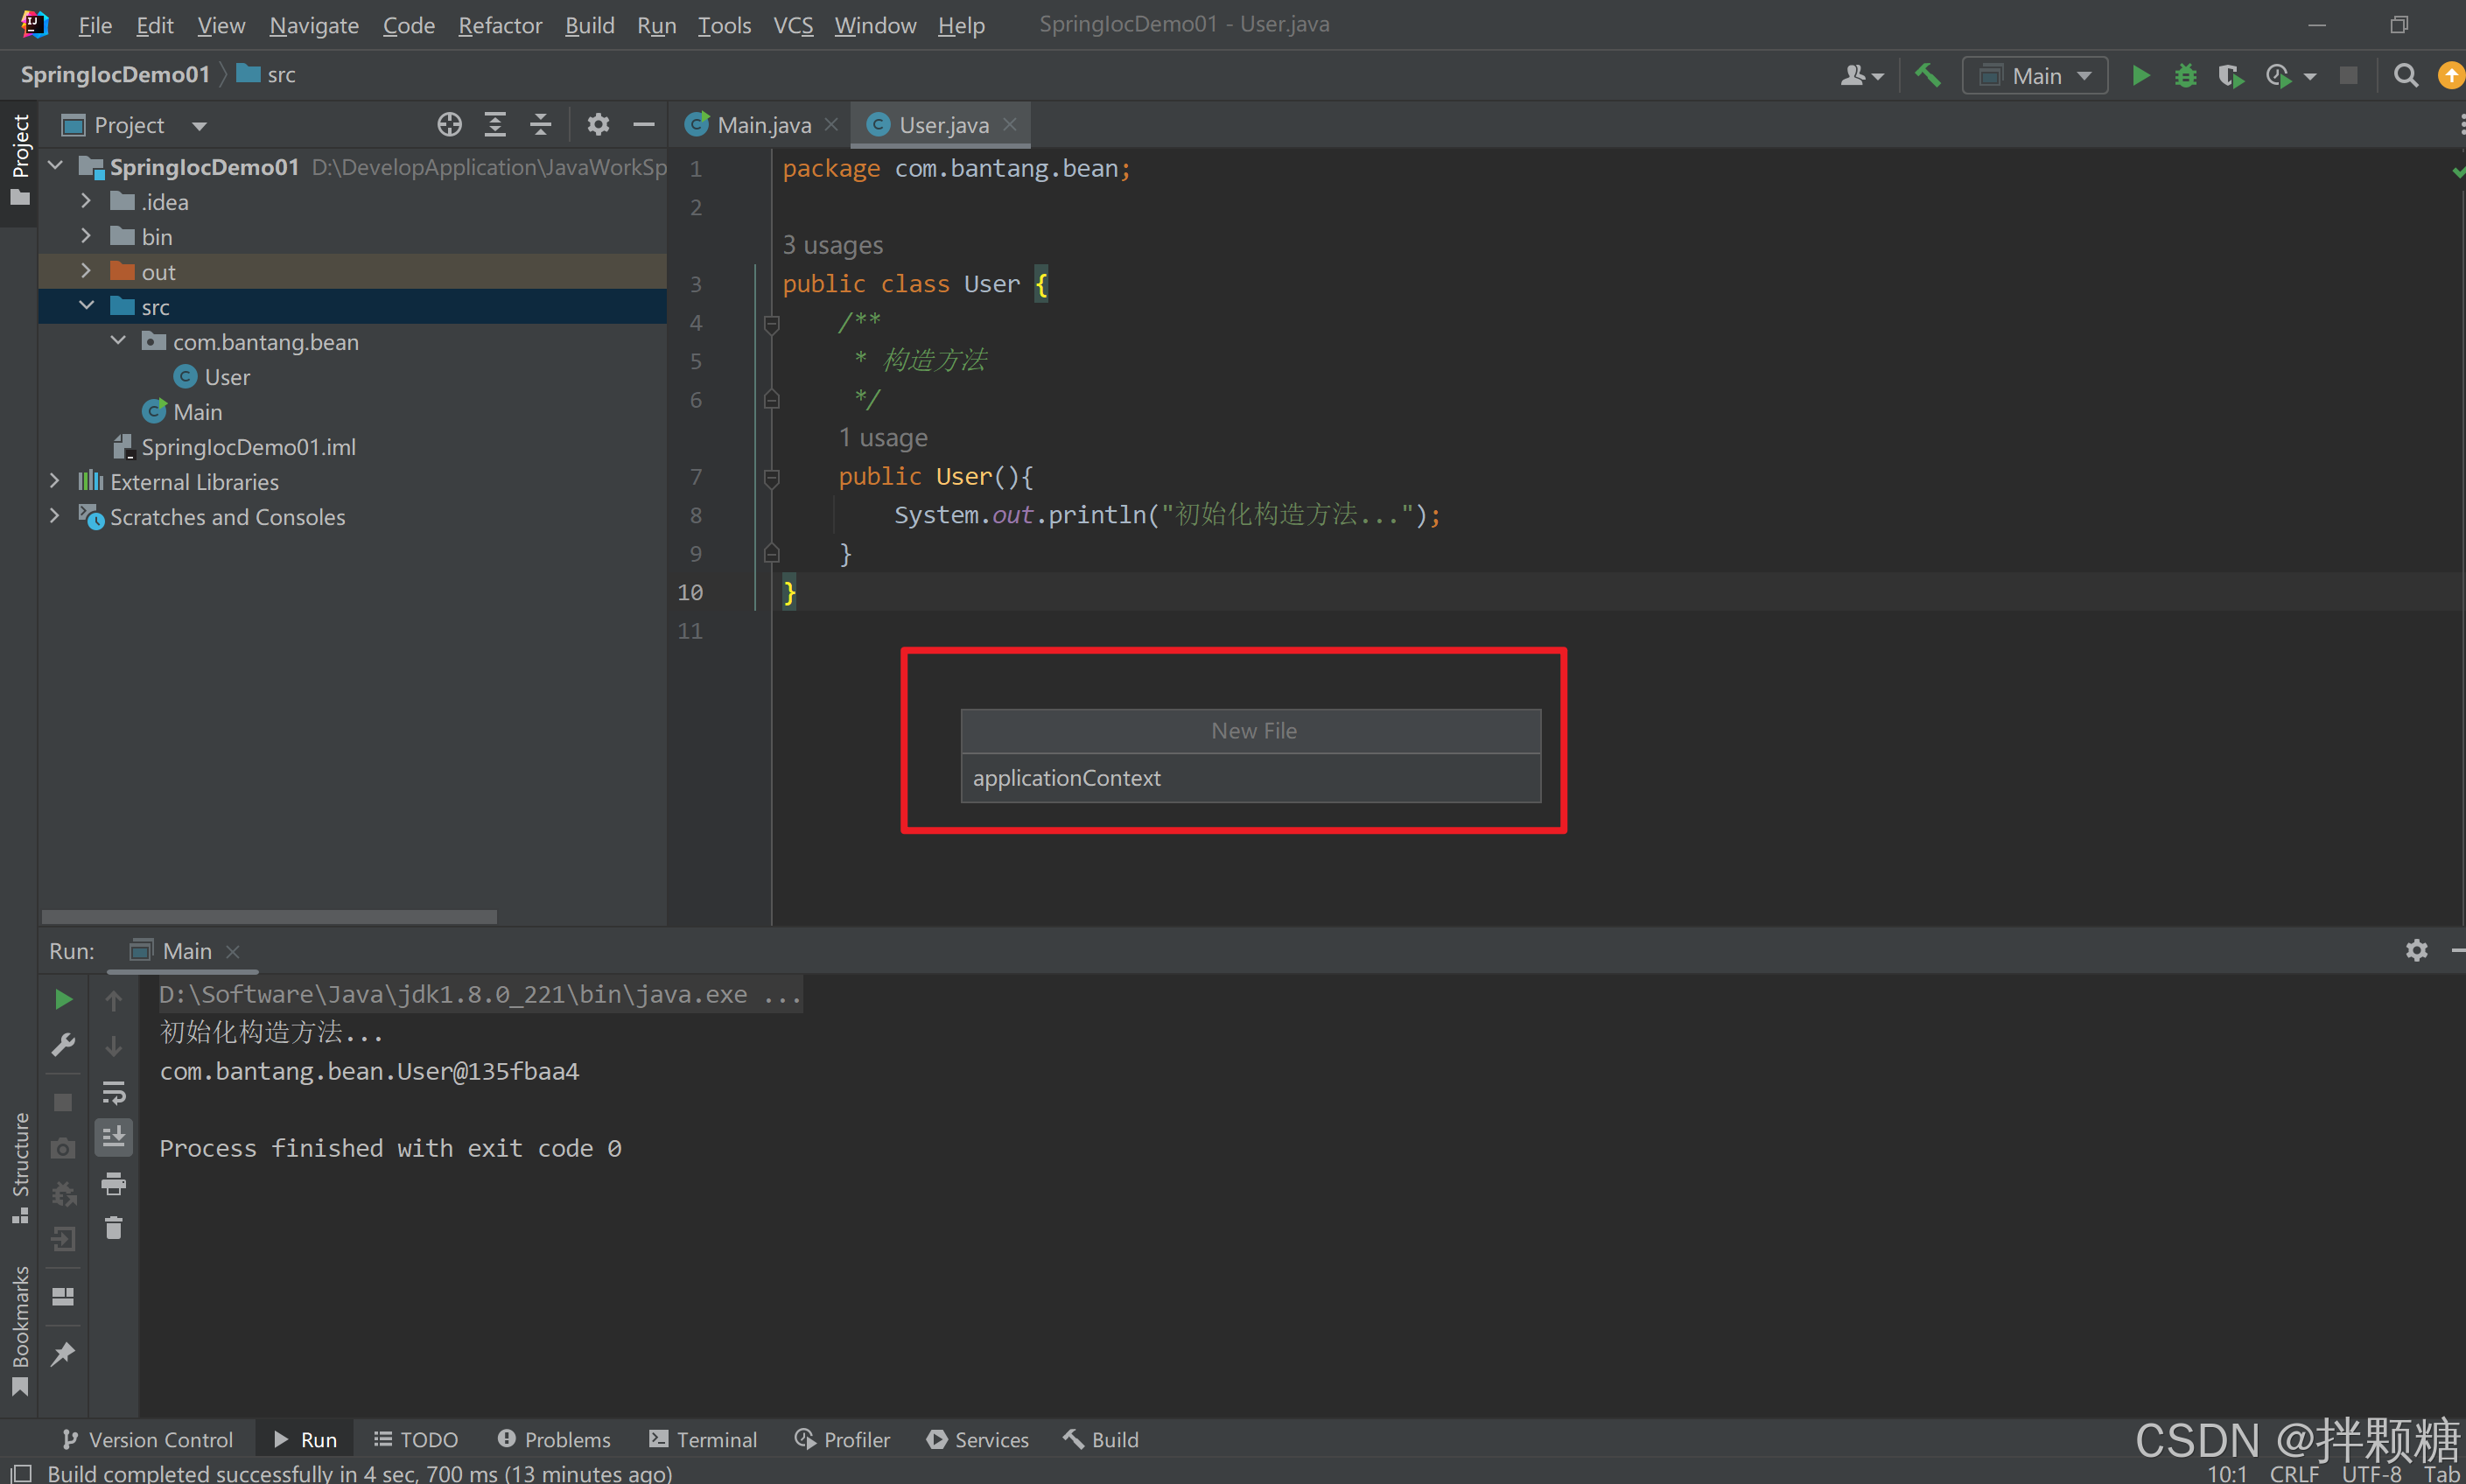
创建好的容器是酱
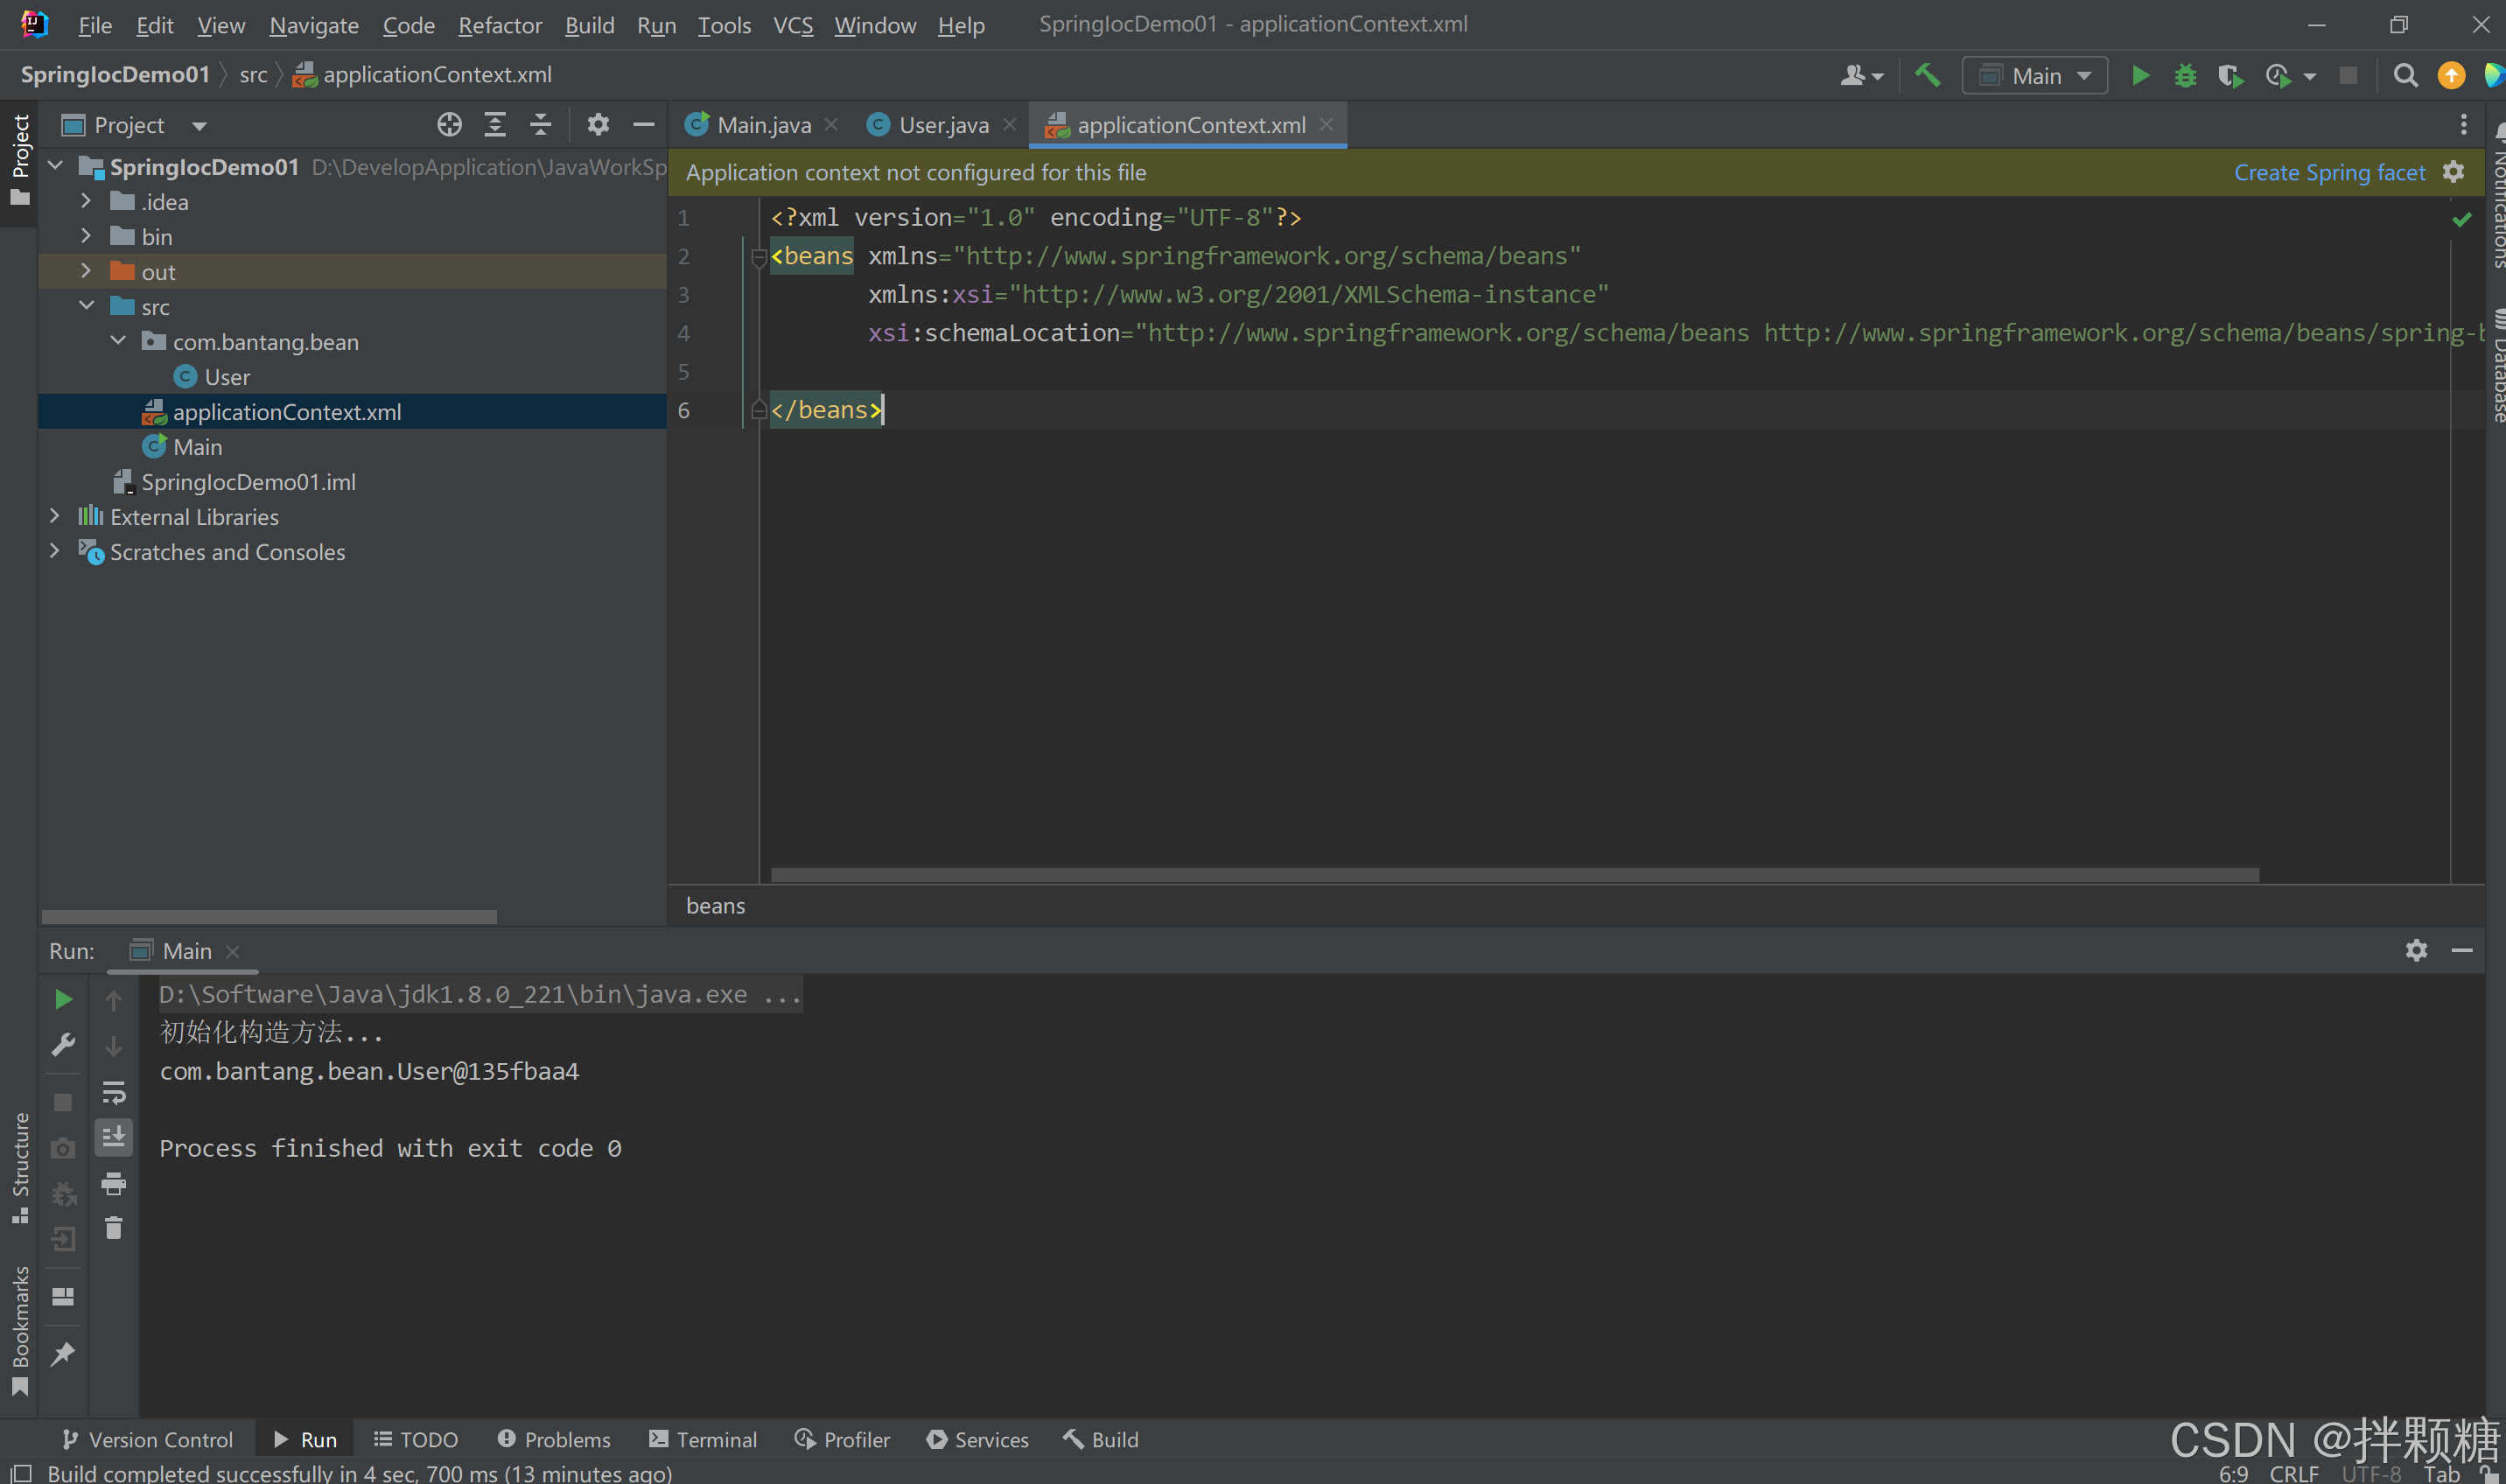
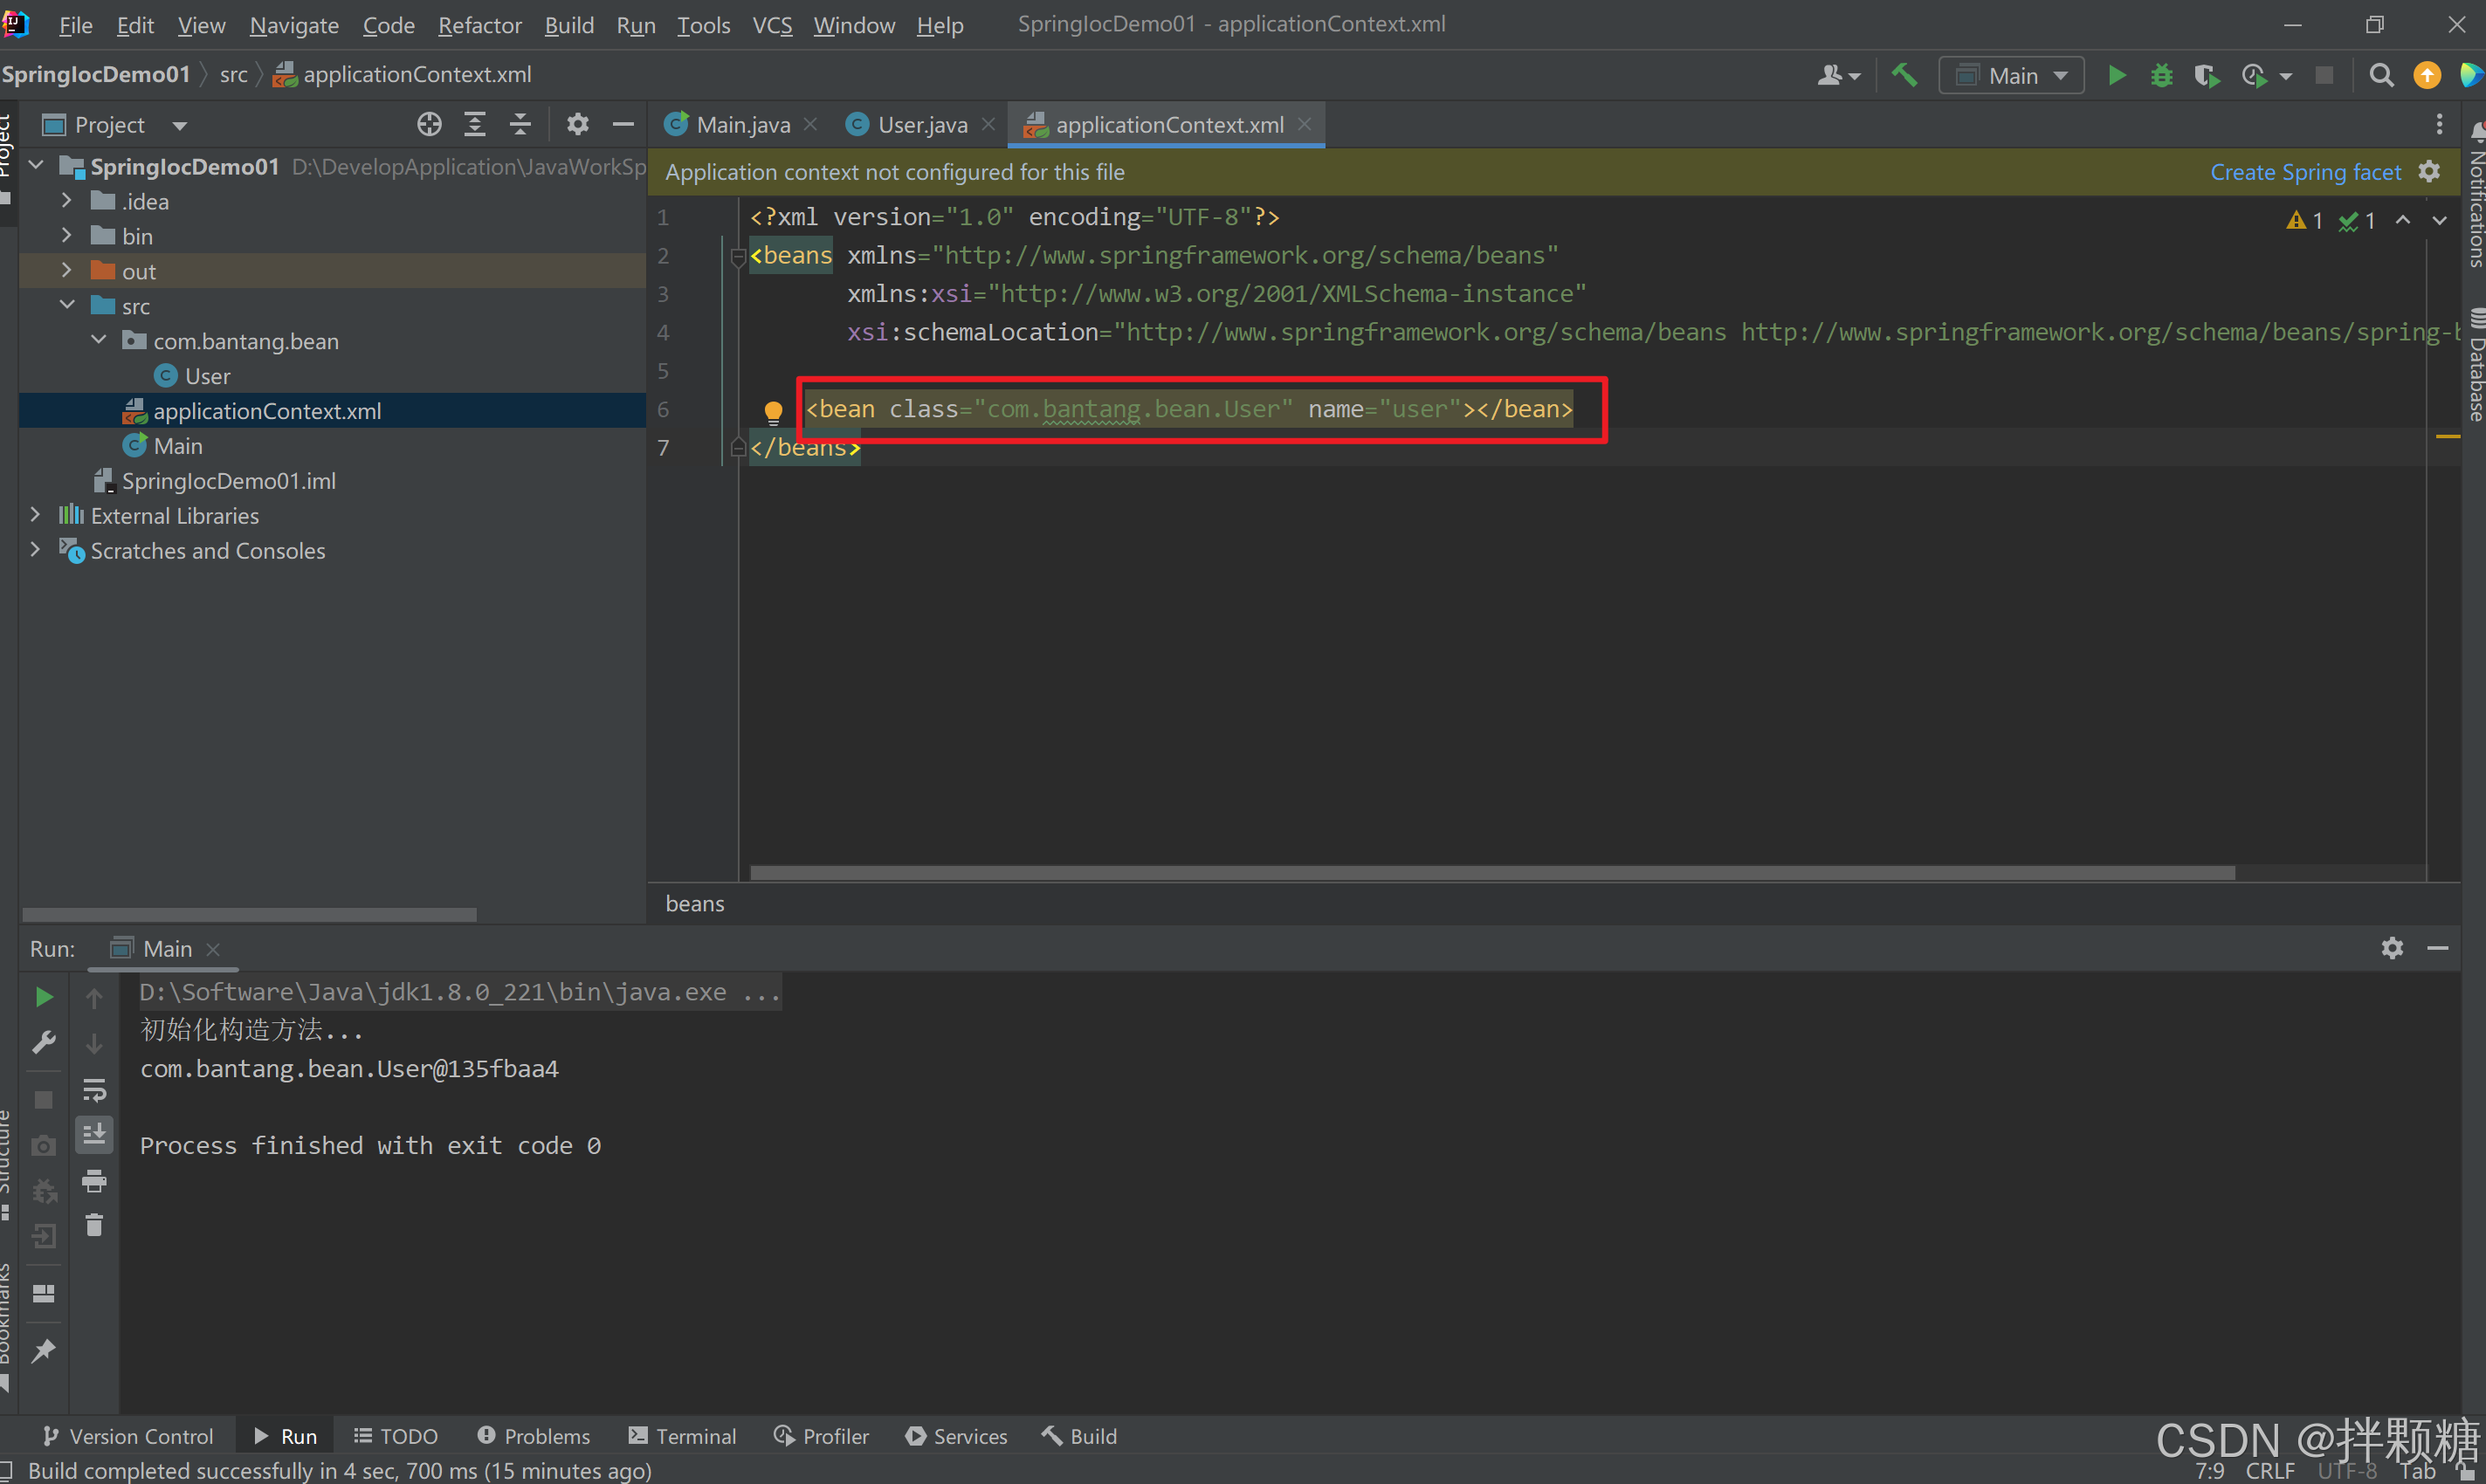
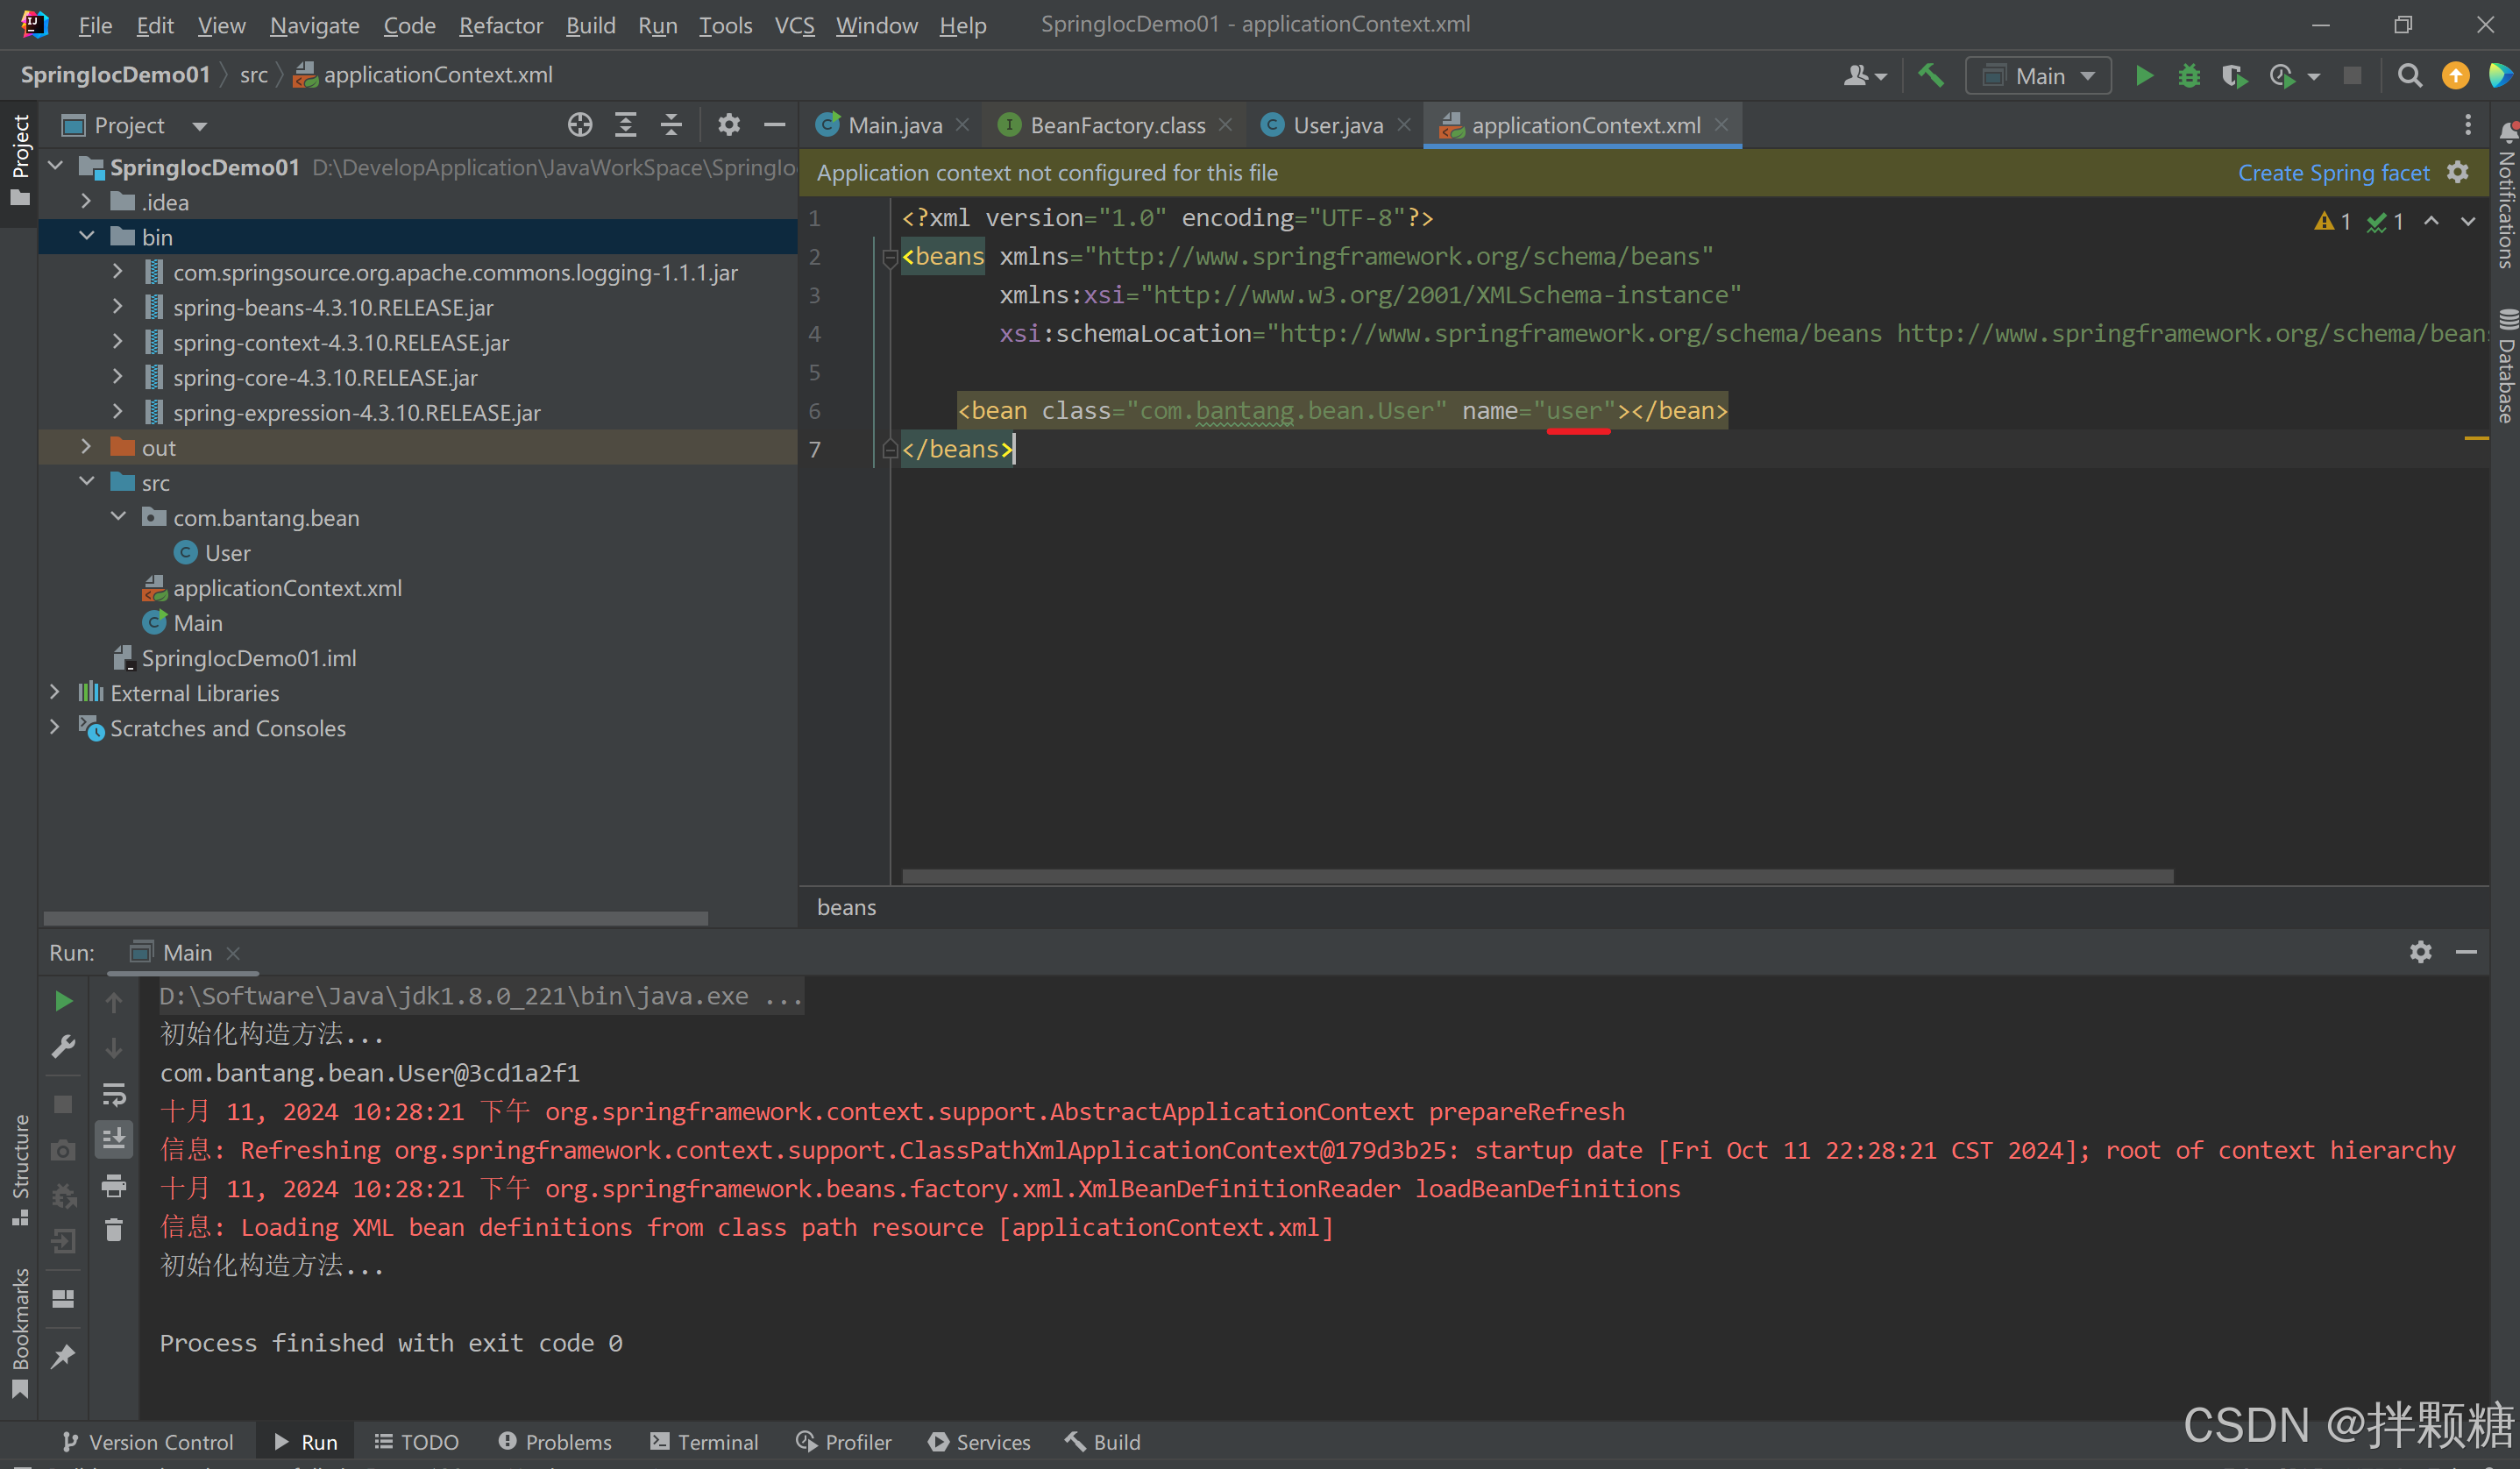
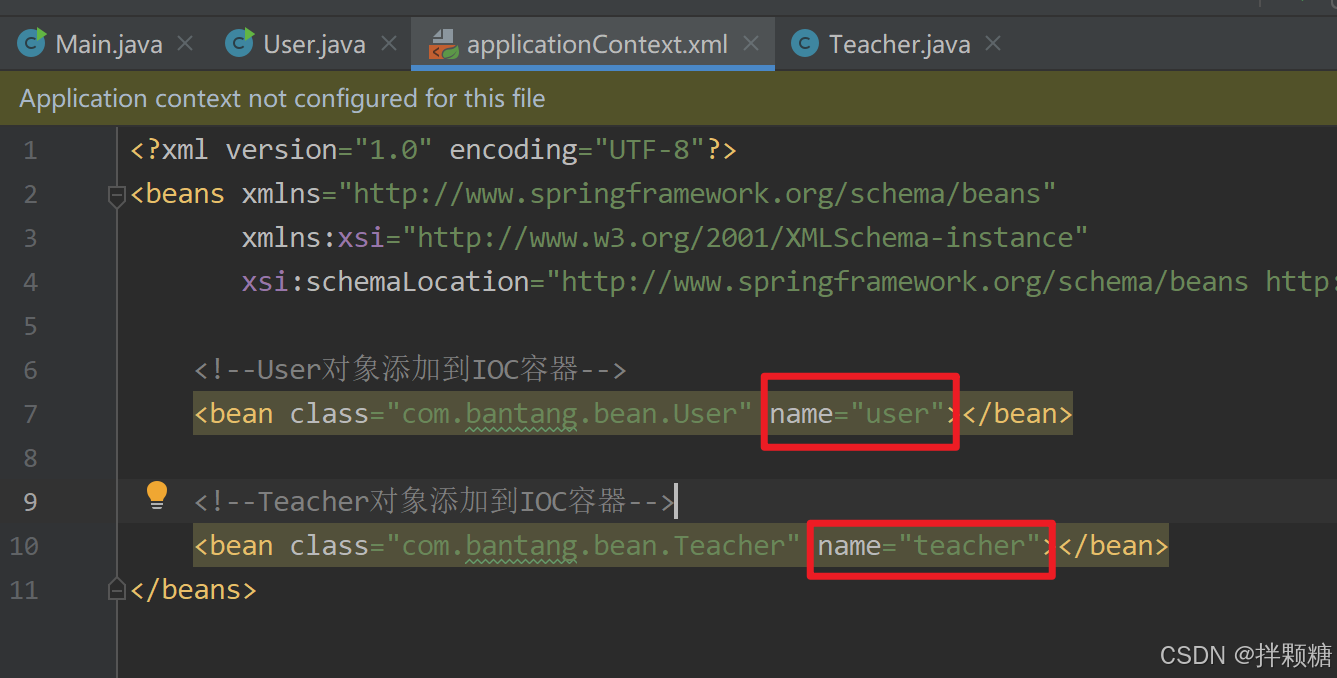
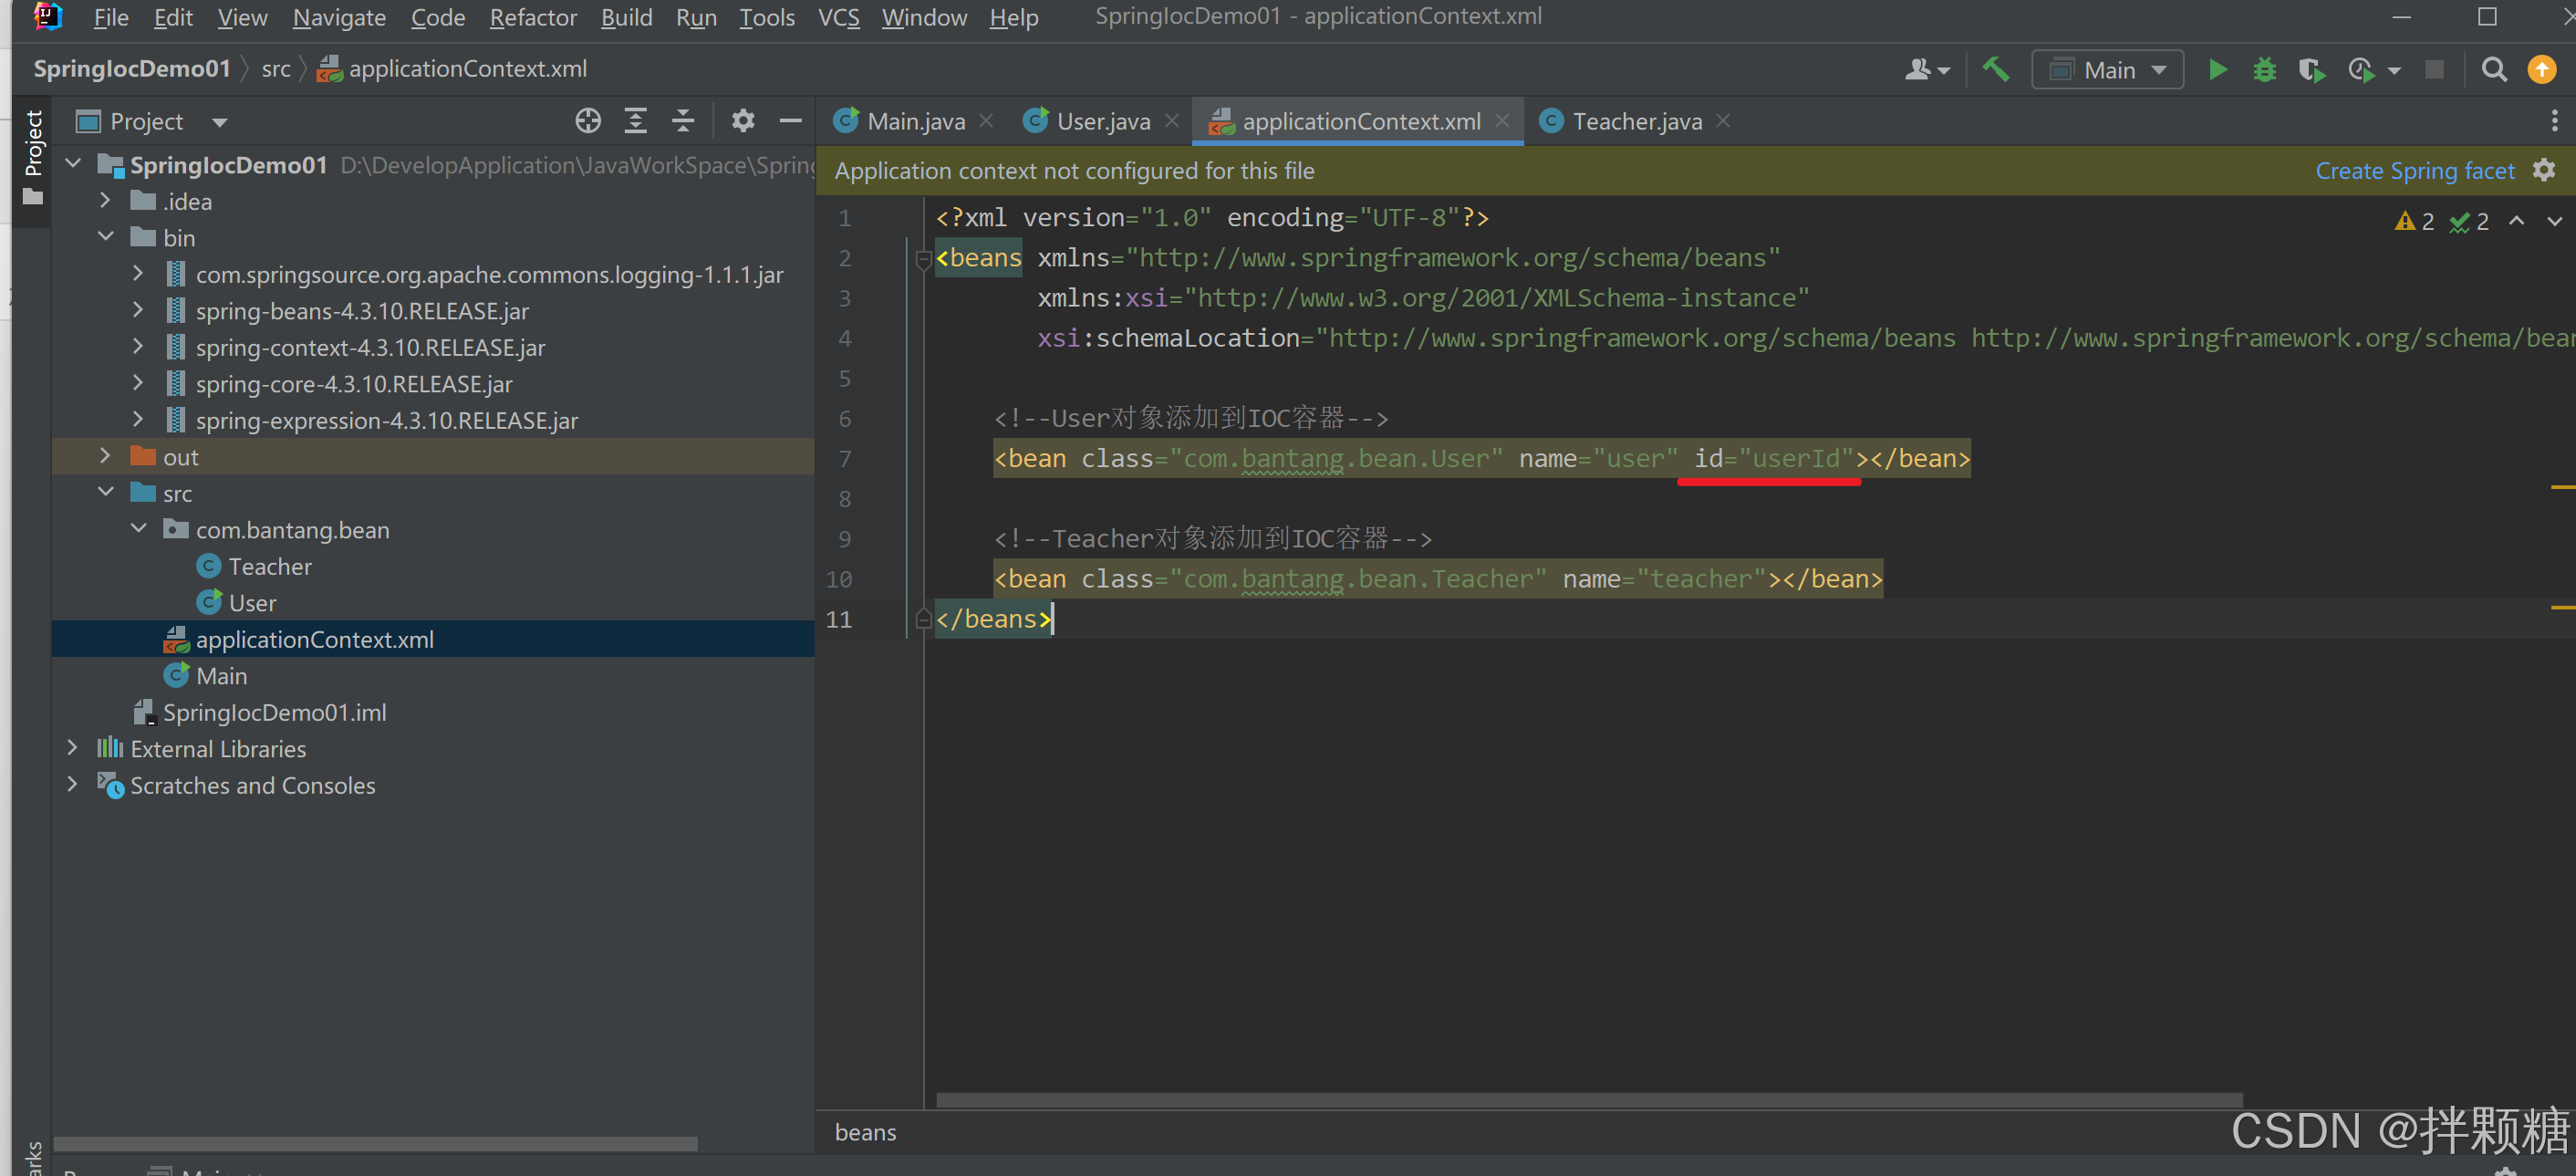
把对象添加到IOC容器
<bean class="com.bantang.bean.User" name="user"></bean>
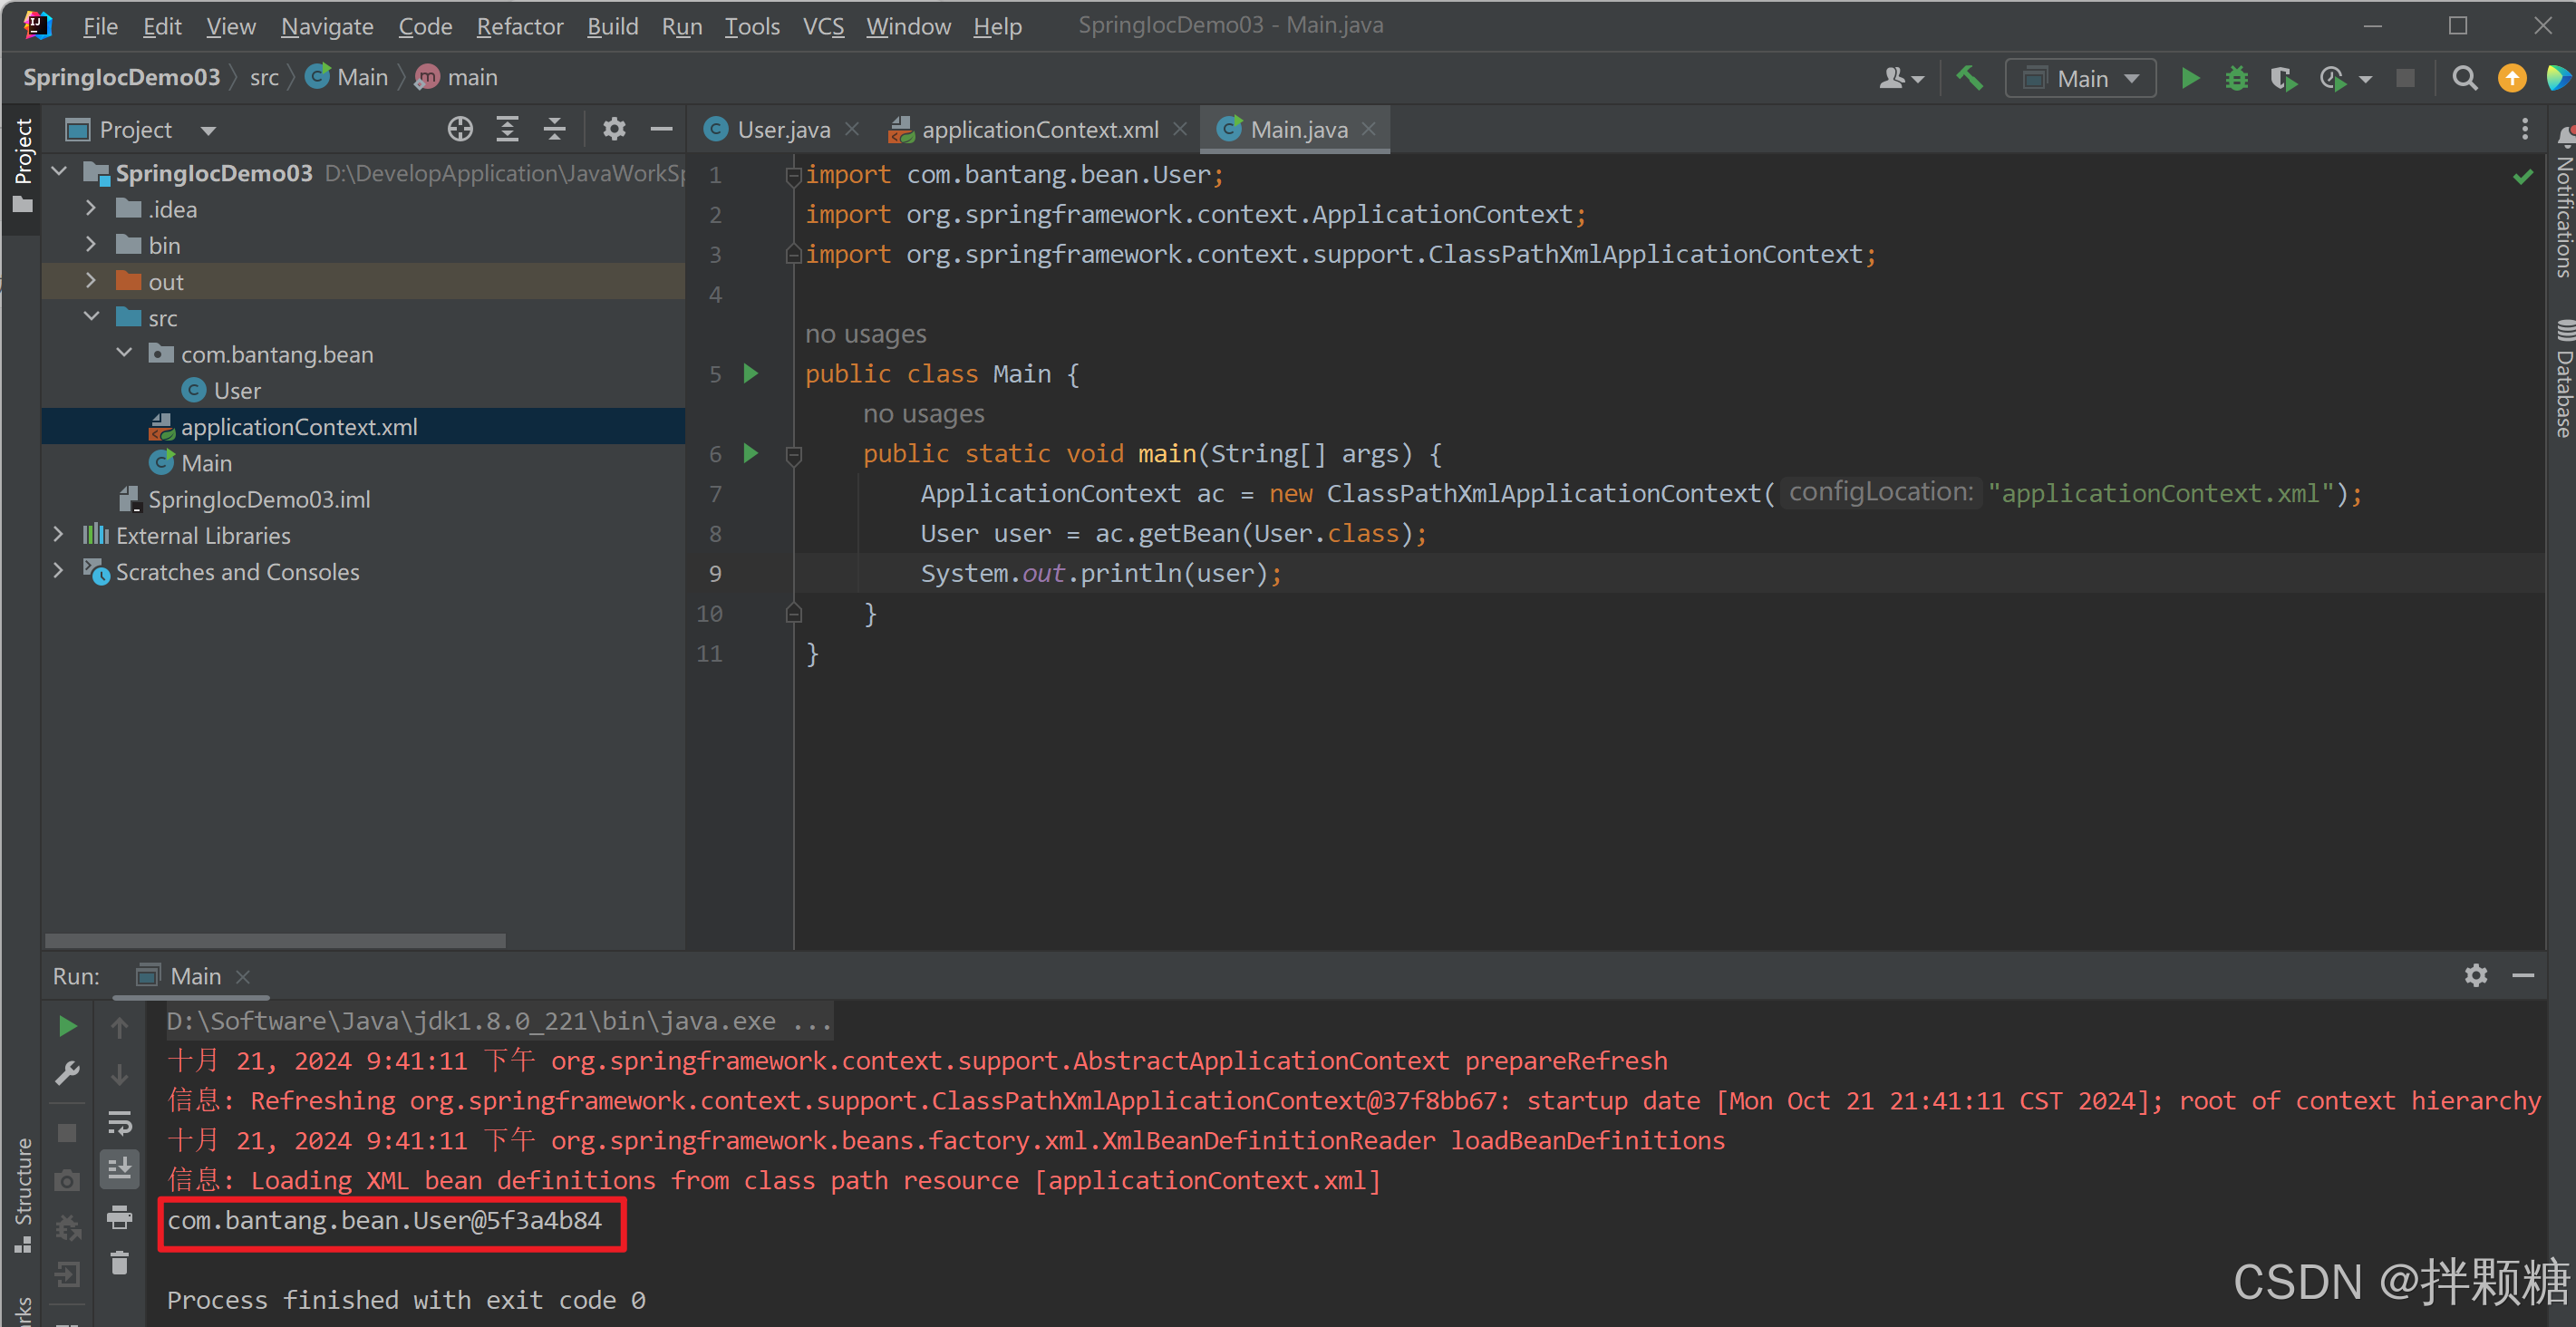
代码实现从容器获取对象
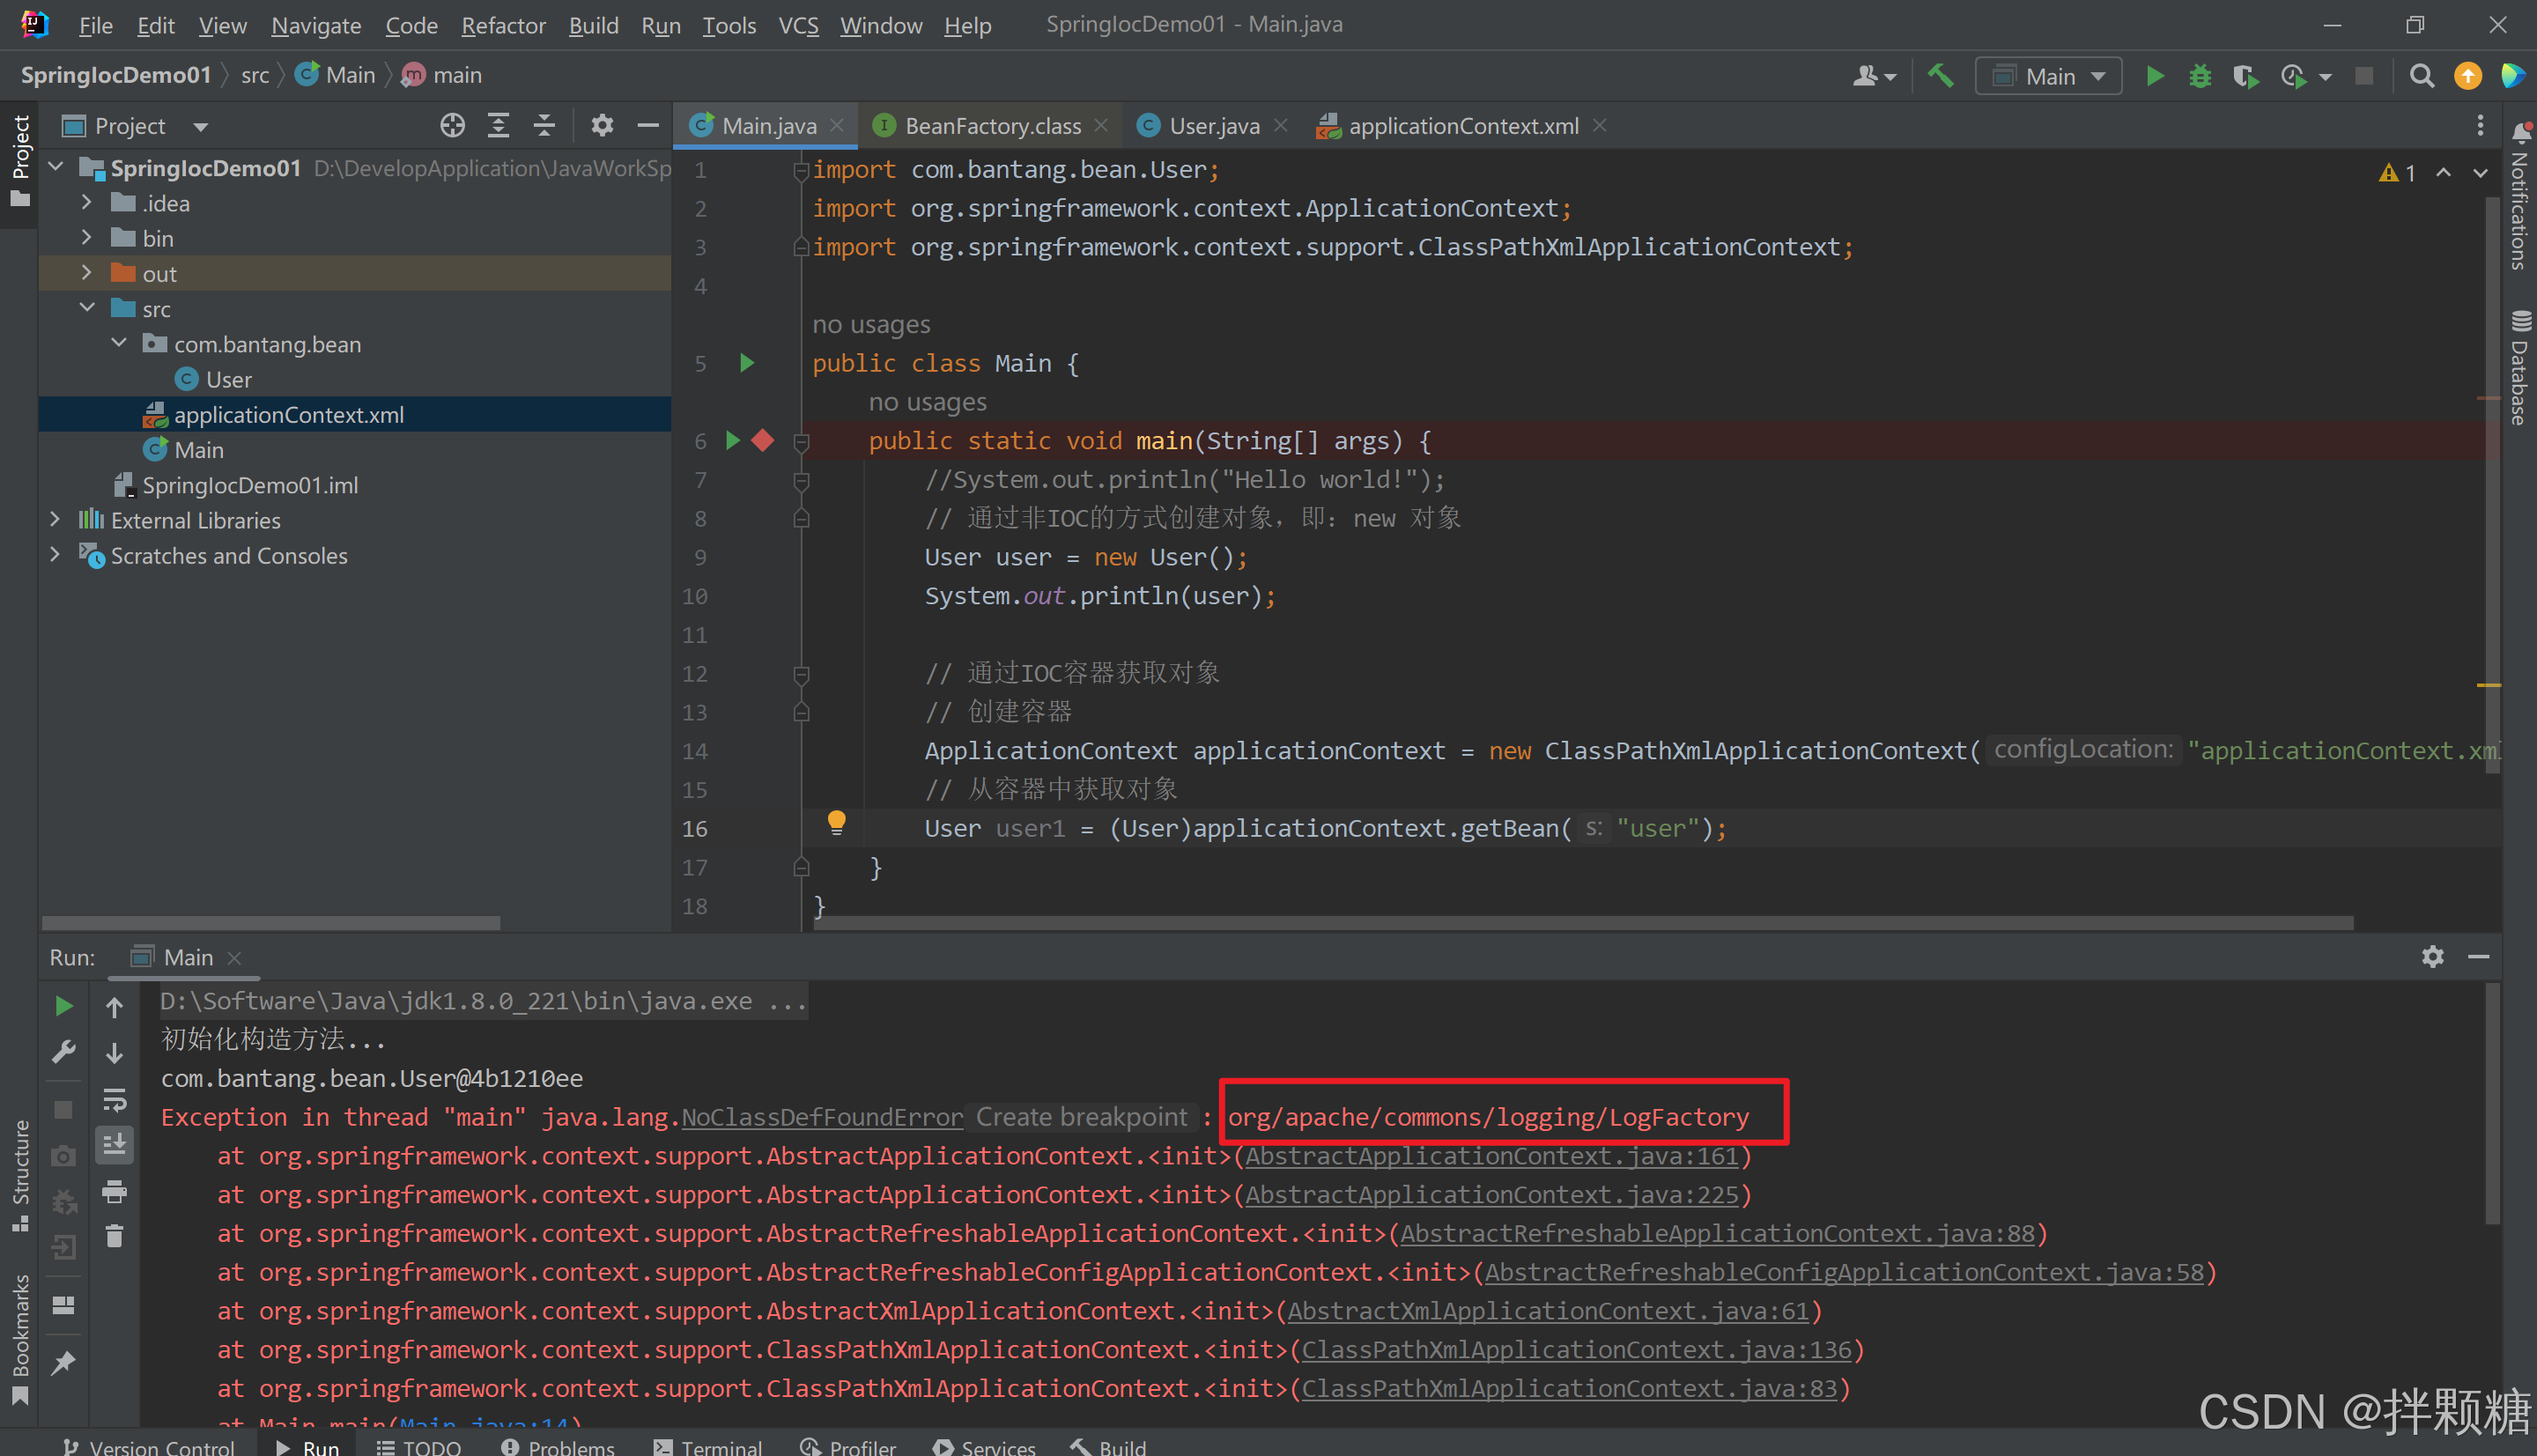
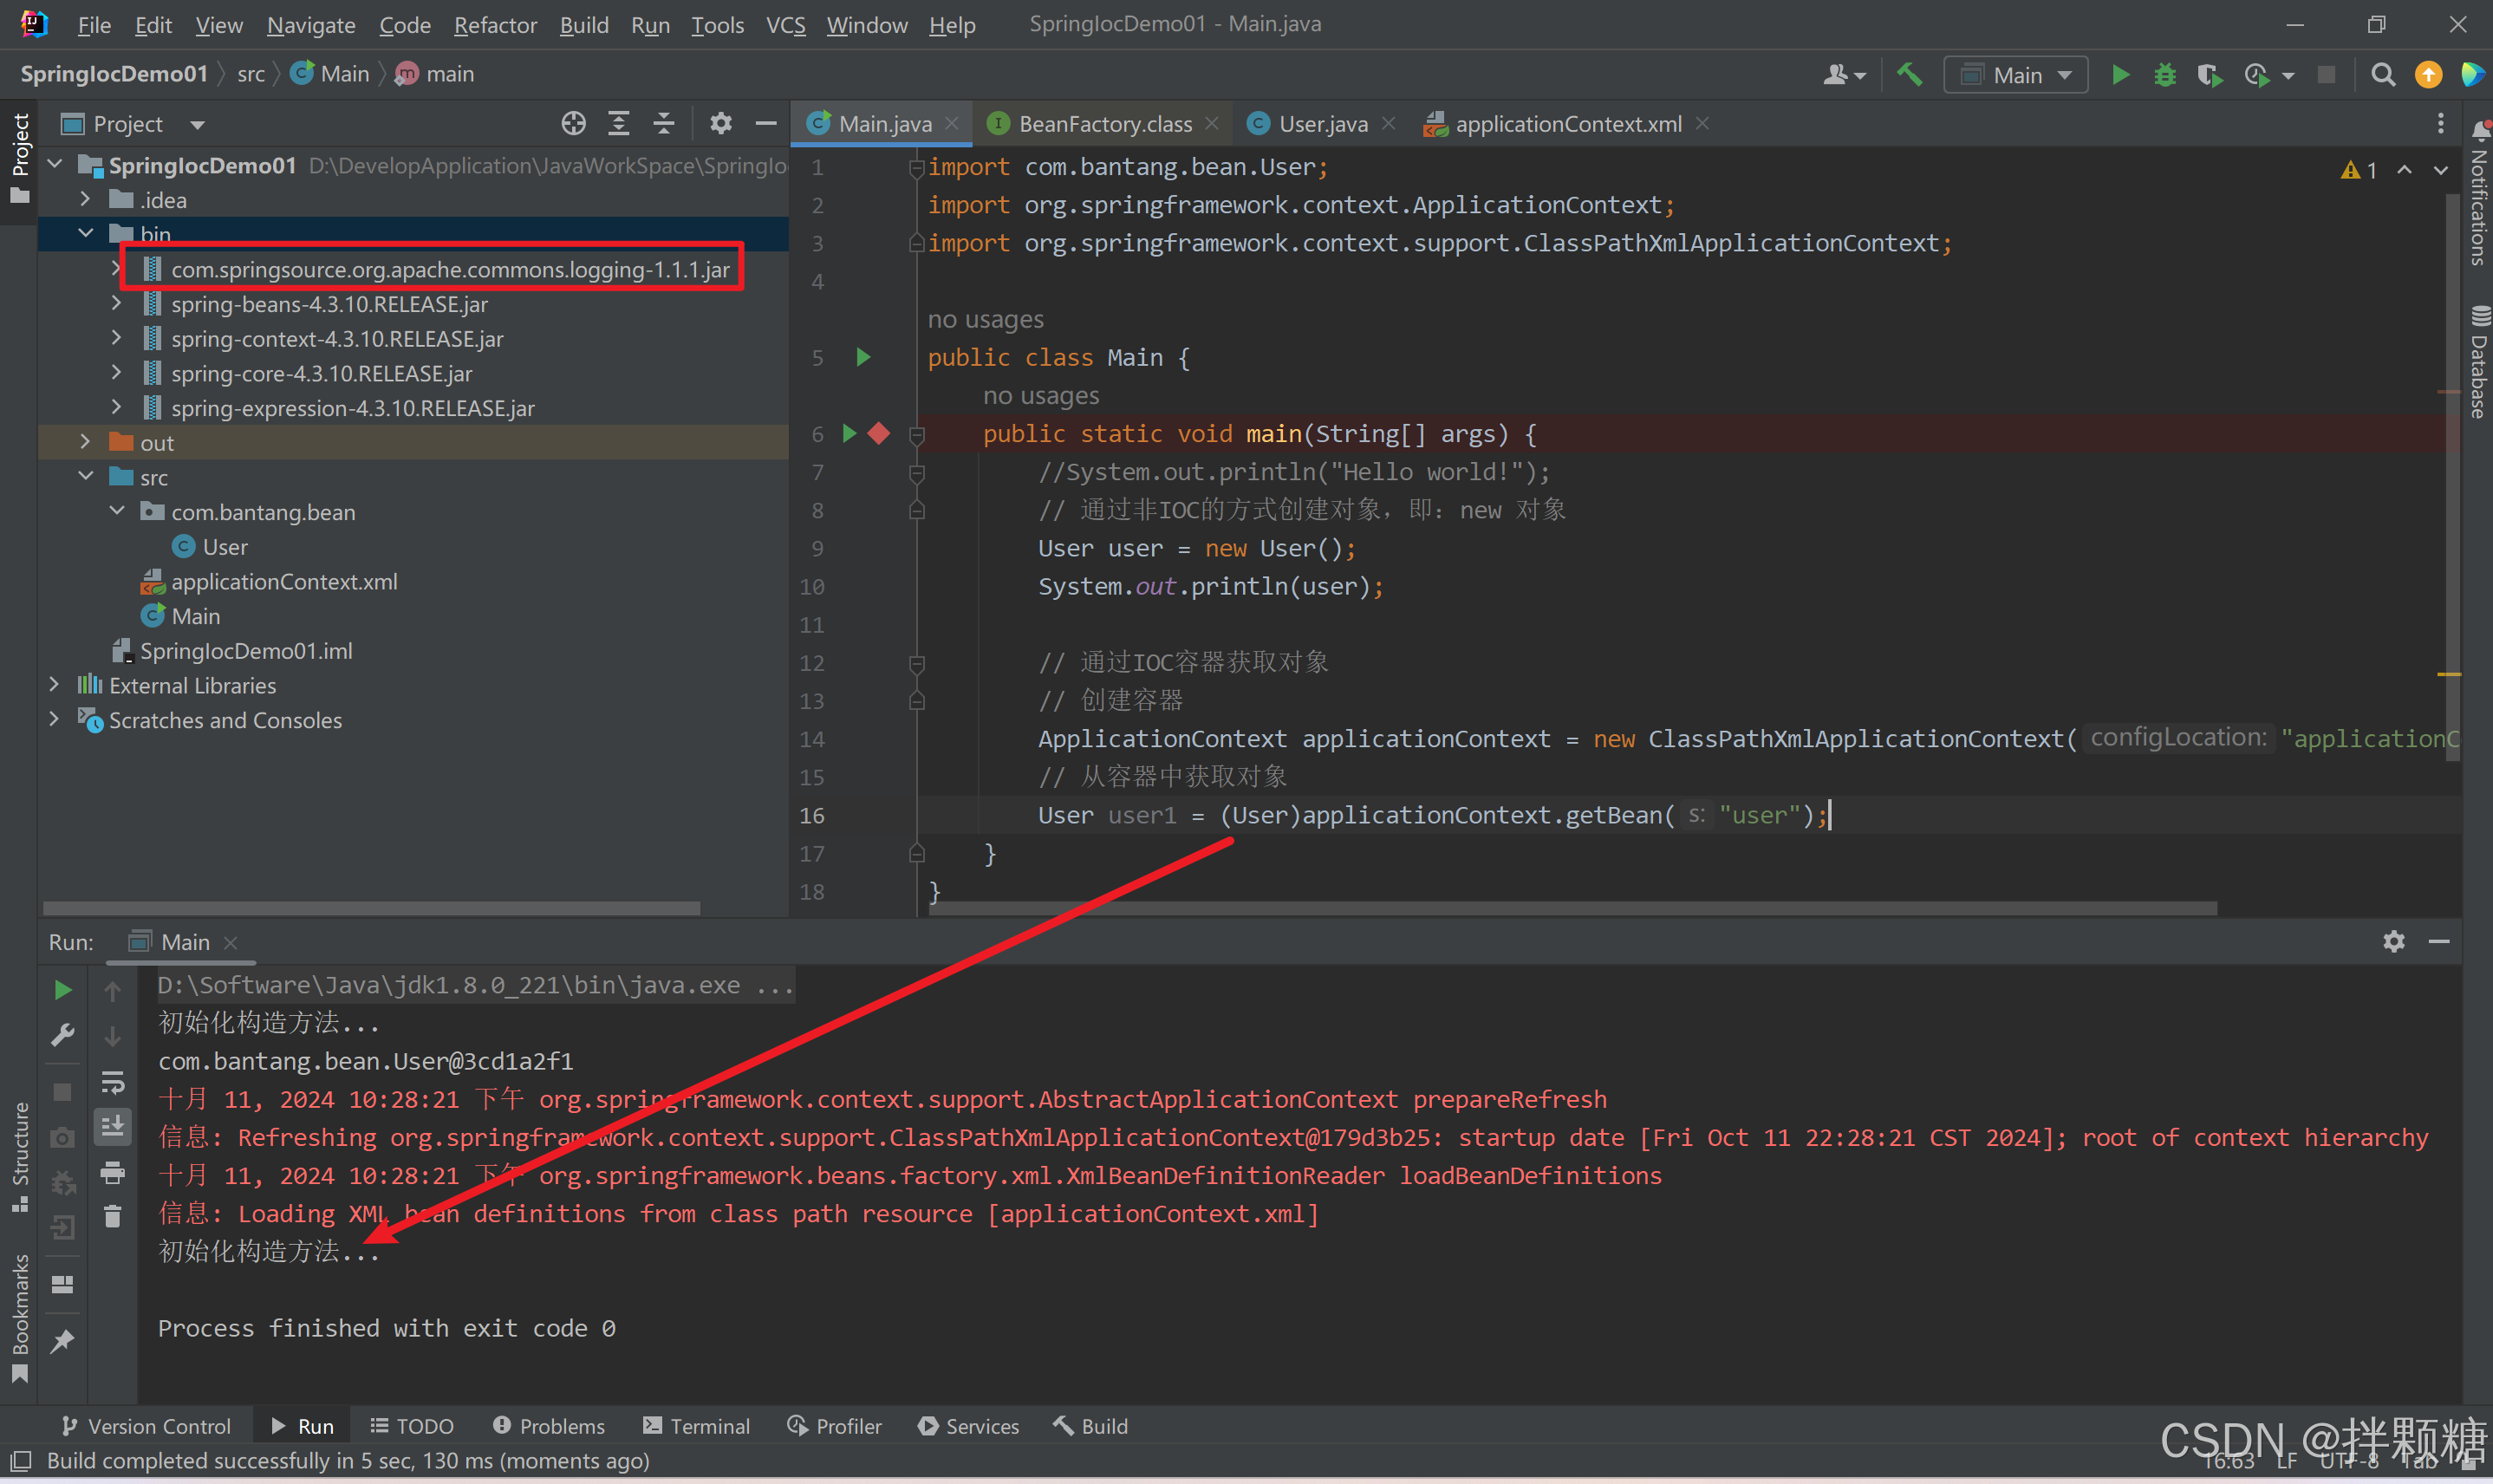
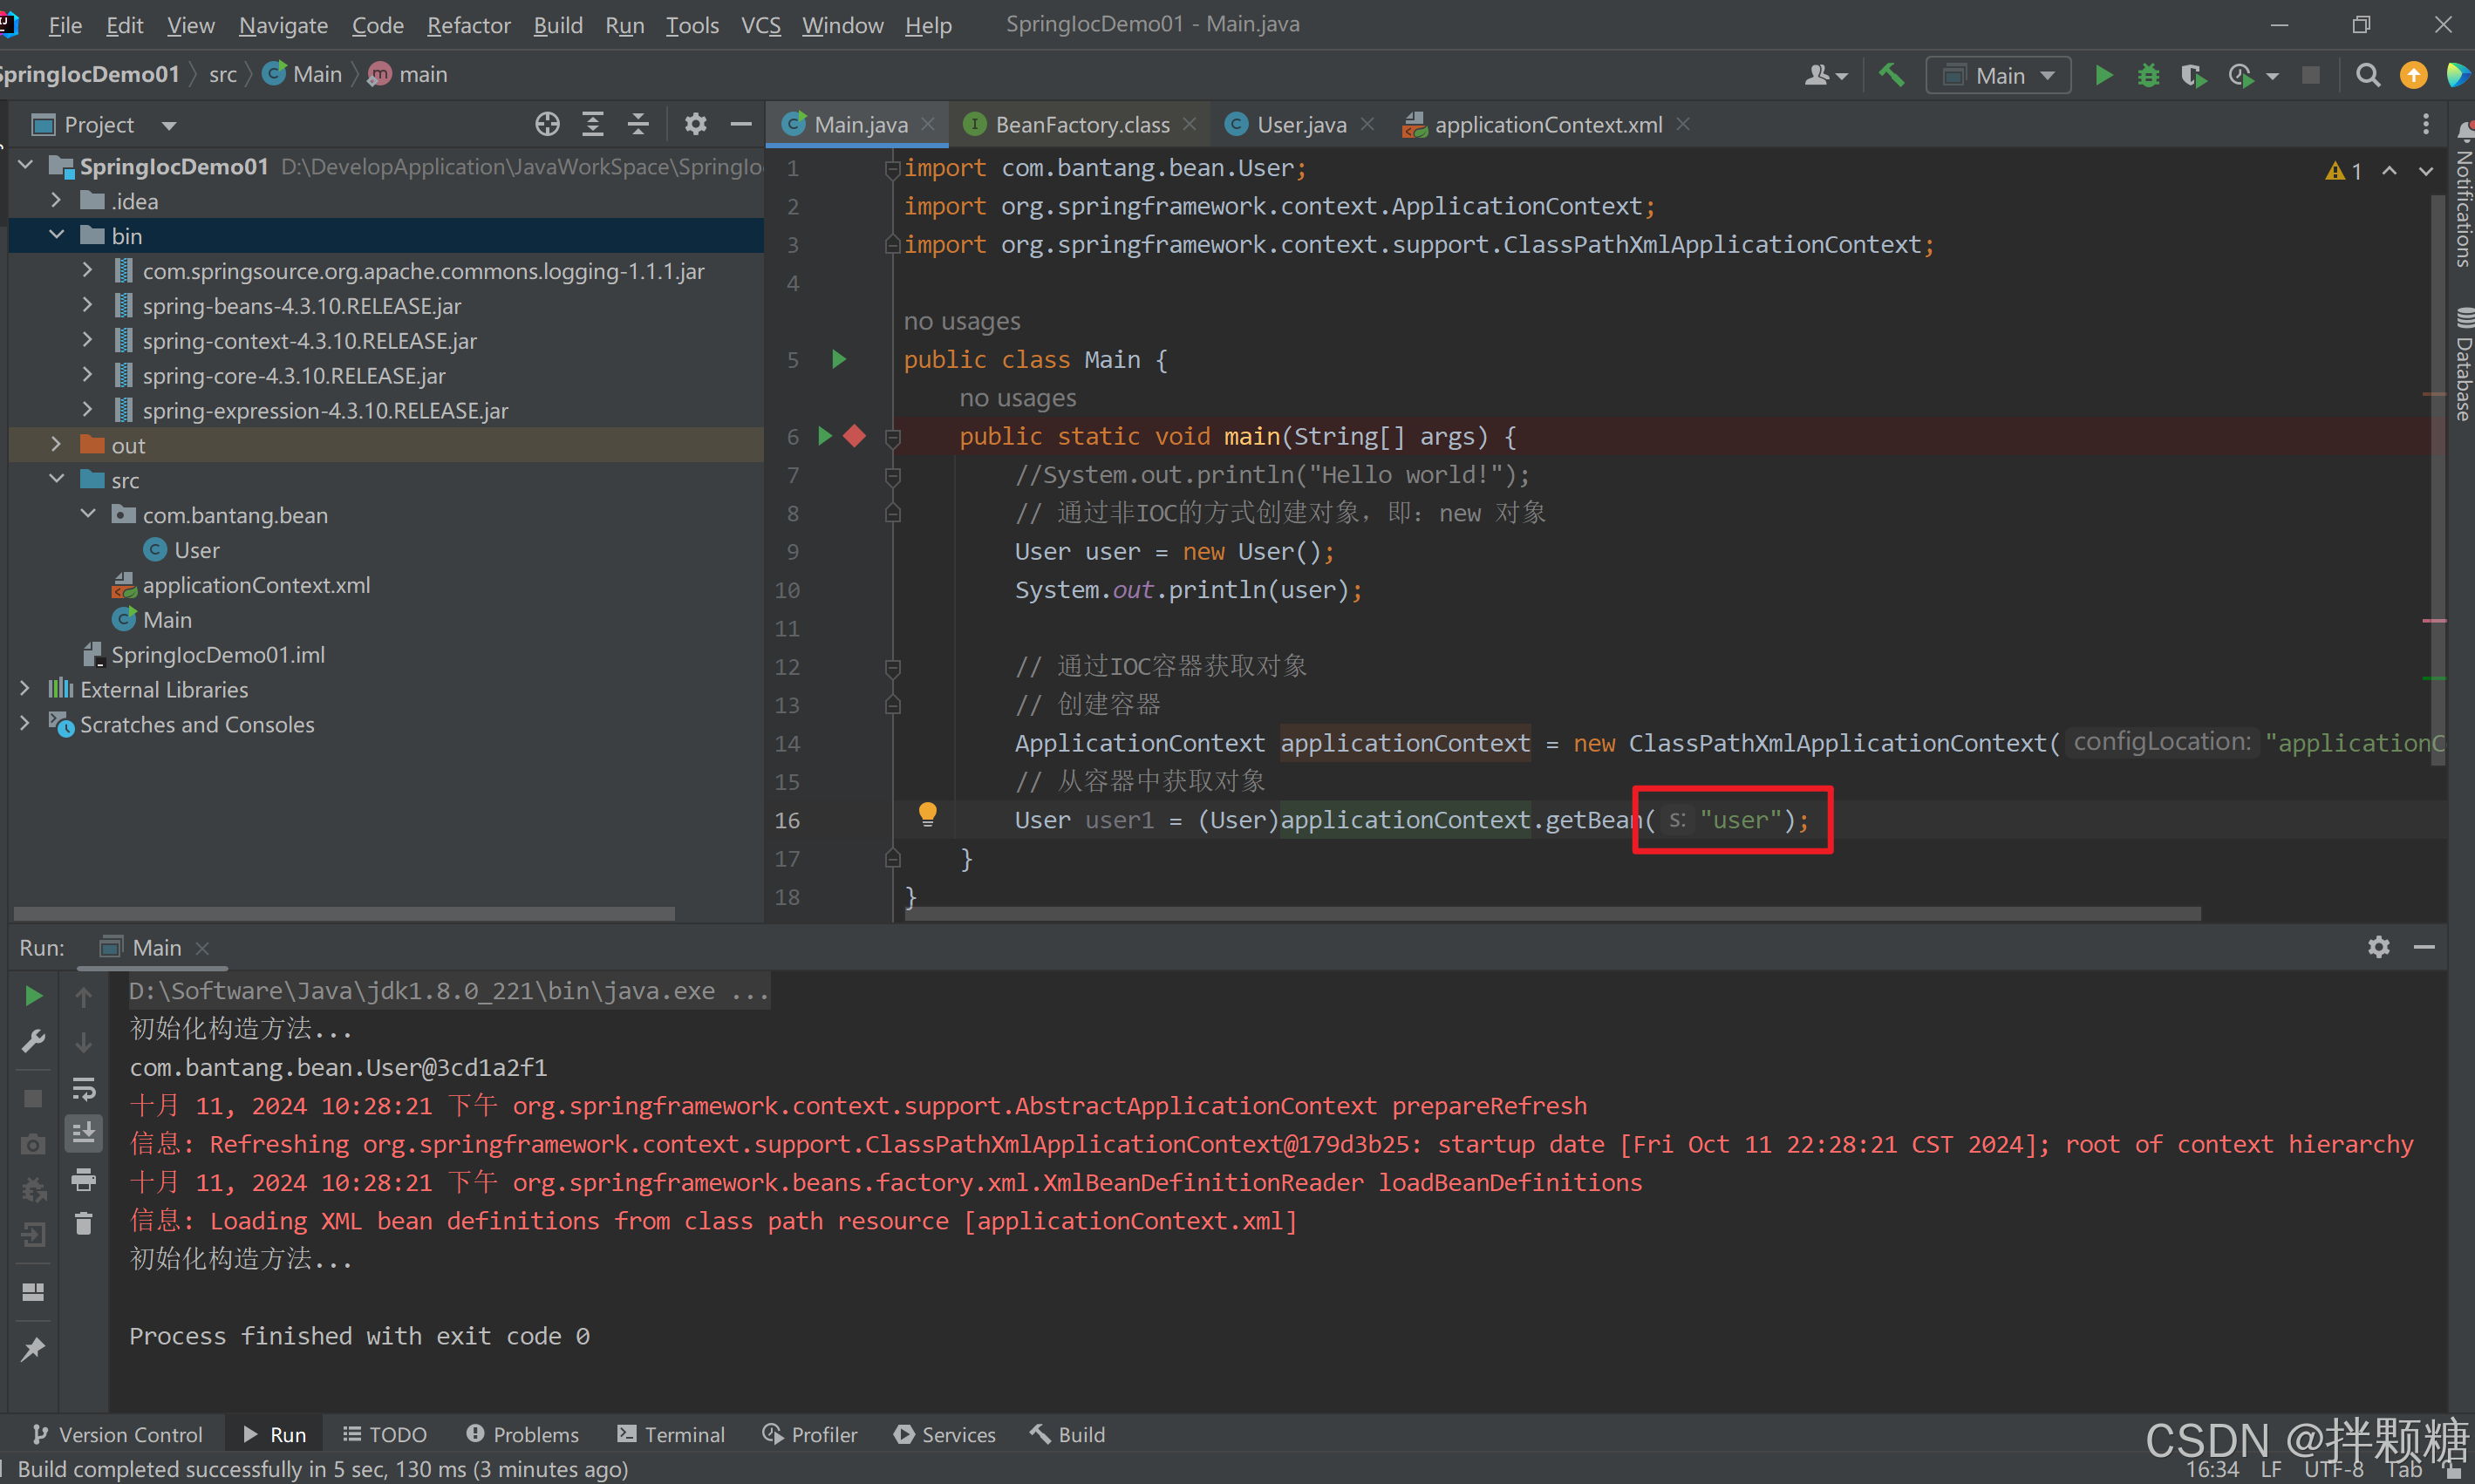
运行报错 原因:缺少一个日志jar包
日志jar包拷到bin目录后 运行正常
代码贴出来
import com.bantang.bean.User;
import org.springframework.context.ApplicationContext;
import org.springframework.context.support.ClassPathXmlApplicationContext;
public class Main {
public static void main(String[] args) {
//System.out.println("Hello world!");
// 通过非IOC的方式创建对象,即:new 对象
User user = new User();
System.out.println(user);
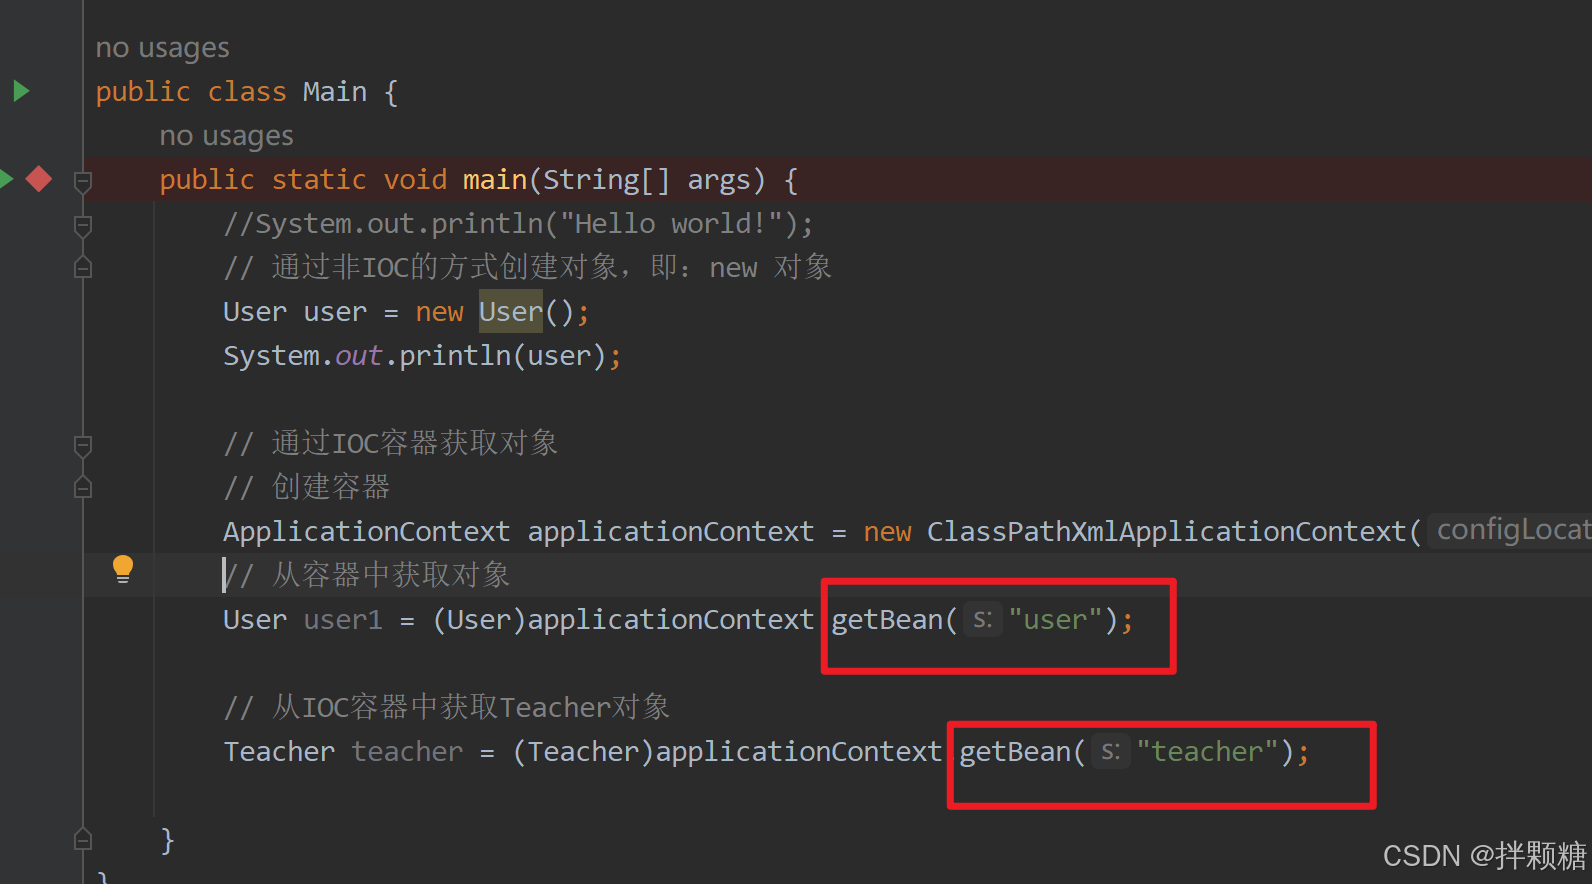
// 通过IOC容器获取对象
// 创建容器
ApplicationContext applicationContext = new ClassPathXmlApplicationContext("applicationContext.xml");
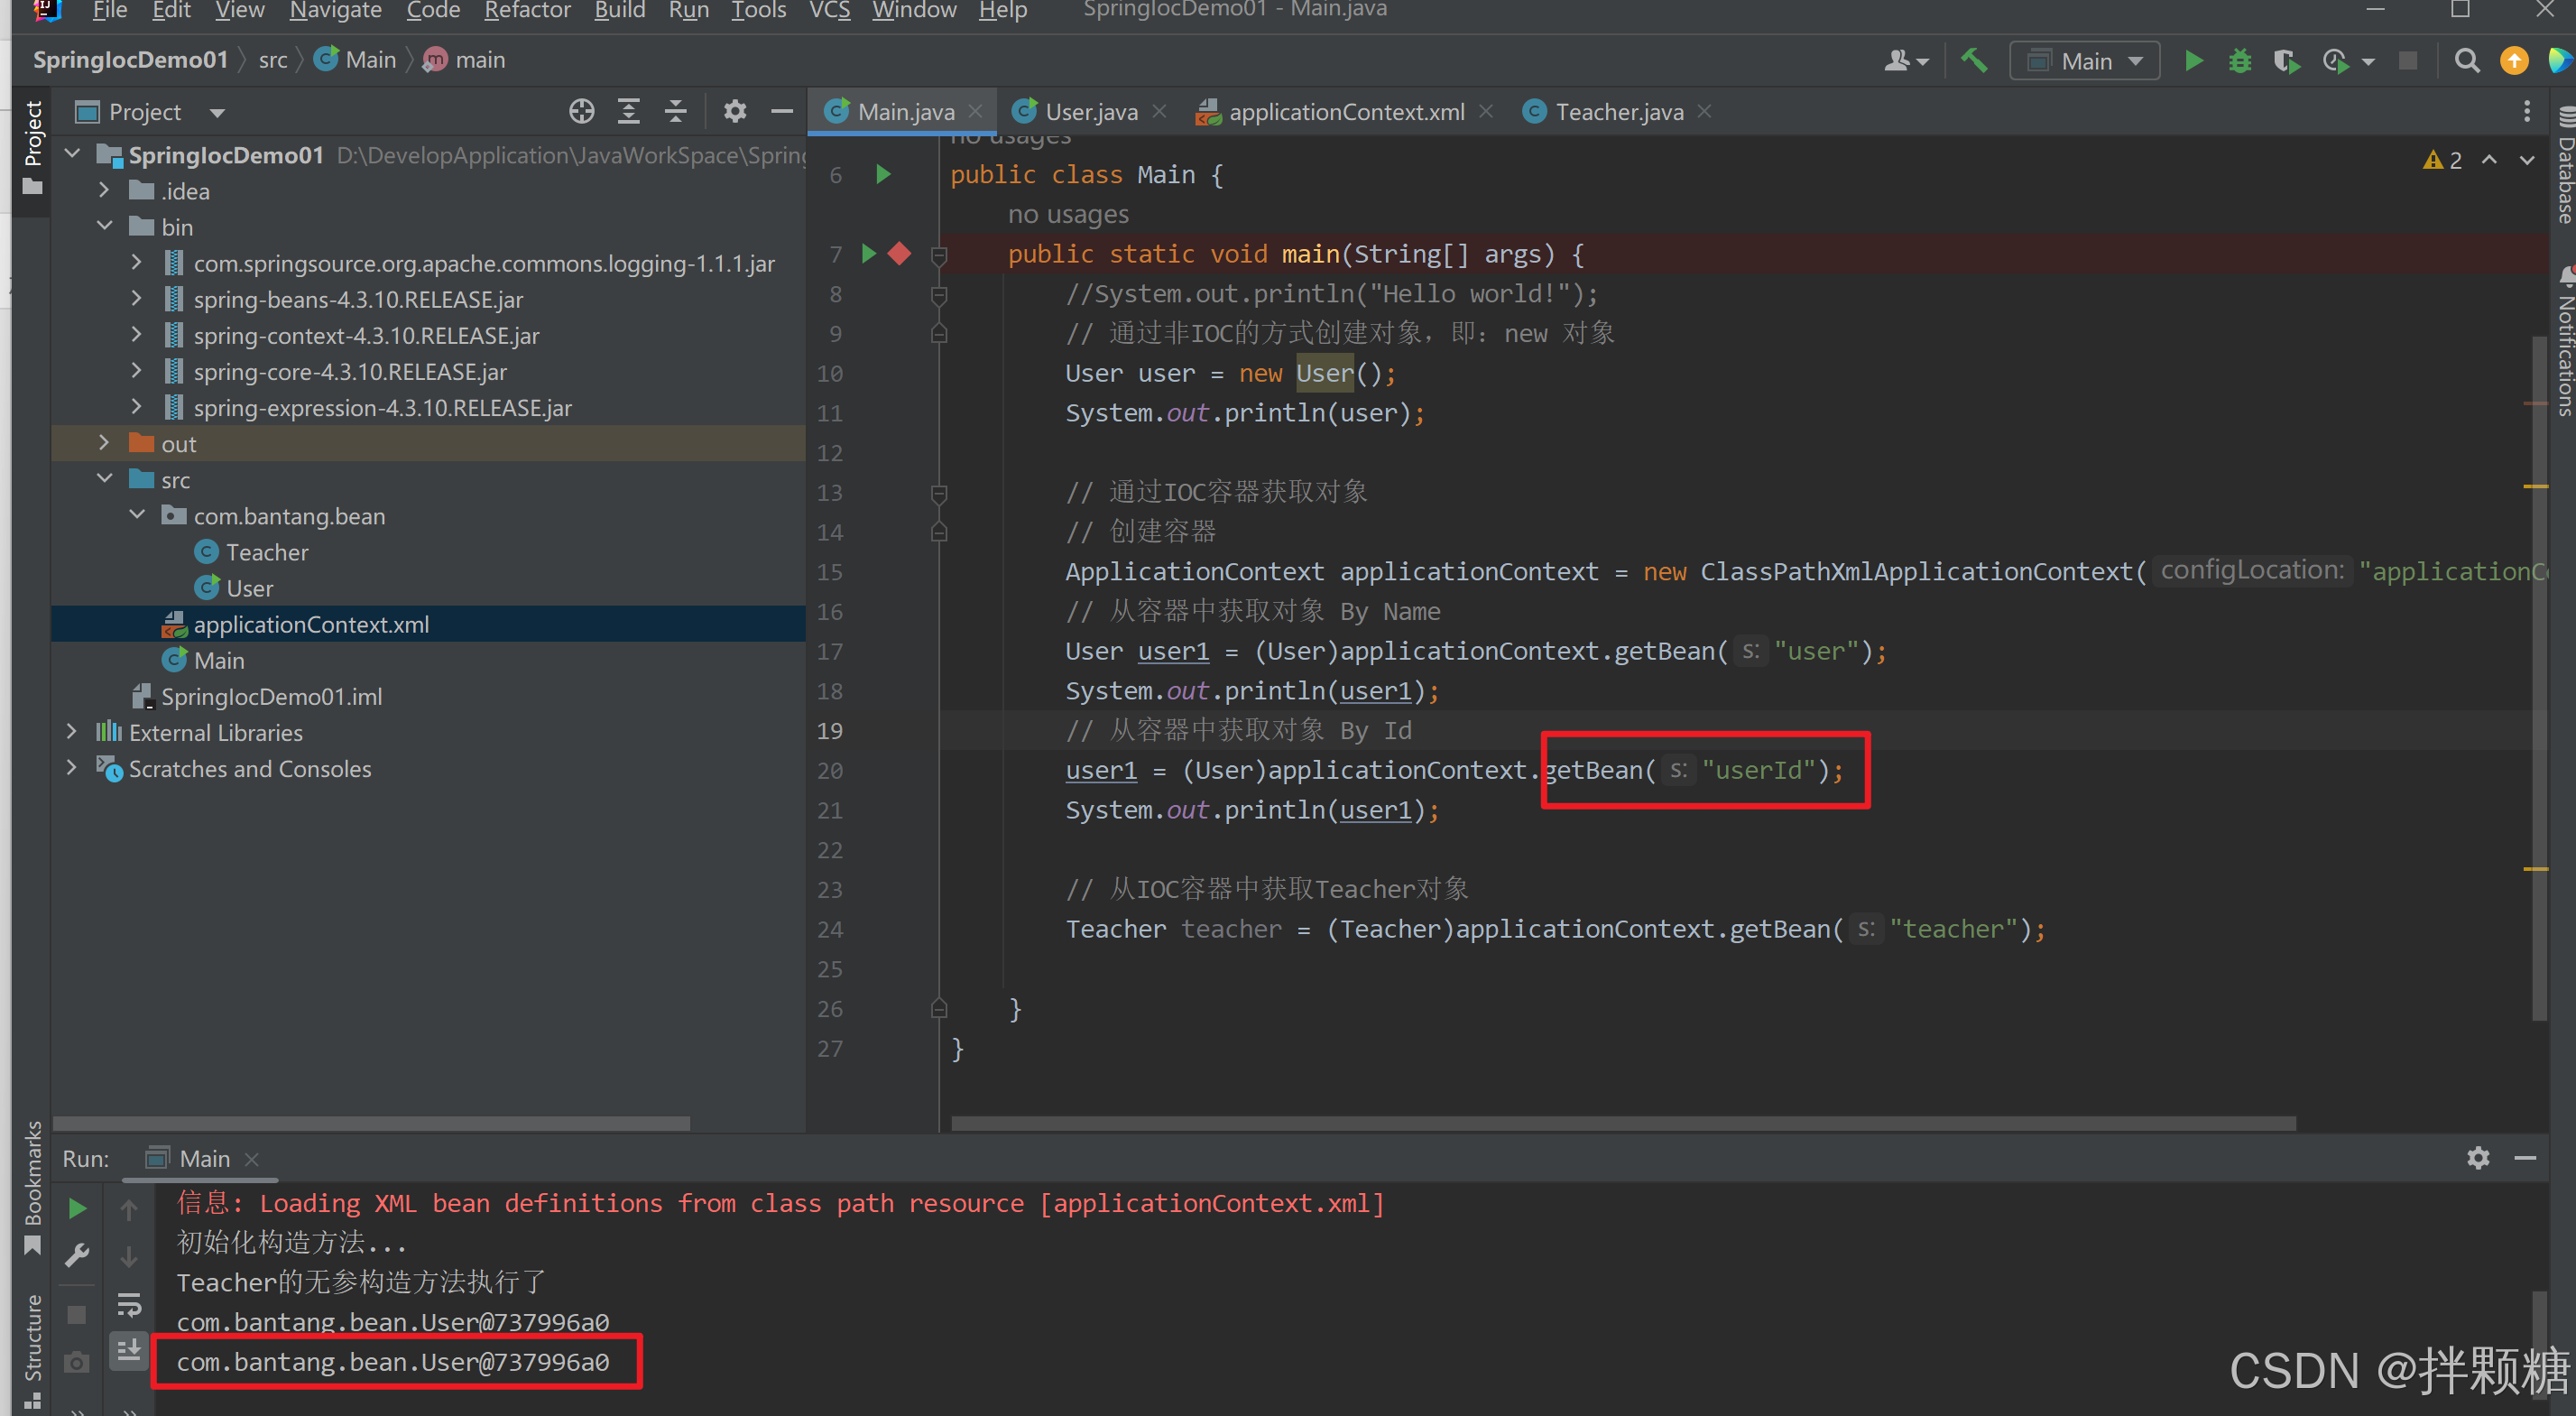
// 从容器中获取对象
User user1 = (User)applicationContext.getBean("user");
}
}
注意啊,getbean的传参就是容器文件中对象的name属性
getBean详解
上面的Demo演示了使用容器方法getBean获取对象
接下来详细介绍下getBean
容器创建对象的原理,就是调用对象的无参构造方法
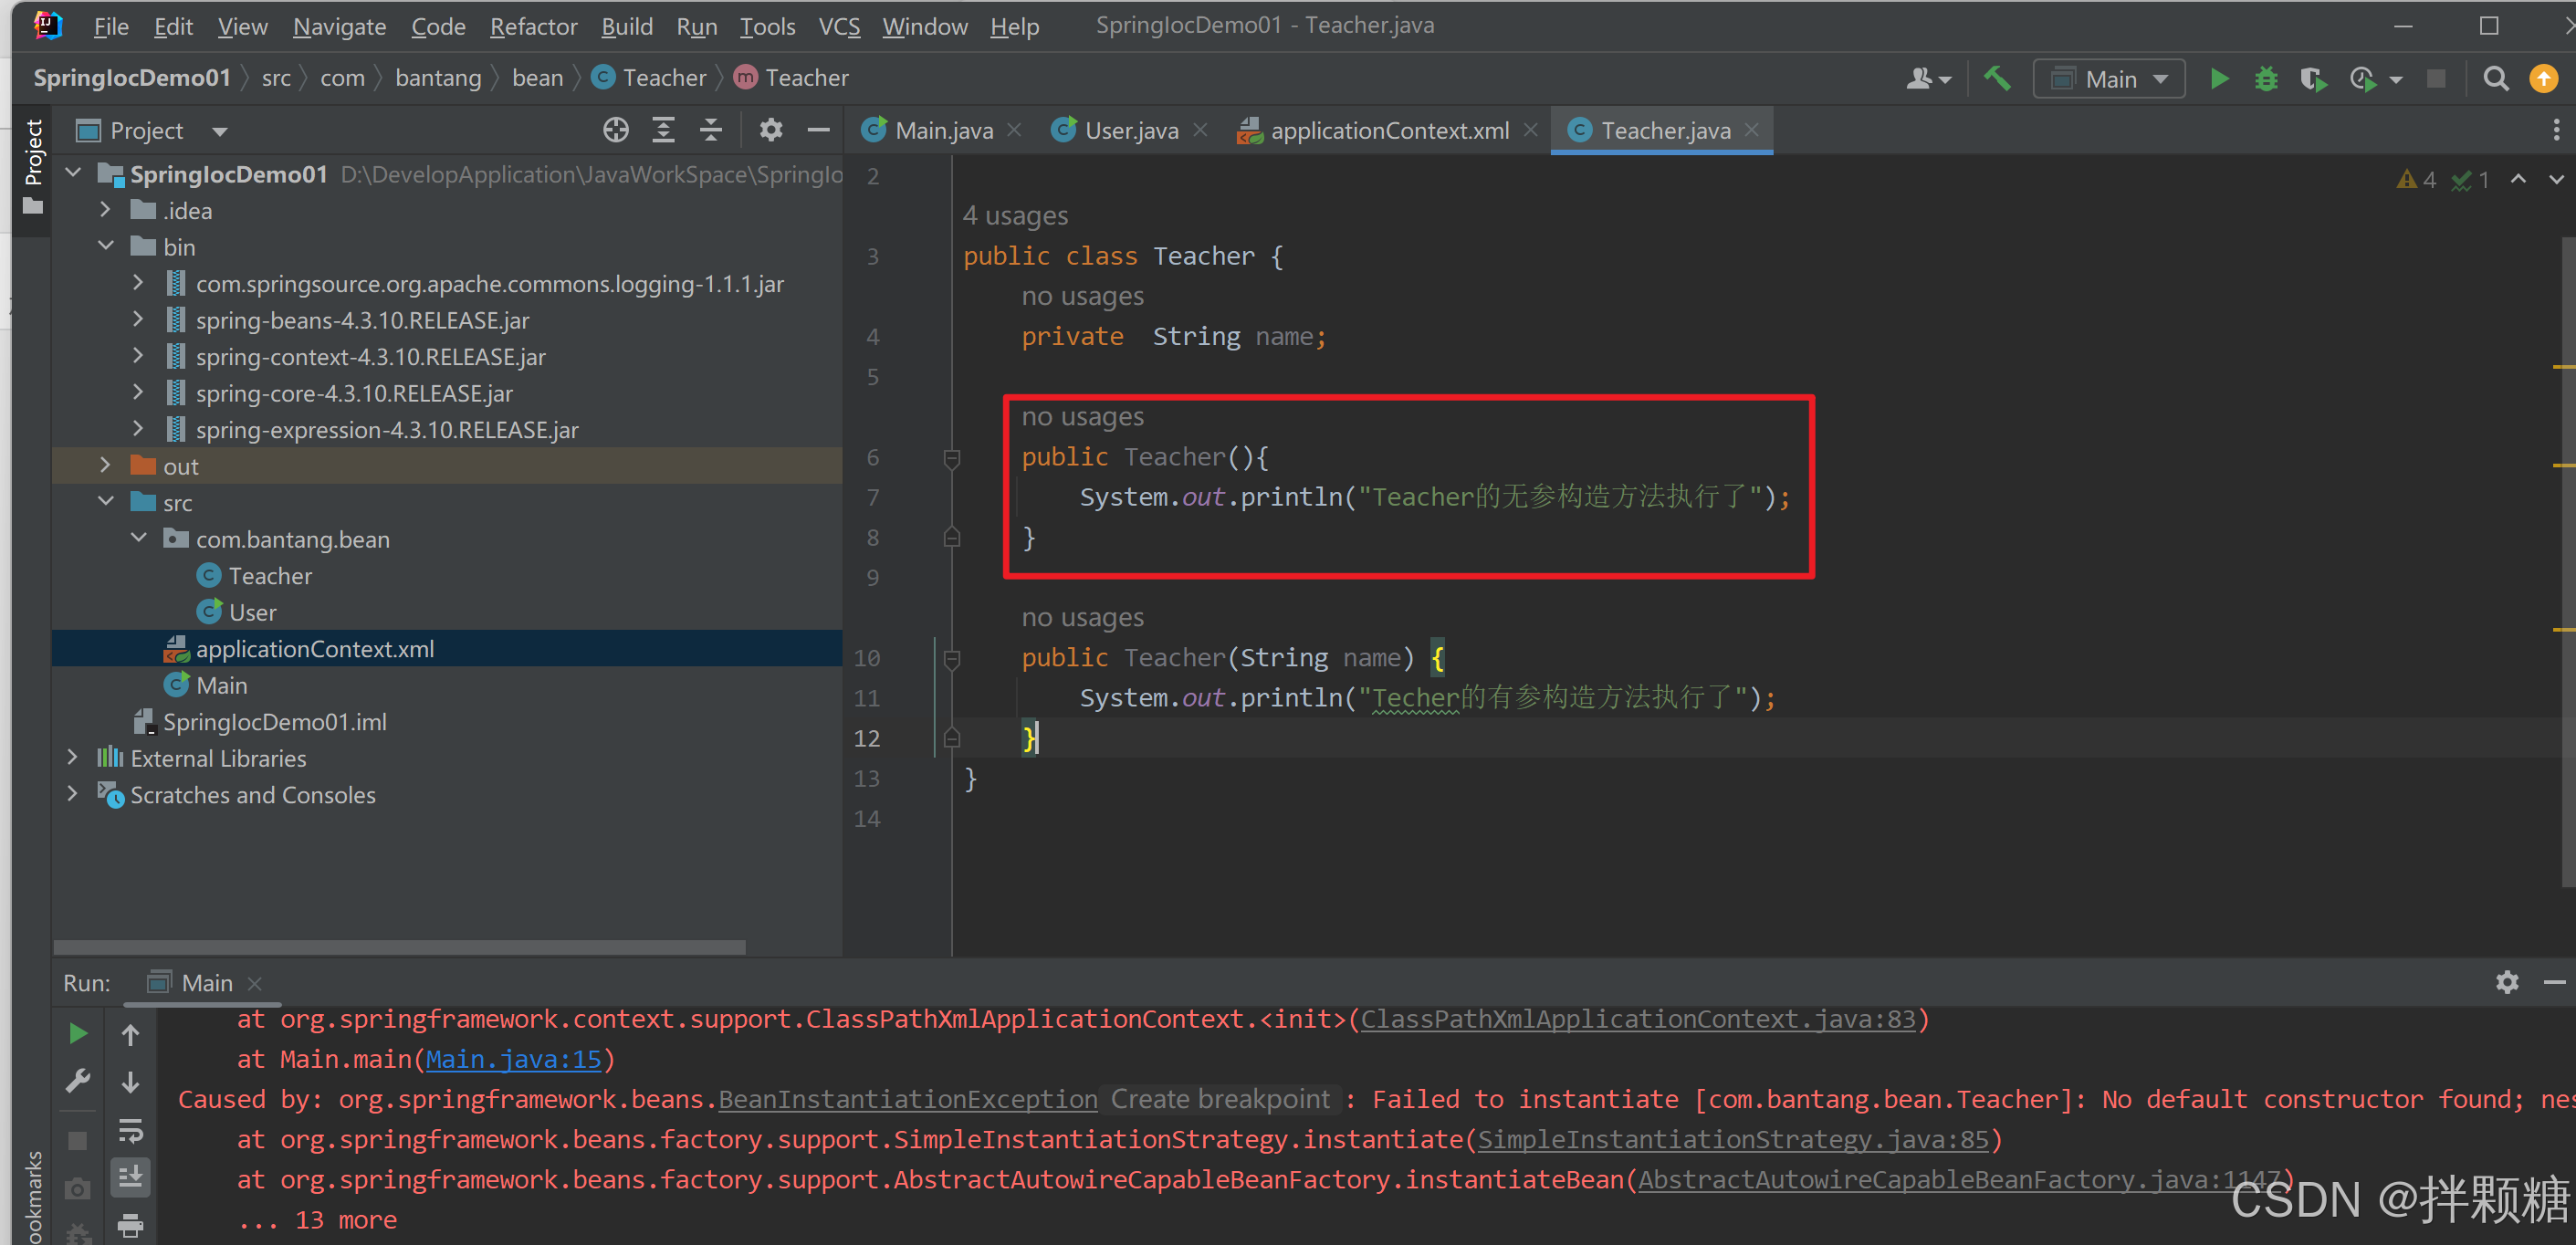
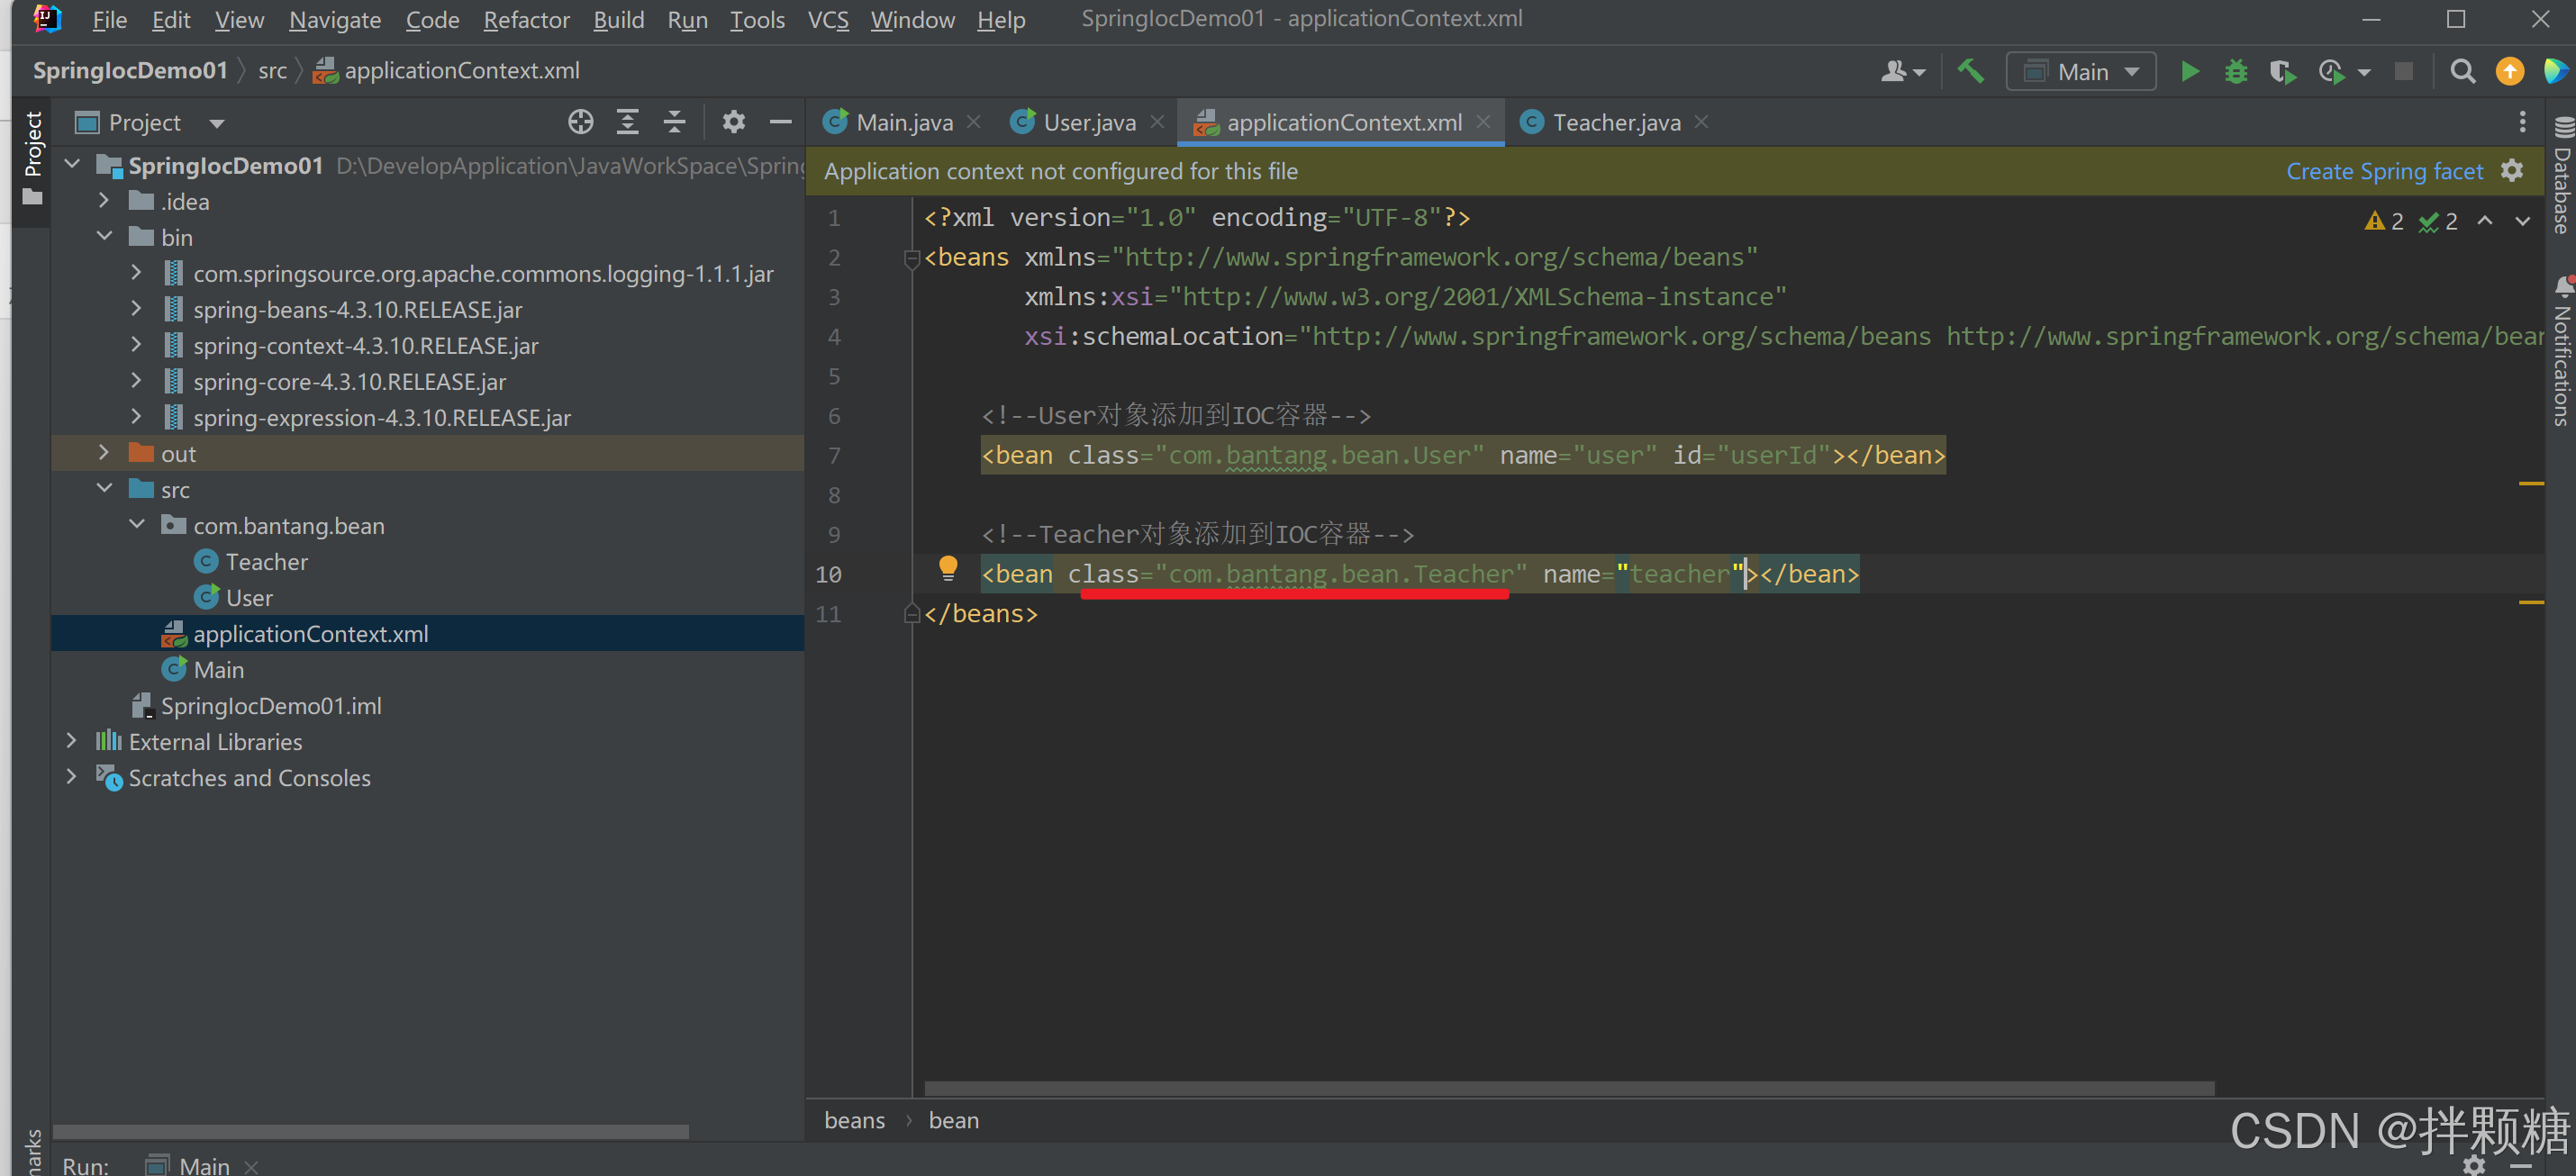
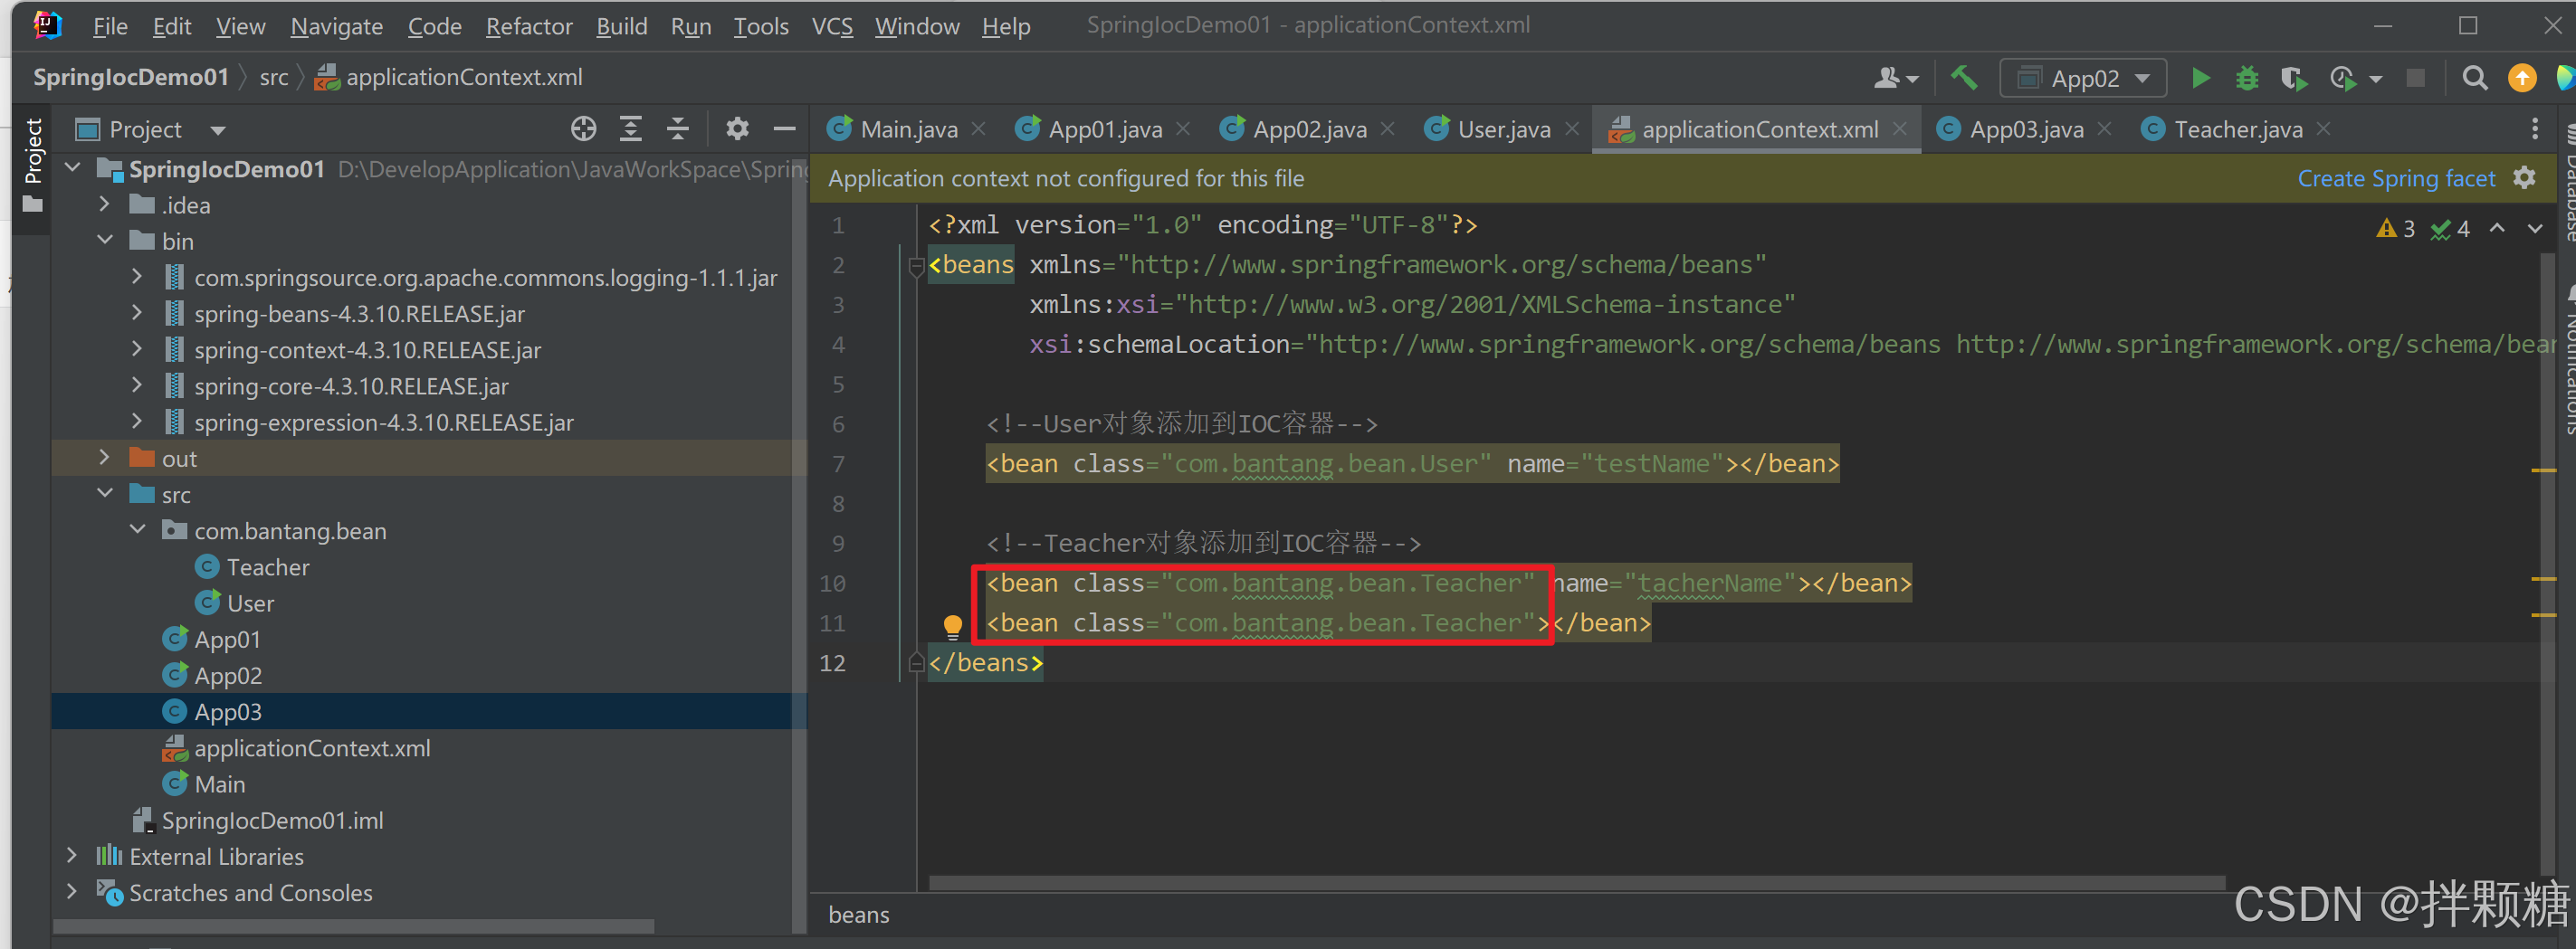
我们新建一个JavaBean,只添加有参构造方法,不添加无参构造方法,如下
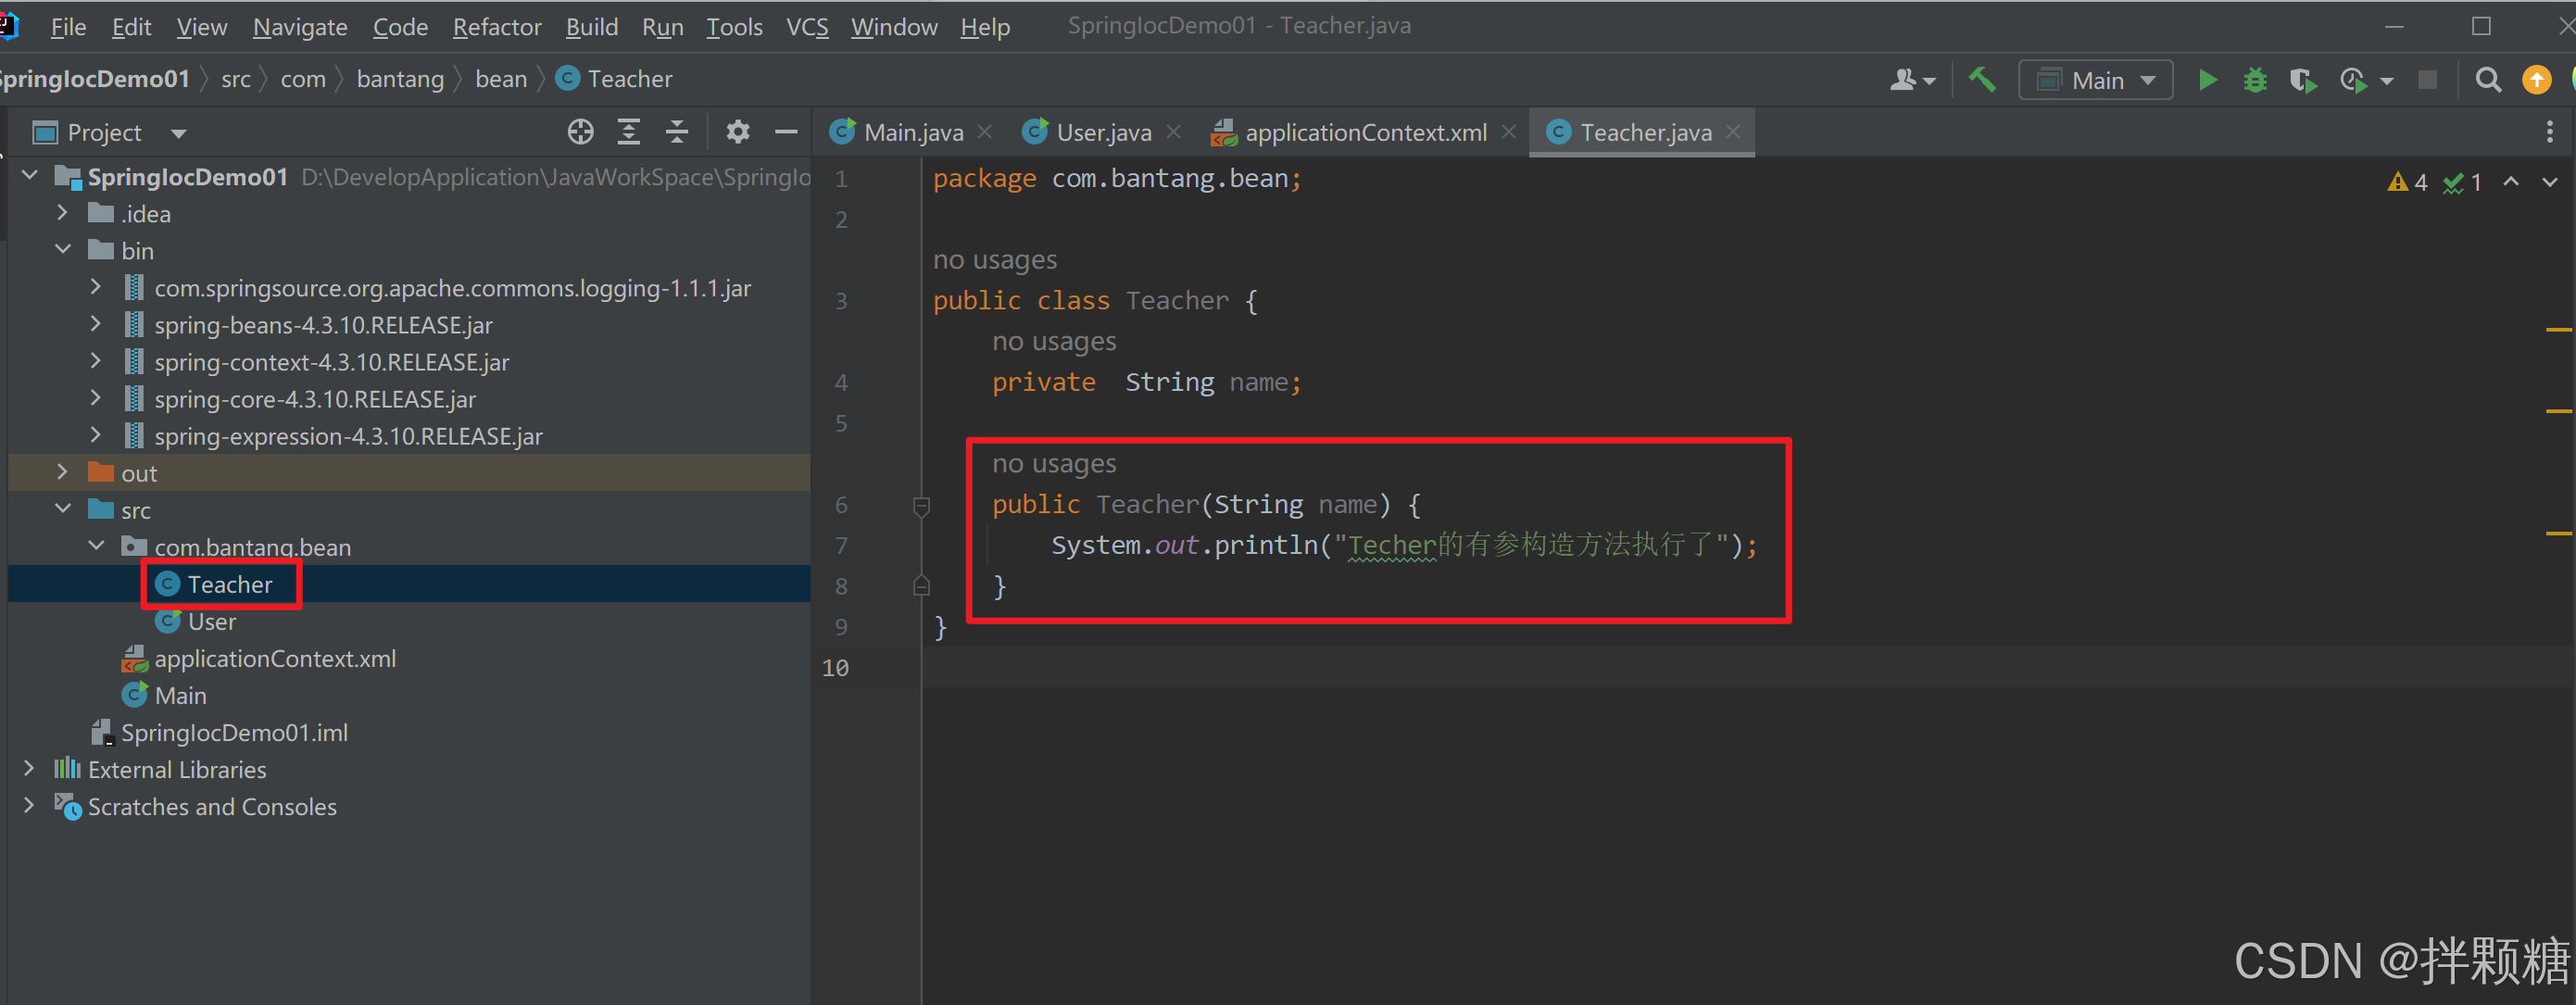
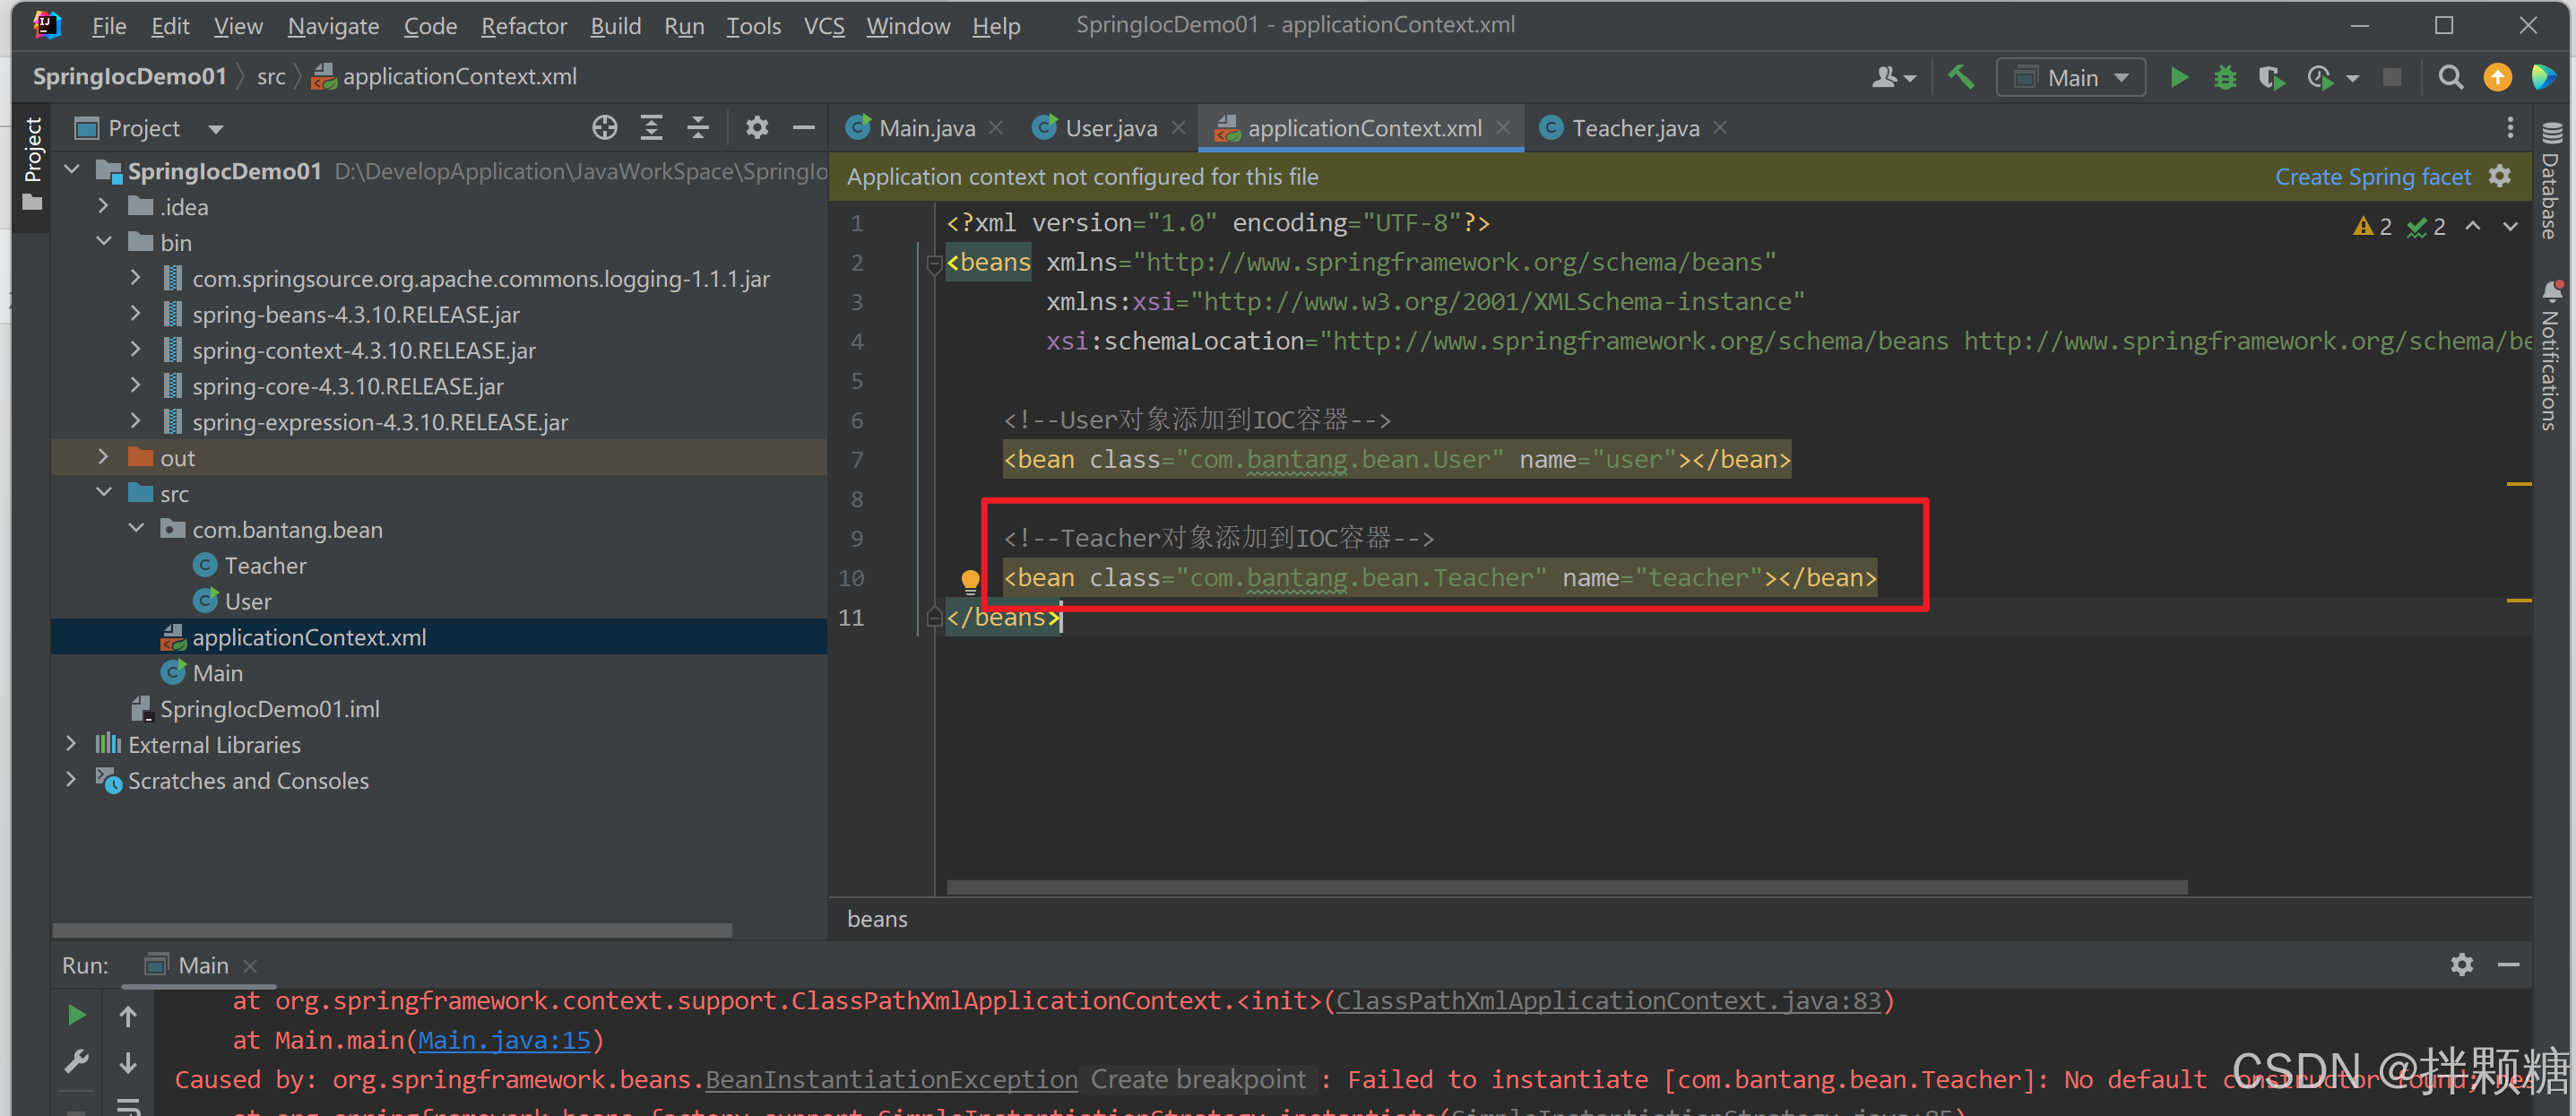
对象添加到IOC容器 可以看到配置文件爆红“No matching constructor found in class ‘Taecher’”
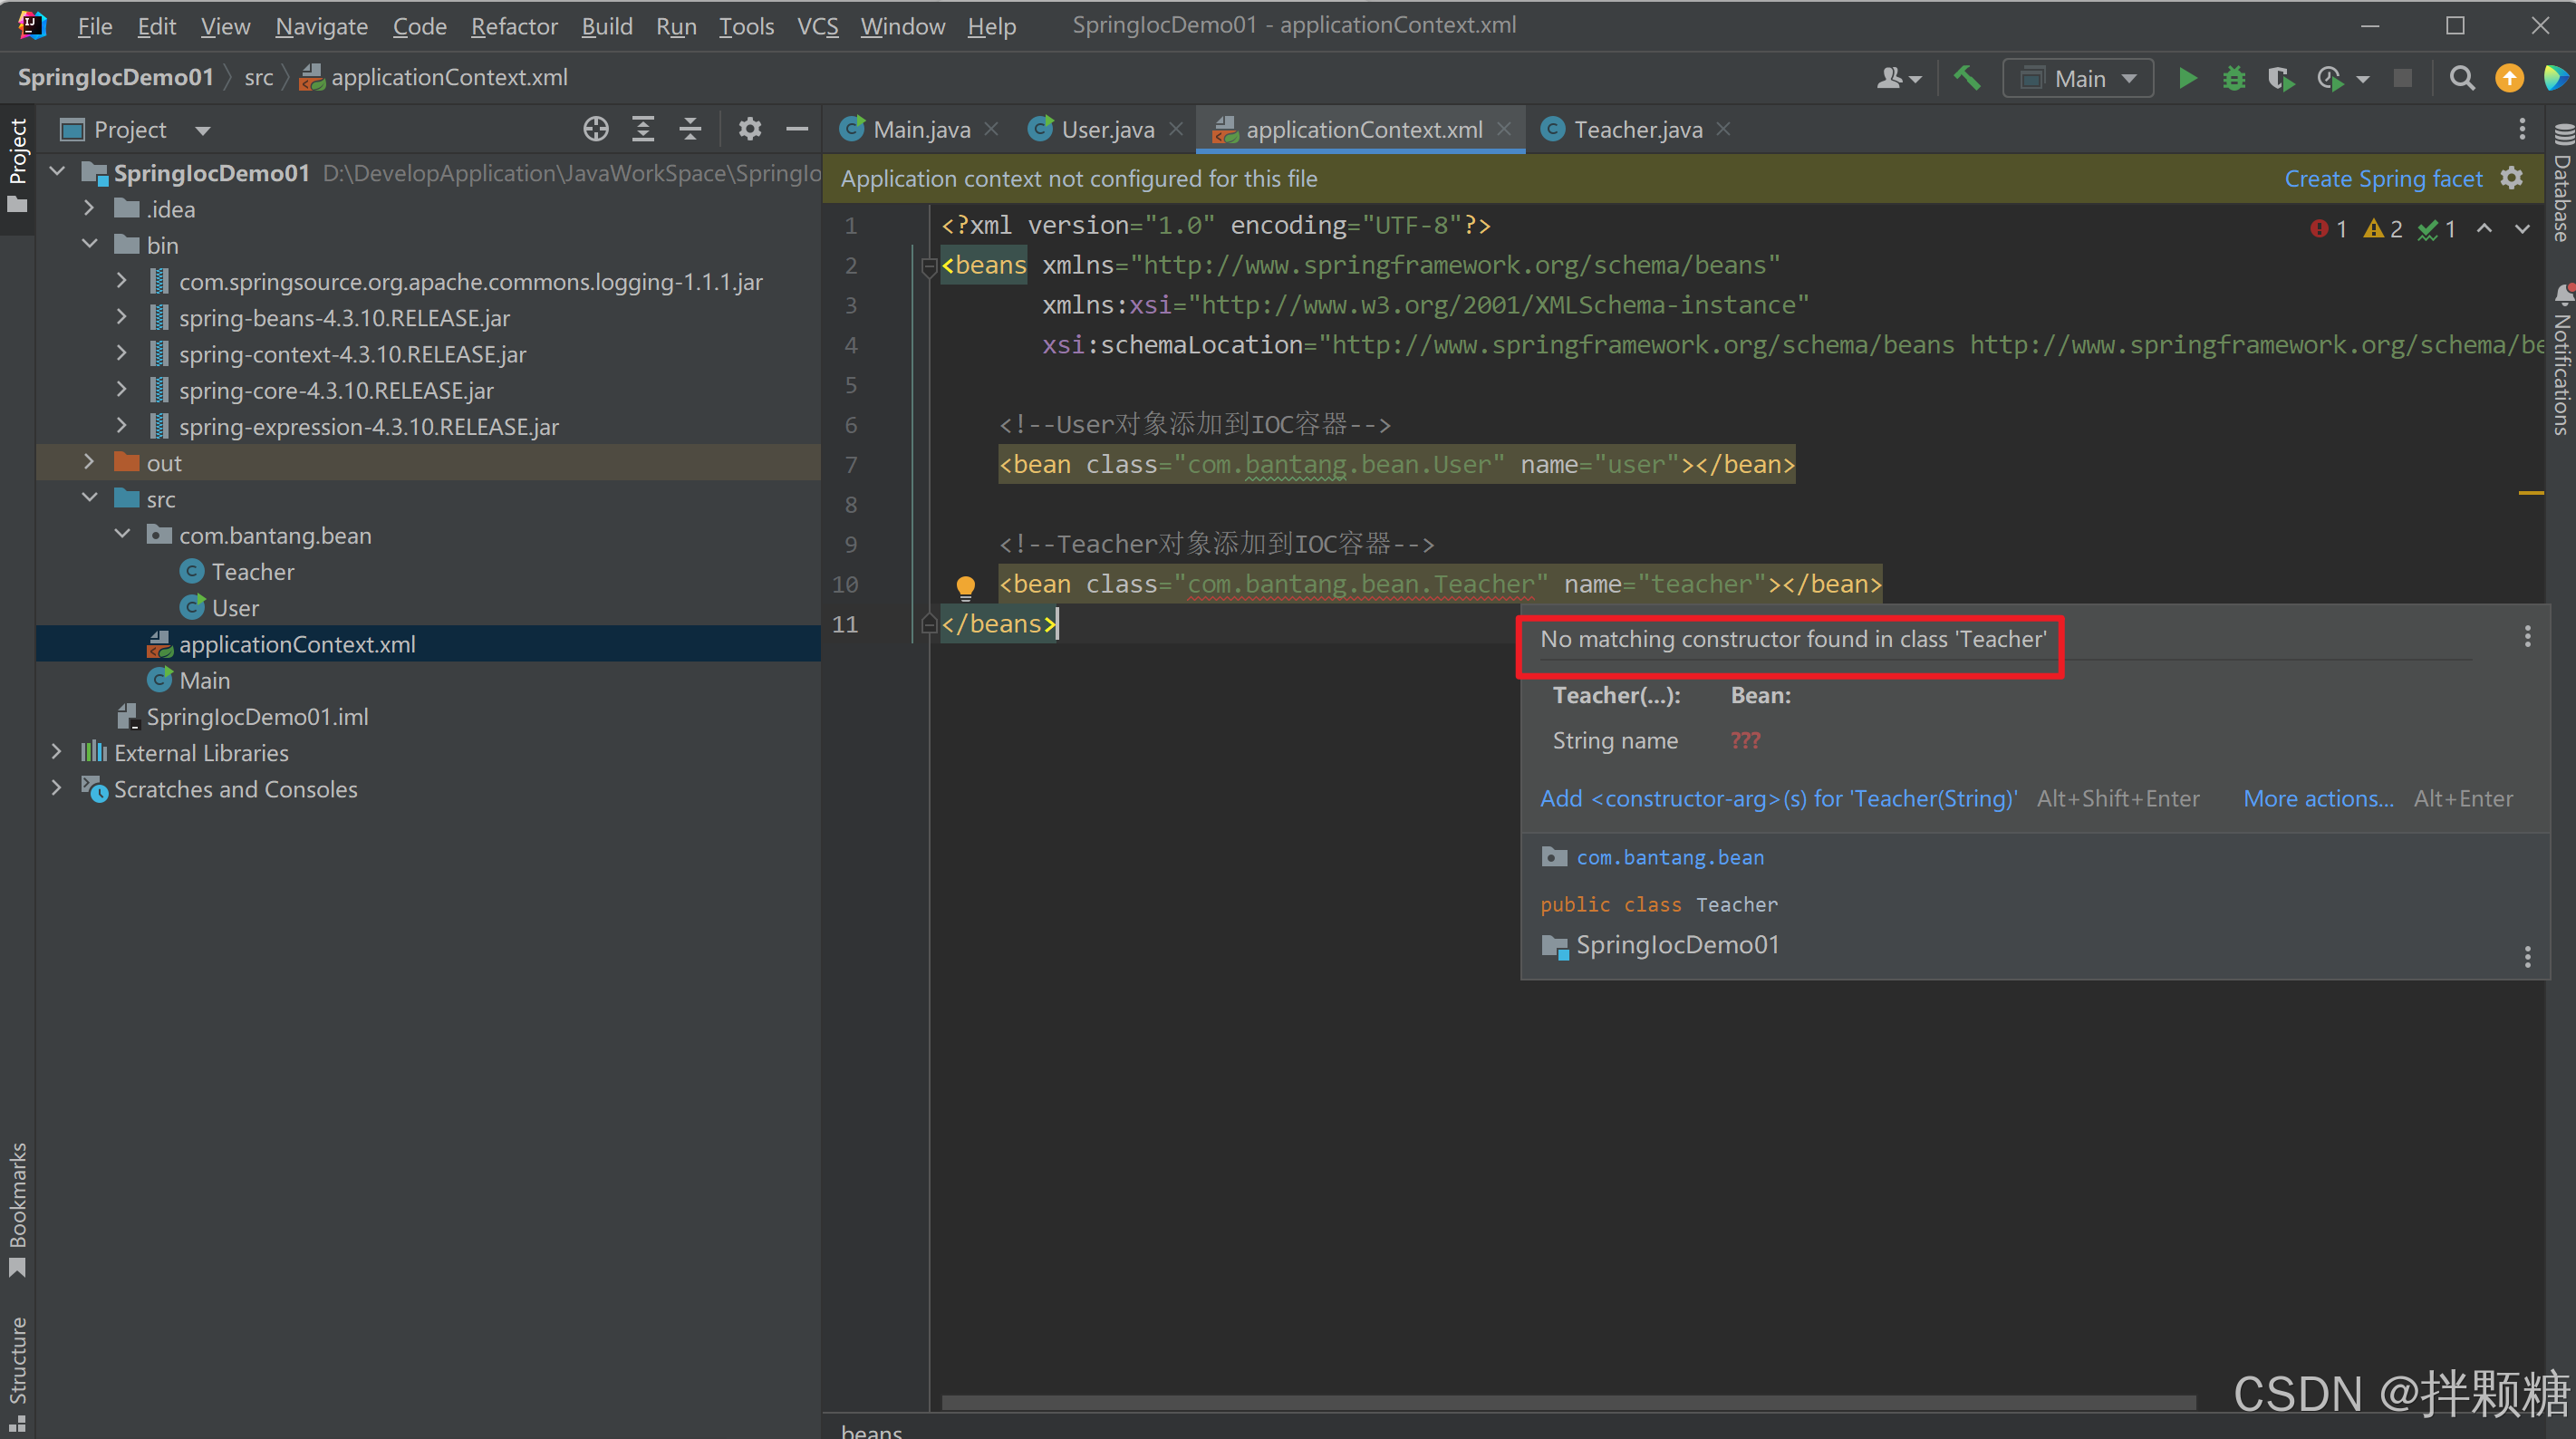
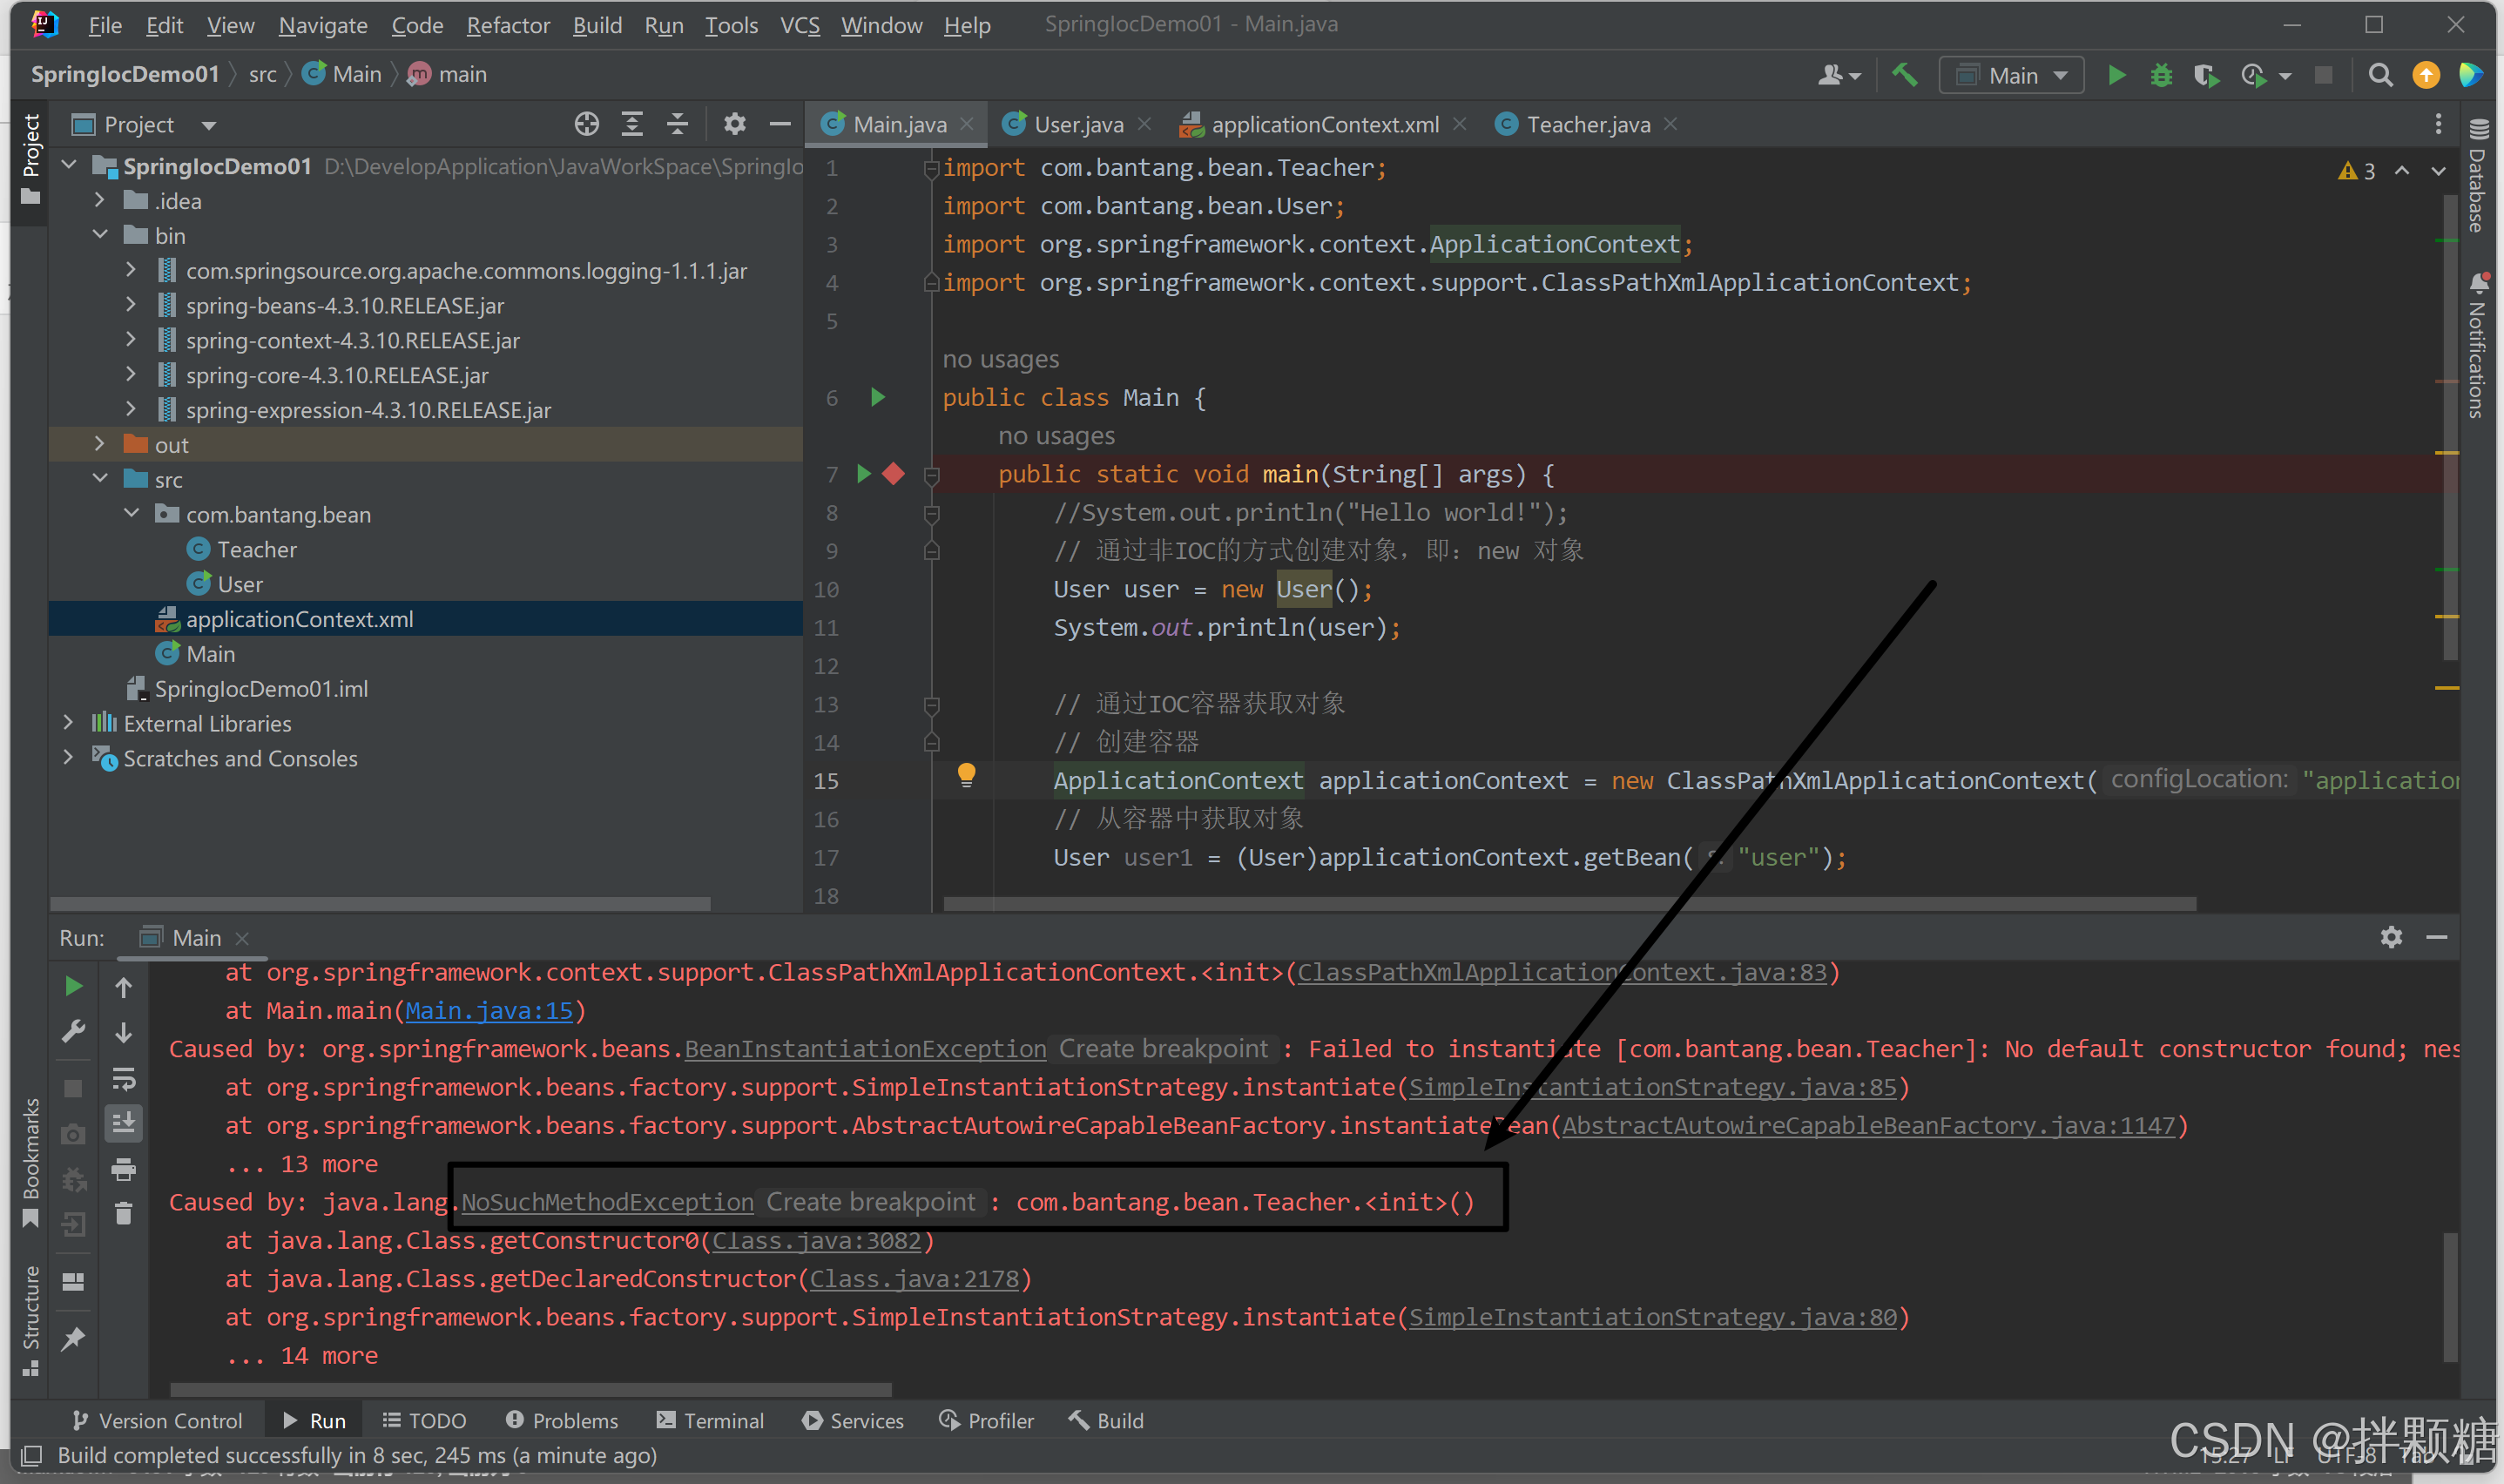
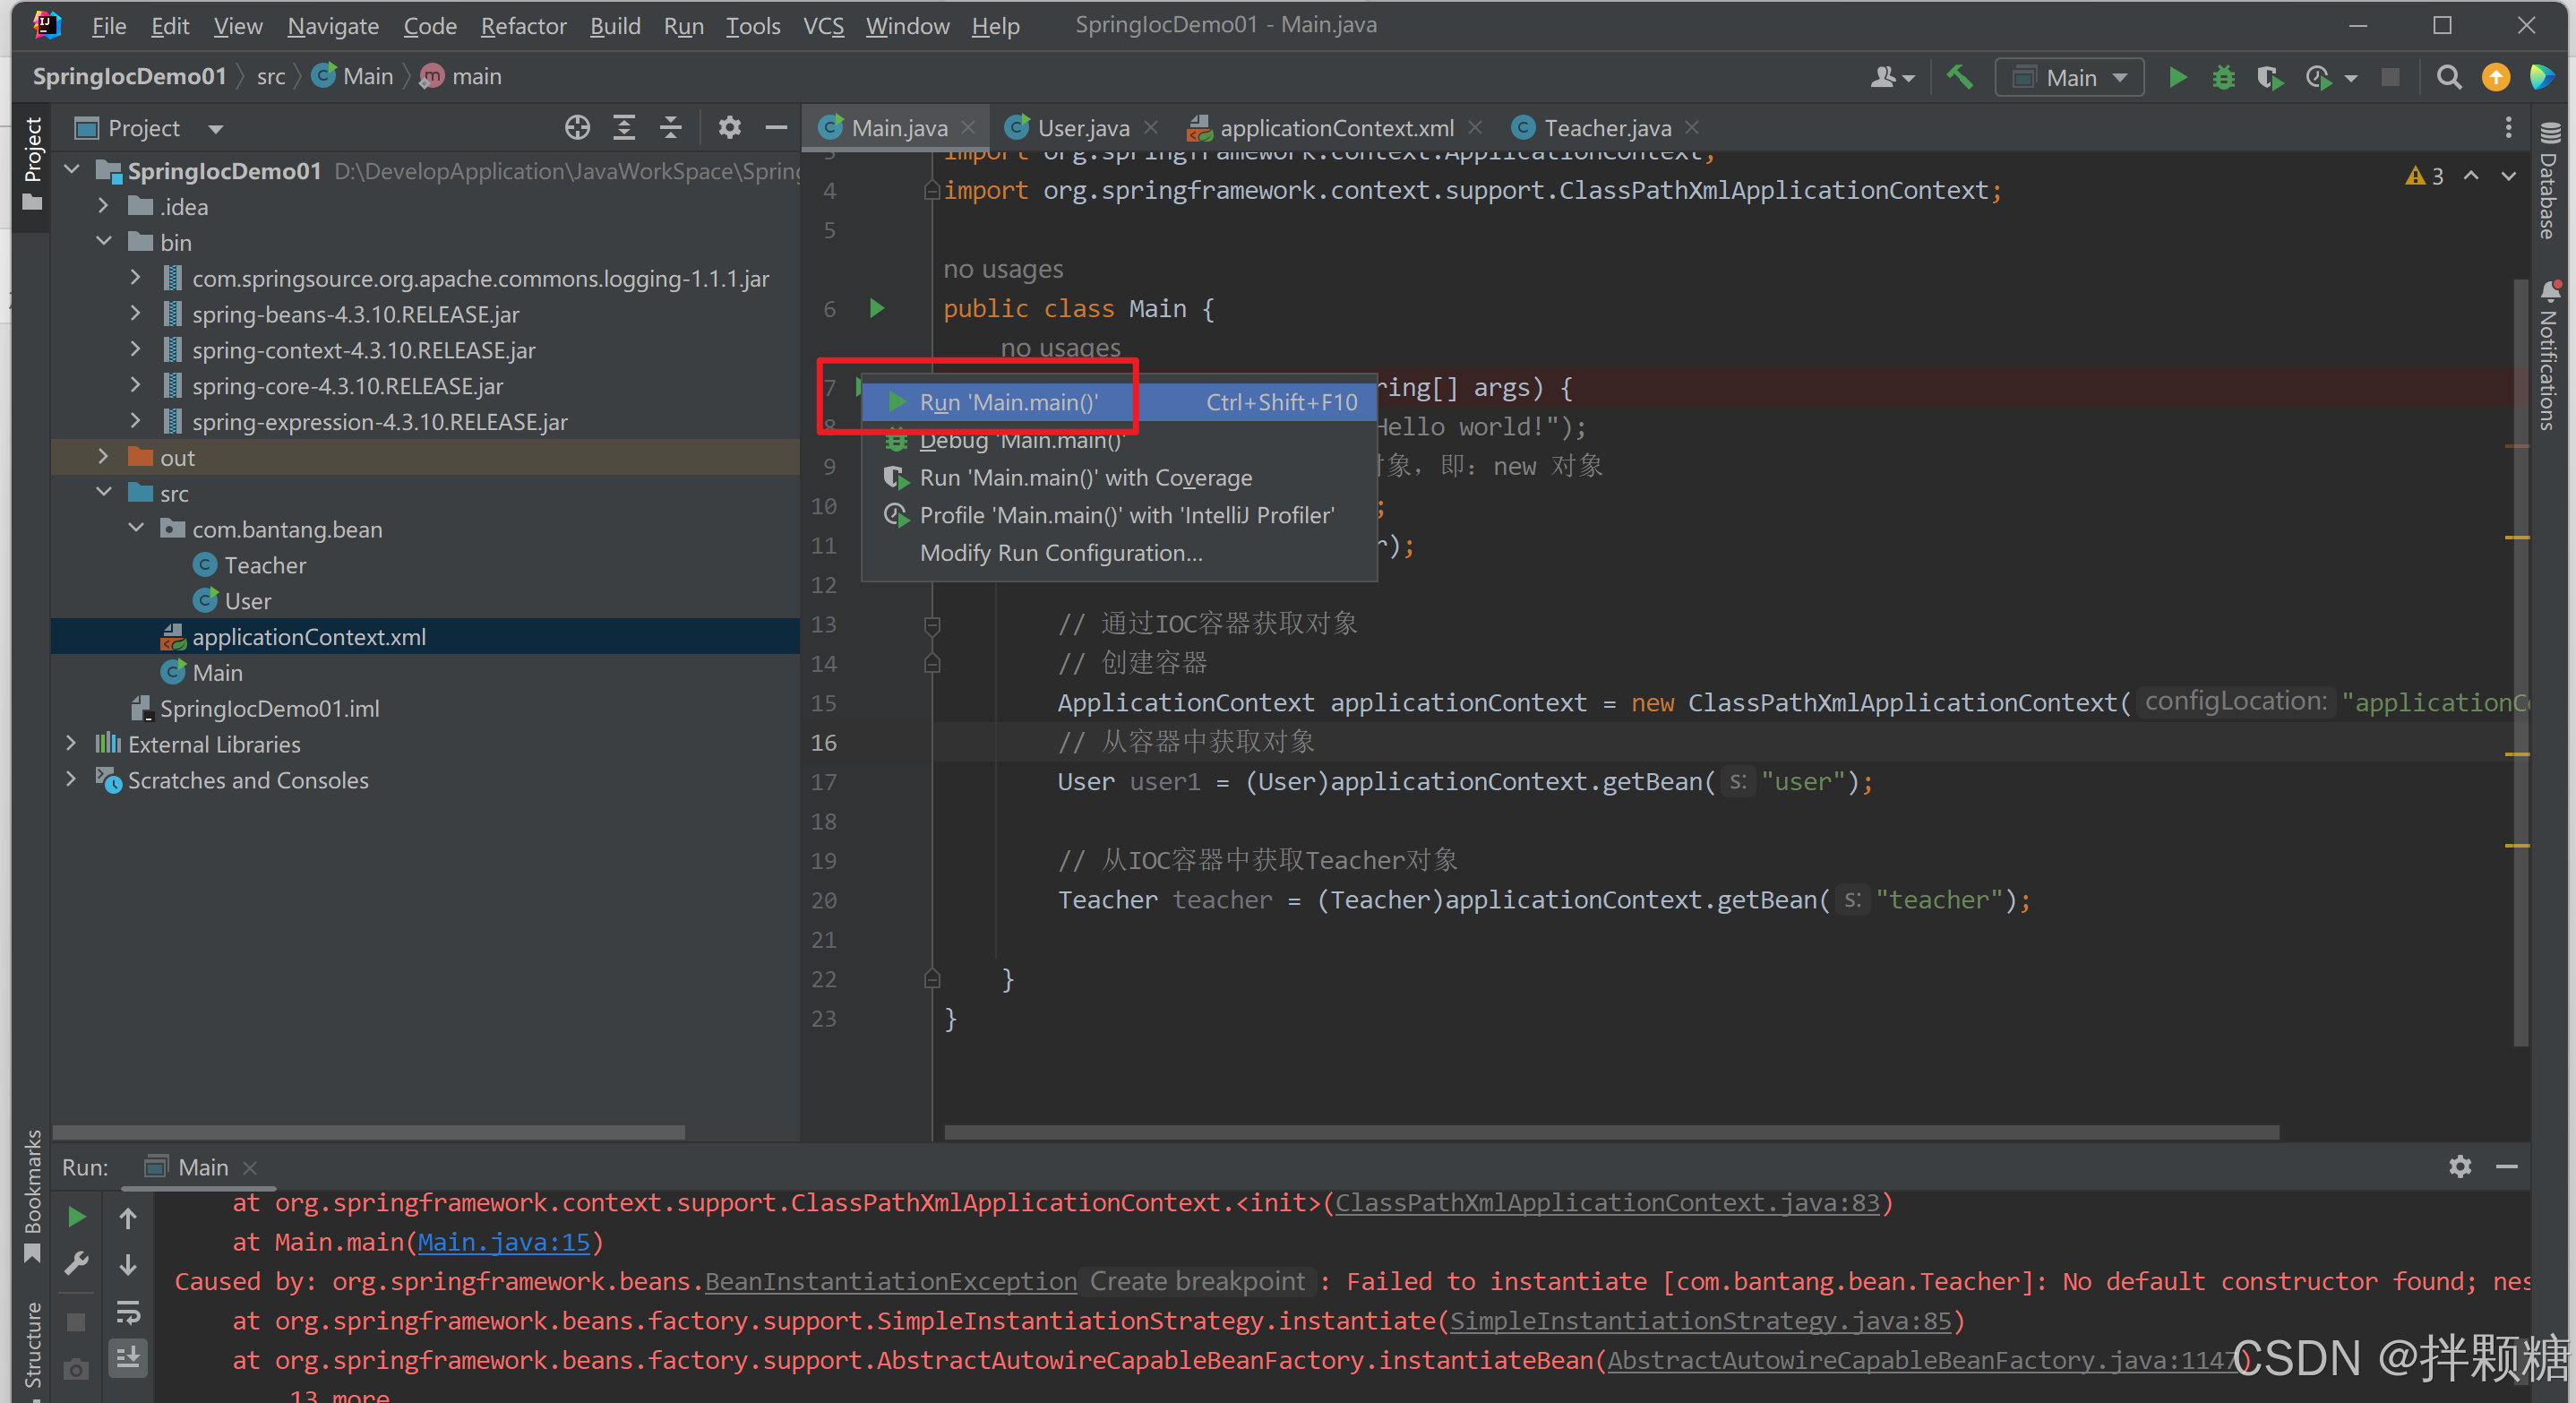
跑一下程序发现报错 报错原因:Teacher类中没有无参构造方法
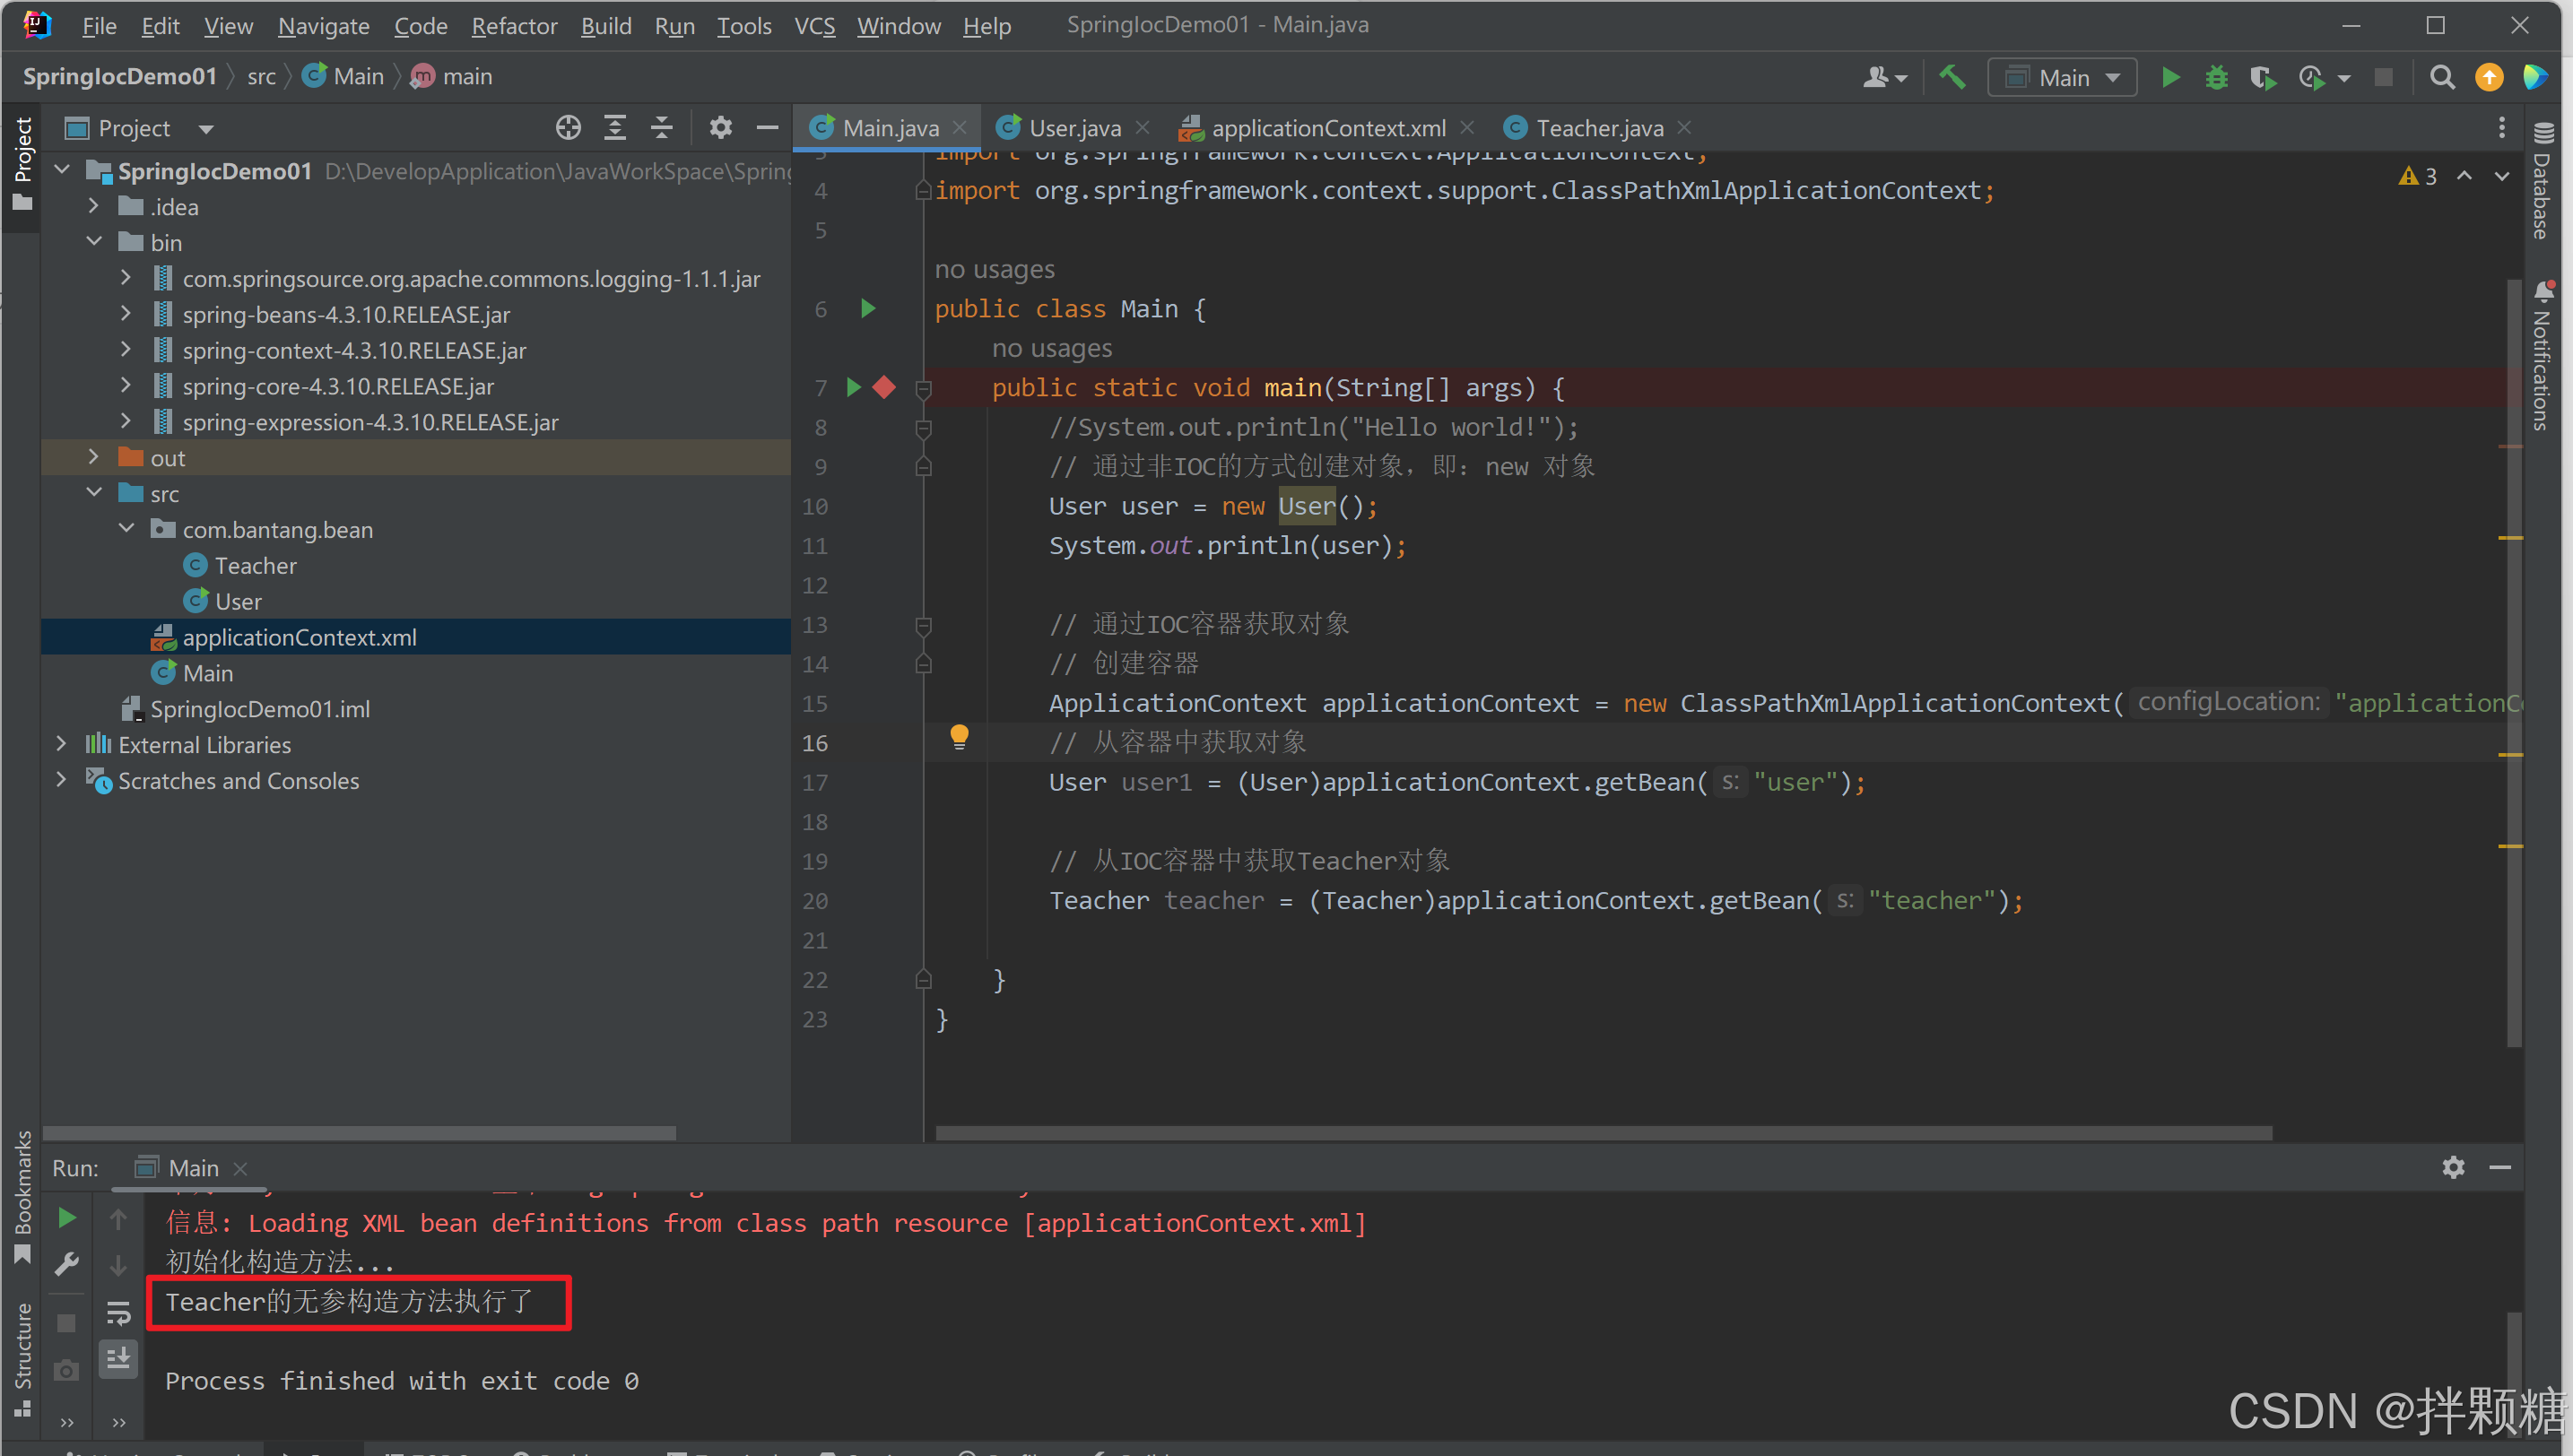
我们给Teacher类加上无参构造方法
容器配置文件也不再爆红
跑一下程序发现 不再报错
getBean传参用法
我们上面的Demo演示 getBean函数的传参都是容器给赋给对象的“name”,还可以传参“id” “class” 或 “id”、“name”、“class”组合
(1)传参name
(2)传参id
(3)传参class
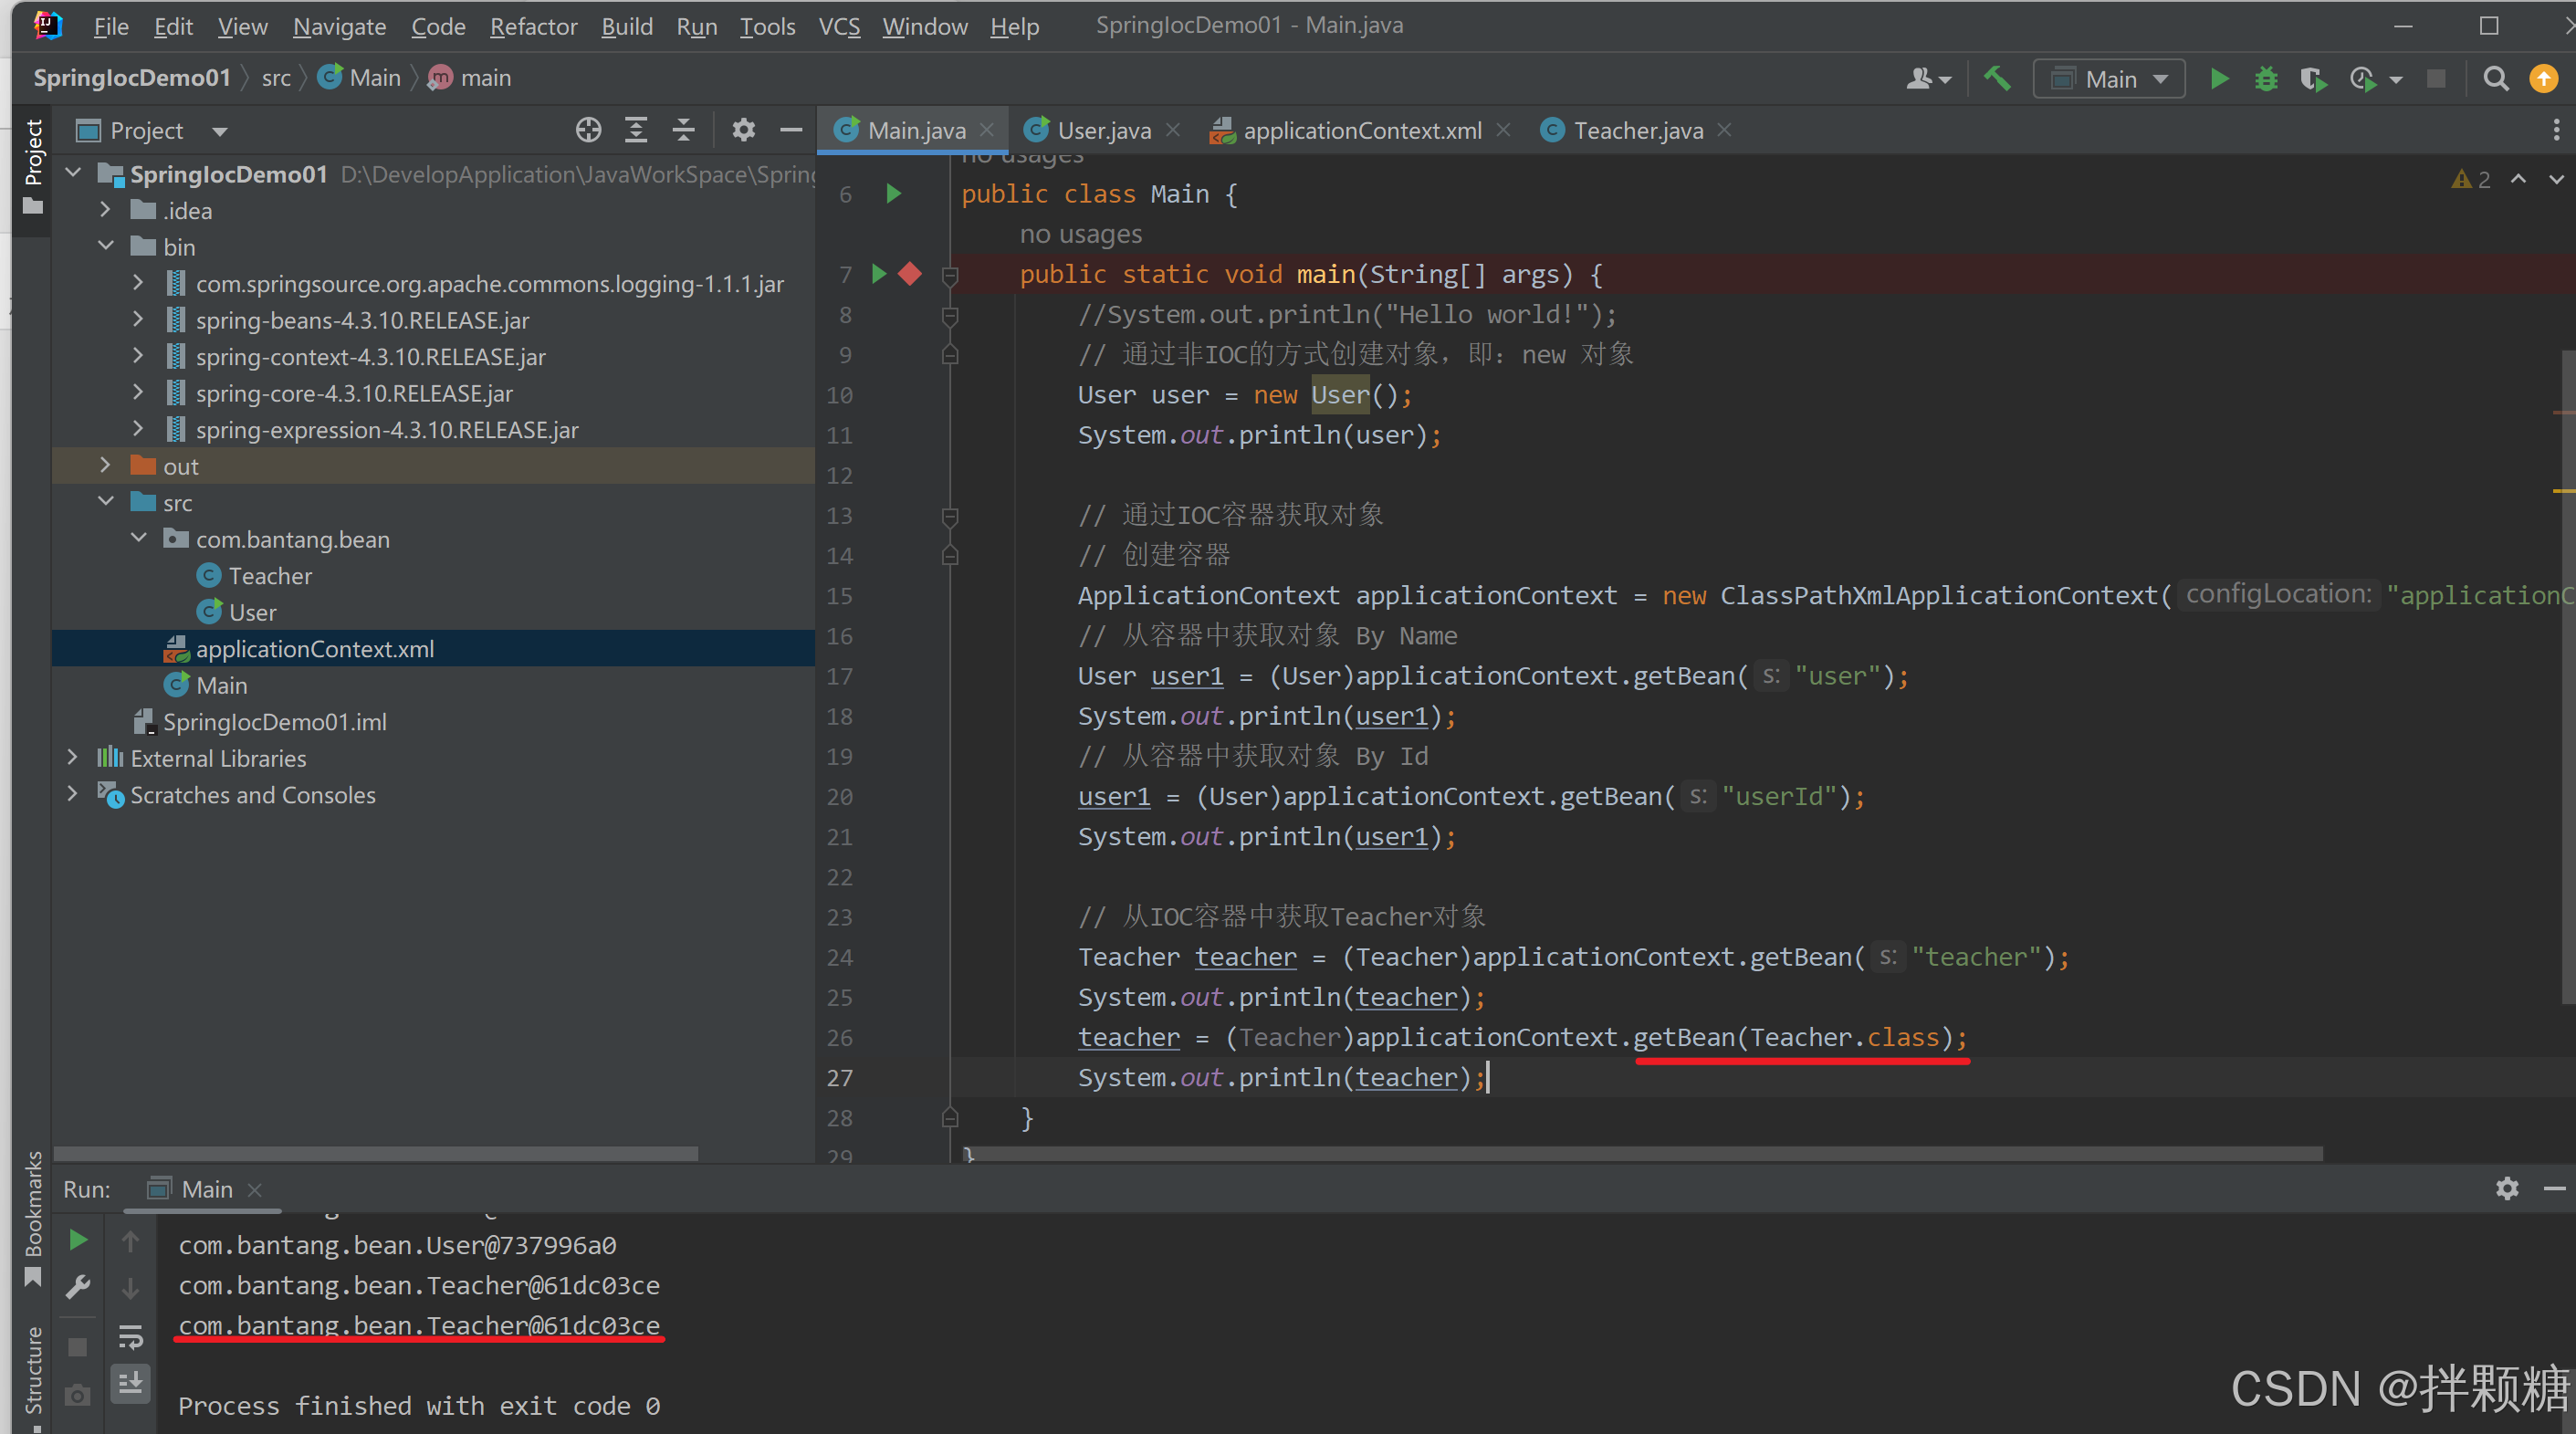
(4)组合传参
为什么要组合传参?
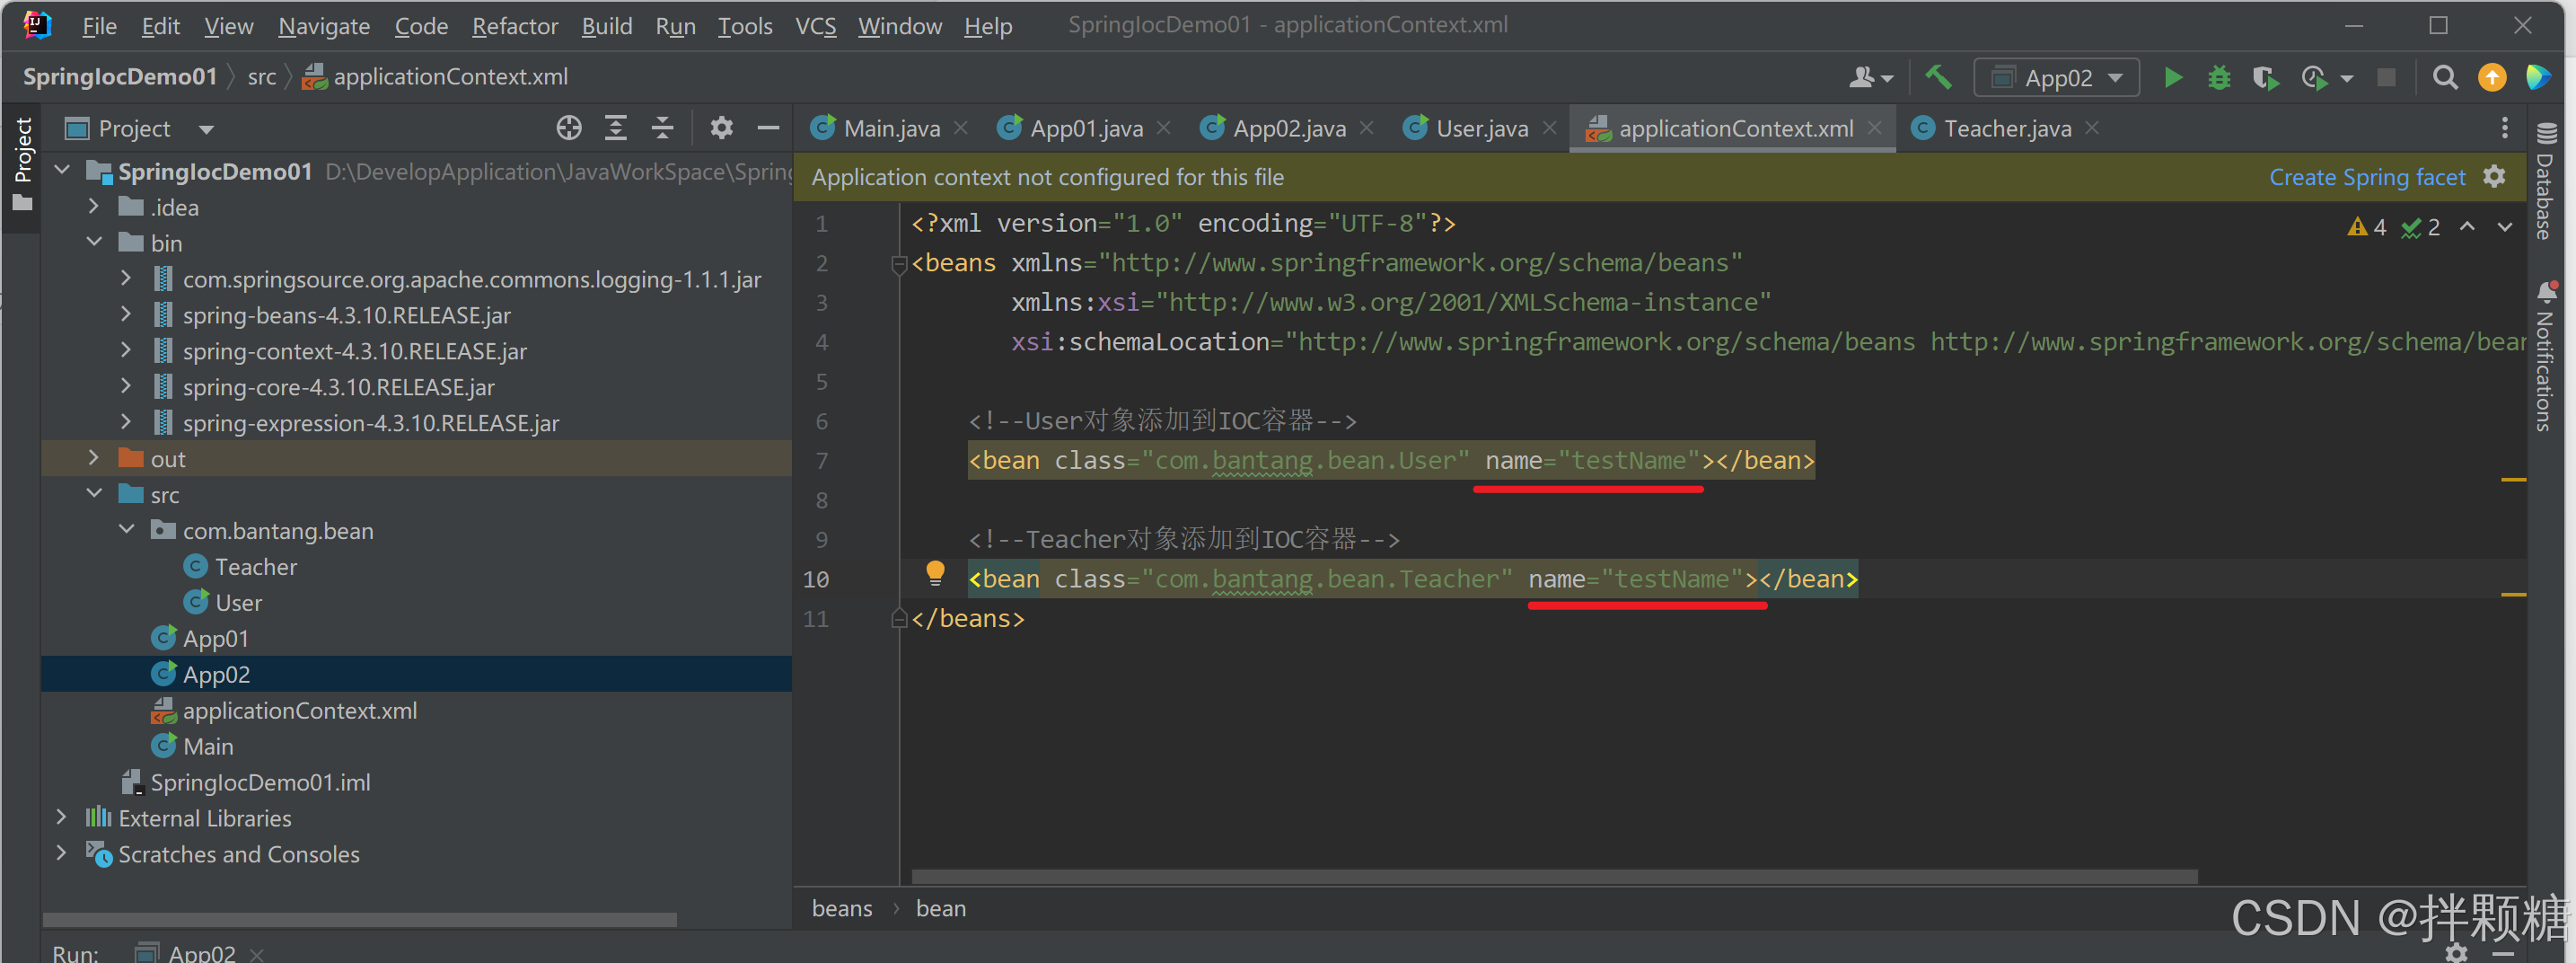
id相当于人的身份证号 必须唯一 如果2个人身份证号重复了 是不是就有问题
name相当于人的名字 如果2个人名字重复 那我们怎么知道我们要找的是哪个人
class相当于物种 如果你只说你要找人 那么多人你要找谁
因此 容器中每个对象id必须唯一,id重复会报错

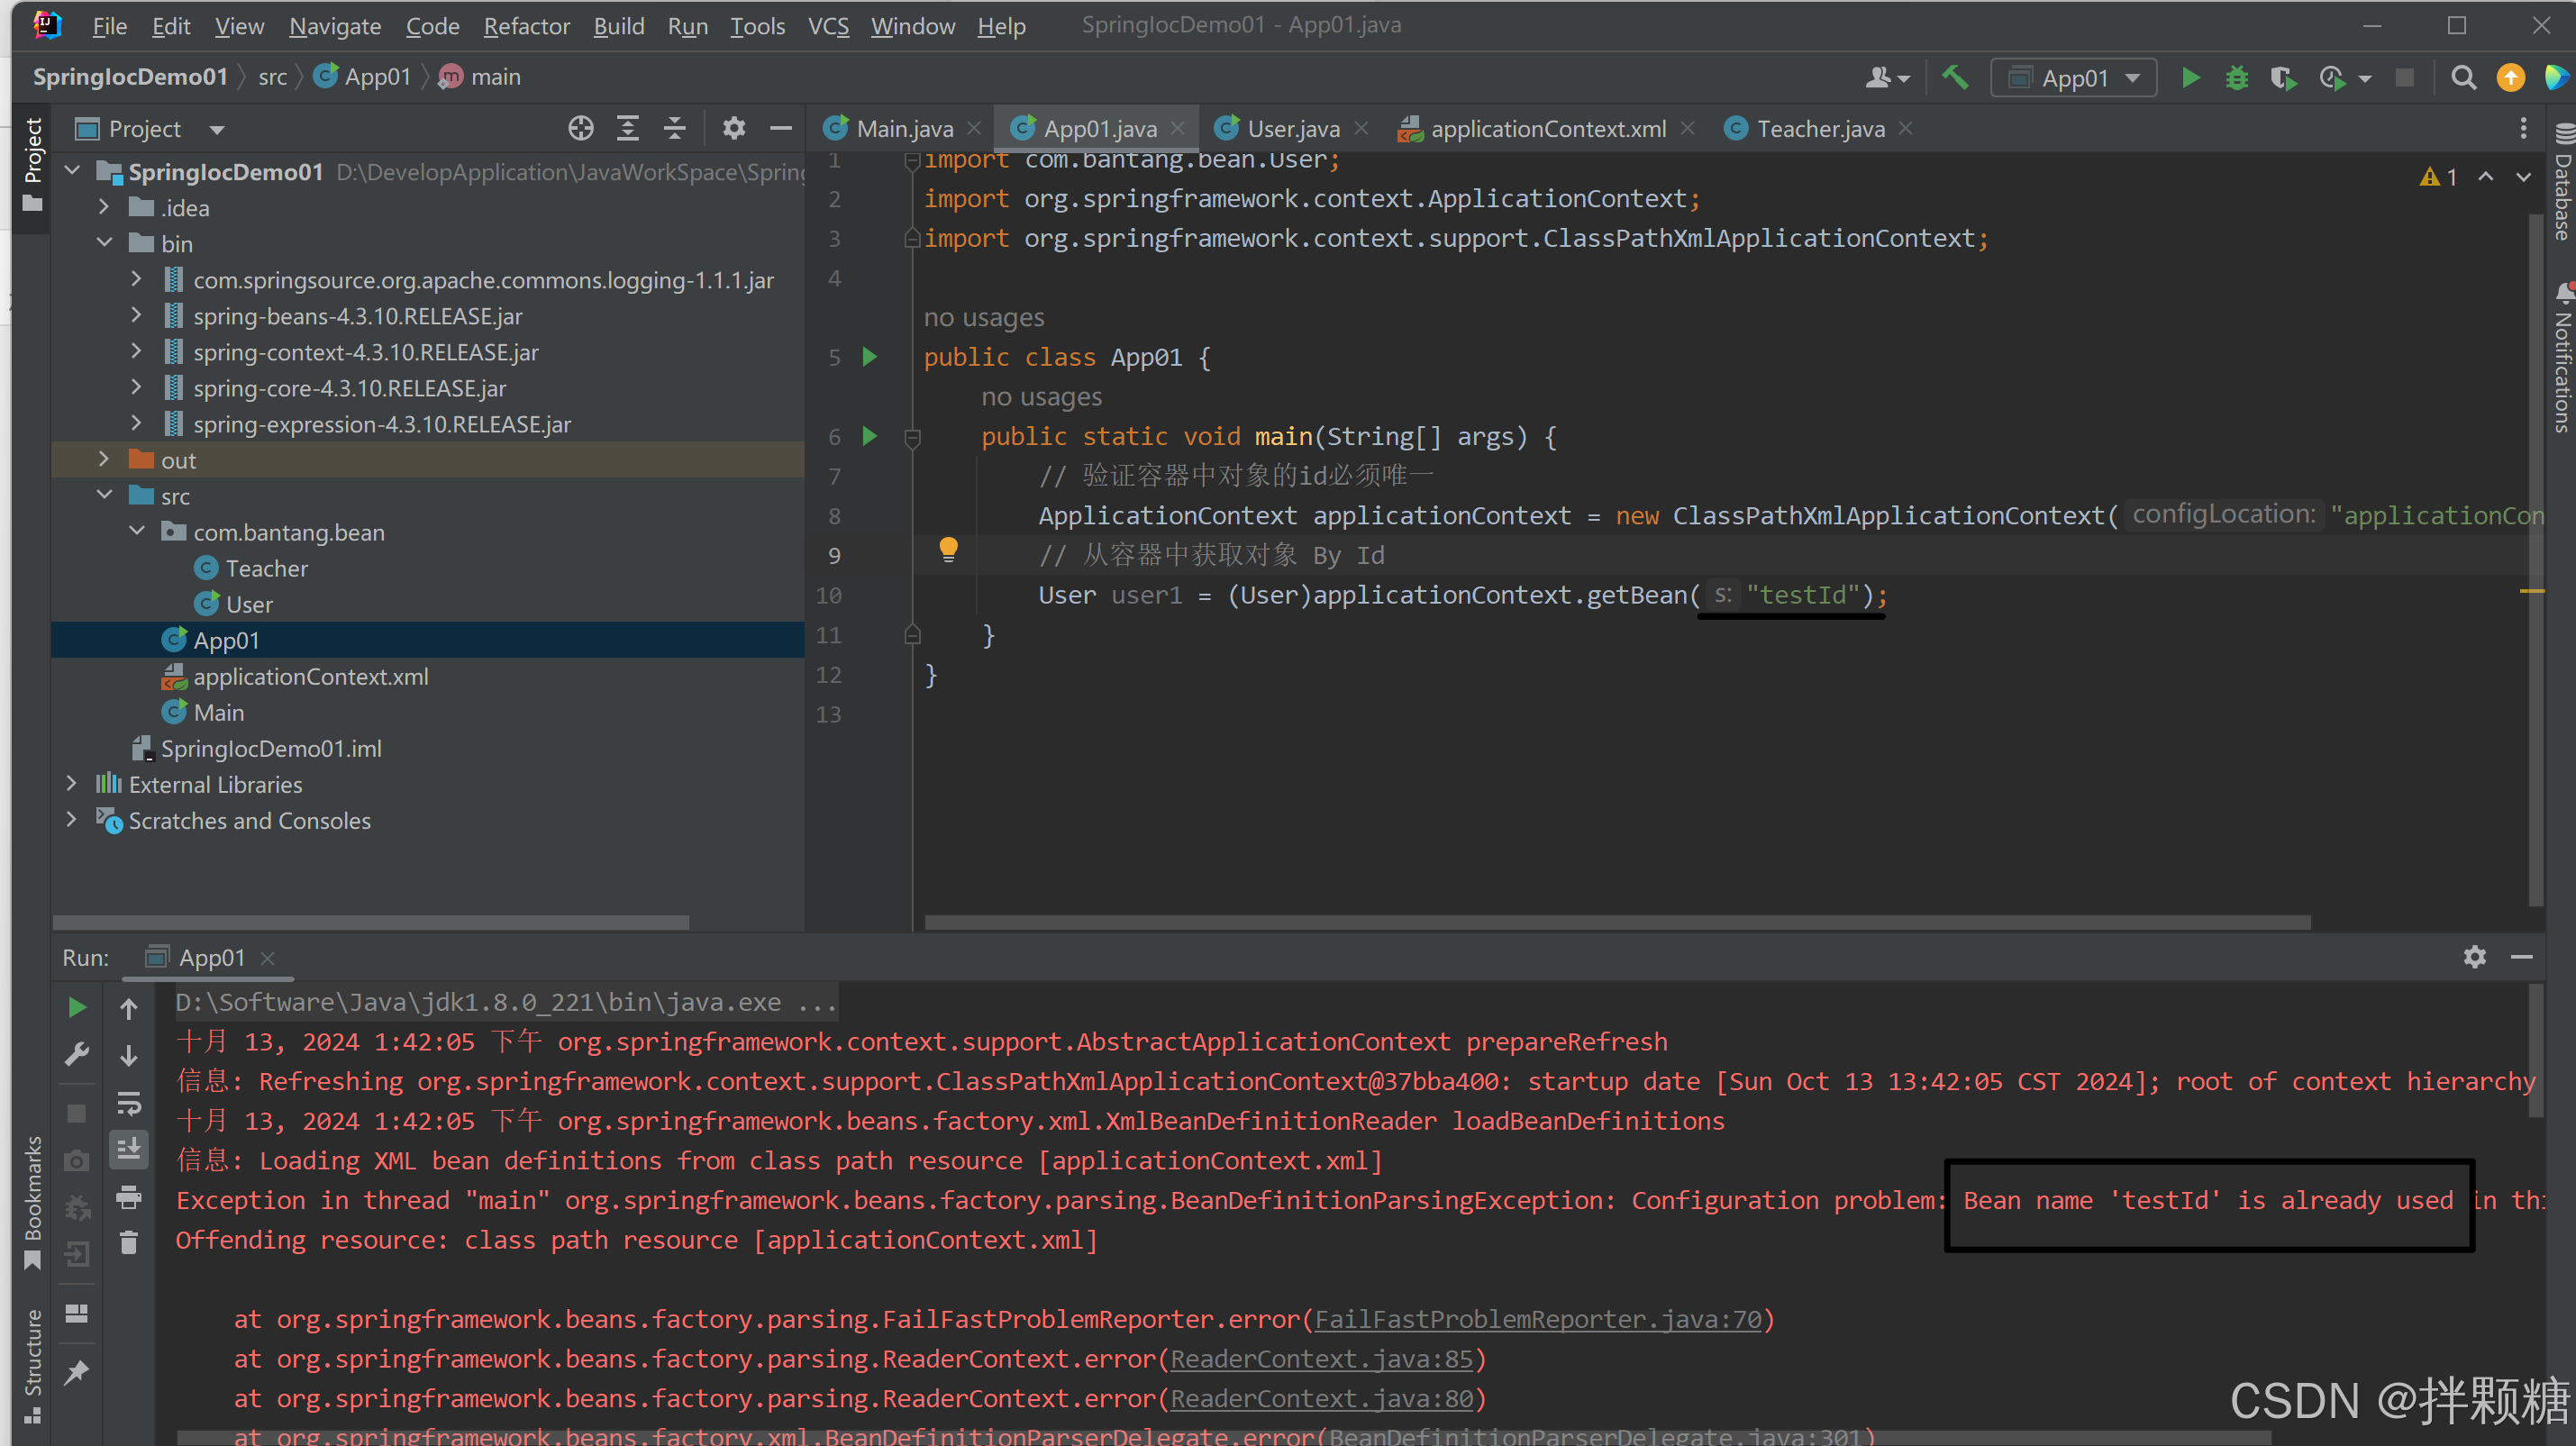
因此 容器中每个对象name必须唯一,name重复会报错
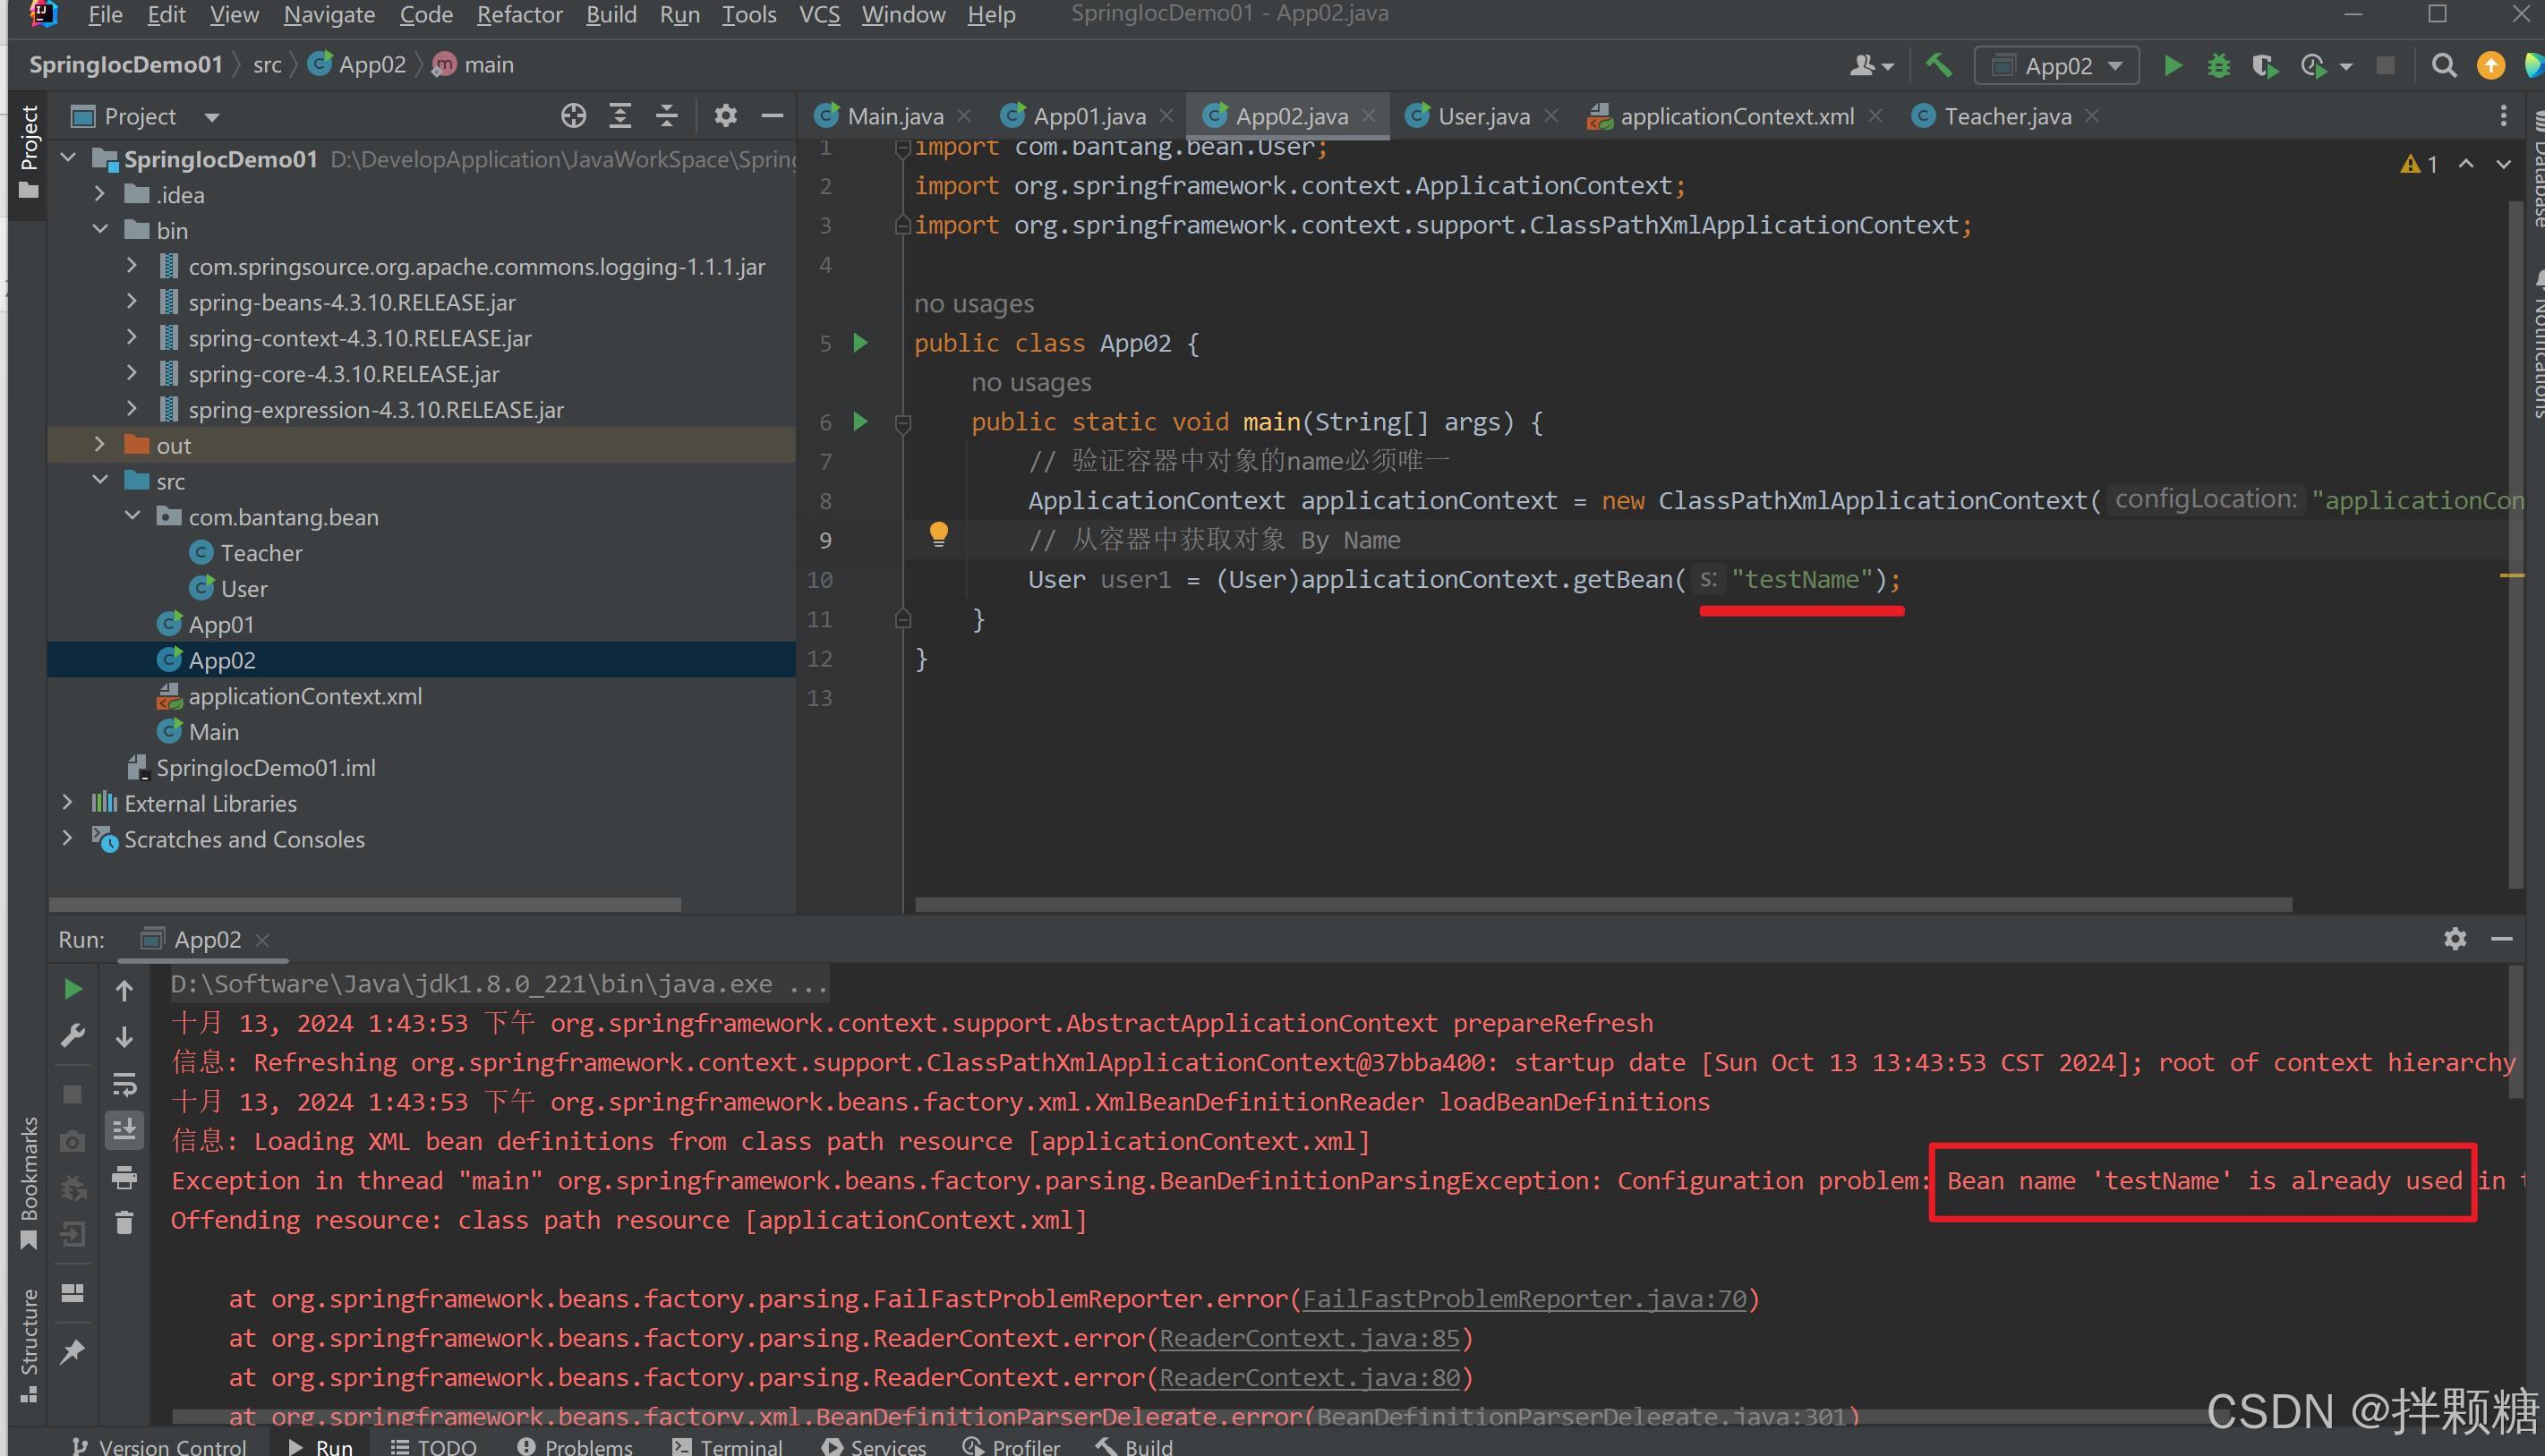
因此 容器中为类添加多个对象时,只通过类类型获取bean会报错 找不到唯一的Teacher对象

组合传参 Id+类型组合 获取对象

组合传参 name+类型组合 获取对象

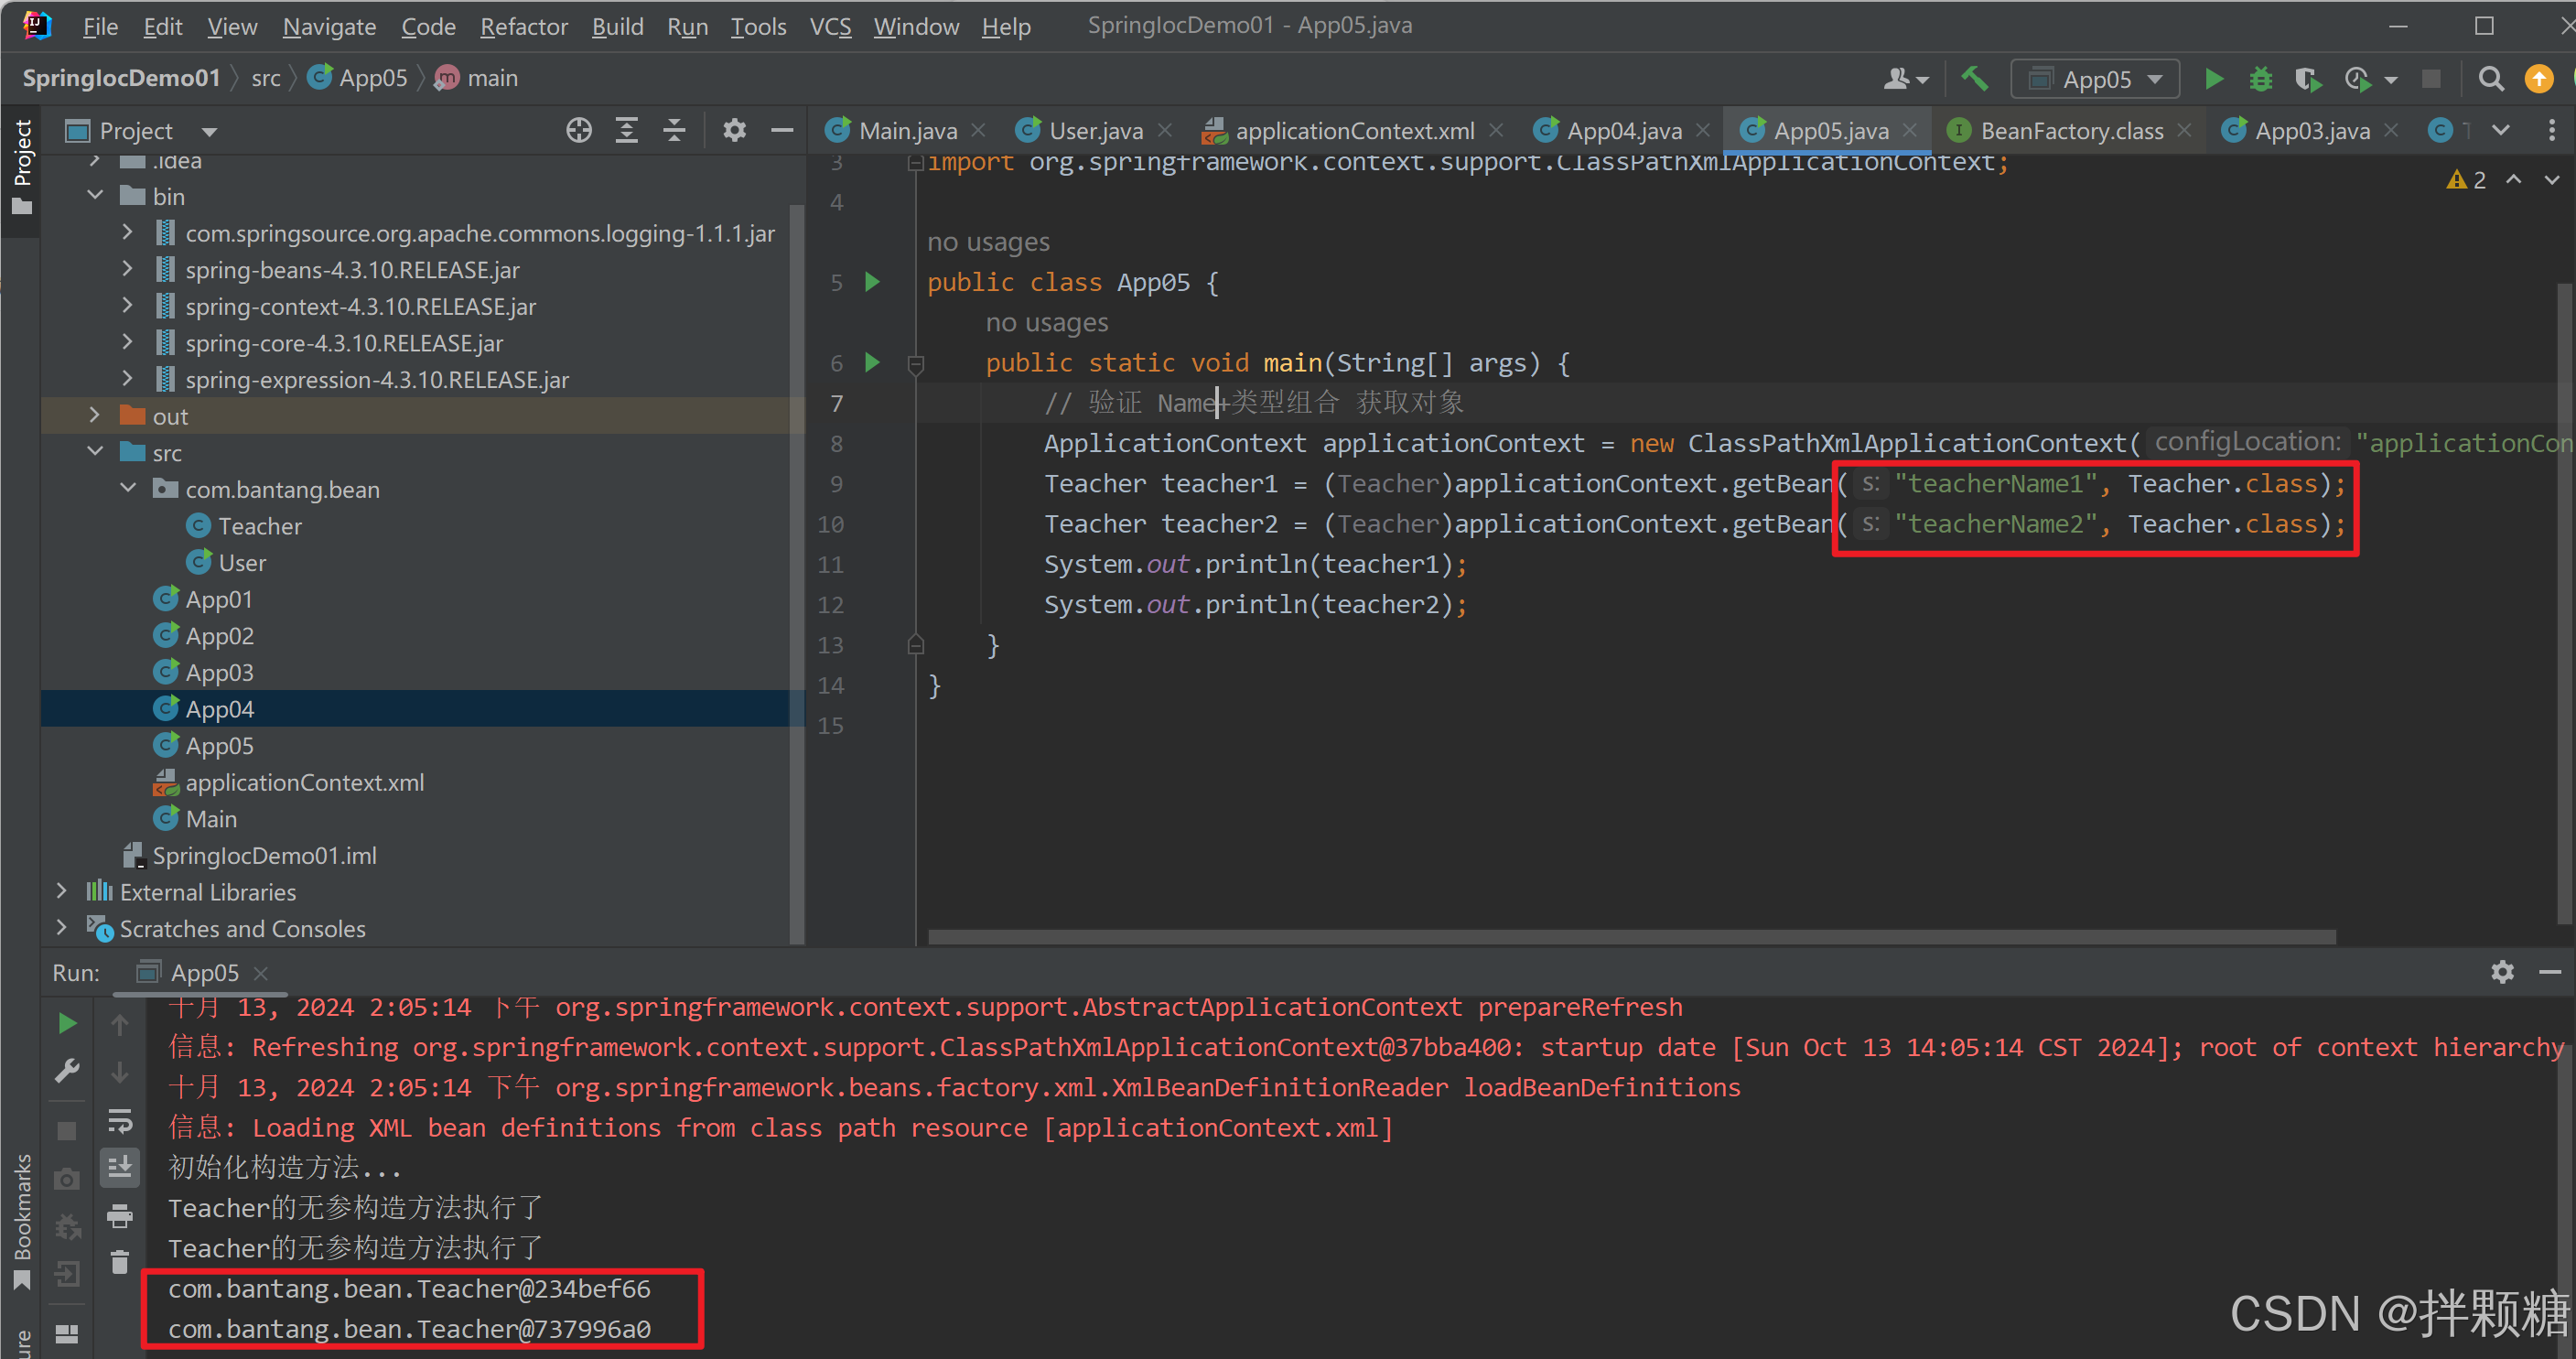
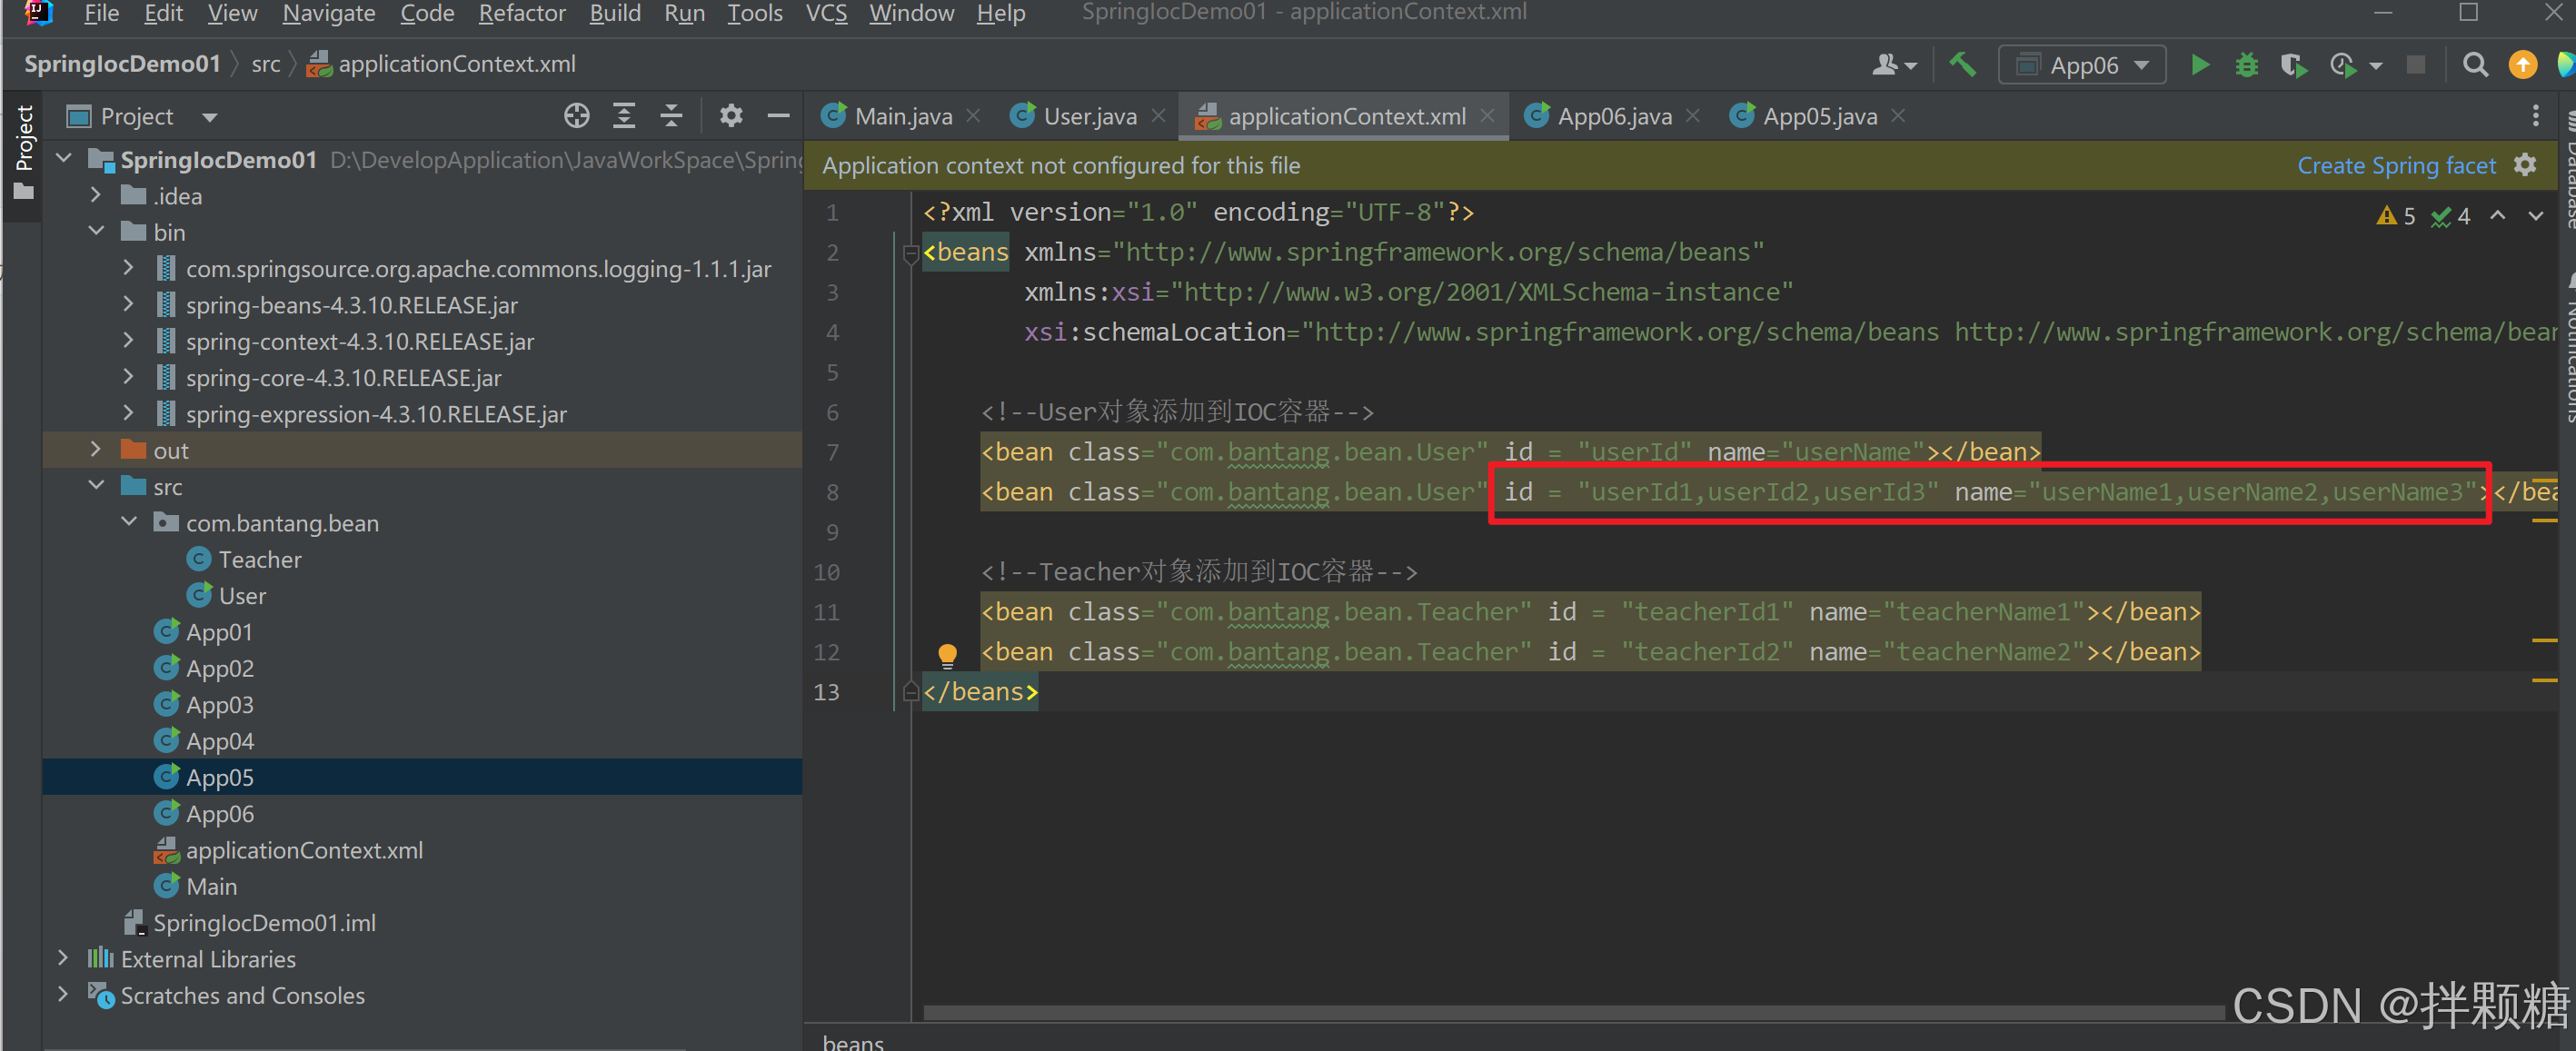
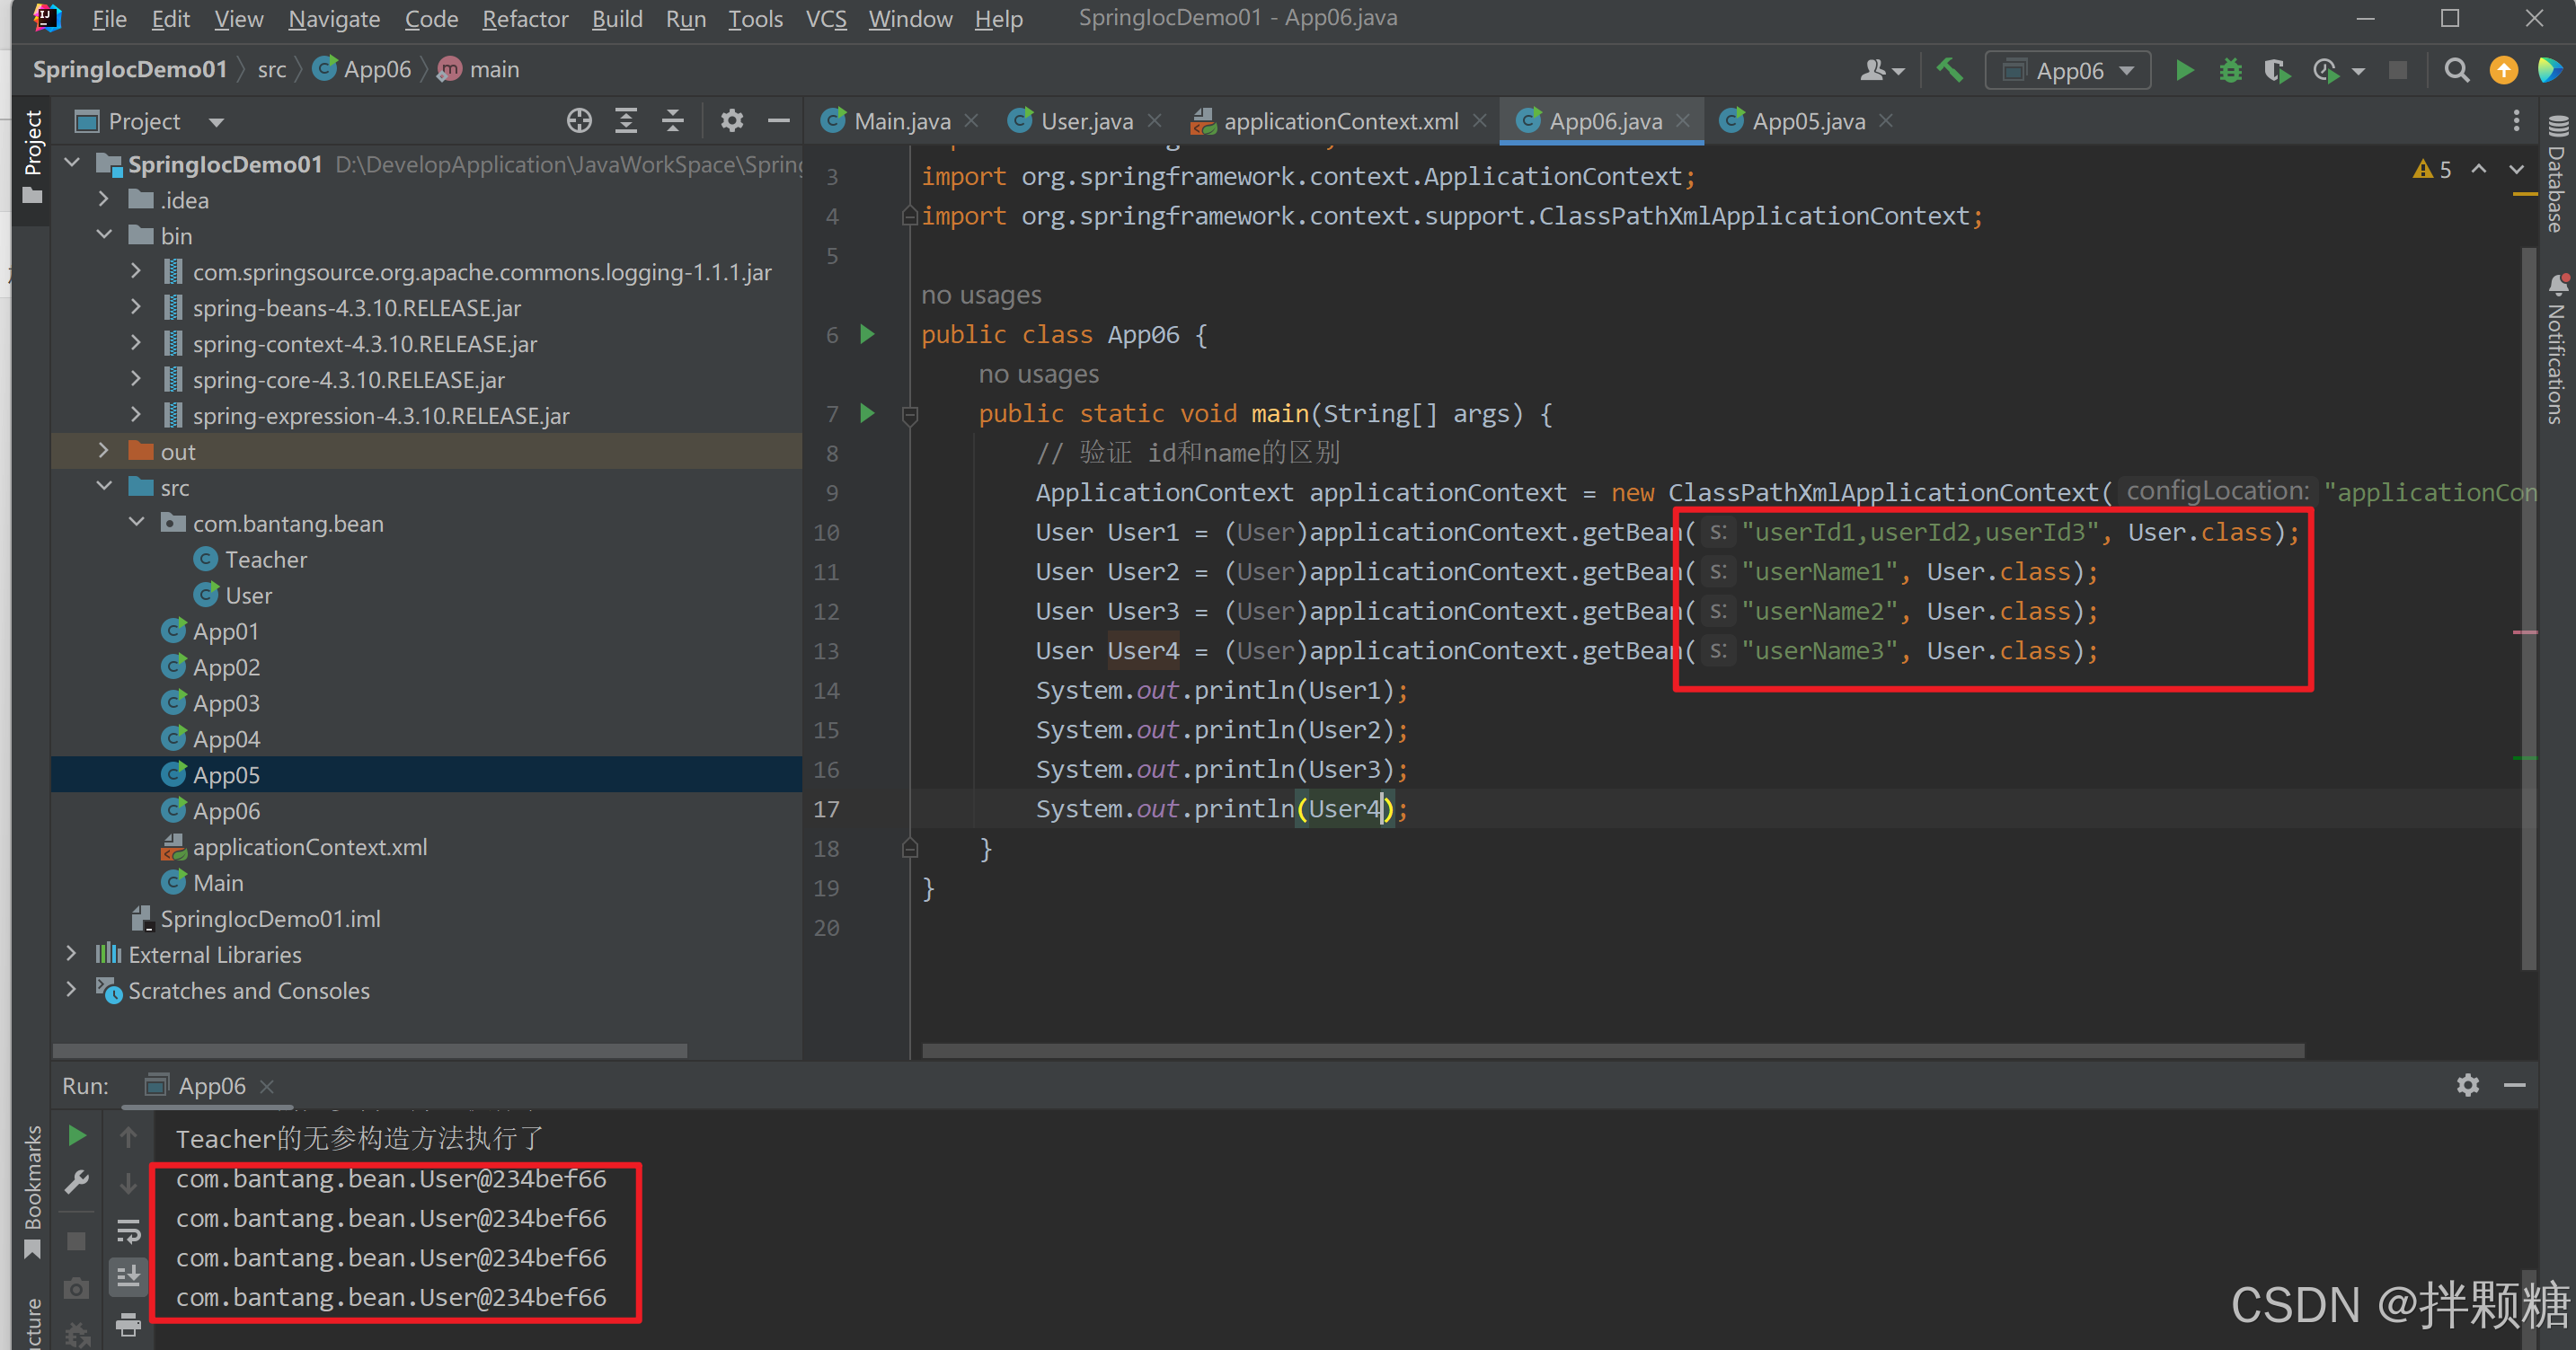
(5)id和name的区别
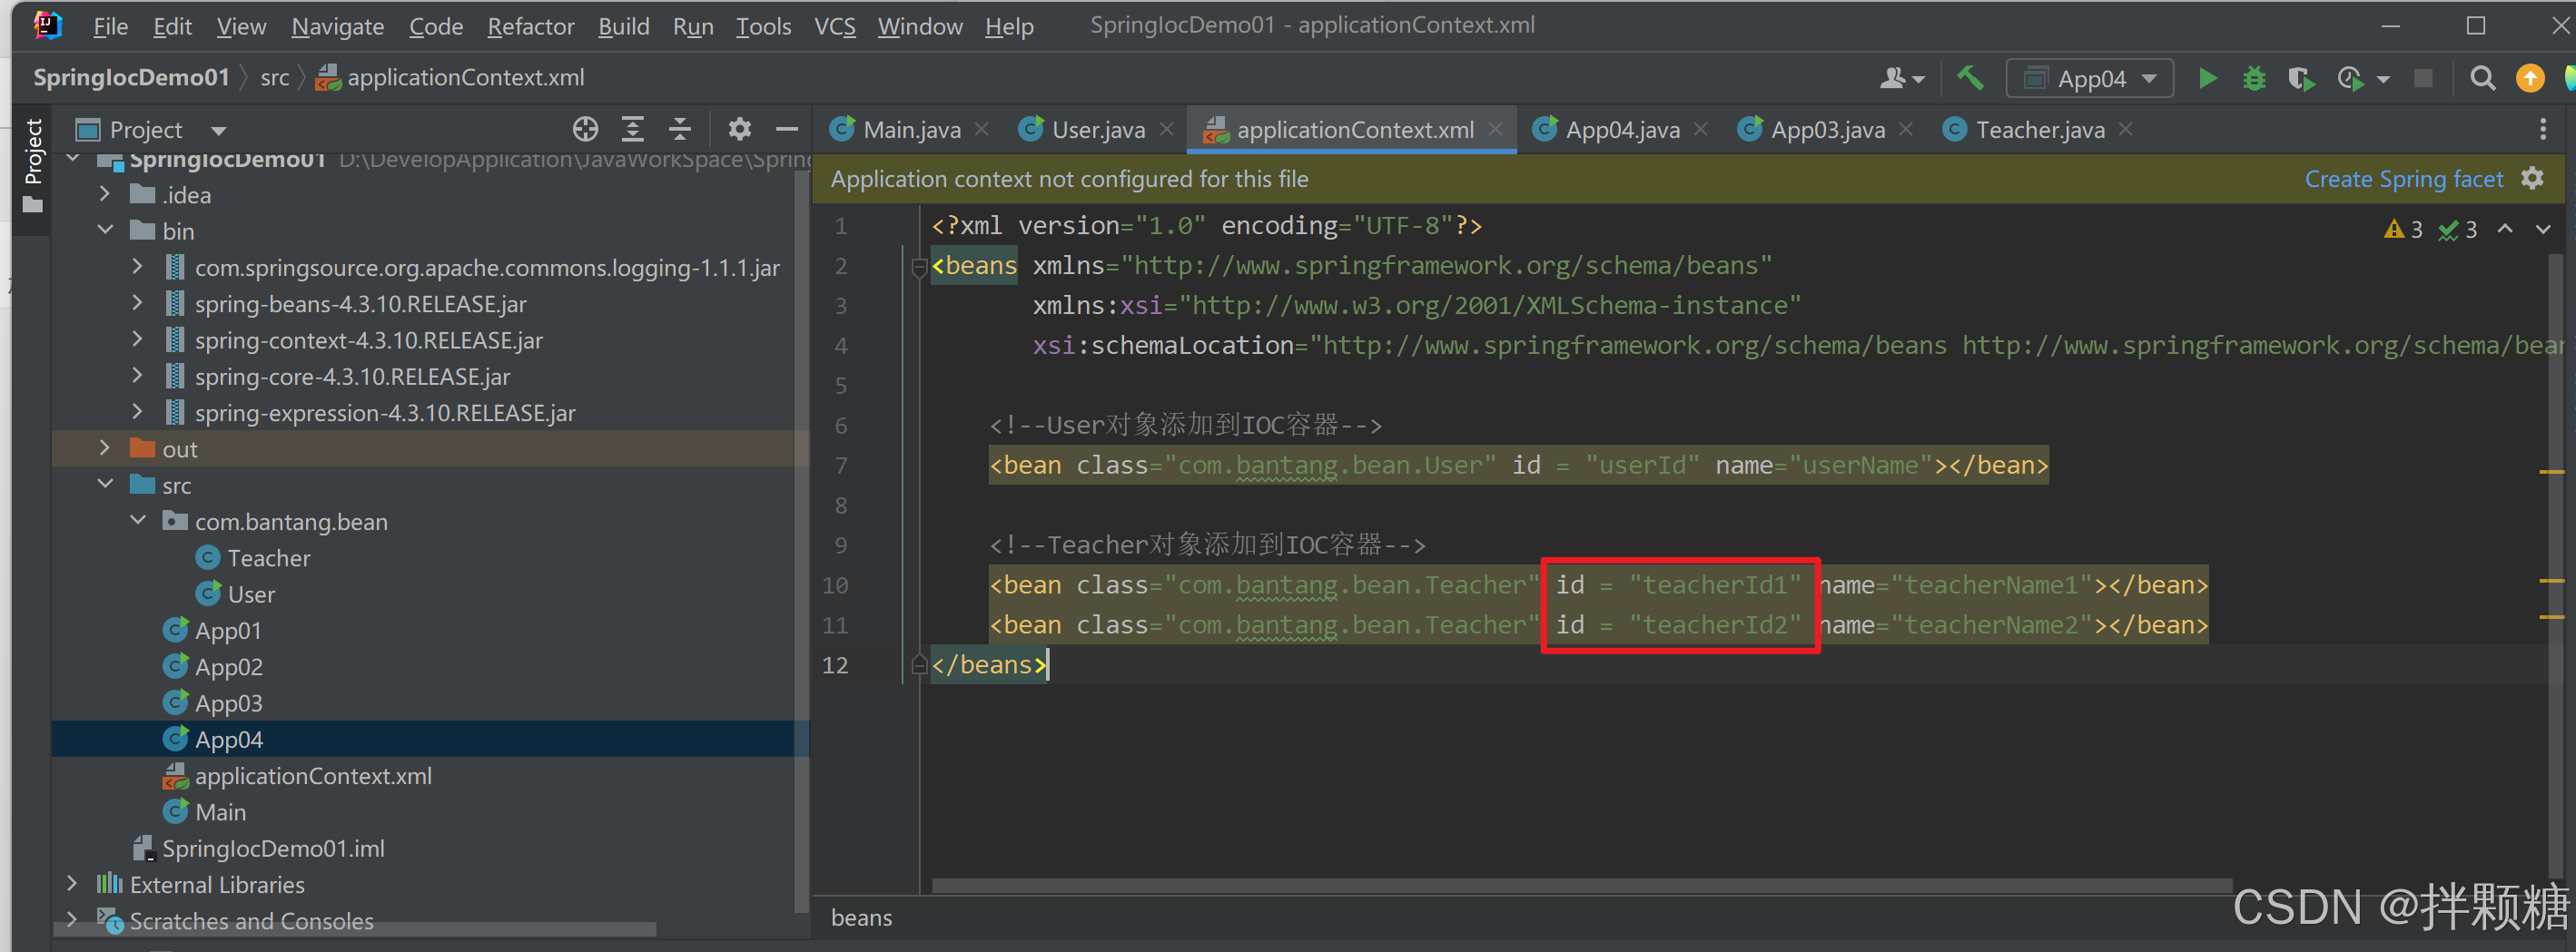
一个对象只能有一个id,但是可以有多个name
如下,代表注册到容器的这个对象的唯一id为“userId1,userId2,userId3”,这个对象有3个name,分别为“userName1”、“userName2”和“userName3”
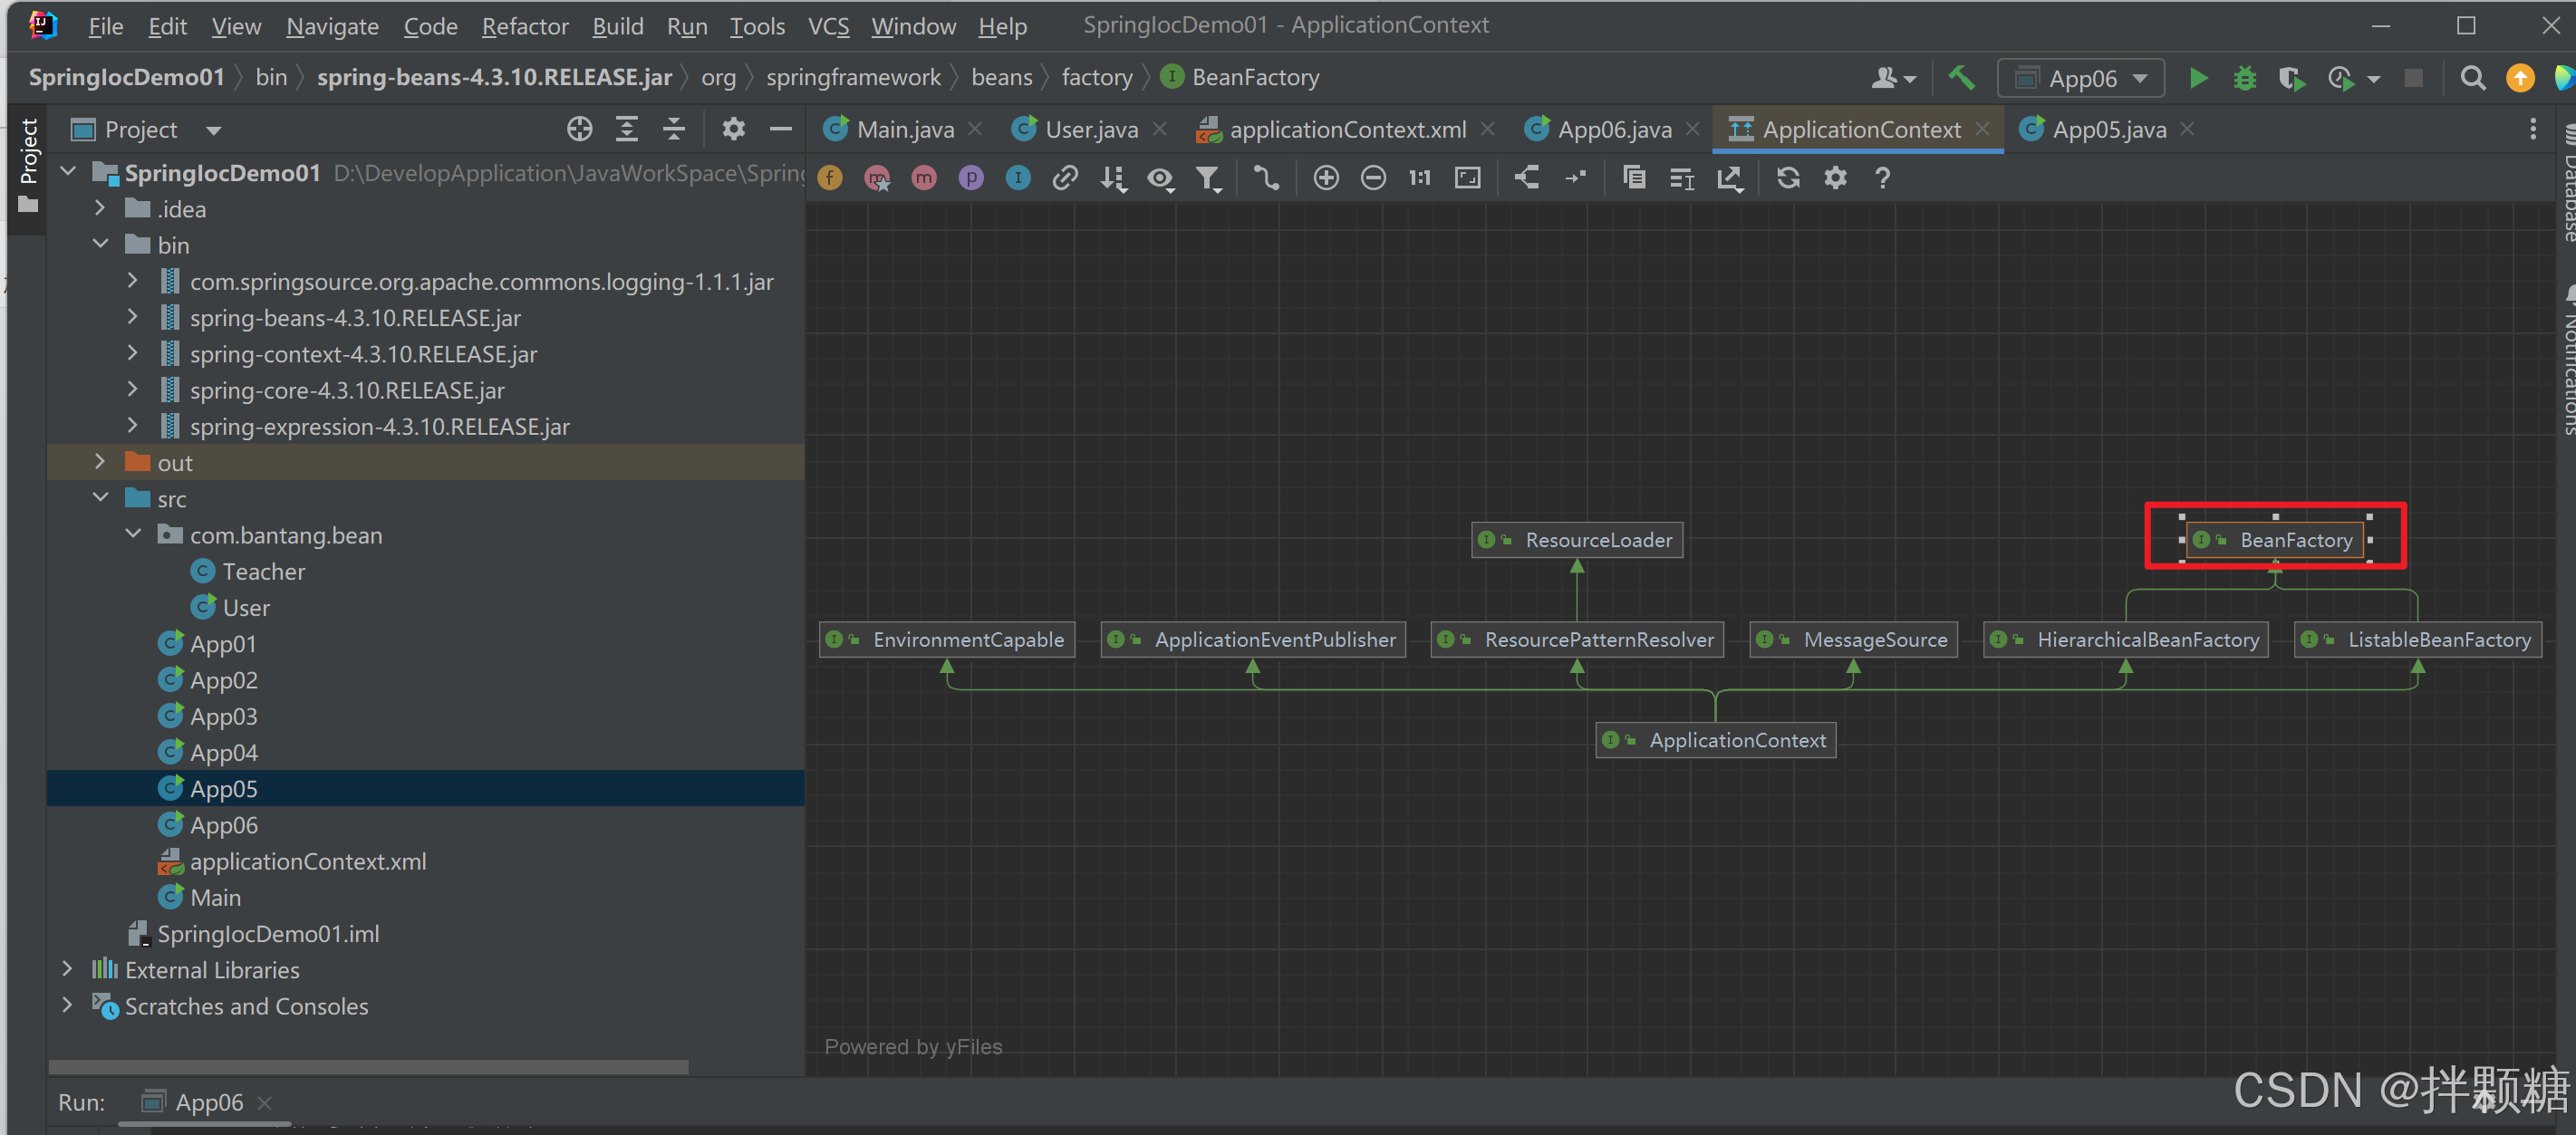
BeanFactory和ApplicationContext区别
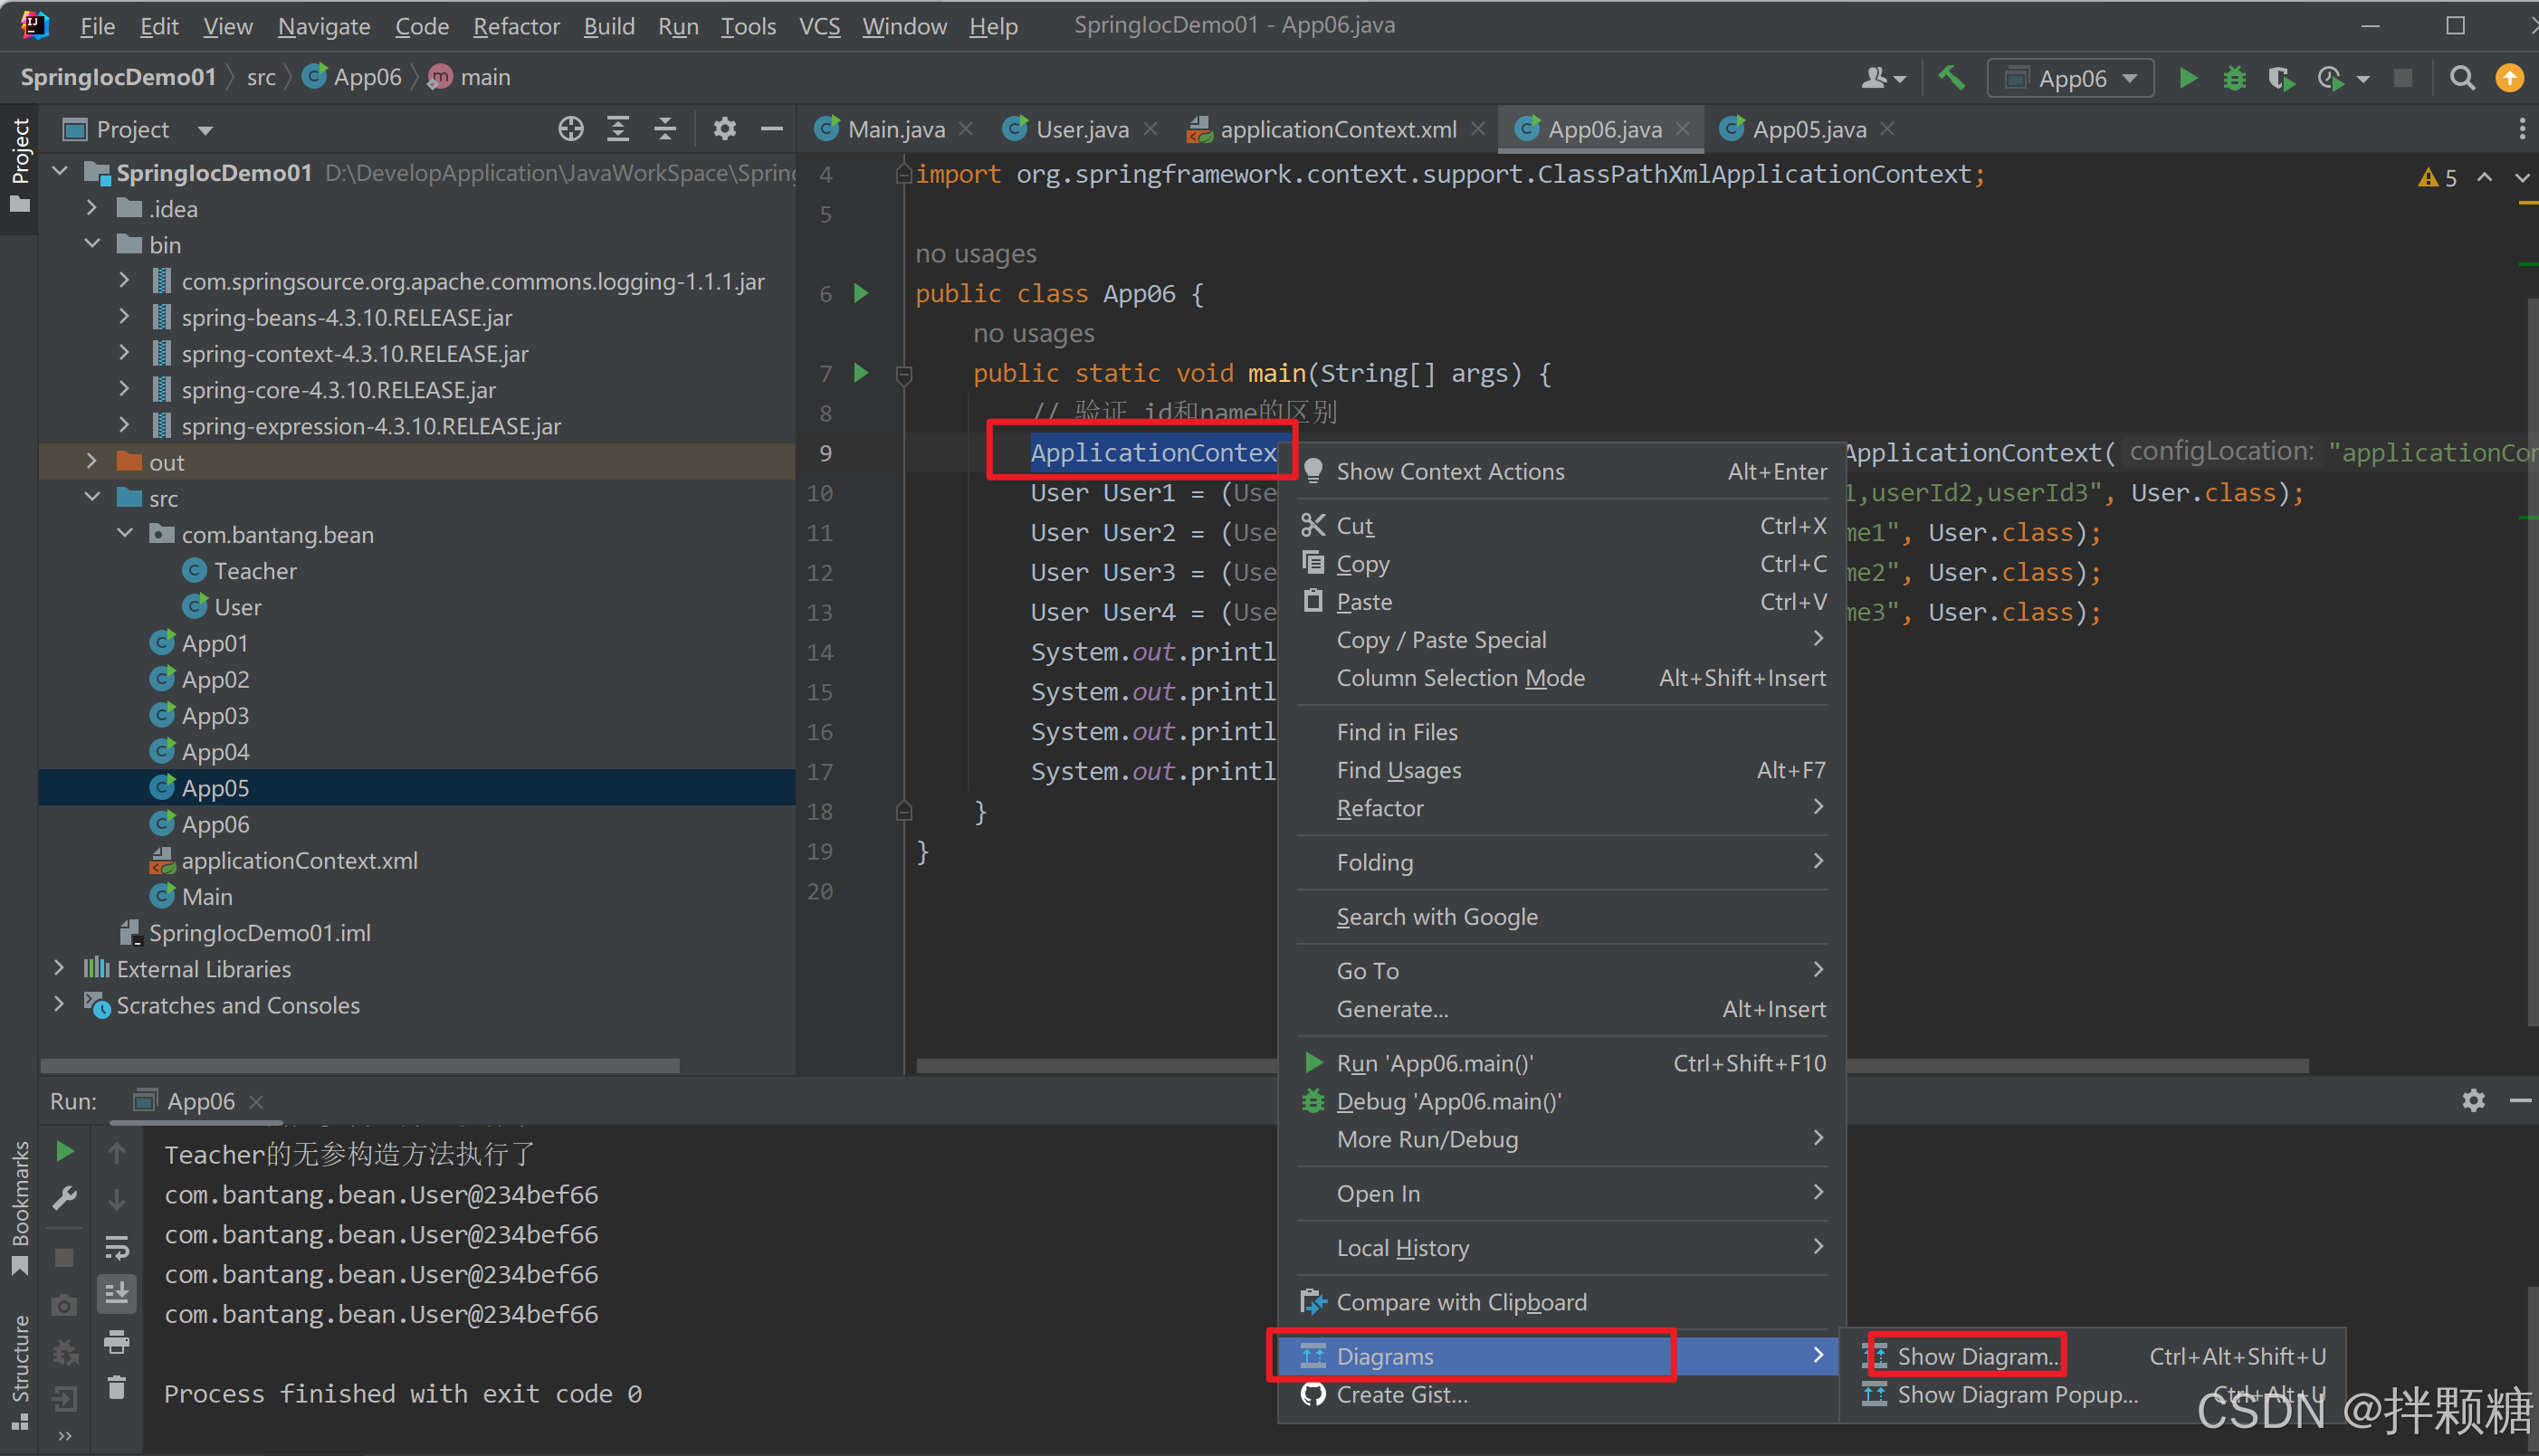
类图解构
按照步骤打开类图解构
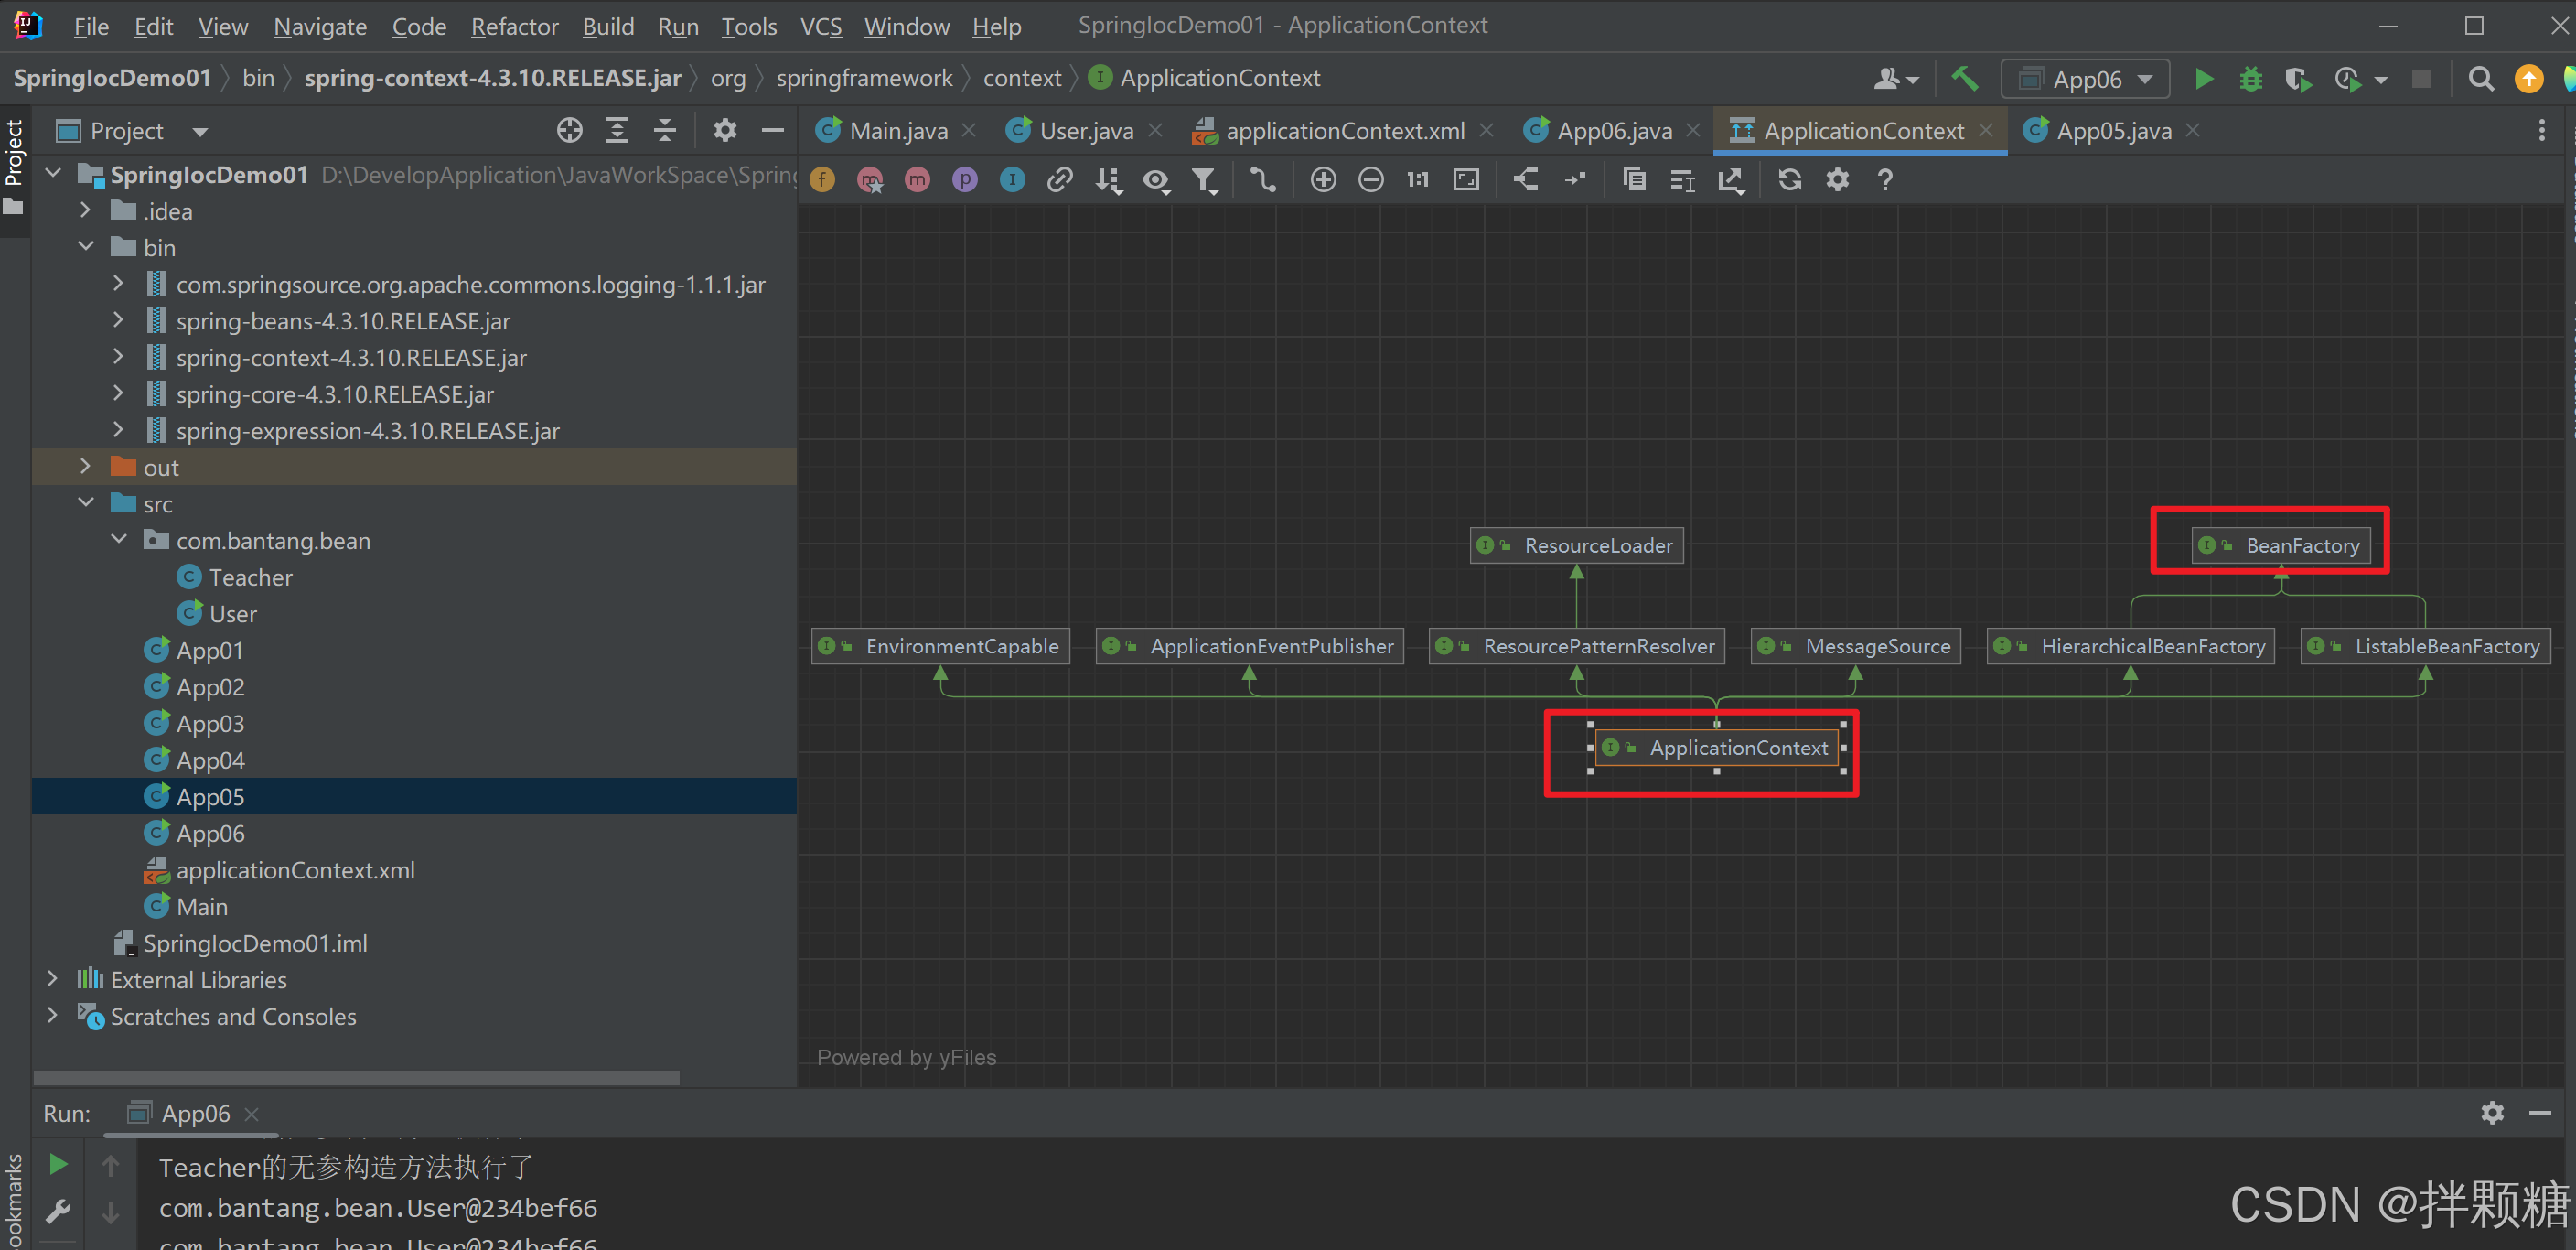
(1)从打开的类图解构得知 ApplicationContext 和 BeanFactory都是接口
(2)BeanFactory是ApplicationContext的其中一个父接口,因此,ApplicationContext功能比BeanFactory强大
BeanFactory的实现
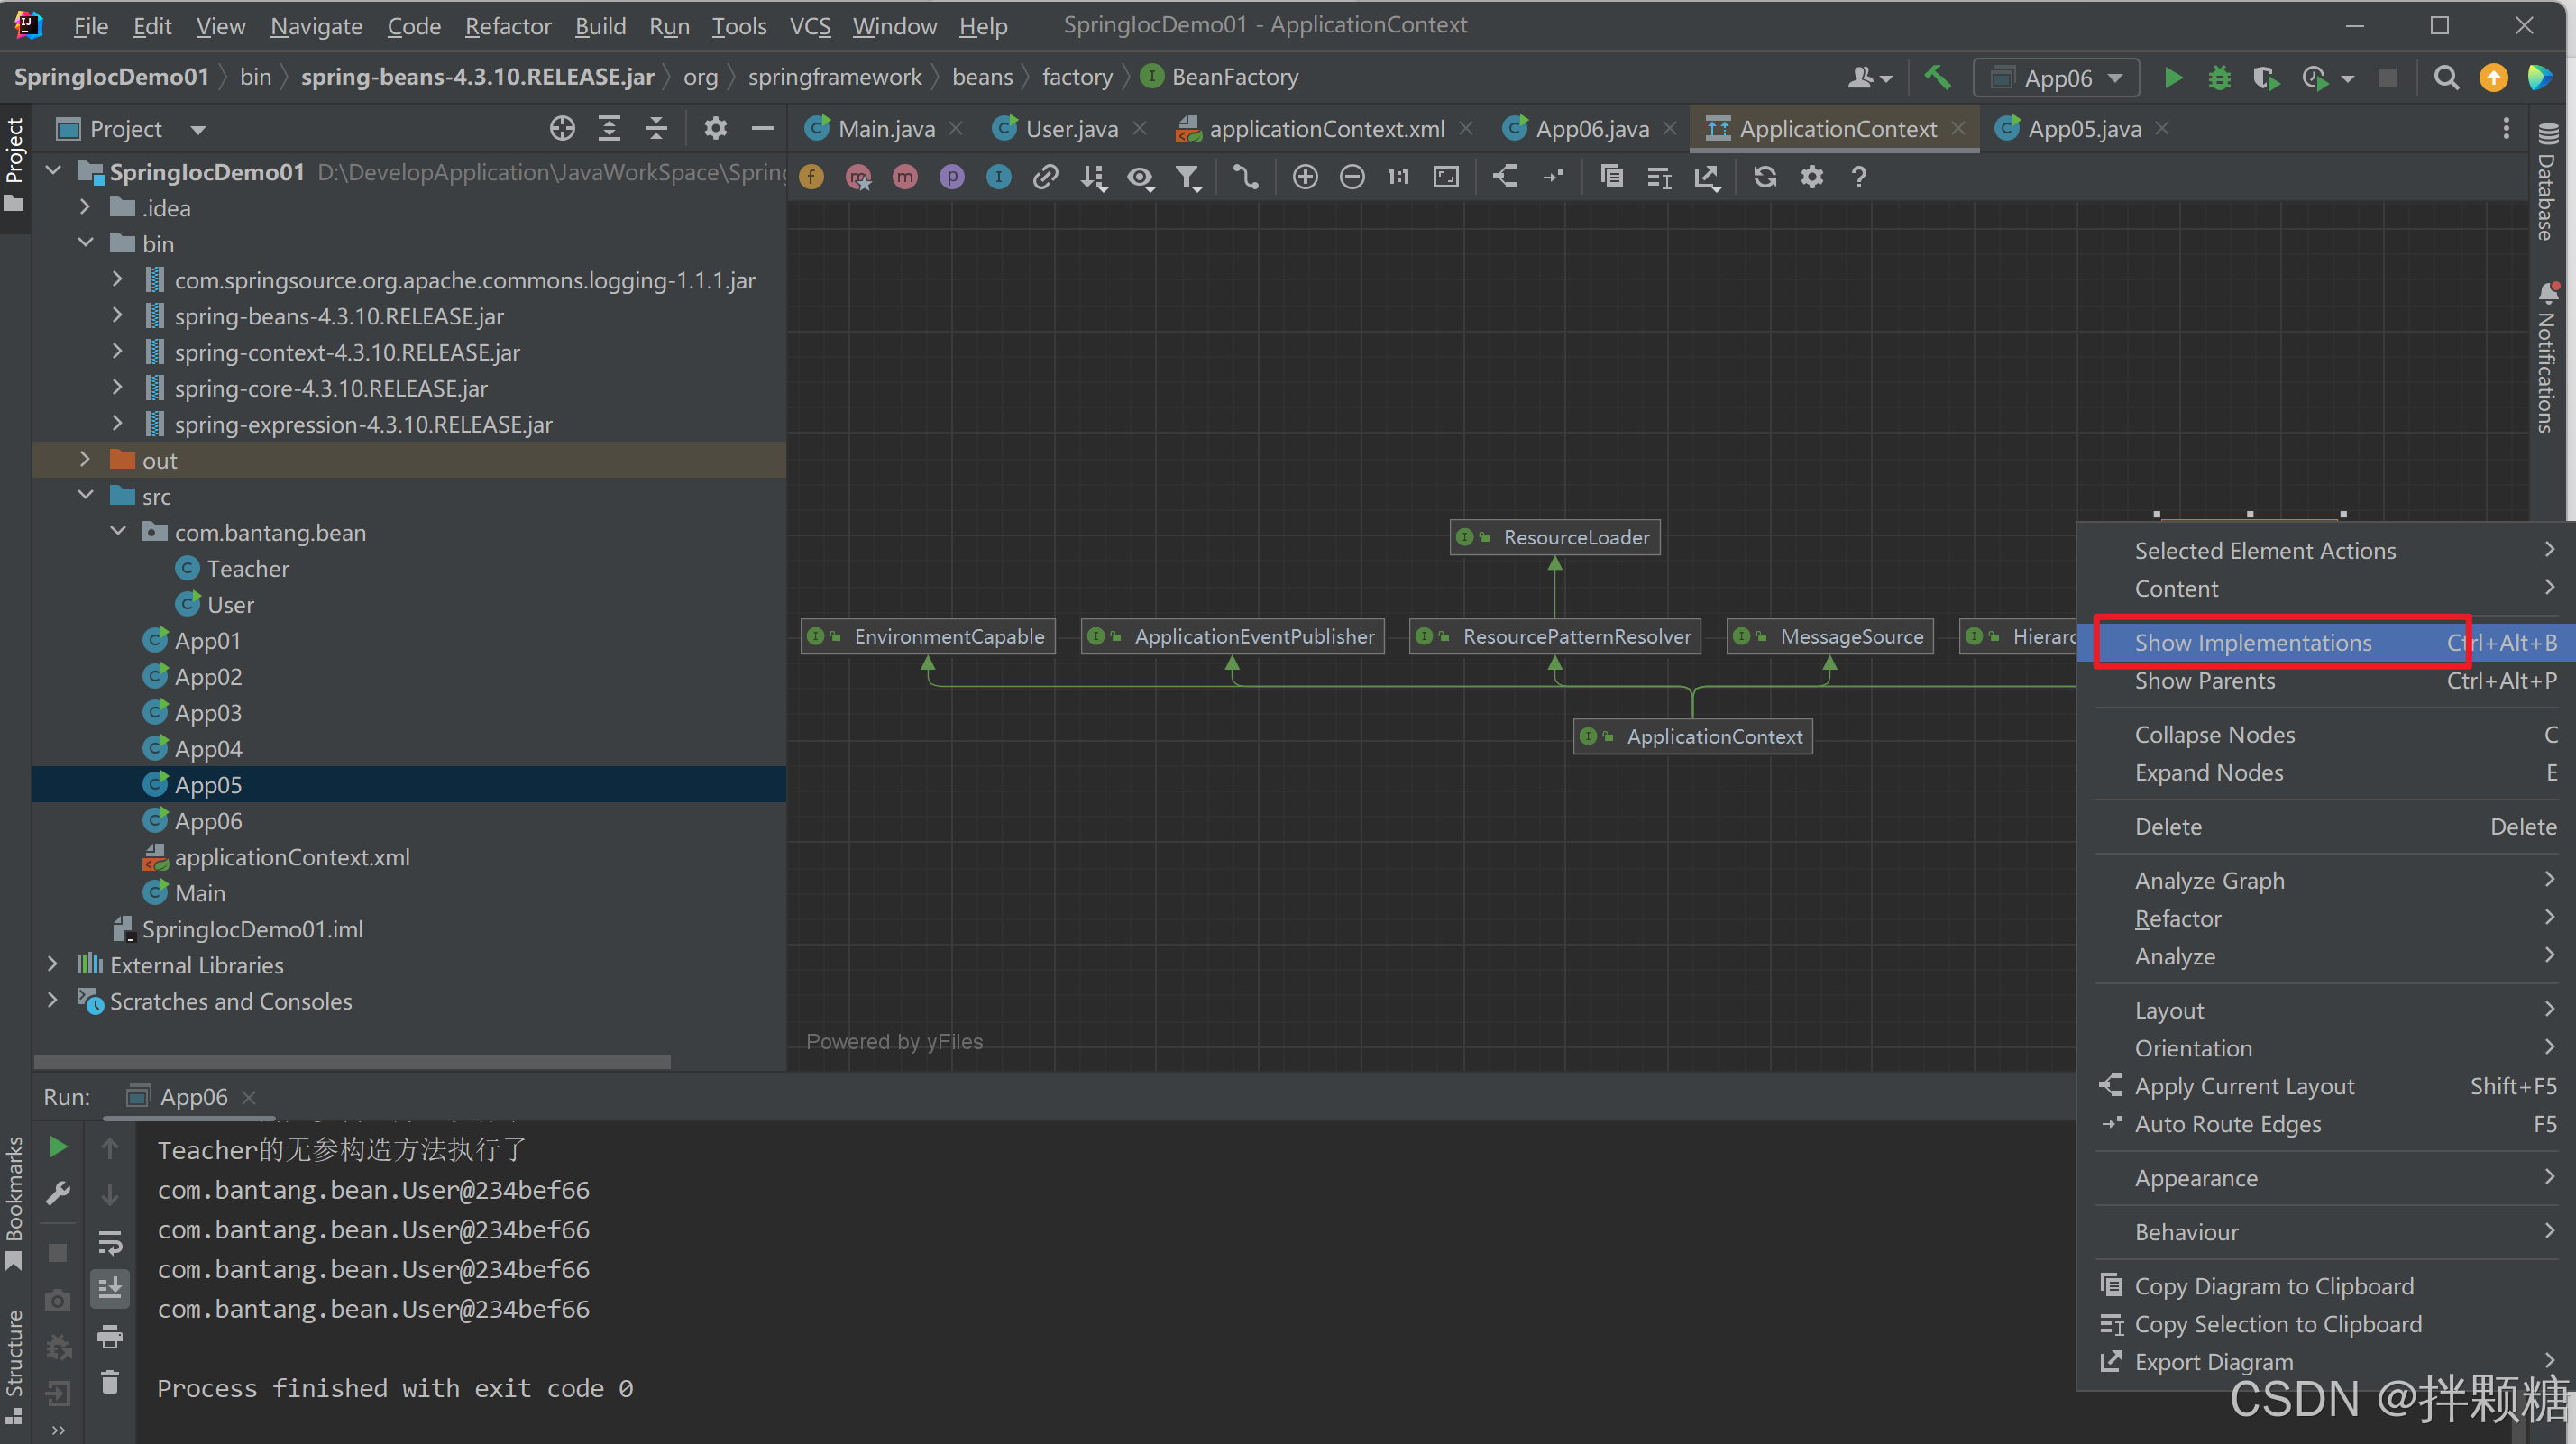
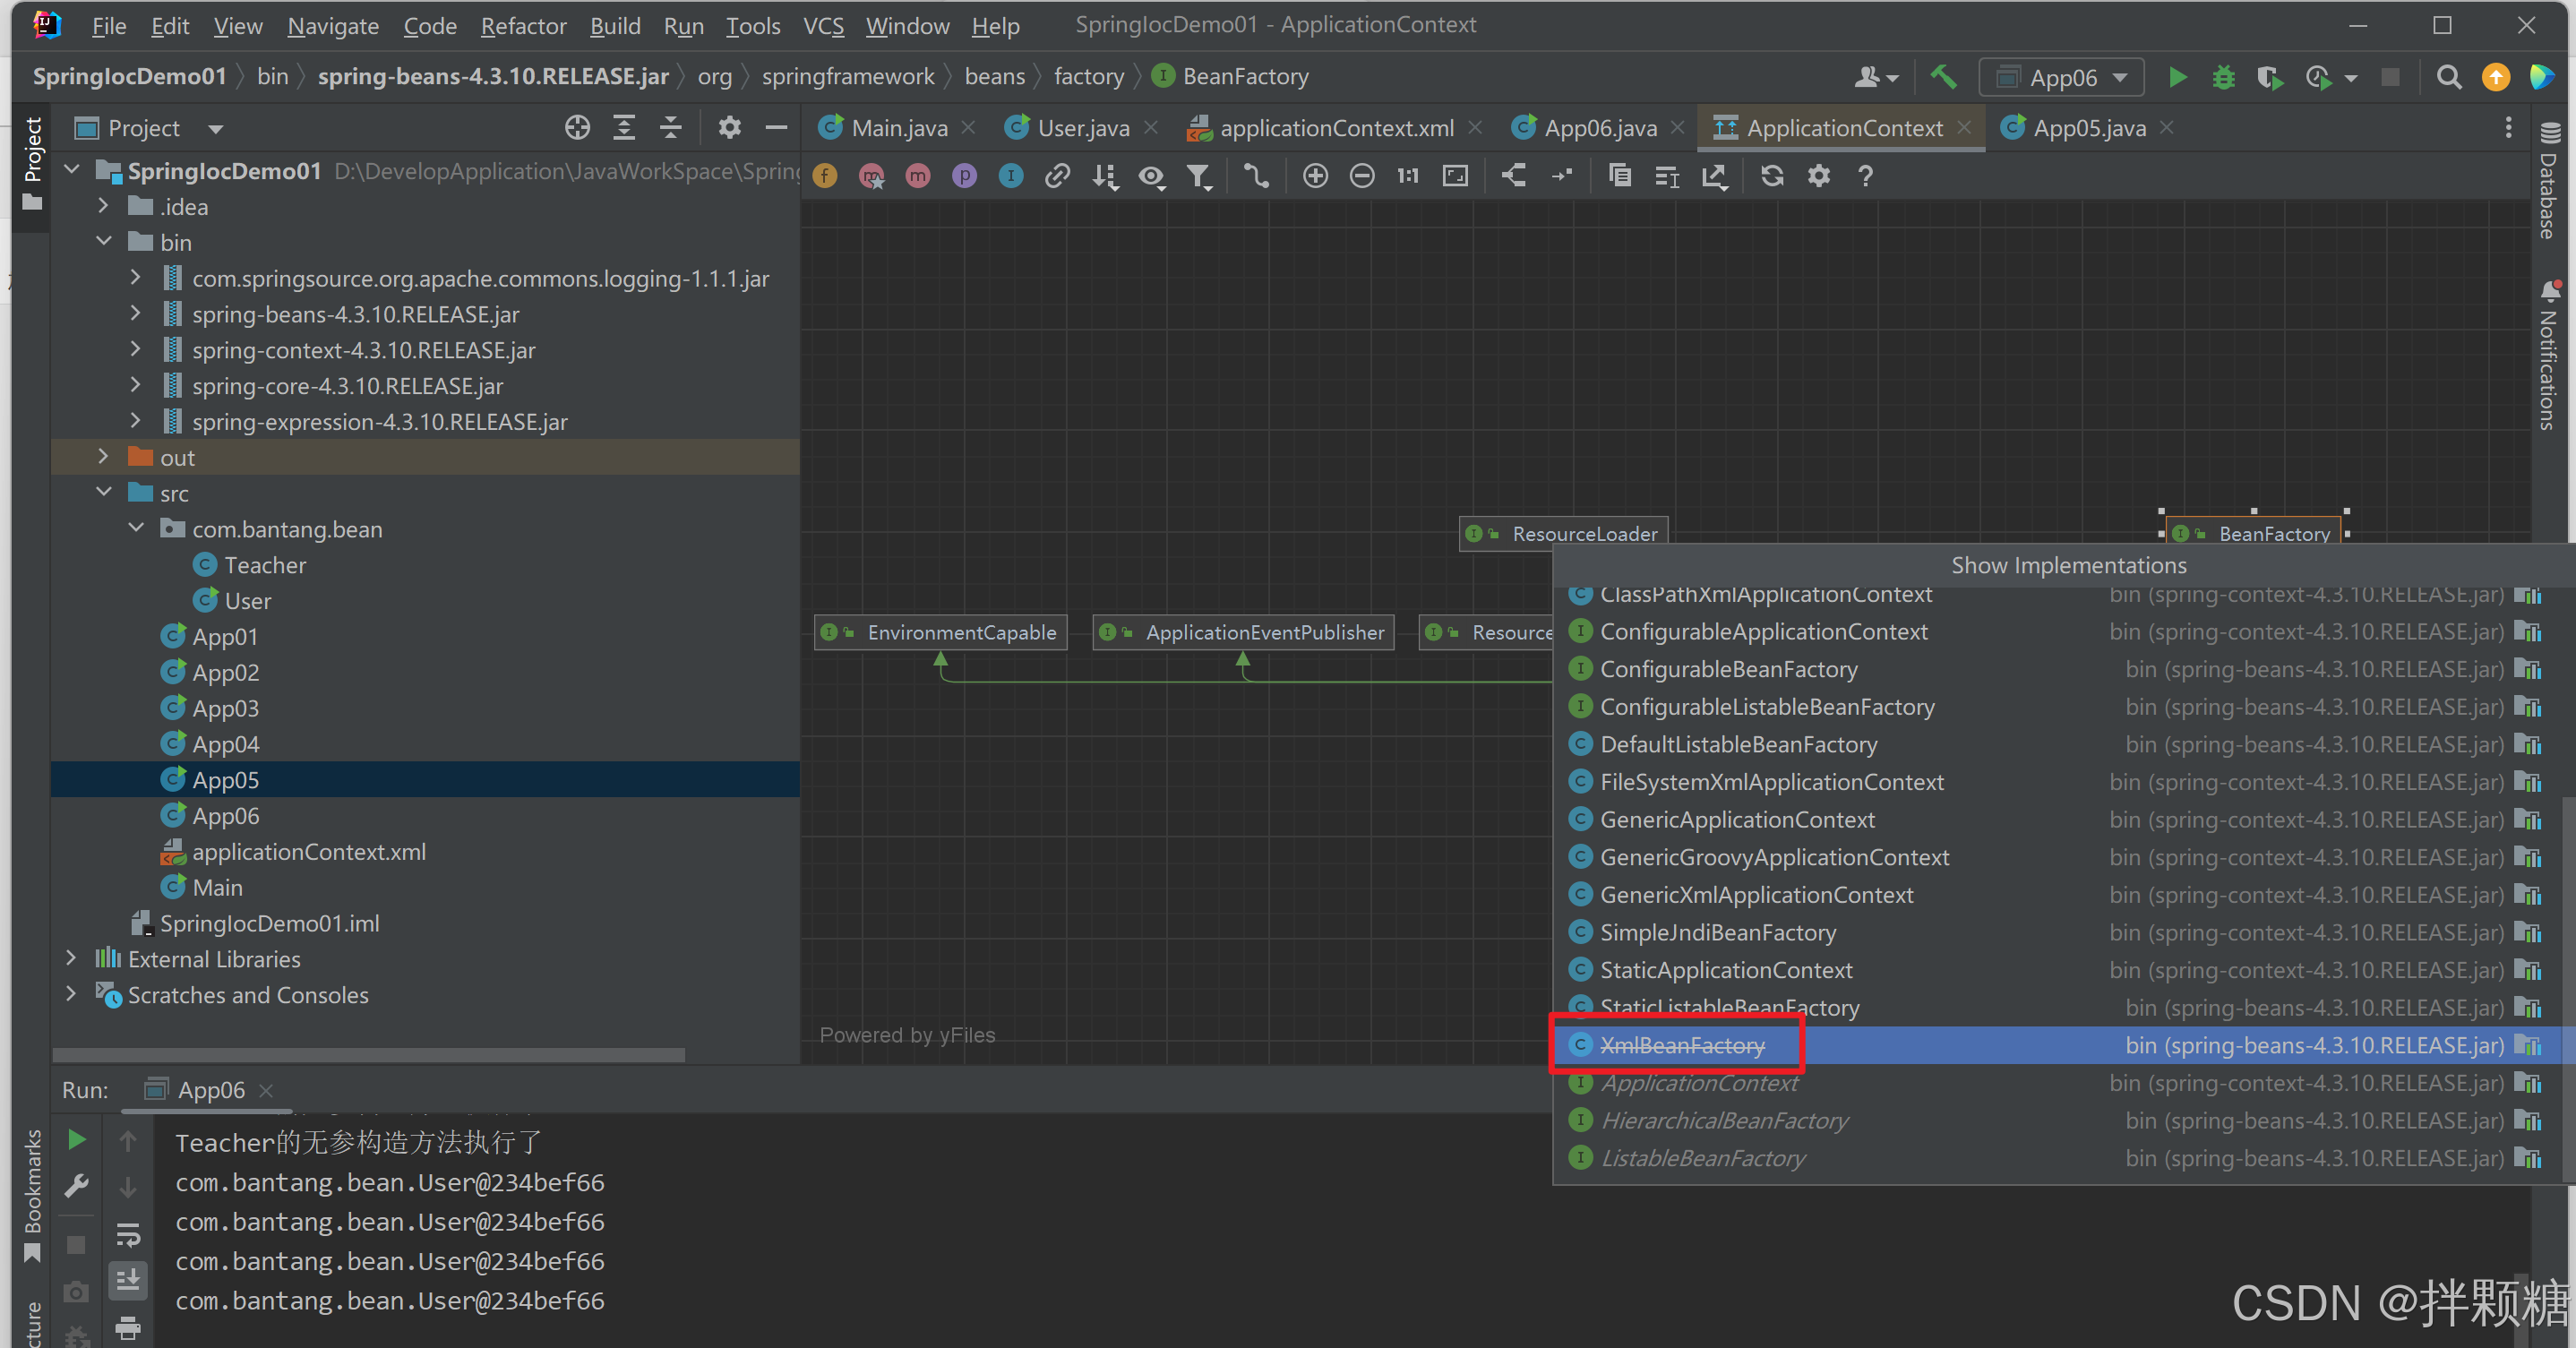
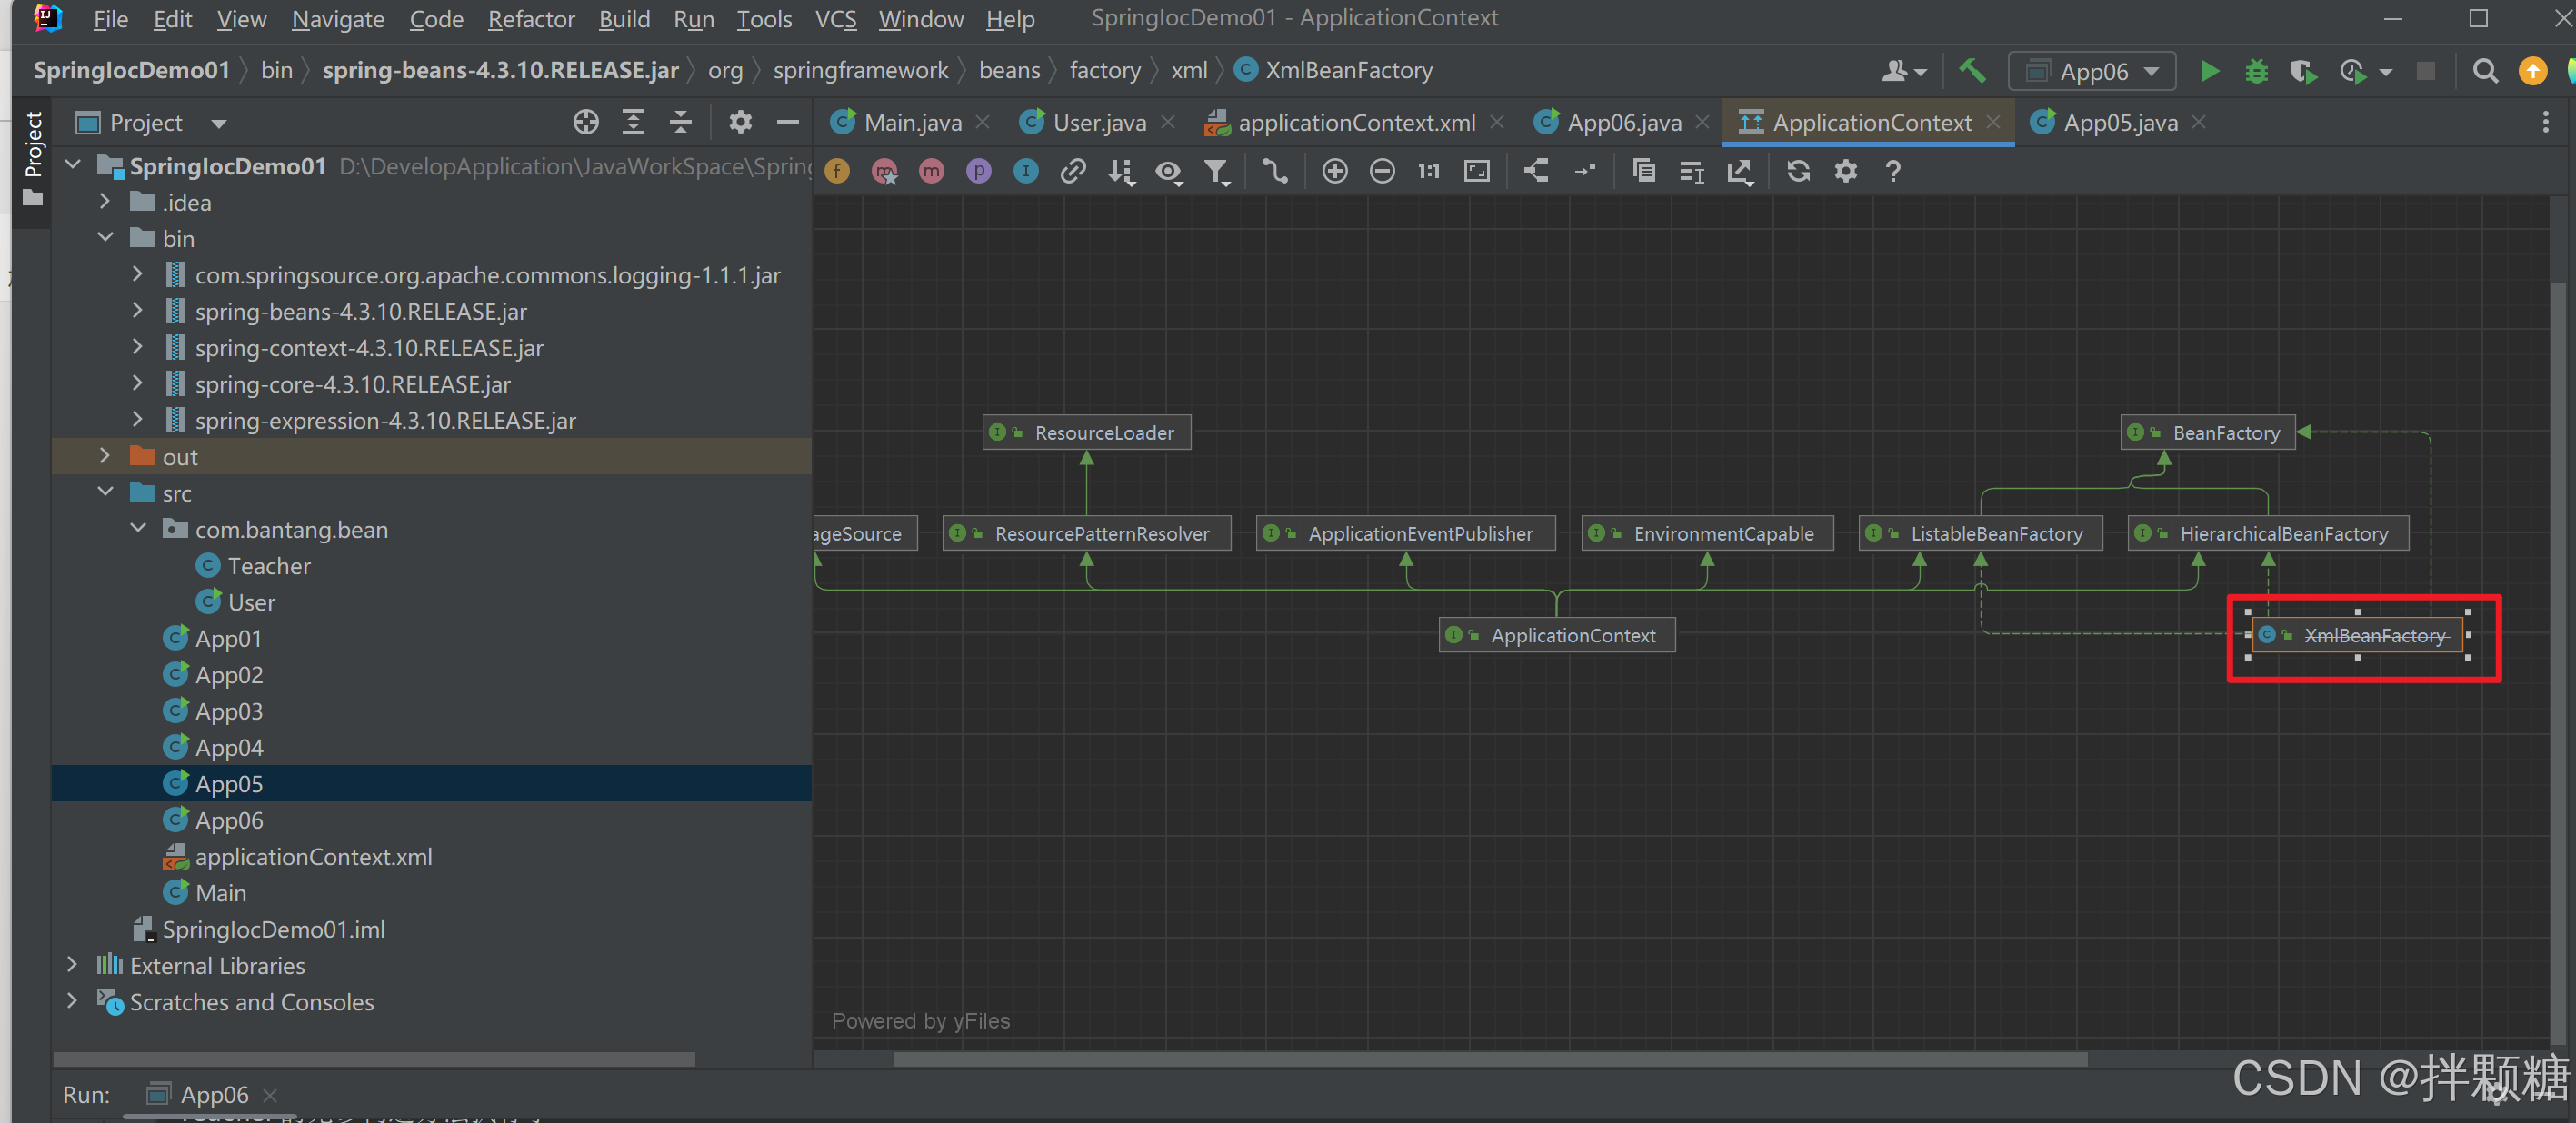
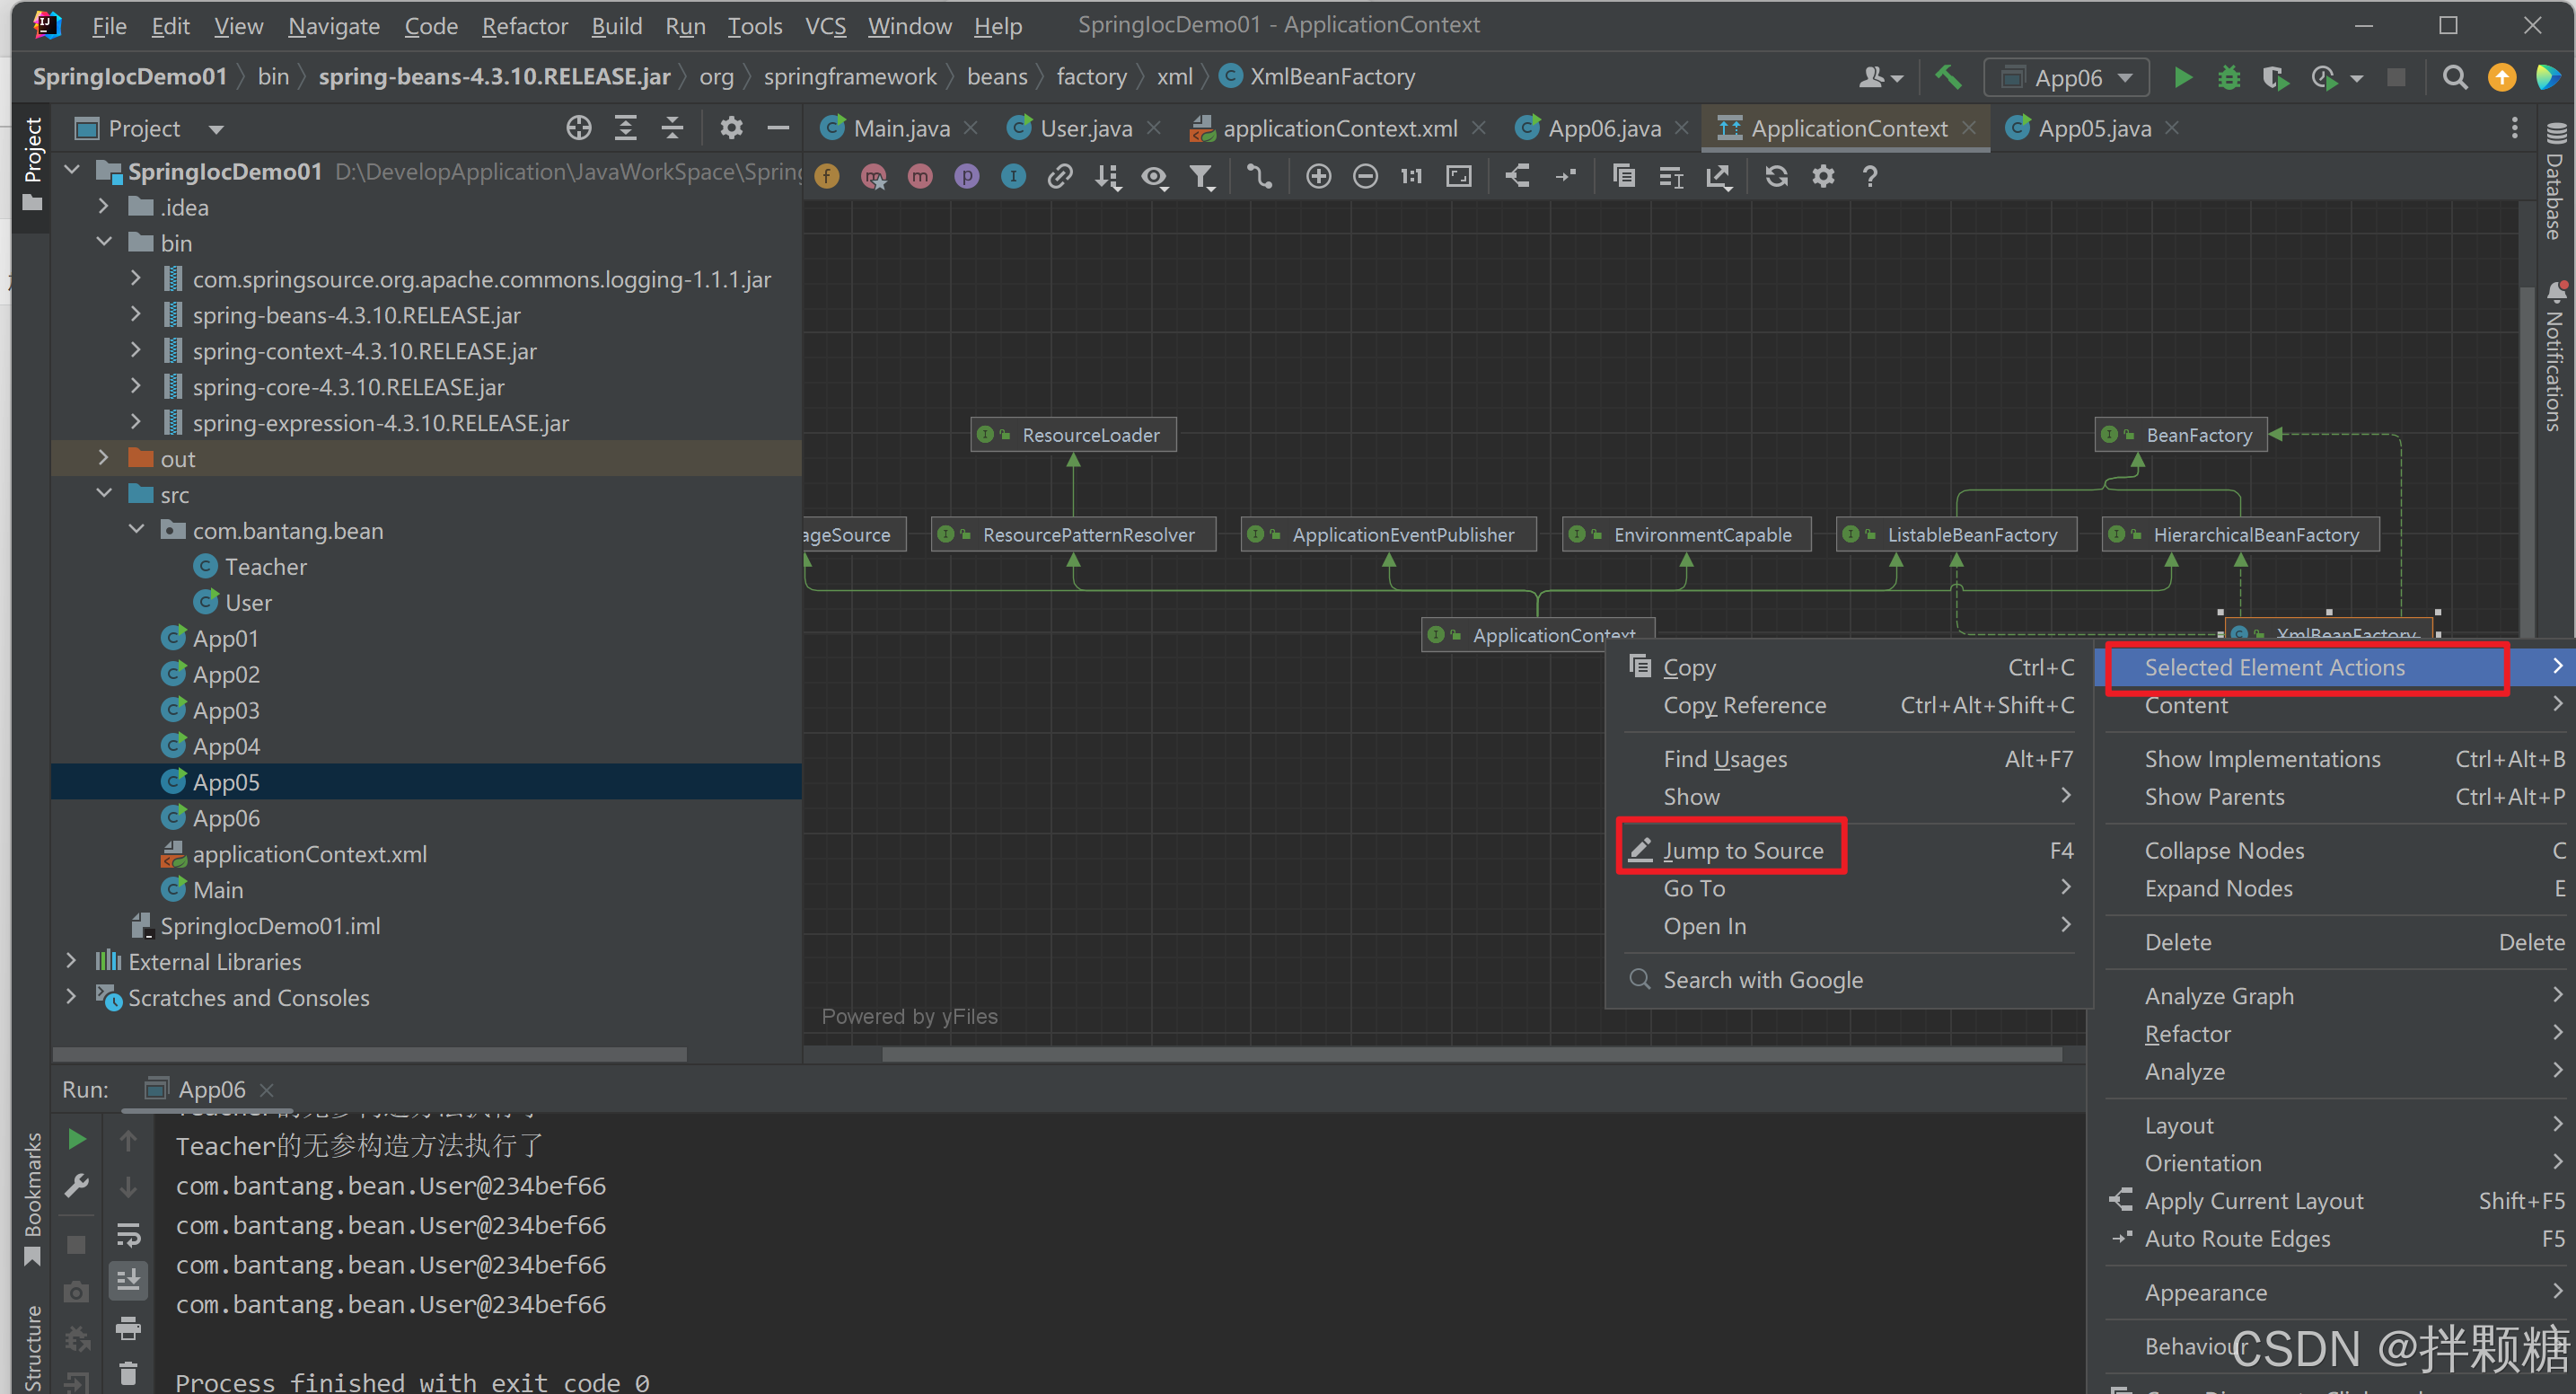
按照以上步骤我们打开了BeanFacroty接口的实现类XmlBeanFactory的源码
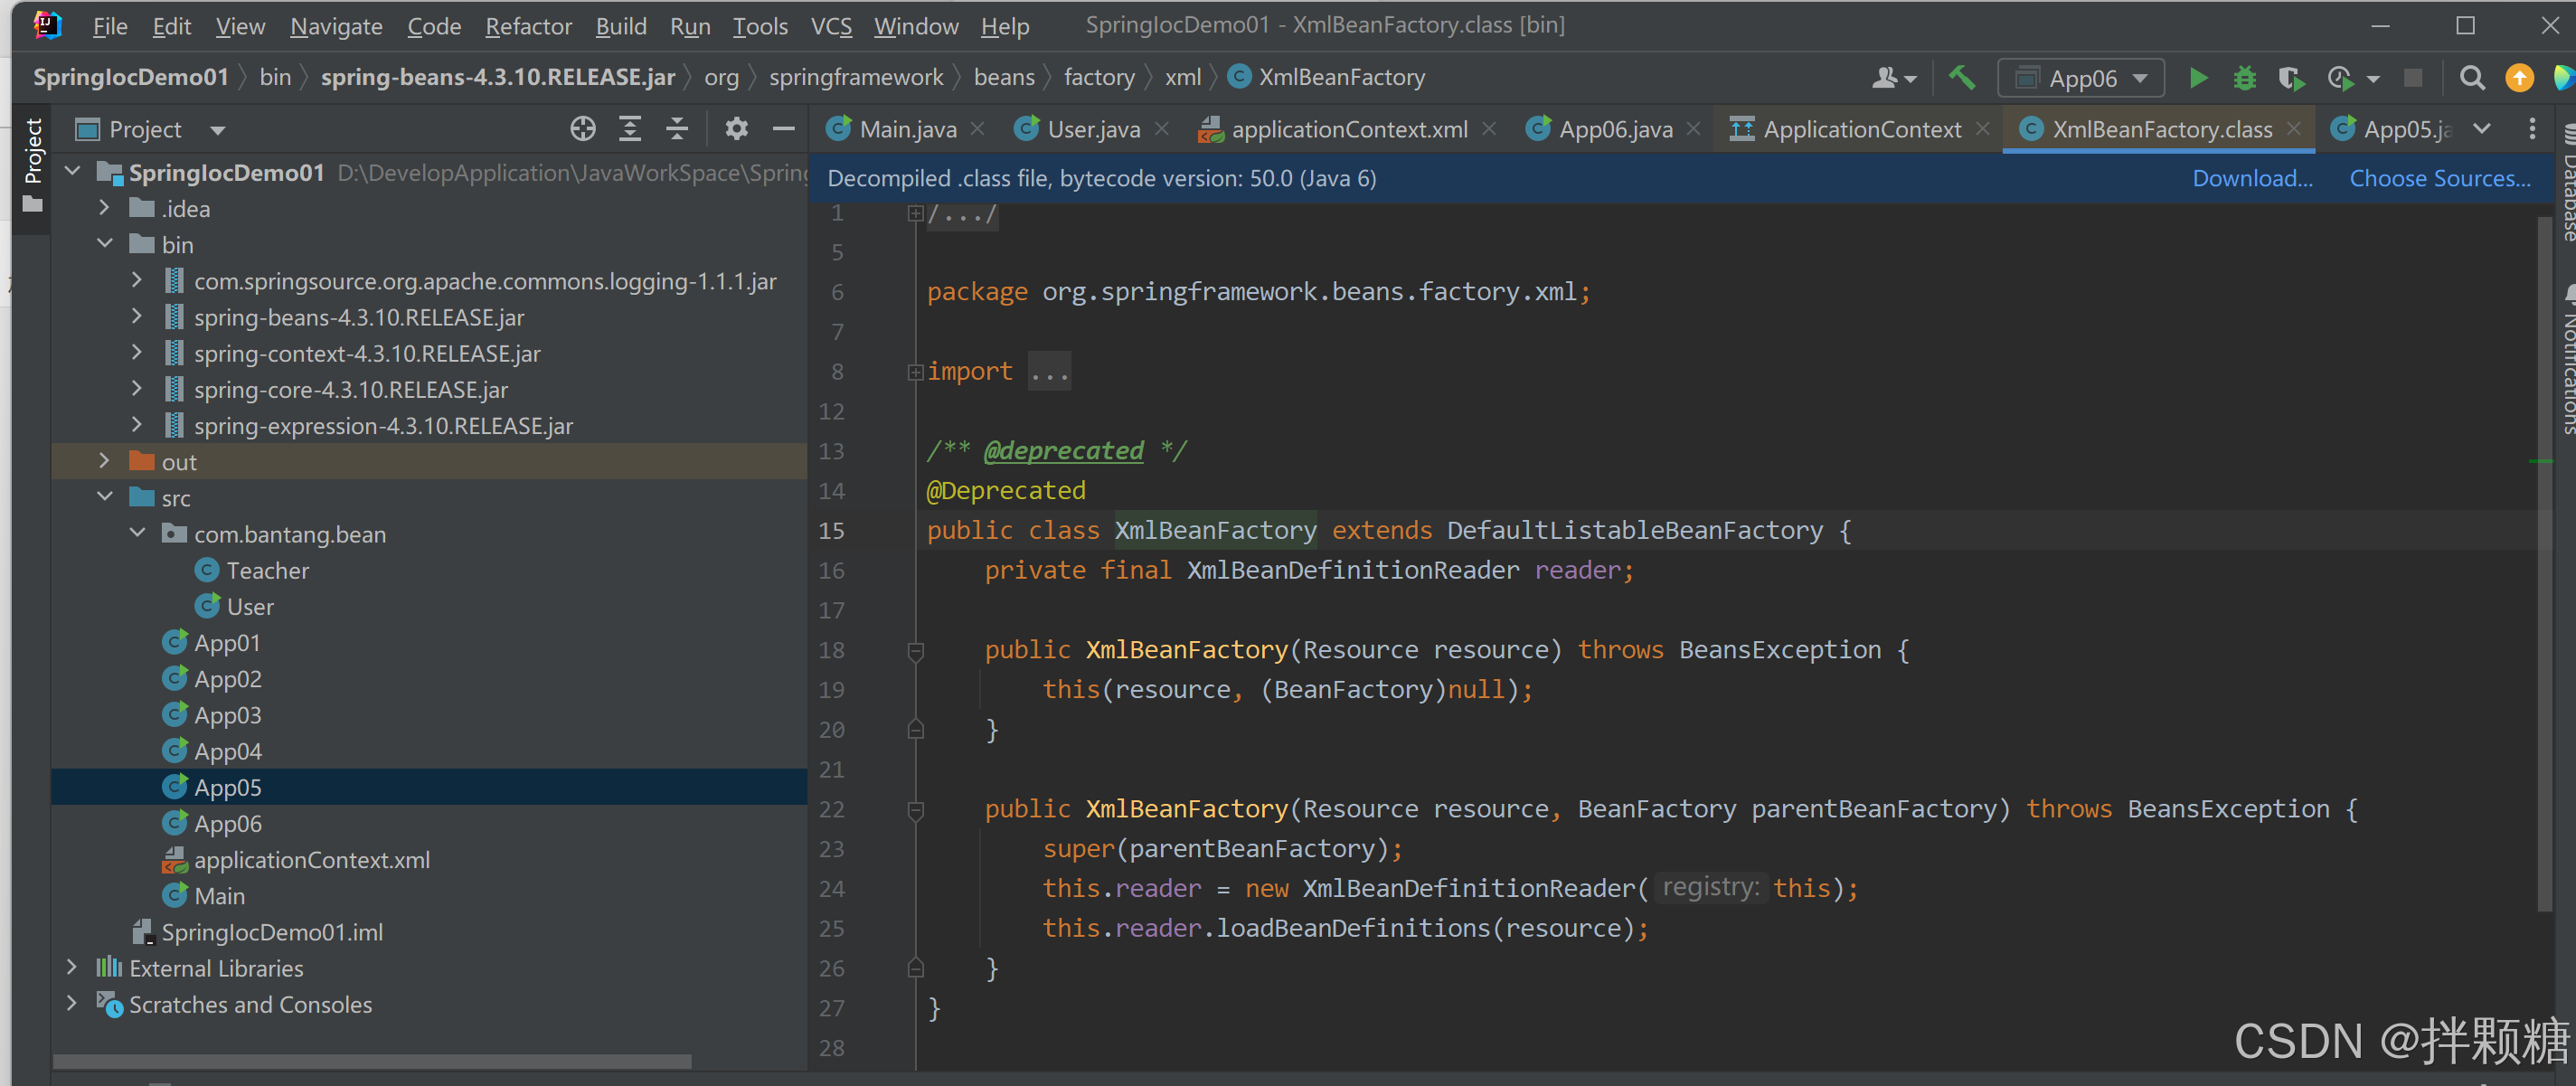
实现类XmlBeanFactory构造函数中传参是一个Resource对象
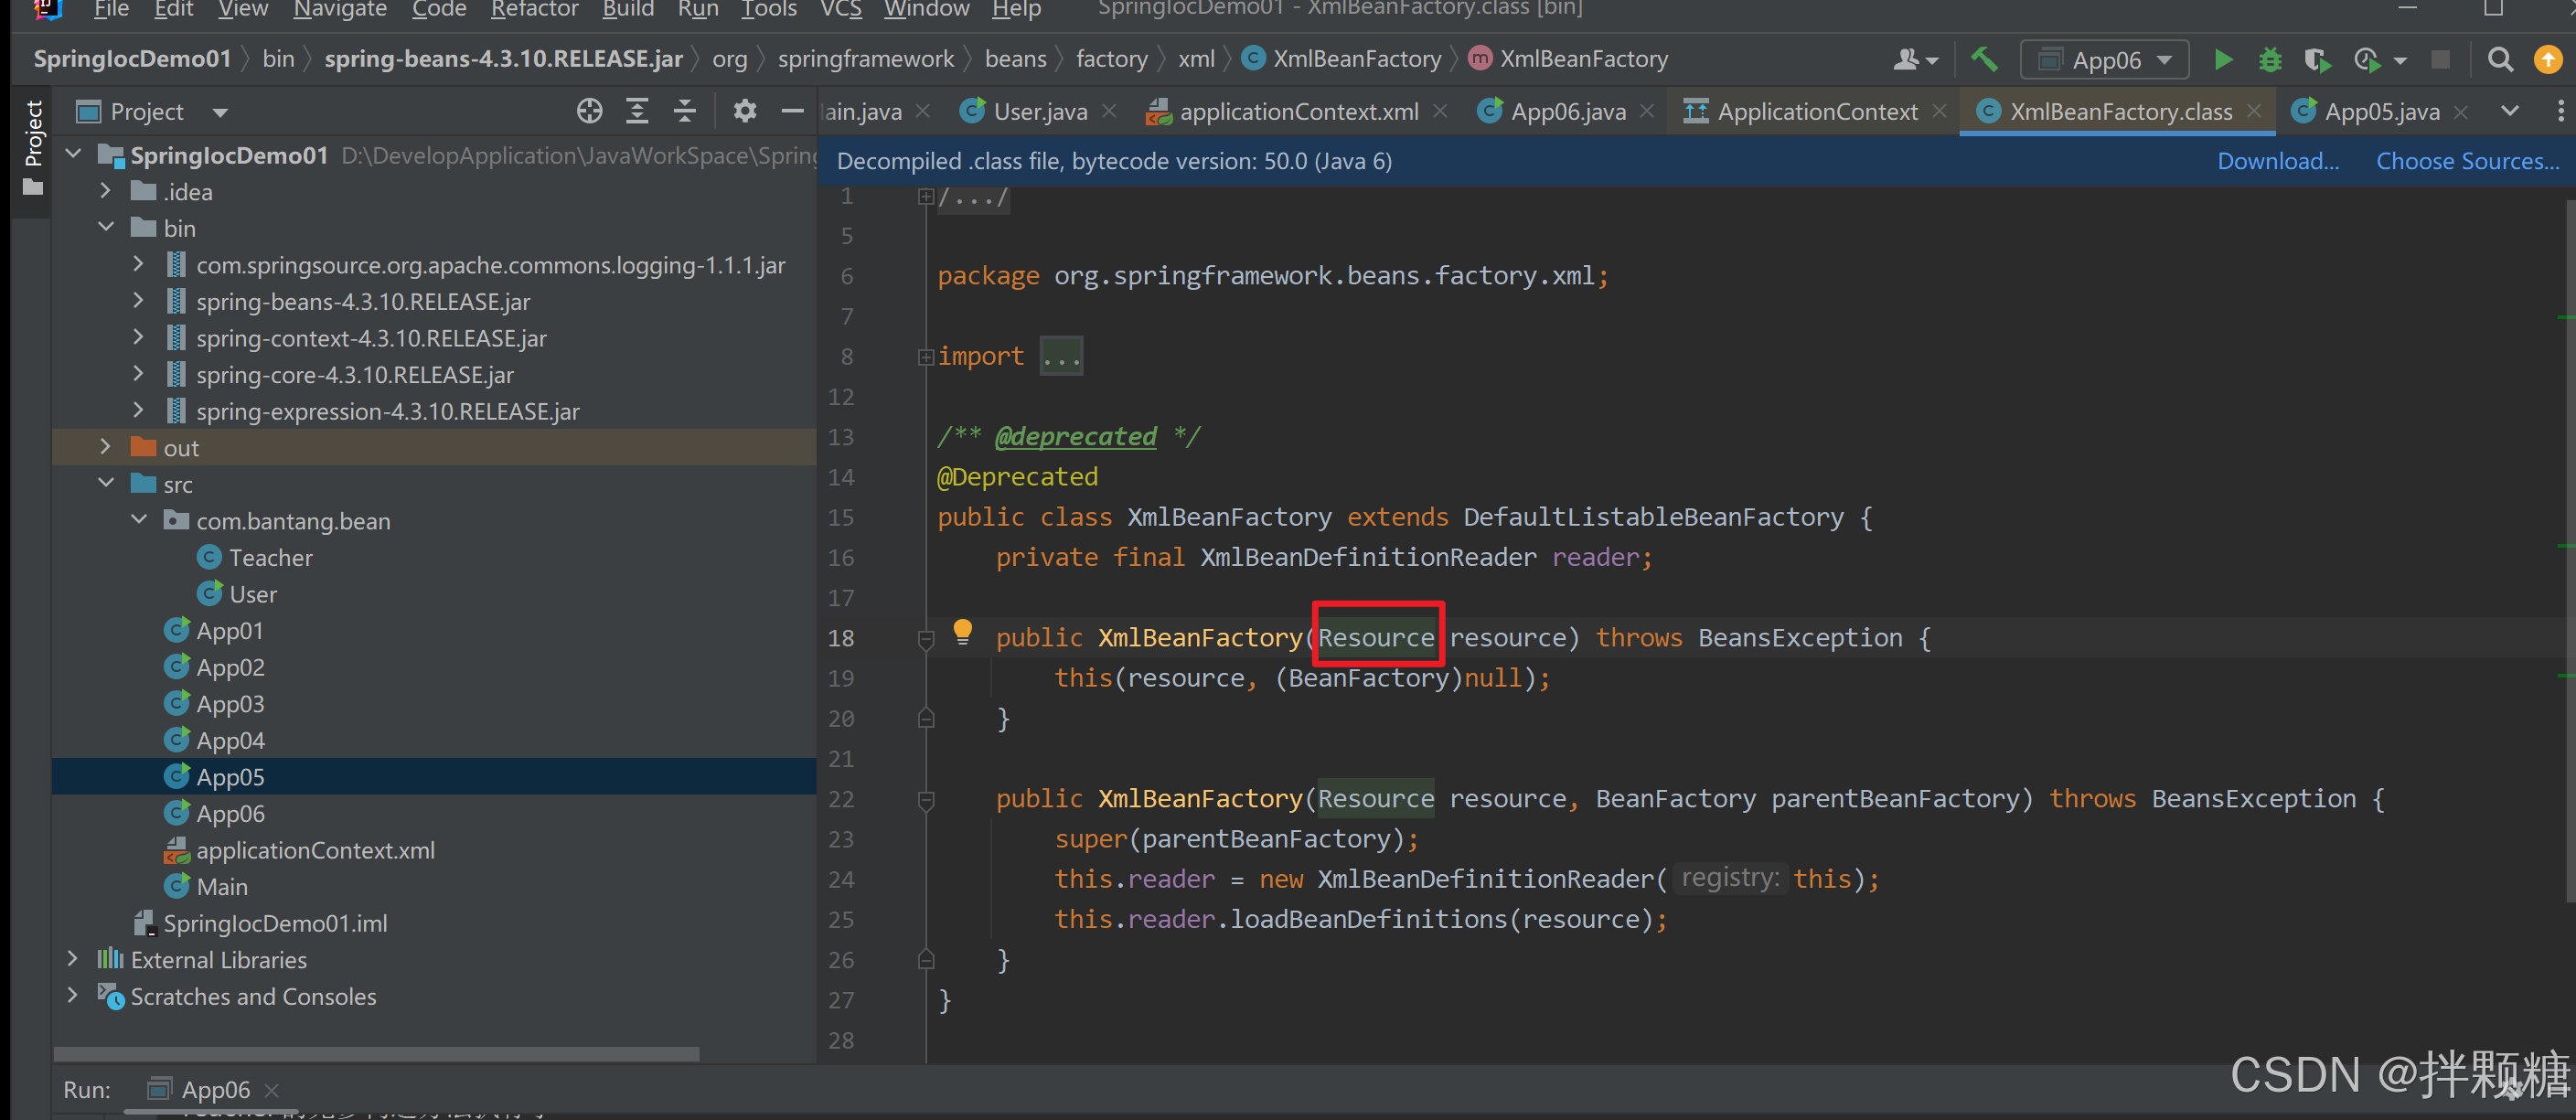
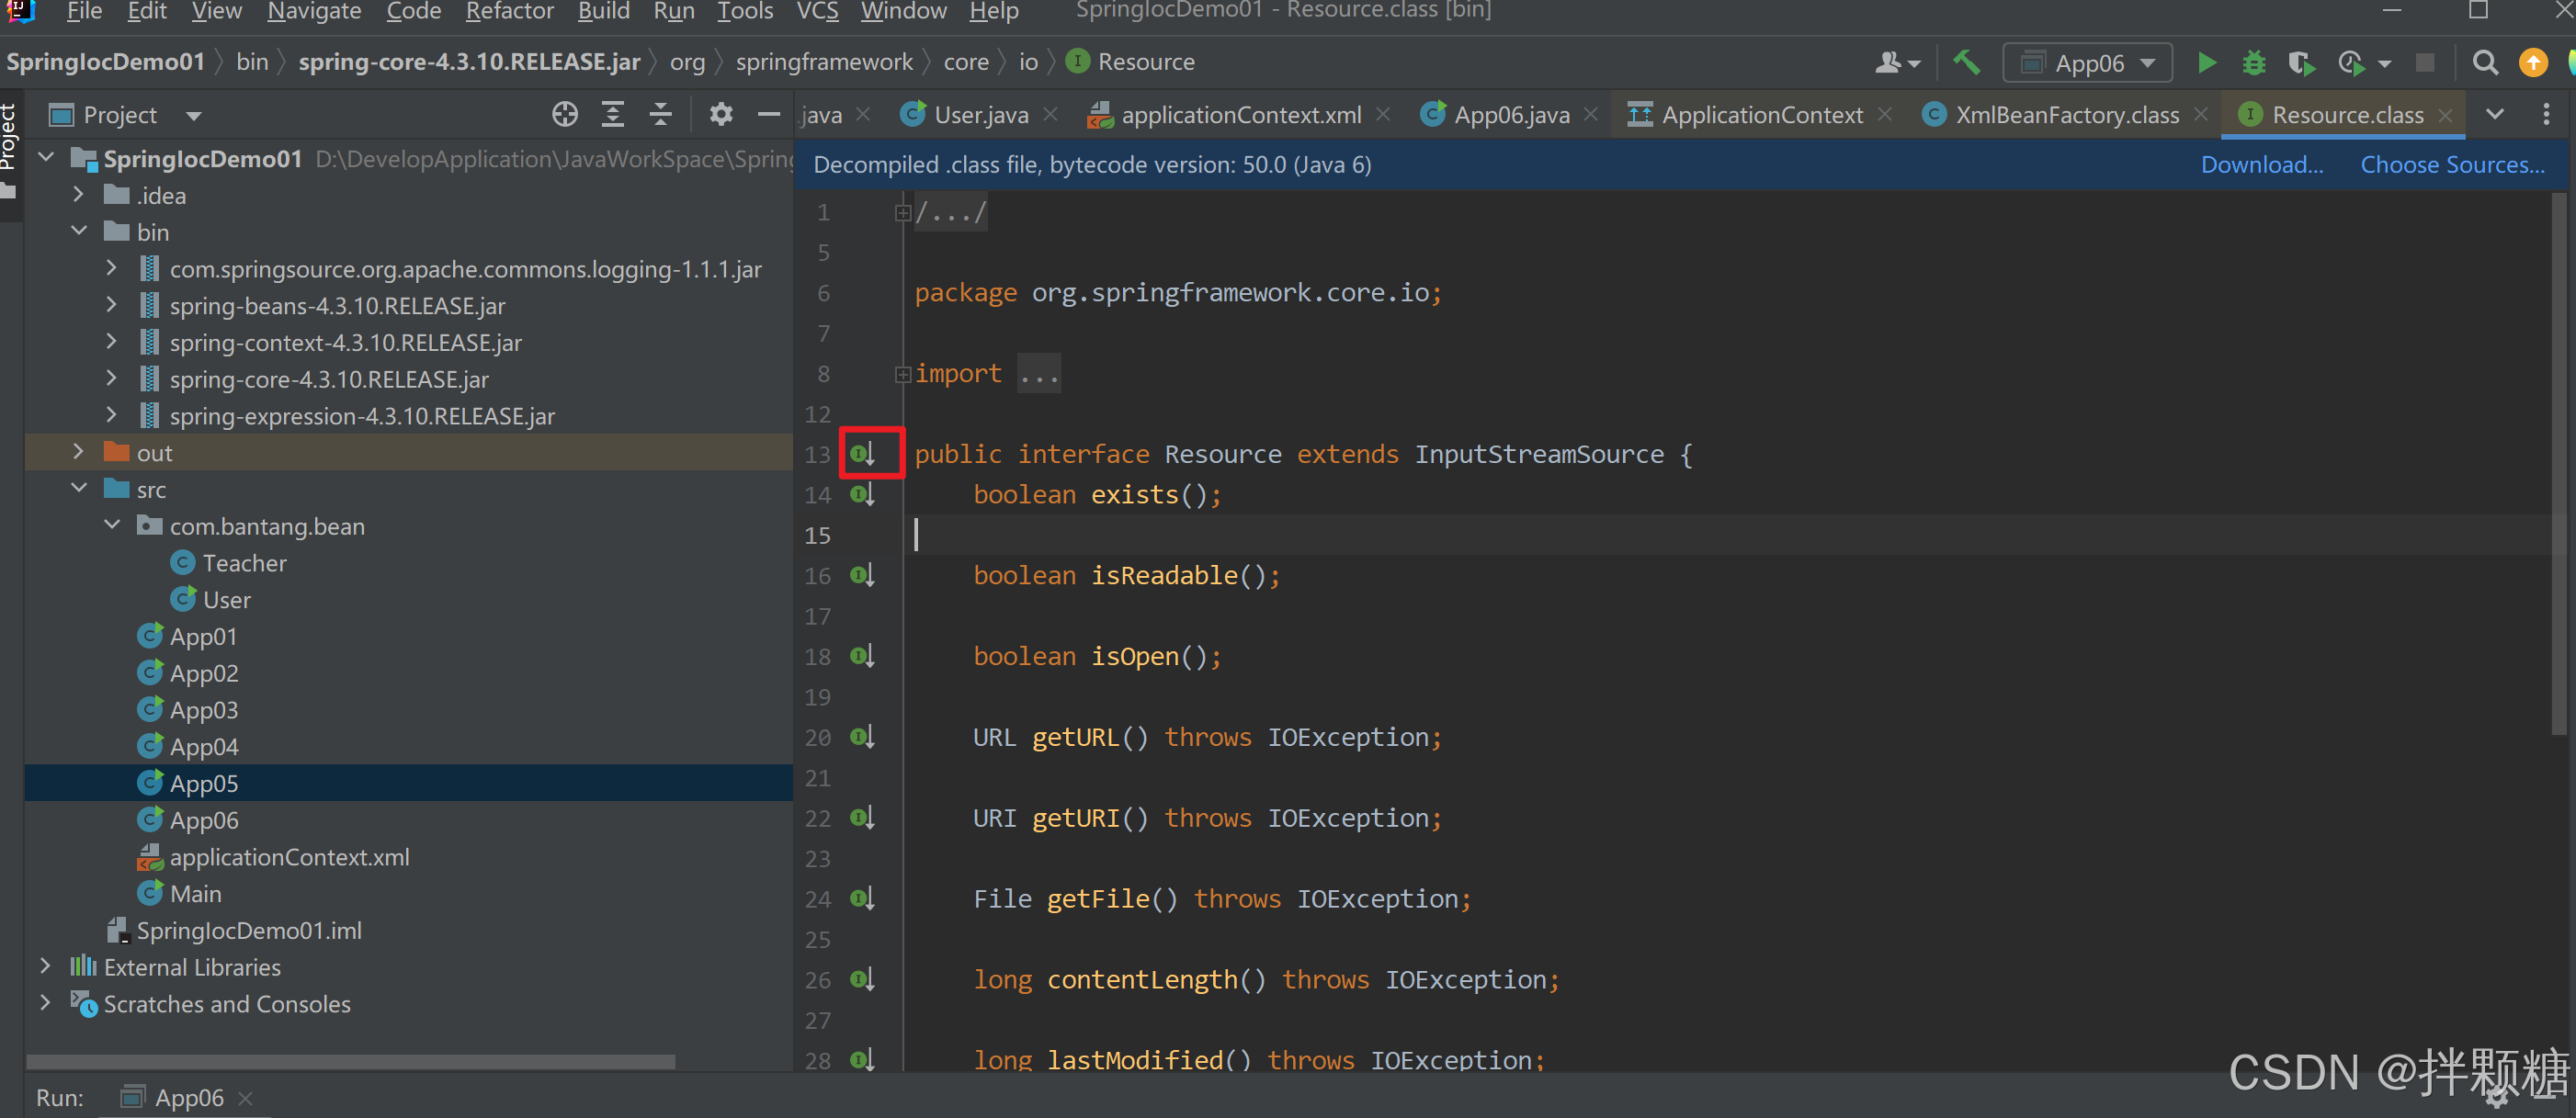
shift+鼠标左键 点开Resource的源码
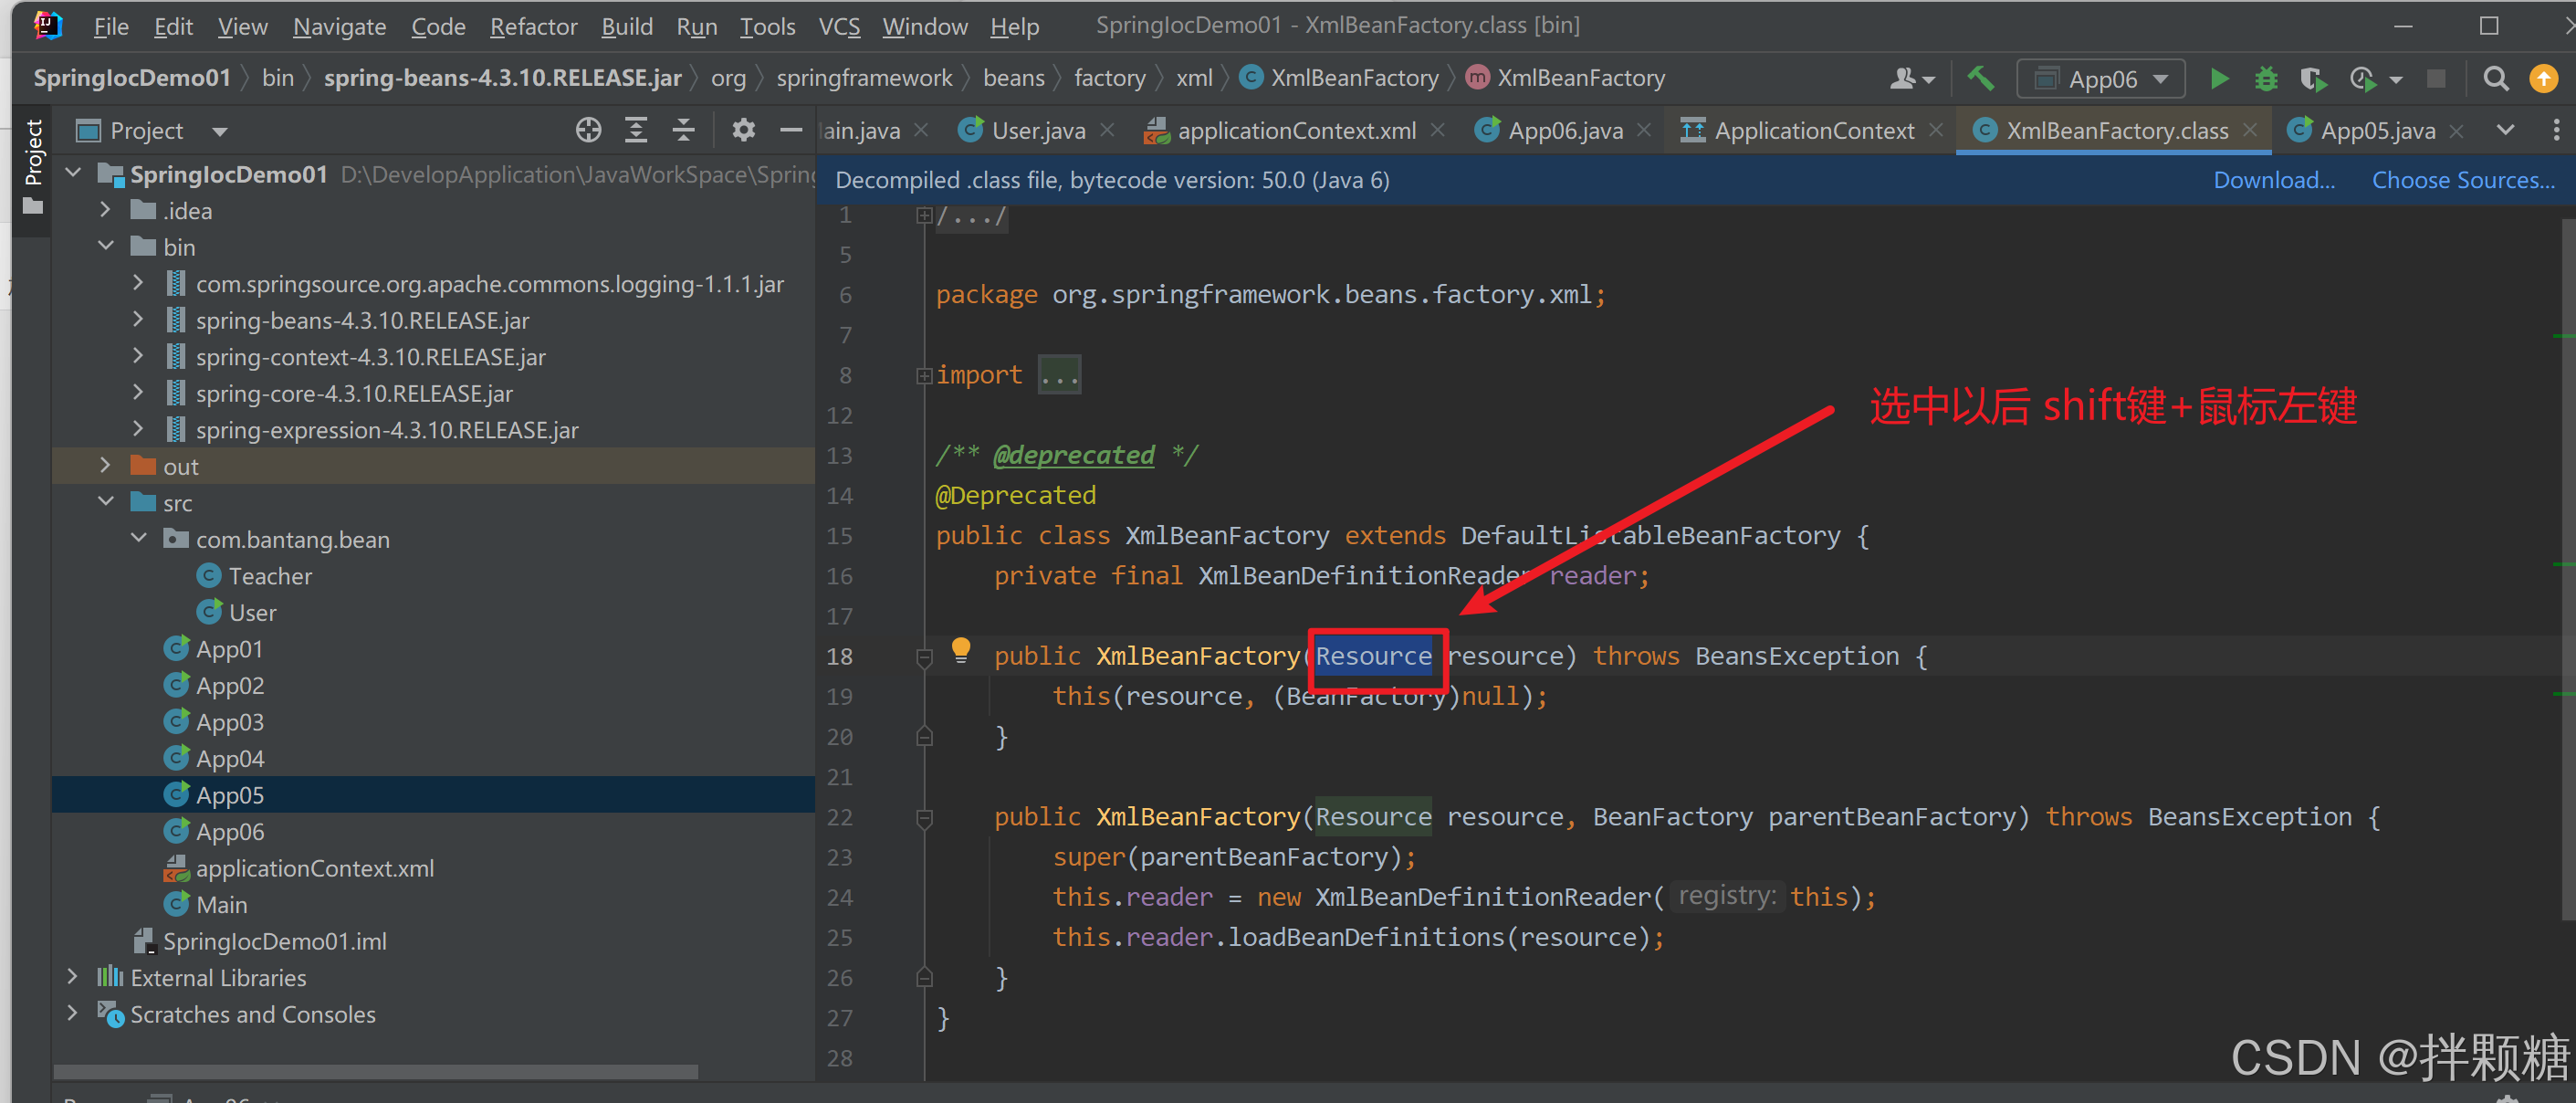
点开Resource的源码发现 Resource本身也是一个接口 点击这里查看Resource接口的实现类
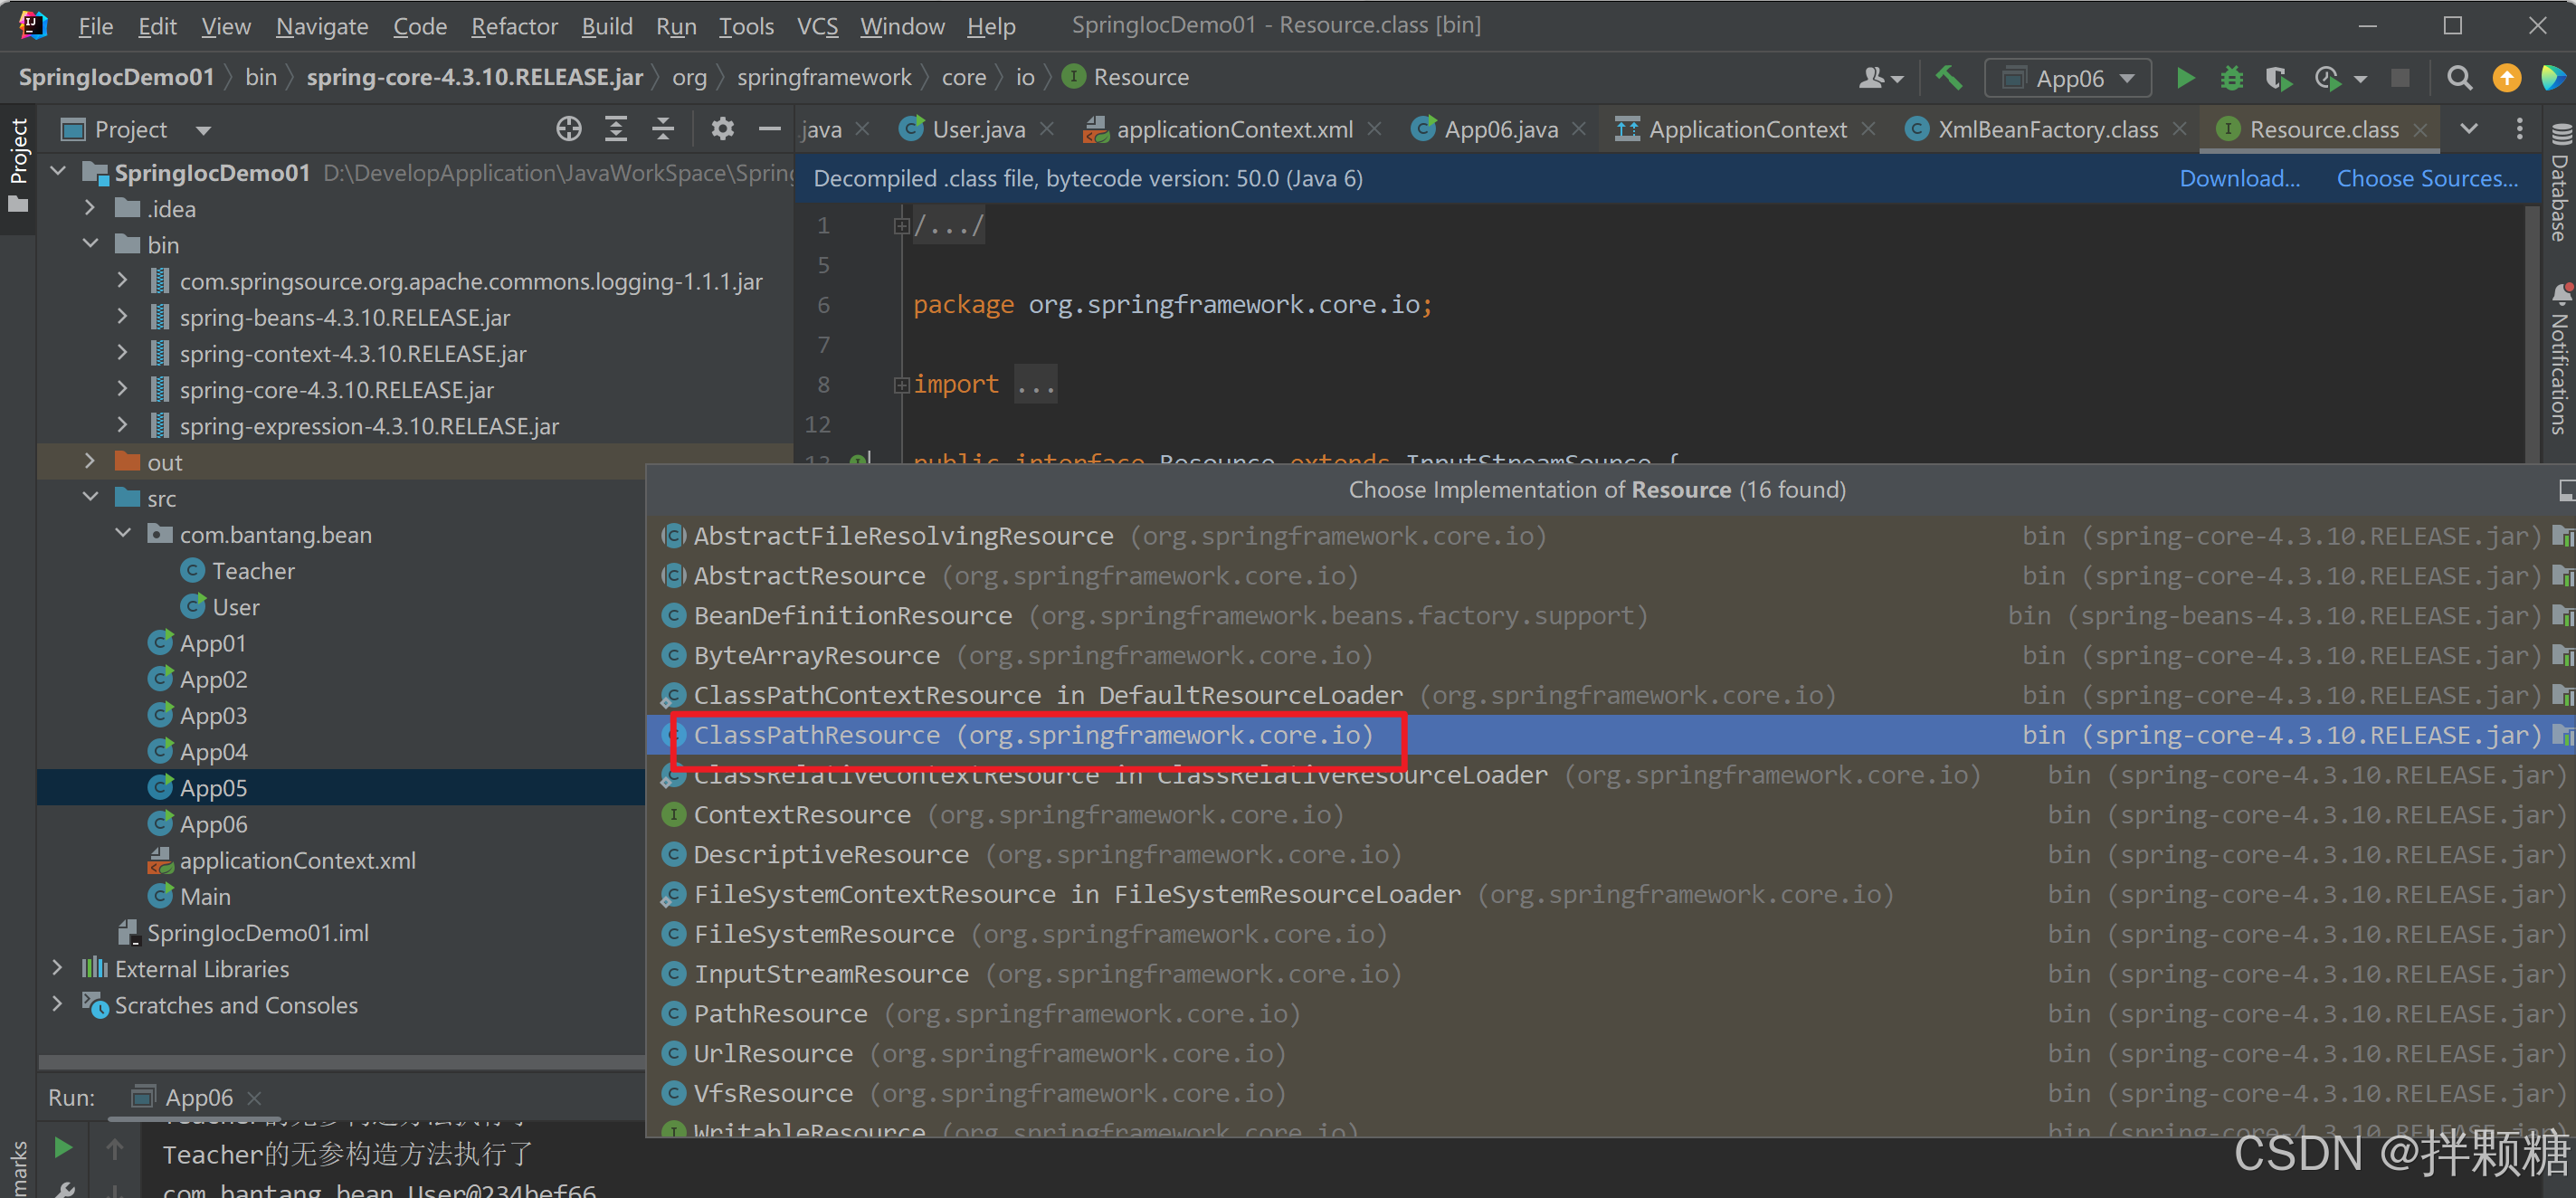
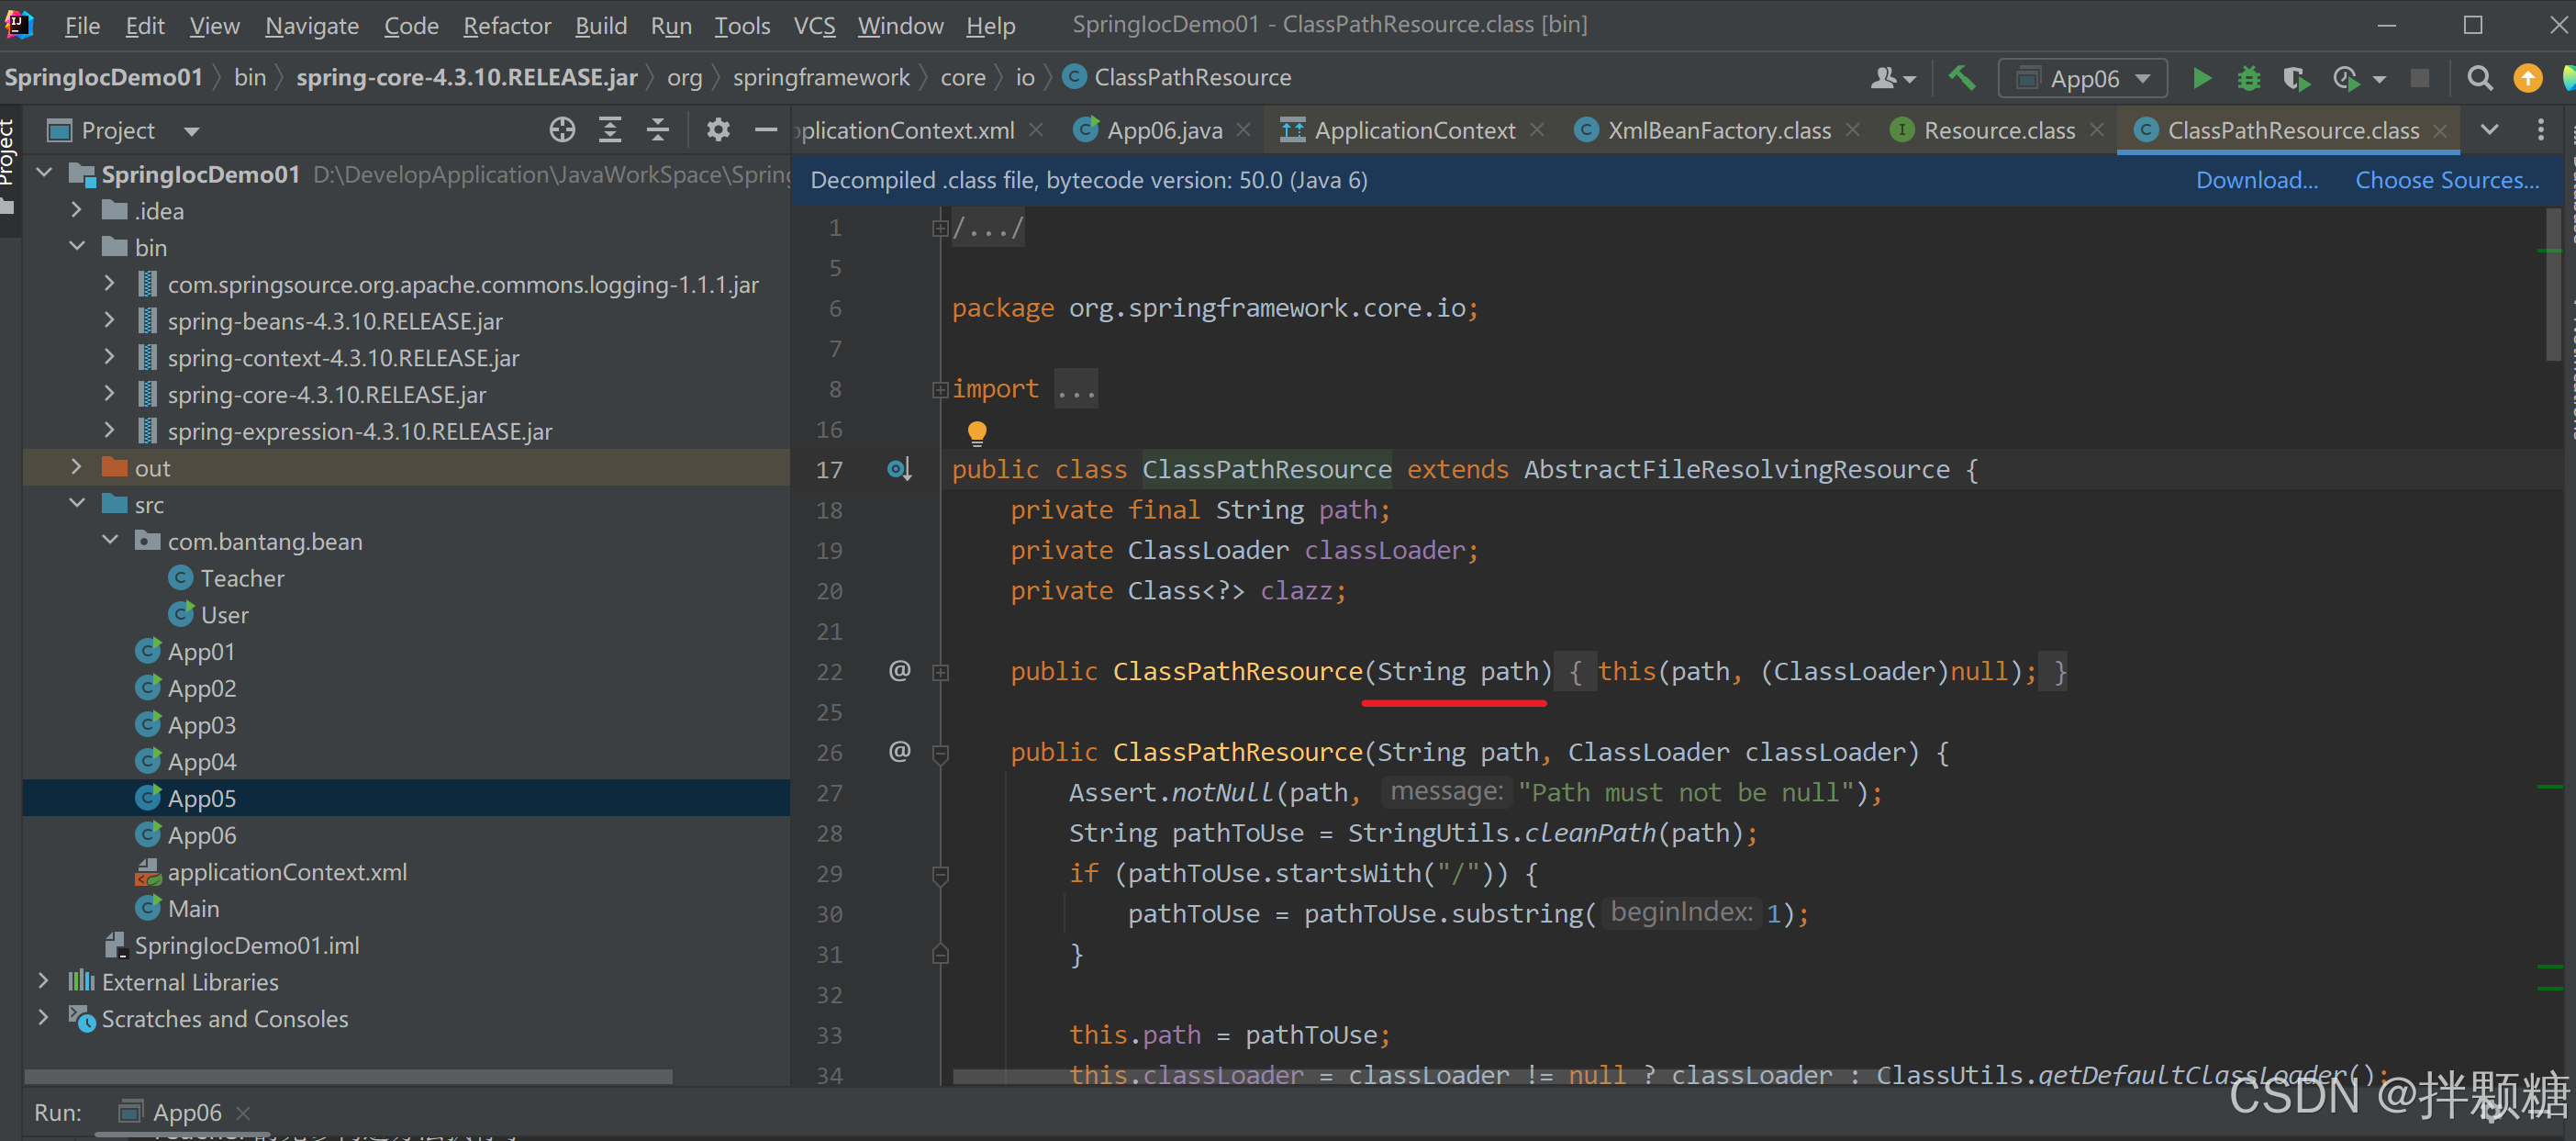
找到ClassPathResource后 我们点进去 查看源码知 ClassPathResource初始化时需要传参一个路径
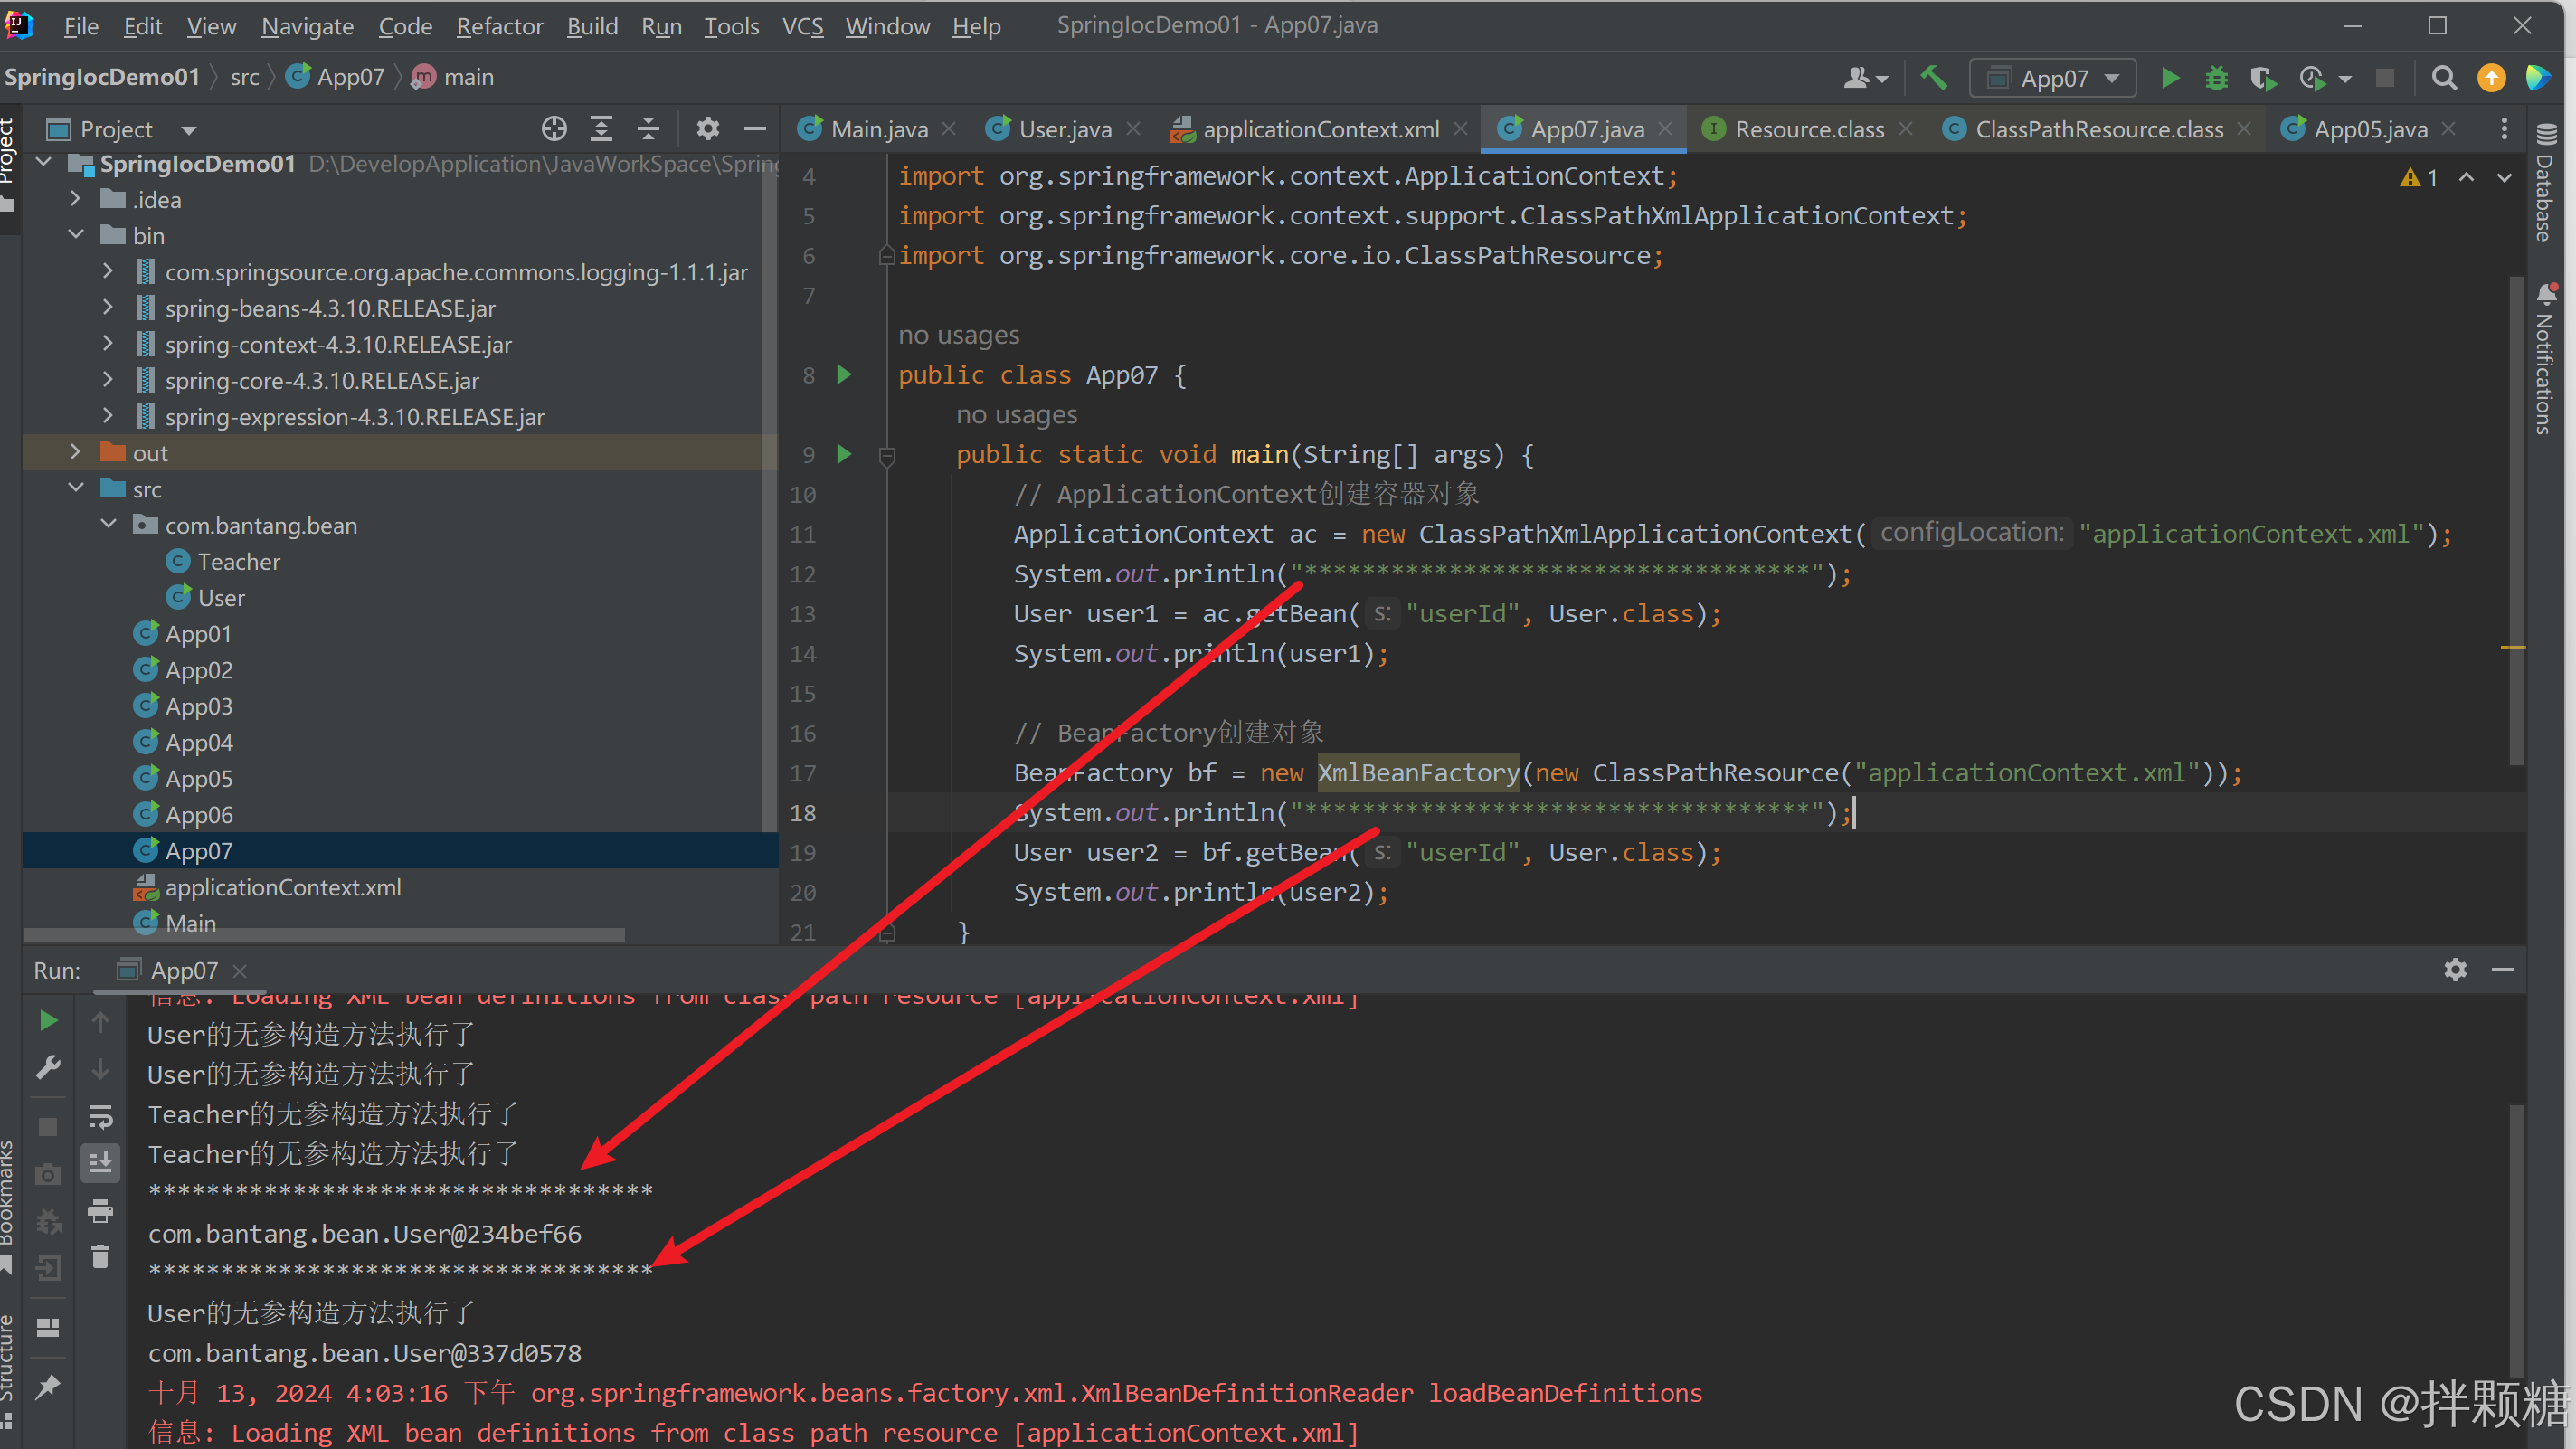
代码演示ApplicationContext 和 BeanFactory区别
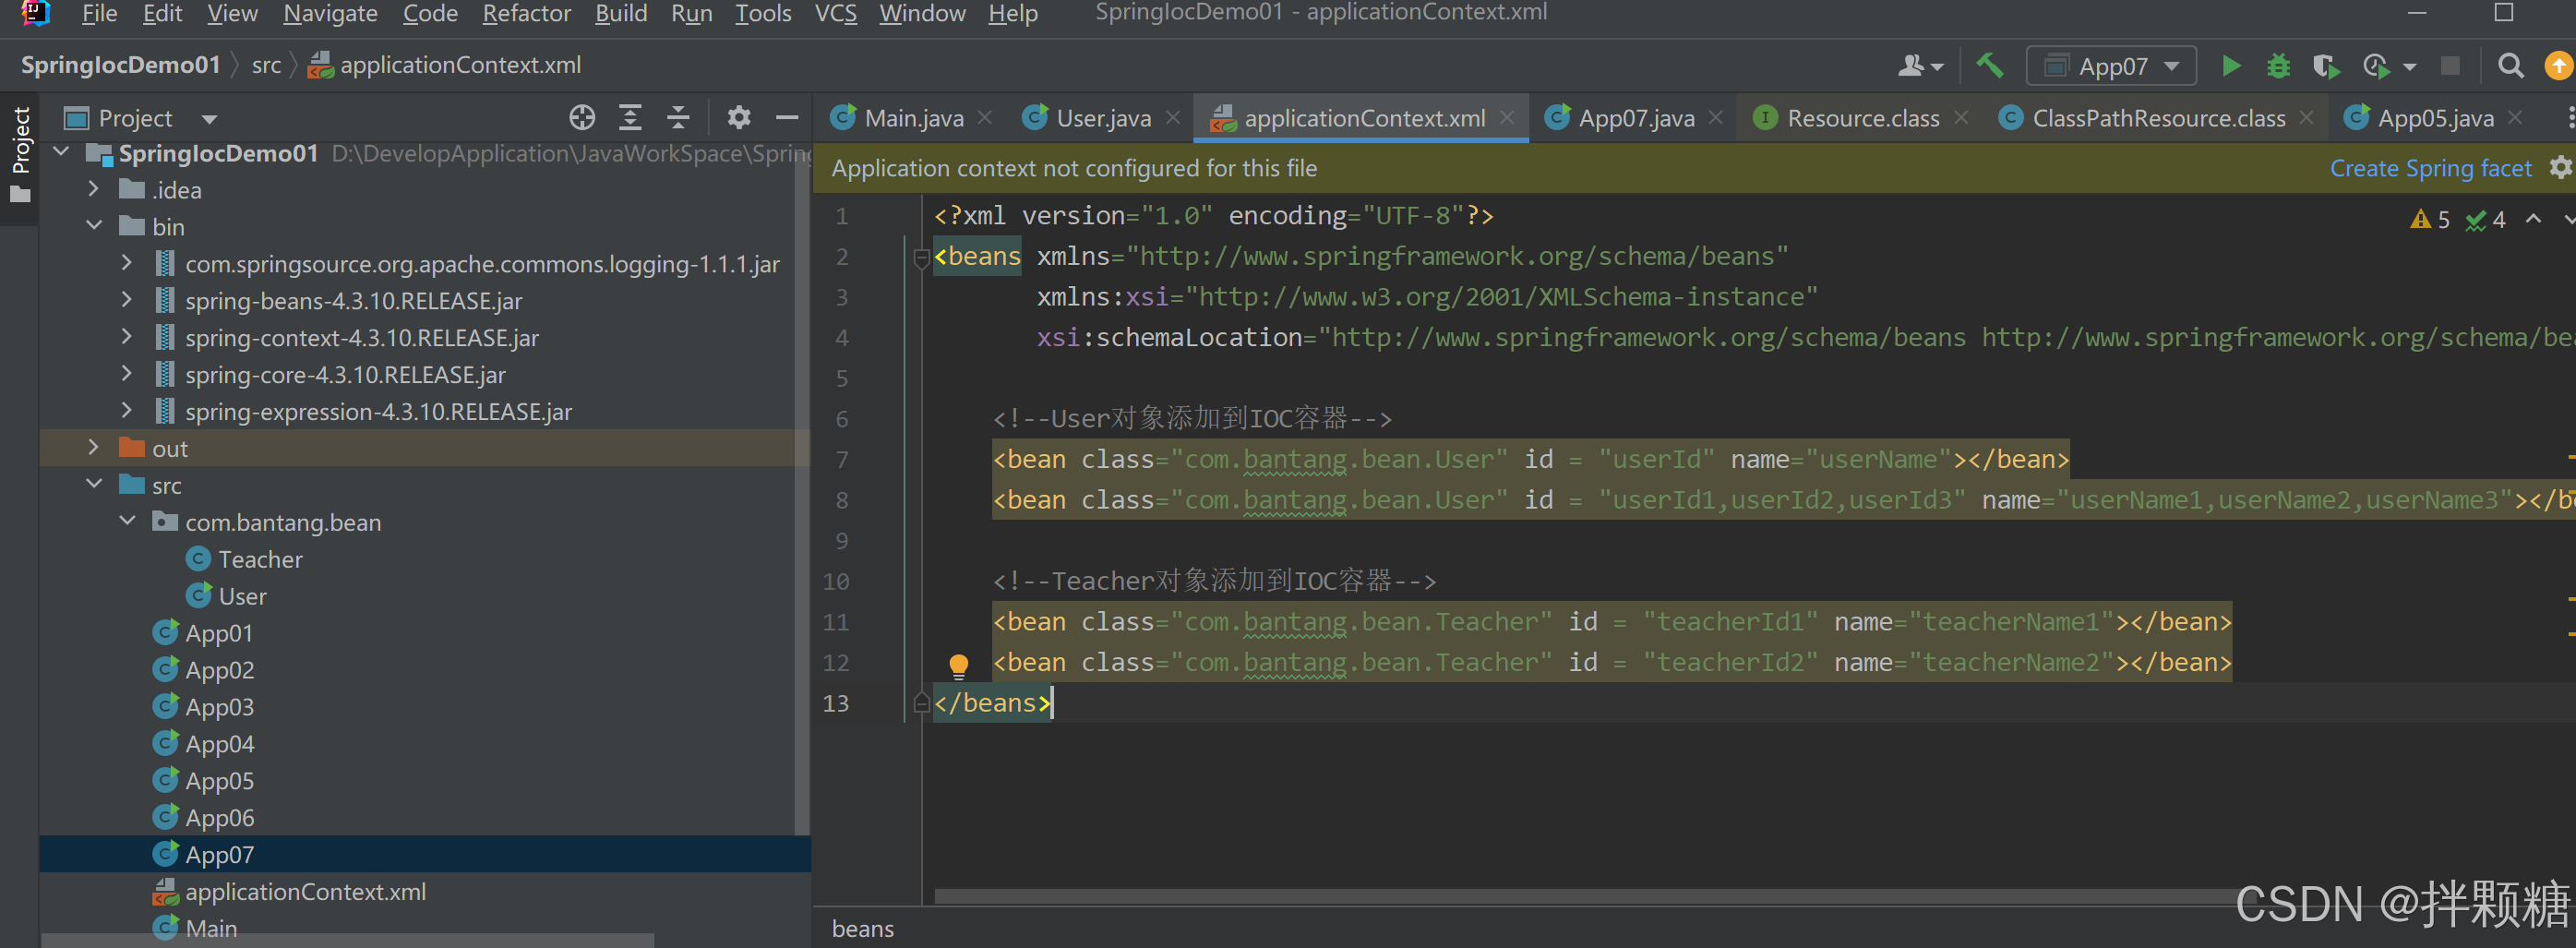
容器配置文件中添加了2个User对象和2个Teacher对象
验证代码
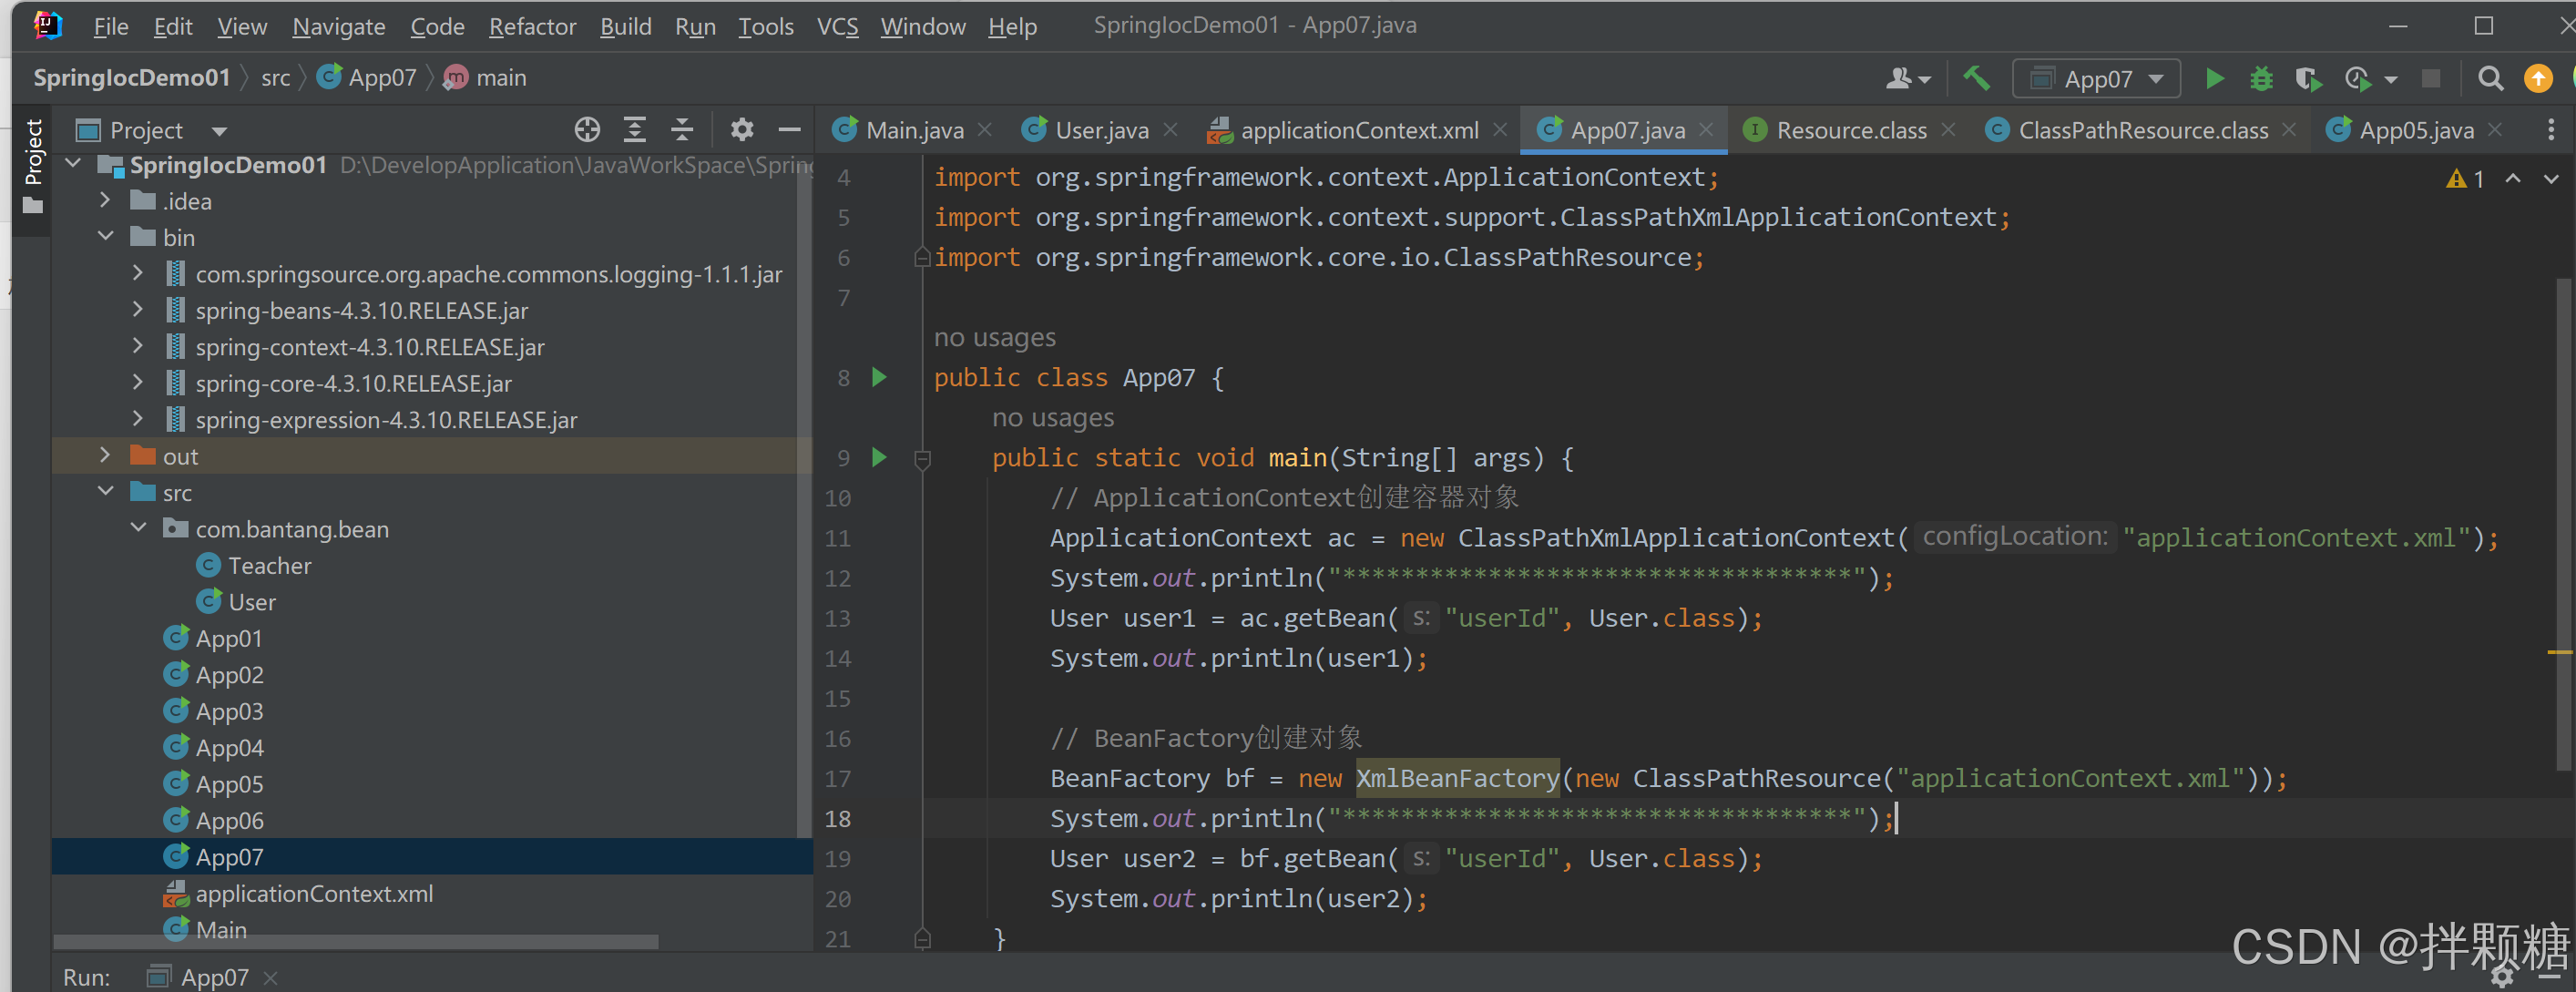
运行结果可以发现
(1)使用ApplicationContext接口初始化容器时,容器中所有对象都会被实例化
(2)而使用BeanFactory接口创建容器时,仅仅只会加载解析容器配置文件,并不会实例化容器中的对象
工厂
我们引入一下工厂的概念
上面的部分我们说了,IOC的核心就是,想吃包子不用自己去做,去包子铺买就可以了。那对于包子铺来说,店铺自己包包子,产量是有限的。那包子铺委托工厂批量化生产一批包子,包子铺只管卖包子,那对买包子的顾客来说是不是无感的,因为顾客只需要有包子买就可以了,不会关注包子怎么来的
静态工厂 static factory【通过工厂类的静态方法获取实例对象】
新建一个package

package中新建工厂类 工厂类添加“生产”对象的静态方法
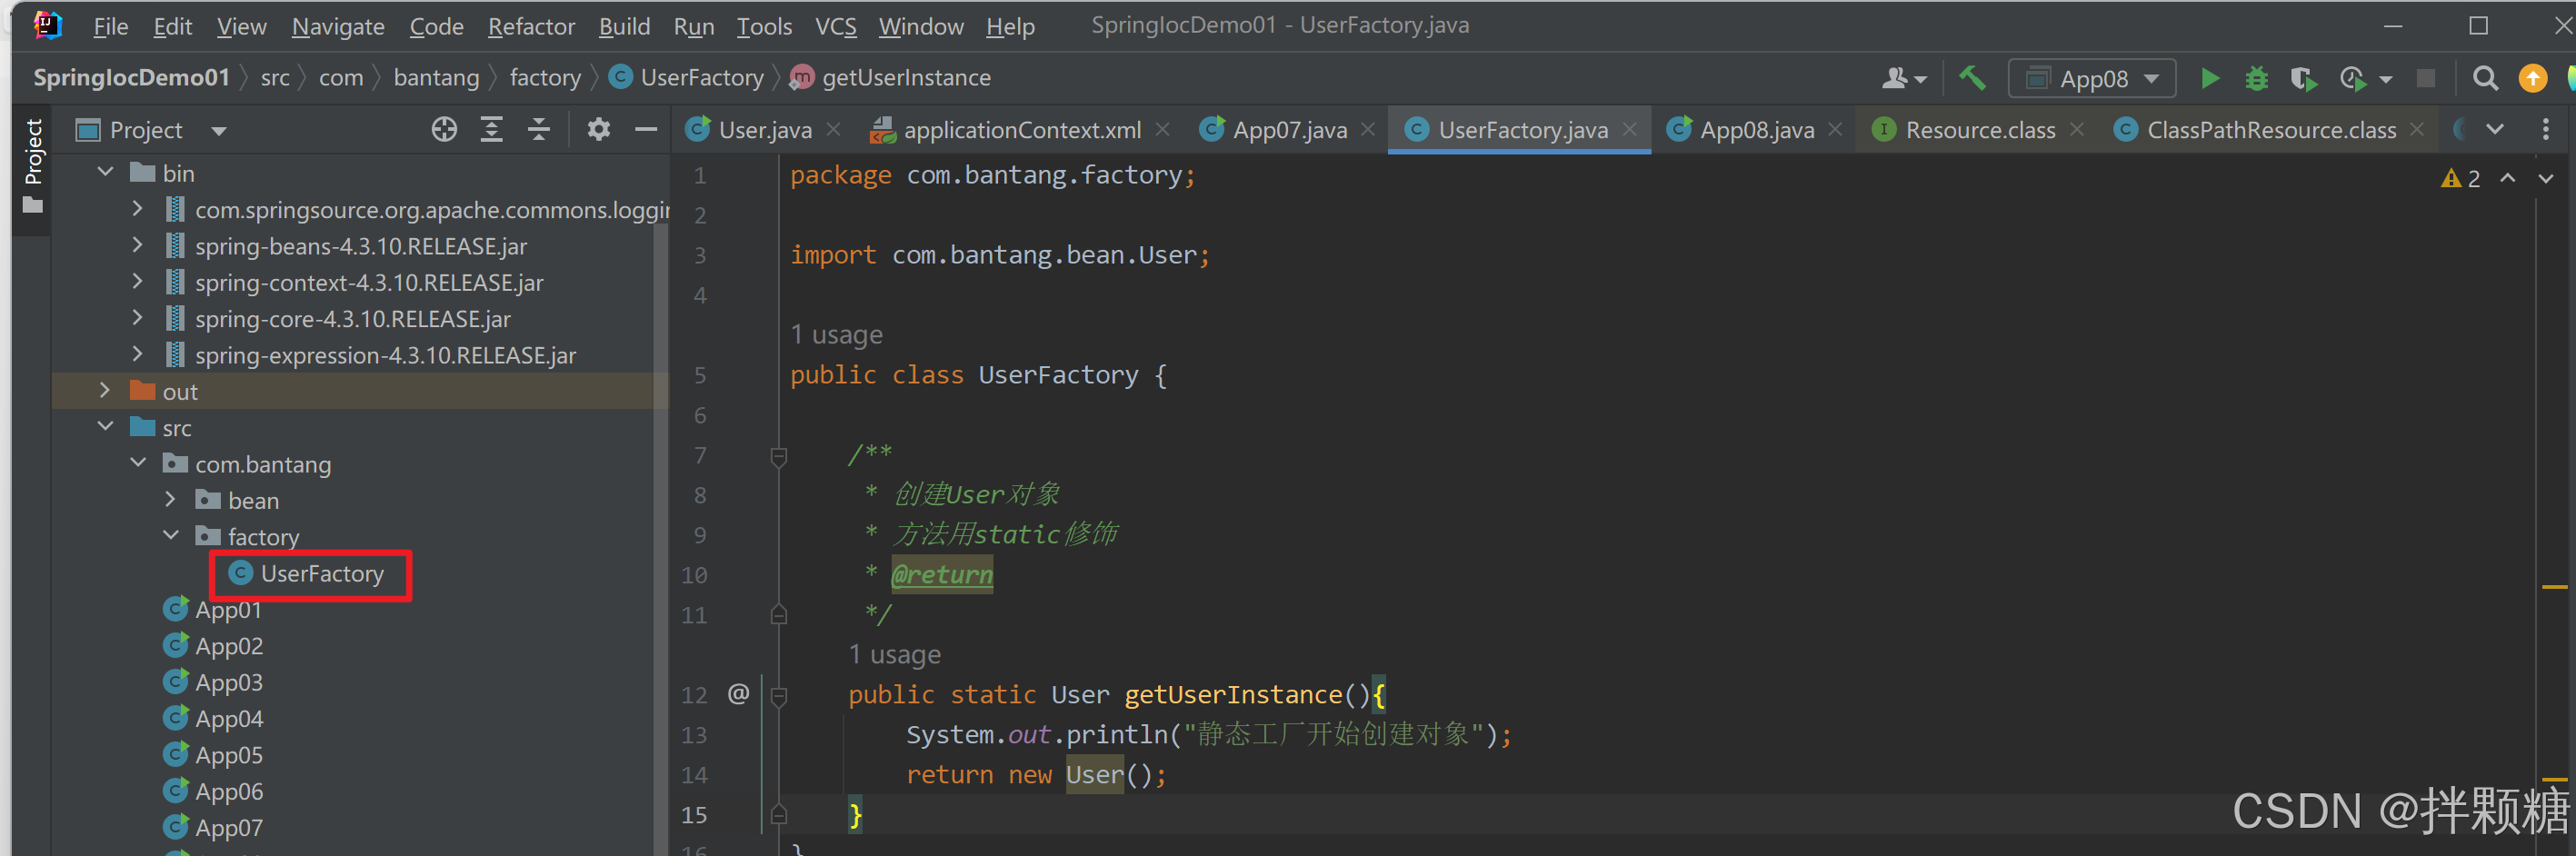
新建一个容器配置文件 容器配置文件中添加工厂对象
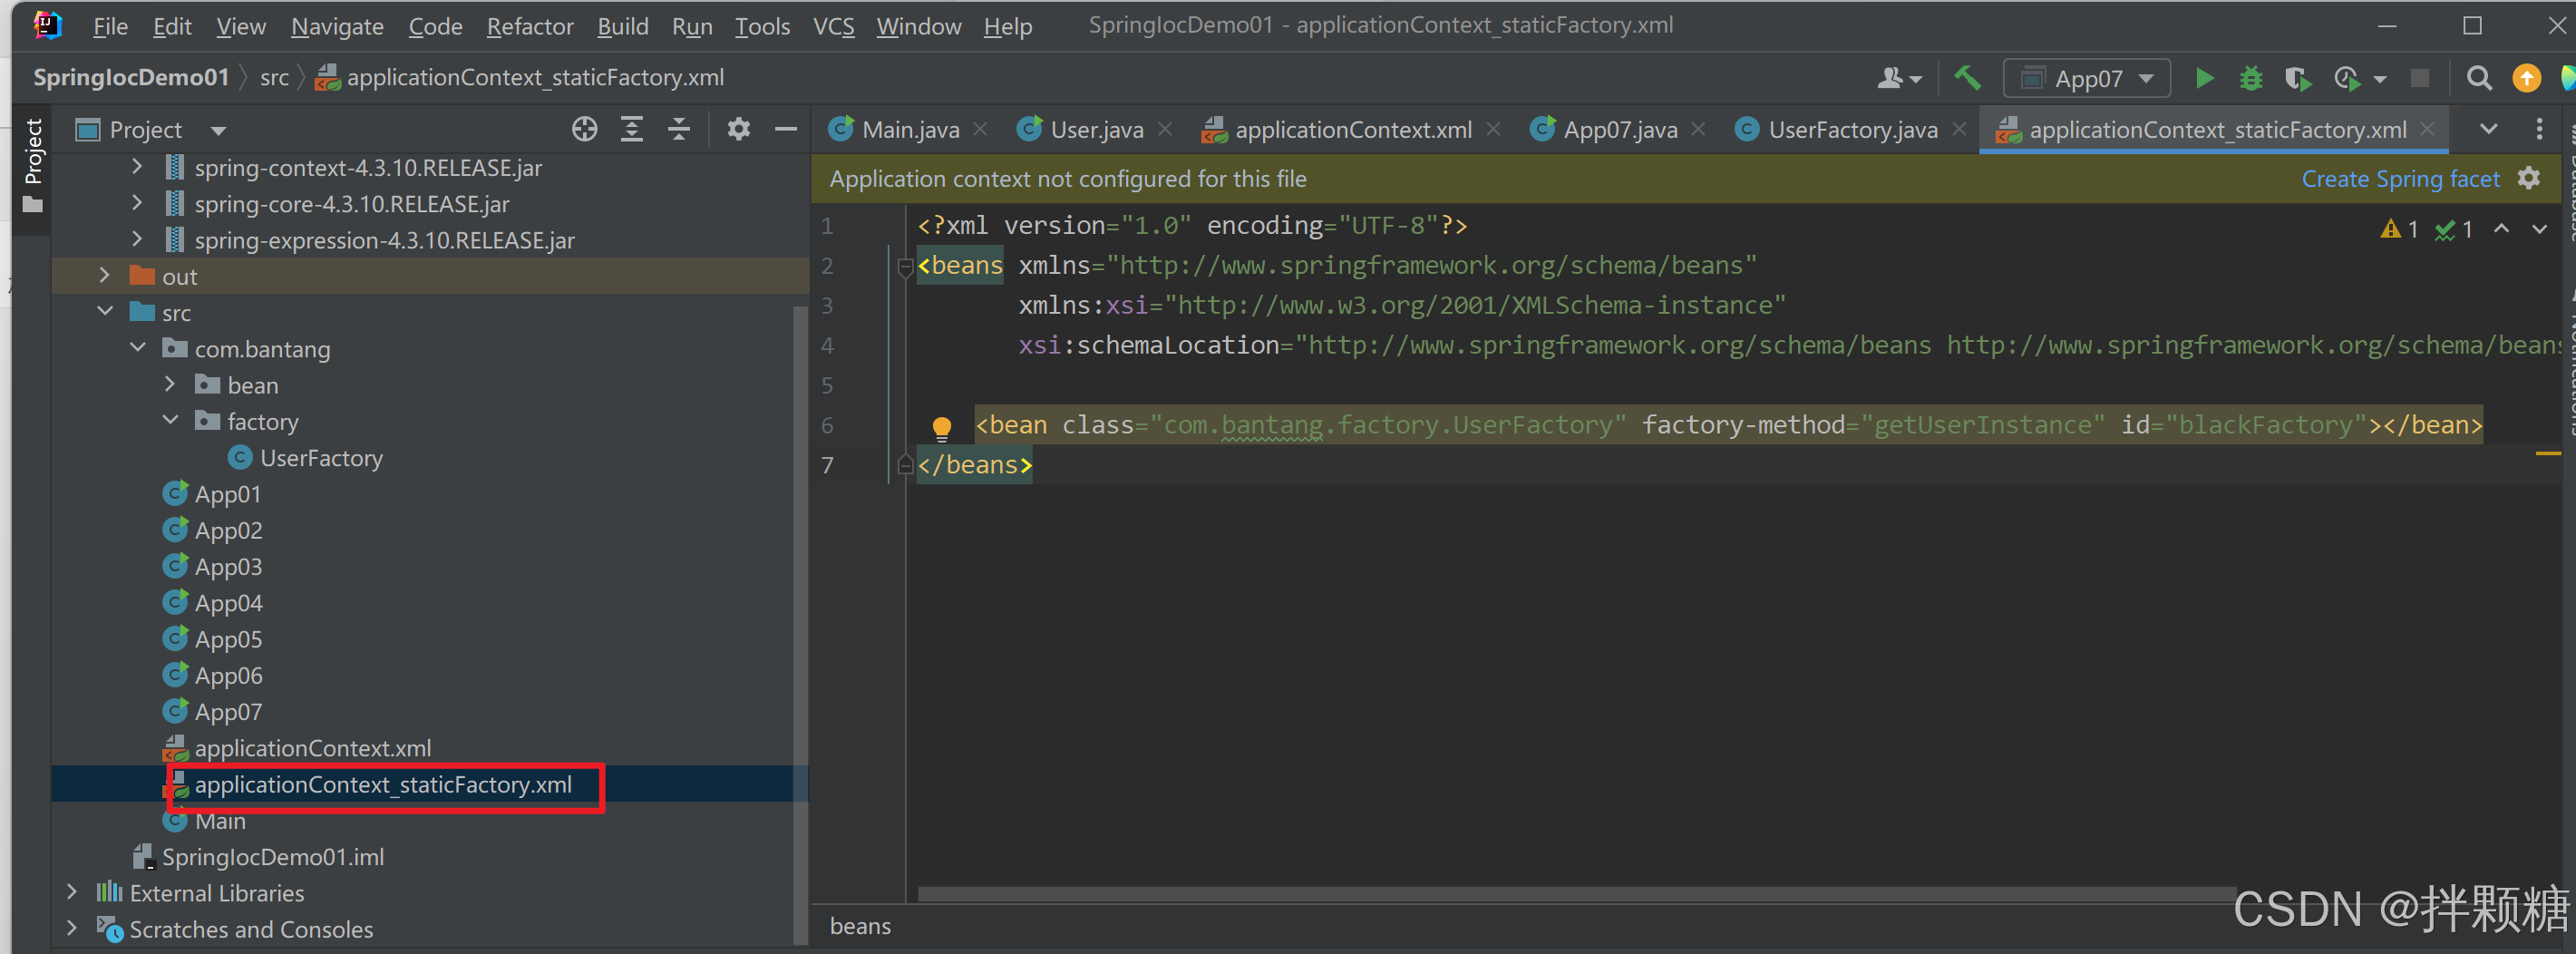
用工厂创建对象

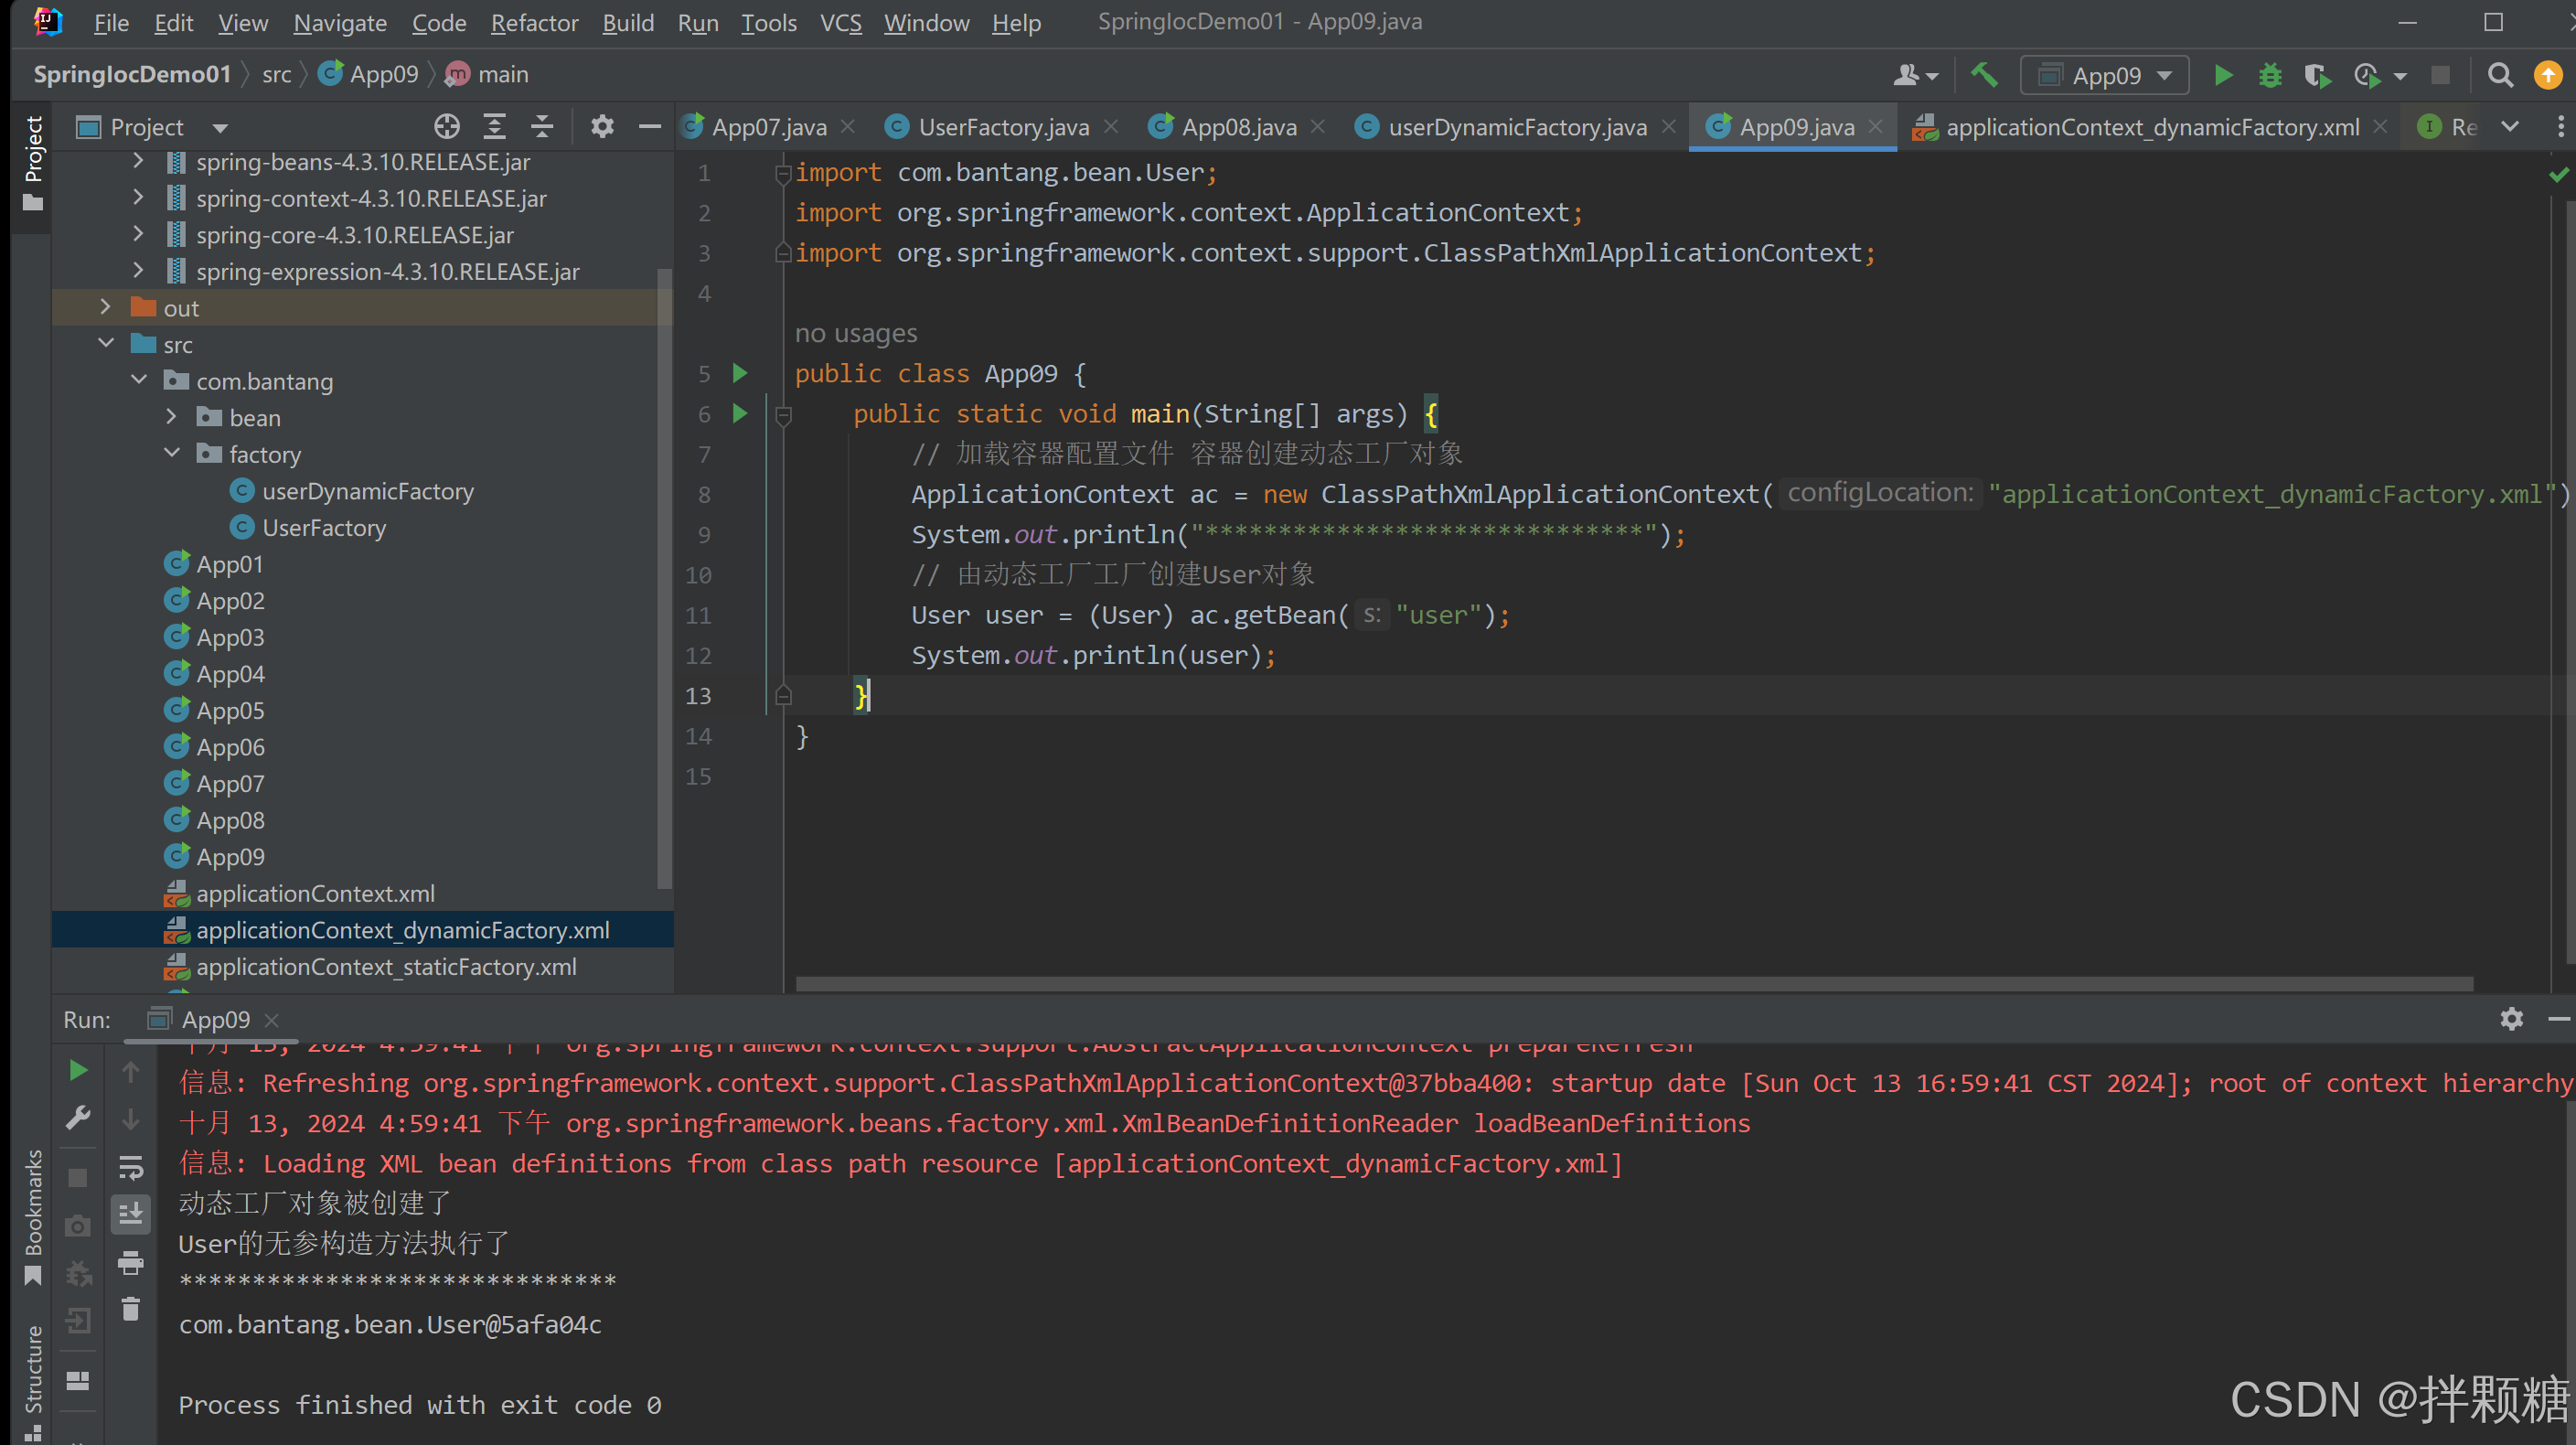
动态工厂 dynamic factory【通过工厂类的普通方法获取实例对象】
(1)创建静态工厂类
其实例化对象的方法是普通方法
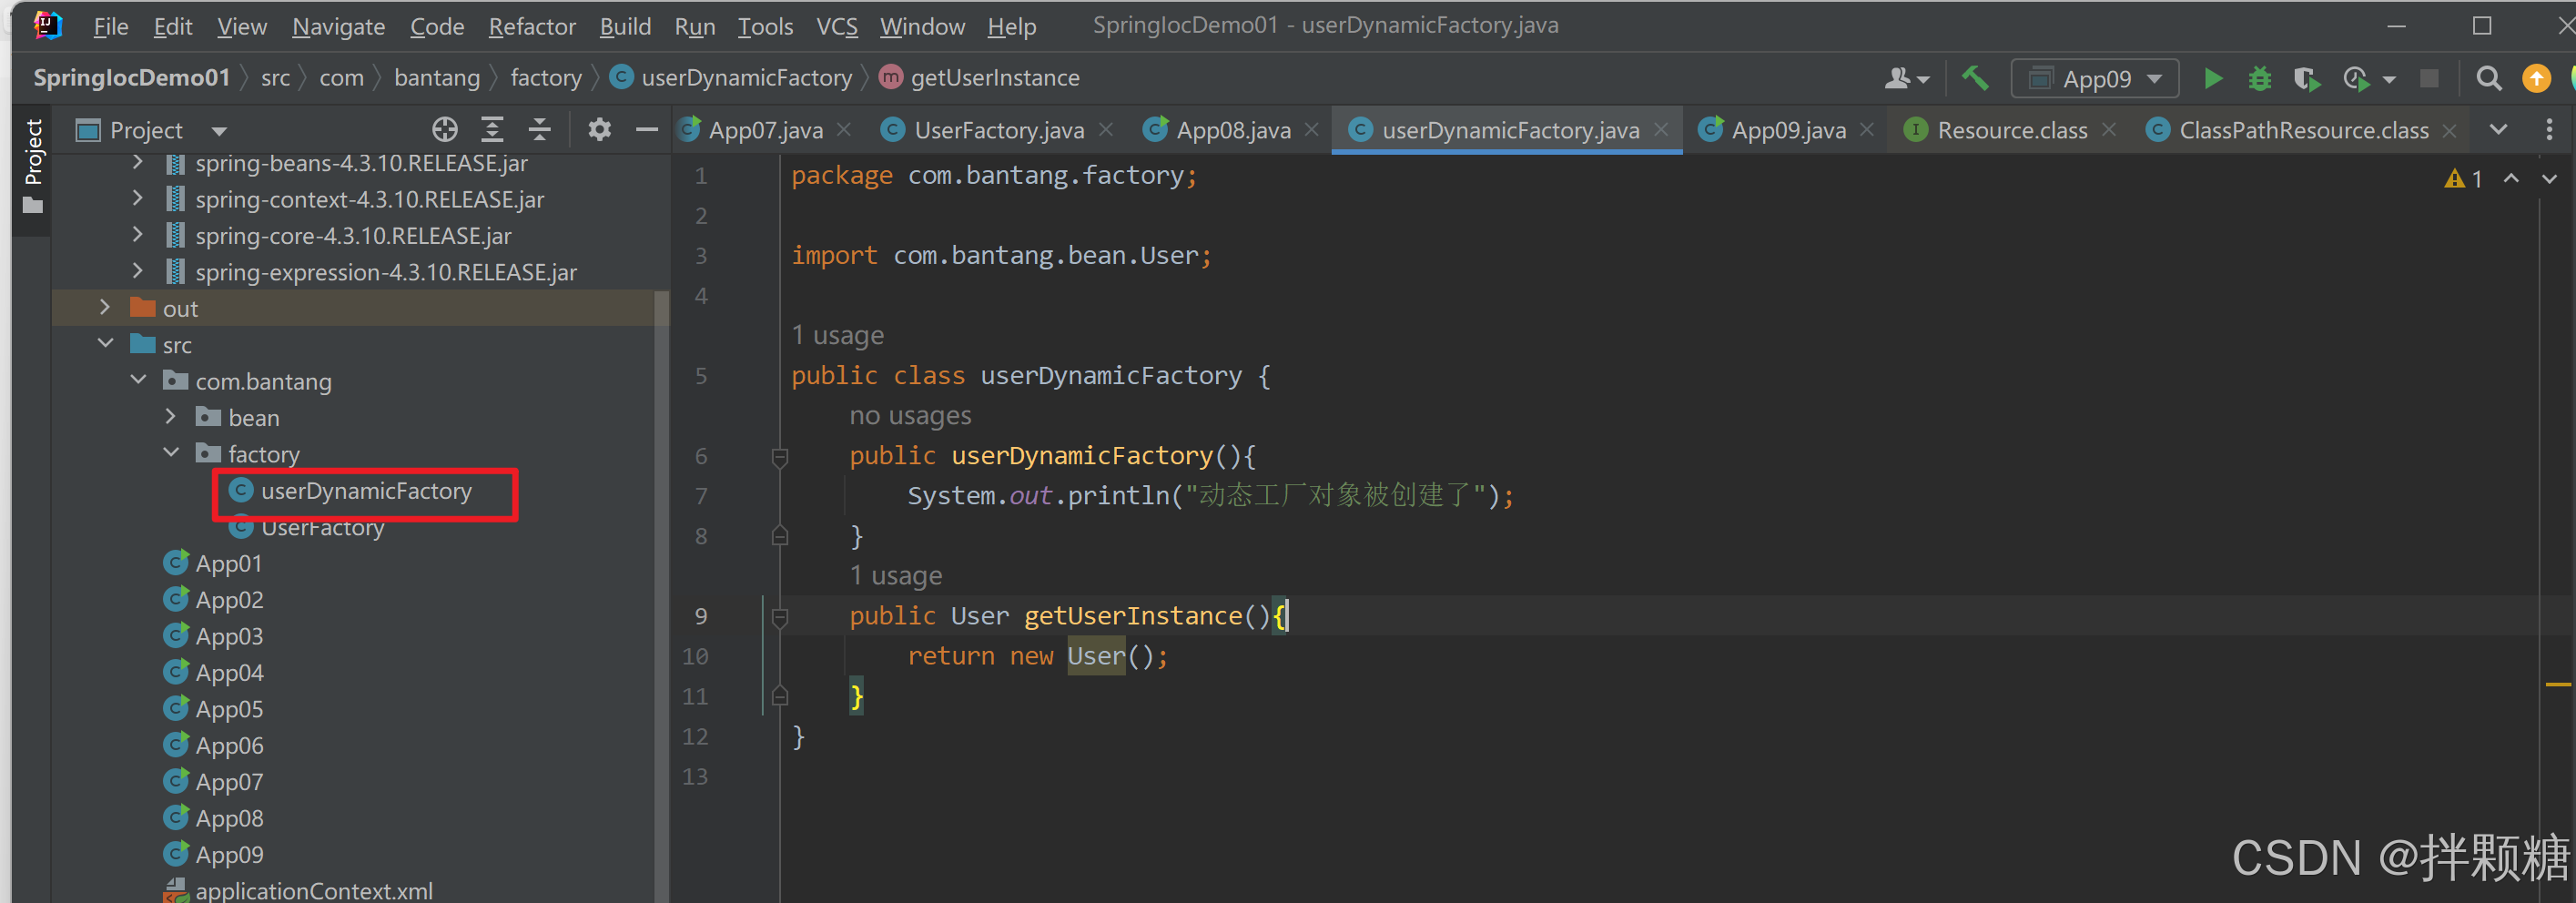
(2)创建容器配置文件 文件中注册 动态工厂类
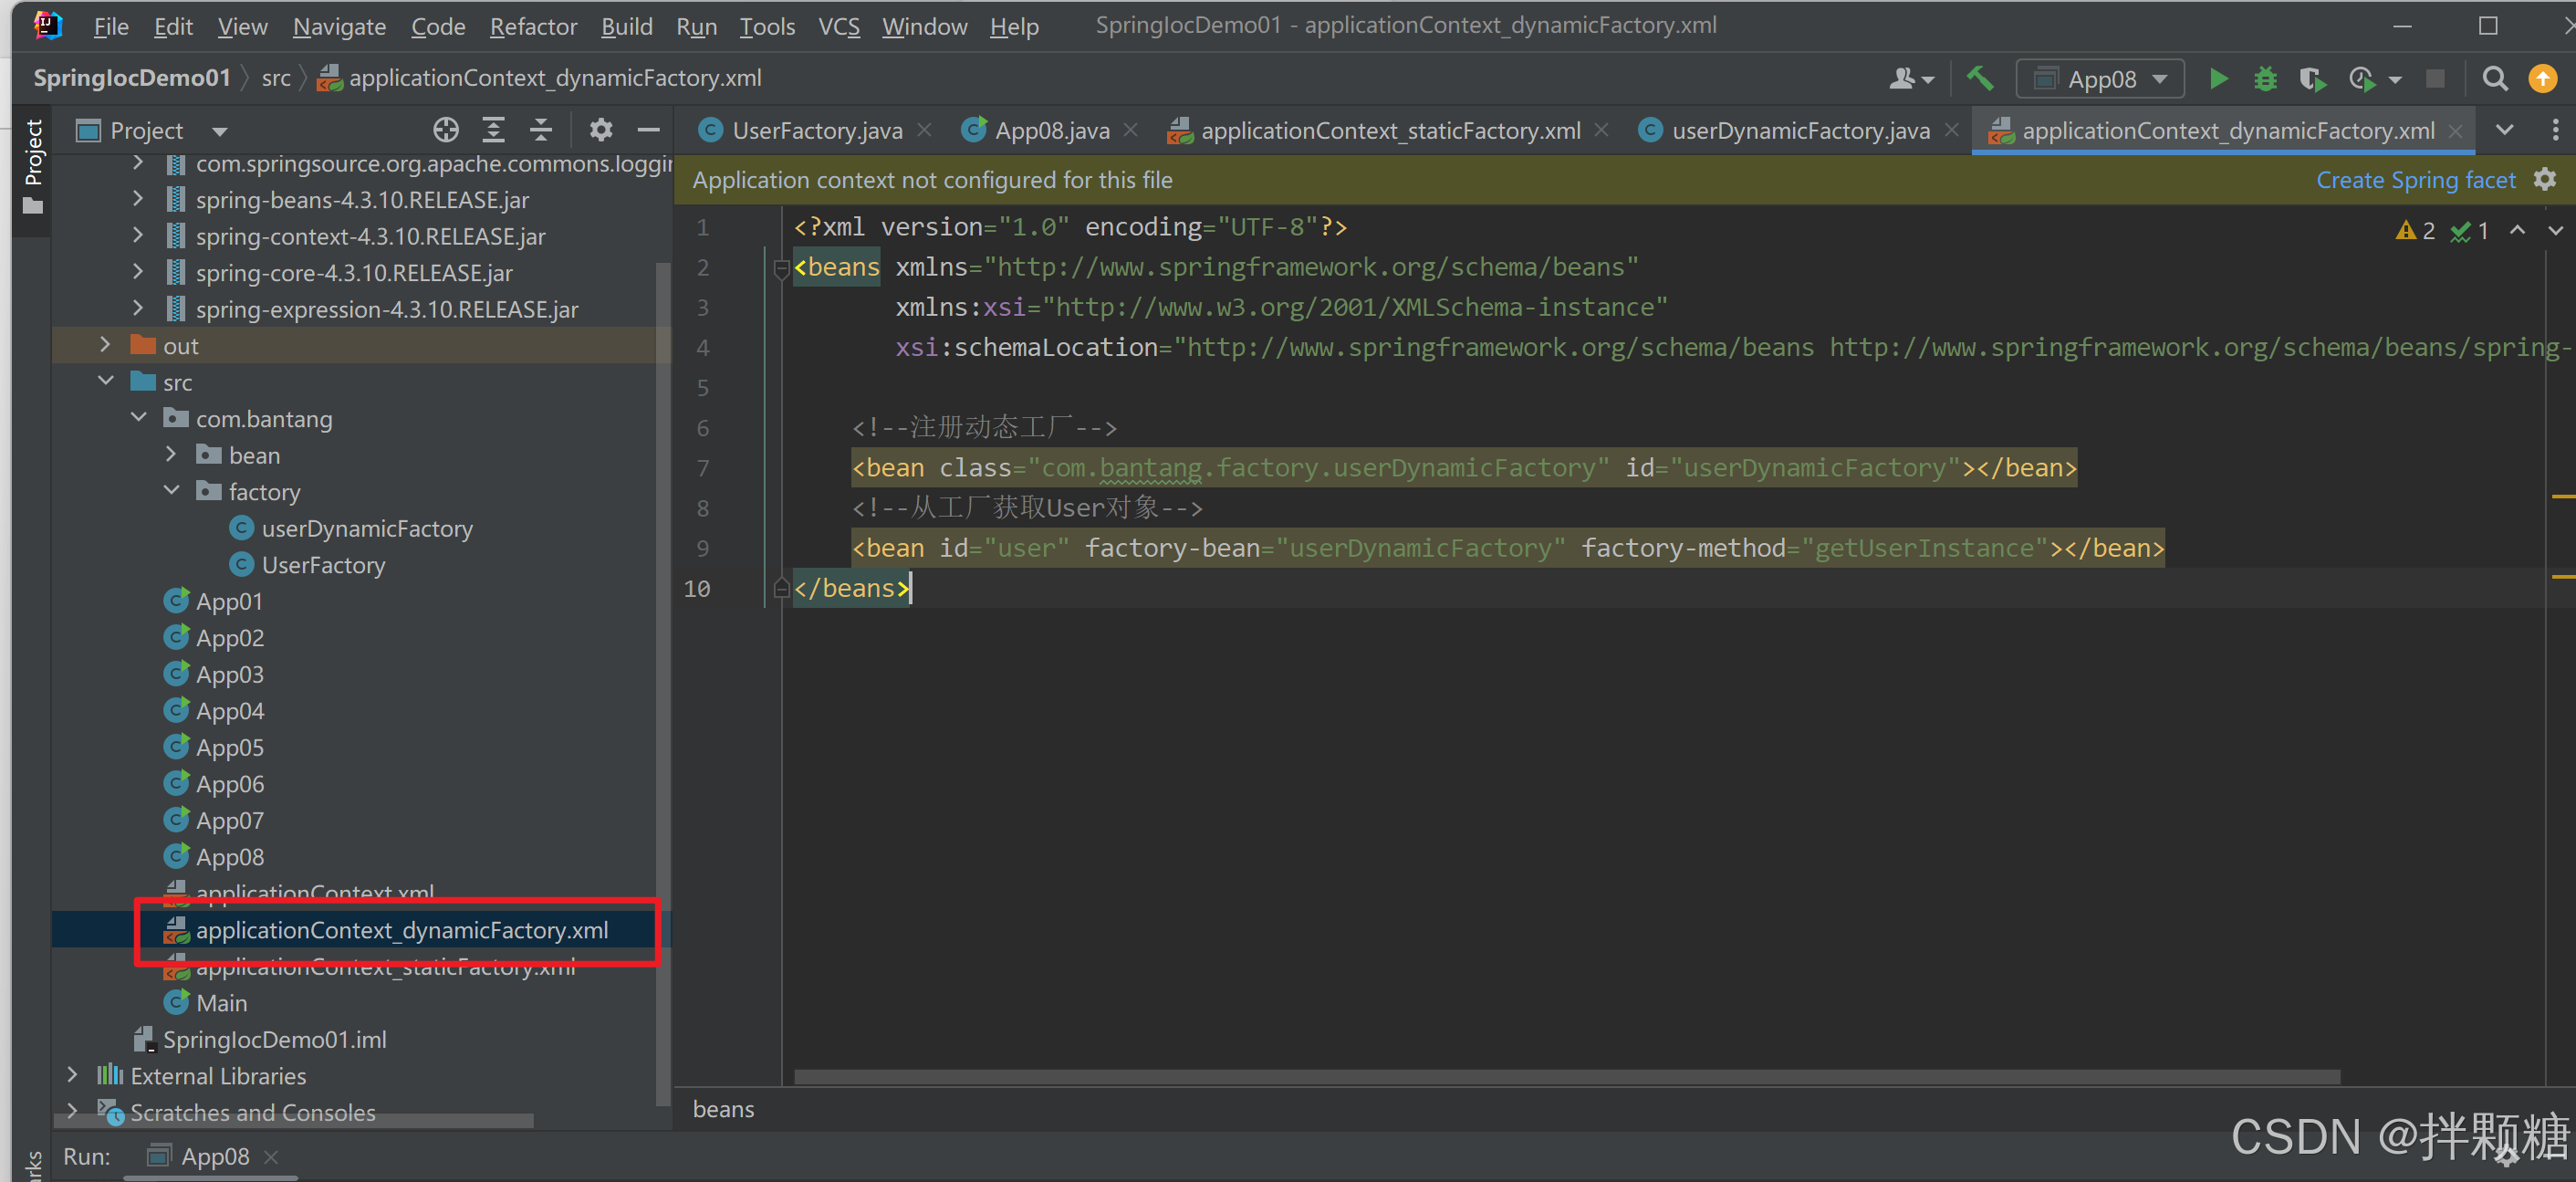
(3)创建容器对象 容器创建动态工厂对象 动态工厂创建user对象
说明
以上的注入都相当于无参构造 也就是说得到的对象没有属性
接下来展示如何给对象赋予属性
构造注入
为Bean创建有参构造函数


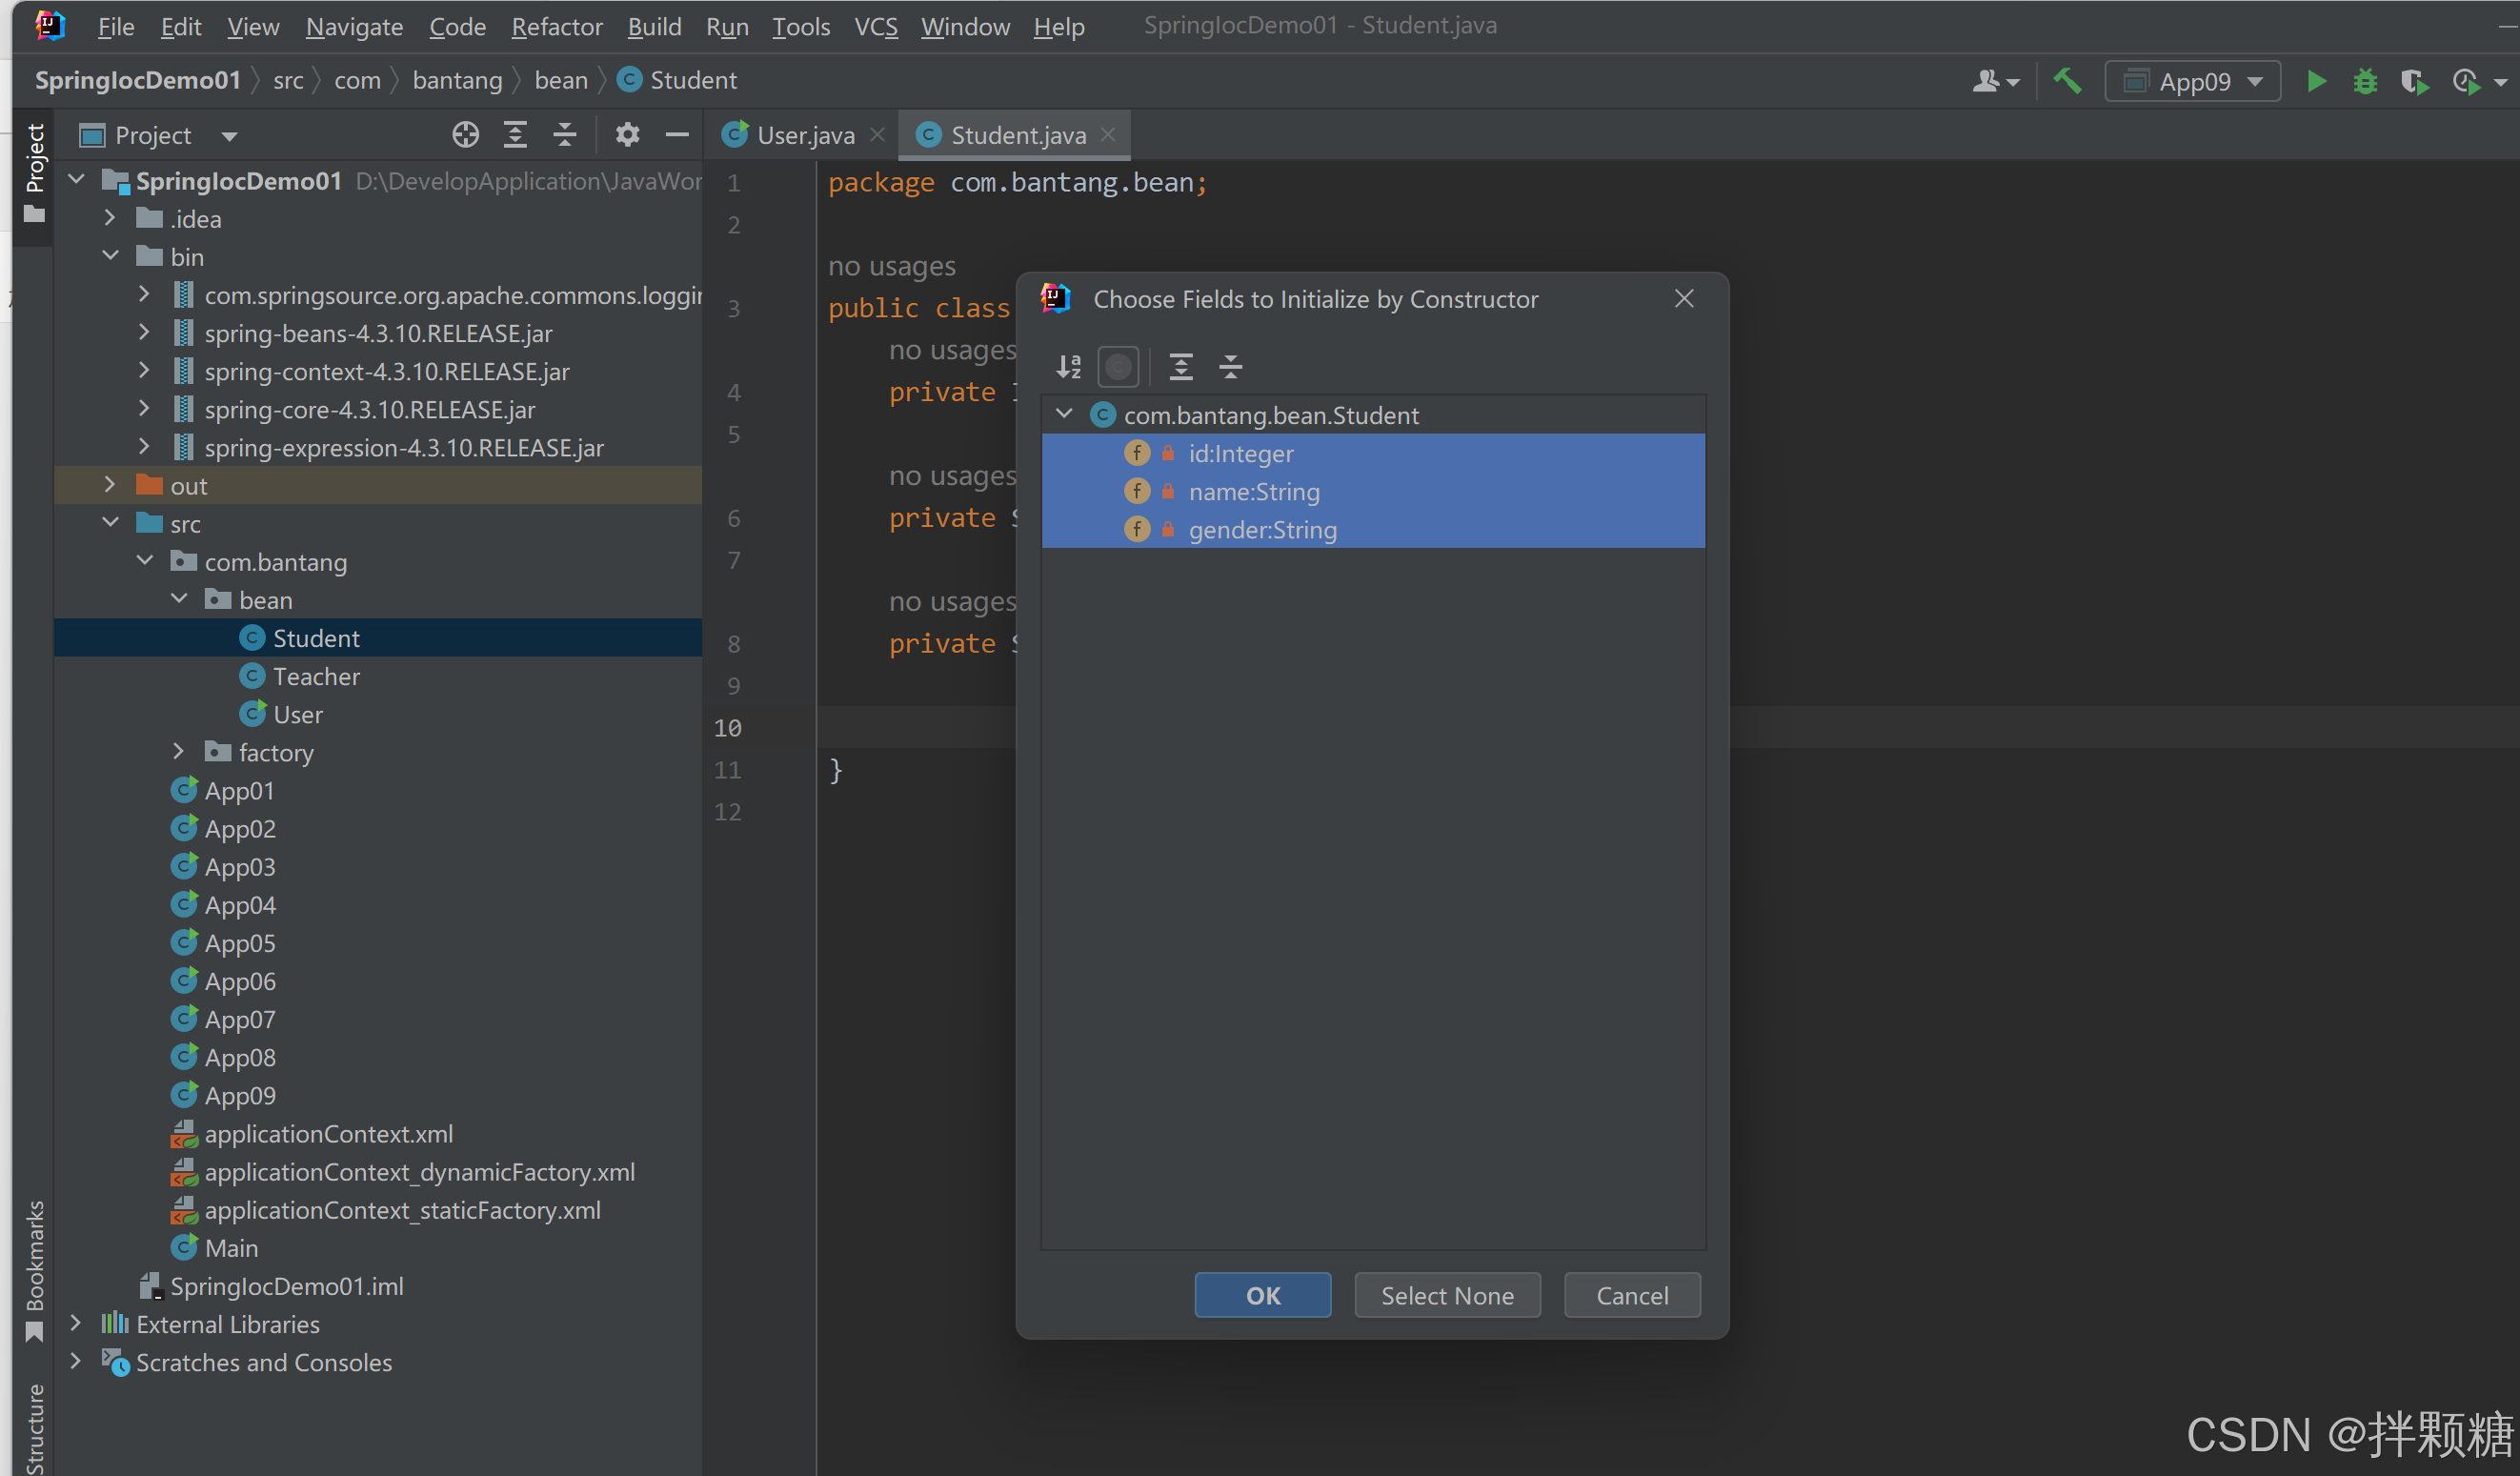
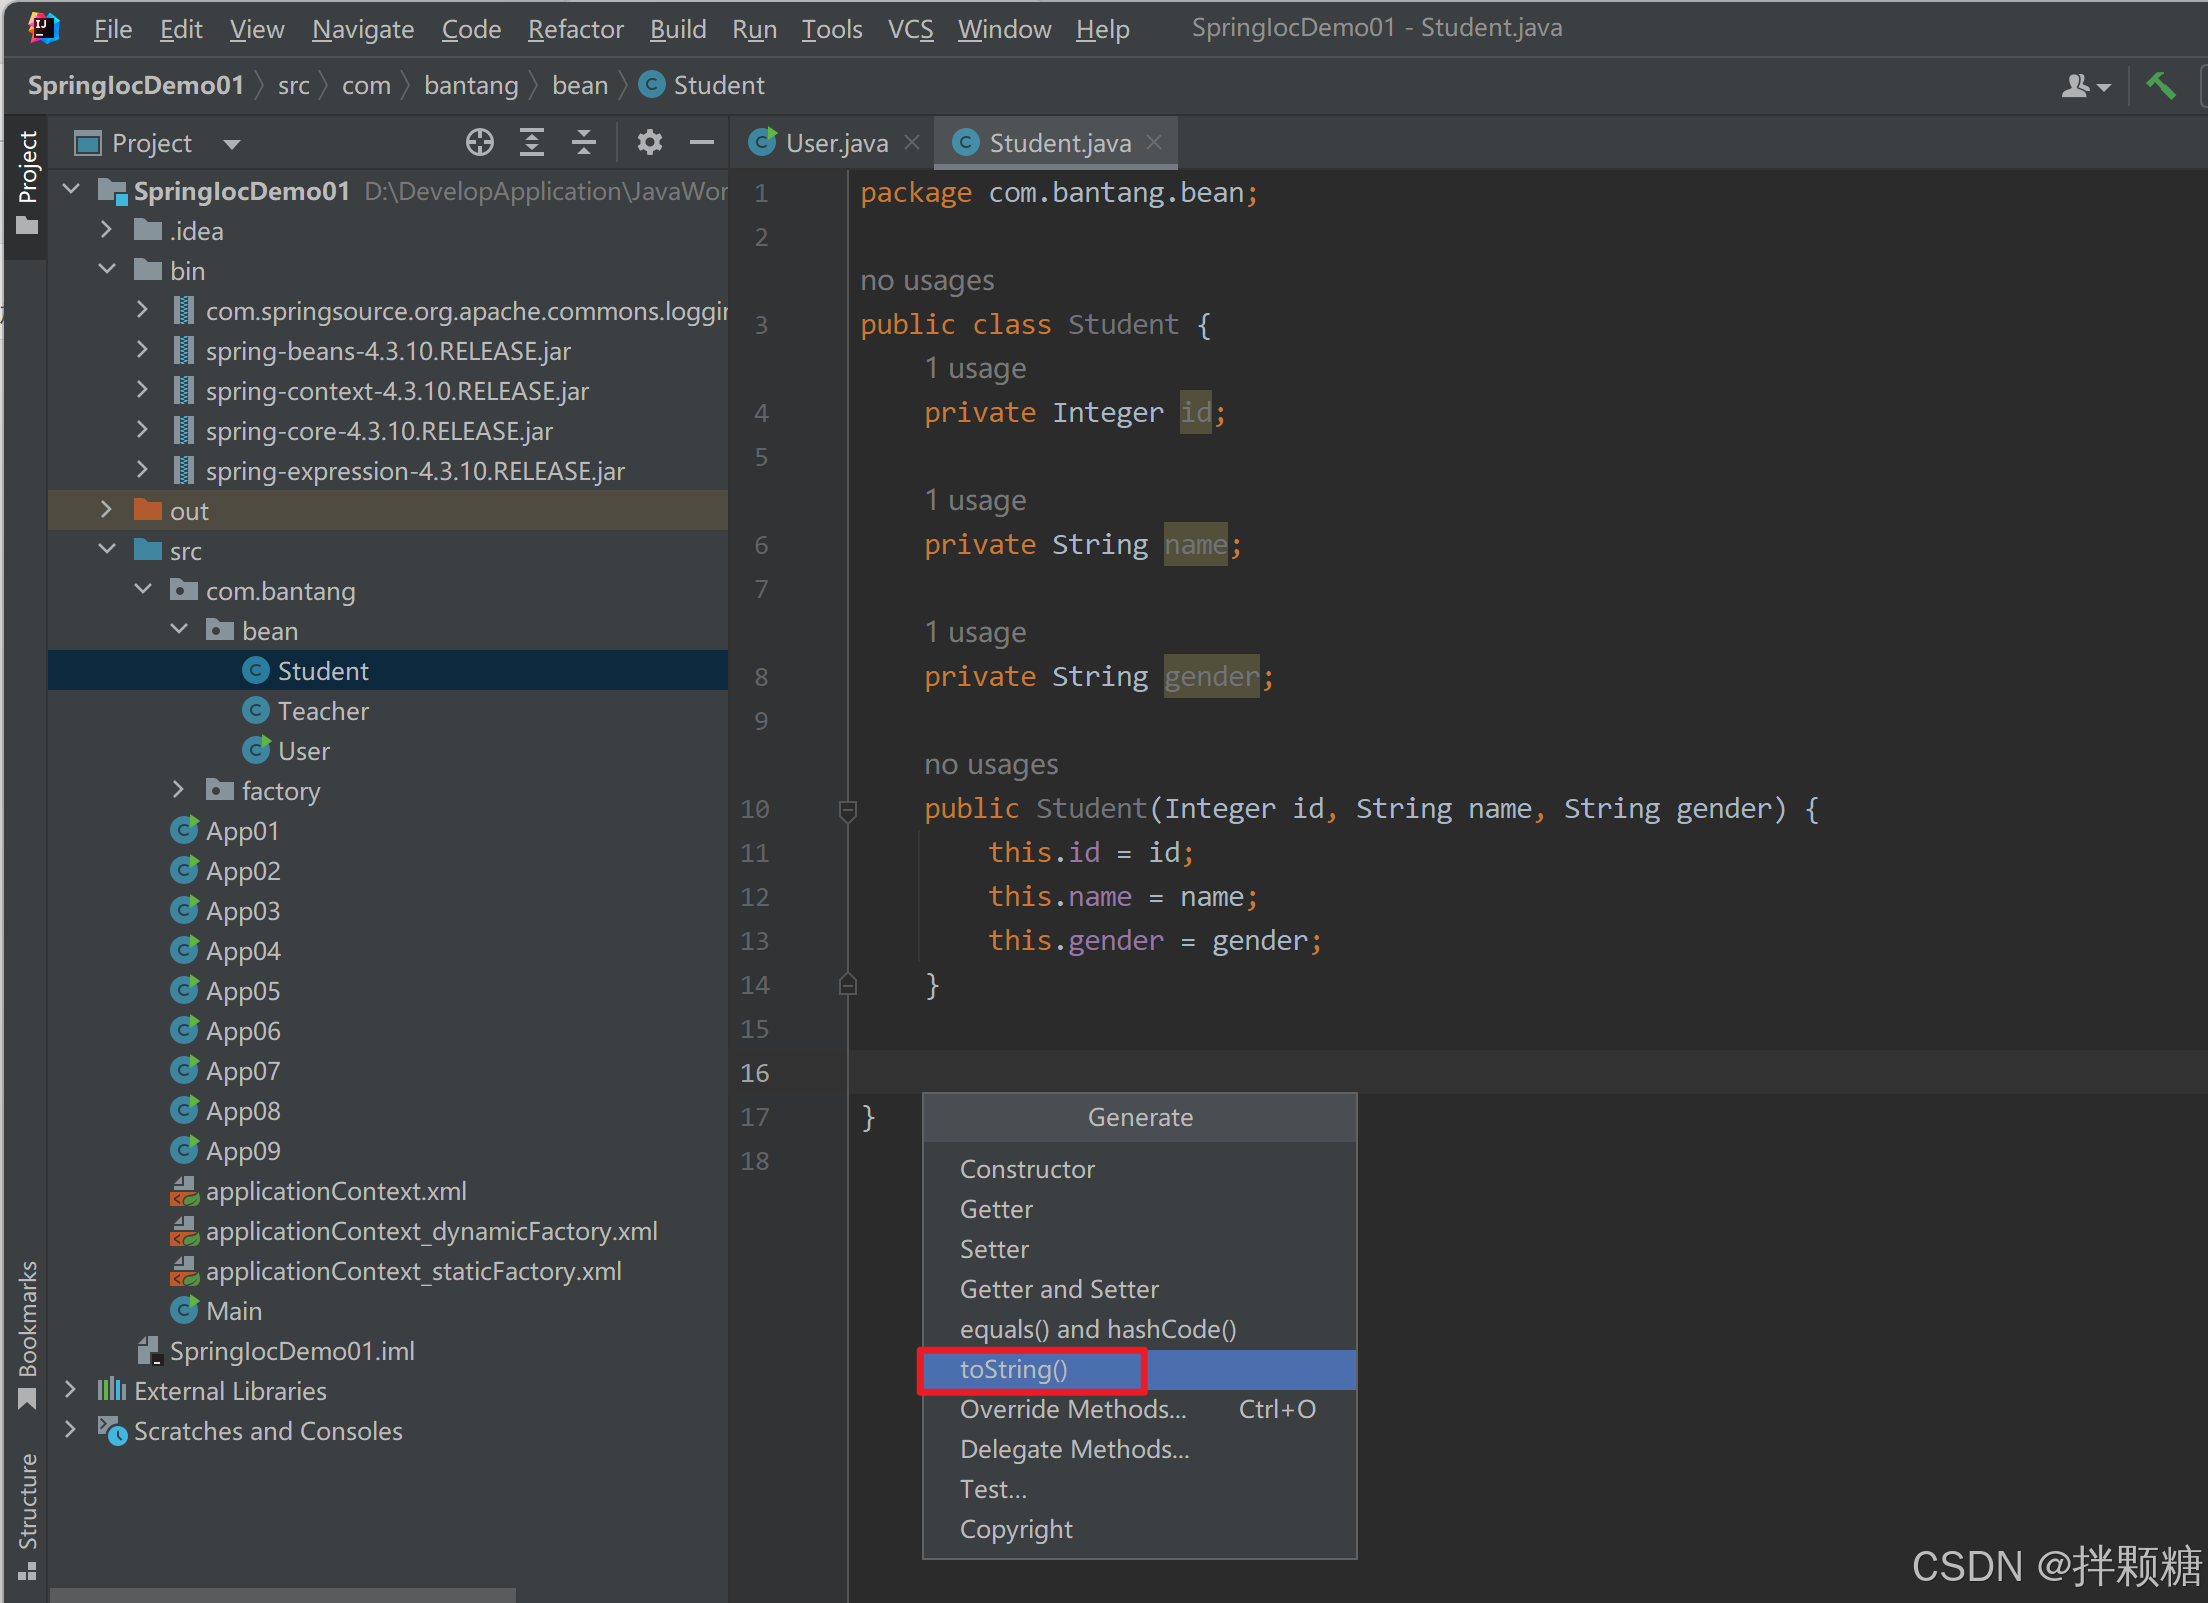
创建有参构造和重写toString()的代码结构
package com.bantang.bean;

public class Student {
	private Integer id;

	private String name;

	private String gender;

	public Student(Integer id, String name, String gender) {
		this.id = id;
		this.name = name;
		this.gender = gender;
	}

	@Override
	public String toString() {
		return "Student{" +
				"id=" + id +
				", name='" + name + '\'' +
				", gender='" + gender + '\'' +
				'}';
	}
}
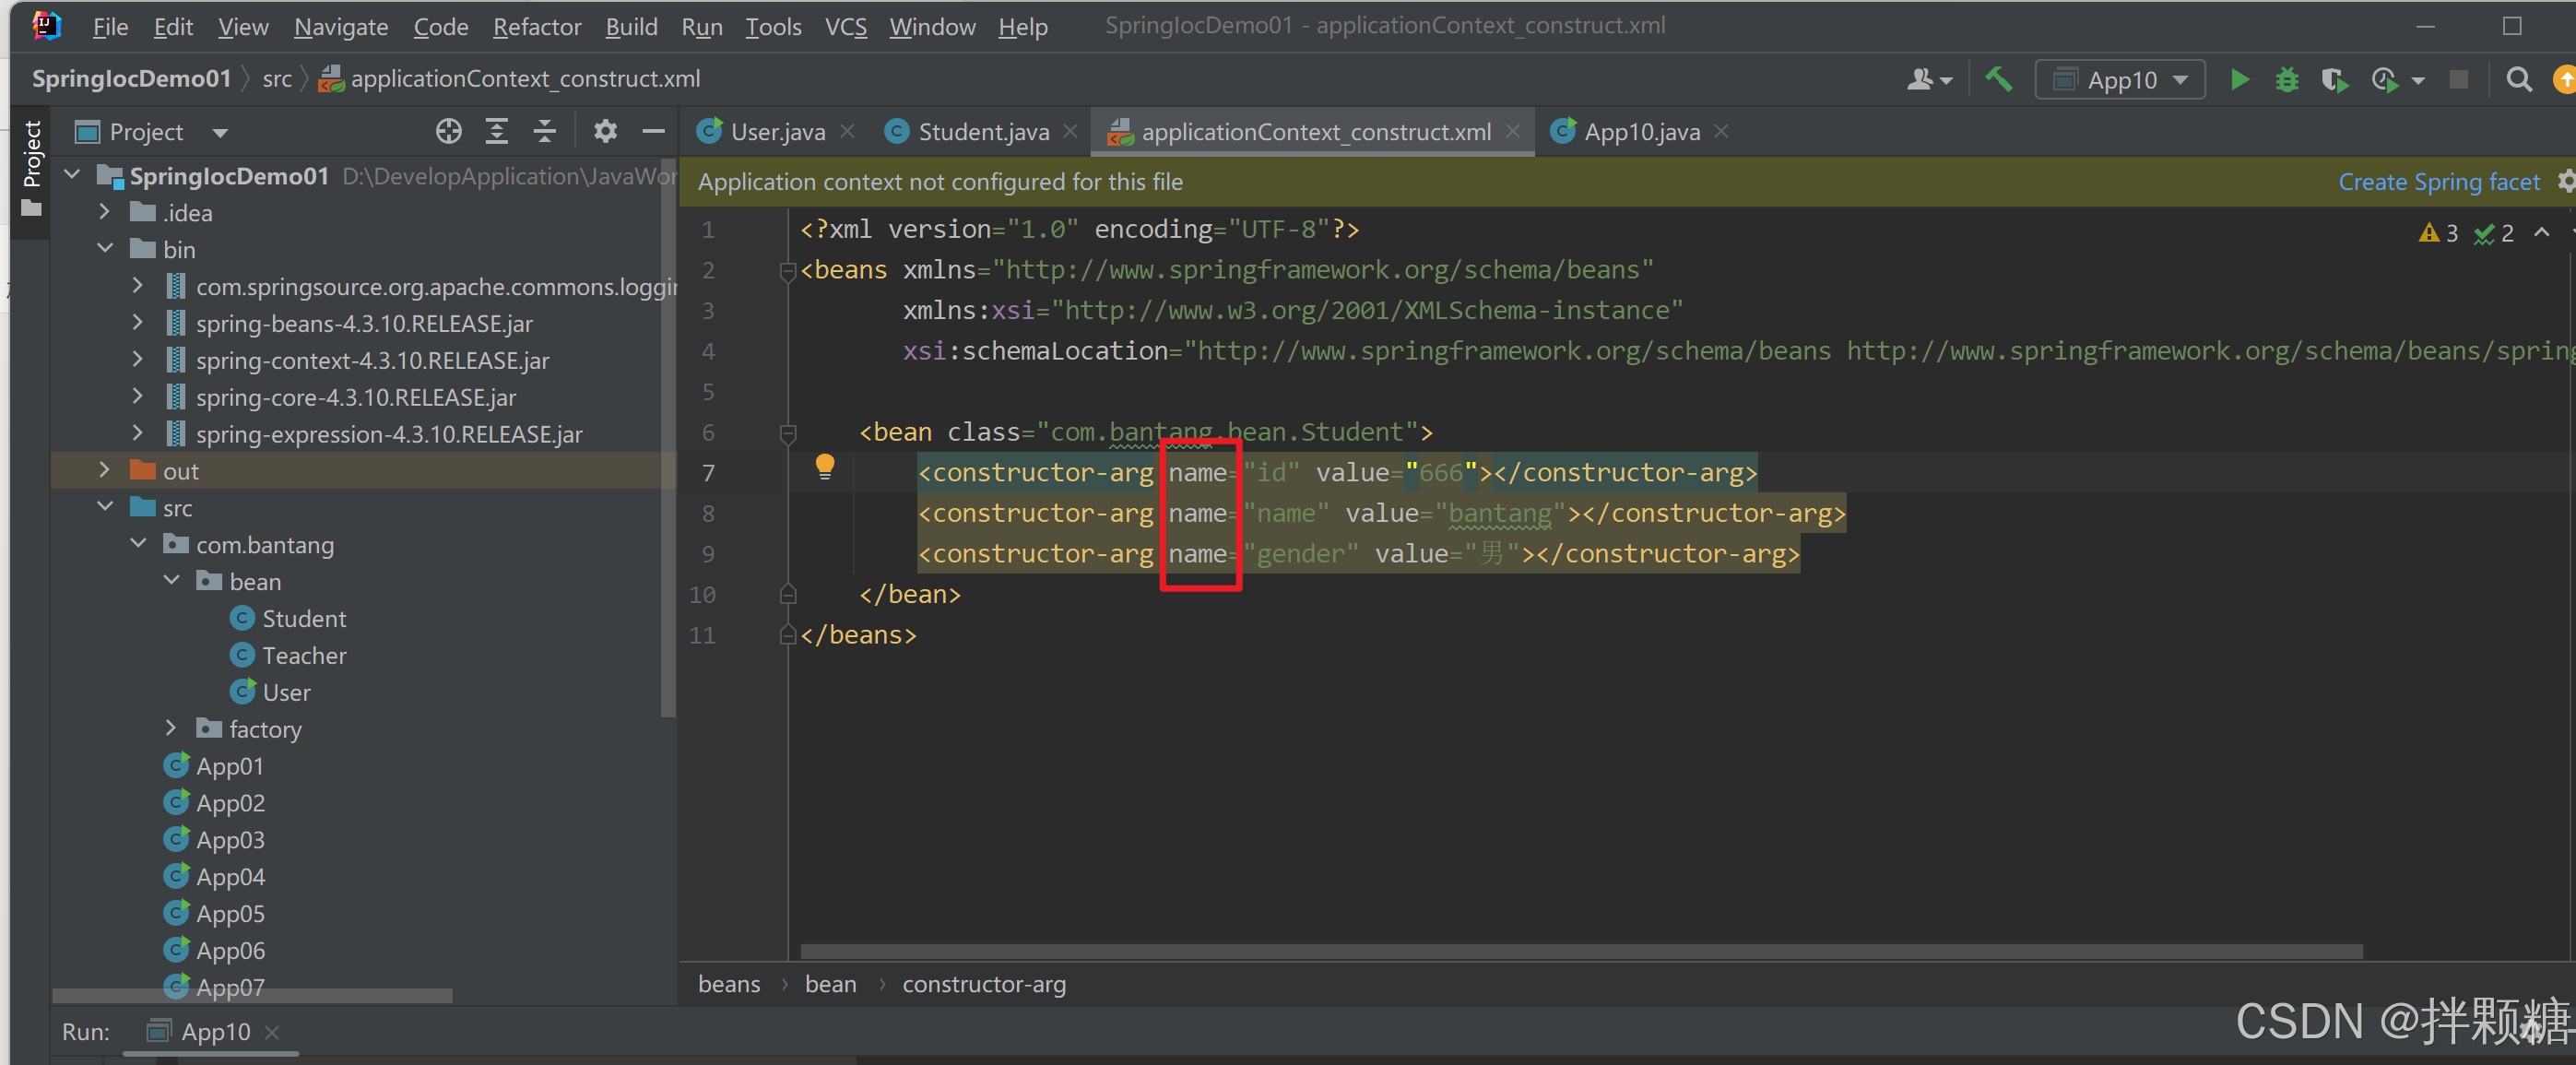
创建构造注入的容器配置文件
在配置文件中注册对象时 发现报错 原因:配置文件和有参构造函数不匹配
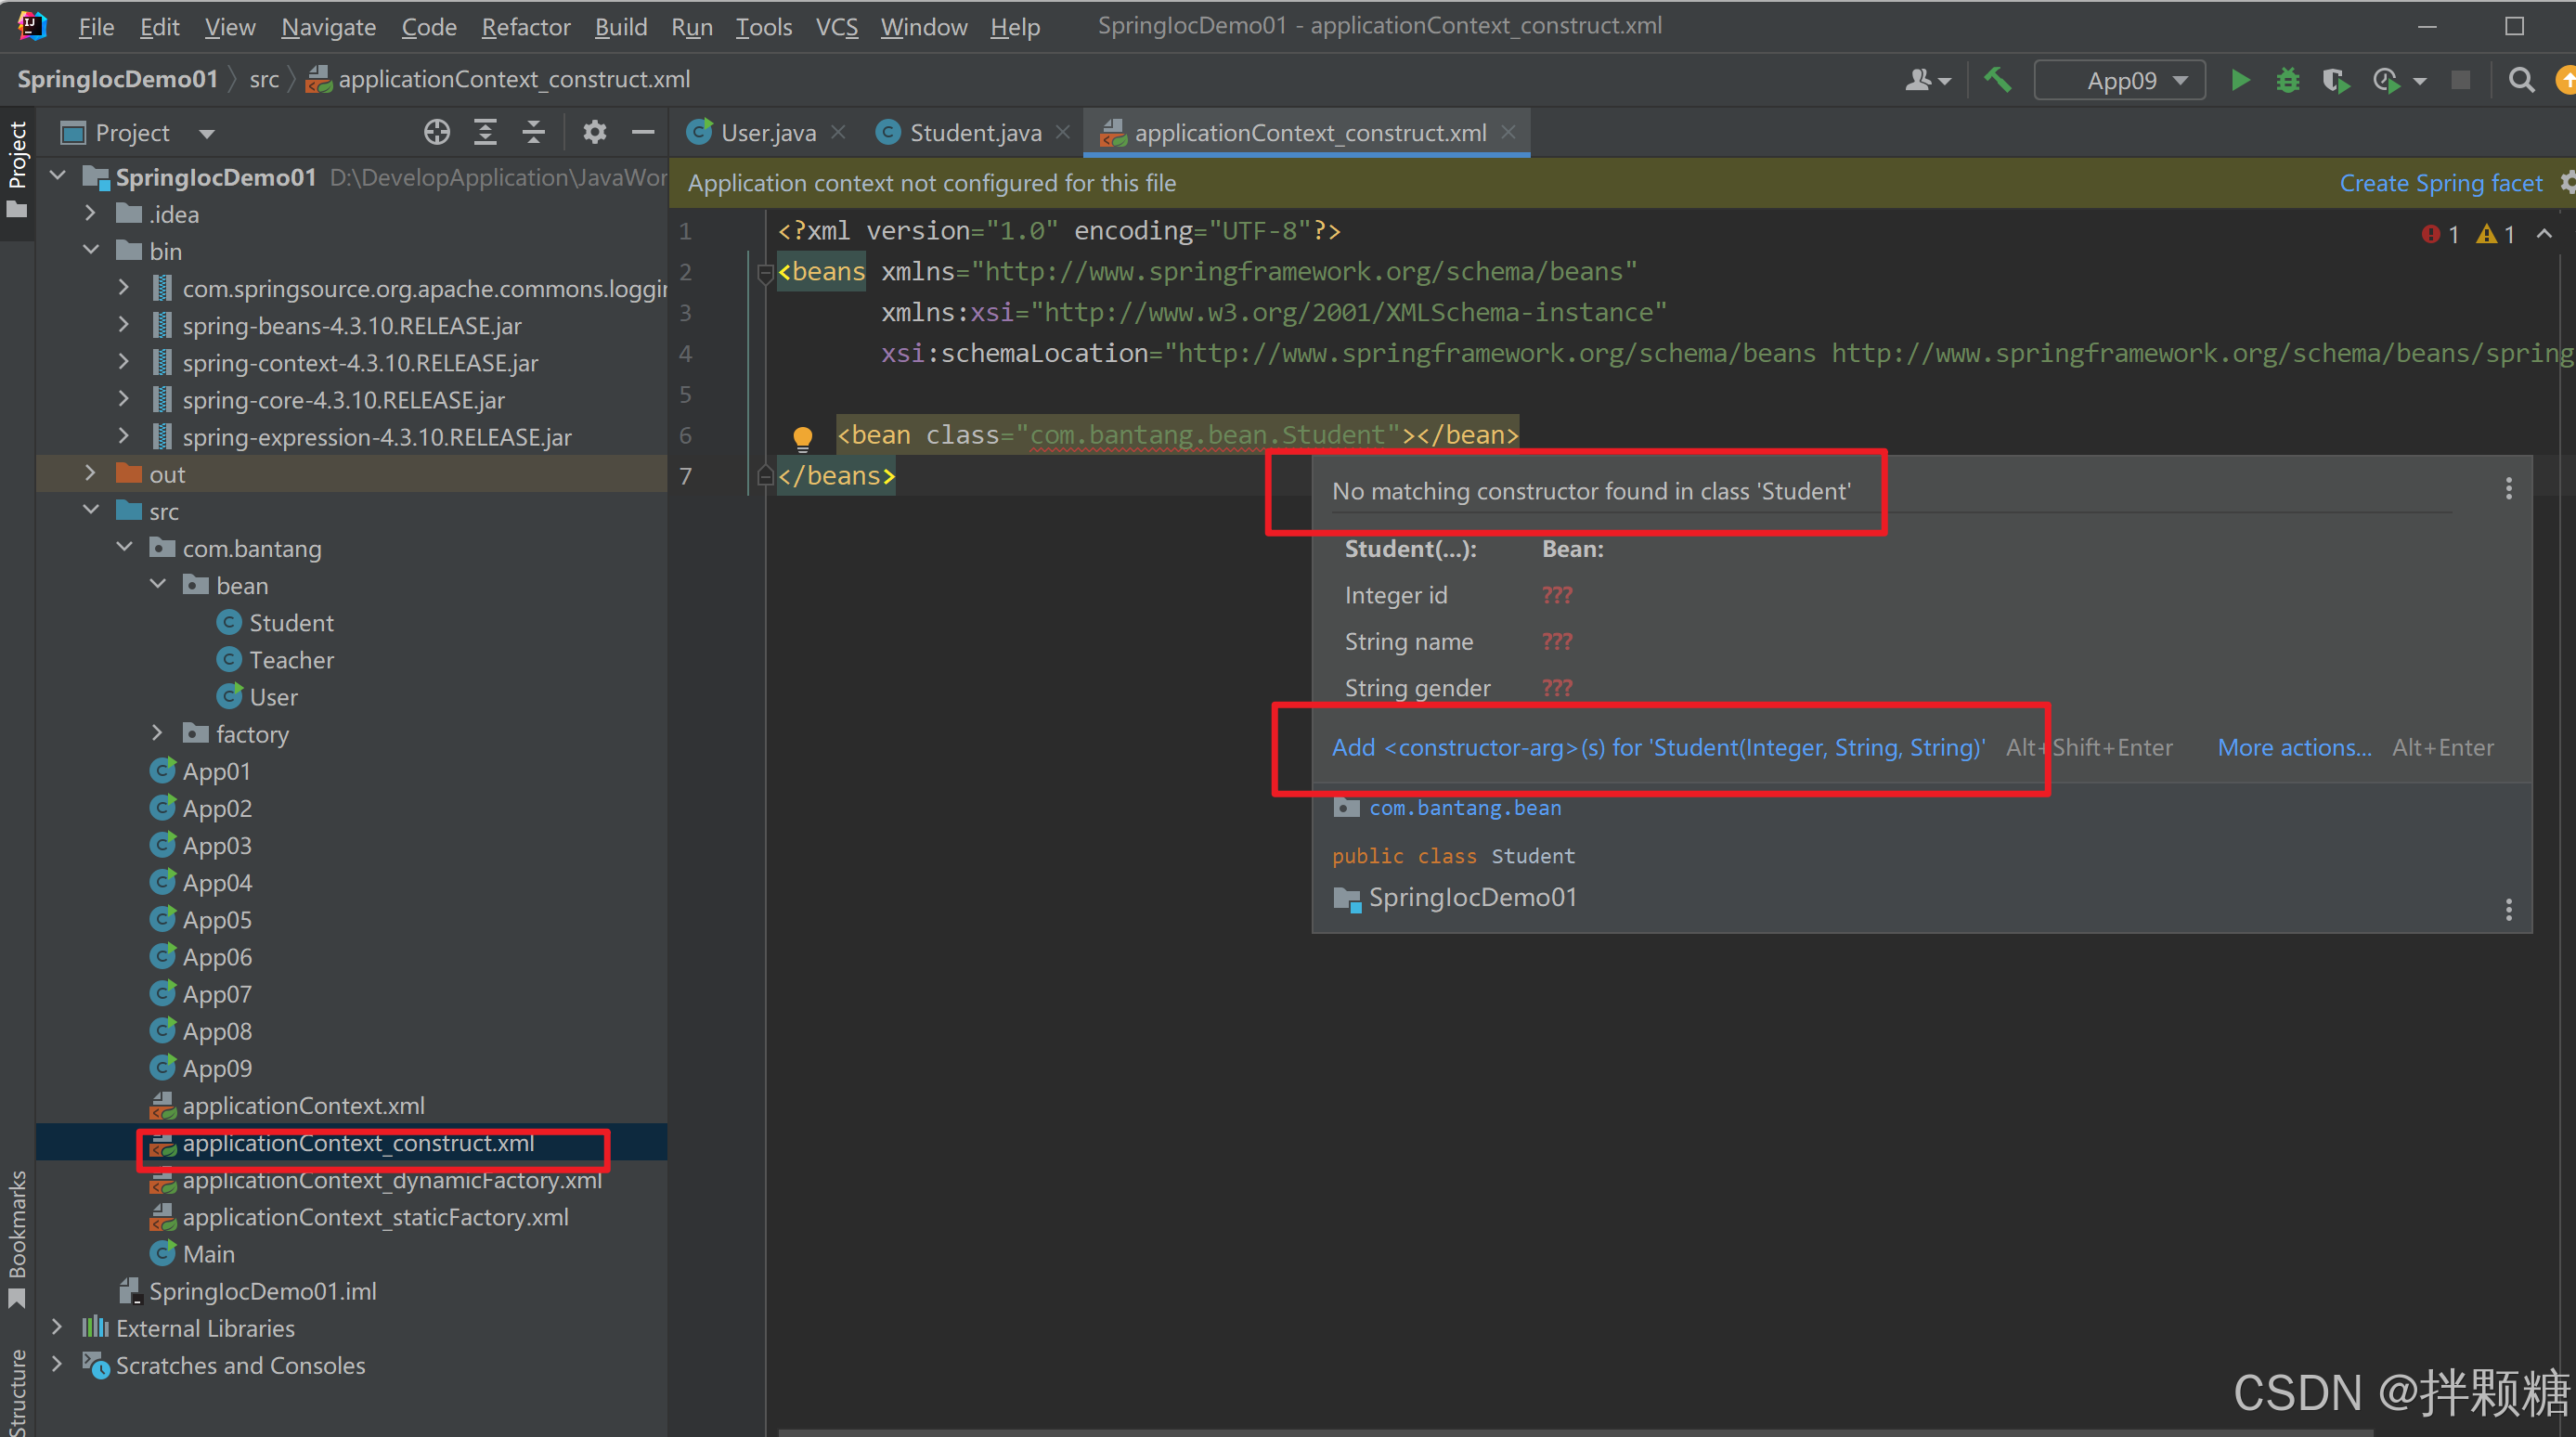
需要这样修改 在bean内部使用constructor-arg为有参构造函数的3个参数赋值 然后发现爆红就没啦
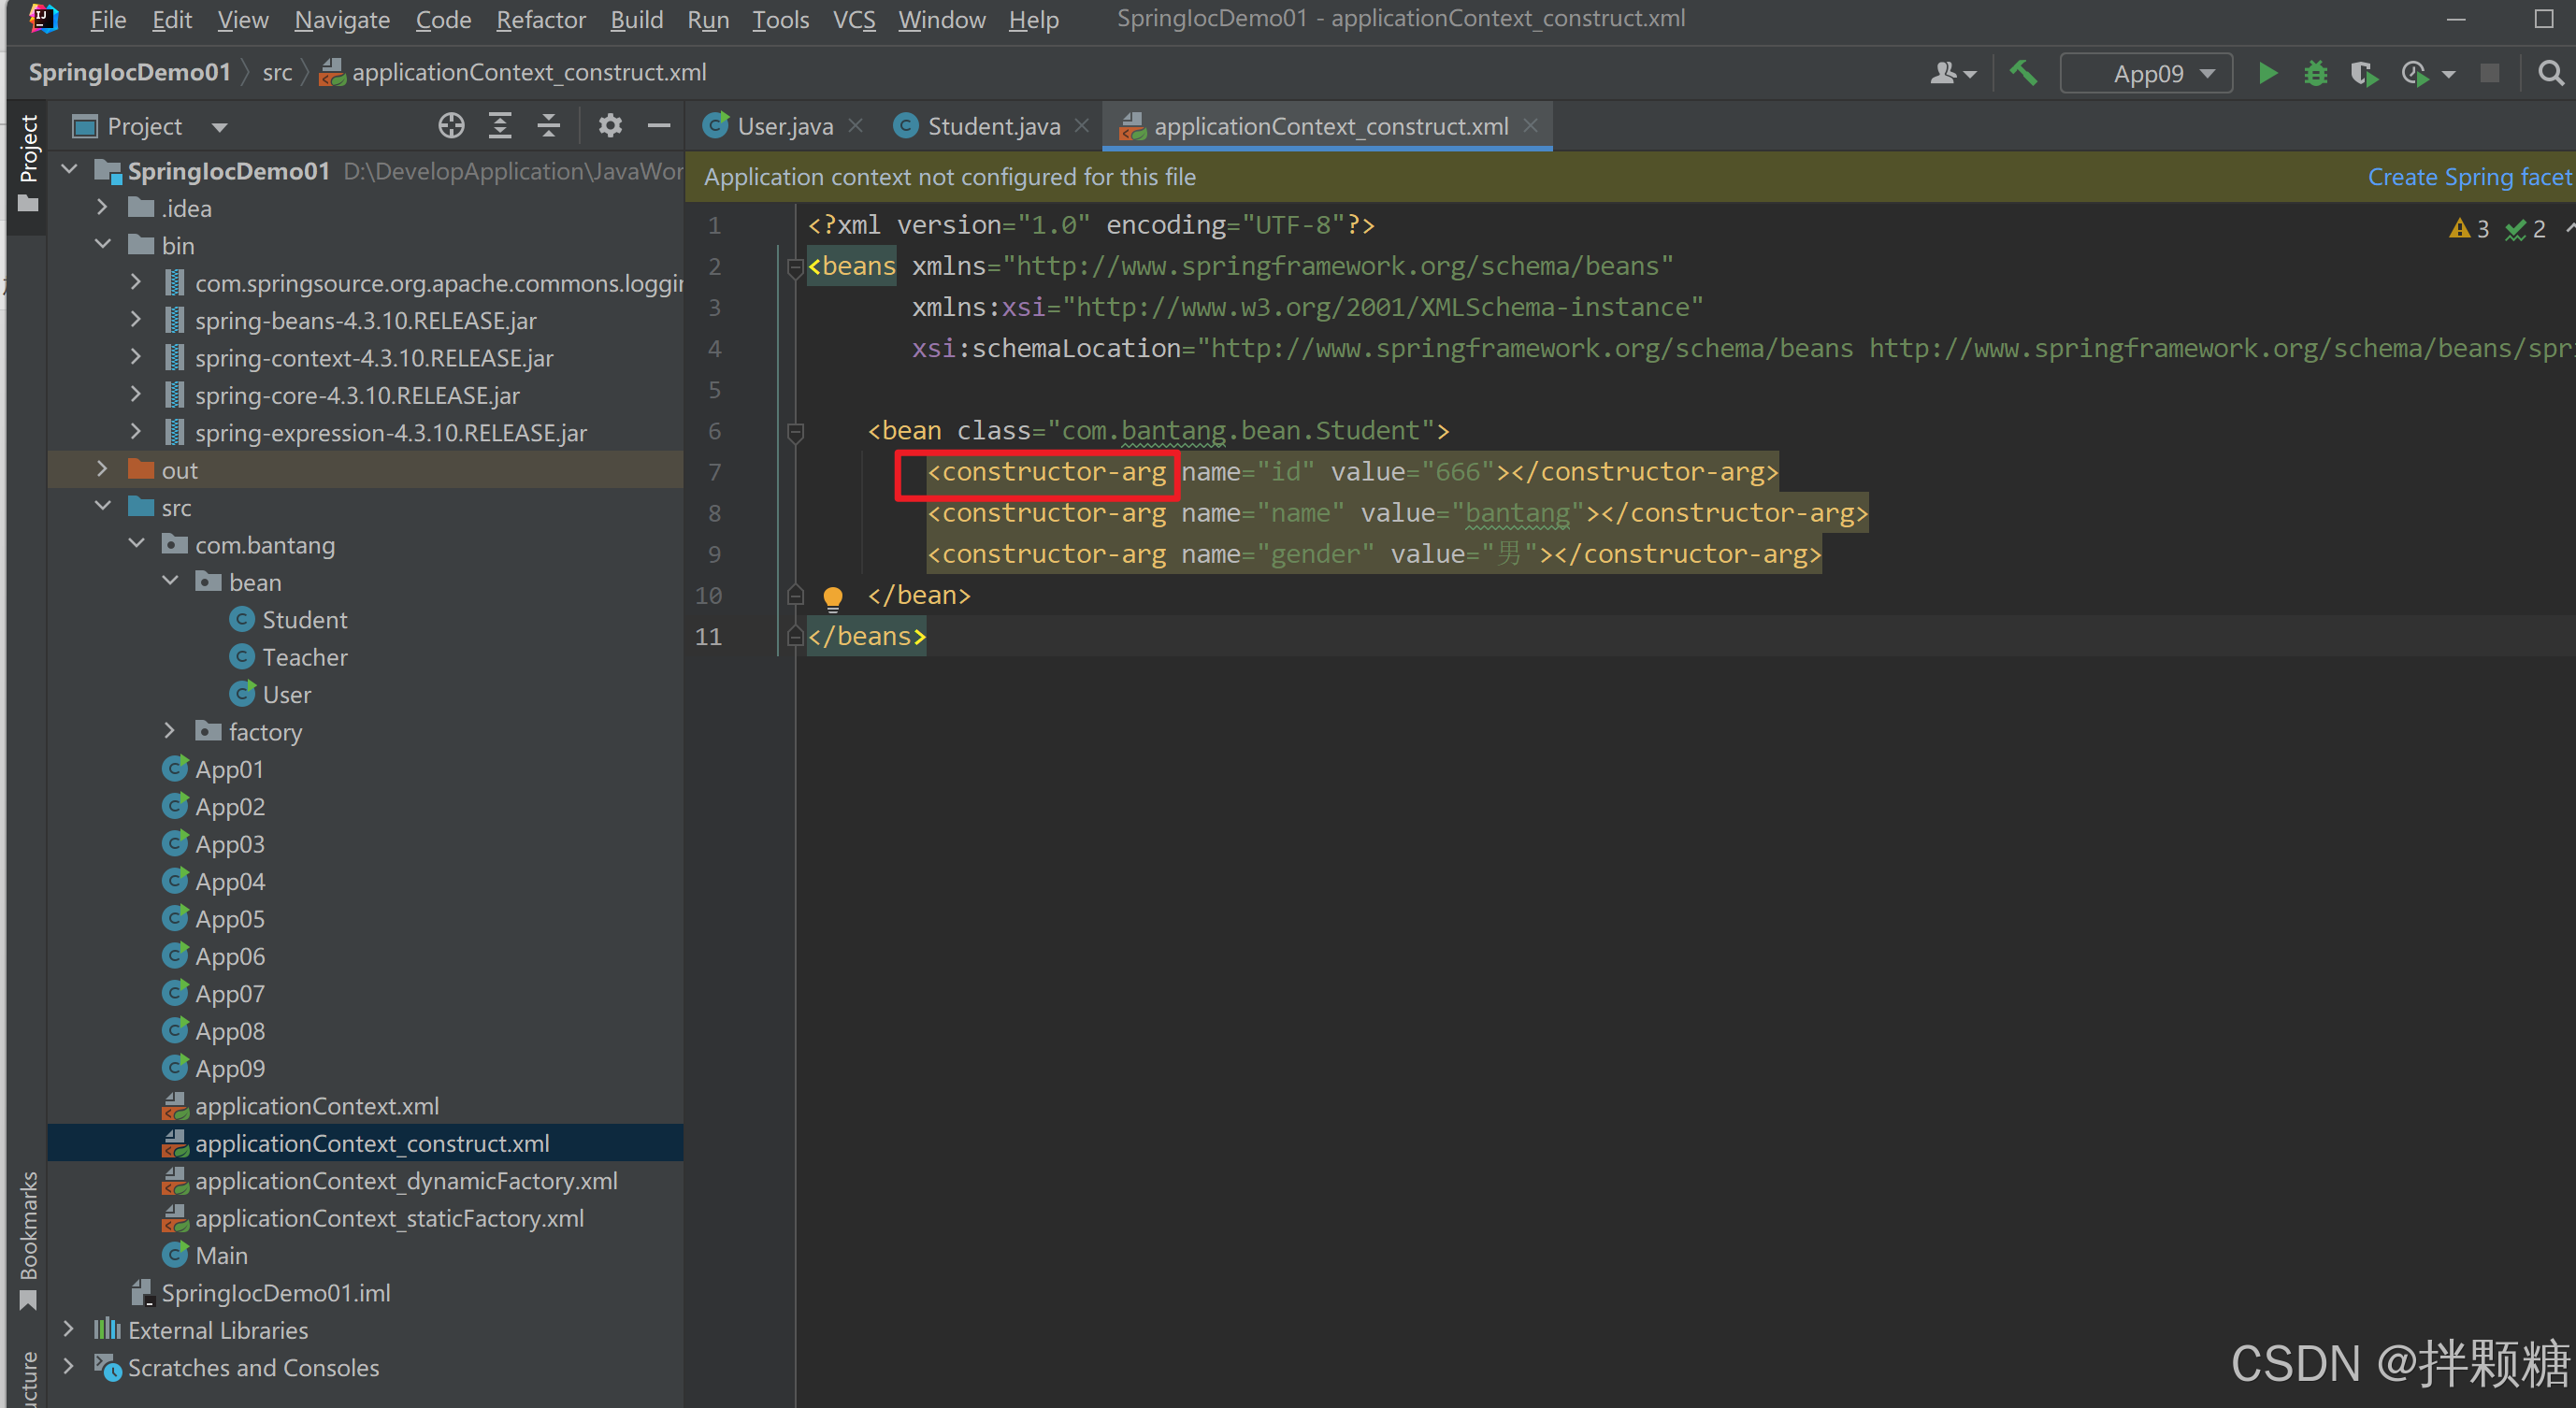
使用属性name的容器配置文件代码
<?xml version="1.0" encoding="UTF-8"?>
<beans xmlns="http://www.springframework.org/schema/beans"
	   xmlns:xsi="http://www.w3.org/2001/XMLSchema-instance"
	   xsi:schemaLocation="http://www.springframework.org/schema/beans http://www.springframework.org/schema/beans/spring-beans.xsd">

	<bean class="com.bantang.bean.Student">
		<constructor-arg name="id" value="666"></constructor-arg>
		<constructor-arg name="name" value="bantang"></constructor-arg>
		<constructor-arg name="gender" value="男"></constructor-arg>
	</bean>
</beans>
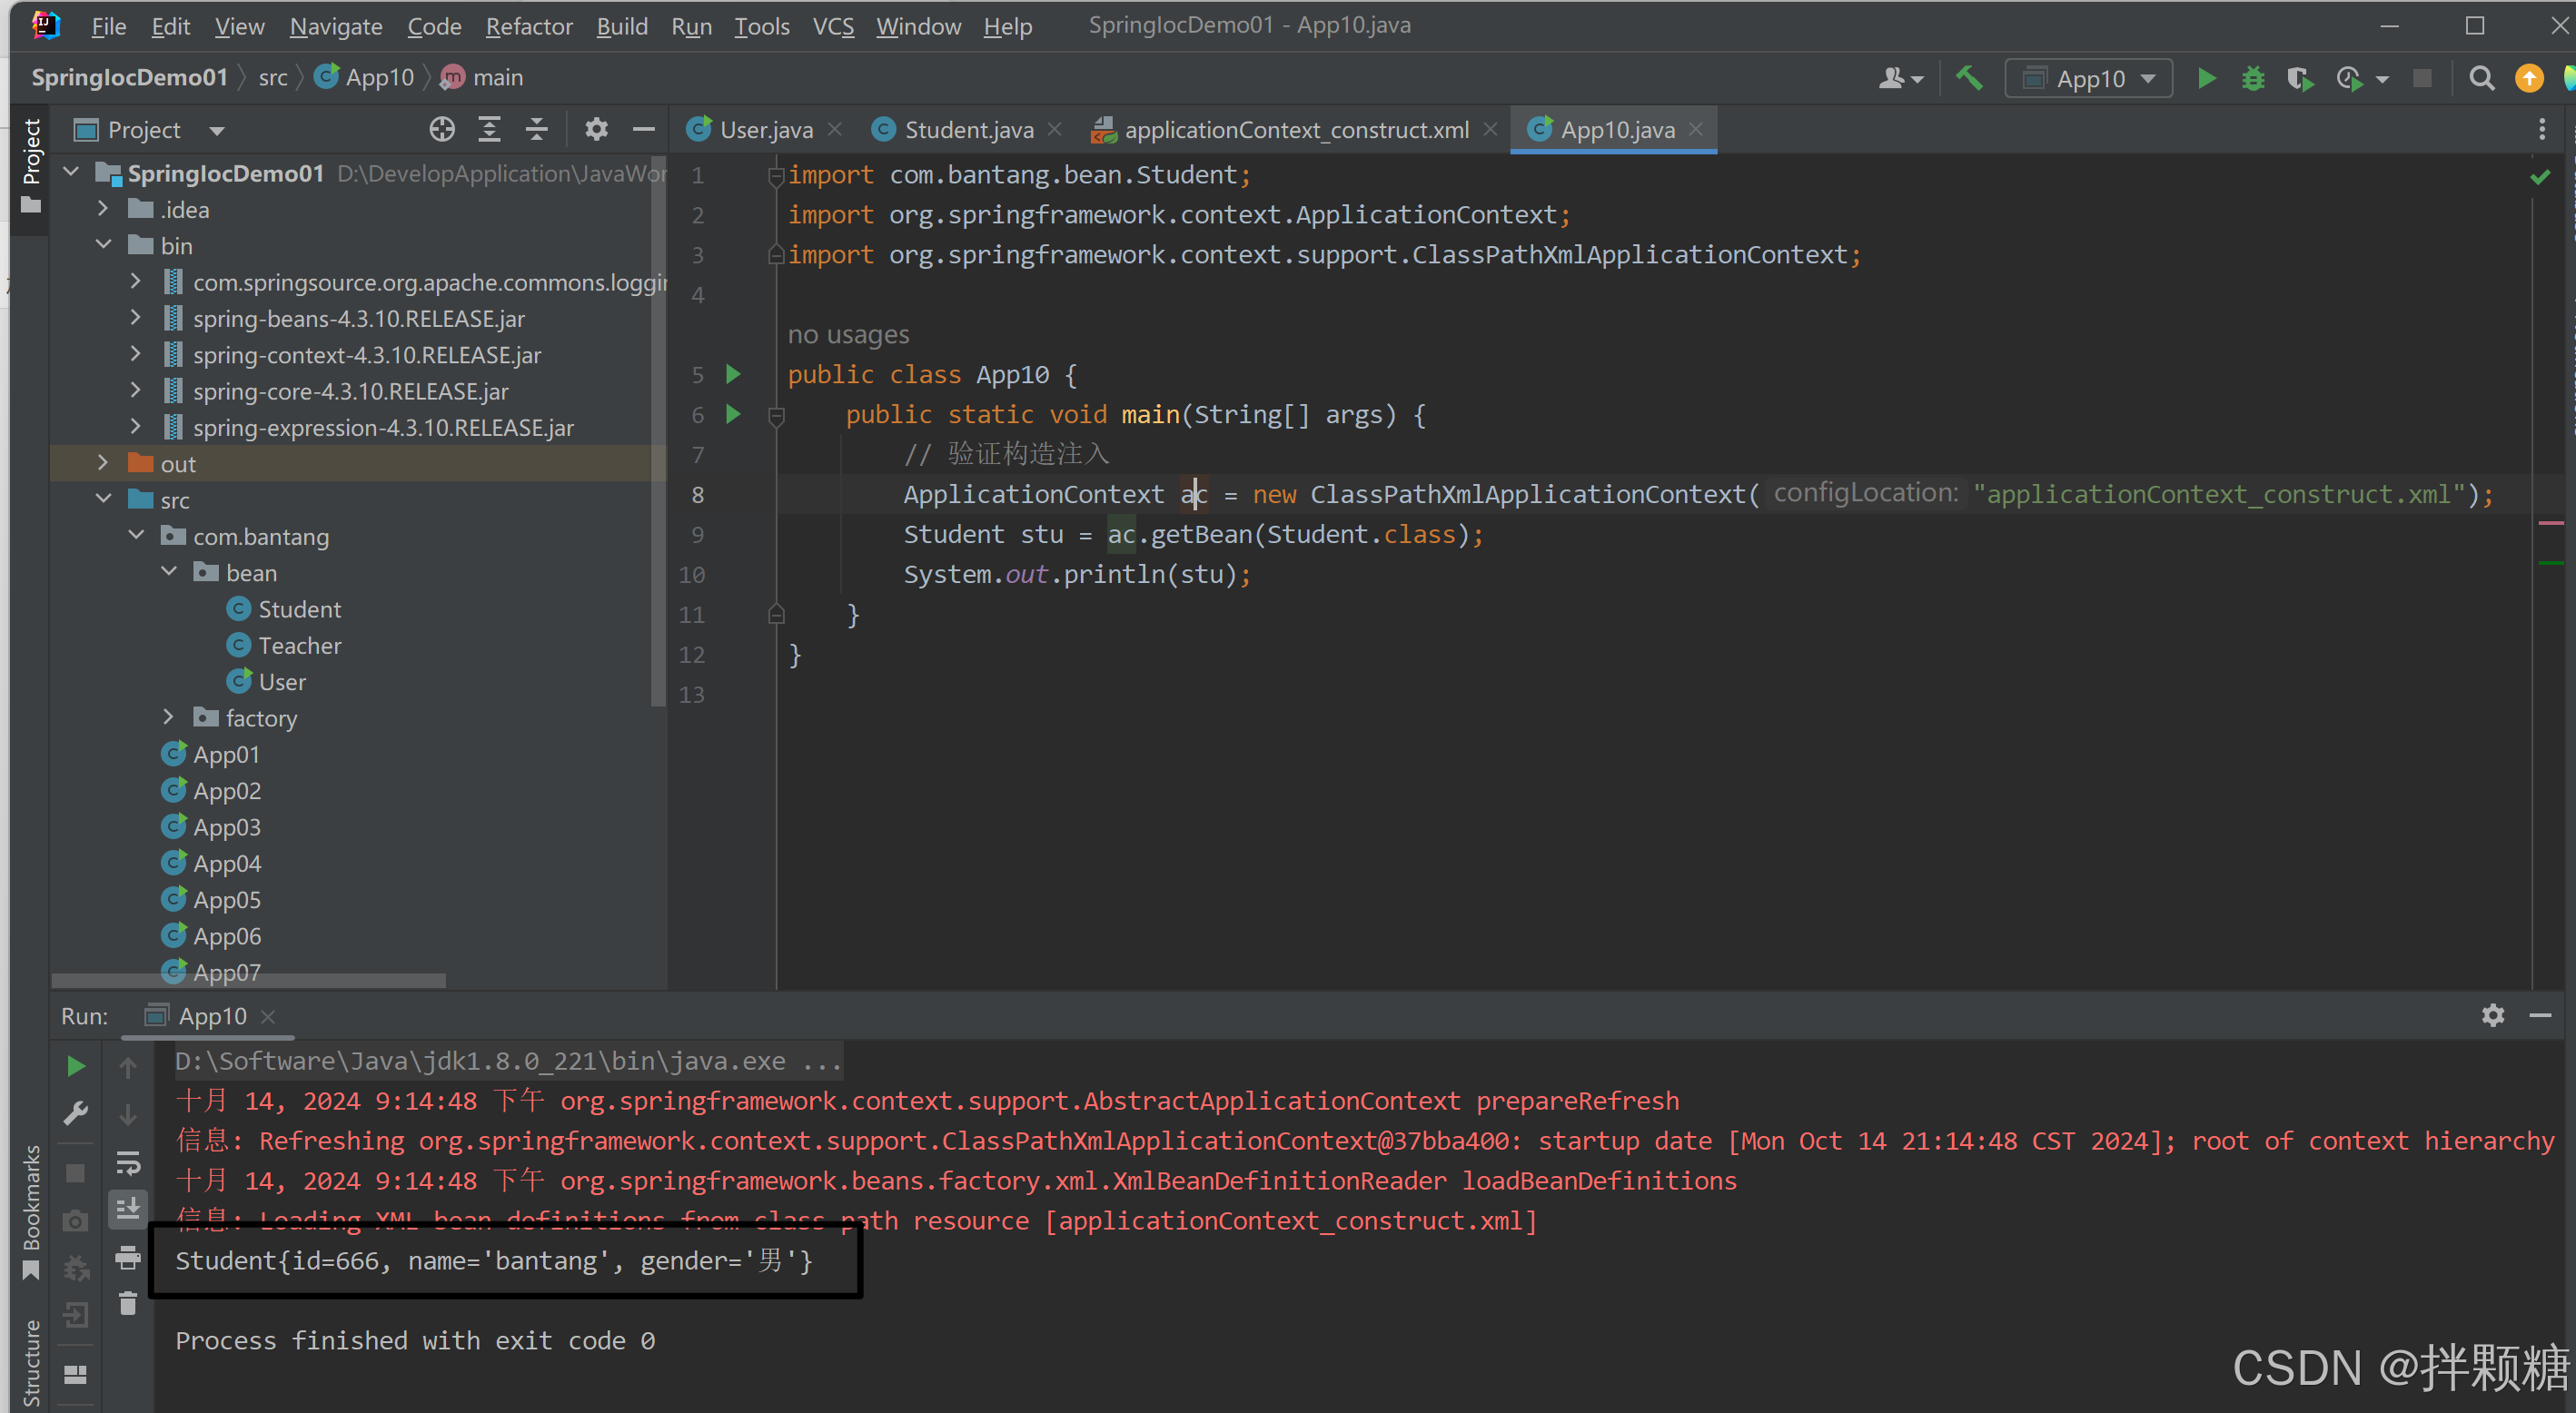
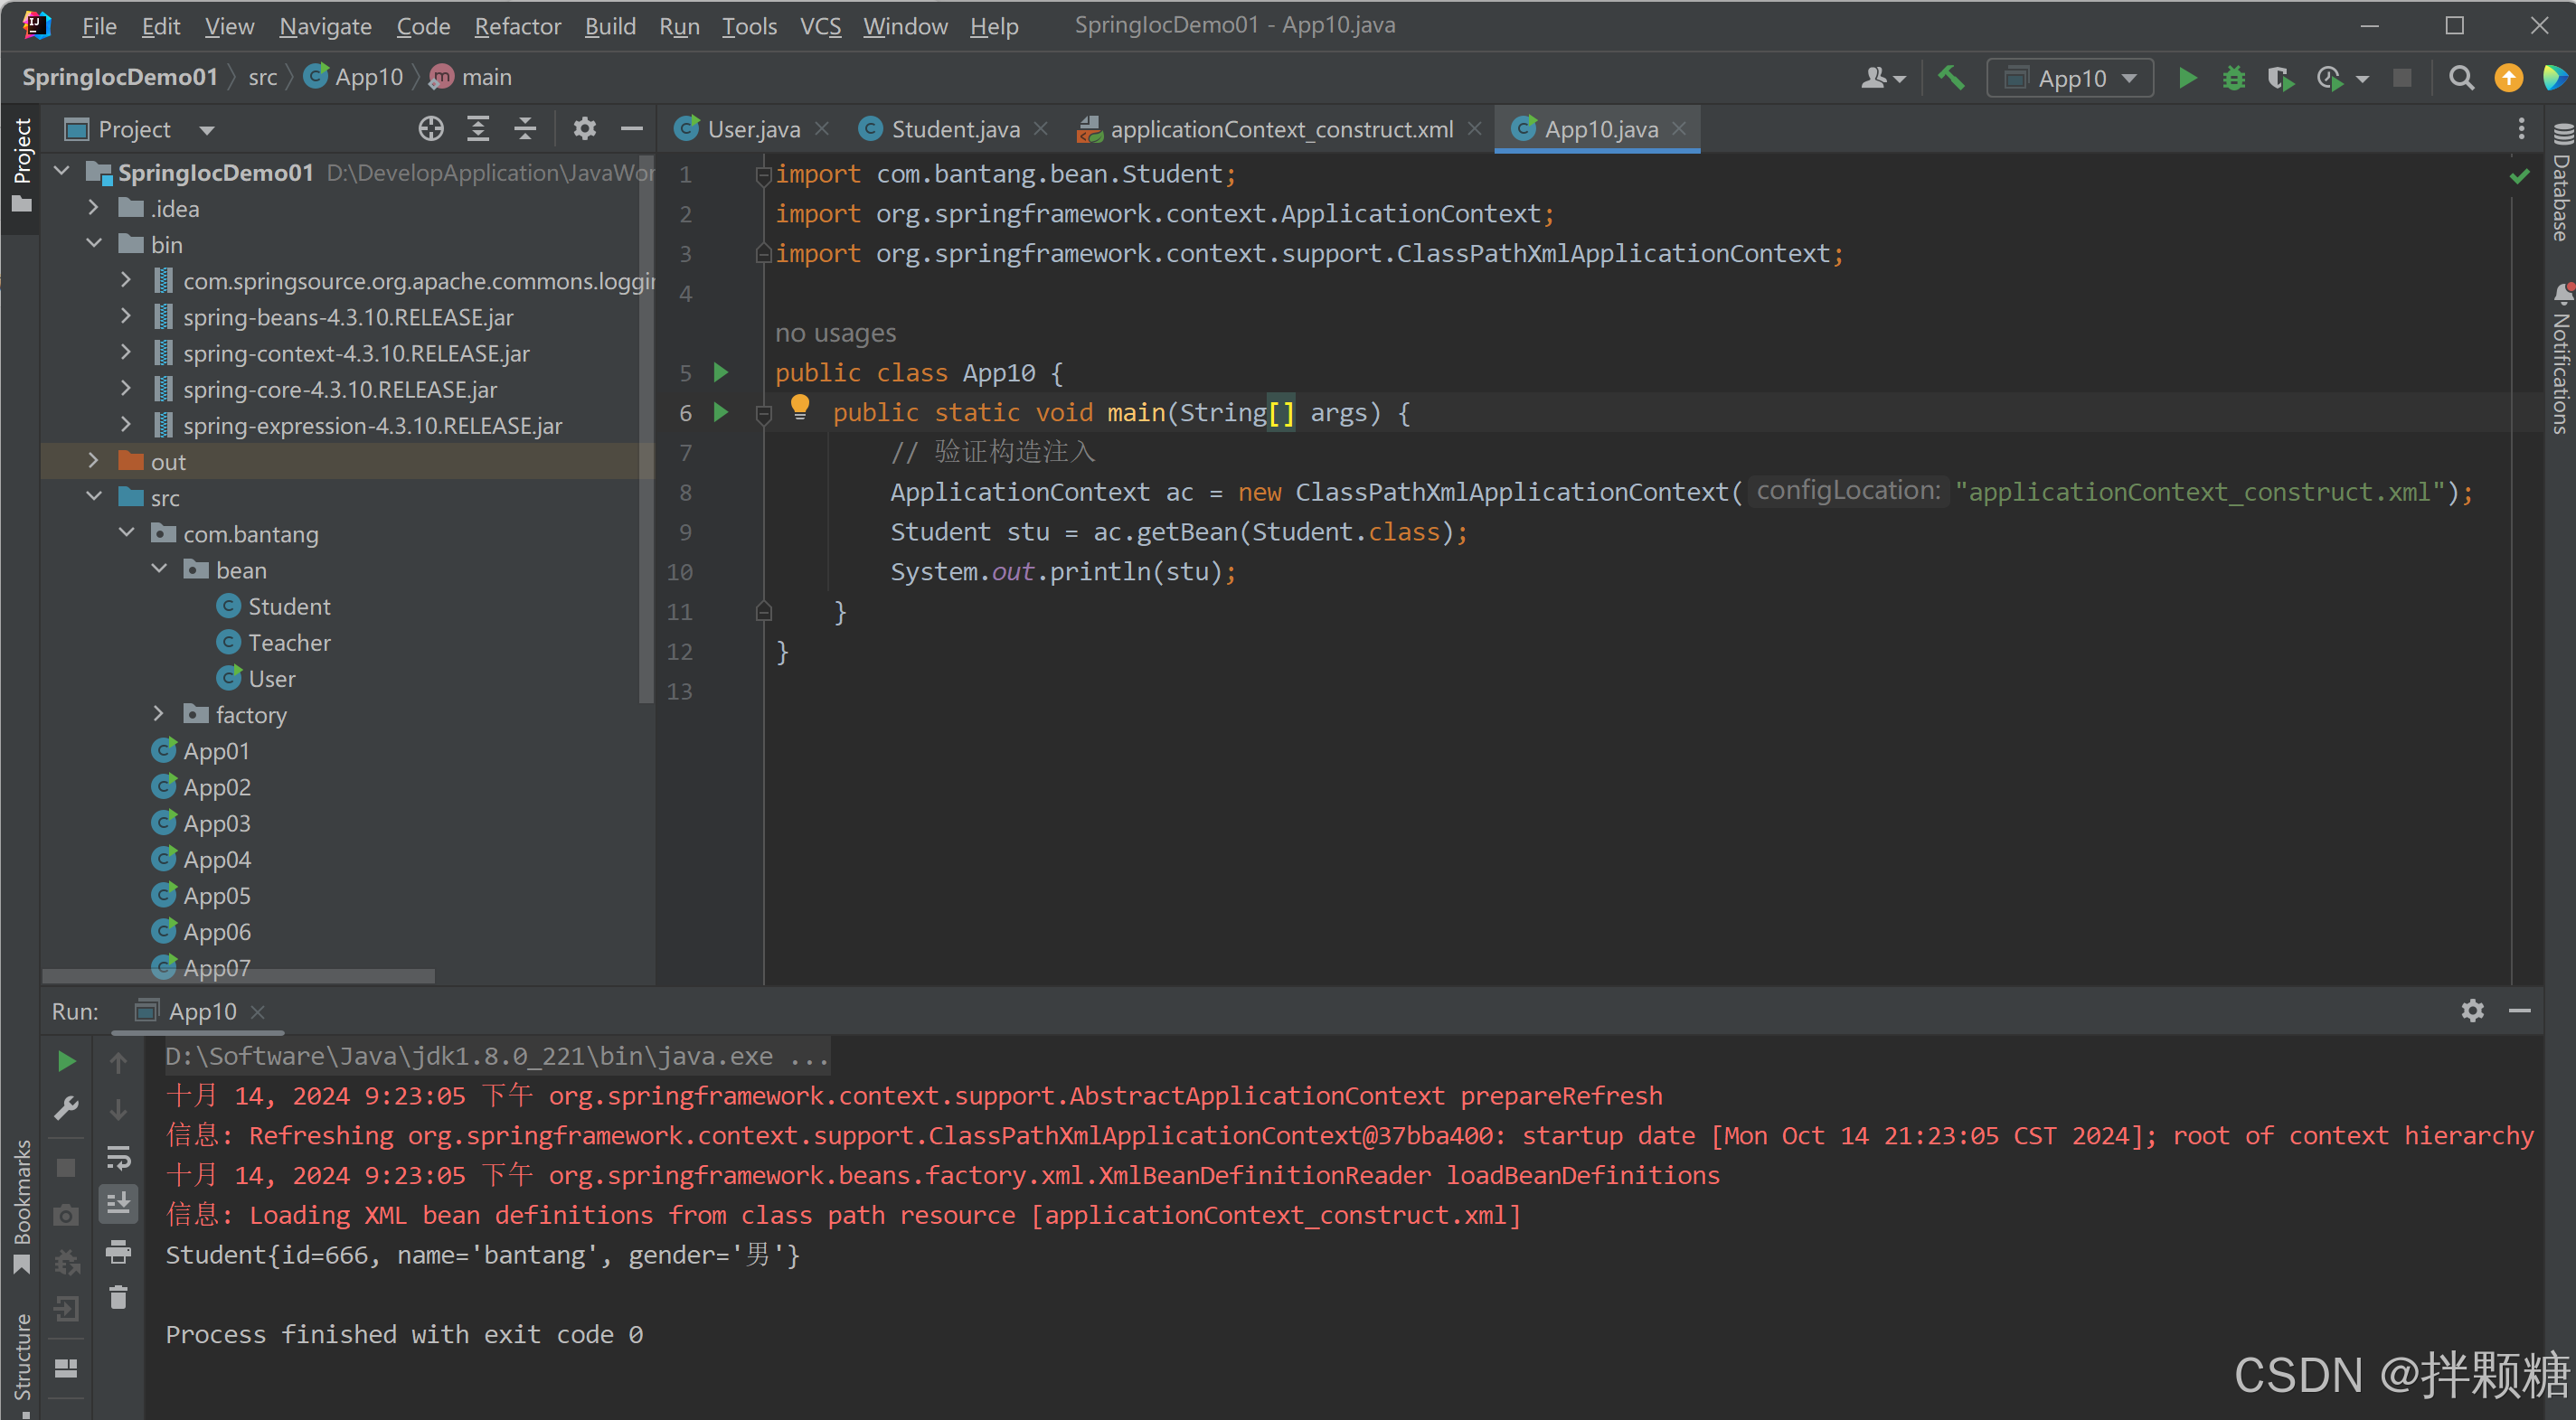
Demo验证
import com.bantang.bean.Student;
import org.springframework.context.ApplicationContext;
import org.springframework.context.support.ClassPathXmlApplicationContext;
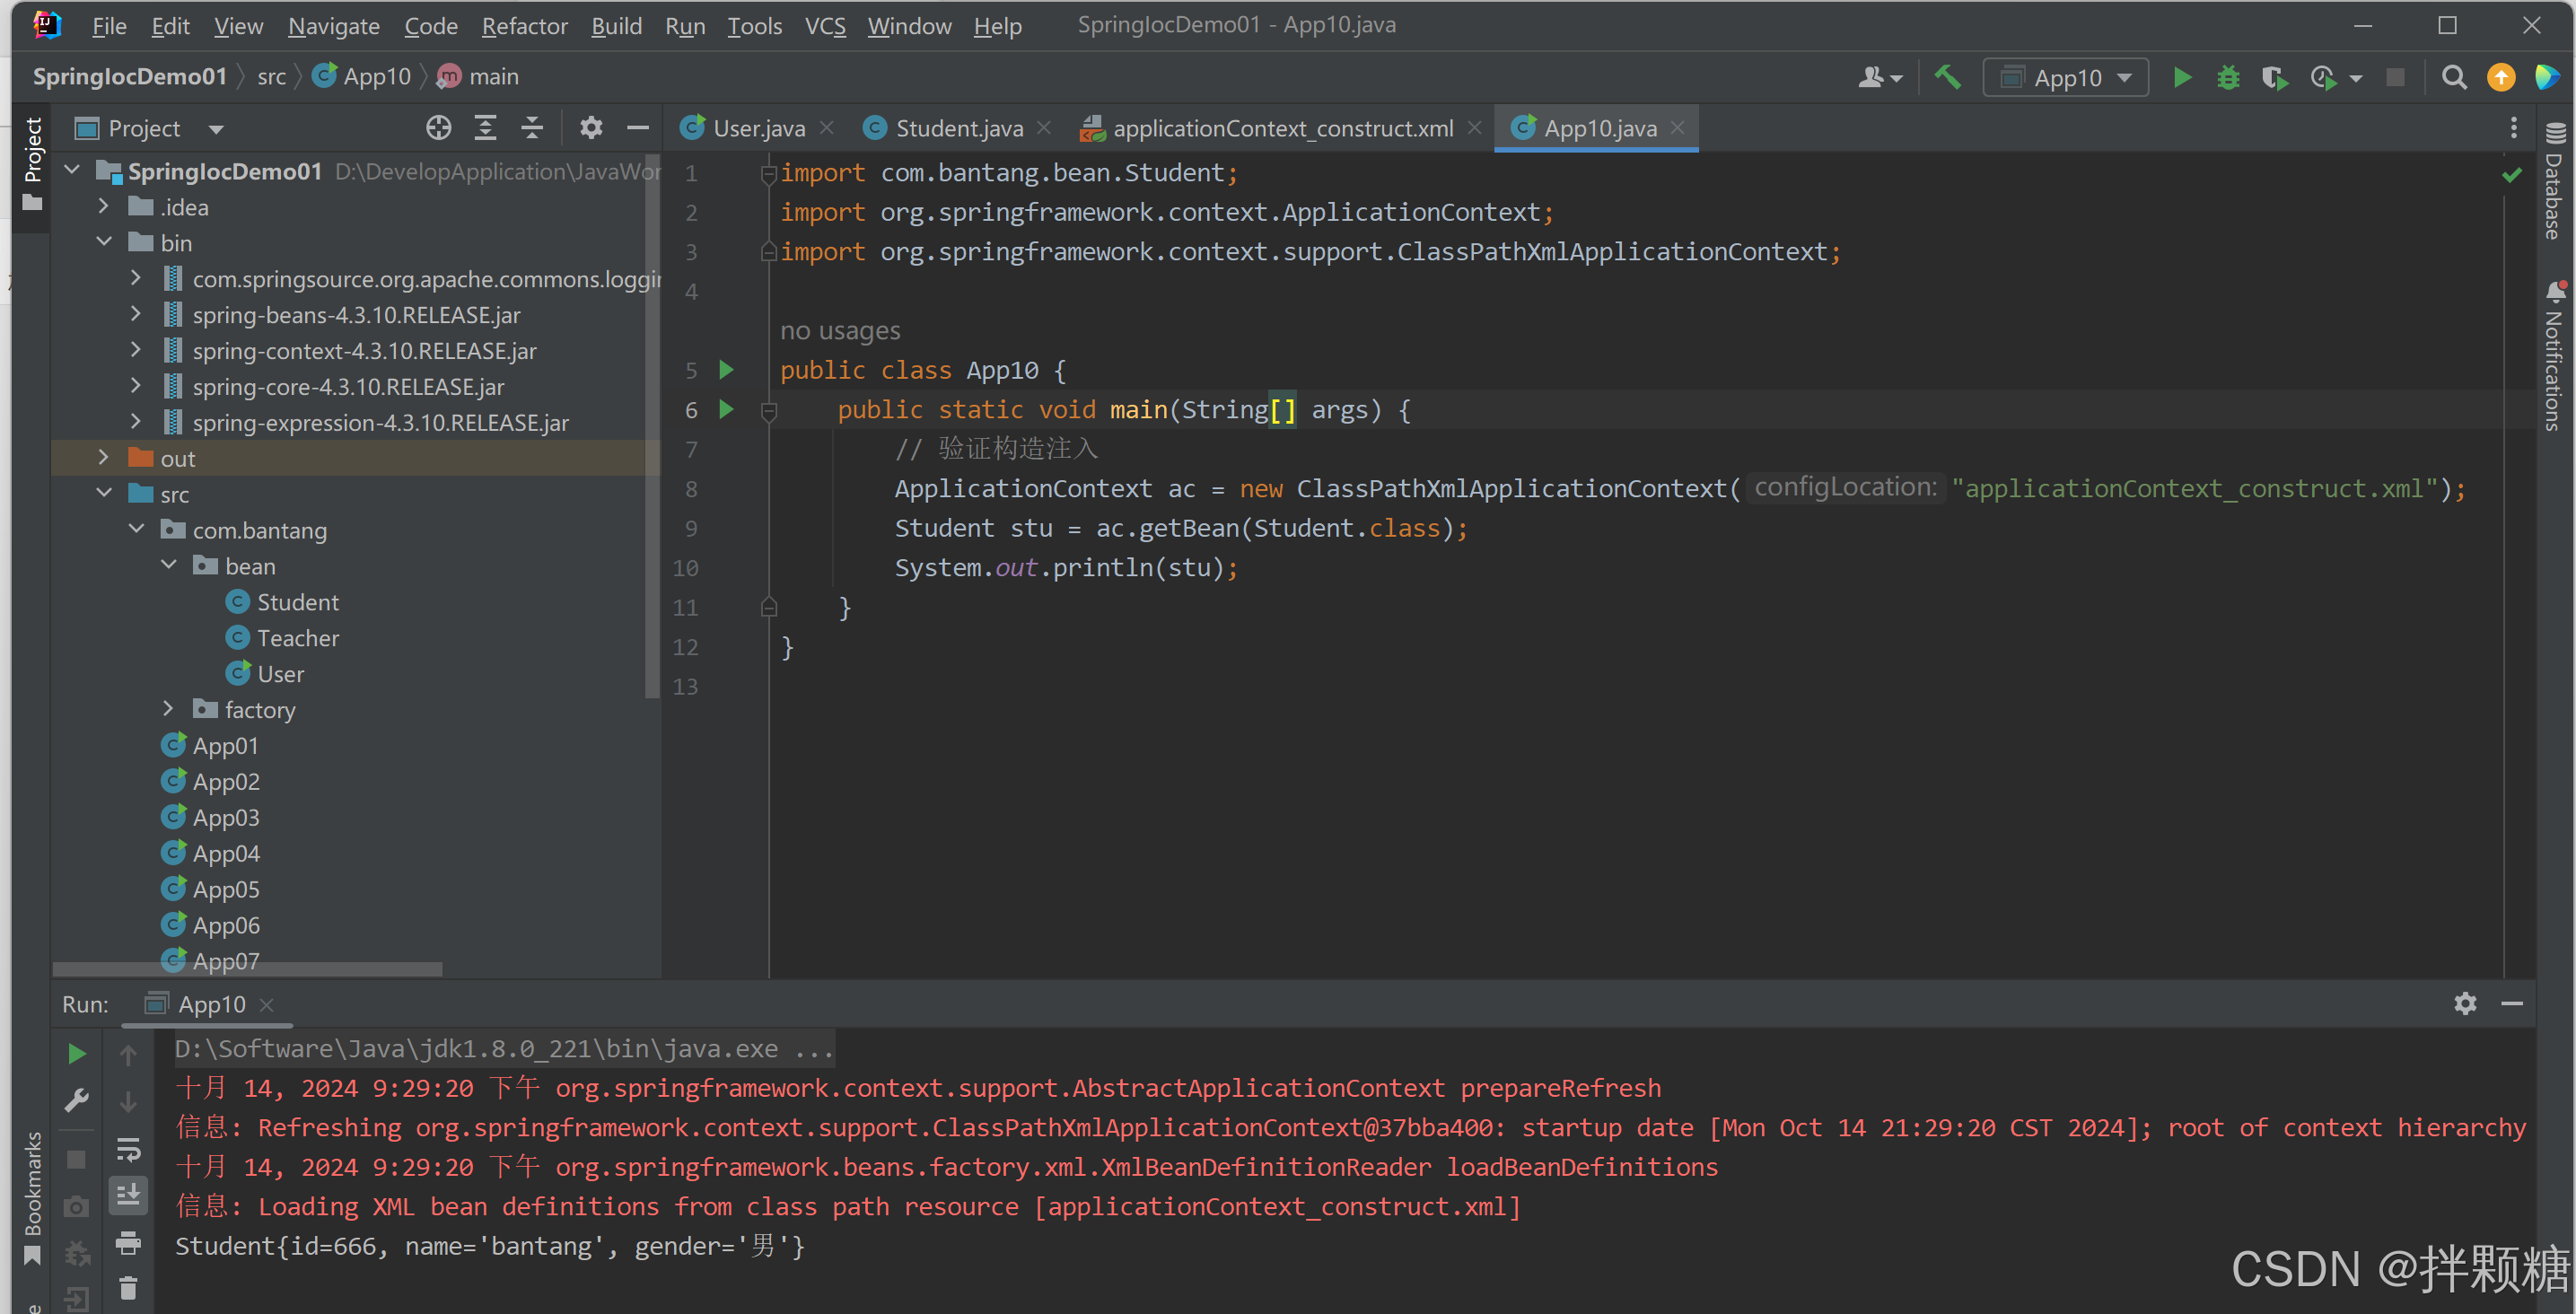
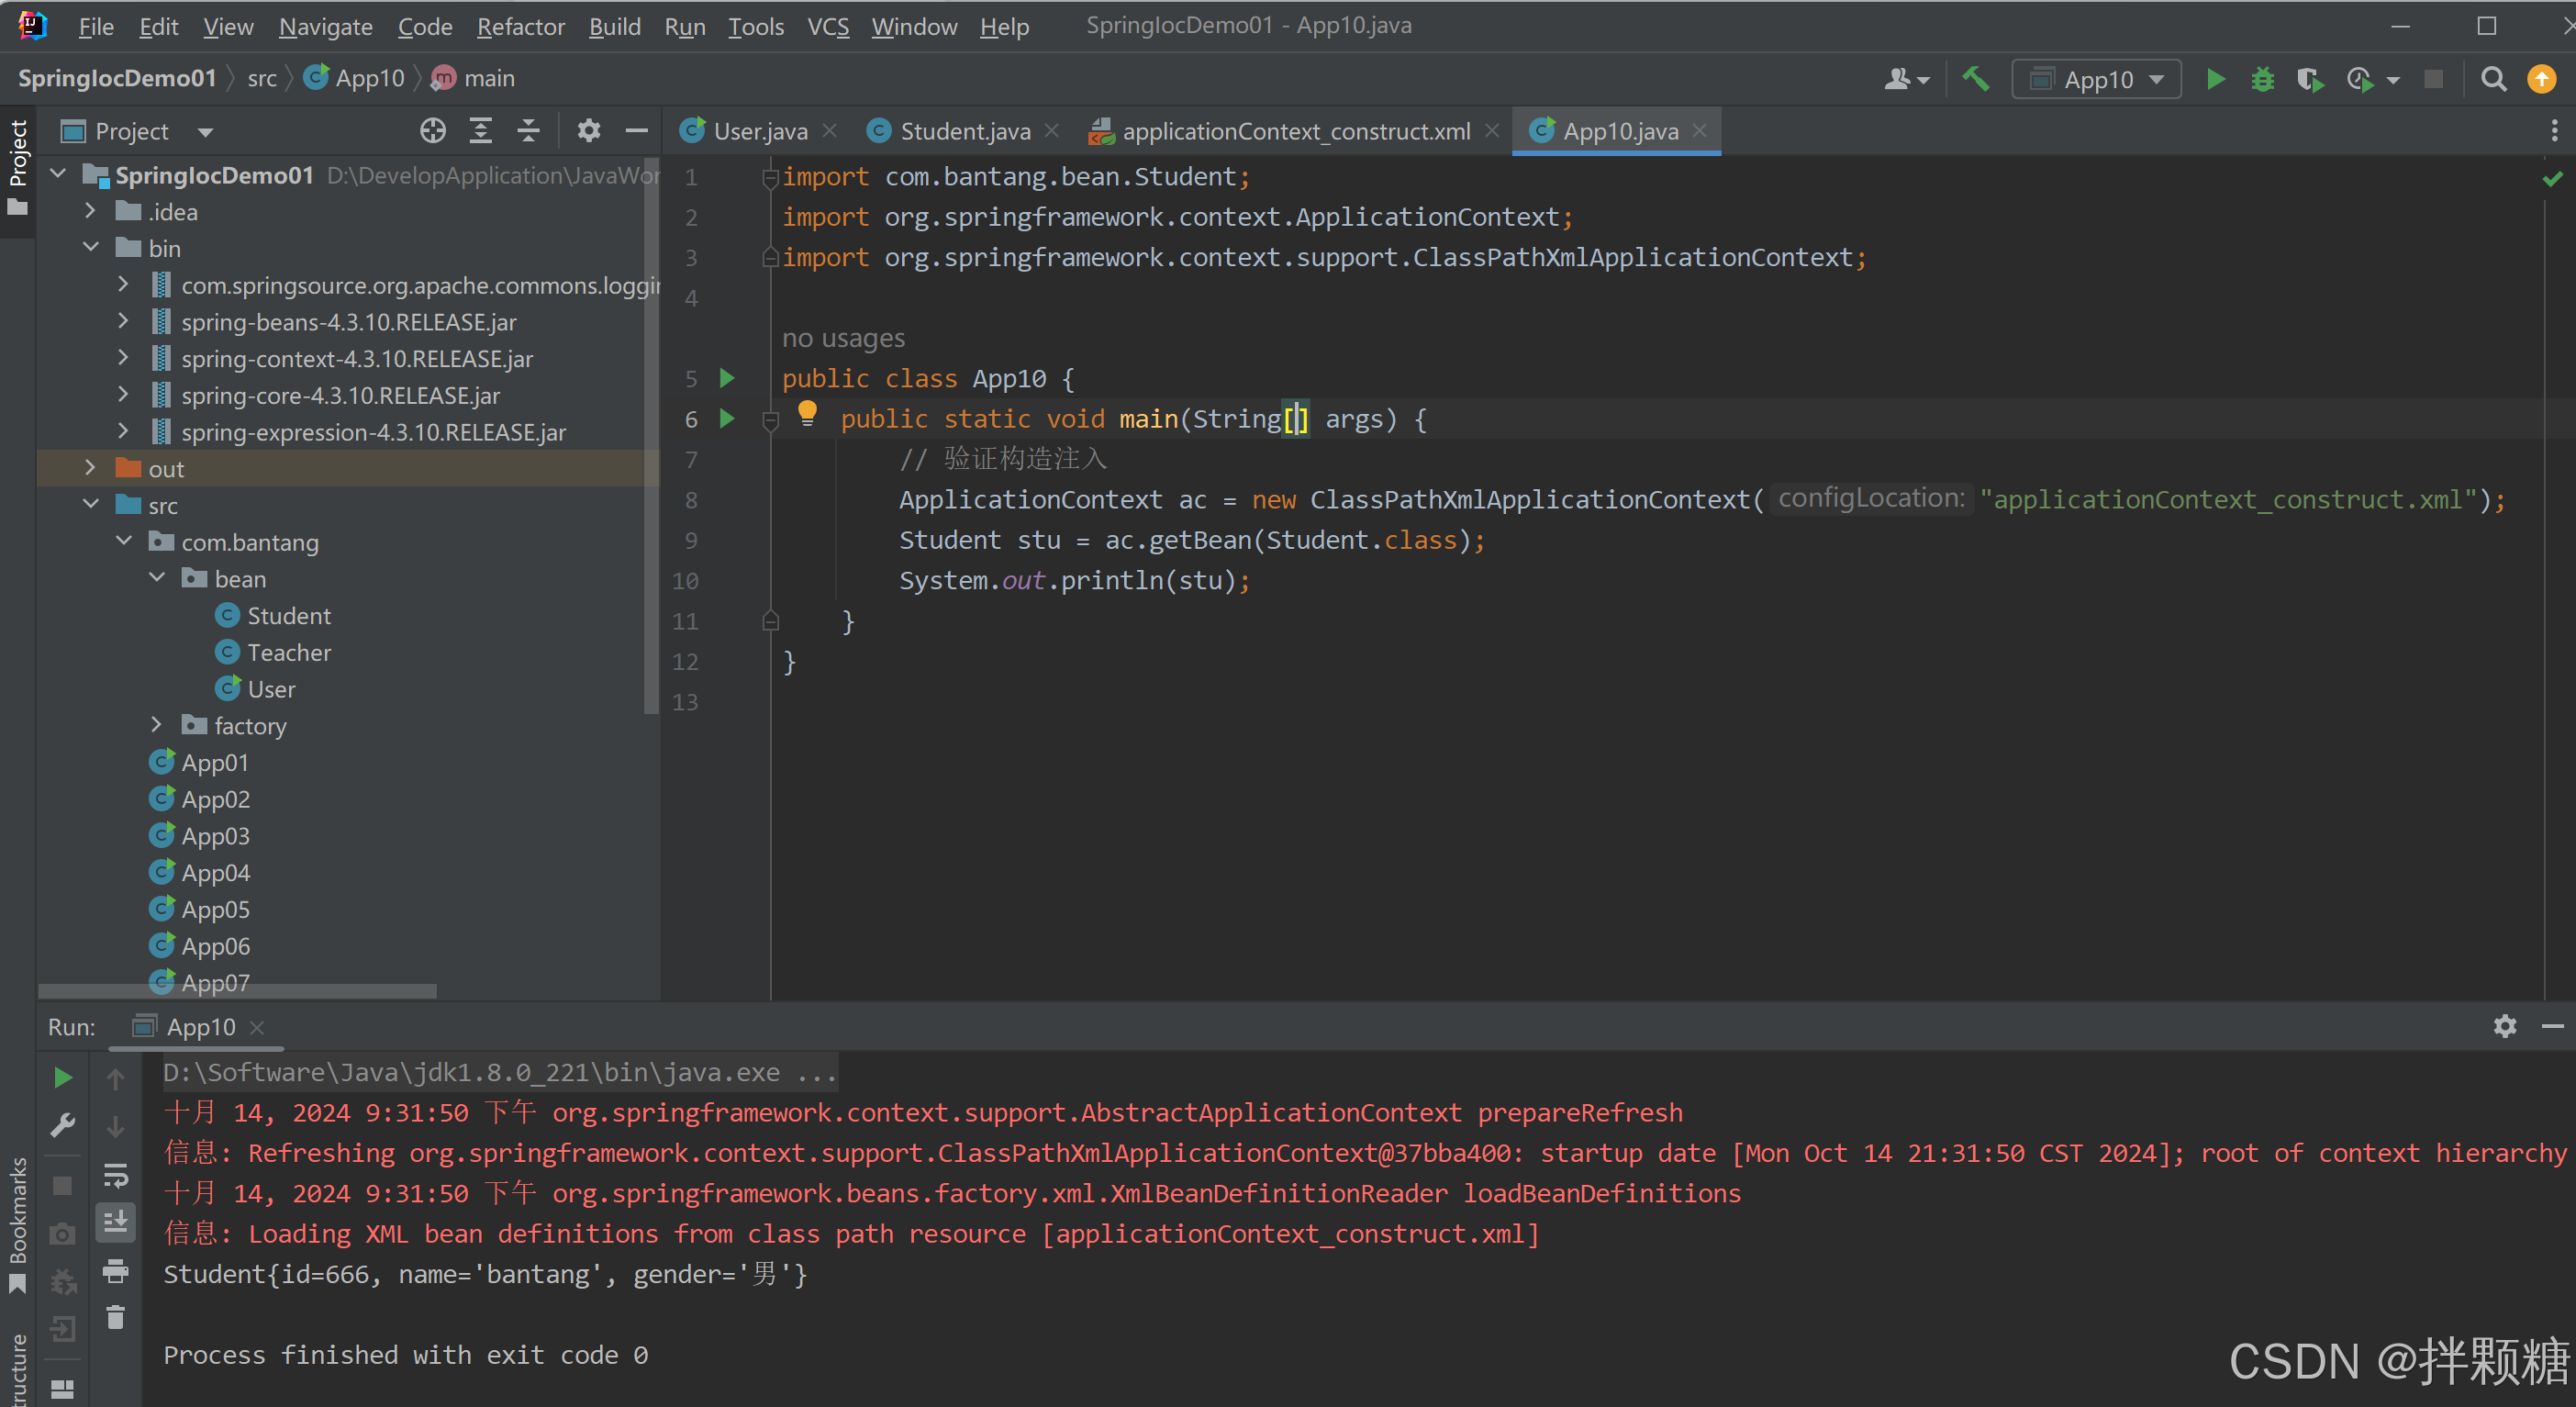
public class App10 {
public static void main(String[] args) {
// 验证构造注入
ApplicationContext ac = new ClassPathXmlApplicationContext("applicationContext_construct.xml");
Student stu = ac.getBean(Student.class);
System.out.println(stu);
}
}
结果:
构造注入使用属性的索引
上面演示的构造注入 给属性赋值使用的是“name”
还可以使用索引
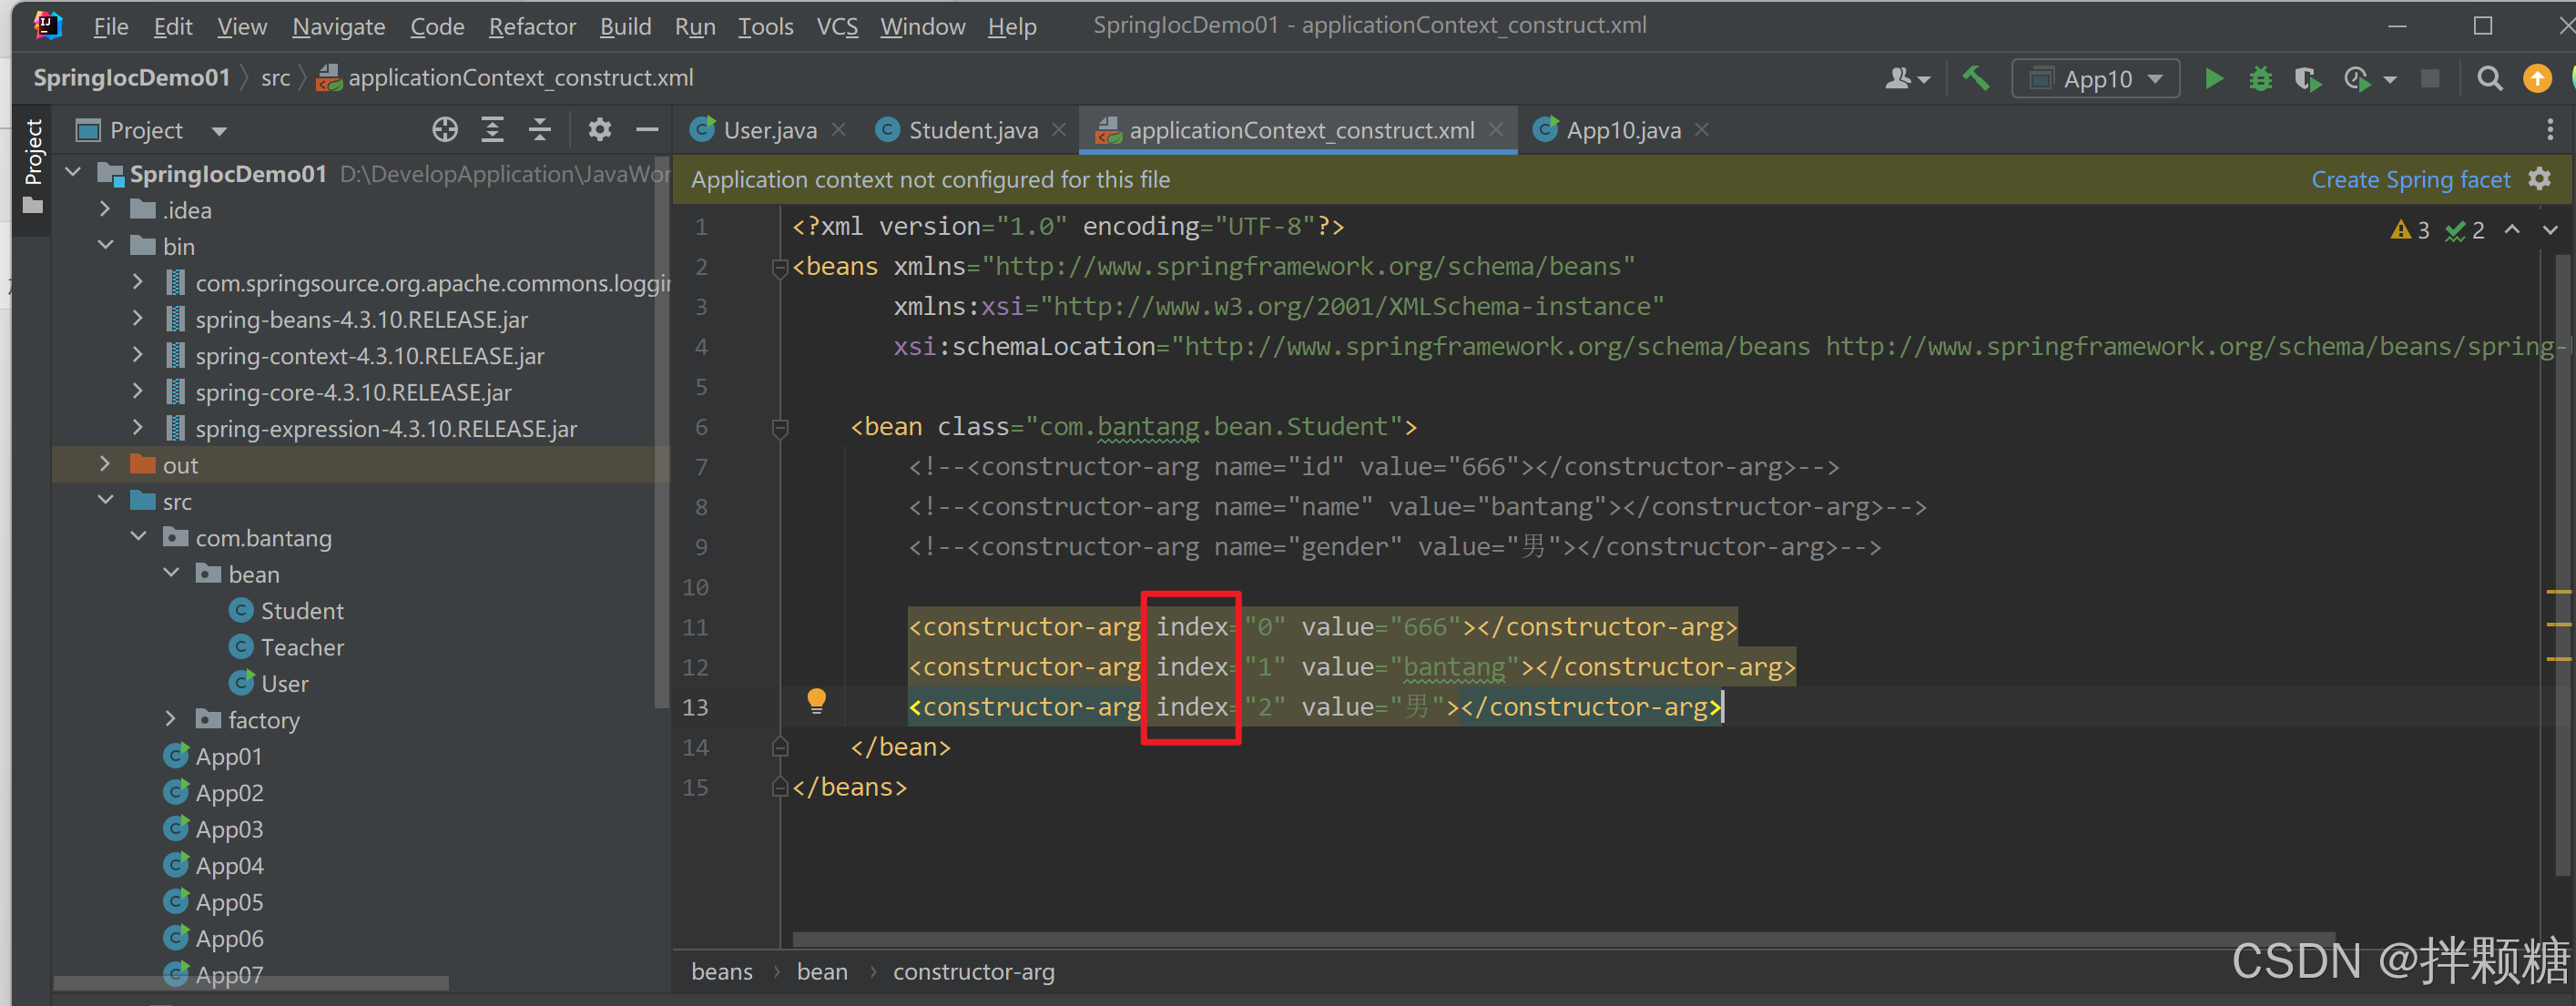
使用属性索引的容器配置文件代码
<?xml version="1.0" encoding="UTF-8"?>
<beans xmlns="http://www.springframework.org/schema/beans"
	   xmlns:xsi="http://www.w3.org/2001/XMLSchema-instance"
	   xsi:schemaLocation="http://www.springframework.org/schema/beans http://www.springframework.org/schema/beans/spring-beans.xsd">

	<bean class="com.bantang.bean.Student">
		<!--<constructor-arg name="id" value="666"></constructor-arg>-->
		<!--<constructor-arg name="name" value="bantang"></constructor-arg>-->
		<!--<constructor-arg name="gender" value="男"></constructor-arg>-->

		<constructor-arg index="0" value="666"></constructor-arg>
		<constructor-arg index="1" value="bantang"></constructor-arg>
		<constructor-arg index="2" value="男"></constructor-arg>
	</bean>
</beans>
结果:
简化构造注入命名空间
引入c命名空间 然后使用“c:属性名”的简化用法
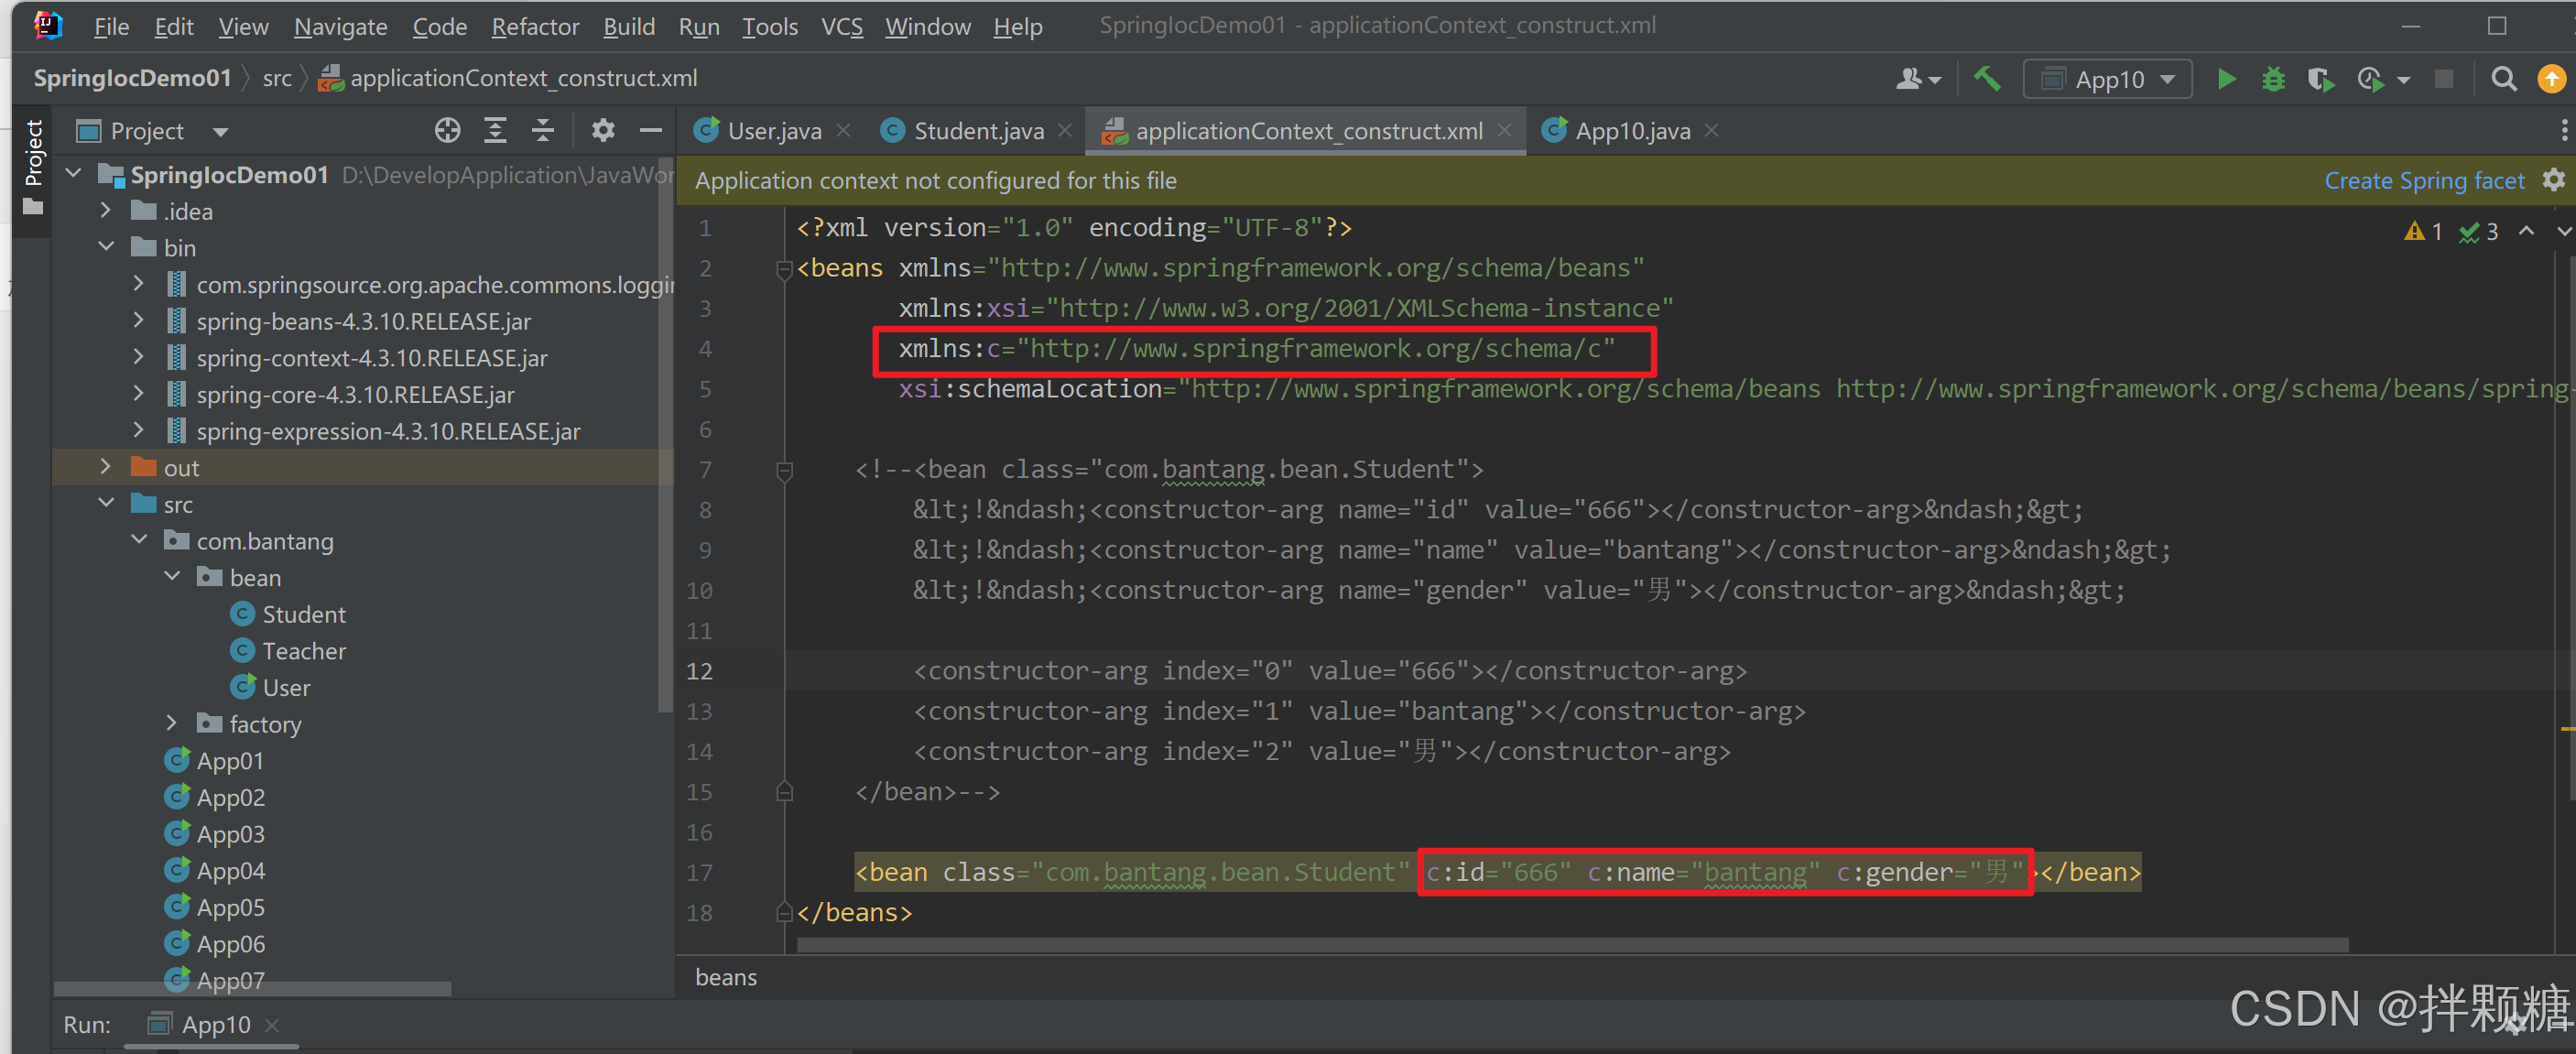
<?xml version="1.0" encoding="UTF-8"?>
<beans xmlns="http://www.springframework.org/schema/beans"
xmlns:xsi="http://www.w3.org/2001/XMLSchema-instance"
xmlns:c="http://www.springframework.org/schema/c"
xsi:schemaLocation="http://www.springframework.org/schema/beans http://www.springframework.org/schema/beans/spring-beans.xsd">
<!--<bean class="com.bantang.bean.Student">
<!–<constructor-arg name="id" value="666"></constructor-arg>–>
<!–<constructor-arg name="name" value="bantang"></constructor-arg>–>
<!–<constructor-arg name="gender" value="男"></constructor-arg>–>
<constructor-arg index="0" value="666"></constructor-arg>
<constructor-arg index="1" value="bantang"></constructor-arg>
<constructor-arg index="2" value="男"></constructor-arg>
</bean>-->
<bean class="com.bantang.bean.Student" c:id="666" c:name="bantang" c:gender="男"></bean>
</beans>
运行结果:
然后使用“c:索引”的简化用法
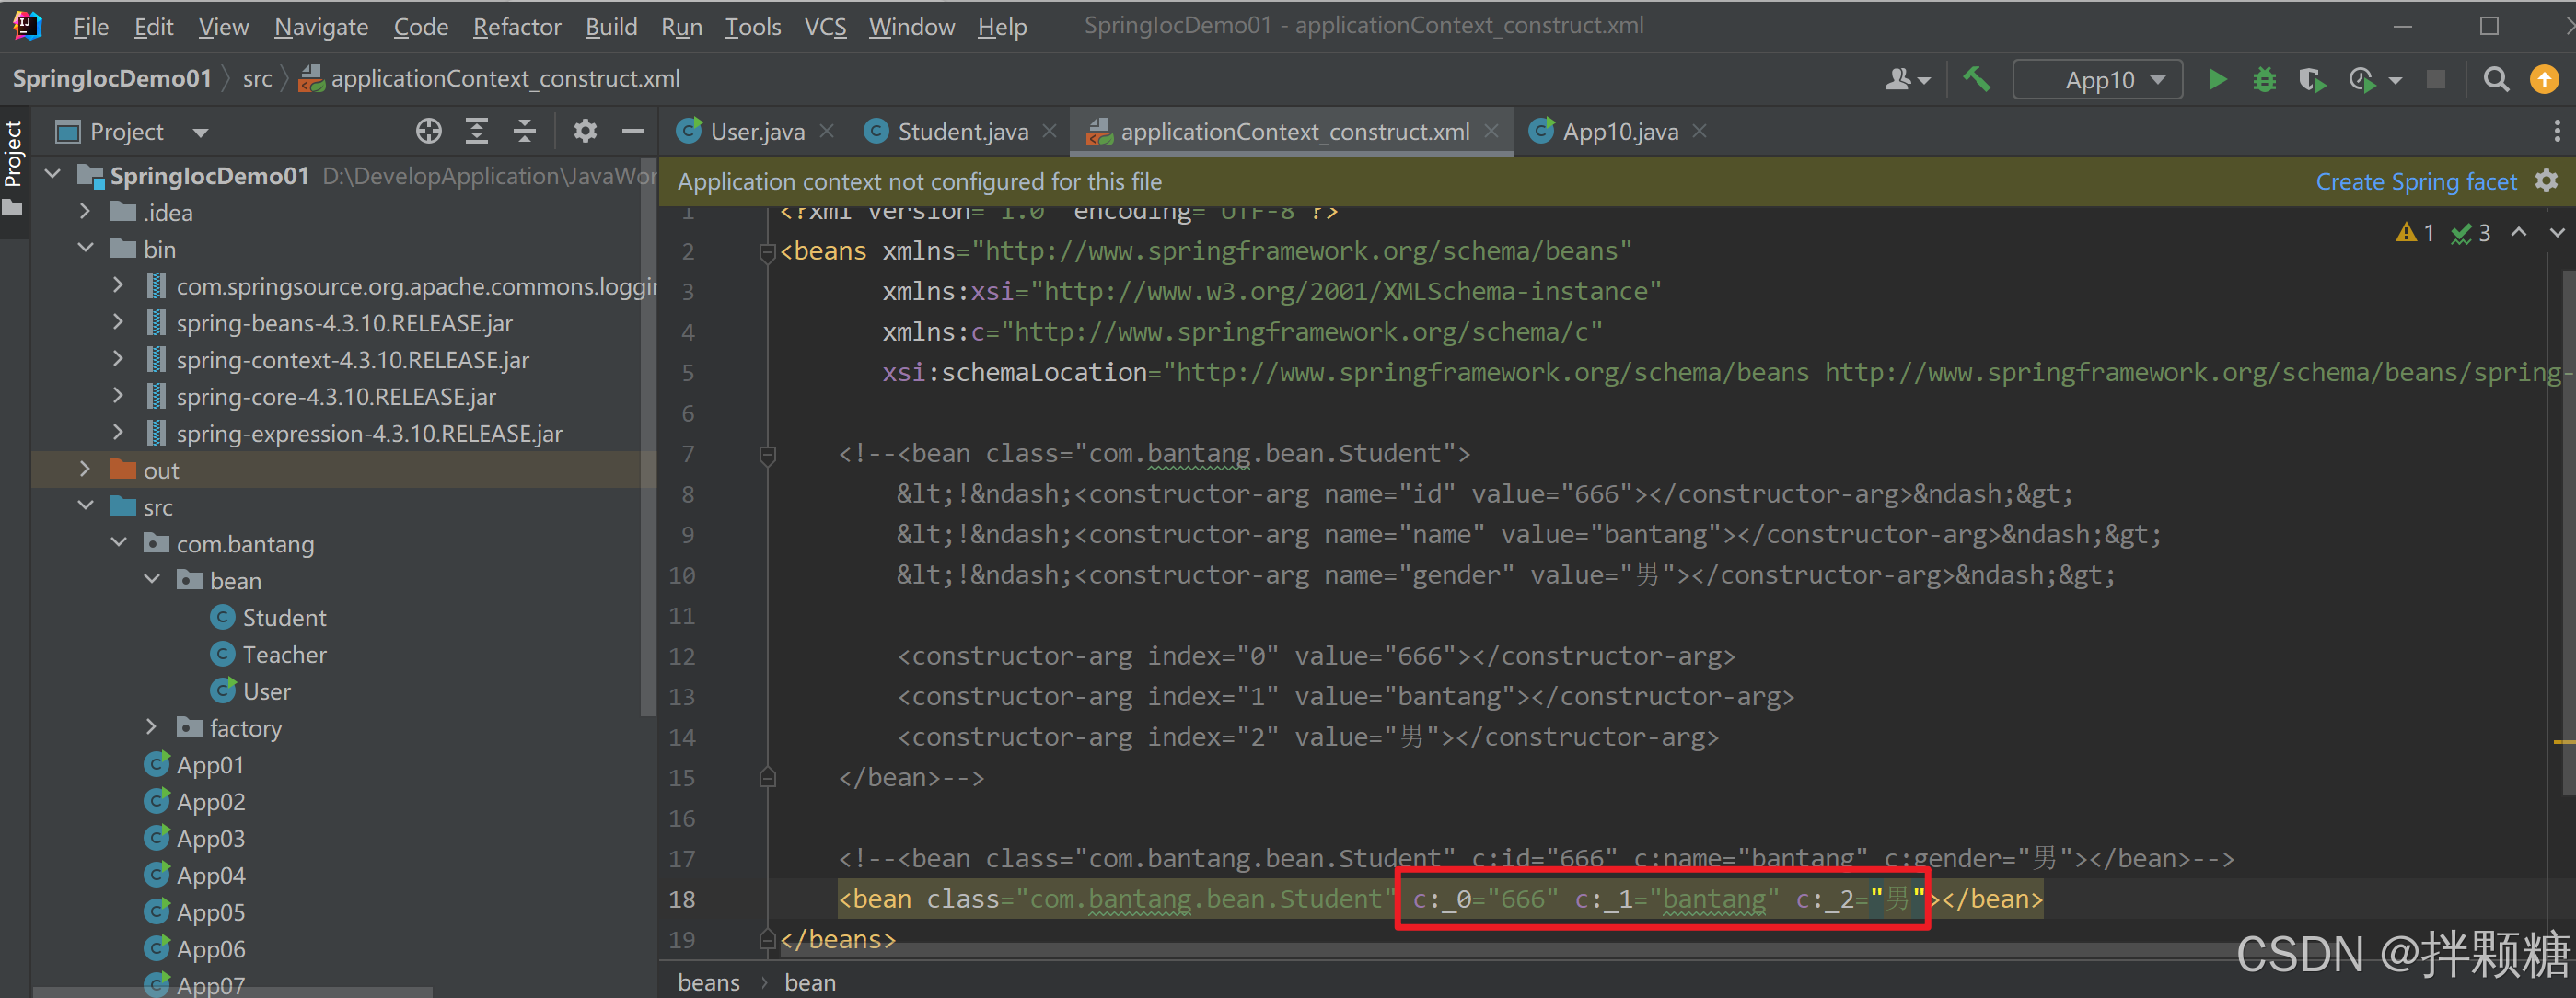
<?xml version="1.0" encoding="UTF-8"?>
<beans xmlns="http://www.springframework.org/schema/beans"
xmlns:xsi="http://www.w3.org/2001/XMLSchema-instance"
xmlns:c="http://www.springframework.org/schema/c"
xsi:schemaLocation="http://www.springframework.org/schema/beans http://www.springframework.org/schema/beans/spring-beans.xsd">
<!--<bean class="com.bantang.bean.Student">
<!–<constructor-arg name="id" value="666"></constructor-arg>–>
<!–<constructor-arg name="name" value="bantang"></constructor-arg>–>
<!–<constructor-arg name="gender" value="男"></constructor-arg>–>
<constructor-arg index="0" value="666"></constructor-arg>
<constructor-arg index="1" value="bantang"></constructor-arg>
<constructor-arg index="2" value="男"></constructor-arg>
</bean>-->
<!--<bean class="com.bantang.bean.Student" c:id="666" c:name="bantang" c:gender="男"></bean>-->
<bean class="com.bantang.bean.Student" c:_0="666" c:_1="bantang" c:_2="男"></bean>
</beans>
运行结果:
设值注入
设值注入 其实就相当于使用get set方法给属性传值
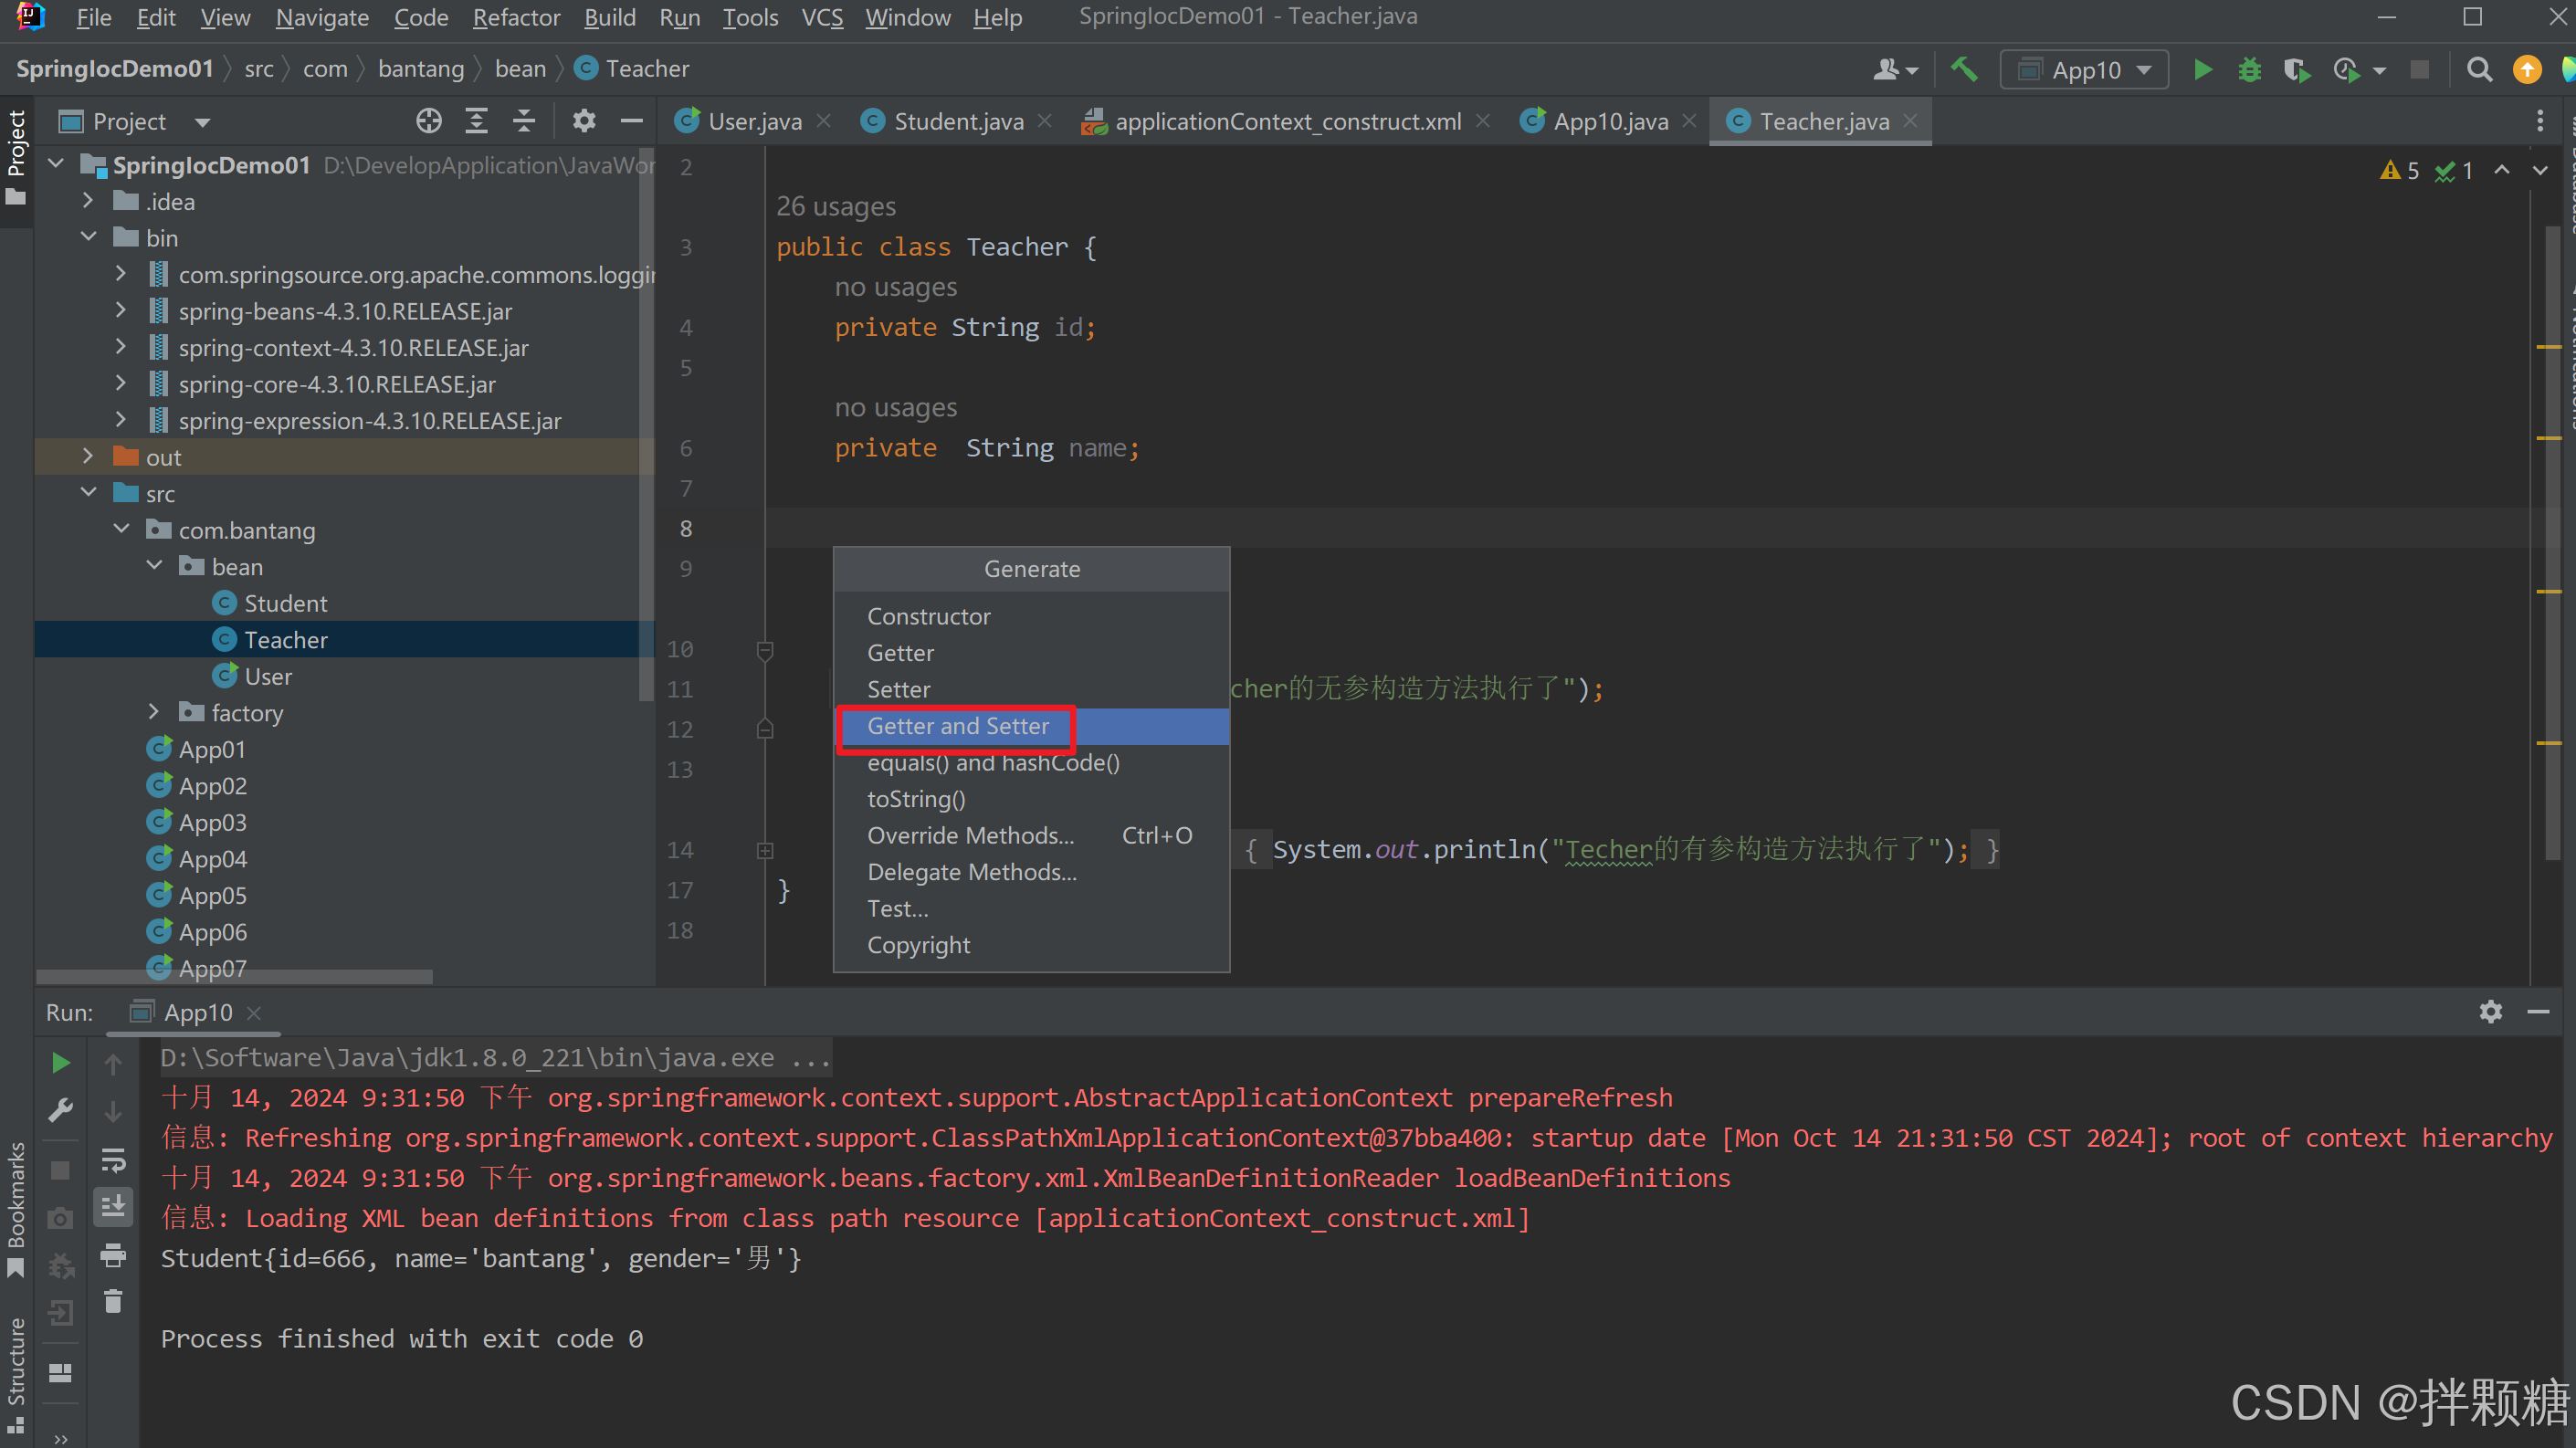
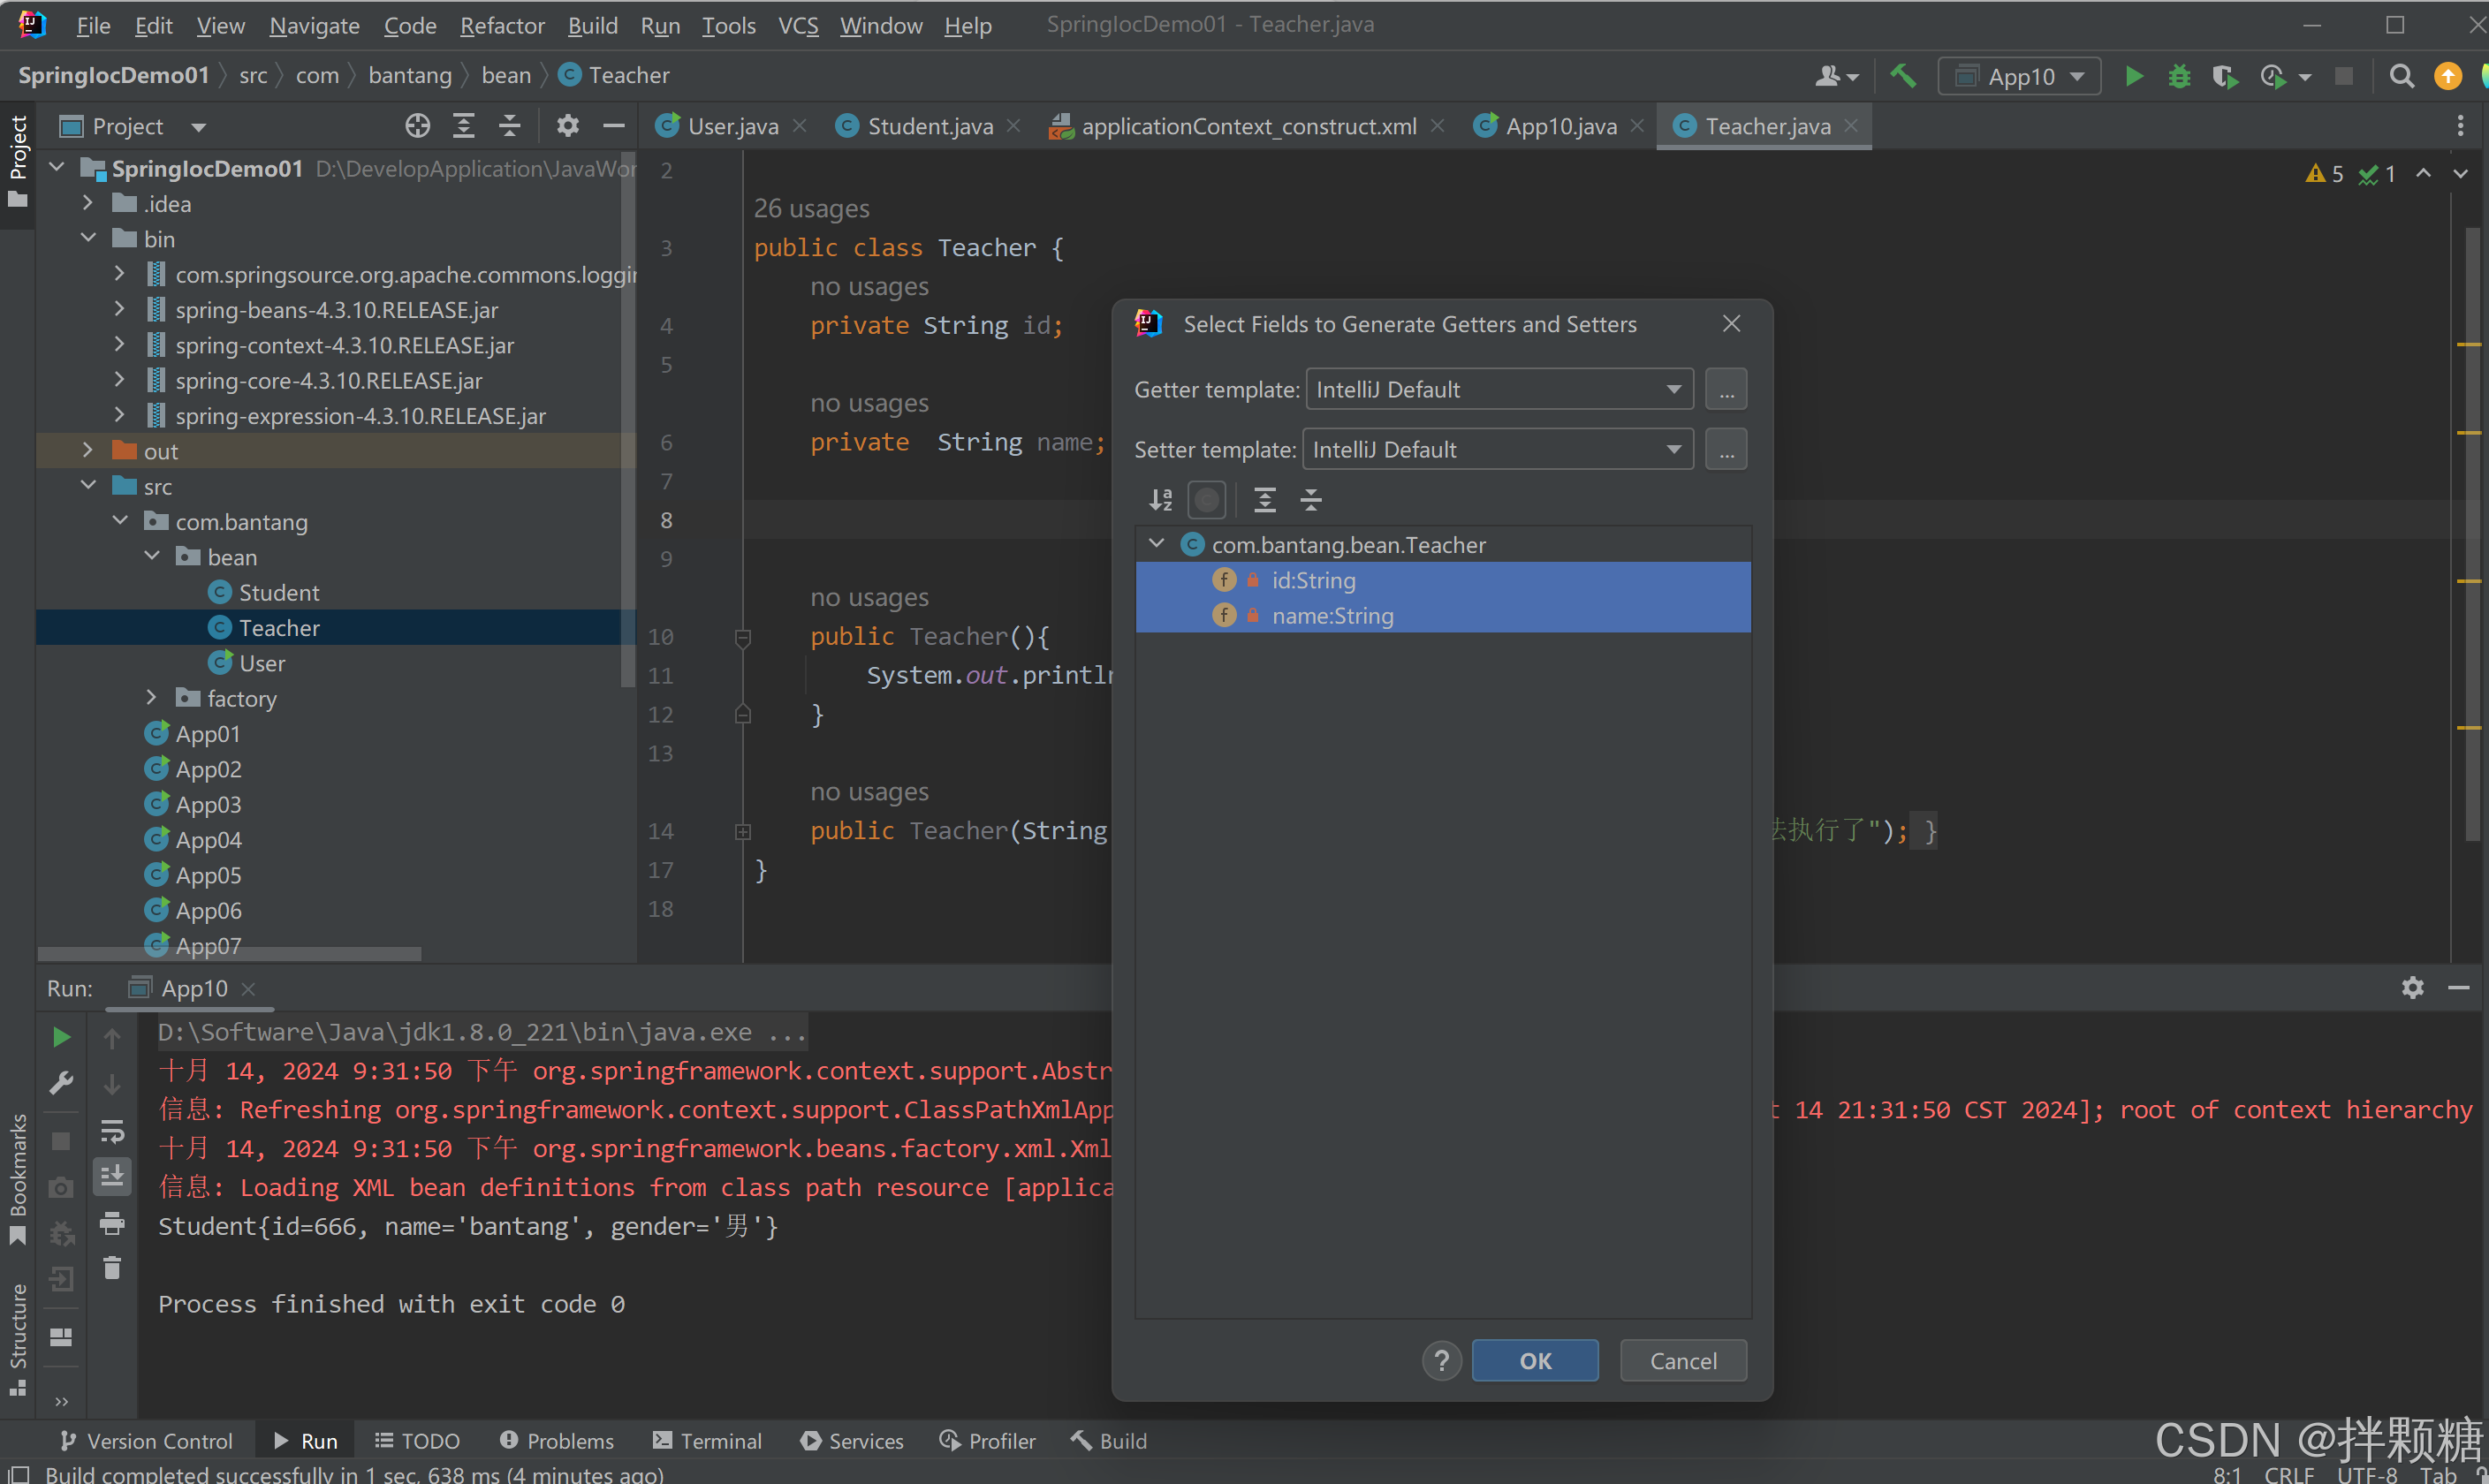
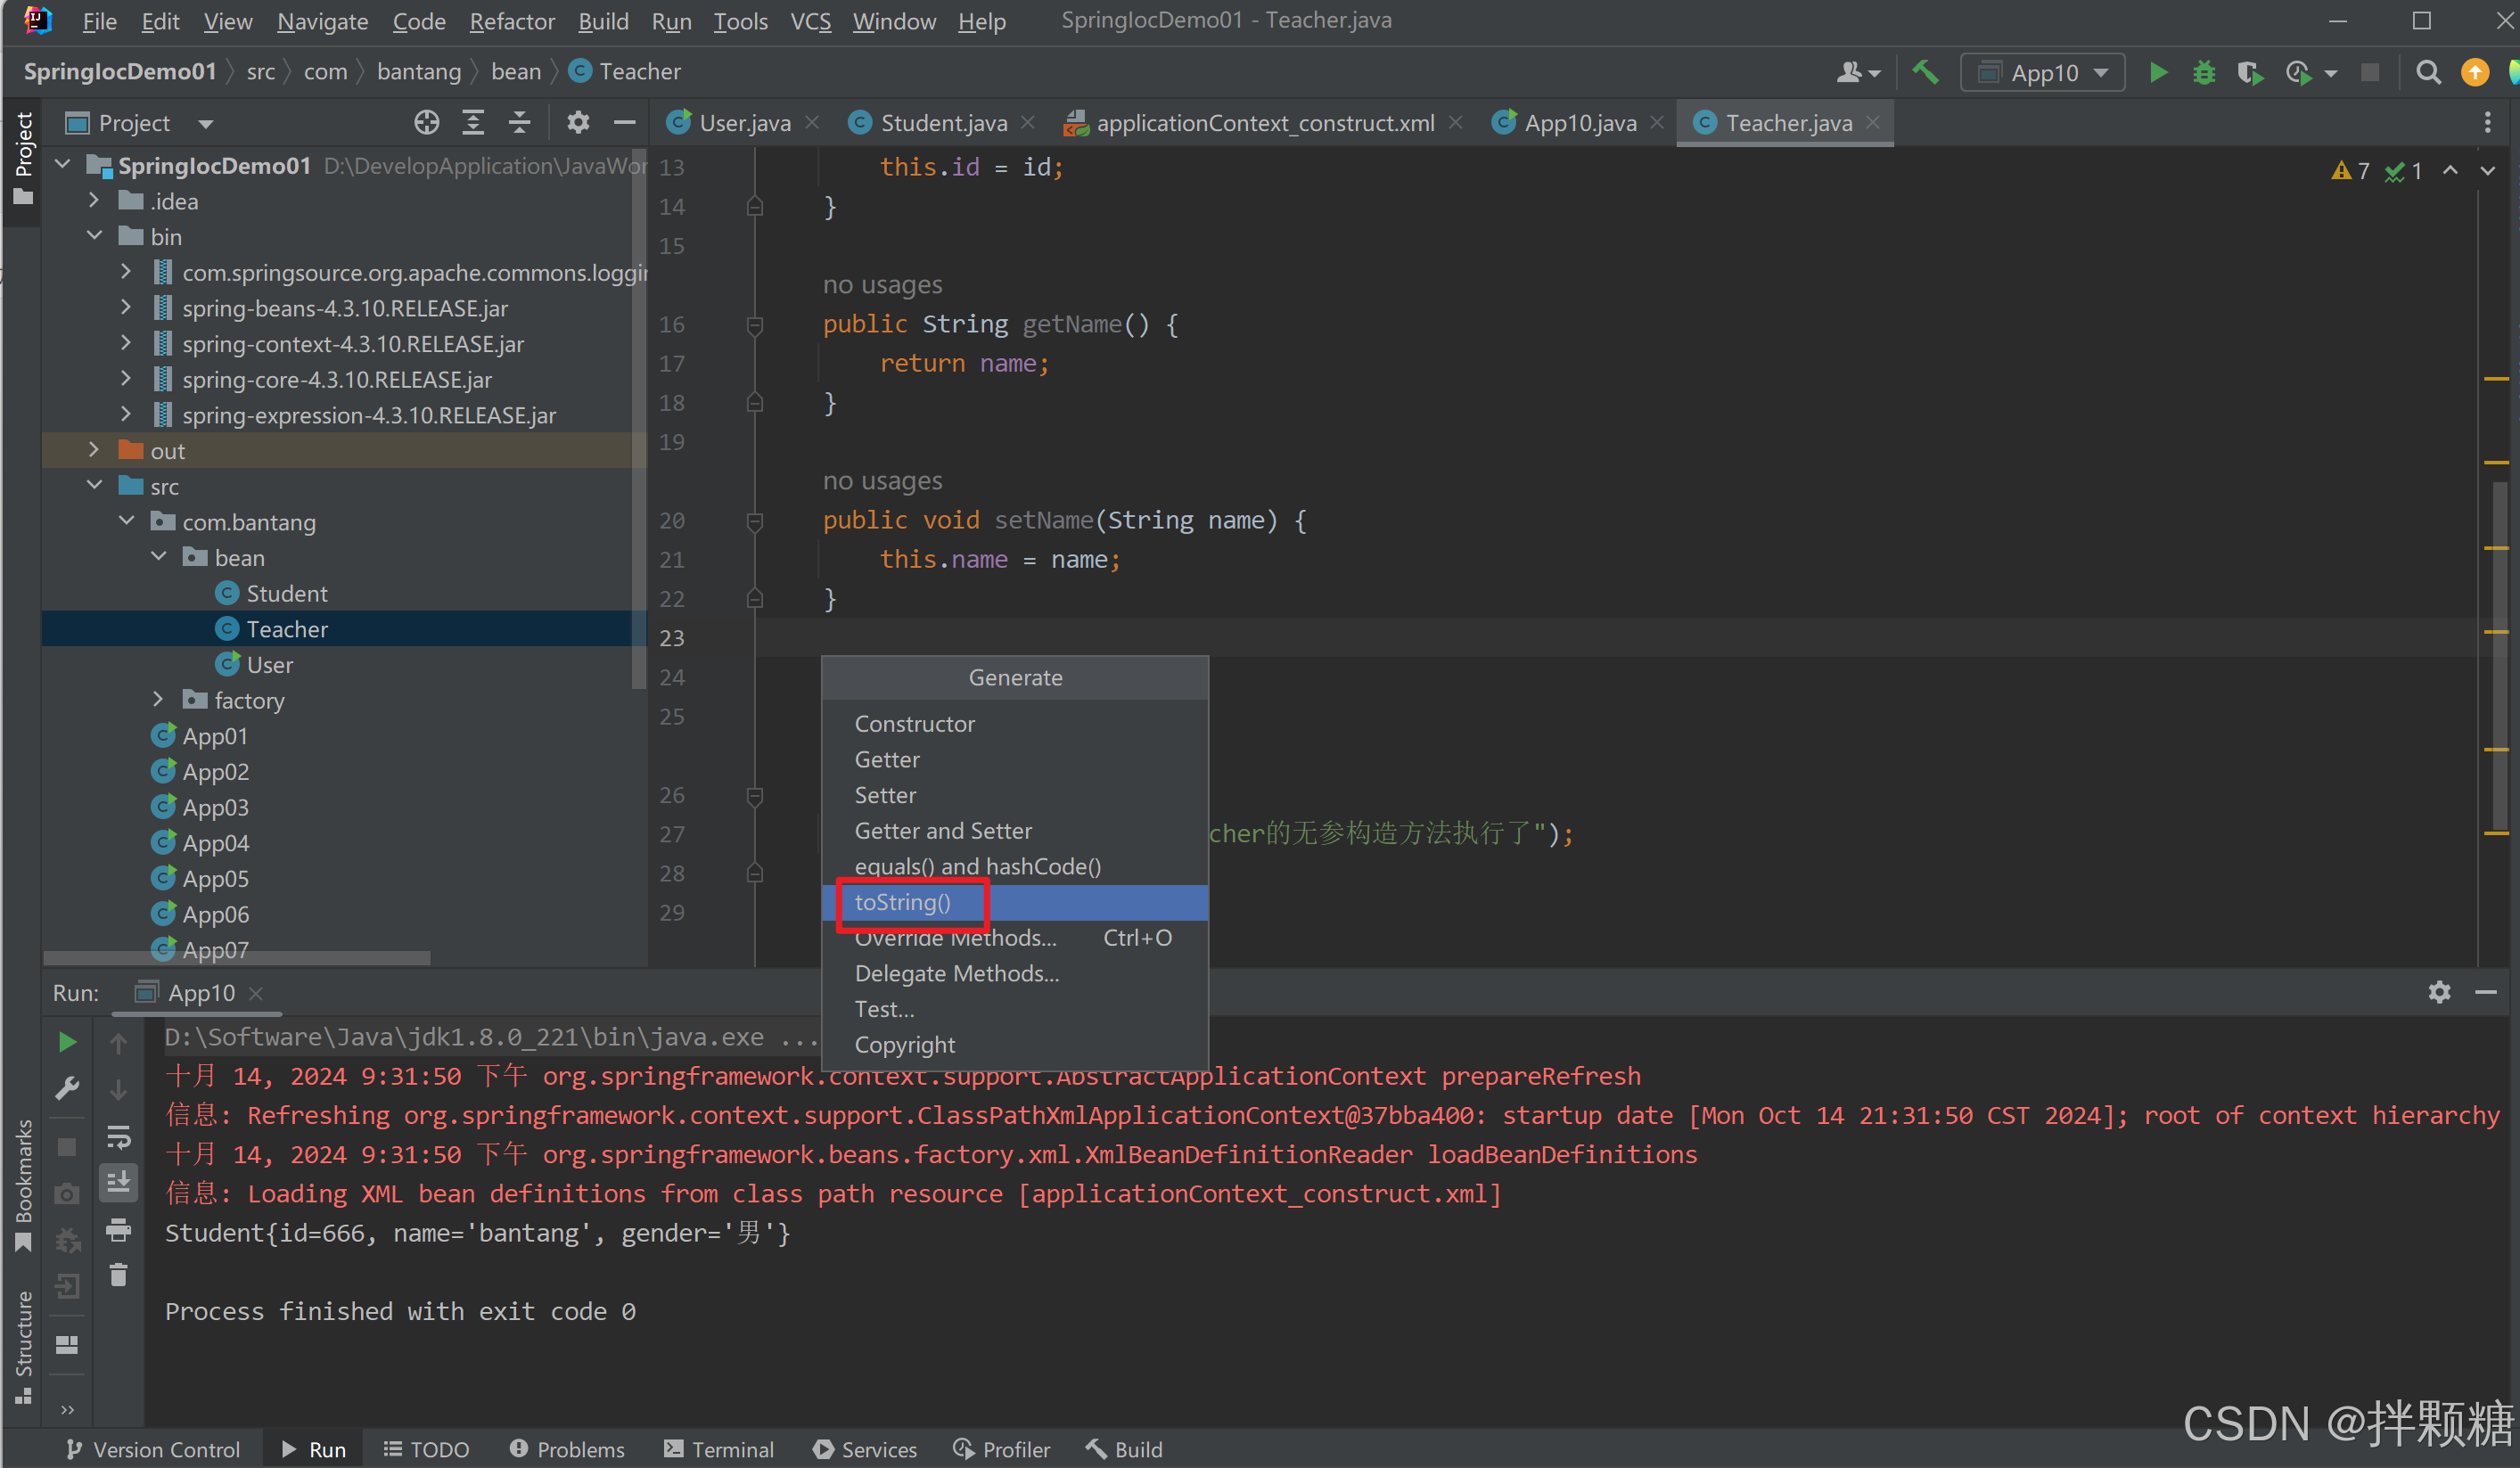
代码结构:
package com.bantang.bean;
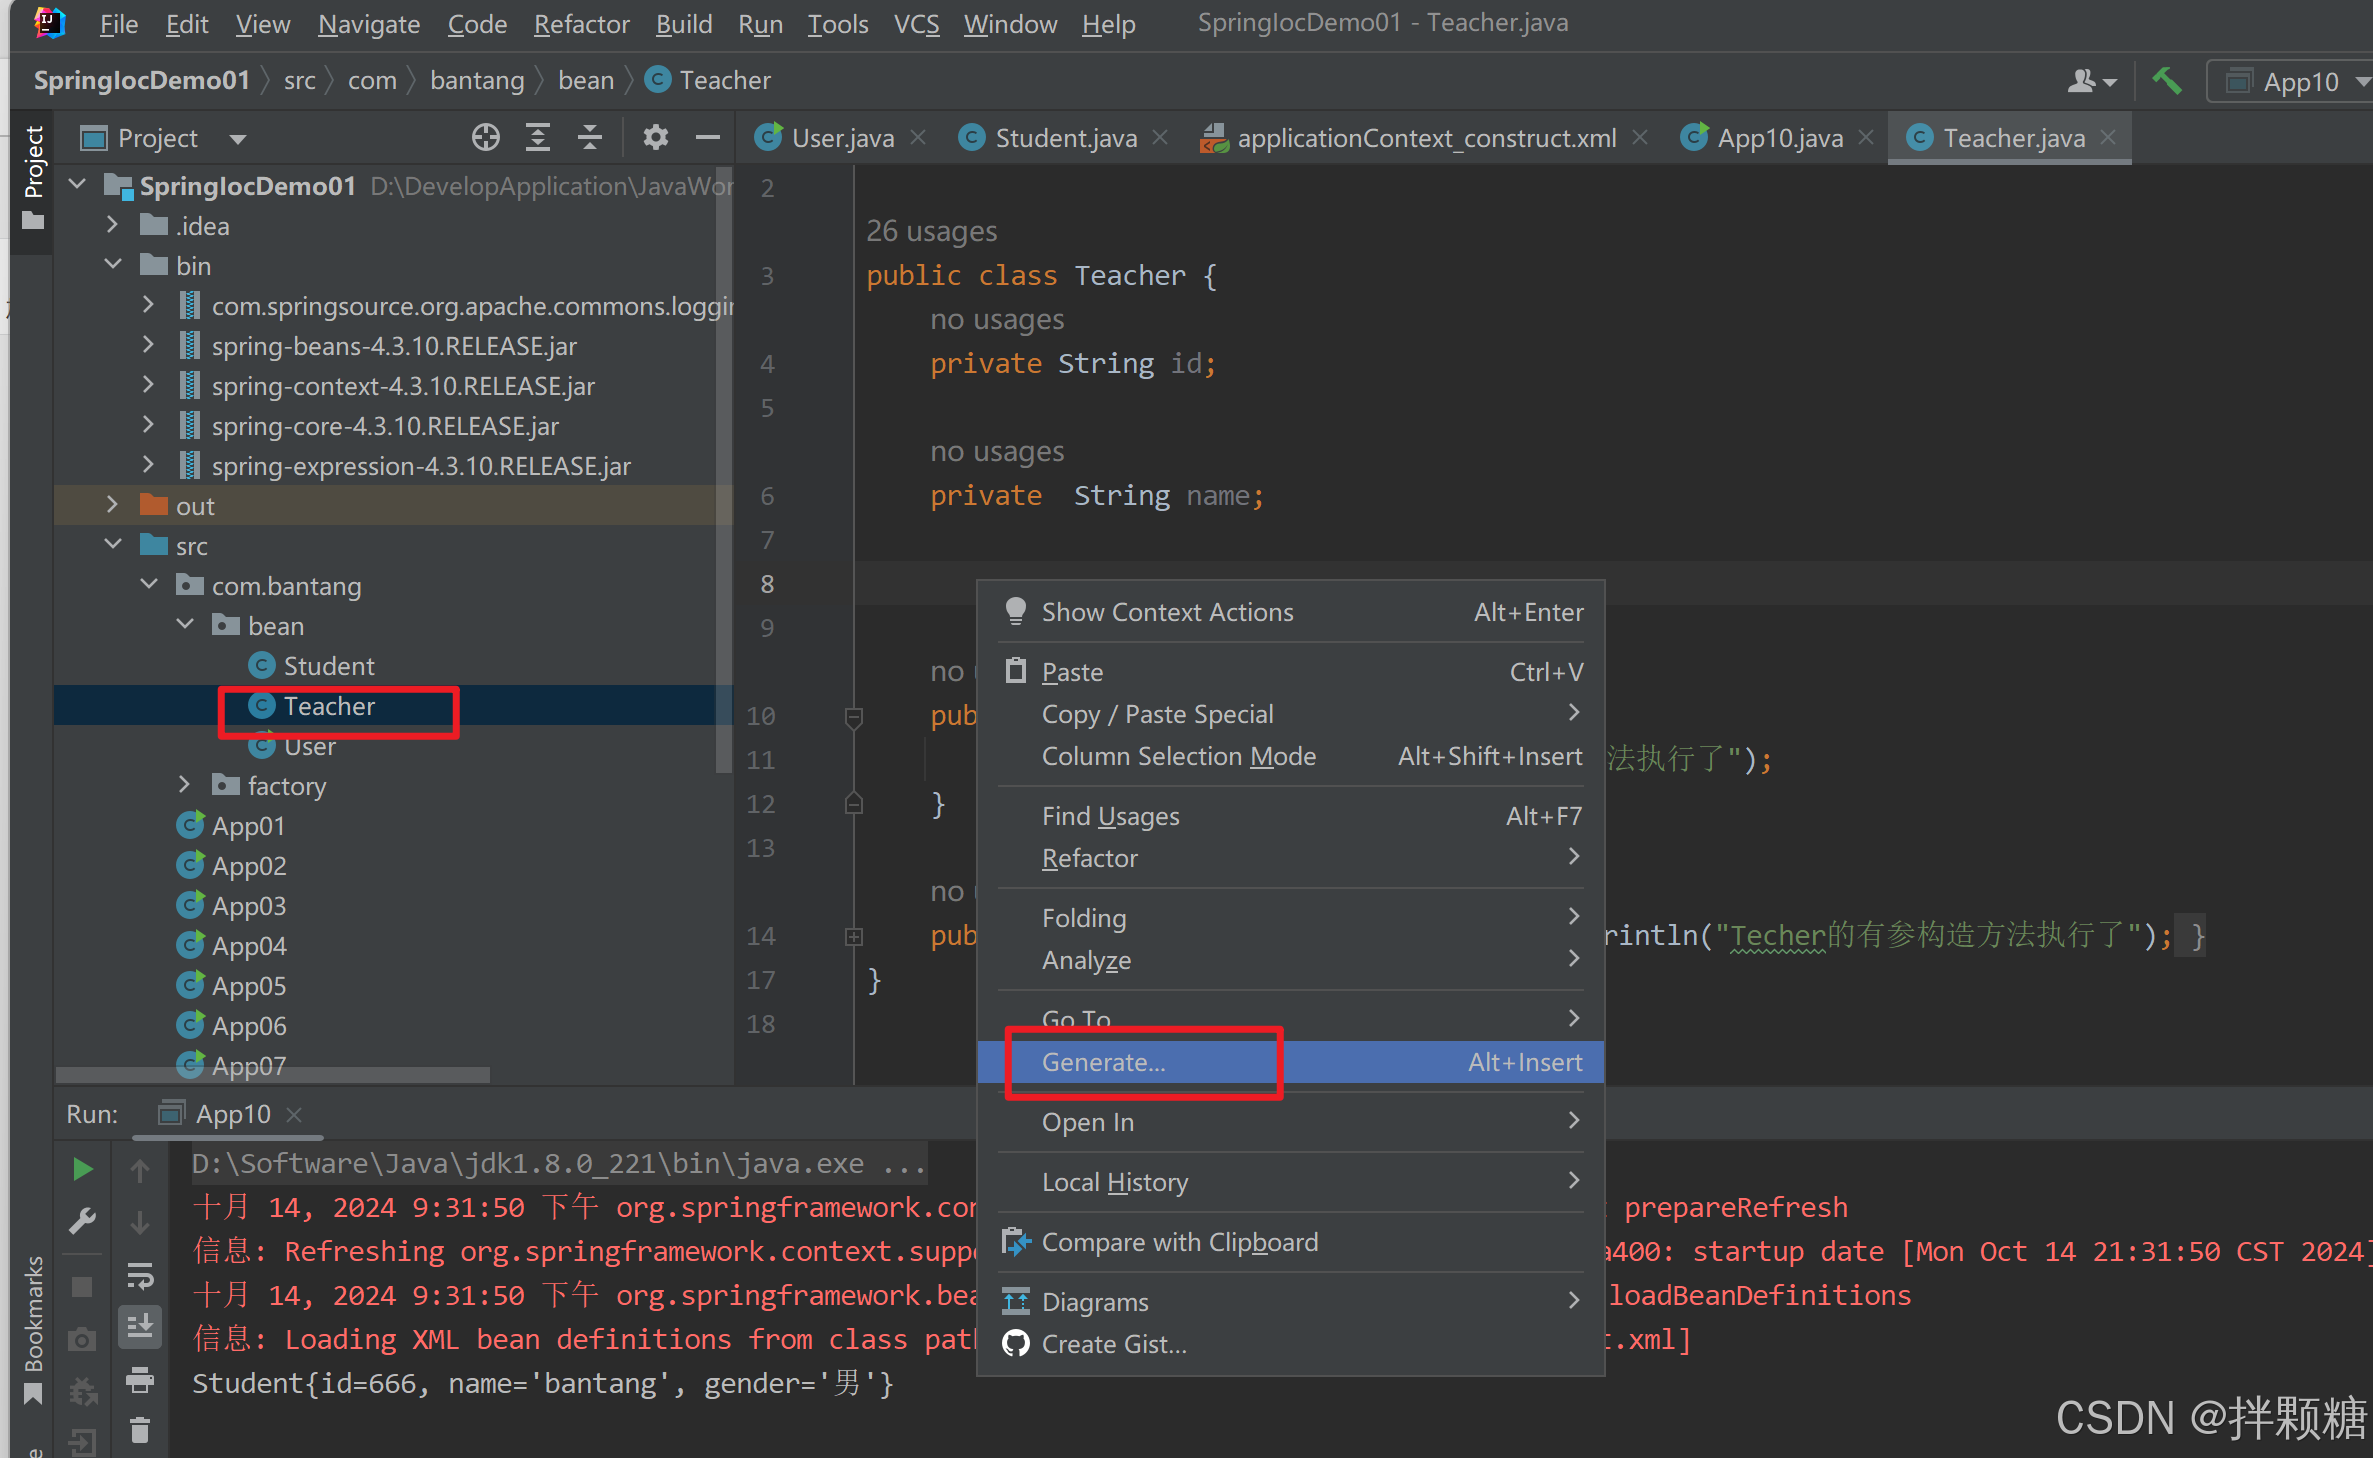
public class Teacher {
private String id;
private String name;
public String getId() {
return id;
}
public void setId(String id) {
this.id = id;
}
public String getName() {
return name;
}
public void setName(String name) {
this.name = name;
}
@Override
public String toString() {
return "Teacher{" +
"id='" + id + '\'' +
", name='" + name + '\'' +
'}';
}
public Teacher(){
System.out.println("Teacher的无参构造方法执行了");
}
public Teacher(String name) {
System.out.println("Techer的有参构造方法执行了");
}
}
设值注入的容器配置文件
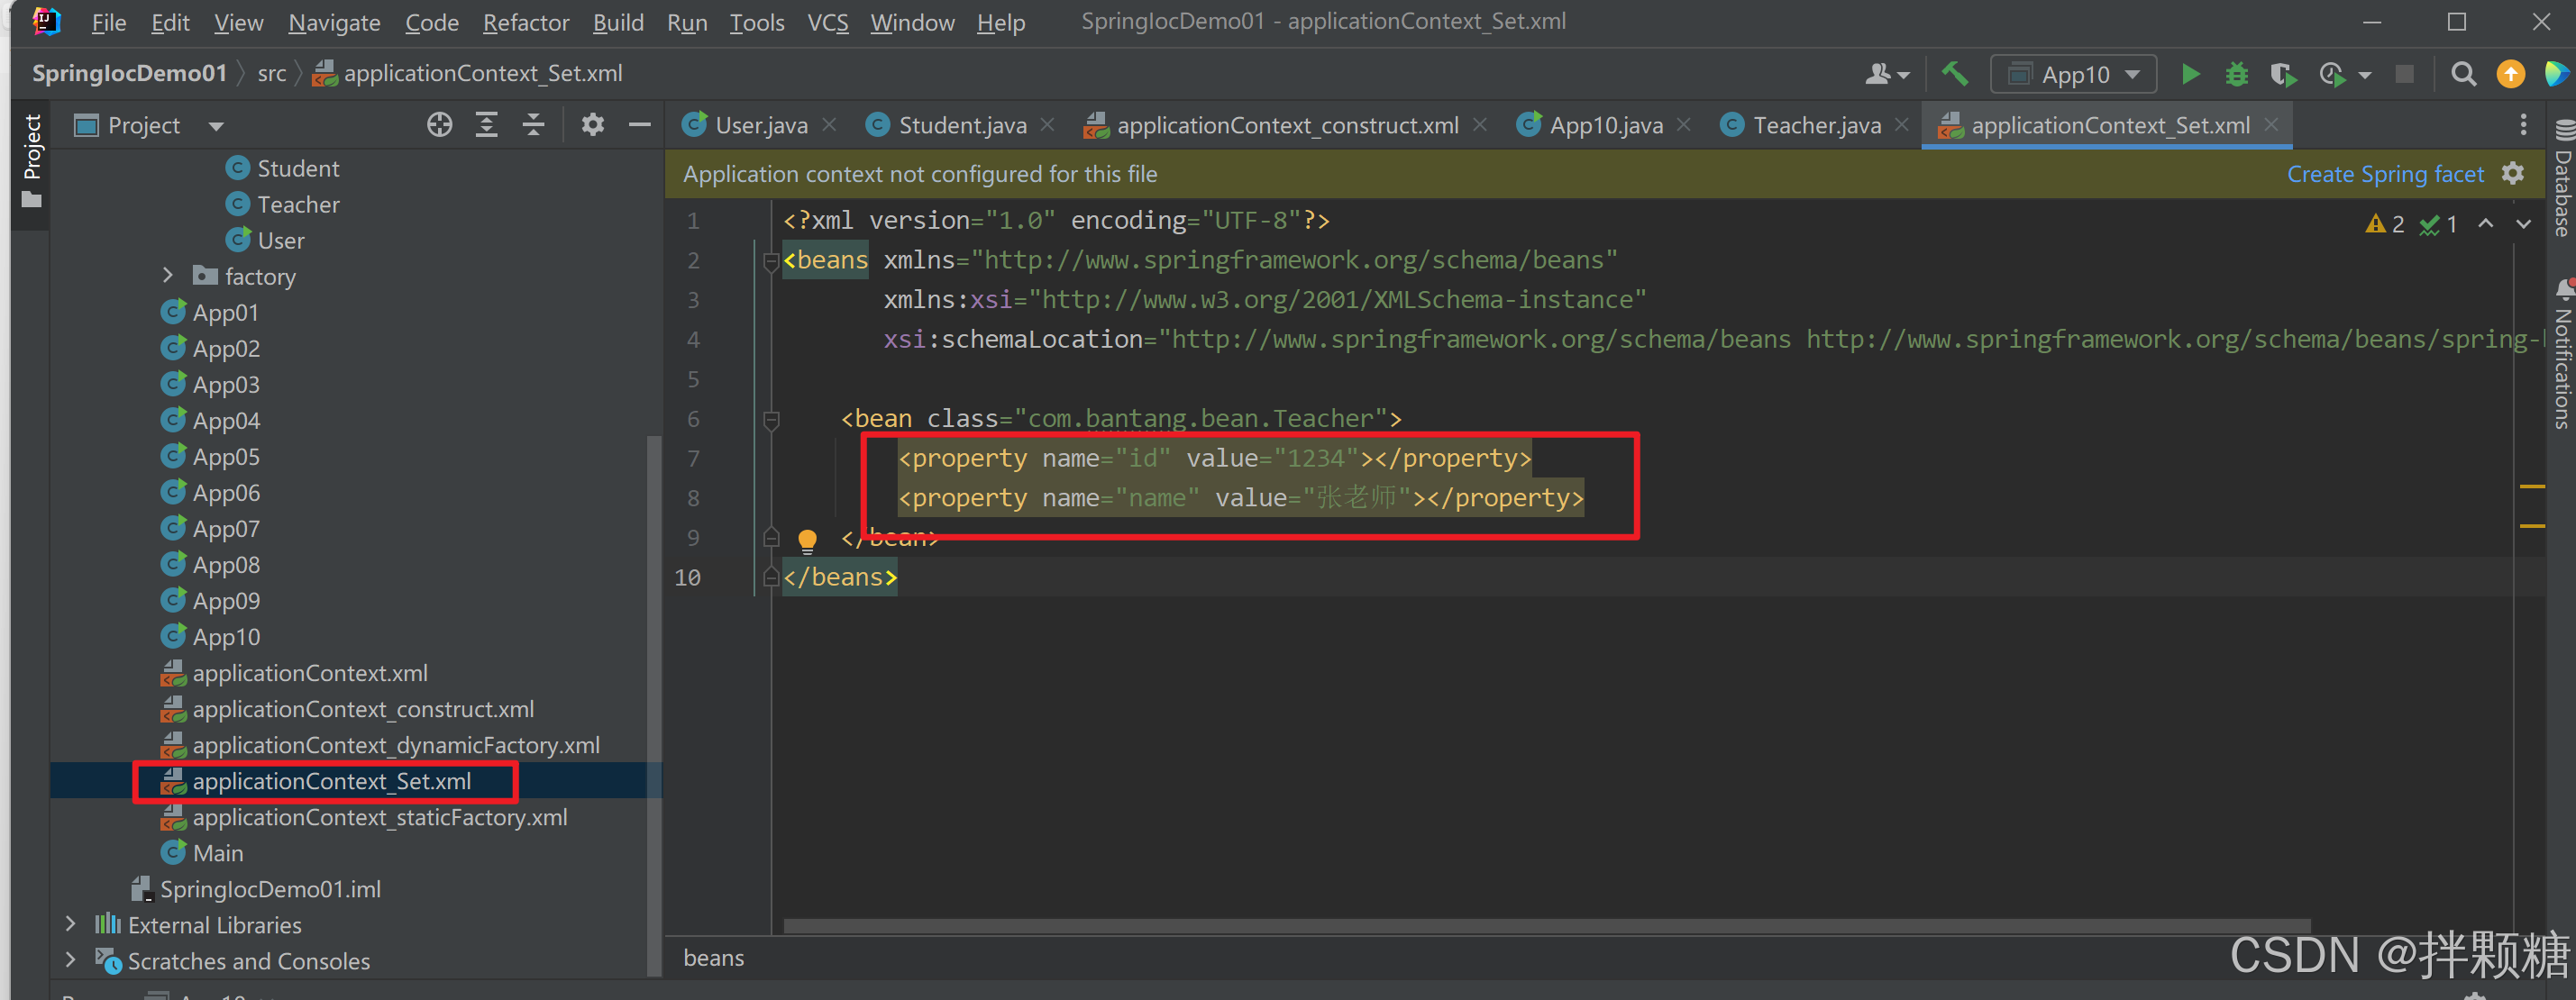
<?xml version="1.0" encoding="UTF-8"?>
<beans xmlns="http://www.springframework.org/schema/beans"
	   xmlns:xsi="http://www.w3.org/2001/XMLSchema-instance"
	   xsi:schemaLocation="http://www.springframework.org/schema/beans http://www.springframework.org/schema/beans/spring-beans.xsd">

	<bean class="com.bantang.bean.Teacher">
		<property name="id" value="1234"></property>
		<property name="name" value="张老师"></property>
 	</bean>
</beans>
验证:
import com.bantang.bean.Student;
import com.bantang.bean.Teacher;
import org.springframework.context.ApplicationContext;
import org.springframework.context.support.ClassPathXmlApplicationContext;
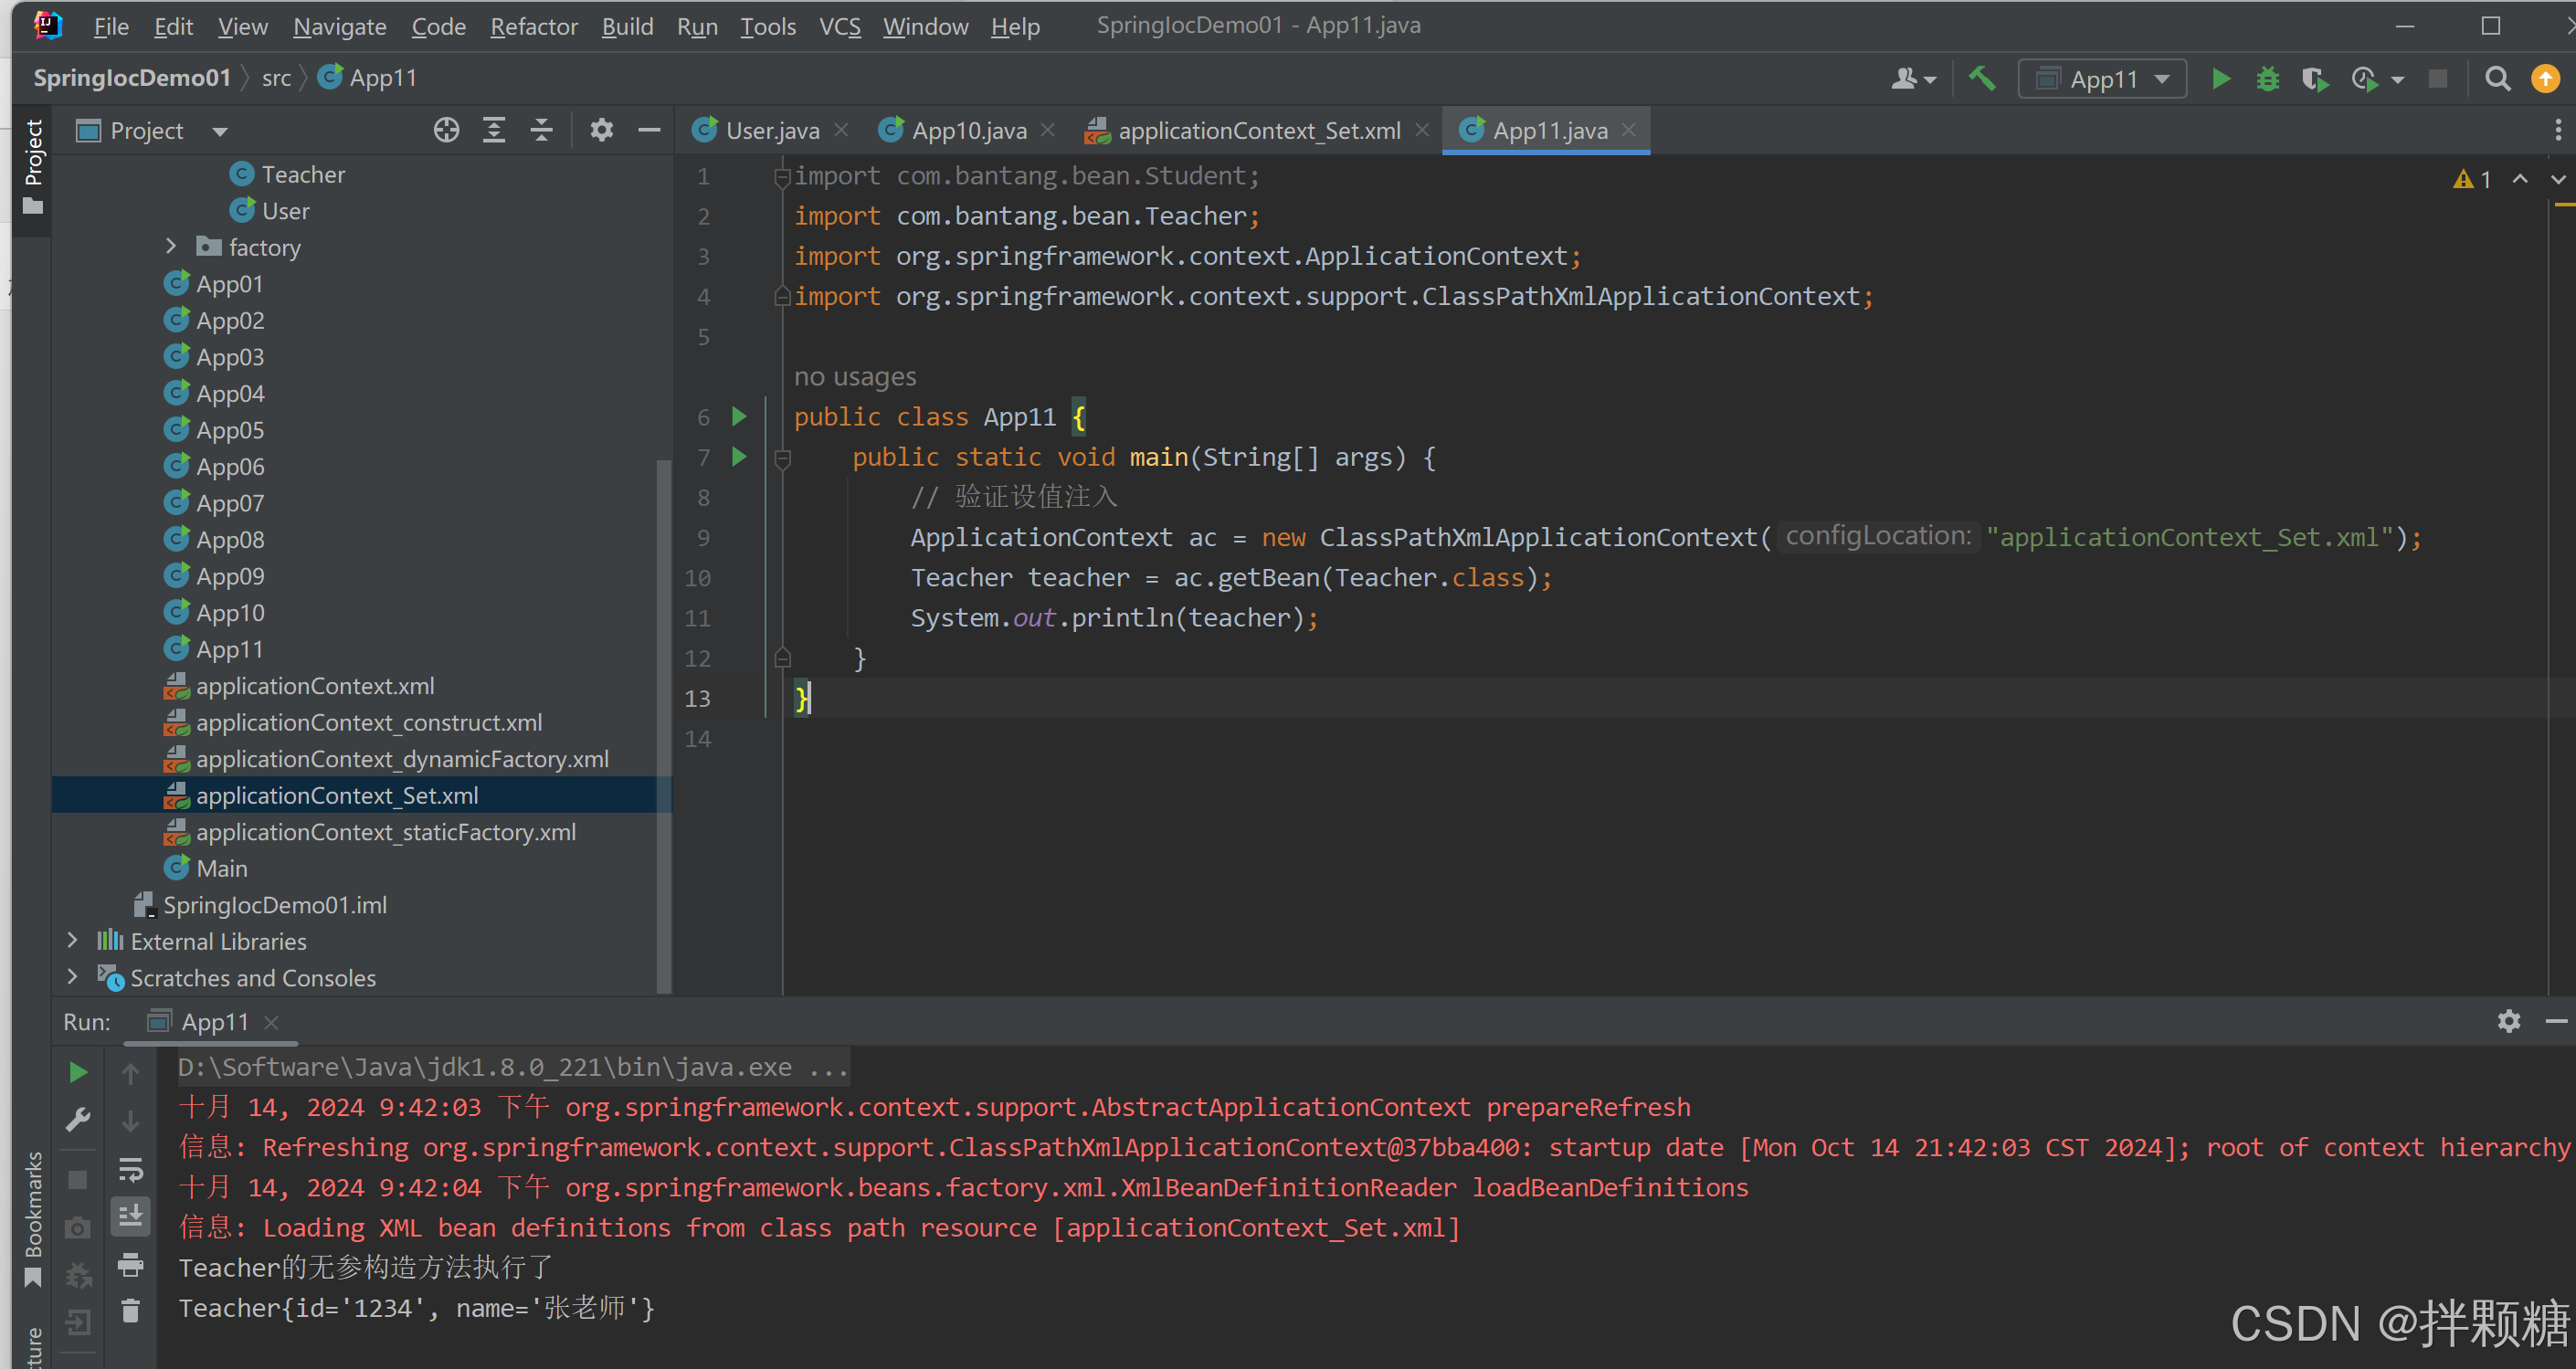
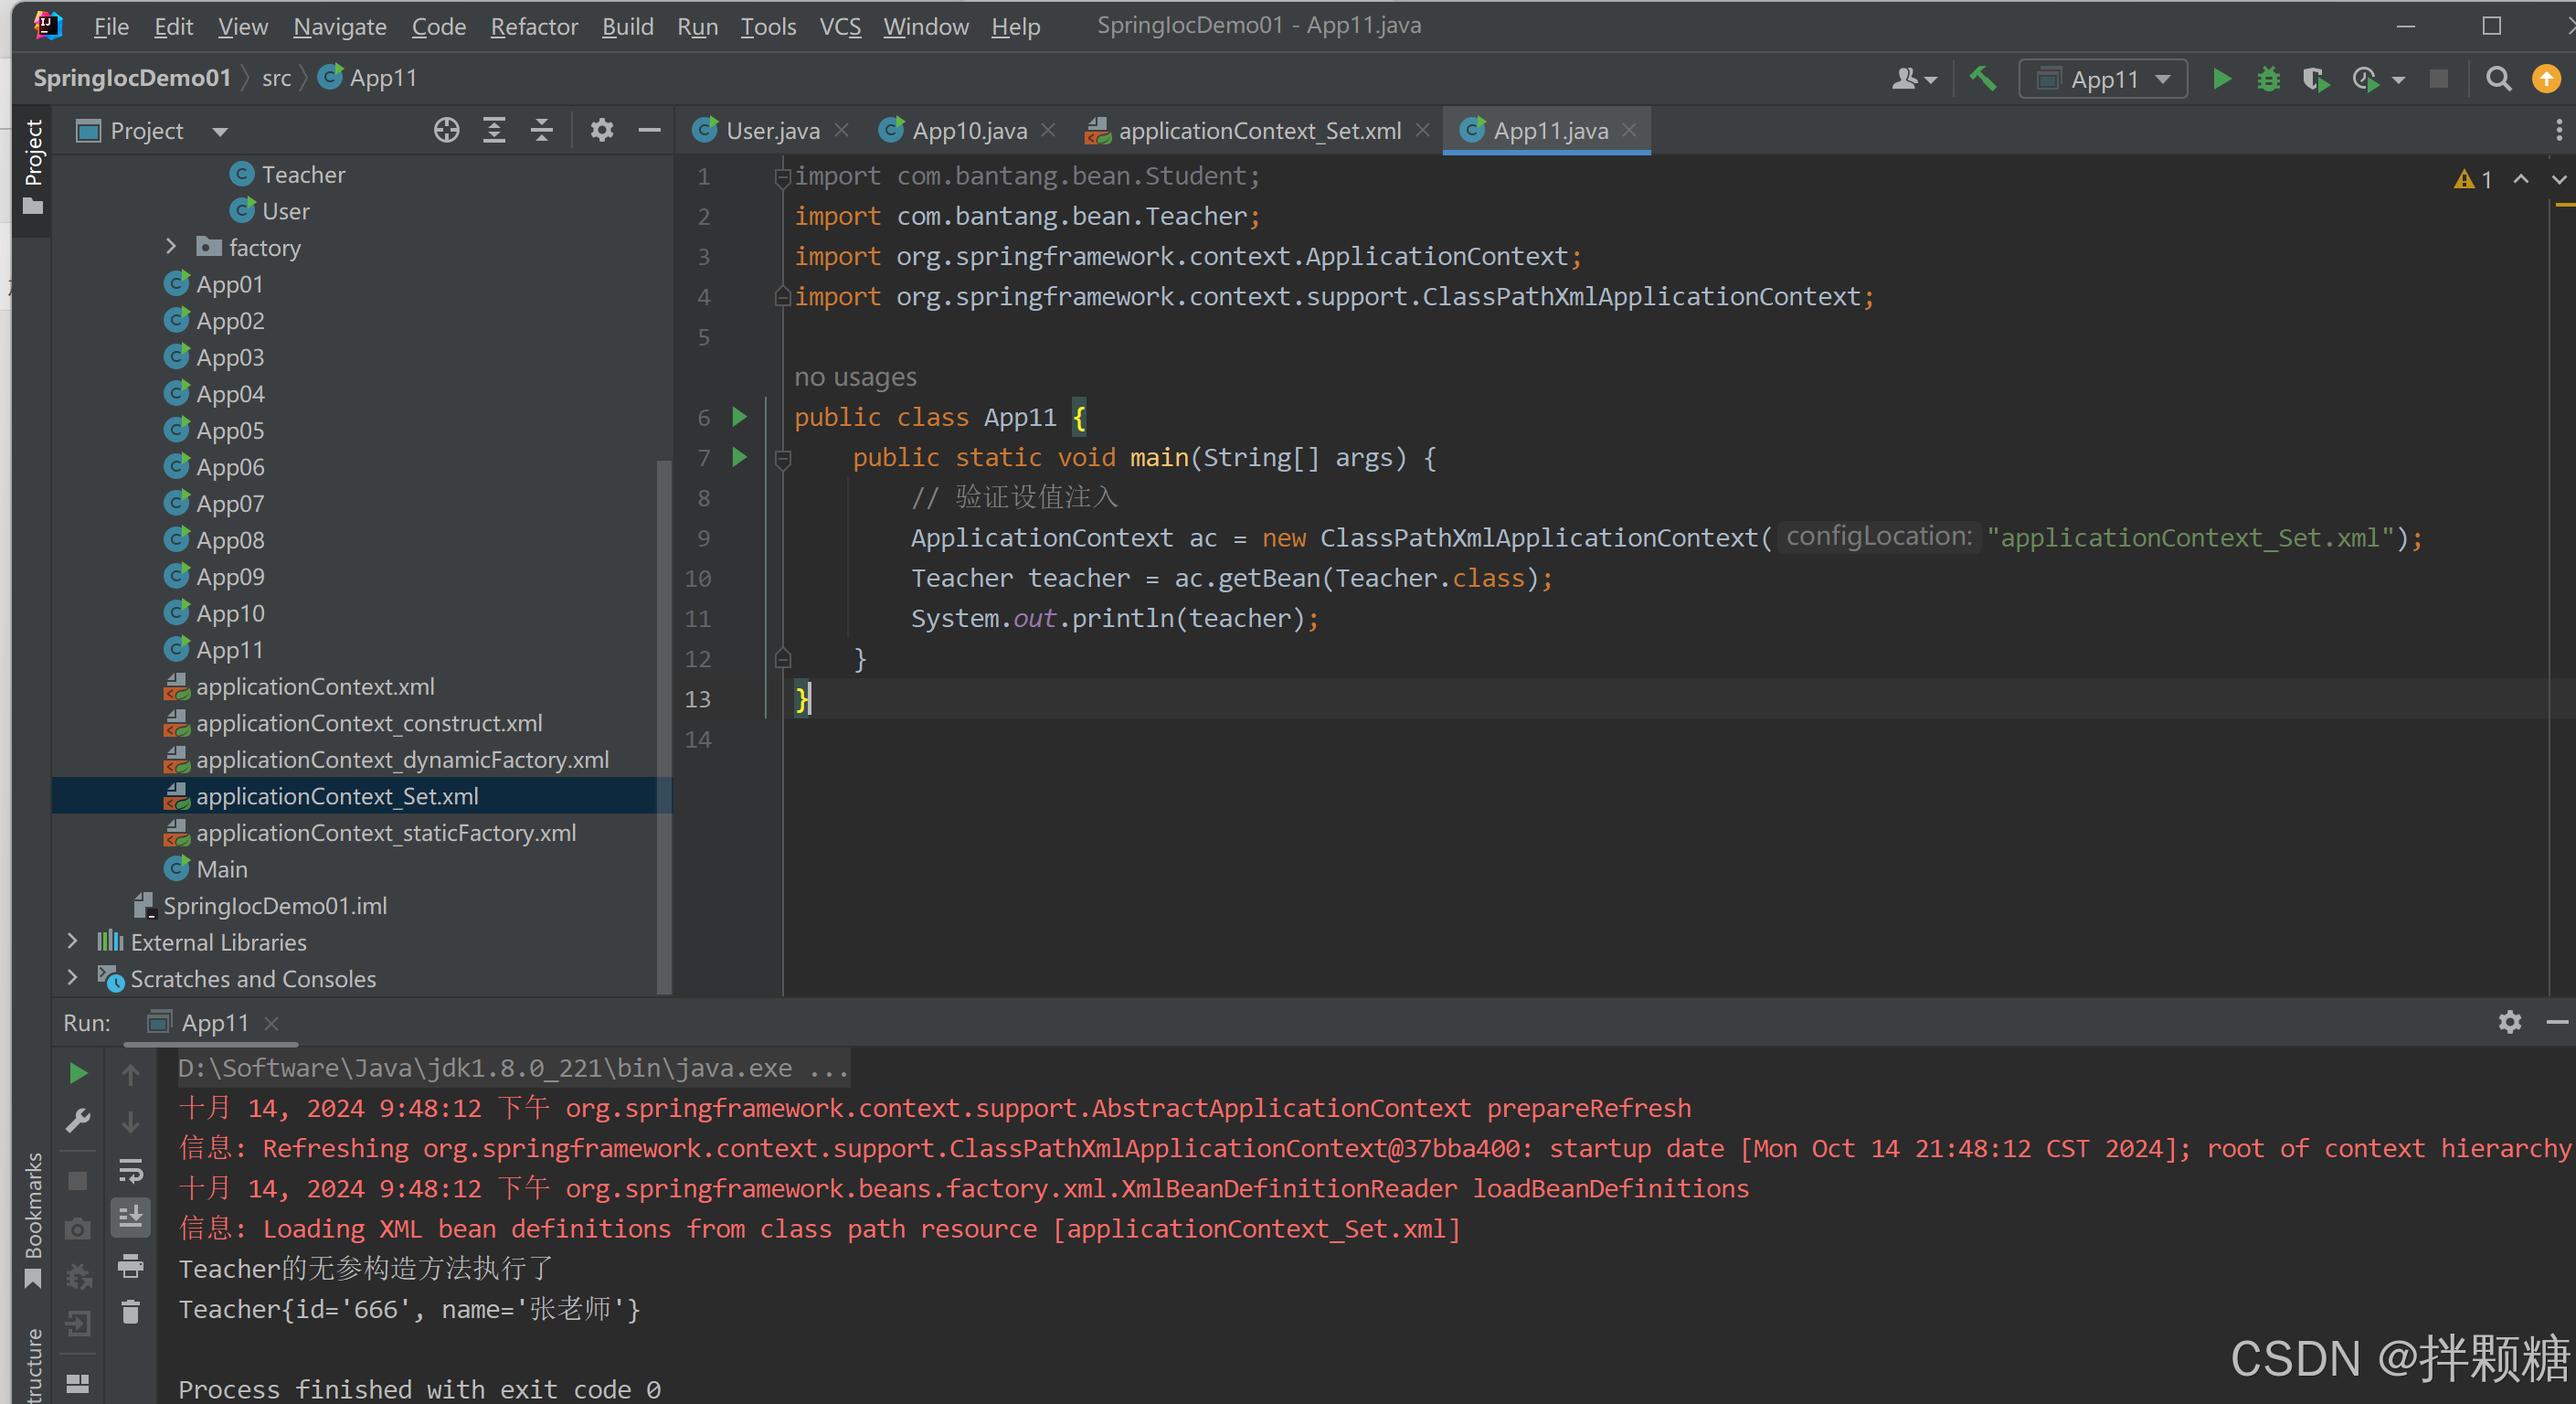
public class App11 {
public static void main(String[] args) {
// 验证设值注入
ApplicationContext ac = new ClassPathXmlApplicationContext("applicationContext_Set.xml");
Teacher teacher = ac.getBean(Teacher.class);
System.out.println(teacher);
}
}
同样 设值注入也可以使用简化命名空间 使用p
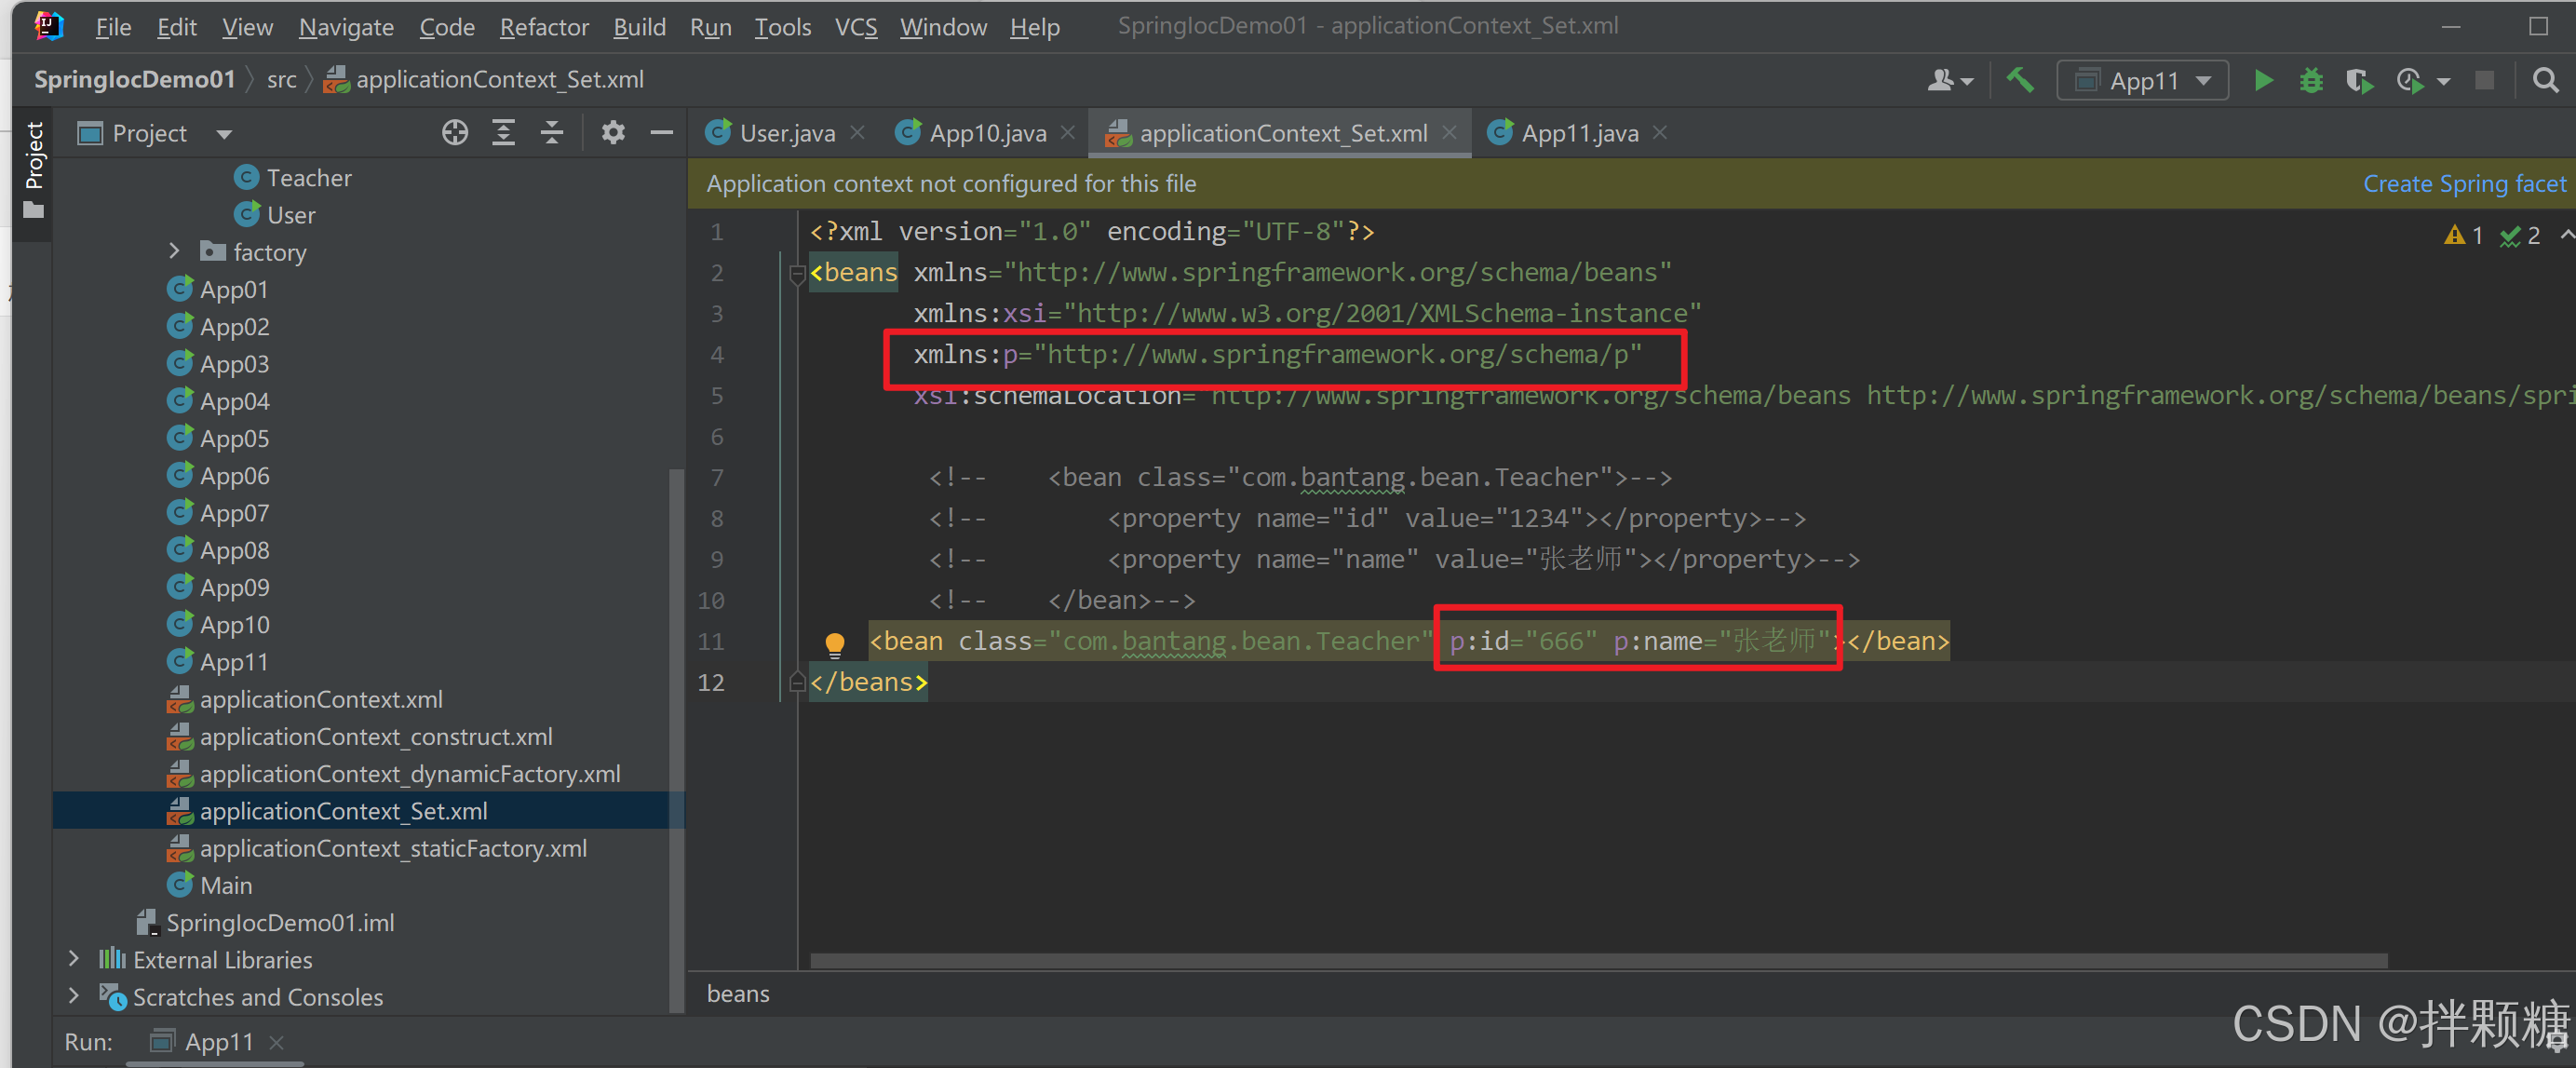
<?xml version="1.0" encoding="UTF-8"?>
<beans xmlns="http://www.springframework.org/schema/beans"
	   xmlns:xsi="http://www.w3.org/2001/XMLSchema-instance"
	   xmlns:p="http://www.springframework.org/schema/p"
	   xsi:schemaLocation="http://www.springframework.org/schema/beans http://www.springframework.org/schema/beans/spring-beans.xsd">

		<!--	<bean class="com.bantang.bean.Teacher">-->
		<!--		<property name="id" value="1234"></property>-->
		<!--		<property name="name" value="张老师"></property>-->
		<!-- 	</bean>-->
	<bean class="com.bantang.bean.Teacher" p:id="666" p:name="张老师"></bean>
</beans>
对象注入
如果属性类型是自定义对象呢 还能构造注入 传值注入嘛?
新建自定义对象
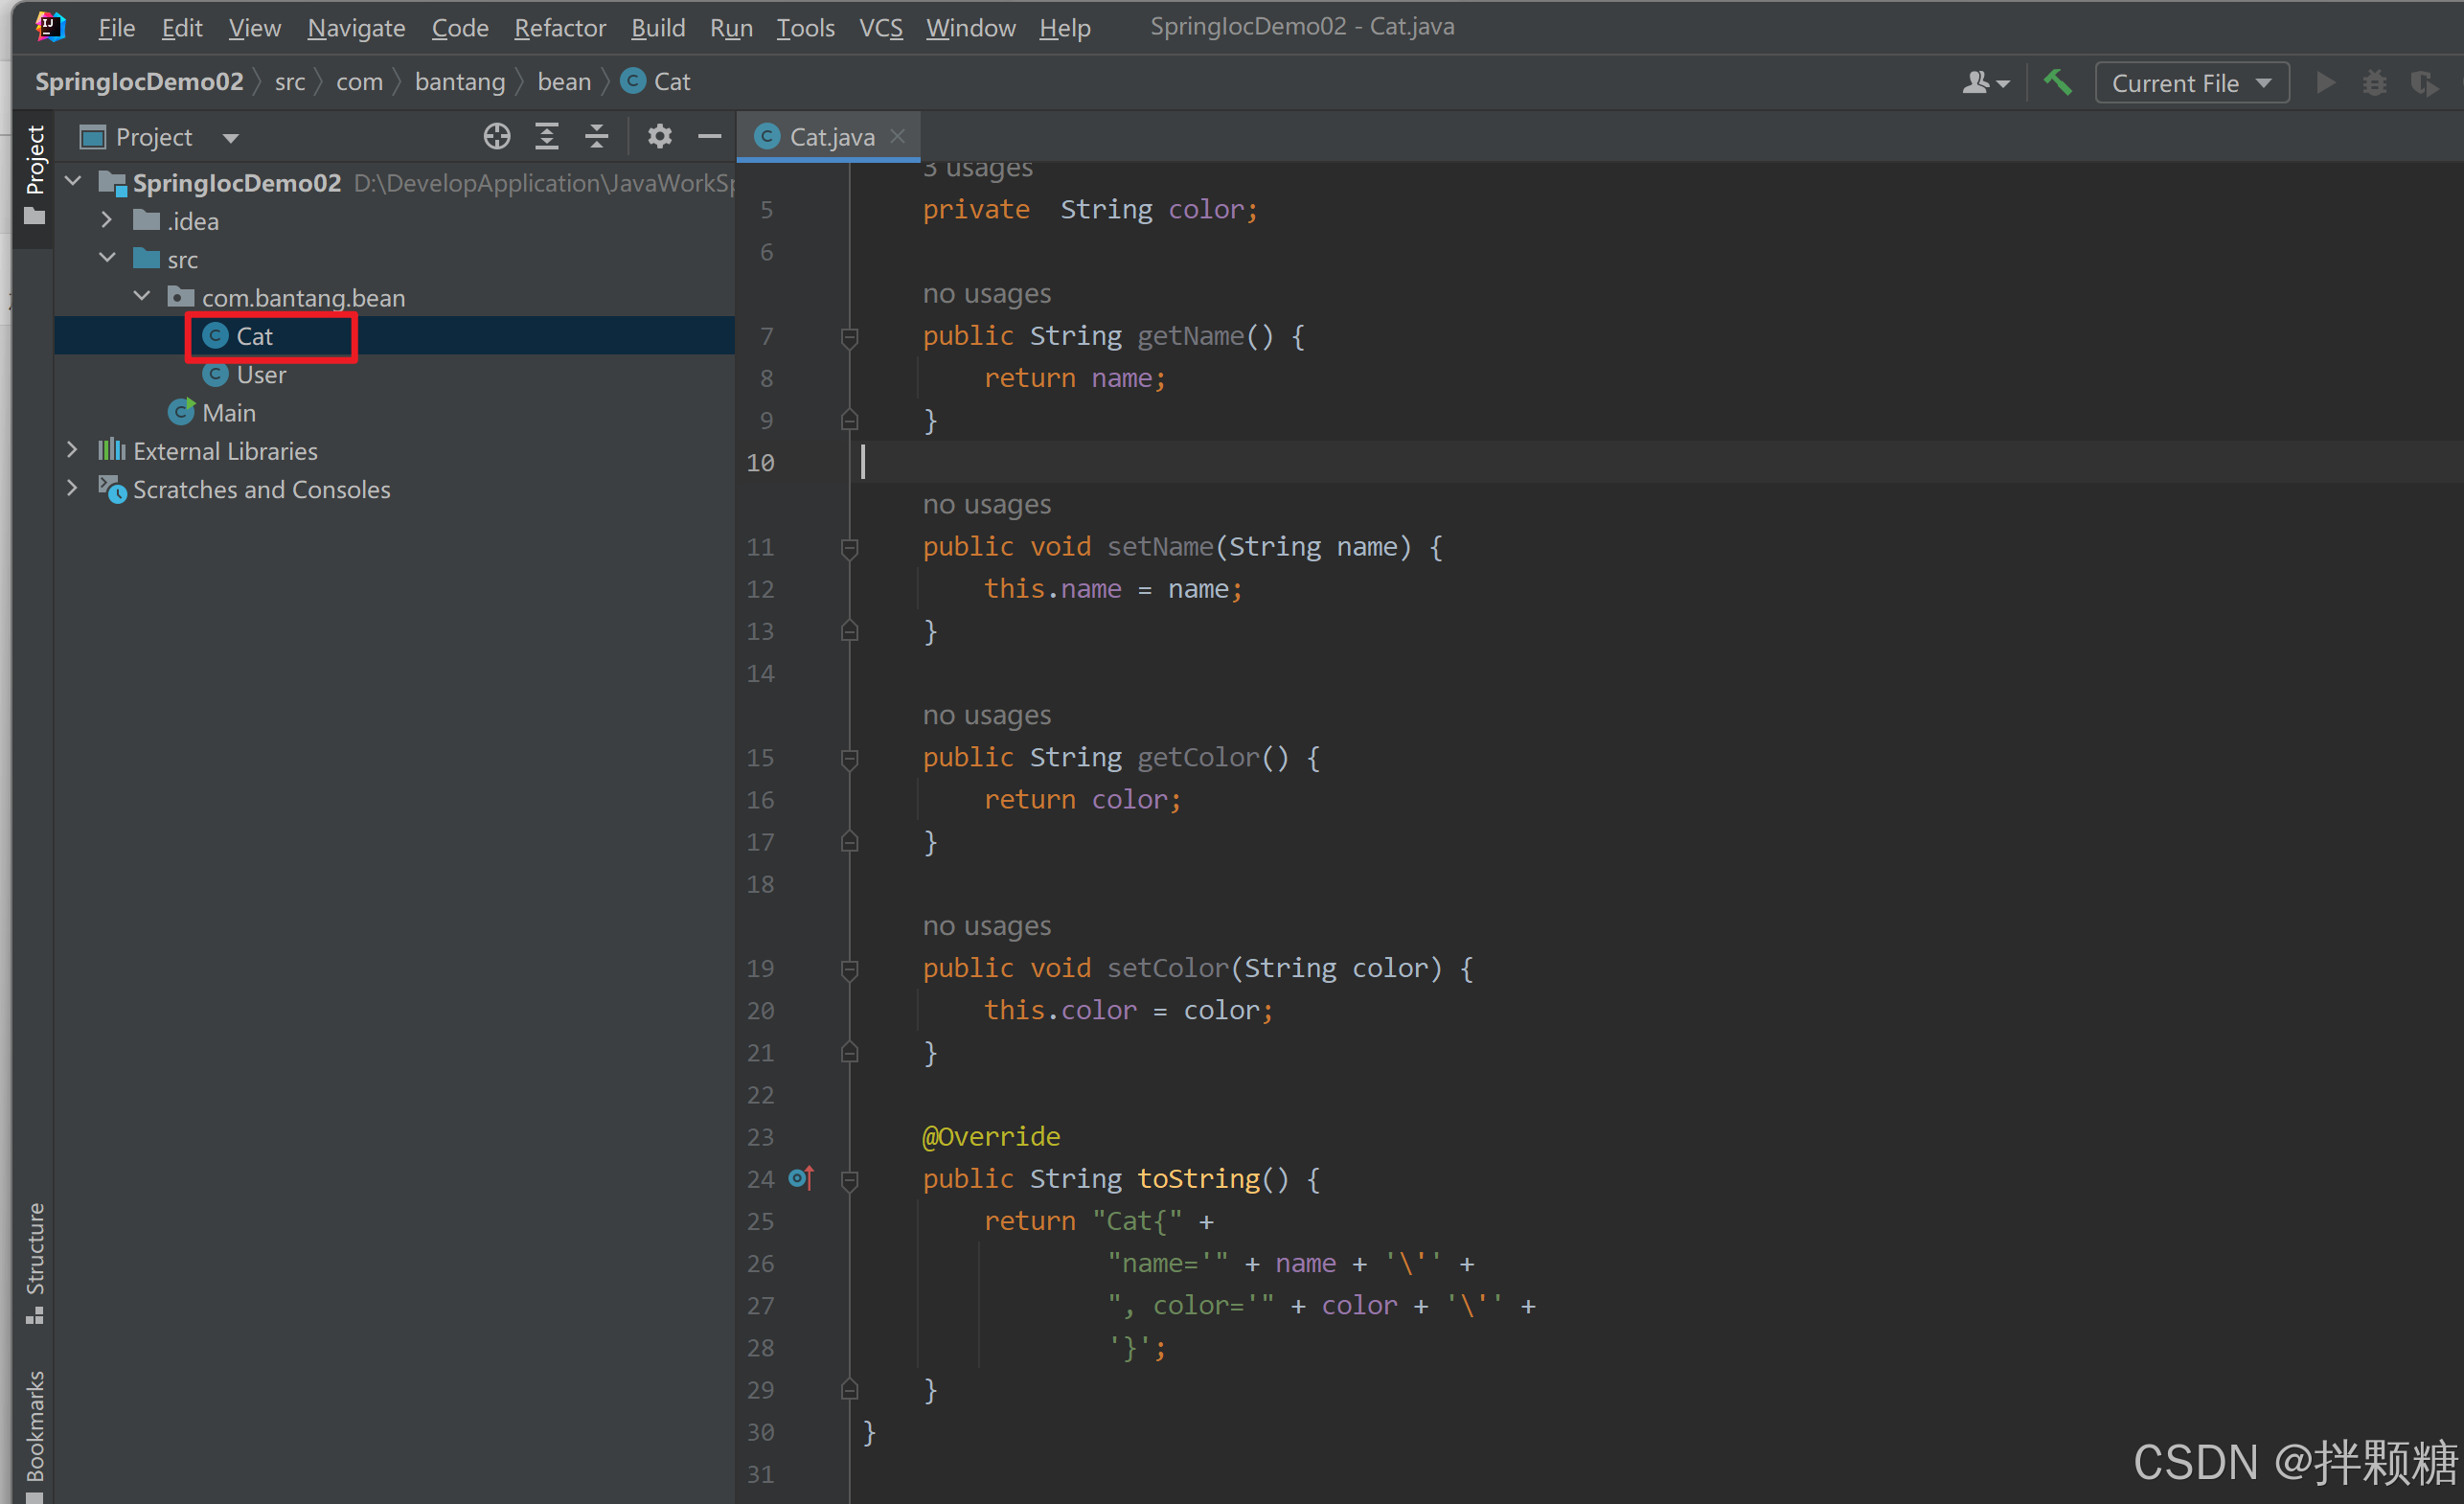
package com.bantang.bean;

public class Cat {
	private  String name;
	private  String color;

	public String getName() {
		return name;
	}

	public void setName(String name) {
		this.name = name;
	}

	public String getColor() {
		return color;
	}

	public void setColor(String color) {
		this.color = color;
	}

	@Override
	public String toString() {
		return "Cat{" +
				"name='" + name + '\'' +
				", color='" + color + '\'' +
				'}';
	}
}
自定义对象作为其他类的属性
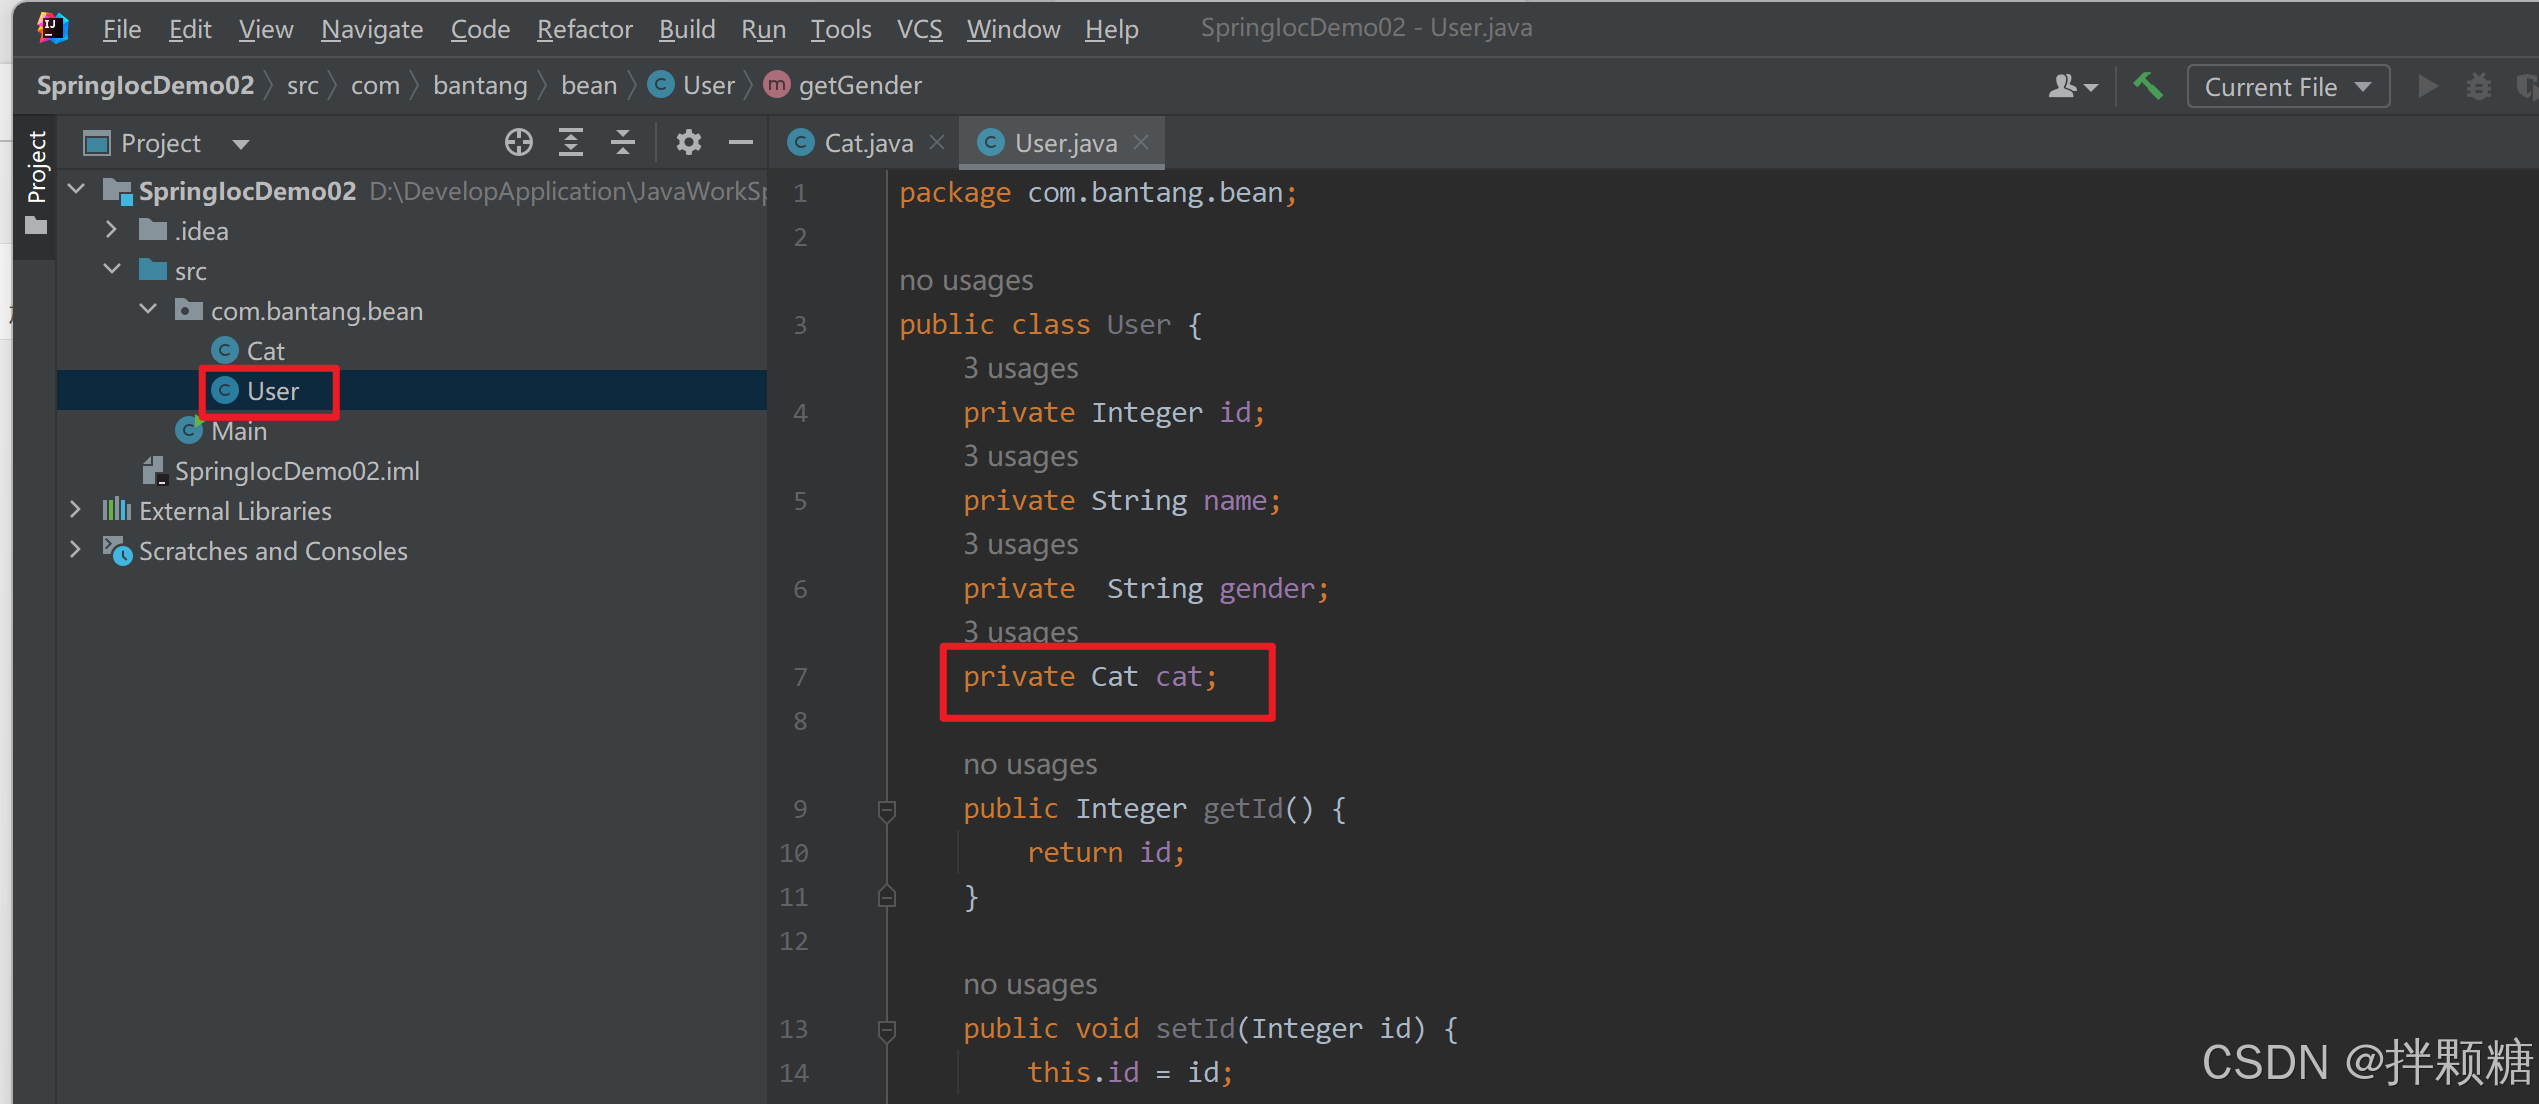
package com.bantang.bean;

public class User {
	private Integer id;
	private String name;
	private  String gender;
	private Cat cat;

	public Integer getId() {
		return id;
	}

	public void setId(Integer id) {
		this.id = id;
	}

	public String getName() {
		return name;
	}

	public void setName(String name) {
		this.name = name;
	}

	public String getGender() {
		return gender;
	}

	public void setGender(String gender) {
		this.gender = gender;
	}

	public Cat getCat() {
		return cat;
	}

	public void setCat(Cat cat) {
		this.cat = cat;
	}

	@Override
	public String toString() {
		return "User{" +
				"id=" + id +
				", name='" + name + '\'' +
				", gender='" + gender + '\'' +
				", cat=" + cat +
				'}';
	}
}
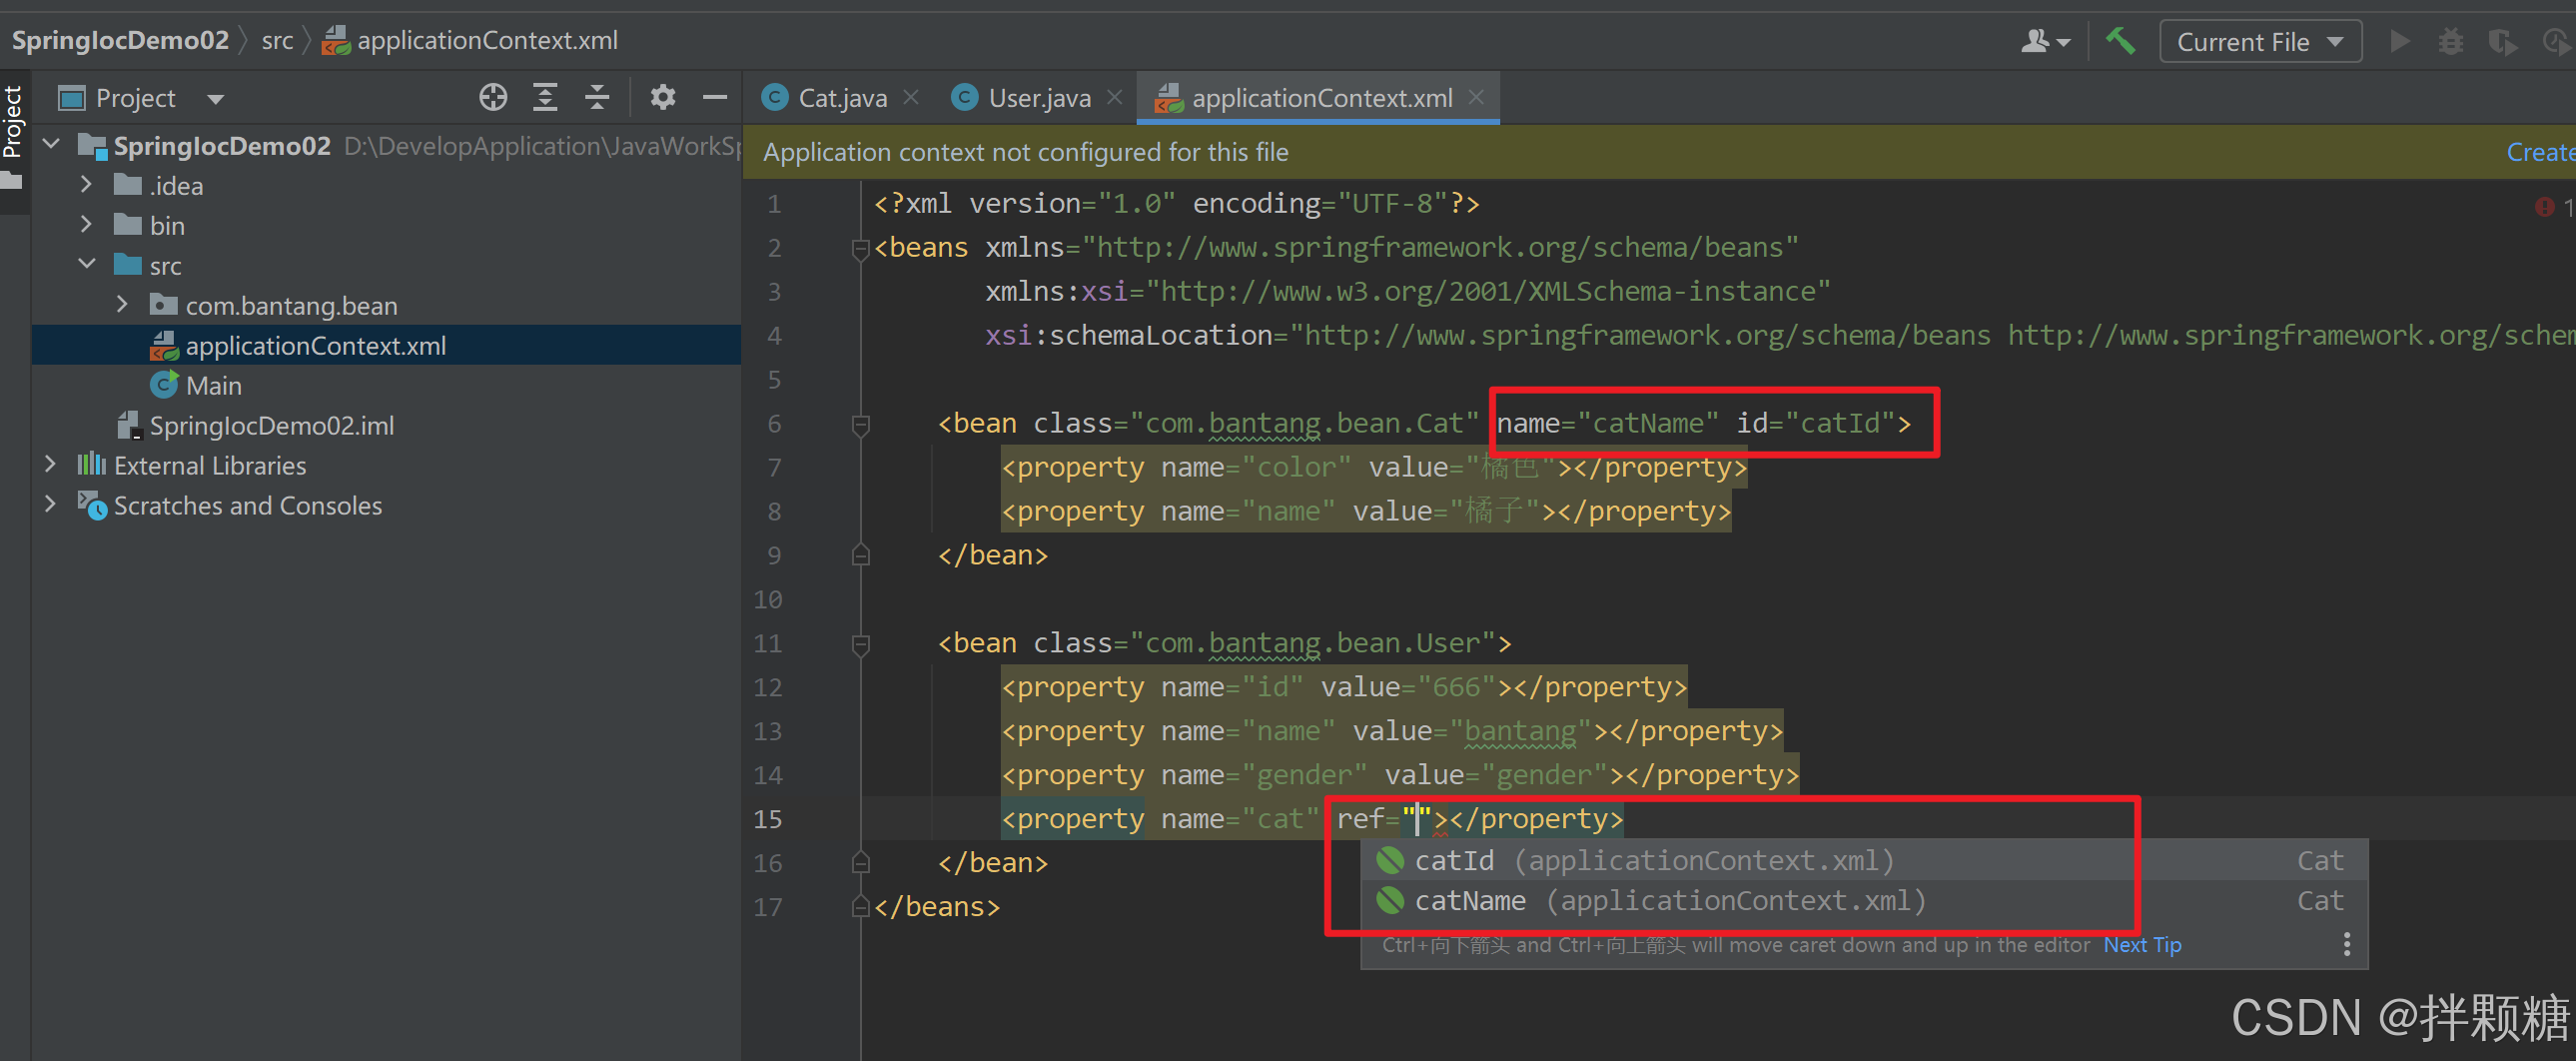
容器配置文件

cat属性是类类型 应该怎么传参呢
如下 先在容器中注册cat对象bean 然后在user对象bean中使用ref赋值
既可以用cat对象bean的id赋值,又可以用cat对象bean的name赋值
验证Demo中使用单元测试注解
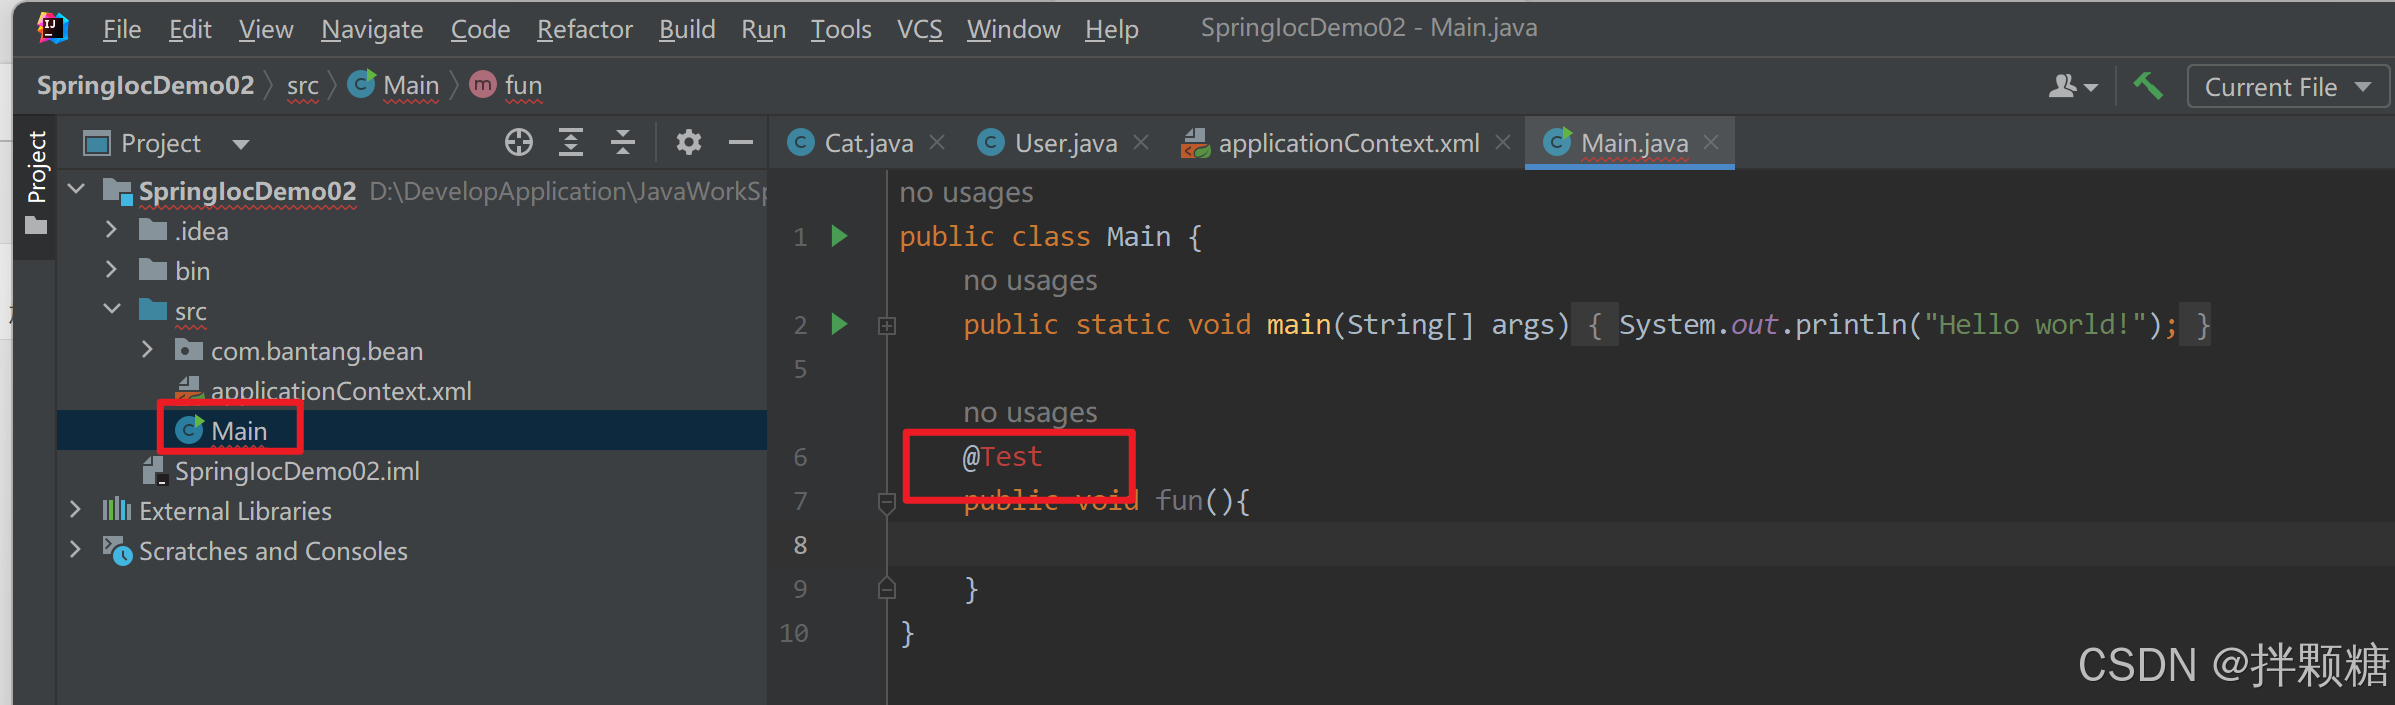
首次使用时爆红 使用alt+enter 导入一下依赖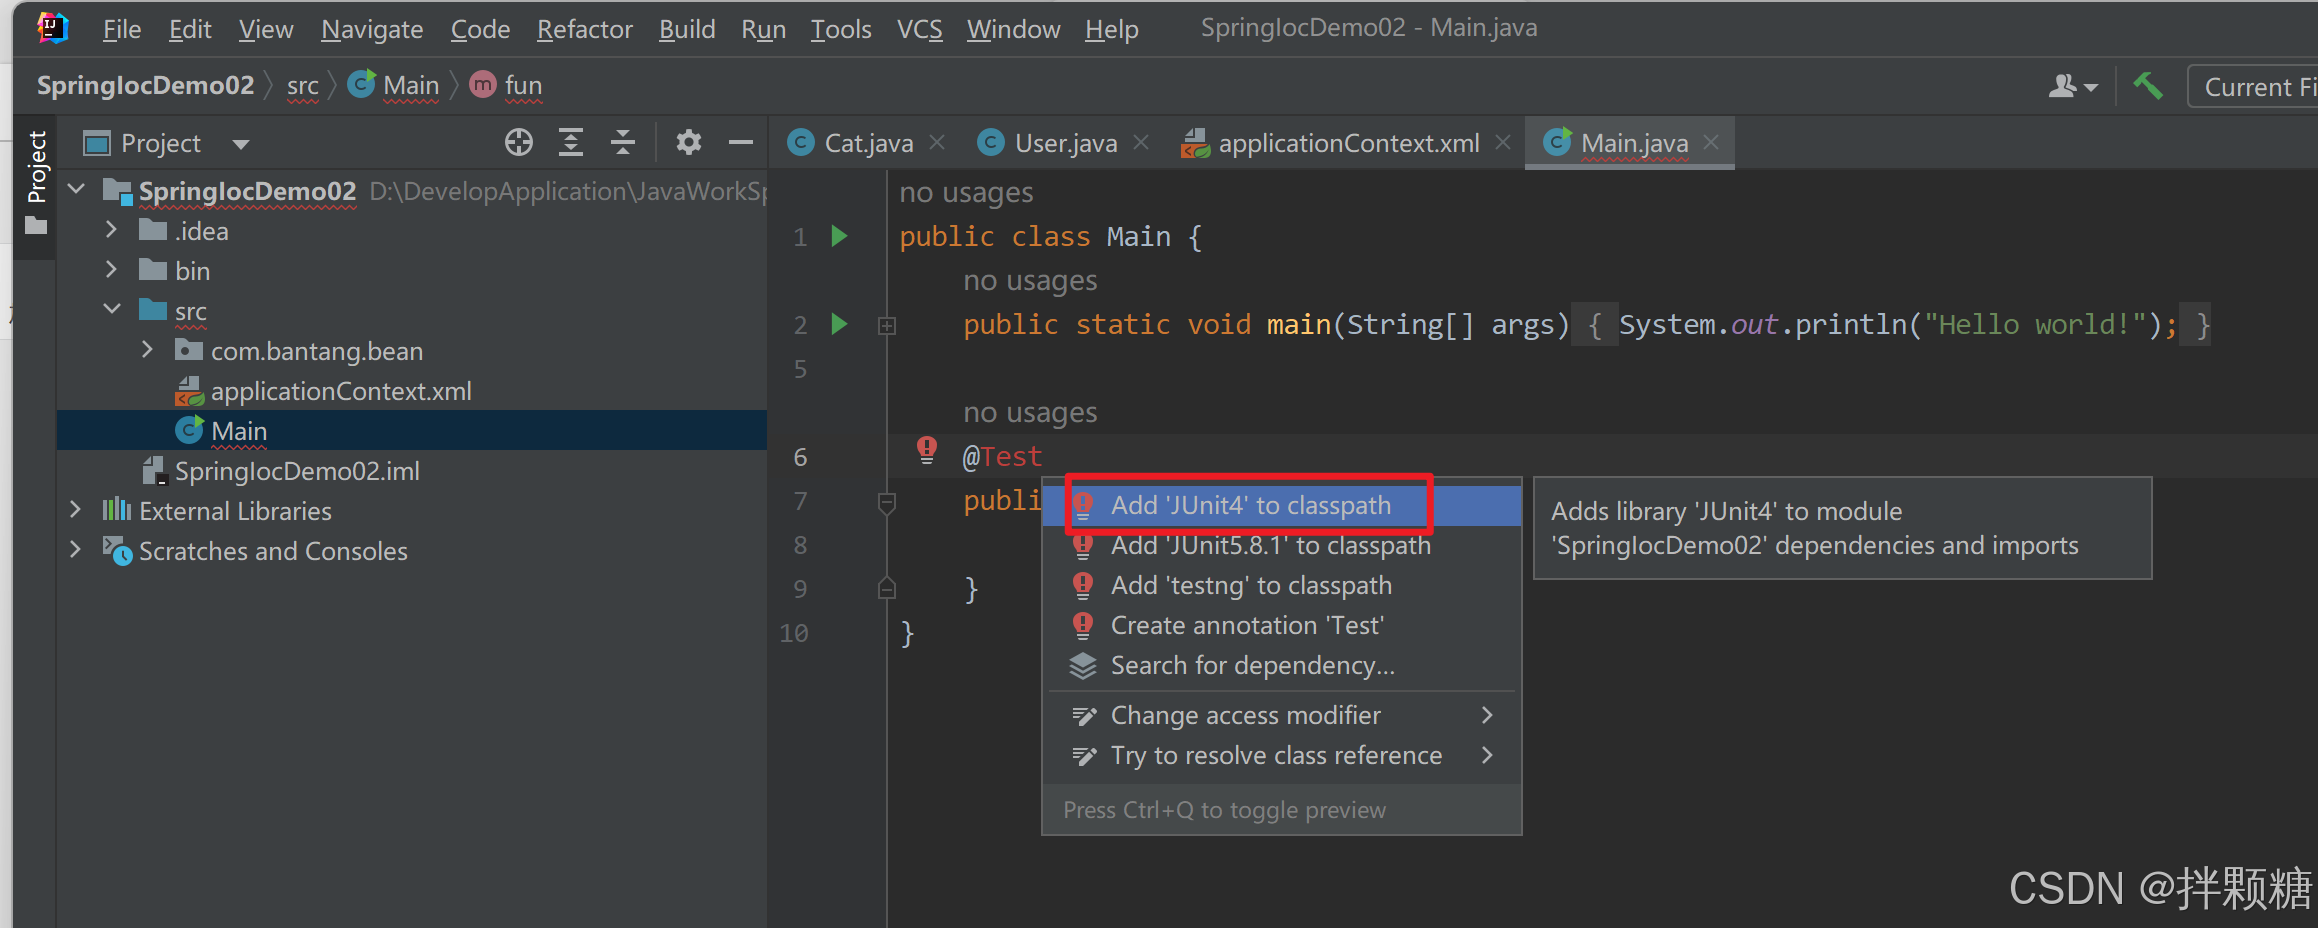
代码
<?xml version="1.0" encoding="UTF-8"?>
<beans xmlns="http://www.springframework.org/schema/beans"
	   xmlns:xsi="http://www.w3.org/2001/XMLSchema-instance"
	   xsi:schemaLocation="http://www.springframework.org/schema/beans http://www.springframework.org/schema/beans/spring-beans.xsd">

	<bean class="com.bantang.bean.Cat" name="catName" id="catId">
		<property name="color" value="橘色"></property>
		<property name="name" value="橘子"></property>
 	</bean>

	<bean class="com.bantang.bean.User">
		<property name="id" value="666"></property>
		<property name="name" value="bantang"></property>
		<property name="gender" value="gender"></property>
		<property name="cat" ref="catId"></property>
	</bean>
</beans>
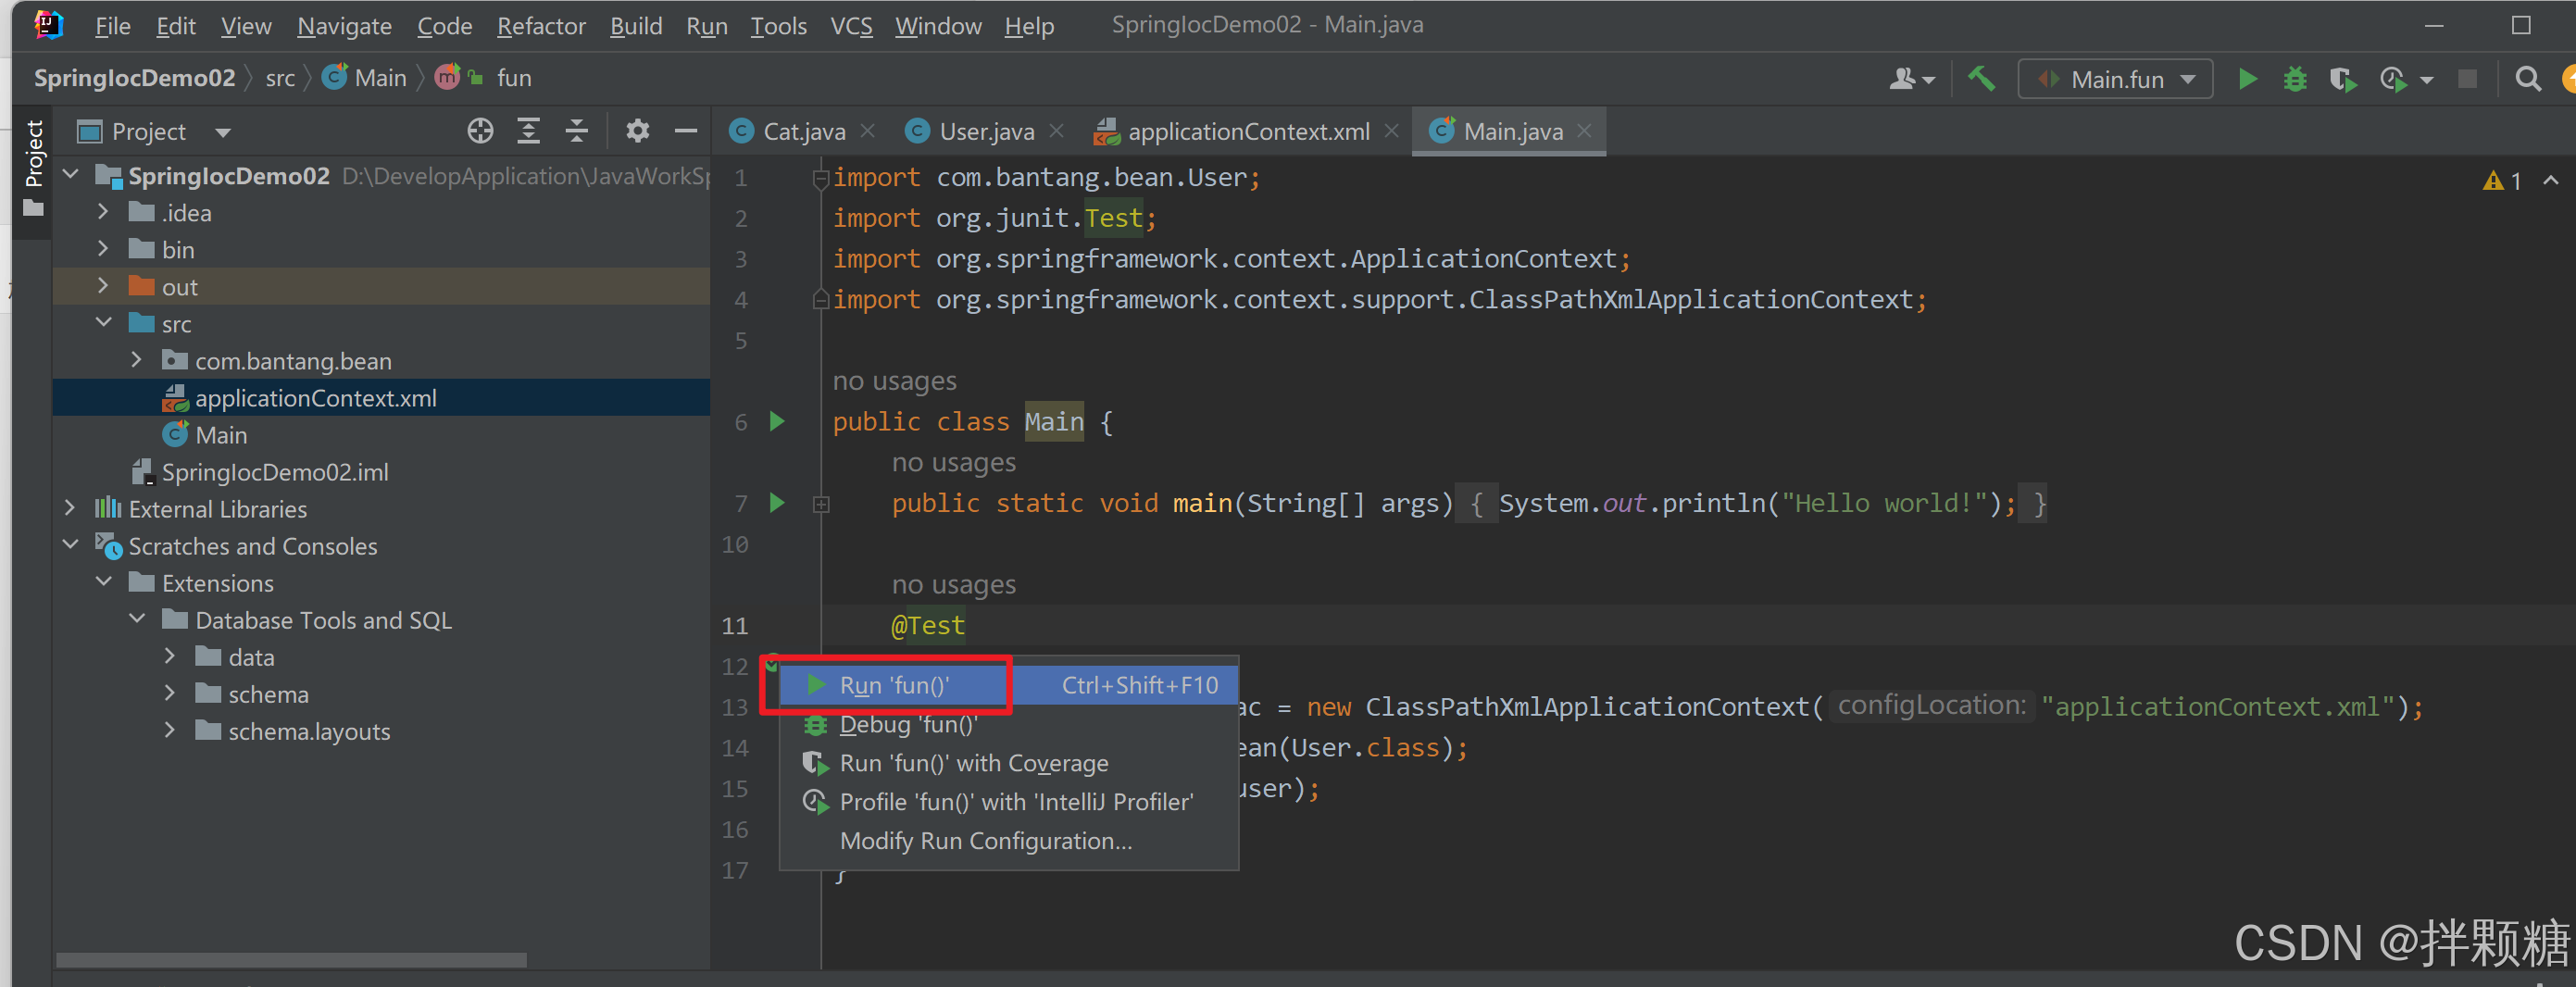
import com.bantang.bean.User;
import org.junit.Test;
import org.springframework.context.ApplicationContext;
import org.springframework.context.support.ClassPathXmlApplicationContext;

public class Main {
	public static void main(String[] args) {
		System.out.println("Hello world!");
	}

	@Test
	public void fun(){
		ApplicationContext ac = new ClassPathXmlApplicationContext("applicationContext.xml");
		User user = ac.getBean(User.class);
		System.out.println(user);
	}
}
对象注入的容器配置文件等价写法如下:
<?xml version="1.0" encoding="UTF-8"?>
<beans xmlns="http://www.springframework.org/schema/beans"
	   xmlns:xsi="http://www.w3.org/2001/XMLSchema-instance"
	   xmlns:p="http://www.springframework.org/schema/p"
	   xsi:schemaLocation="http://www.springframework.org/schema/beans http://www.springframework.org/schema/beans/spring-beans.xsd">

	<bean class="com.bantang.bean.User">
		<property name="id" value="666"></property>
		<property name="name" value="bantang"></property>
		<property name="gender" value="男"></property>
		<property name="cat">
			<bean class="com.bantang.bean.Cat" p:color="橘黄色" p:name="橘子"></bean>
		</property>
	</bean>
</beans>
Demo验证
import com.bantang.bean.User;
import org.junit.Test;
import org.springframework.context.ApplicationContext;
import org.springframework.context.support.ClassPathXmlApplicationContext;
public class Main {
public static void main(String[] args) {
System.out.println("Hello world!");
}
@Test
public void fun(){
ApplicationContext ac = new ClassPathXmlApplicationContext("applicationContext.xml");
User user = ac.getBean(User.class);
System.out.println(user);
}
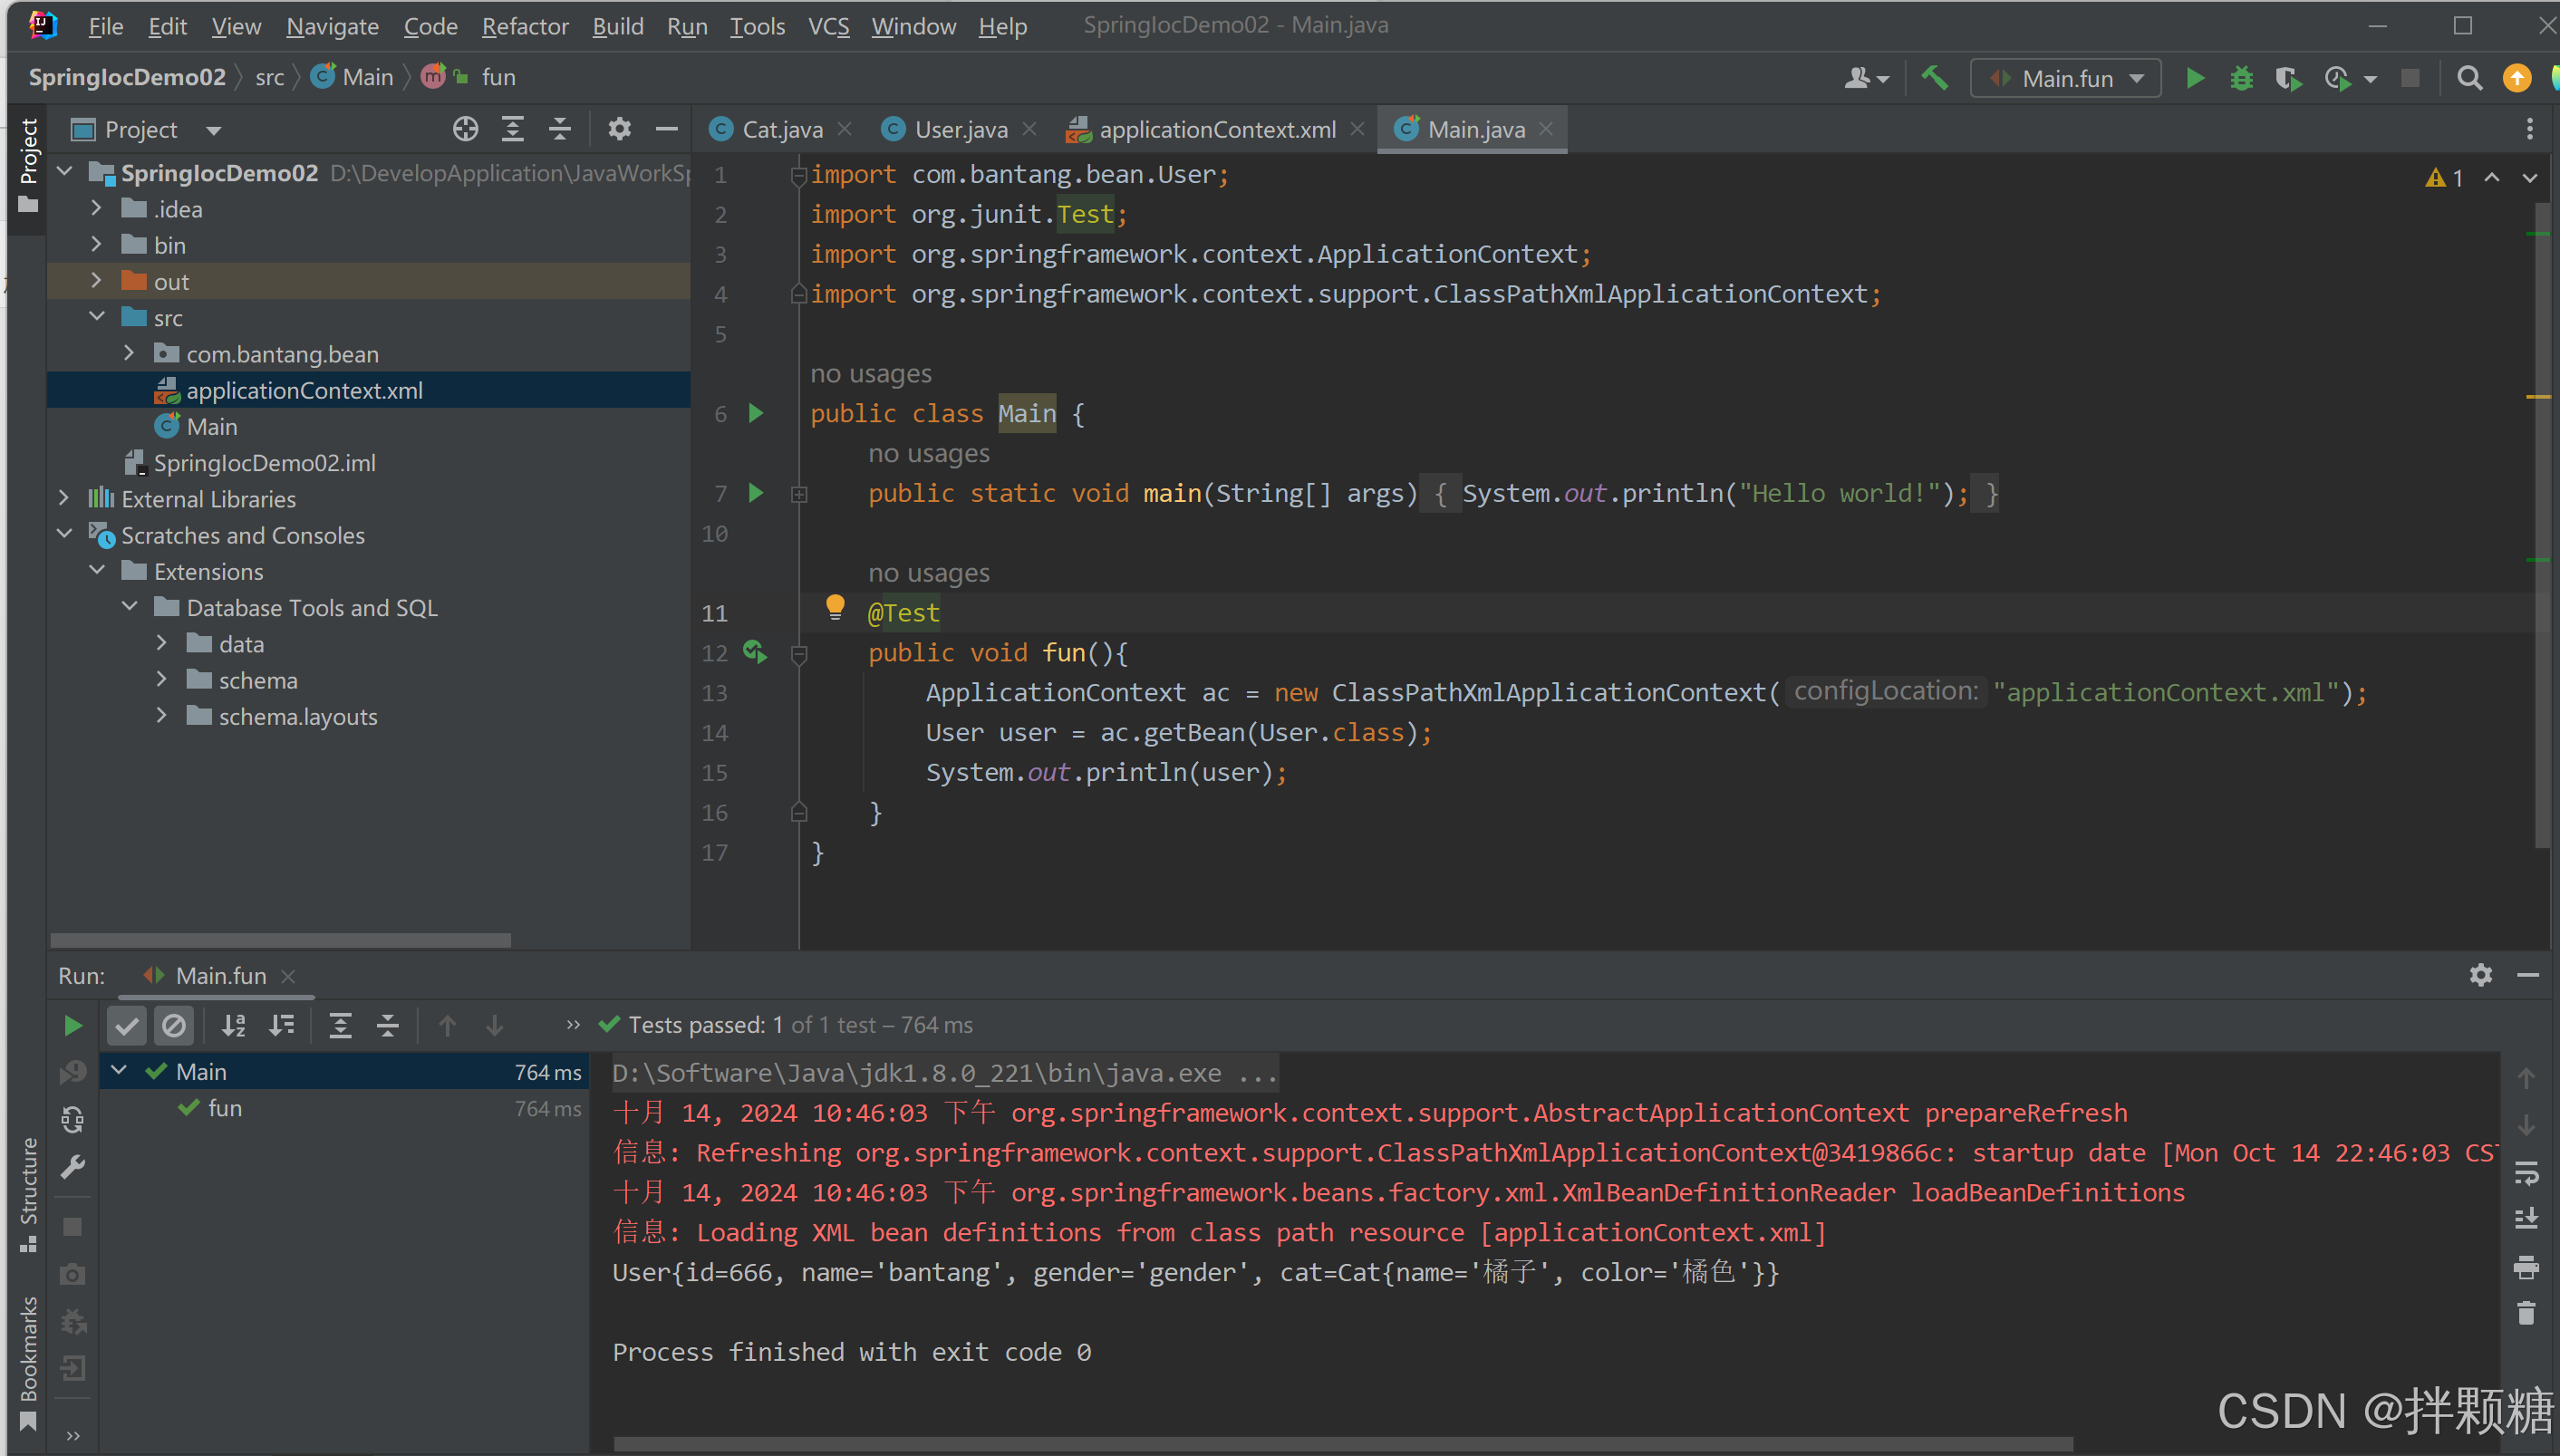
@Test
public void fun2(){
ApplicationContext ac = new ClassPathXmlApplicationContext("applicationContext_ObjectIinjection2.xml");
User user = ac.getBean(User.class);
System.out.println(user);
}
}
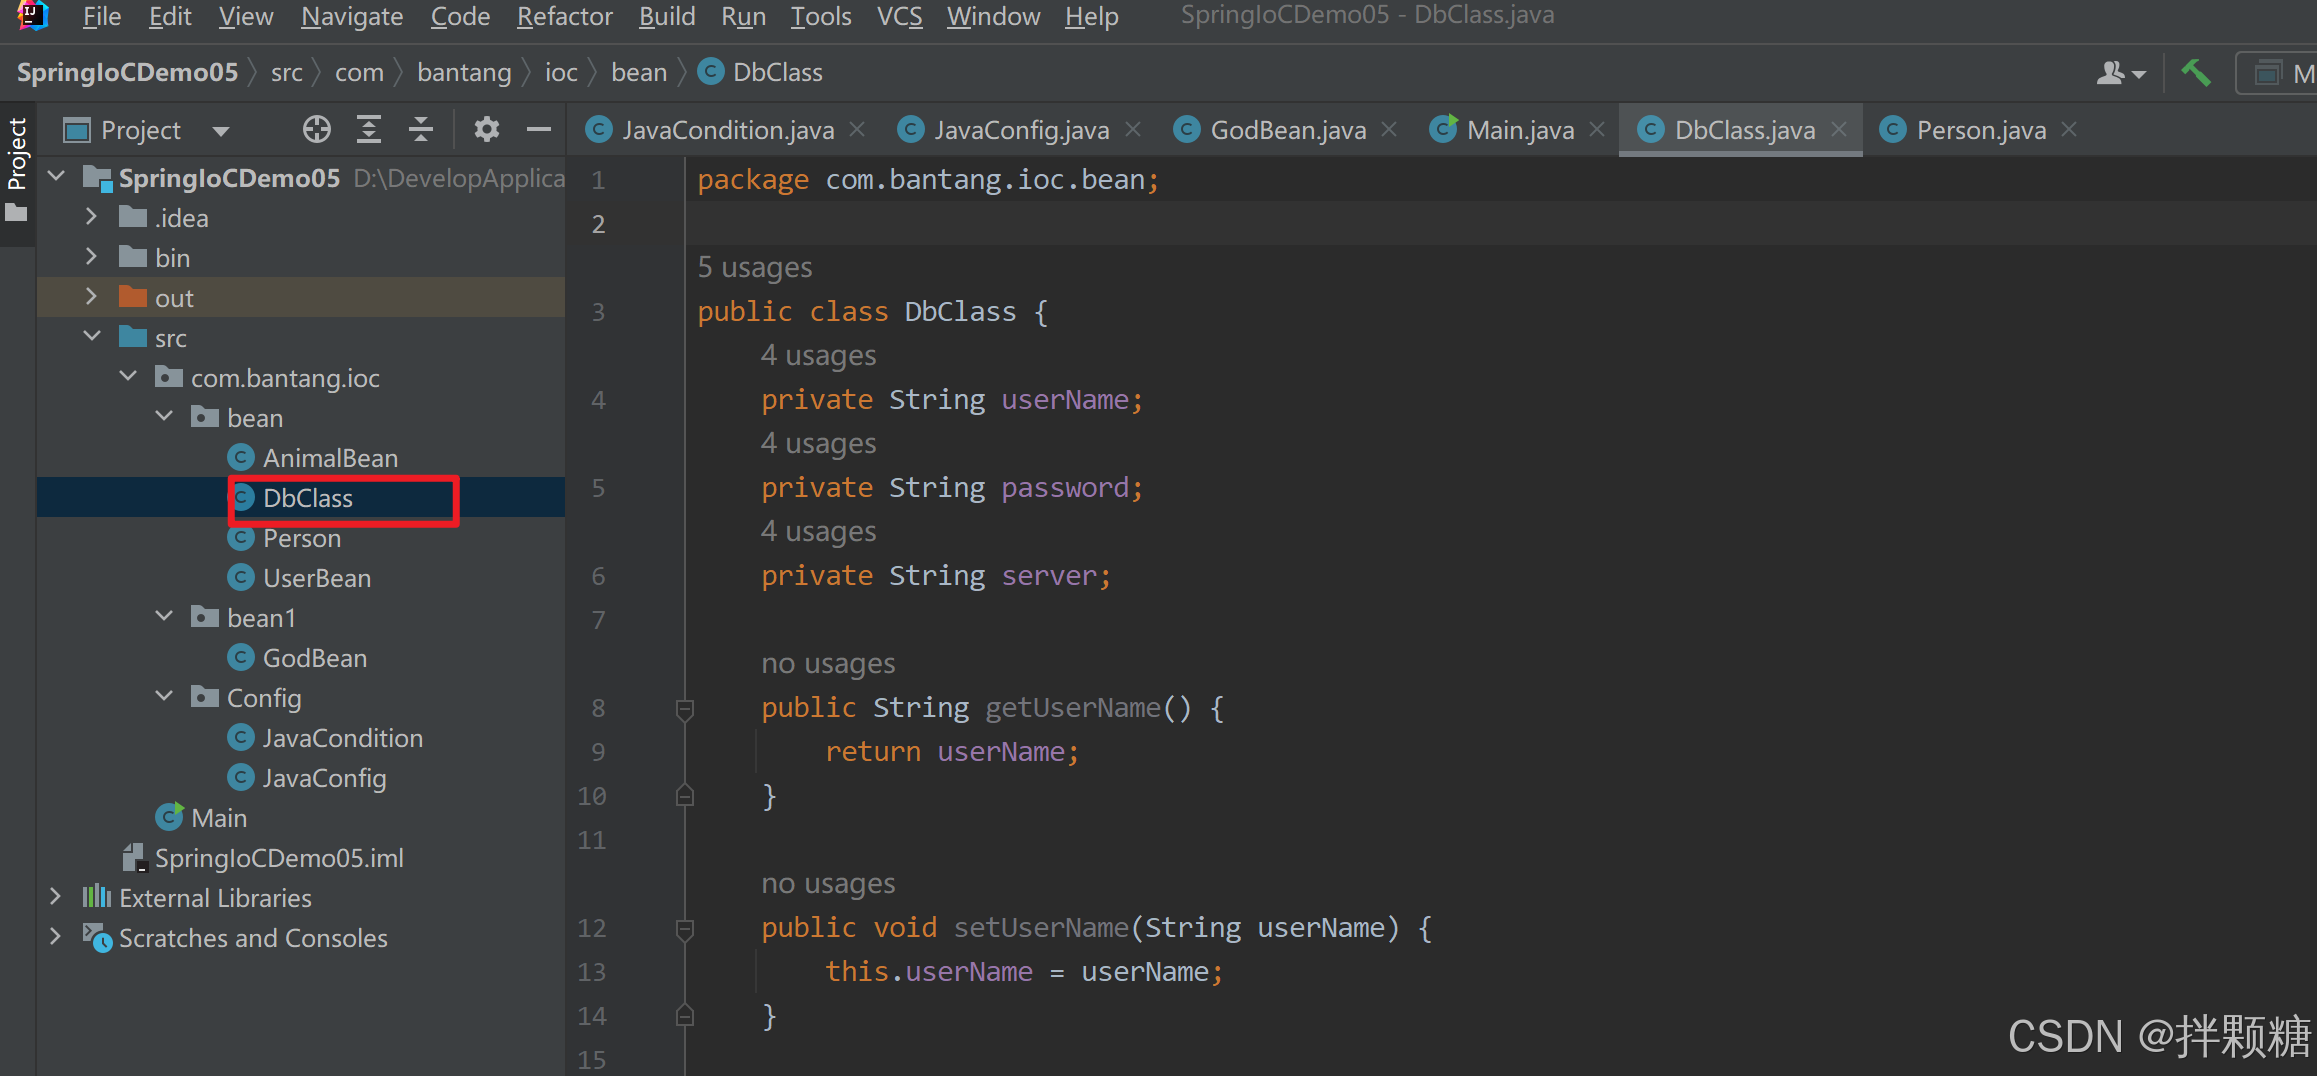
其他数据类型注入
上面的数据注入 数据类型都是基本数据类型
下面演示非基本类型数据的注入
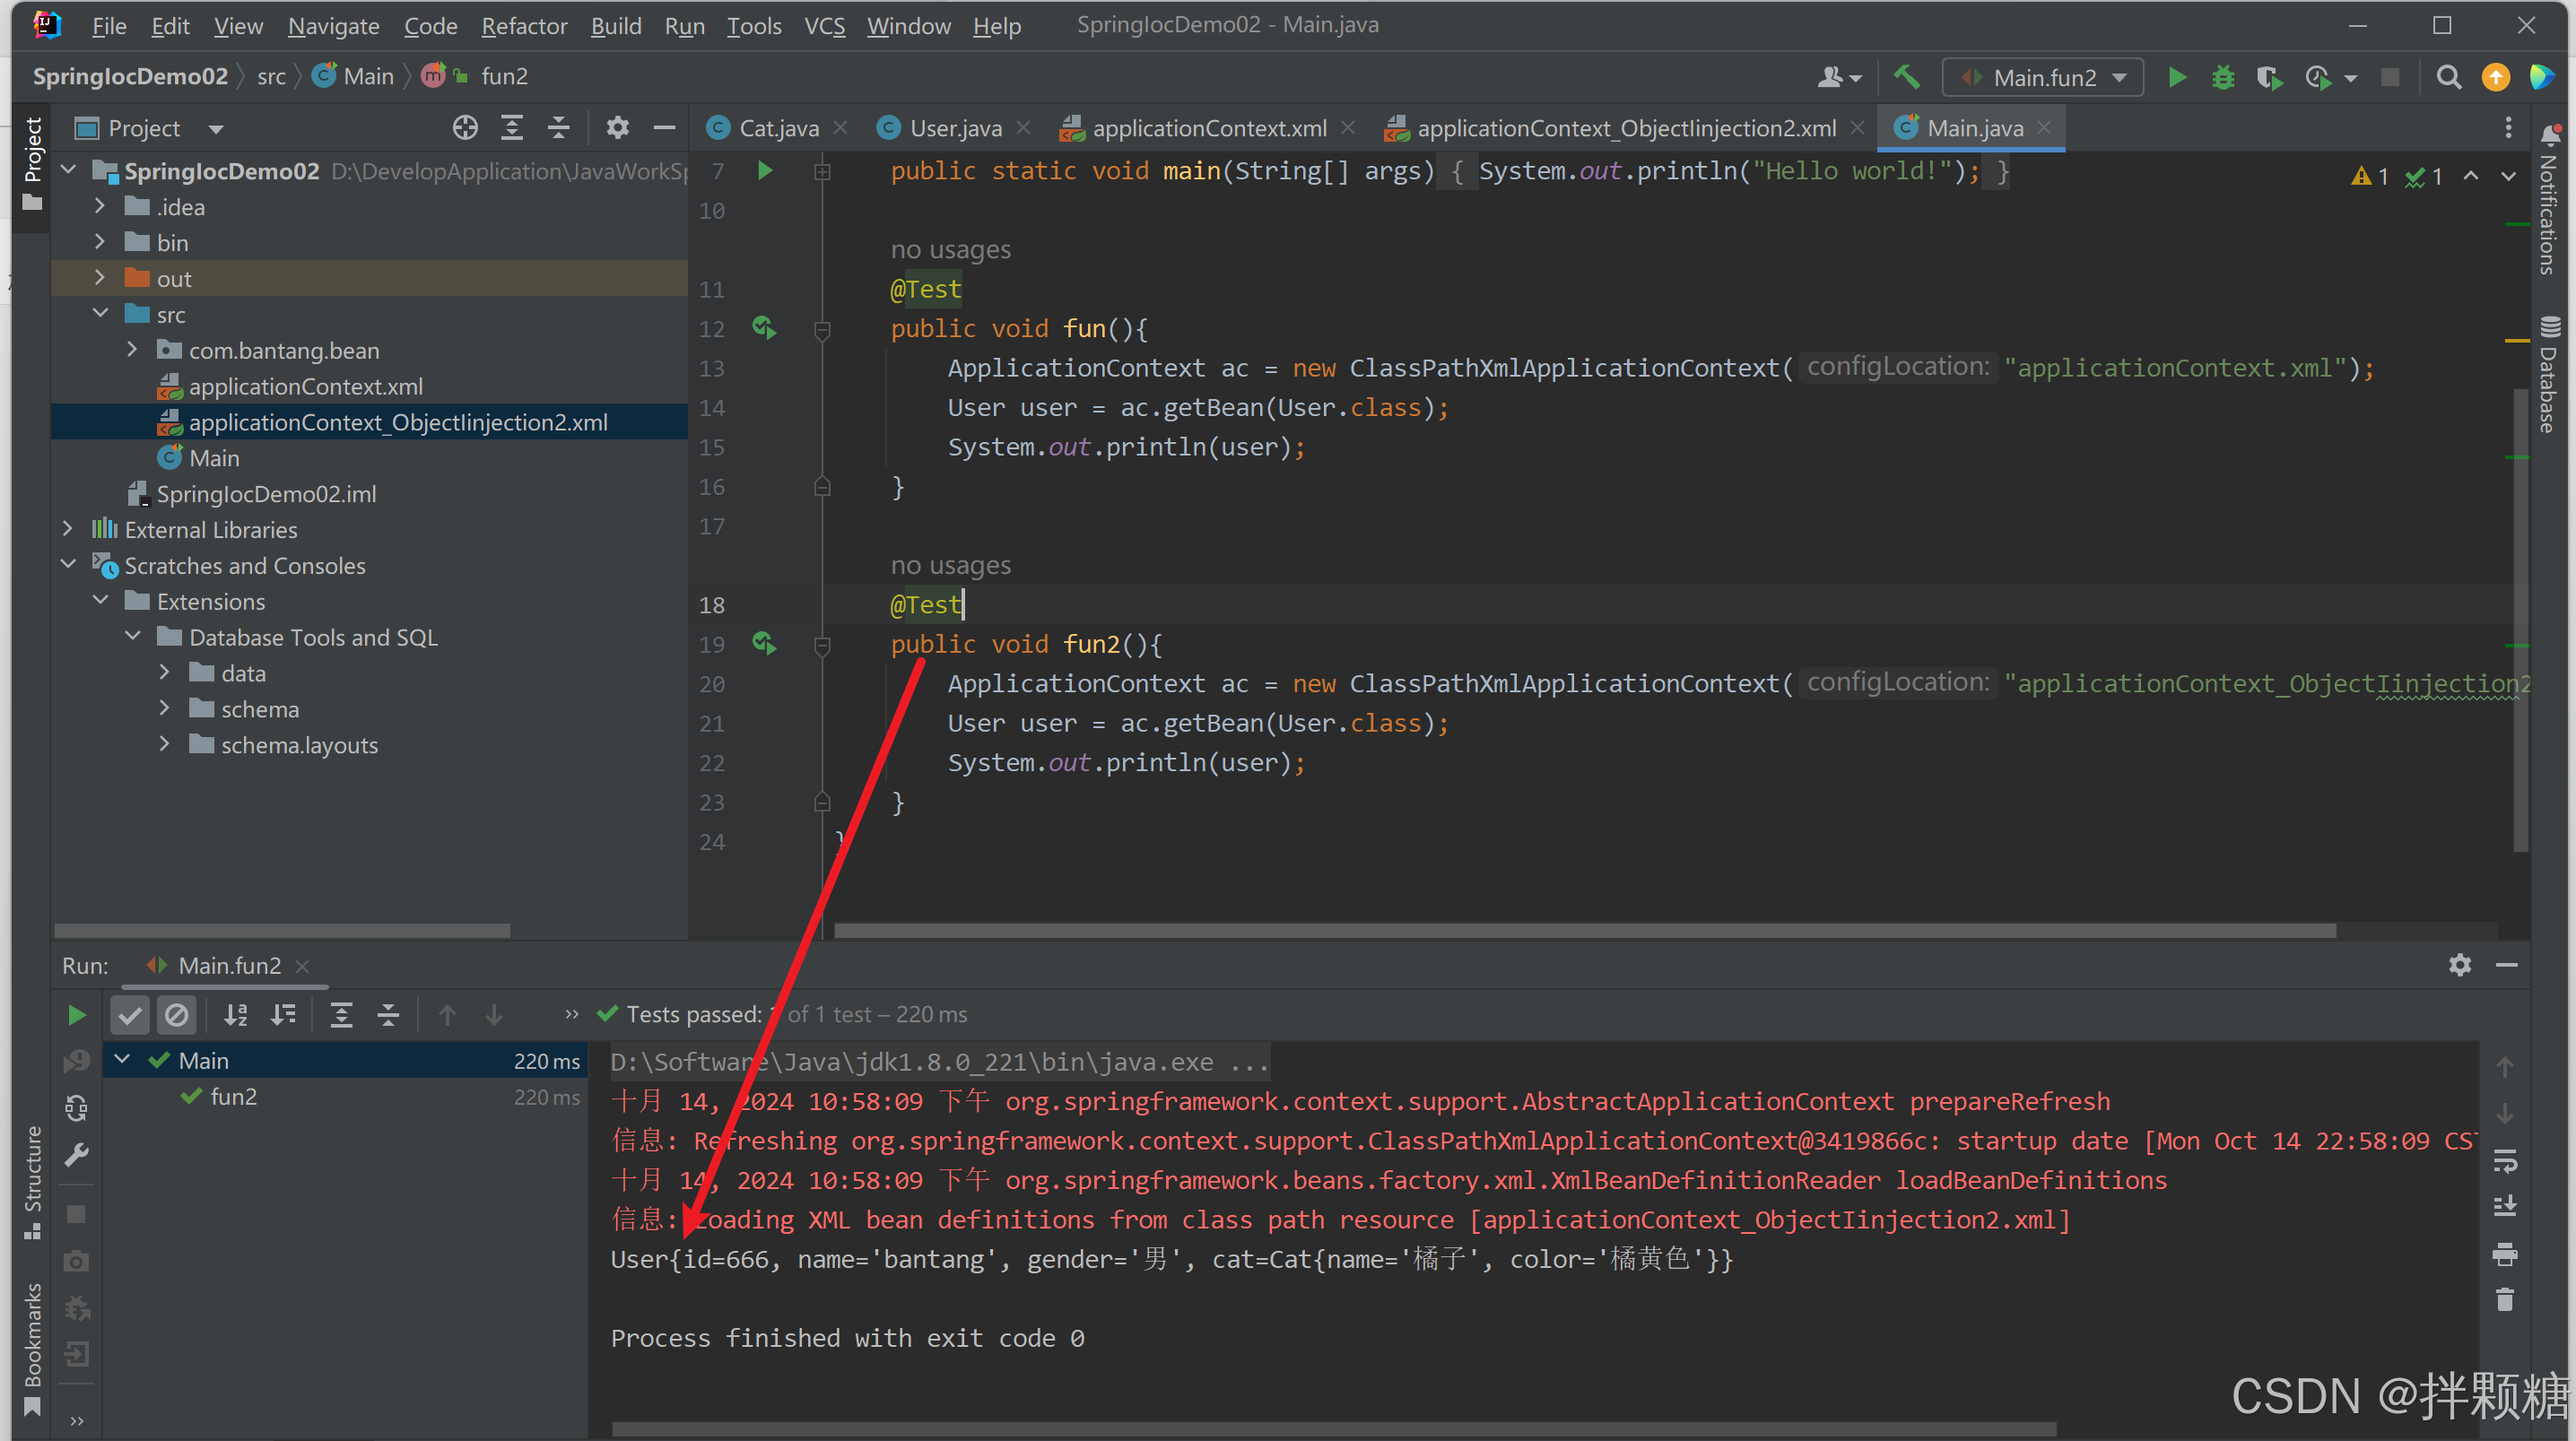
package com.bantang.bean;

import com.sun.xml.internal.ws.api.pipe.helper.PipeAdapter;

import java.util.List;
import java.util.Map;
import java.util.Properties;

public class User {
	private Integer id;
	private String name;
	private  String gender;
	private Cat cat;
	private Cat[] cats;
	private List<String> books;
	private Map<String, Object> scores;
	private Properties properties;


	public Integer getId() {
		return id;
	}

	public void setId(Integer id) {
		this.id = id;
	}

	public String getName() {
		return name;
	}

	public void setName(String name) {
		this.name = name;
	}

	public String getGender() {
		return gender;
	}

	public void setGender(String gender) {
		this.gender = gender;
	}

	public Cat getCat() {
		return cat;
	}

	public void setCat(Cat cat) {
		this.cat = cat;
	}

	public Cat[] getCats() {
		return cats;
	}

	public void setCats(Cat[] cats) {
		this.cats = cats;
	}

	public List<String> getBooks() {
		return books;
	}

	public void setBooks(List<String> books) {
		this.books = books;
	}

	public Map<String, Object> getScores() {
		return scores;
	}

	public void setScores(Map<String, Object> scores) {
		this.scores = scores;
	}

	public Properties getProperties() {
		return properties;
	}

	public void setProperties(Properties properties) {
		this.properties = properties;
	}

	@Override
	public String toString() {
		return "User{" +
				"id=" + id +
				", name='" + name + '\'' +
				", gender='" + gender + '\'' +
				", cat=" + cat +
				'}';
	}
}
<?xml version="1.0" encoding="UTF-8"?>
<beans xmlns="http://www.springframework.org/schema/beans"
	   xmlns:xsi="http://www.w3.org/2001/XMLSchema-instance"
	   xmlns:p="http://www.springframework.org/schema/p"
	   xsi:schemaLocation="http://www.springframework.org/schema/beans http://www.springframework.org/schema/beans/spring-beans.xsd">

	<bean class="com.bantang.bean.User">
		<!--基本类型数据注入-->
		<property name="id" value="666"></property>
		<property name="name" value="bantang"></property>
		<property name="gender" value="男"></property>
		<!--类类型数据注入-->
		<property name="cat">
			<bean class="com.bantang.bean.Cat" p:color="橘黄色" p:name="橘子"></bean>
		</property>
		<!--数组类型数据注入-->
		<property name="cats">
			<array>
				<bean class="com.bantang.bean.Cat" p:color="狸花" p:name="虎子"></bean>
				<bean class="com.bantang.bean.Cat" p:color="黑色" p:name="二黑"></bean>
				<bean class="com.bantang.bean.Cat" p:color="三花" p:name="妞妞"></bean>
			</array>
		</property>
		<!--List类型数据注入-->
		<property name="books">
			<list>
				<value>意林</value>
				<value>青年文摘</value>
				<value>读者</value>
			</list>
		</property>
		<!--Map类型数据注入-->
		<property name="scores">
			<map>
				<description>绩效考核</description>
				<entry key="考勤" value="100"></entry>
				<entry key="加班" value="80"></entry>
				<entry key="CIP" value="70"></entry>
			</map>
		</property>
		<!--Properties类型数据注入-->
		<property name="properties">
			<props>
				<prop key="username">bantang</prop>
				<prop key="password">root@123*</prop>
			</props>
		</property>
	</bean>
</beans>
import com.bantang.bean.User;
import org.junit.Test;
import org.springframework.context.ApplicationContext;
import org.springframework.context.support.ClassPathXmlApplicationContext;
import java.util.Arrays;
import java.util.Map;
import java.util.Properties;
import java.util.Set;
public class Main {
public static void main(String[] args) {
System.out.println("Hello world!");
}
@Test
public void fun(){
ApplicationContext ac = new ClassPathXmlApplicationContext("applicationContext.xml");
User user = ac.getBean(User.class);
System.out.println(user);
}
@Test
public void fun2(){
ApplicationContext ac = new ClassPathXmlApplicationContext("applicationContext_ObjectIinjection2.xml");
User user = ac.getBean(User.class);
System.out.println(user);
}
@Test
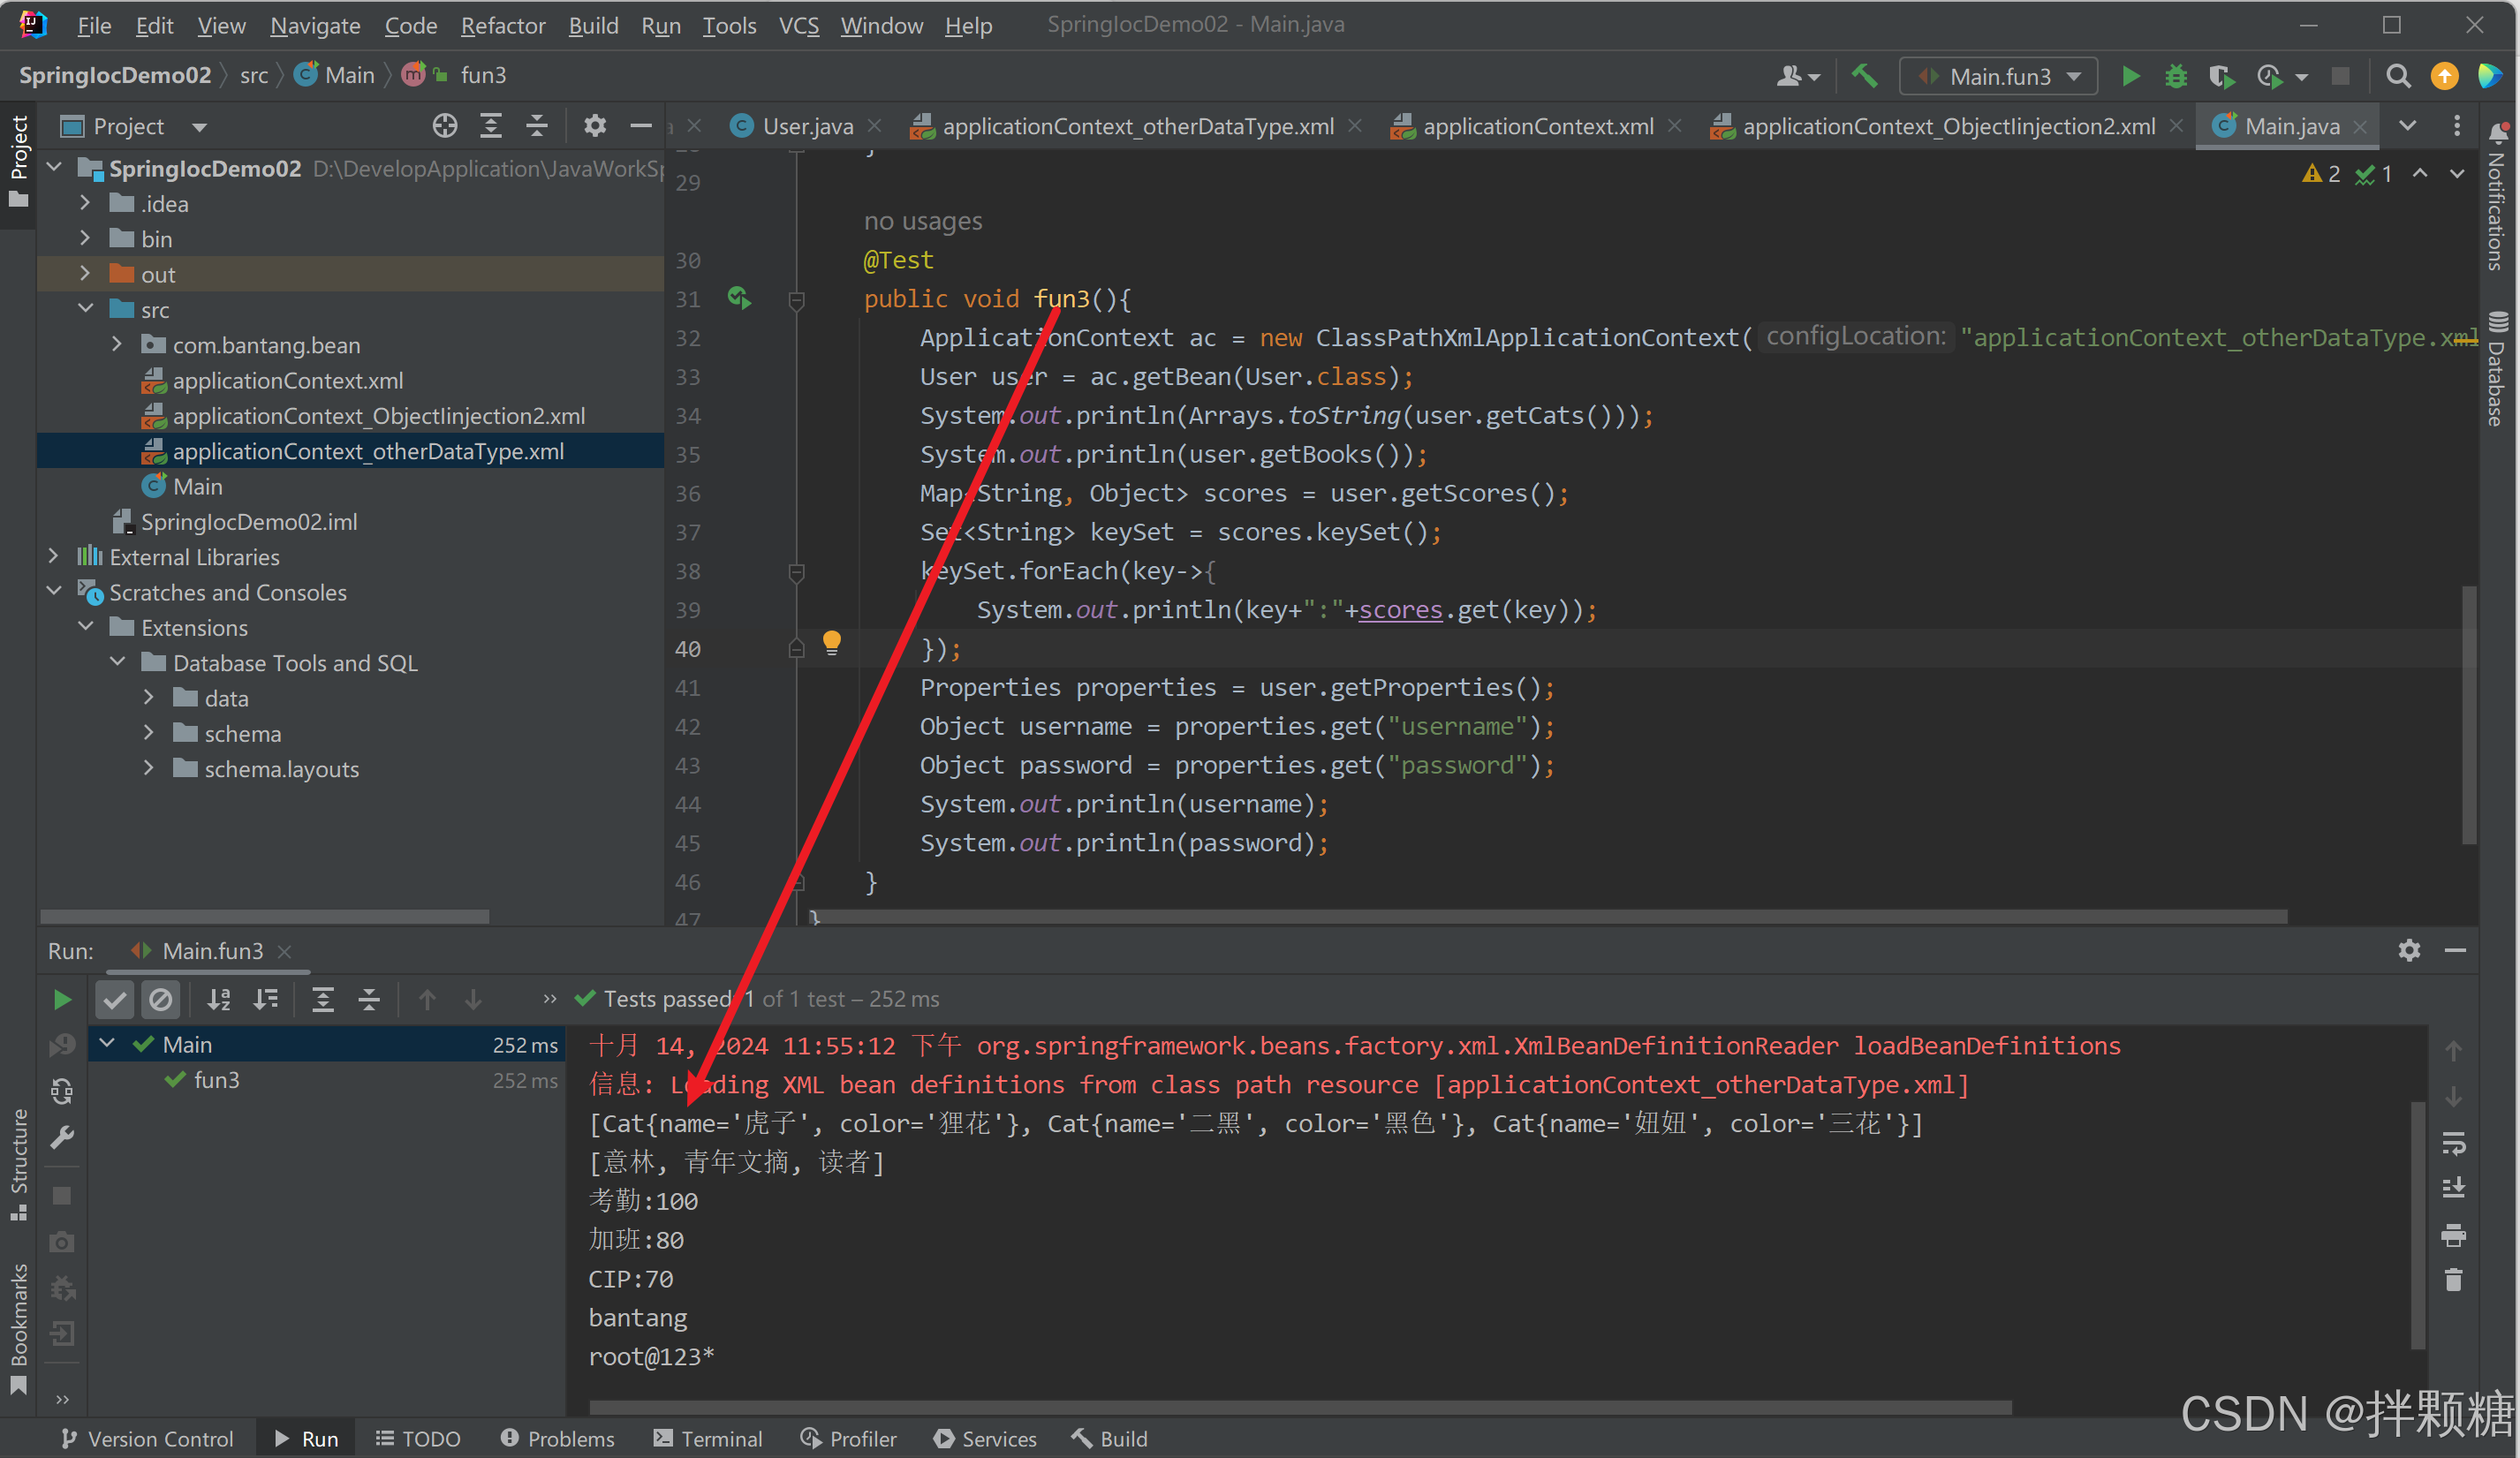
public void fun3(){
ApplicationContext ac = new ClassPathXmlApplicationContext("applicationContext_otherDataType.xml");
User user = ac.getBean(User.class);
System.out.println(Arrays.toString(user.getCats()));
System.out.println(user.getBooks());
Map<String, Object> scores = user.getScores();
Set<String> keySet = scores.keySet();
keySet.forEach(key->{
System.out.println(key+":"+scores.get(key));
});
Properties properties = user.getProperties();
Object username = properties.get("username");
Object password = properties.get("password");
System.out.println(username);
System.out.println(password);
}
}
注解注入
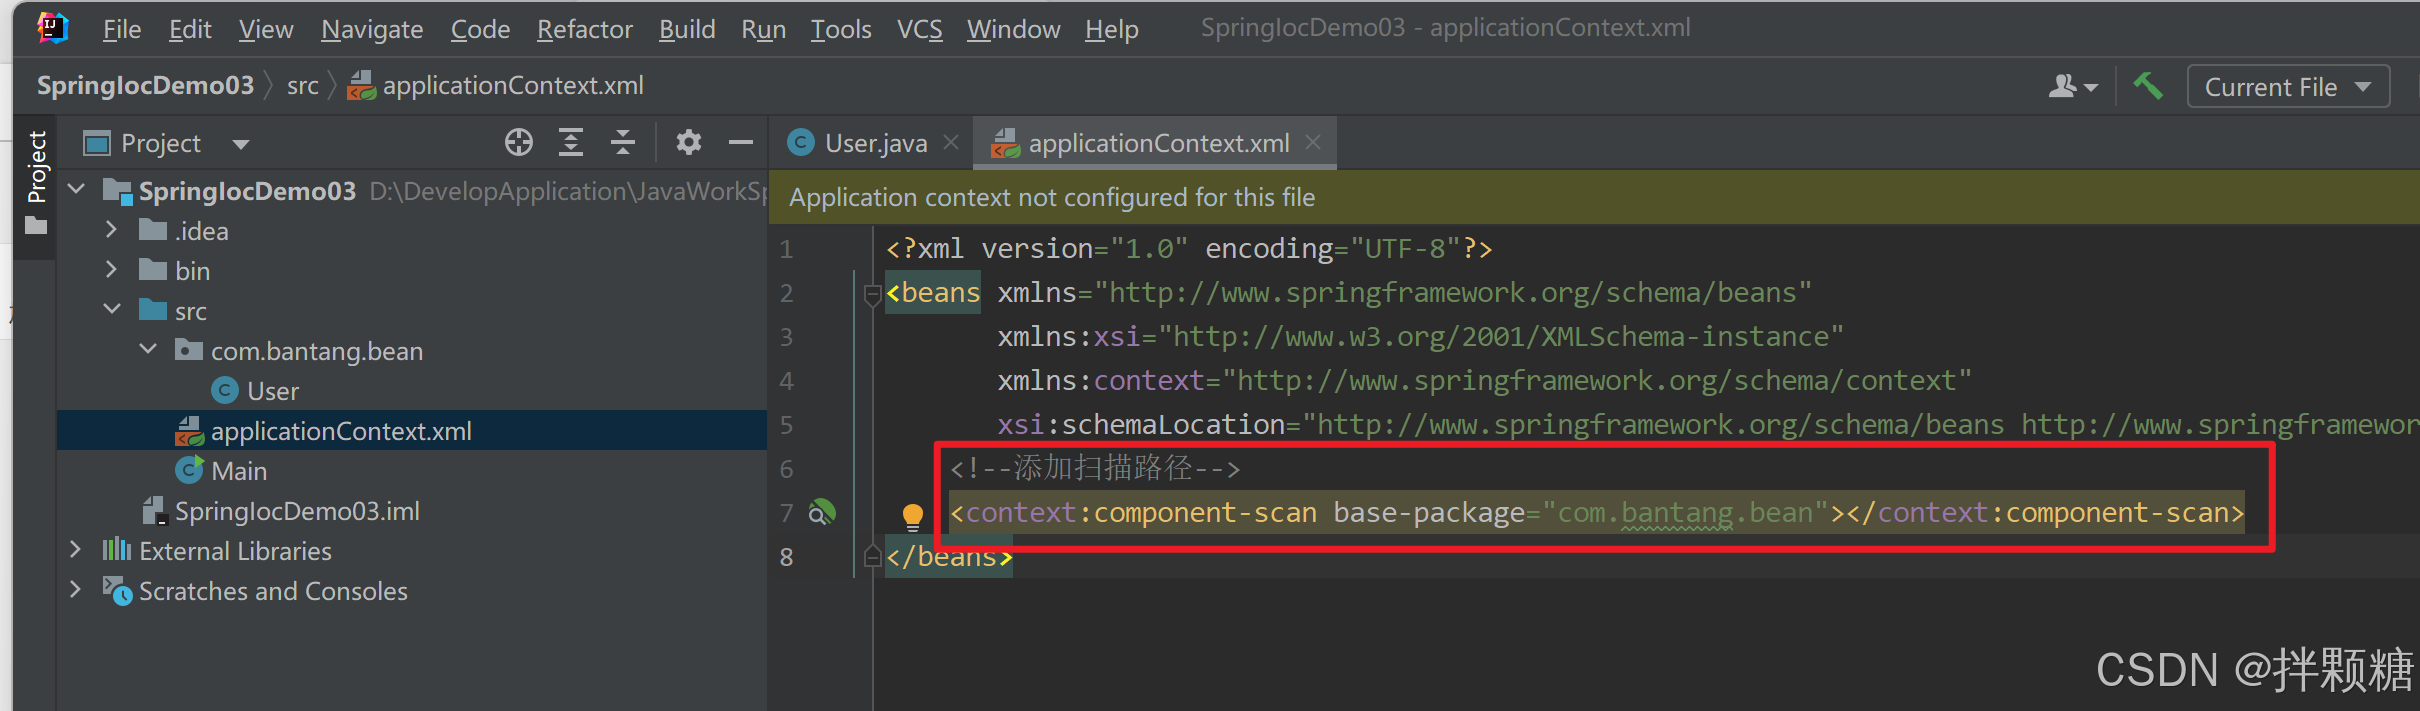
在容器配置文件中注册大量bean时,配置文件是不是越来越复杂,越来越难用,所以,我们需要引入注解
导入jar包
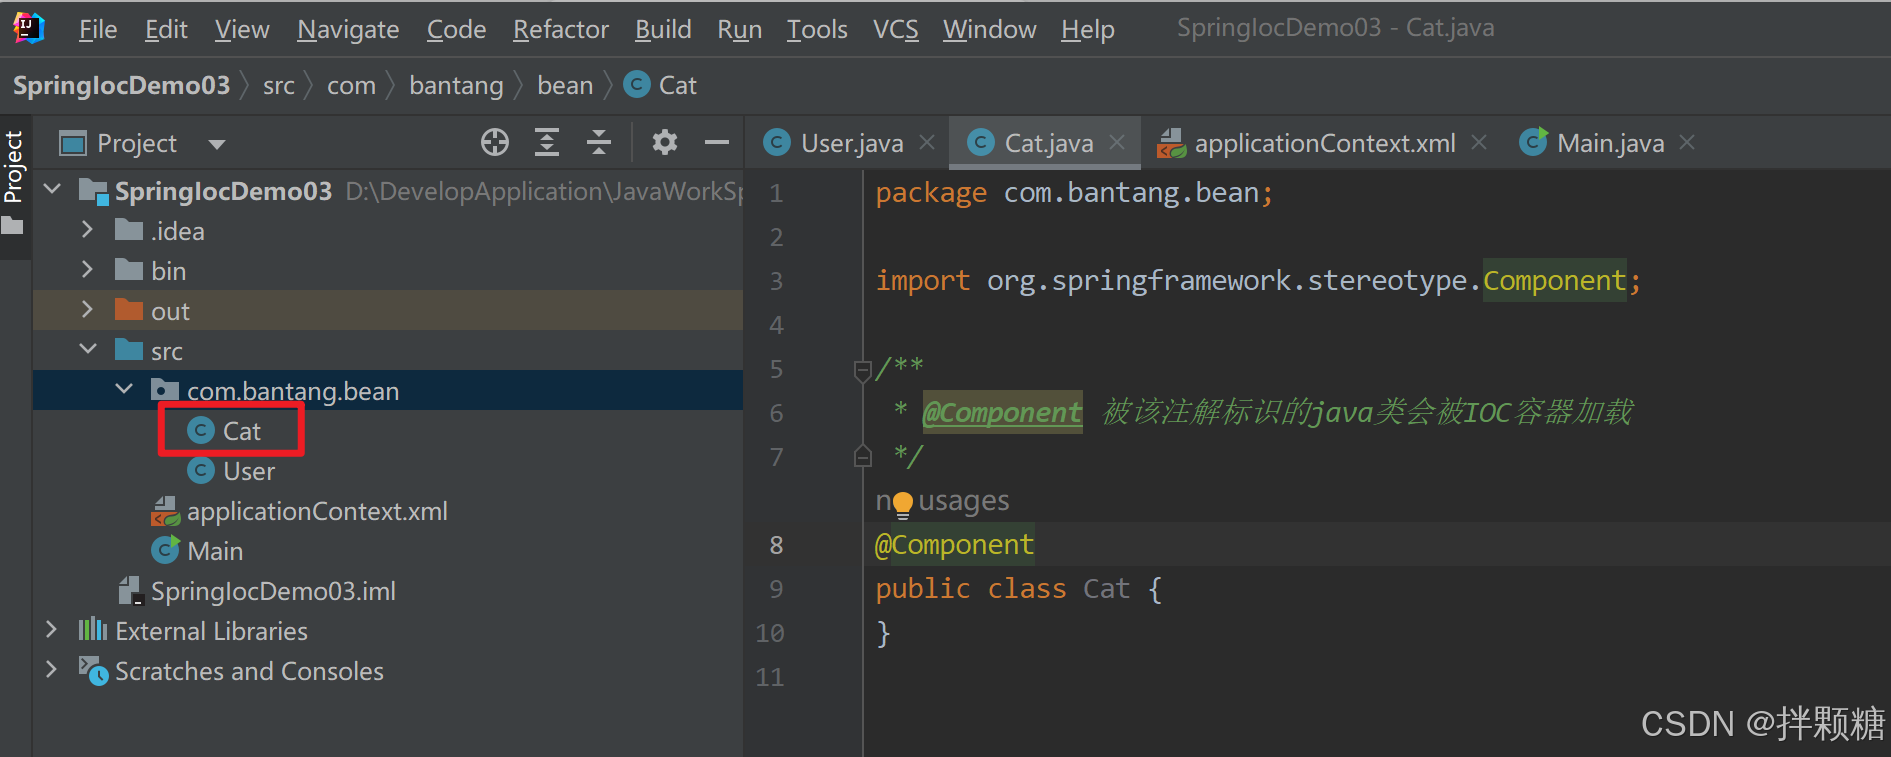
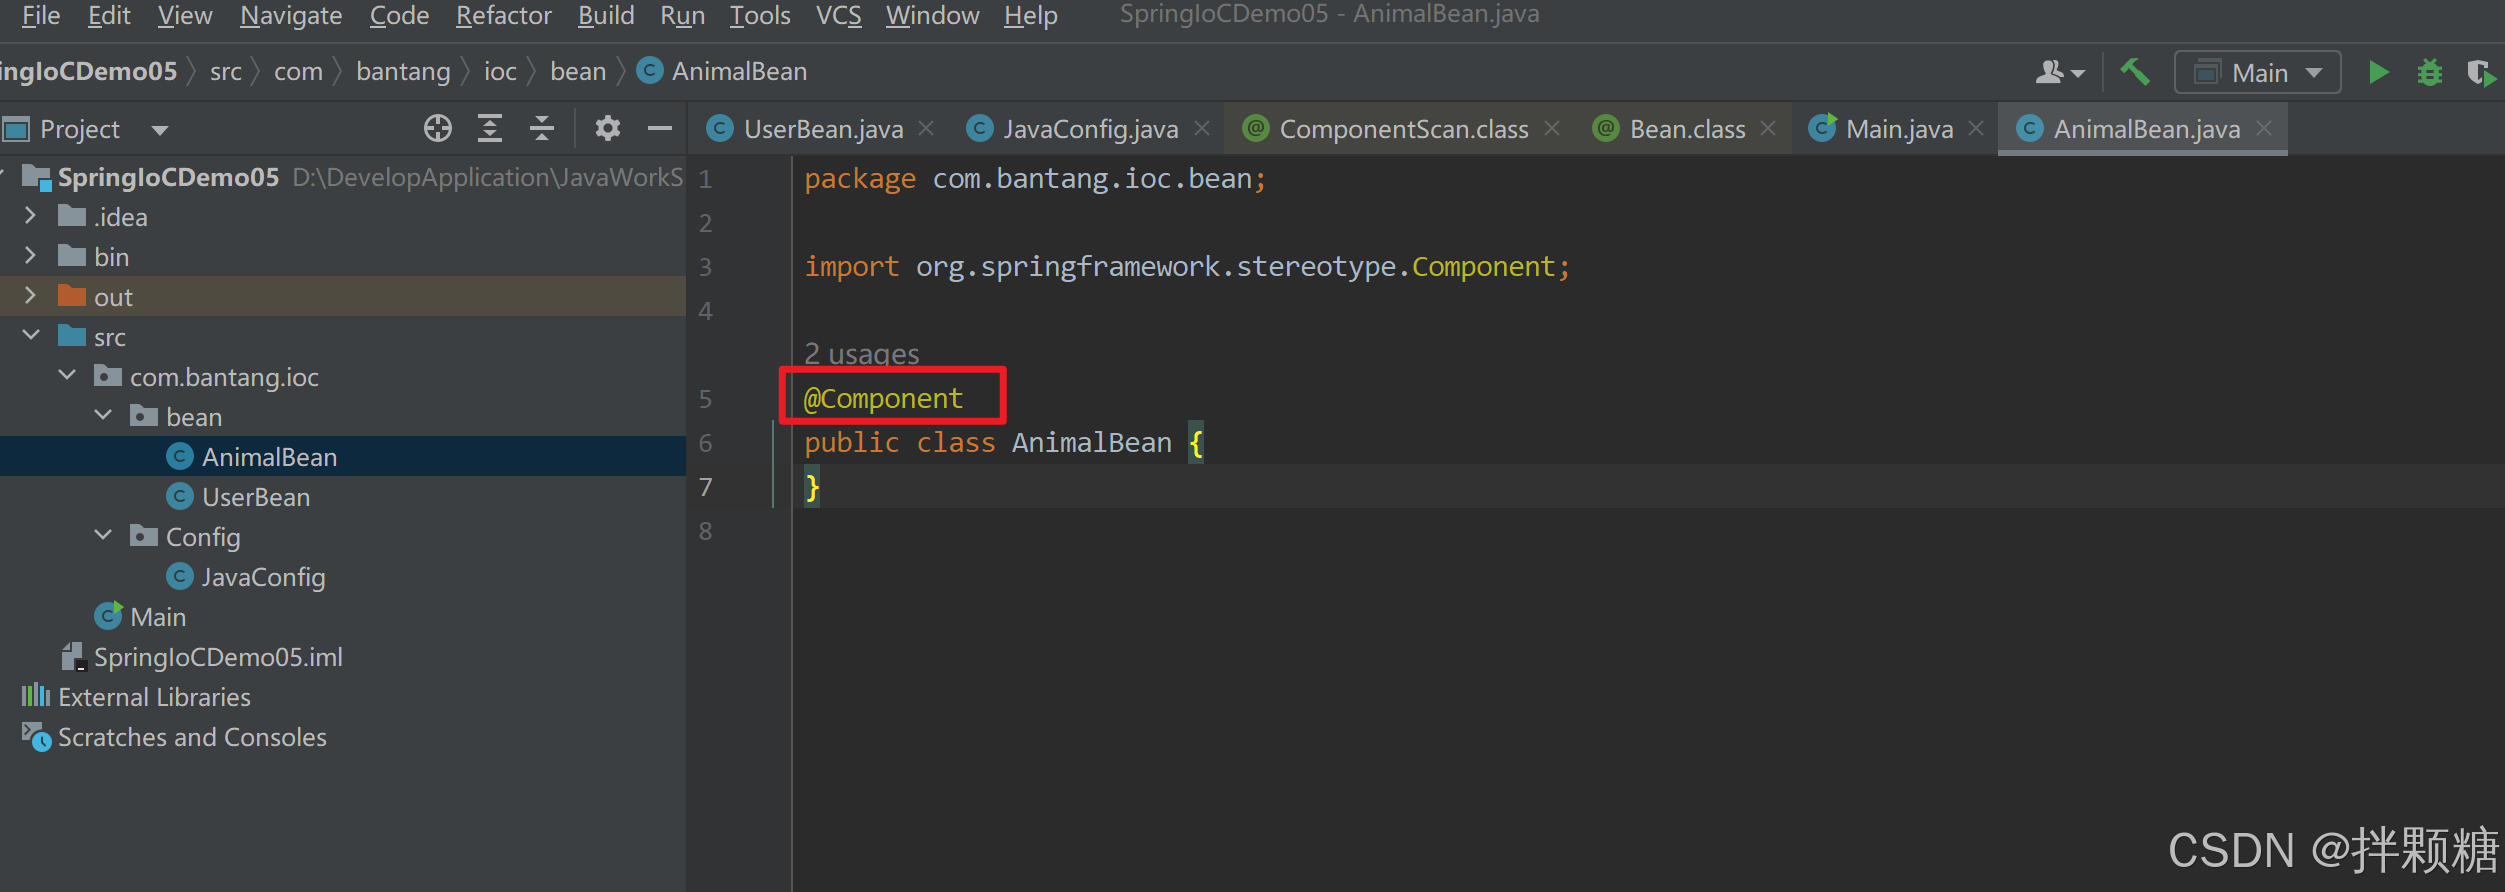
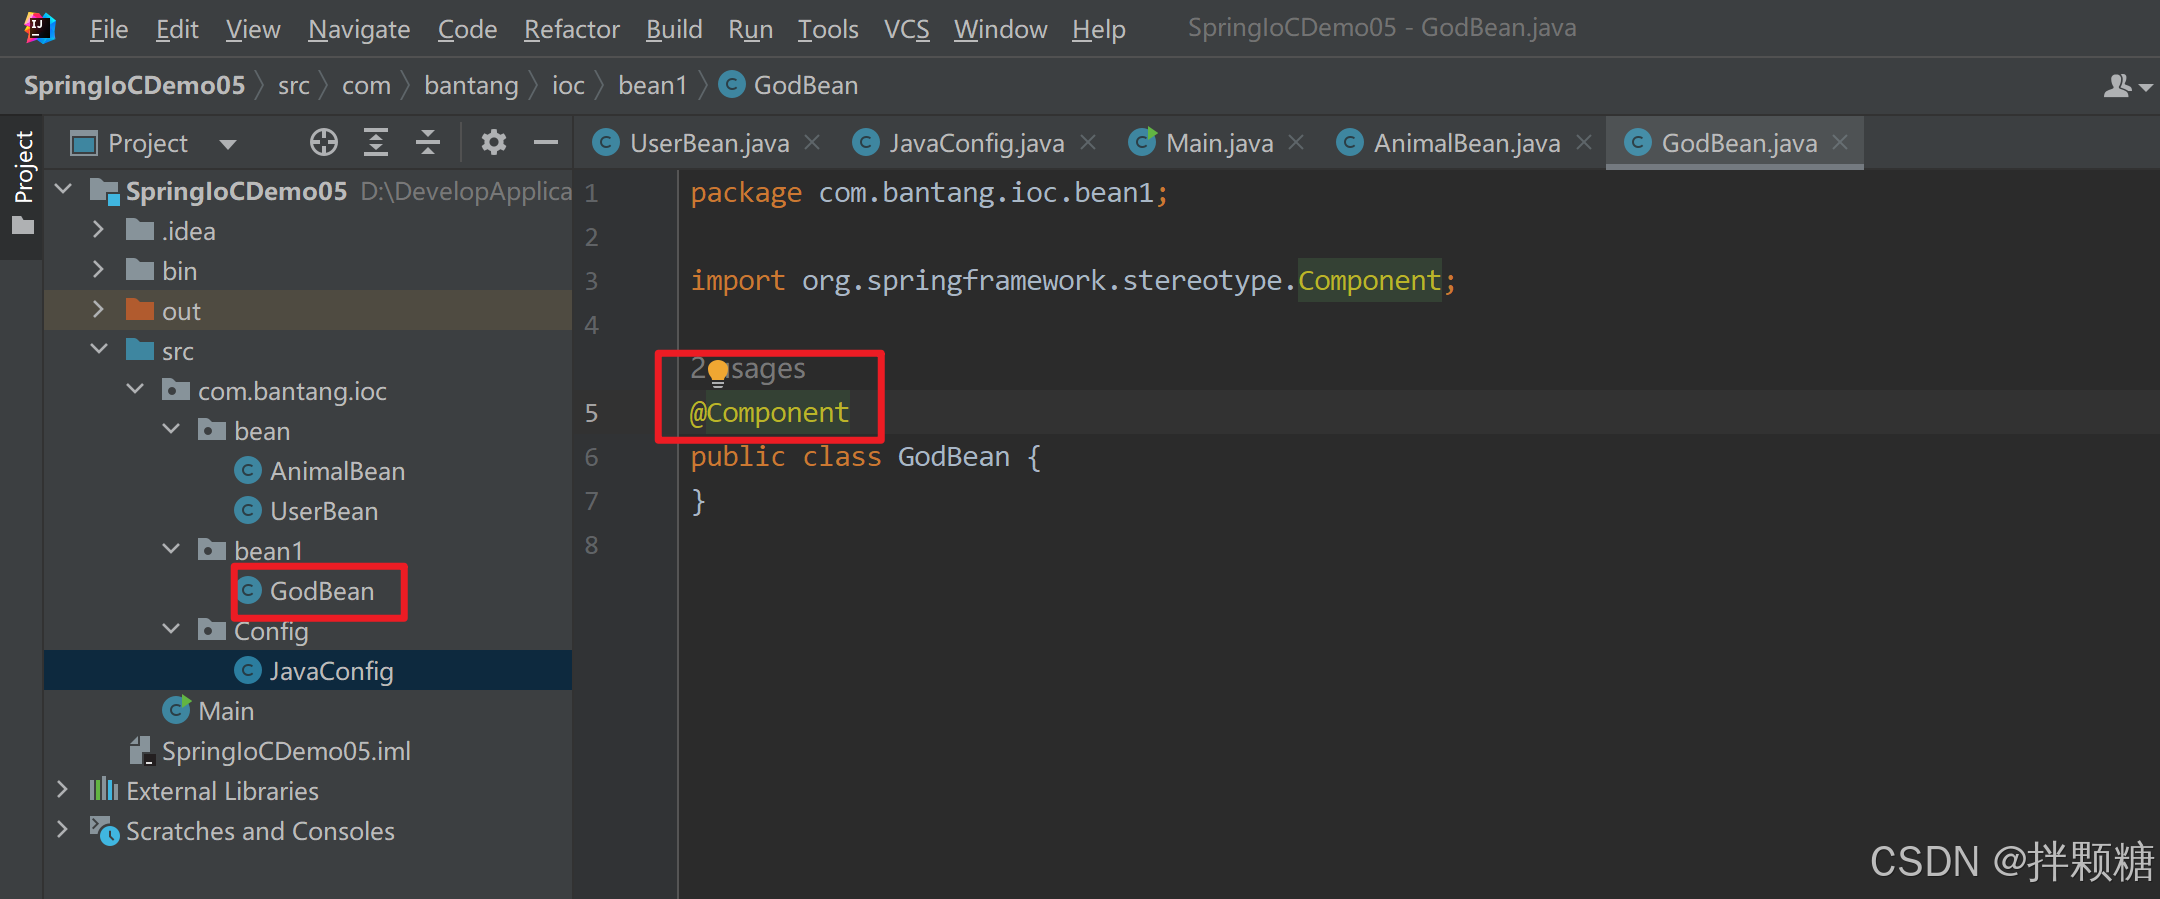
@Component注解
新建Bean,添加@Component注解

新建容器配置文件,注册扫描路径
测试:
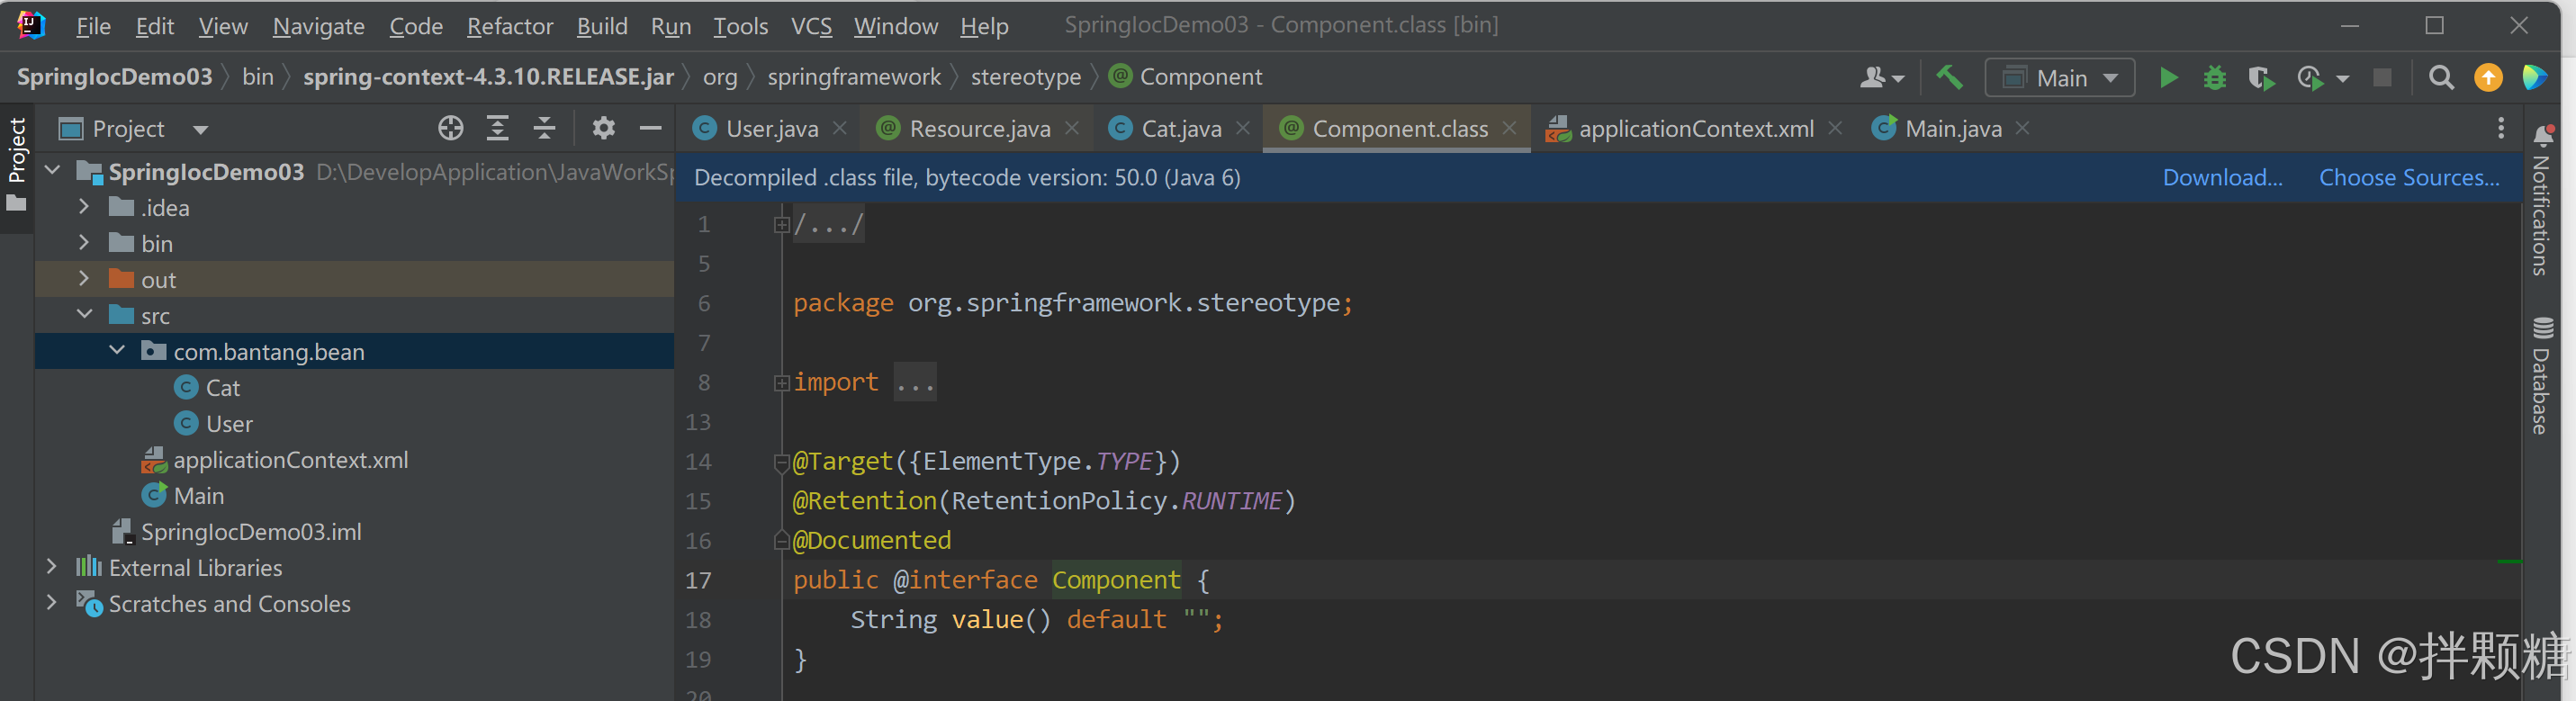
@Component注解用法解释
被该注解标识的java类会被IOC容器加载
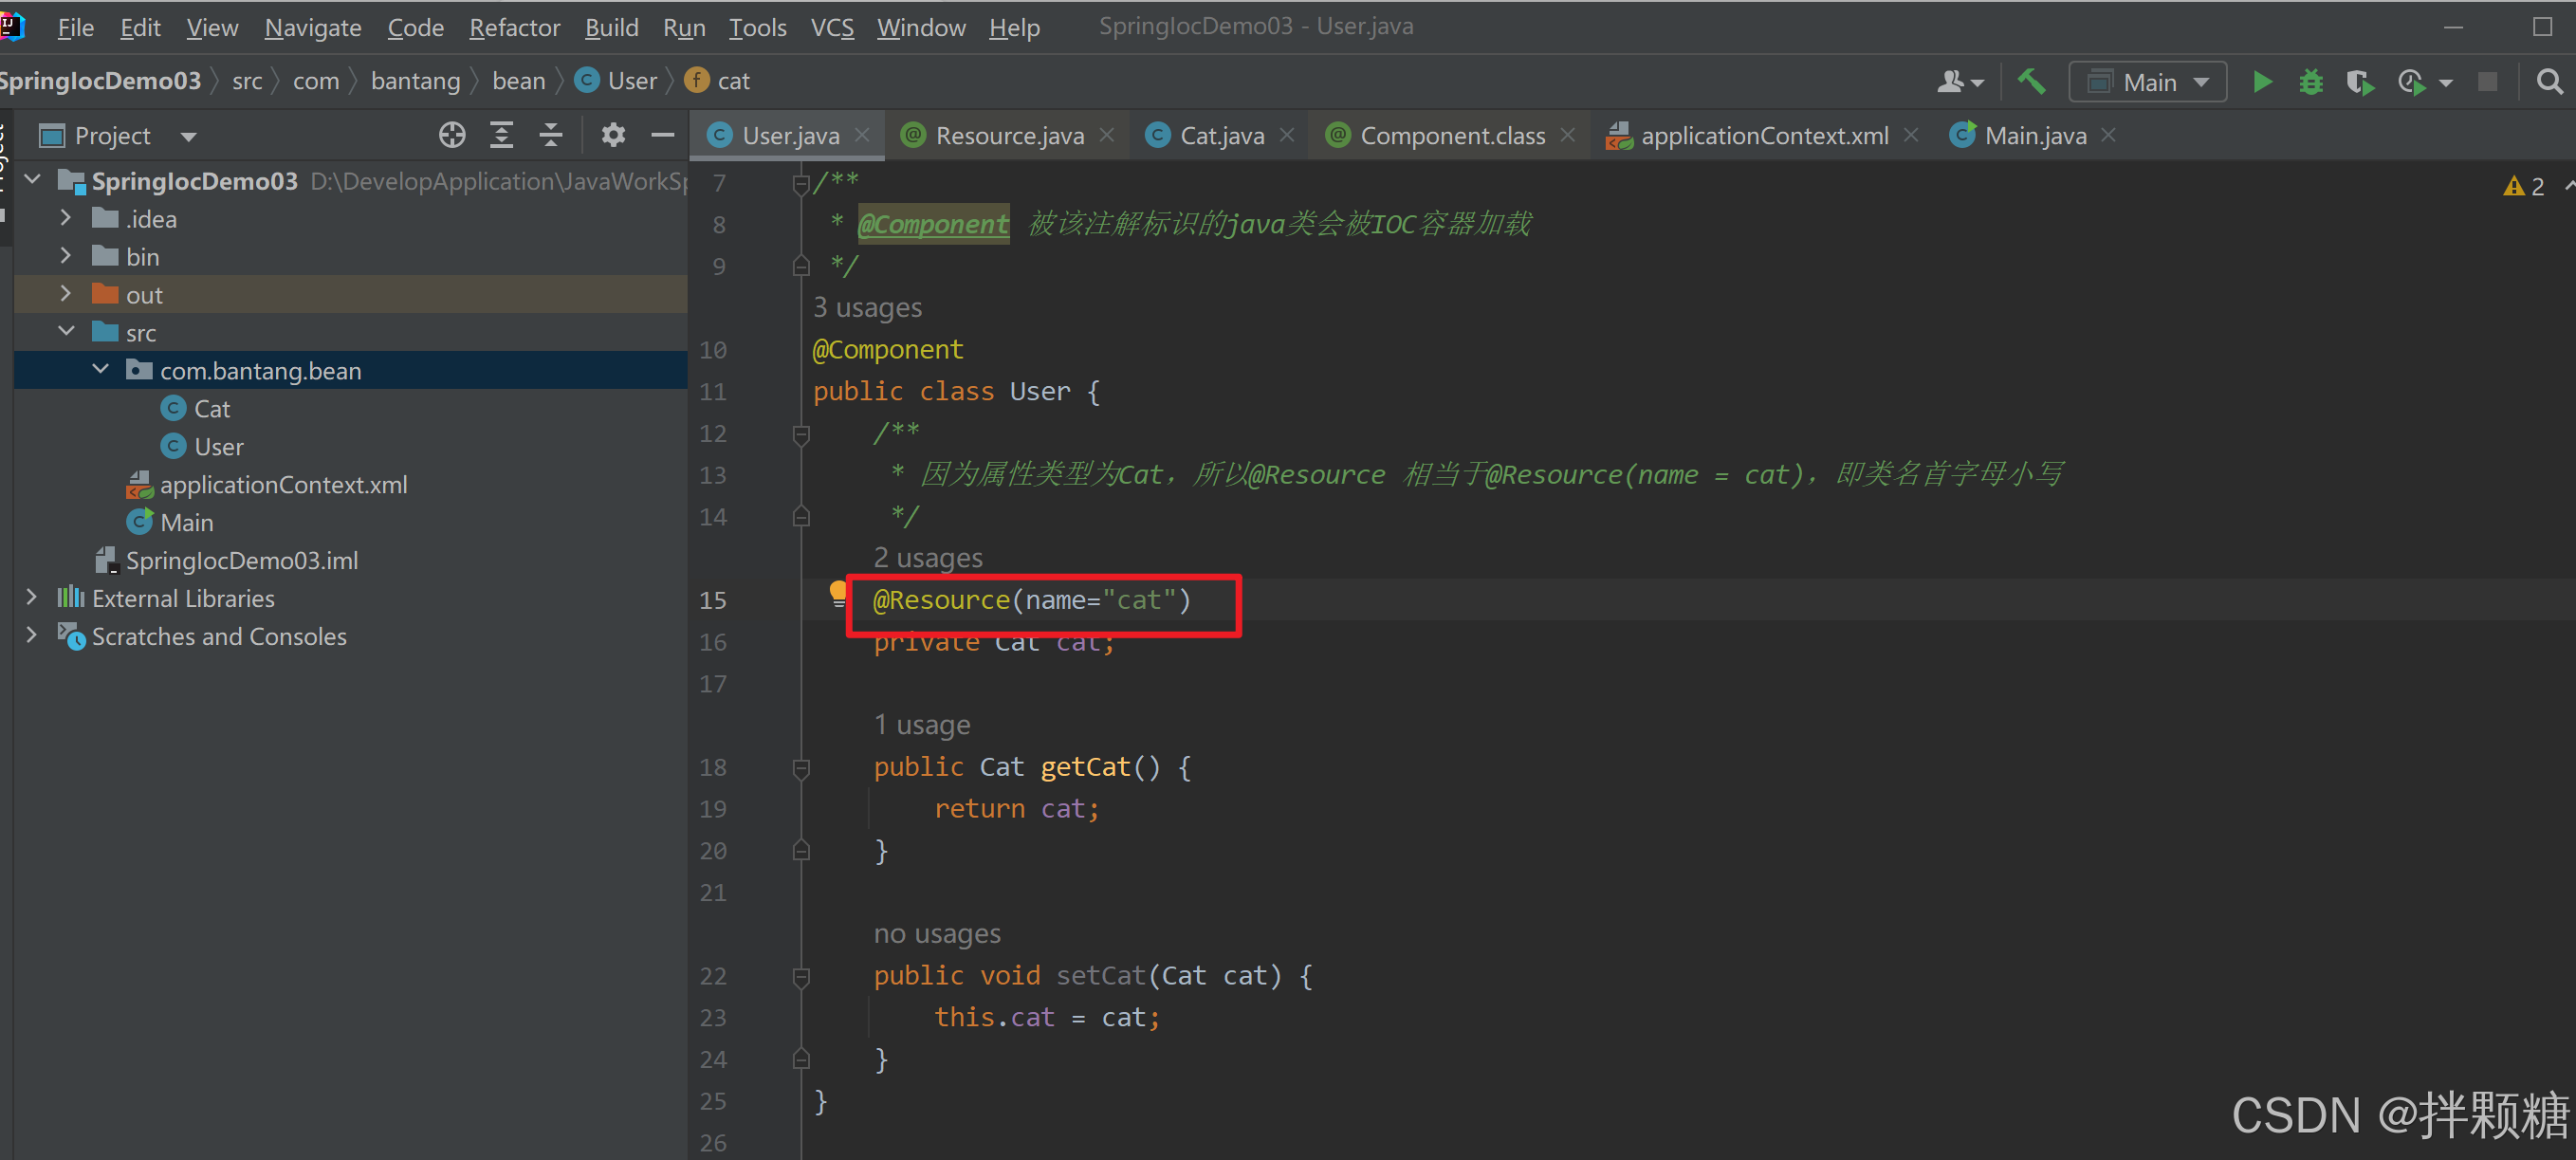
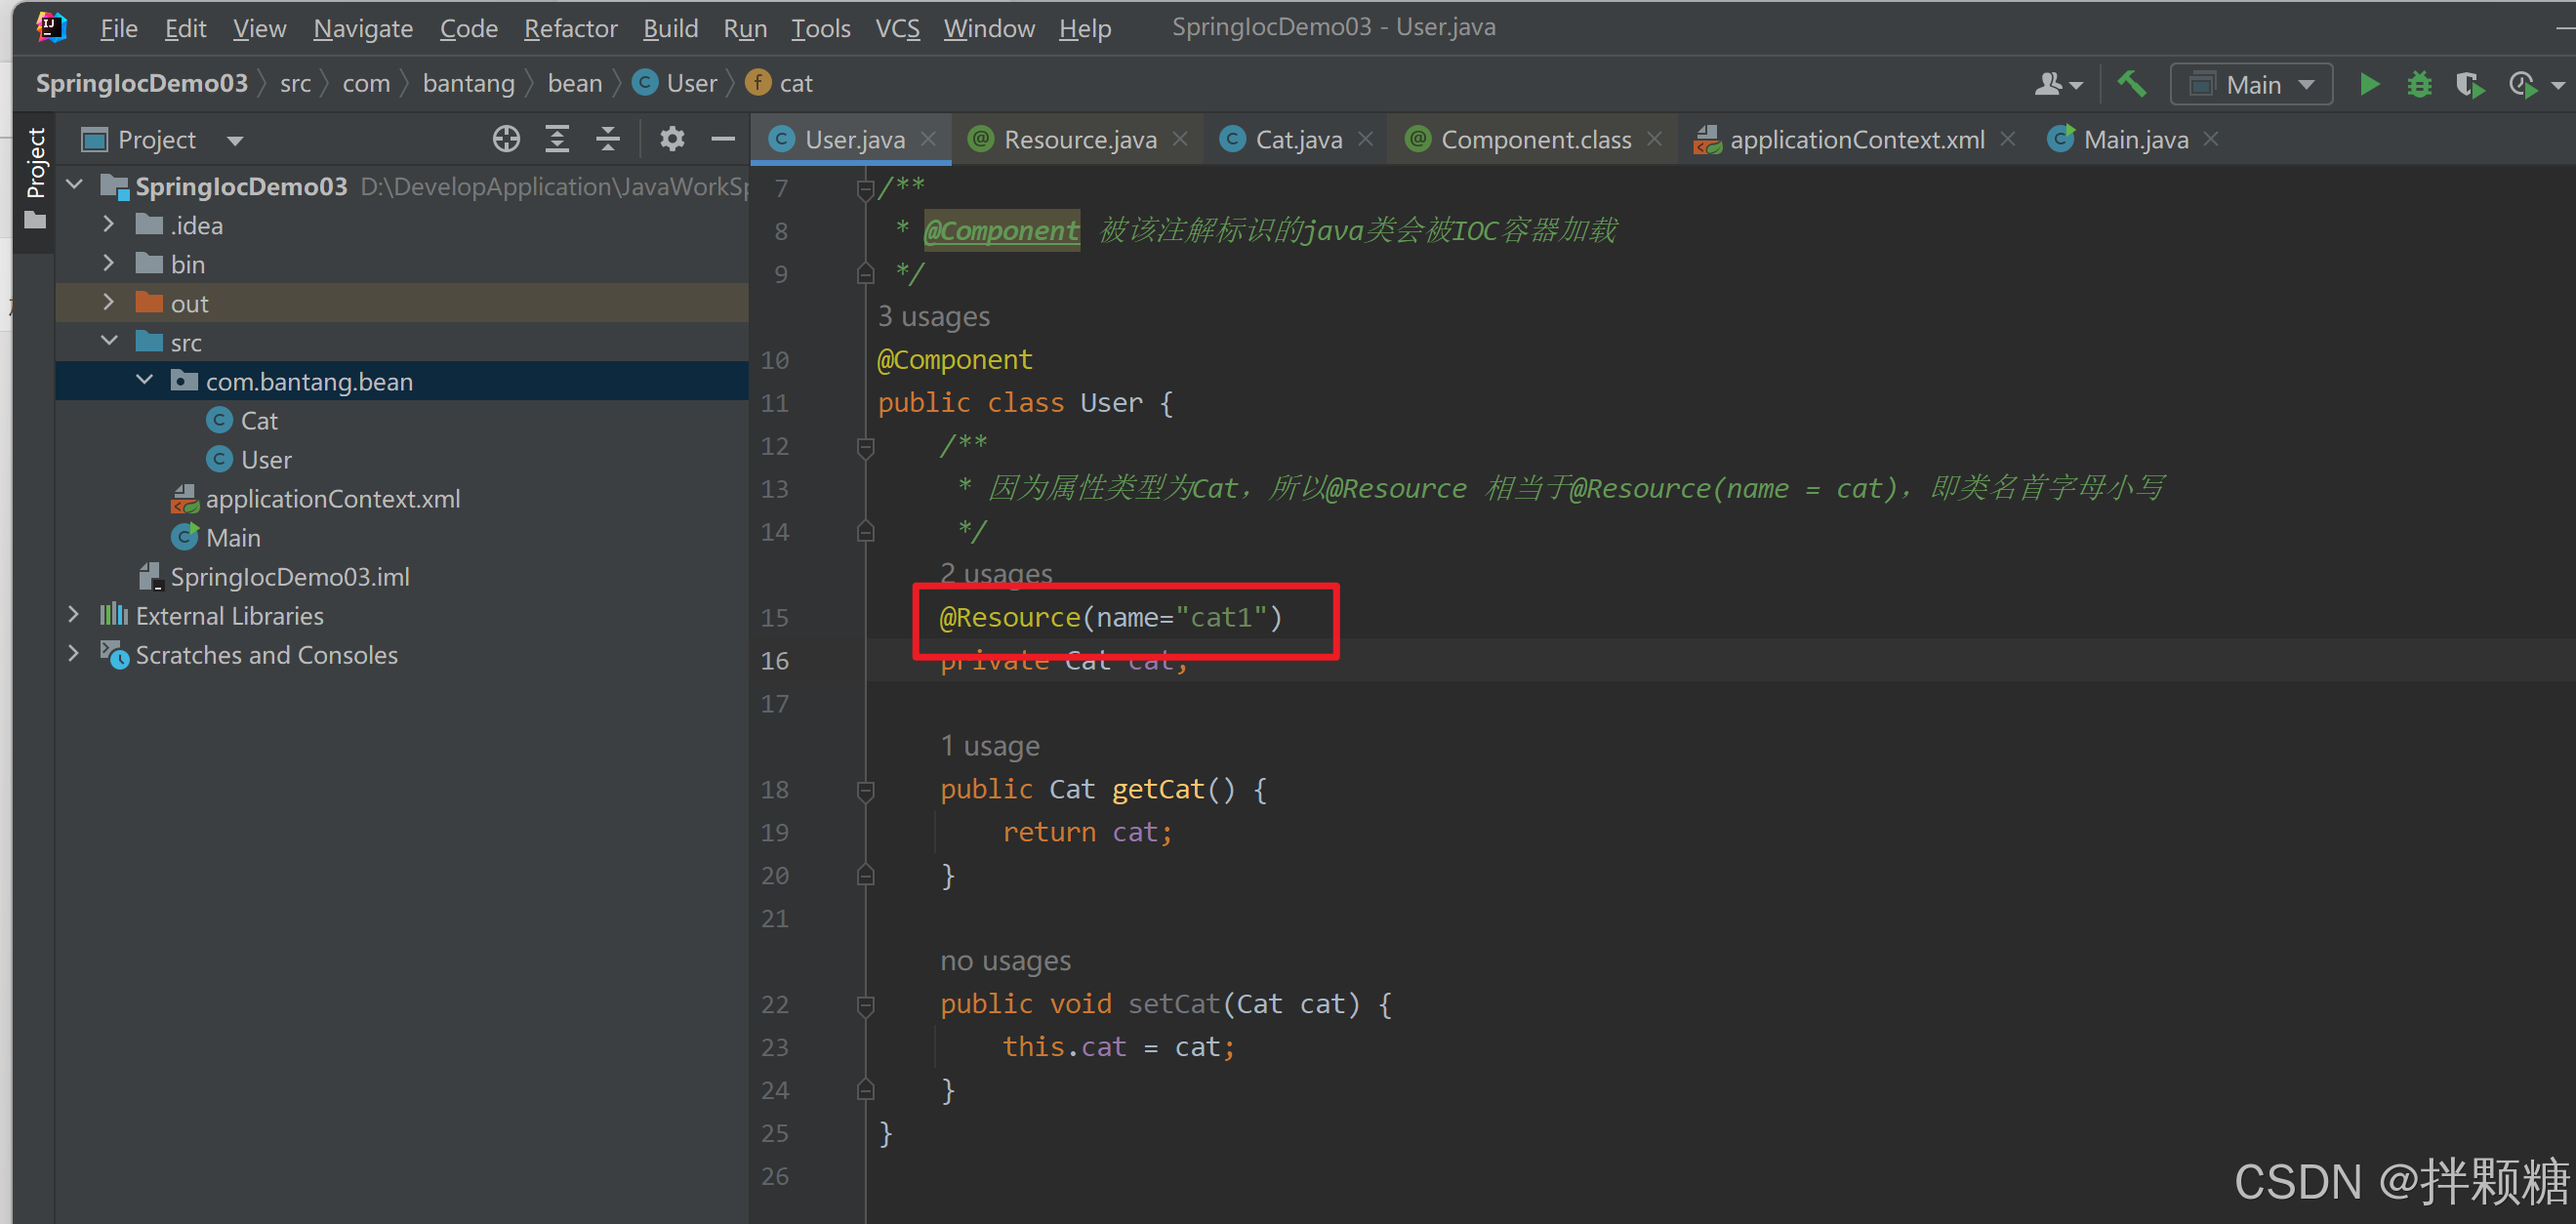
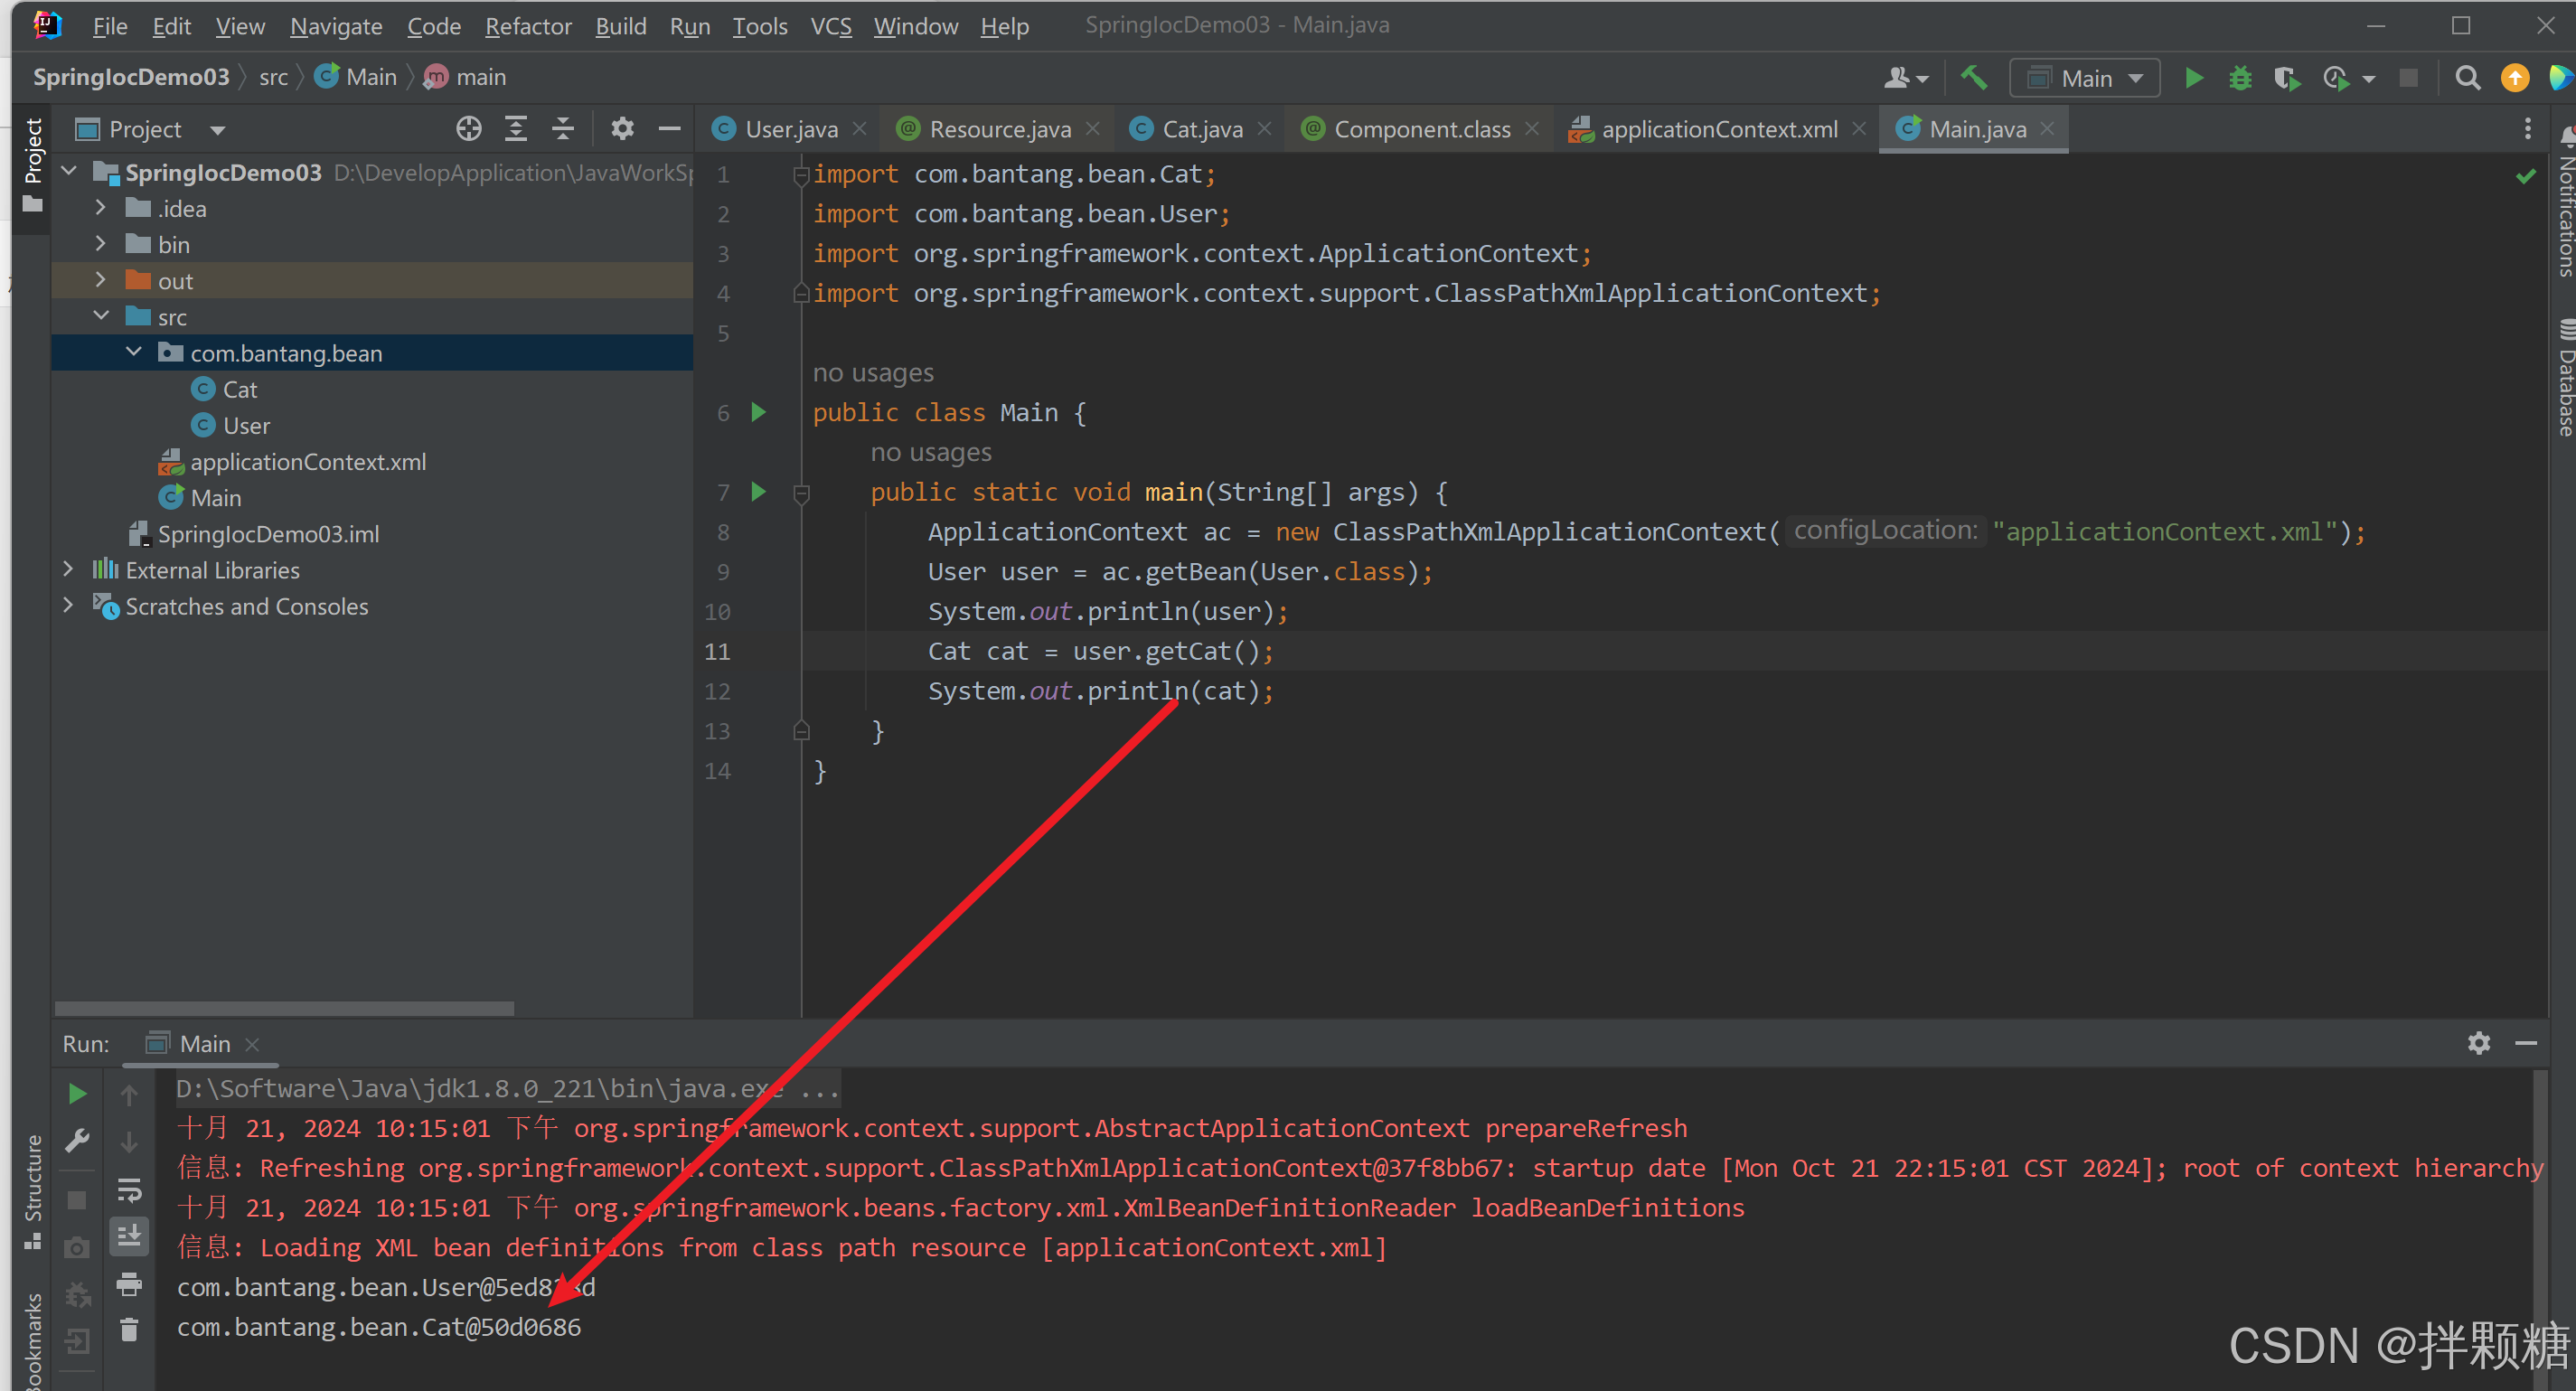
@Resource注解
如果java的属性是类类型 该如何注入?
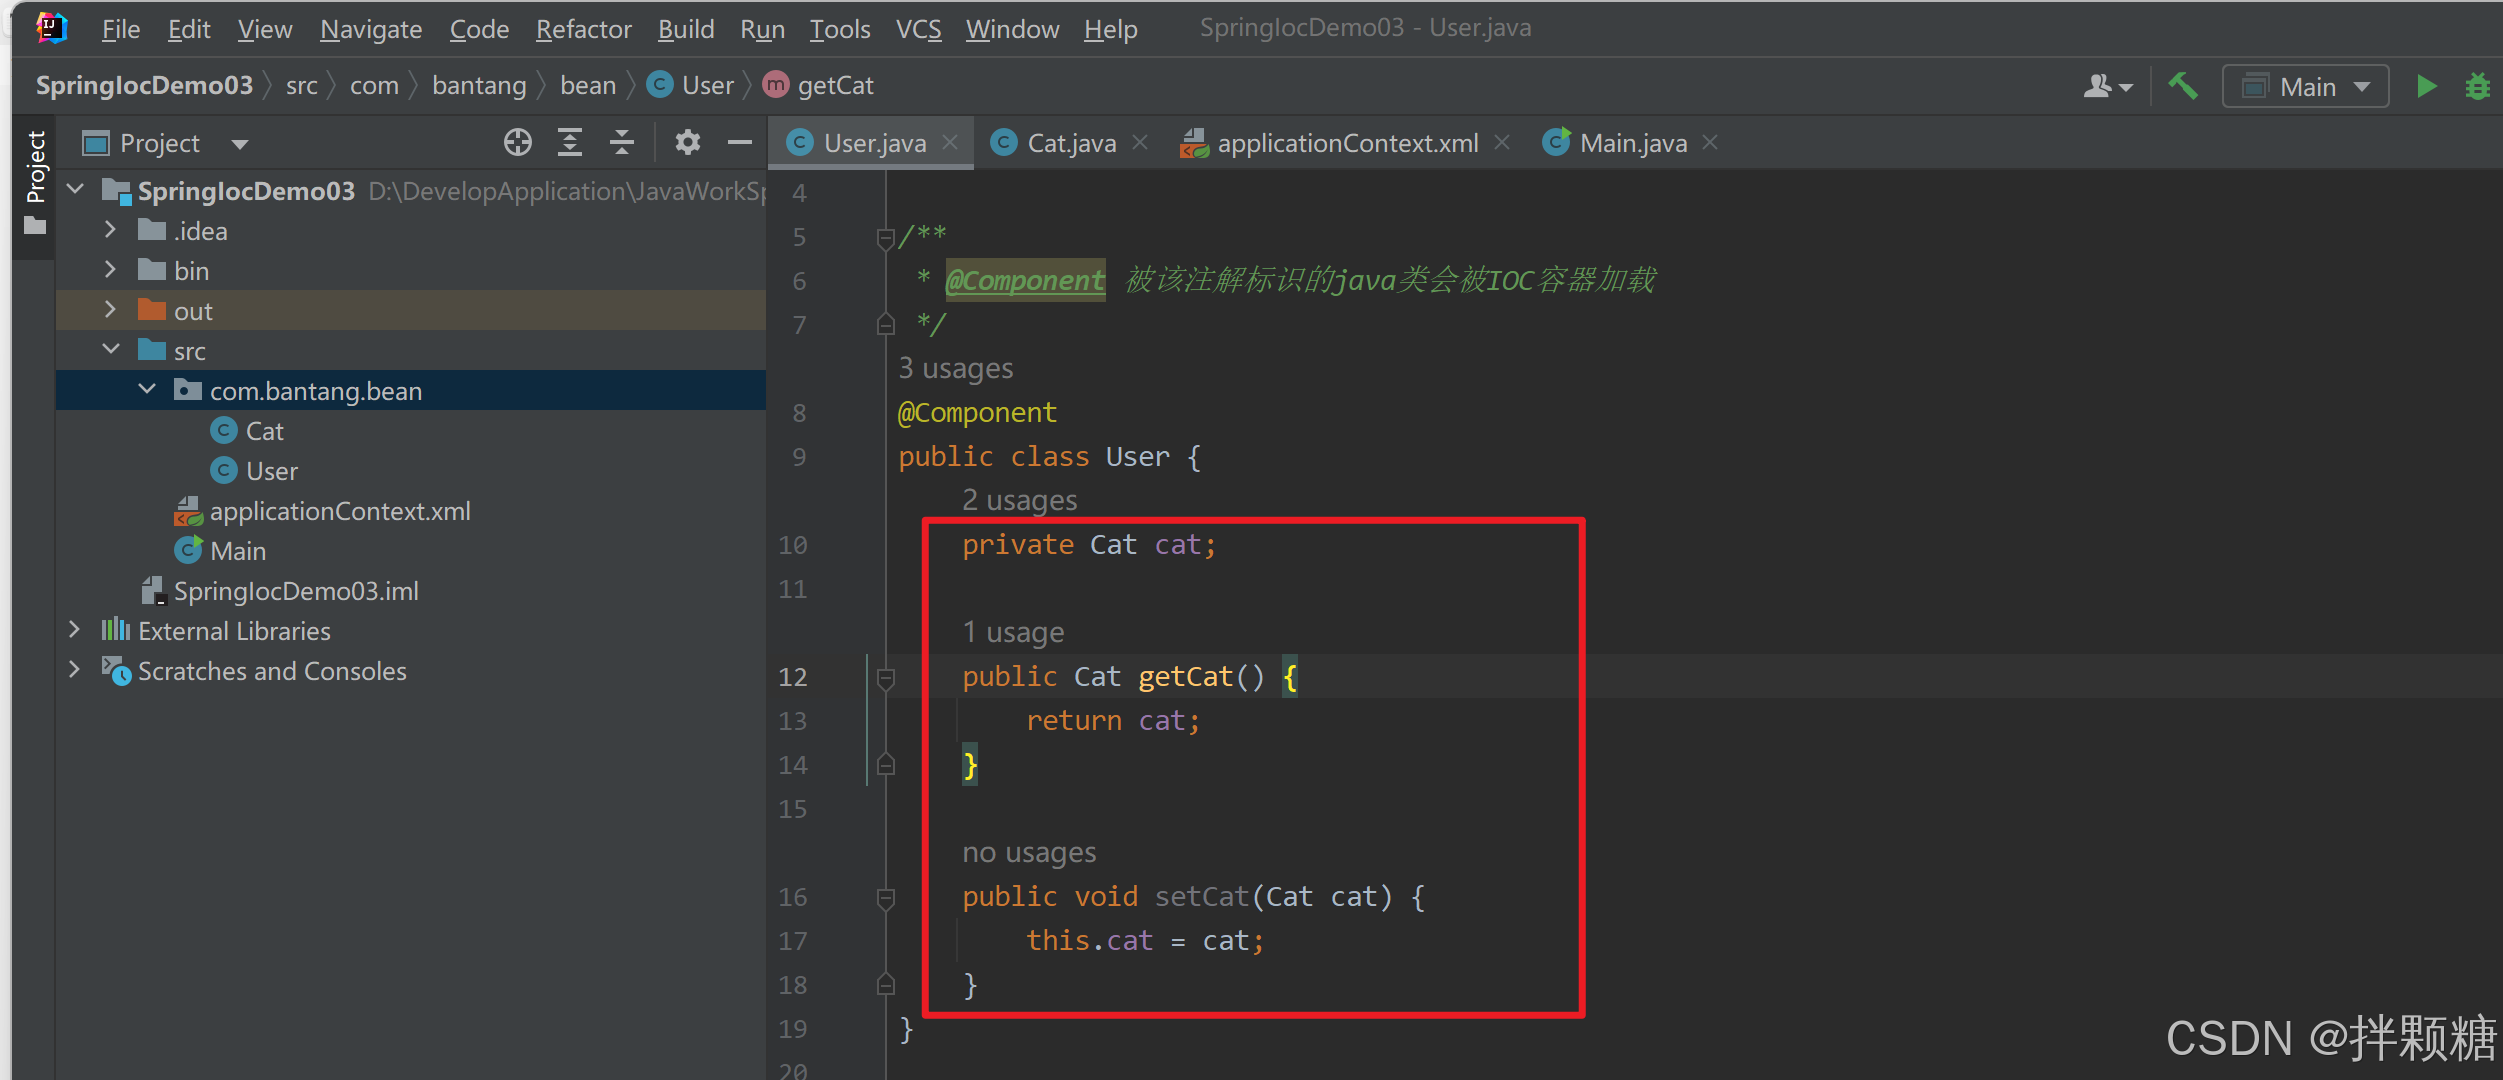
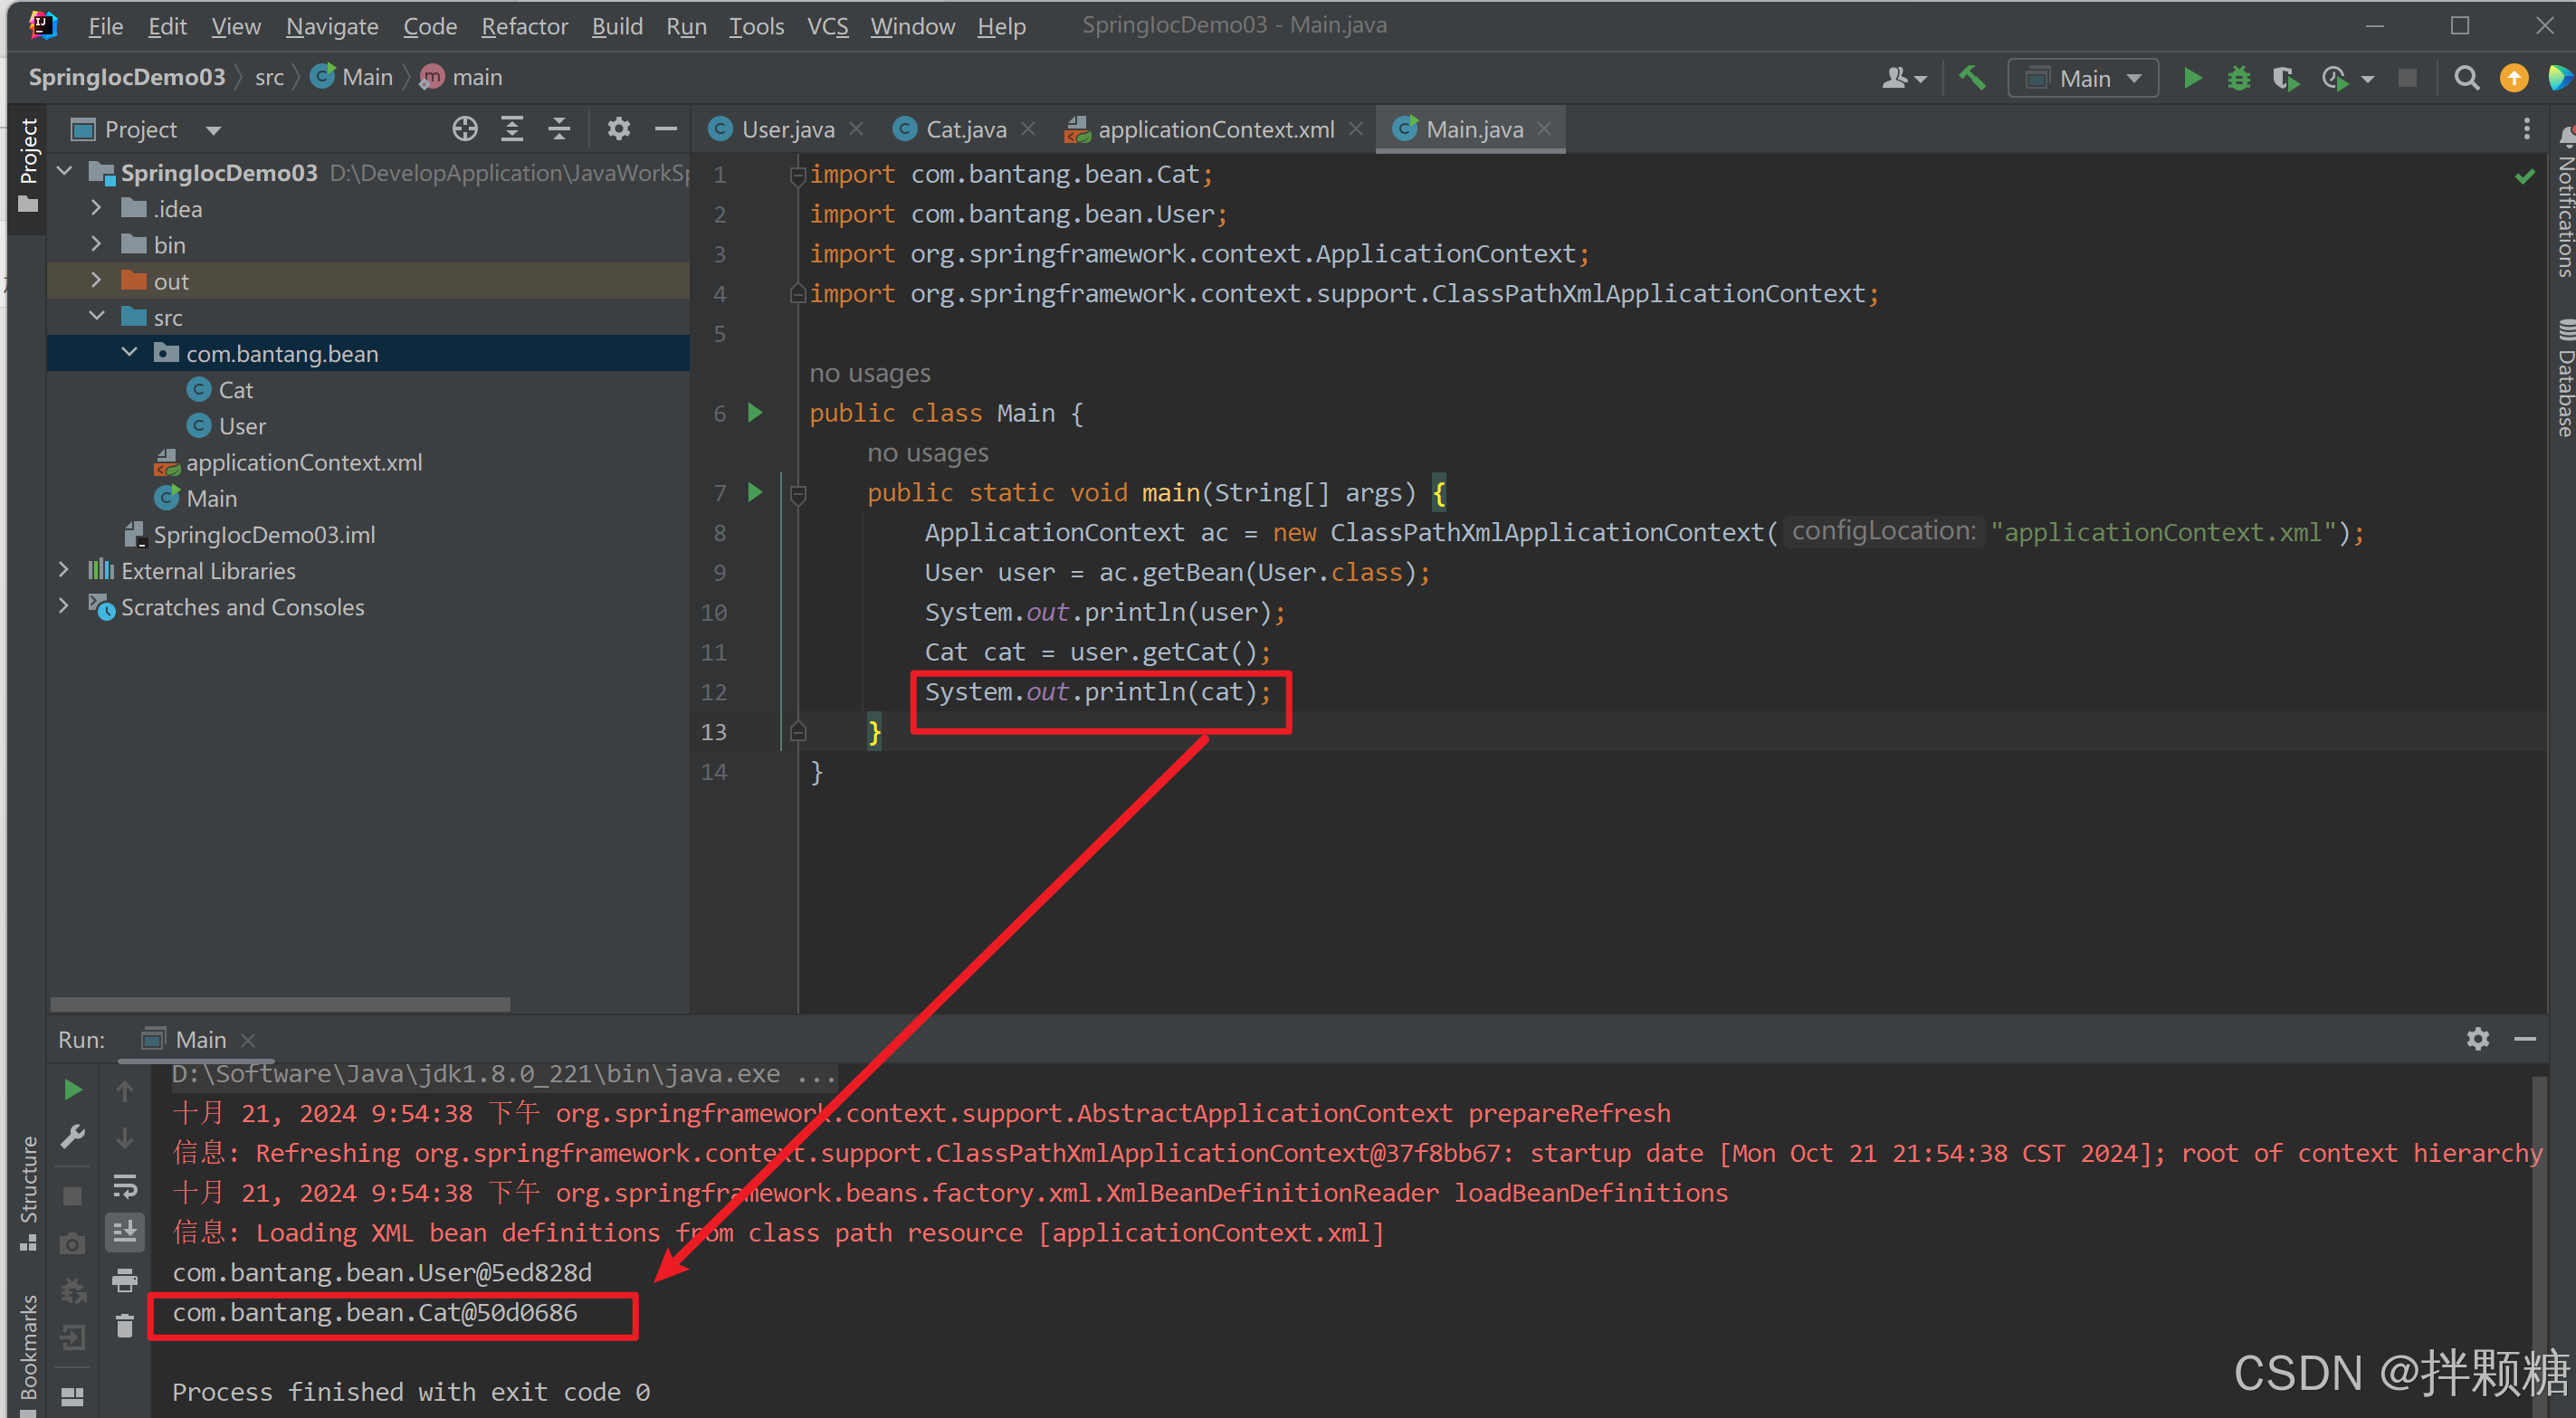
我们为User引入Cat类类型属性,创建get和set后,测试发现,返回的cat为null,说明cat并没有被set注入
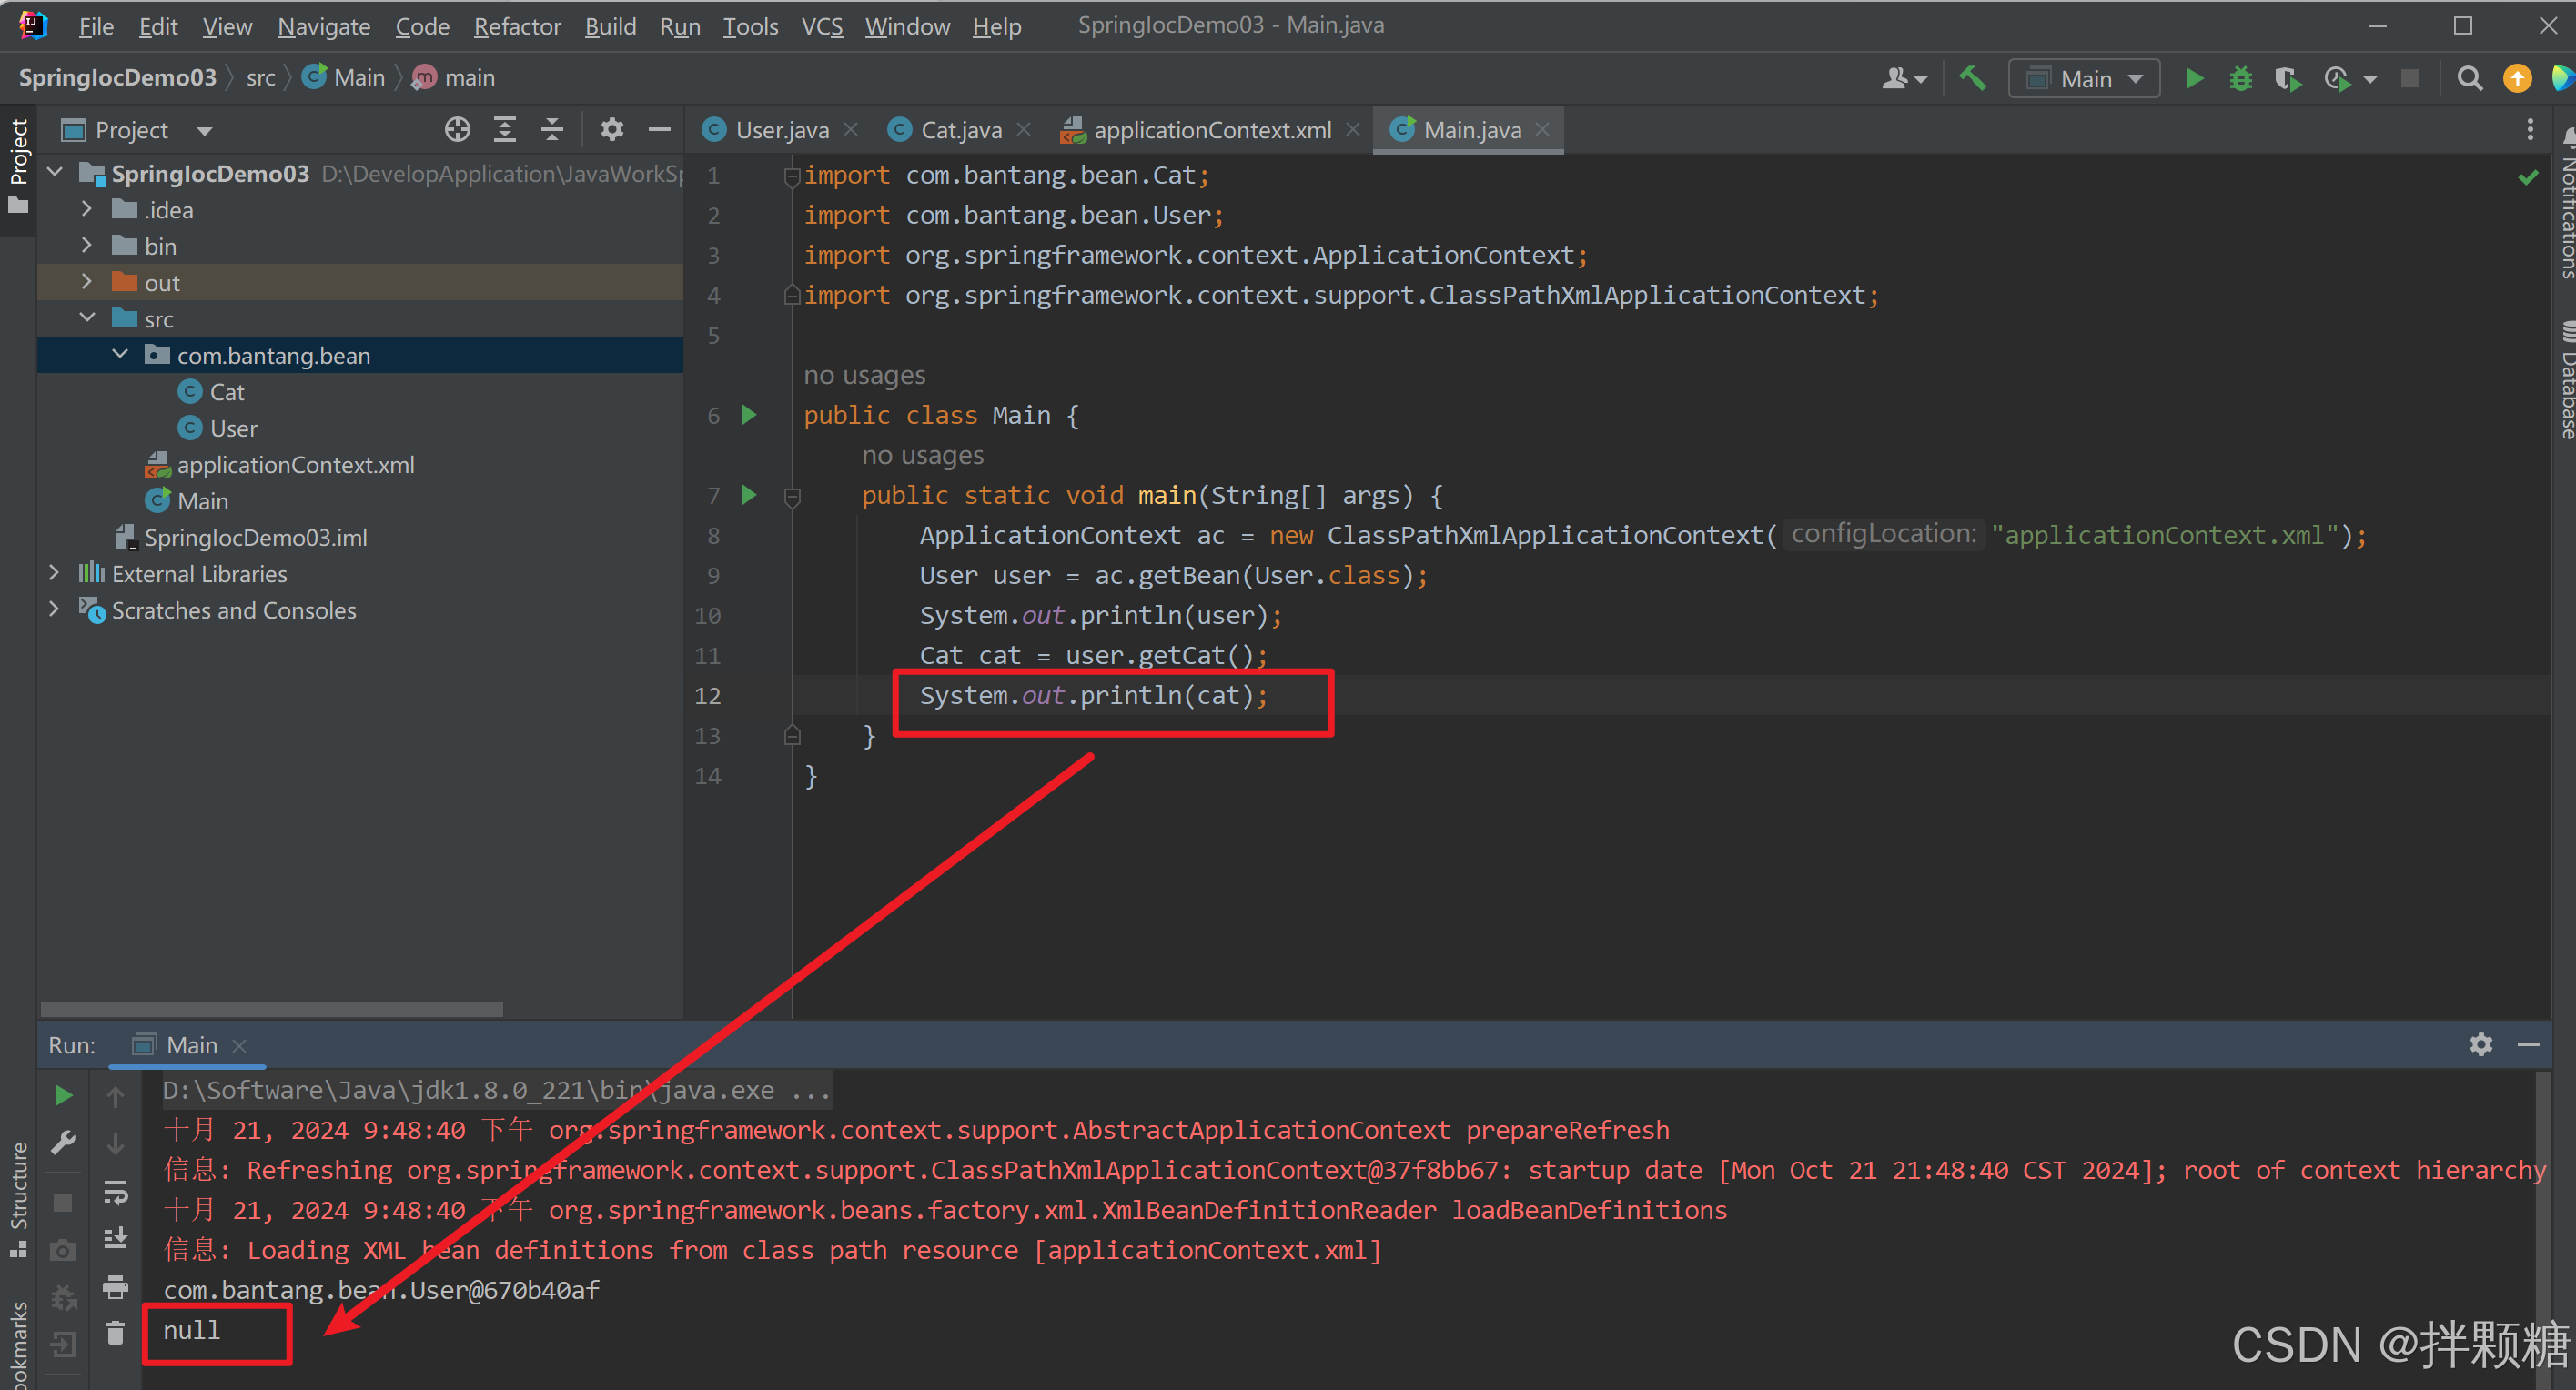
原因:cat属性缺少注解
修改如下,修改后正常
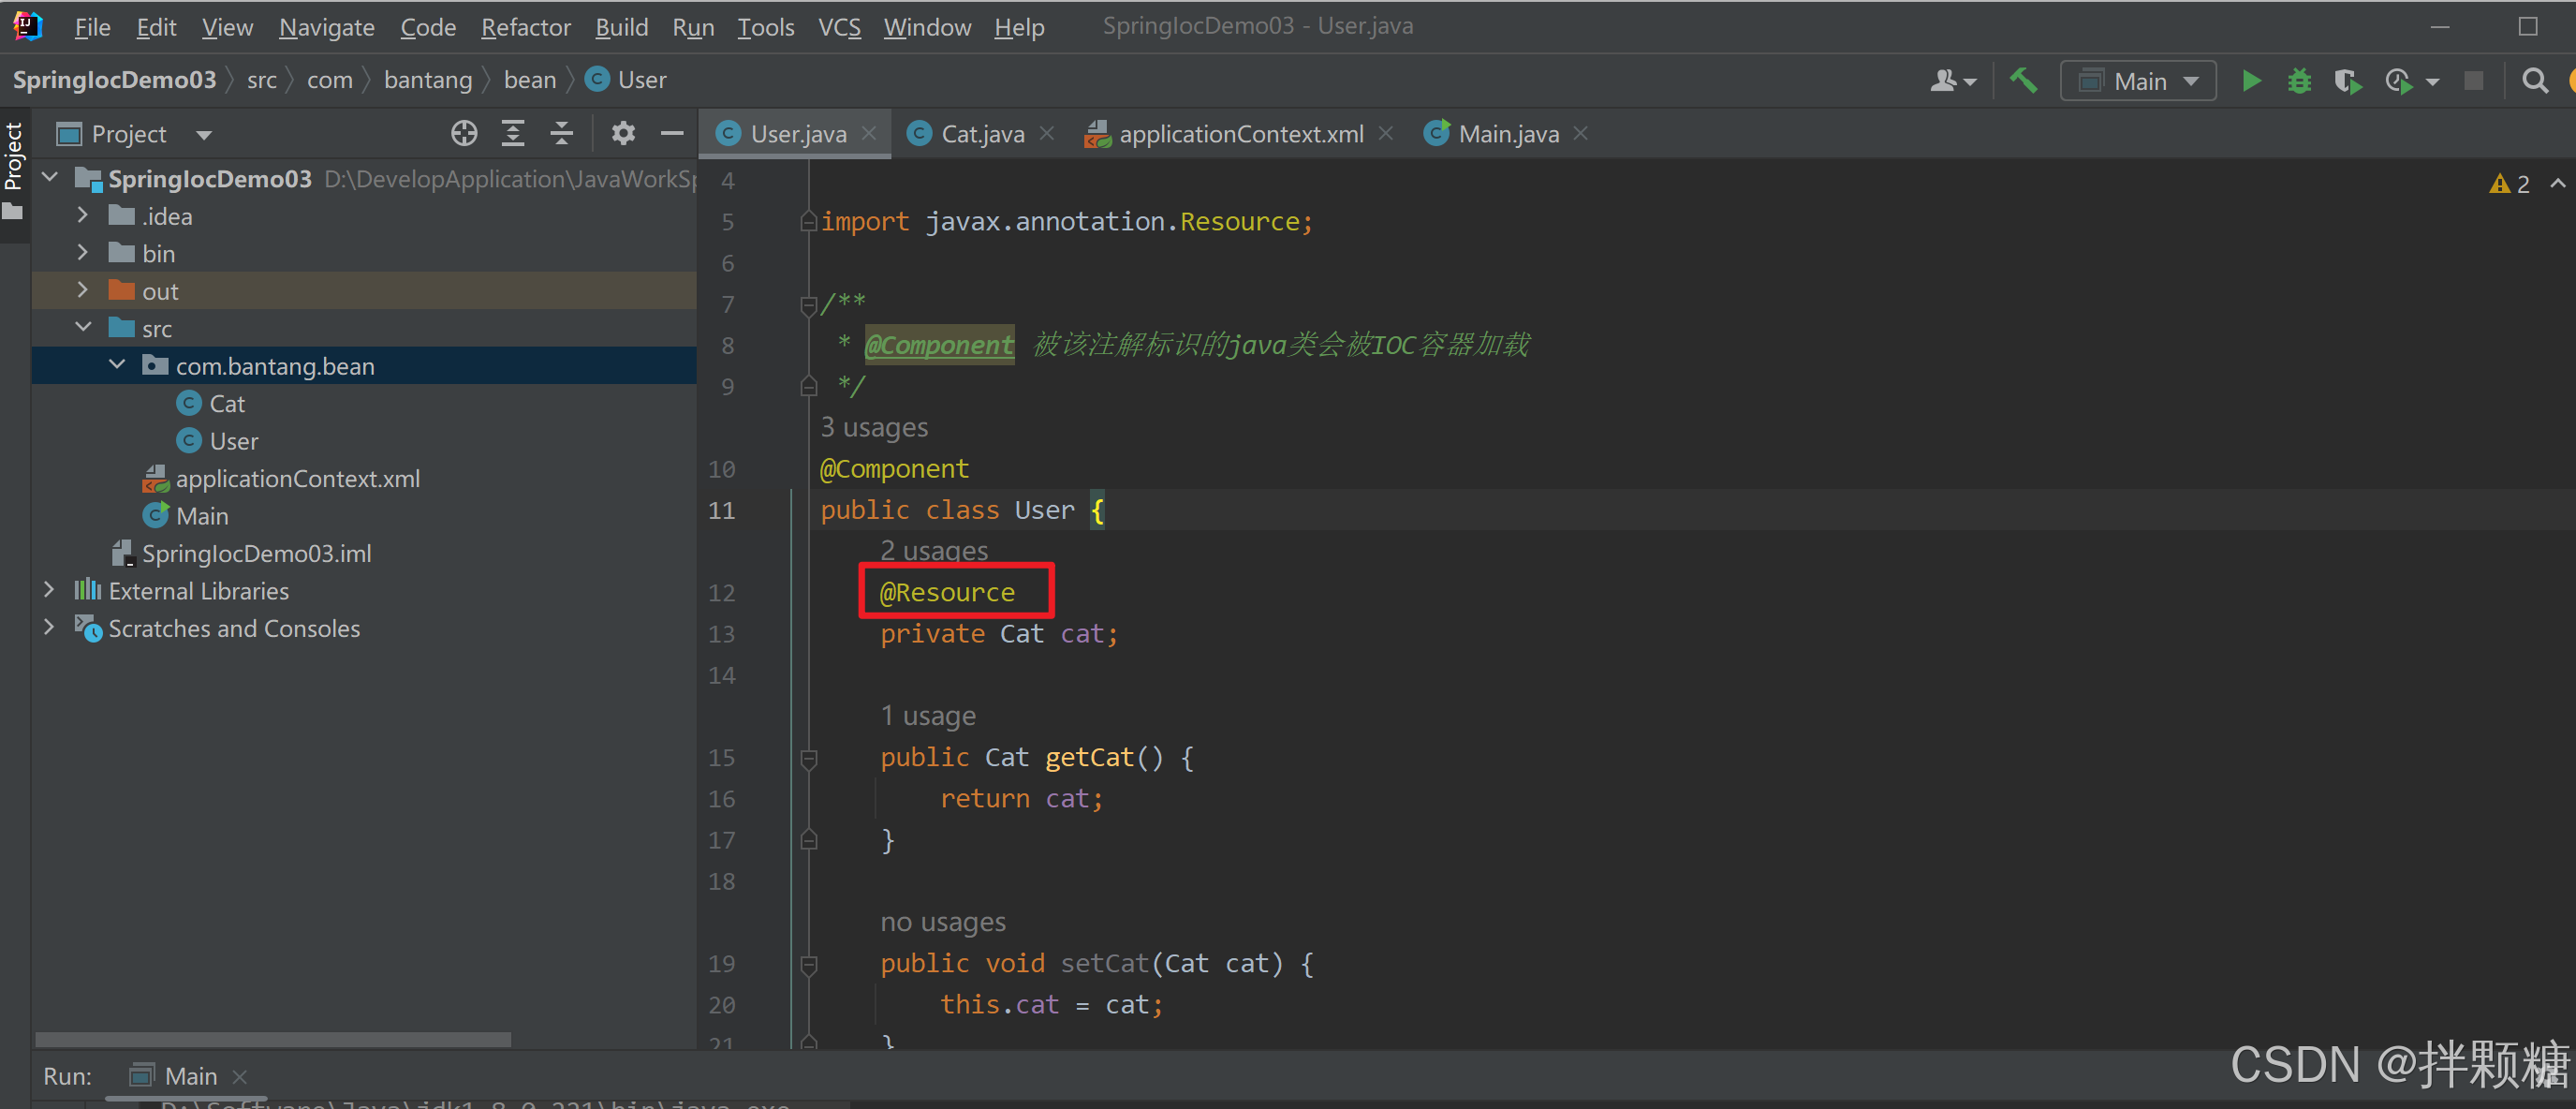
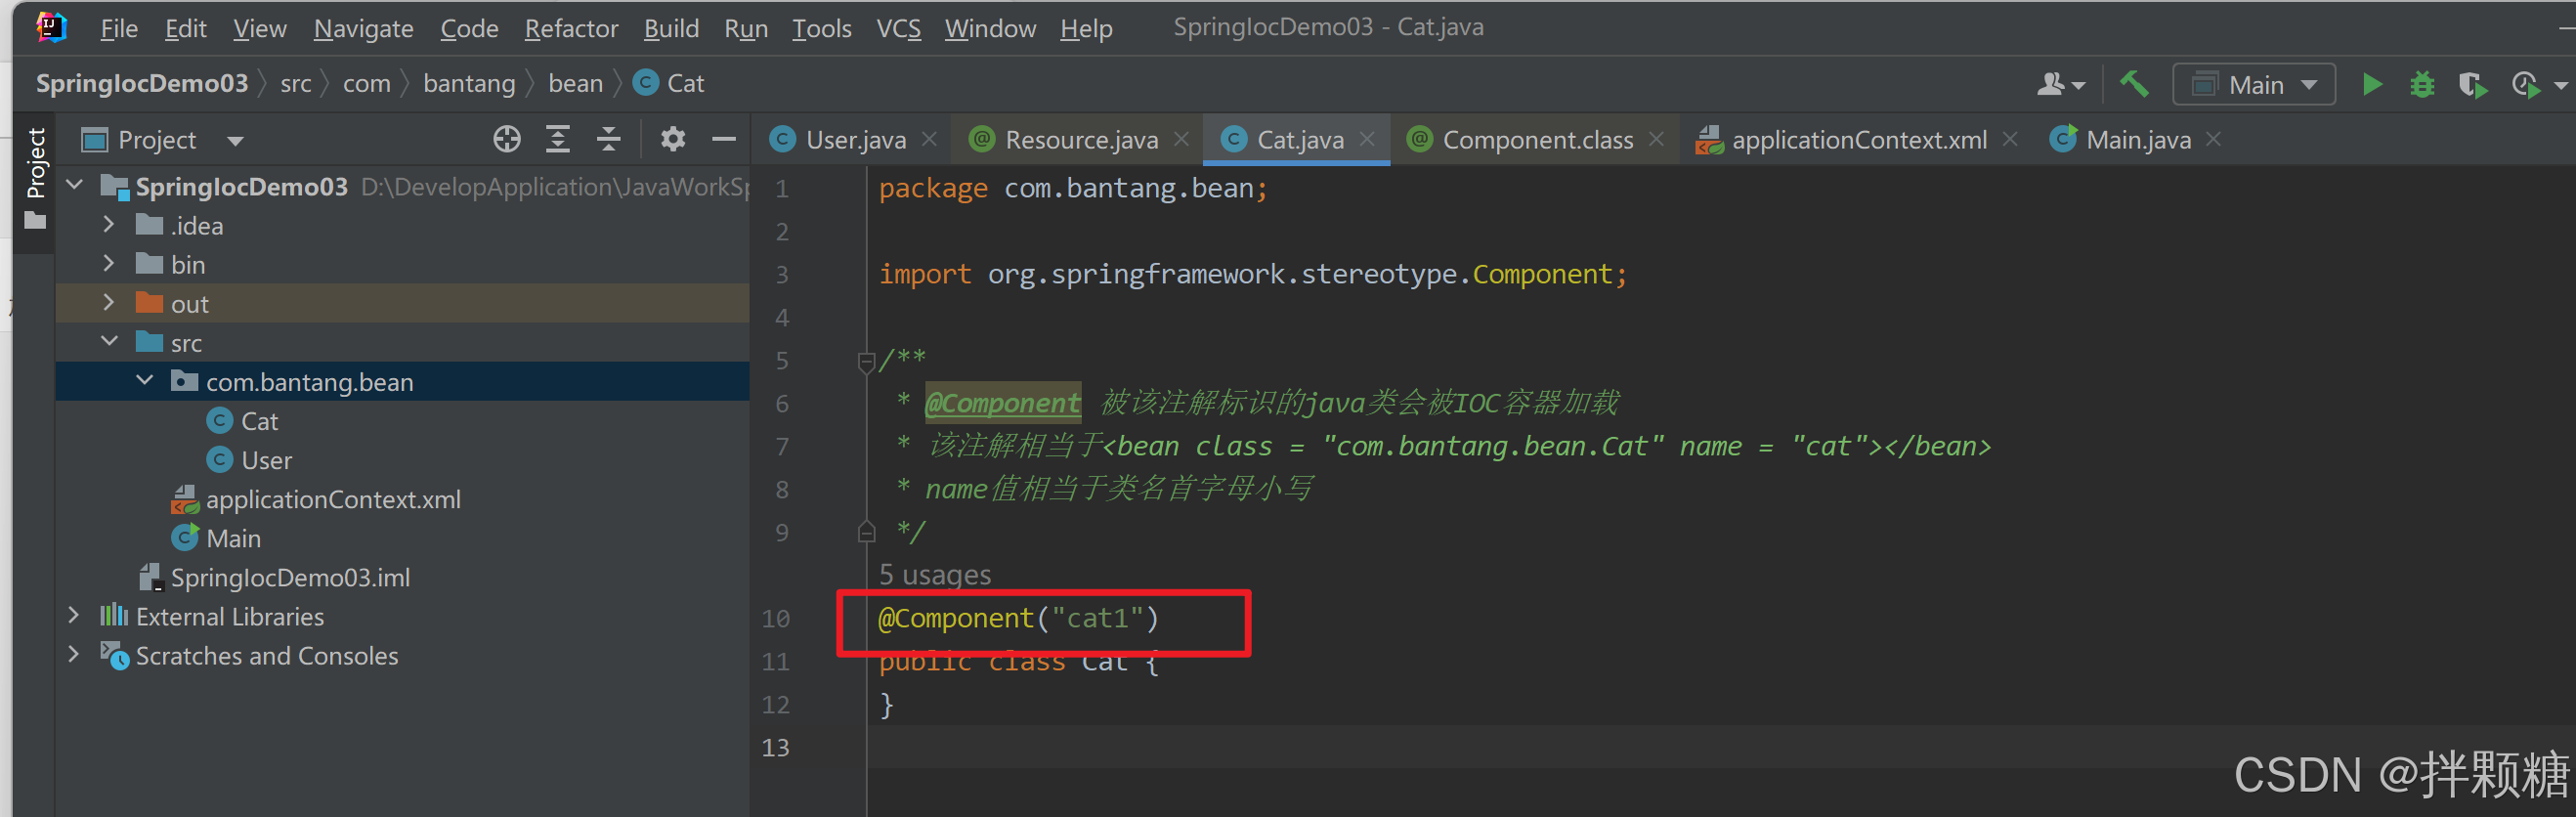
为什么为User的Cat类型属性标识上@Resource注解后,就无异常了?
我们点开@Resource注解源码可知,默认需要向注解传参一个name值
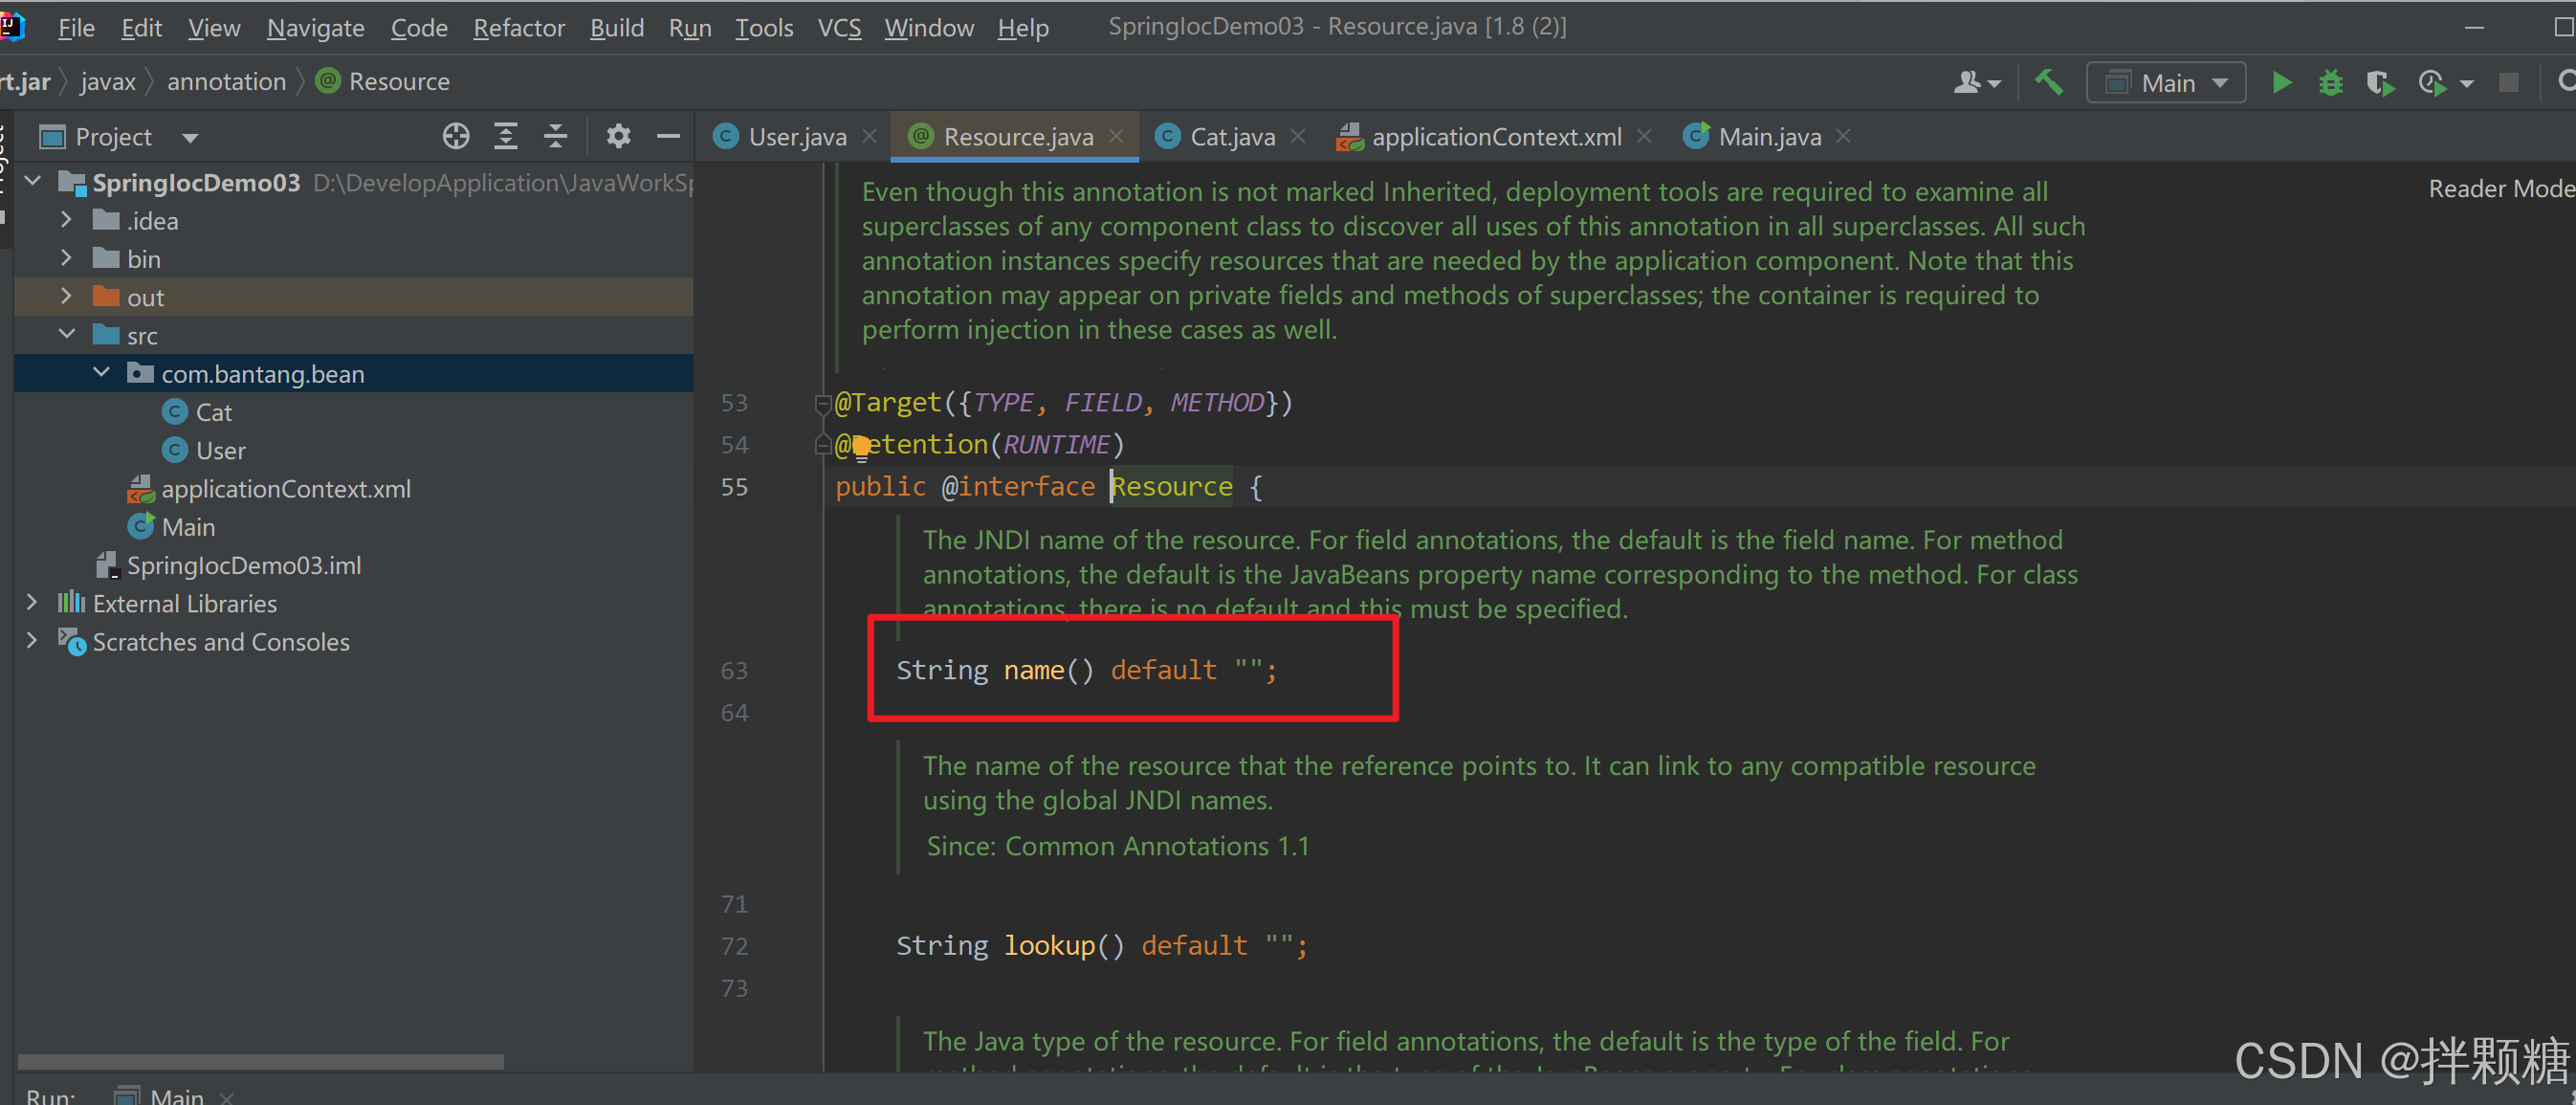
那我们测试的时候,没有传name,为什么不报错
原因:
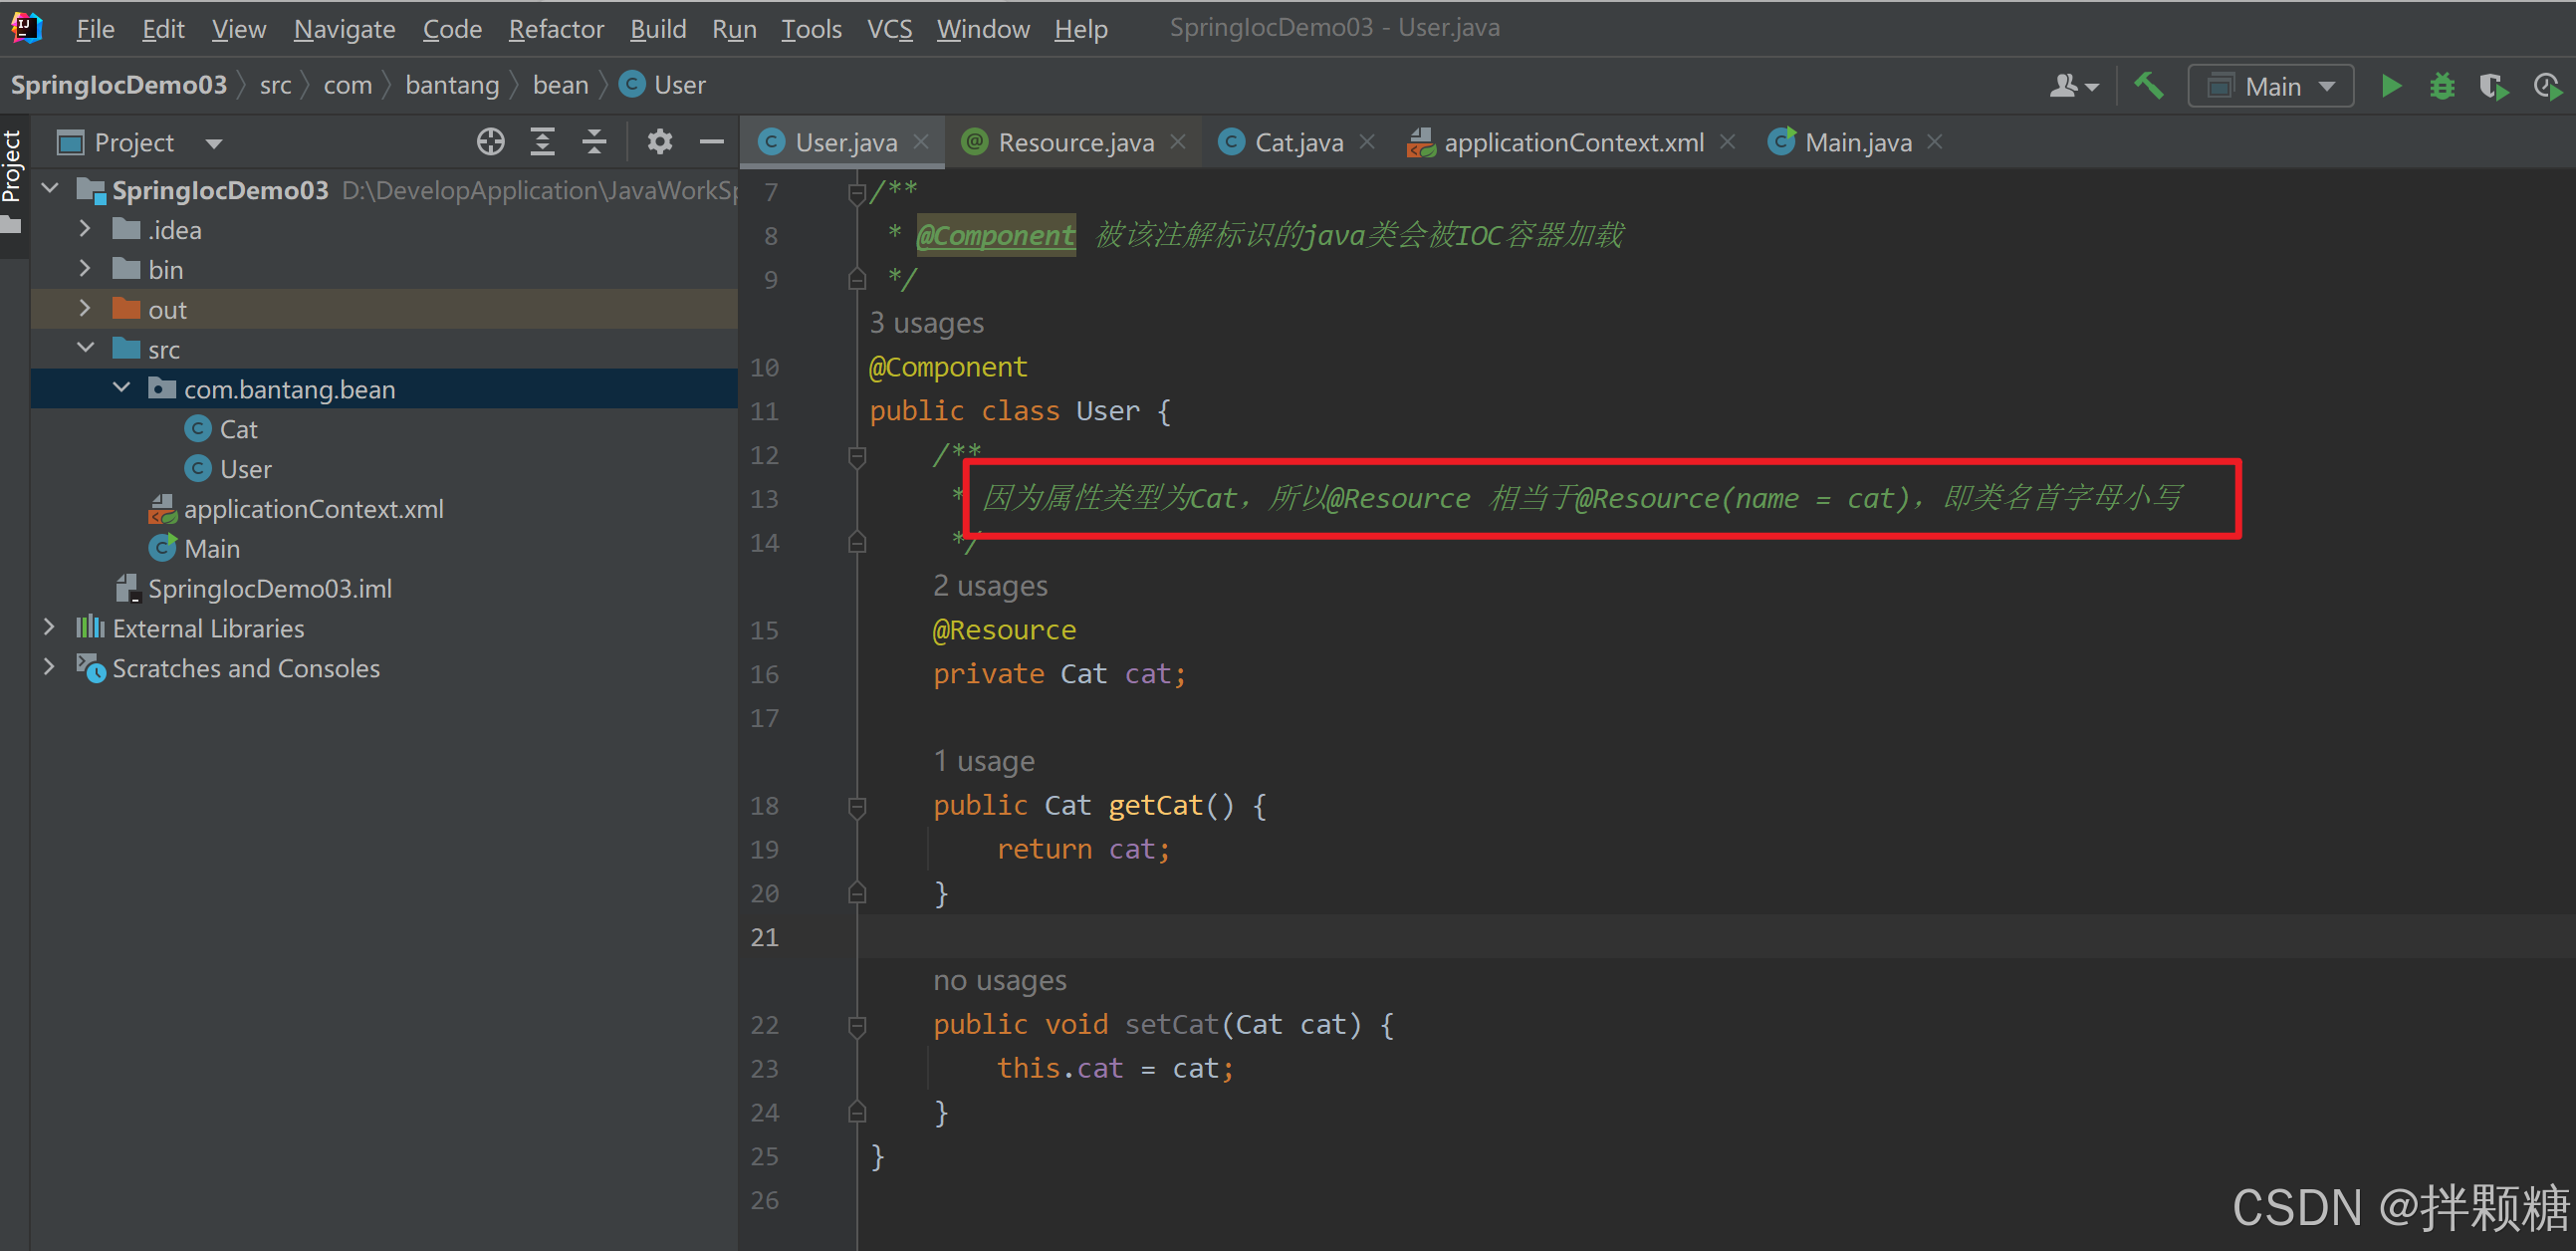
那问题又来了,我们并没有给Cat属性起名字“cat”,为什么不报错
原因:

我们点开@Component注解的源码知,需要传一个value值,这个值就是上图中的name,如果不传值,默认就是类名首字母小写
我们给Cat类起注入名cat1
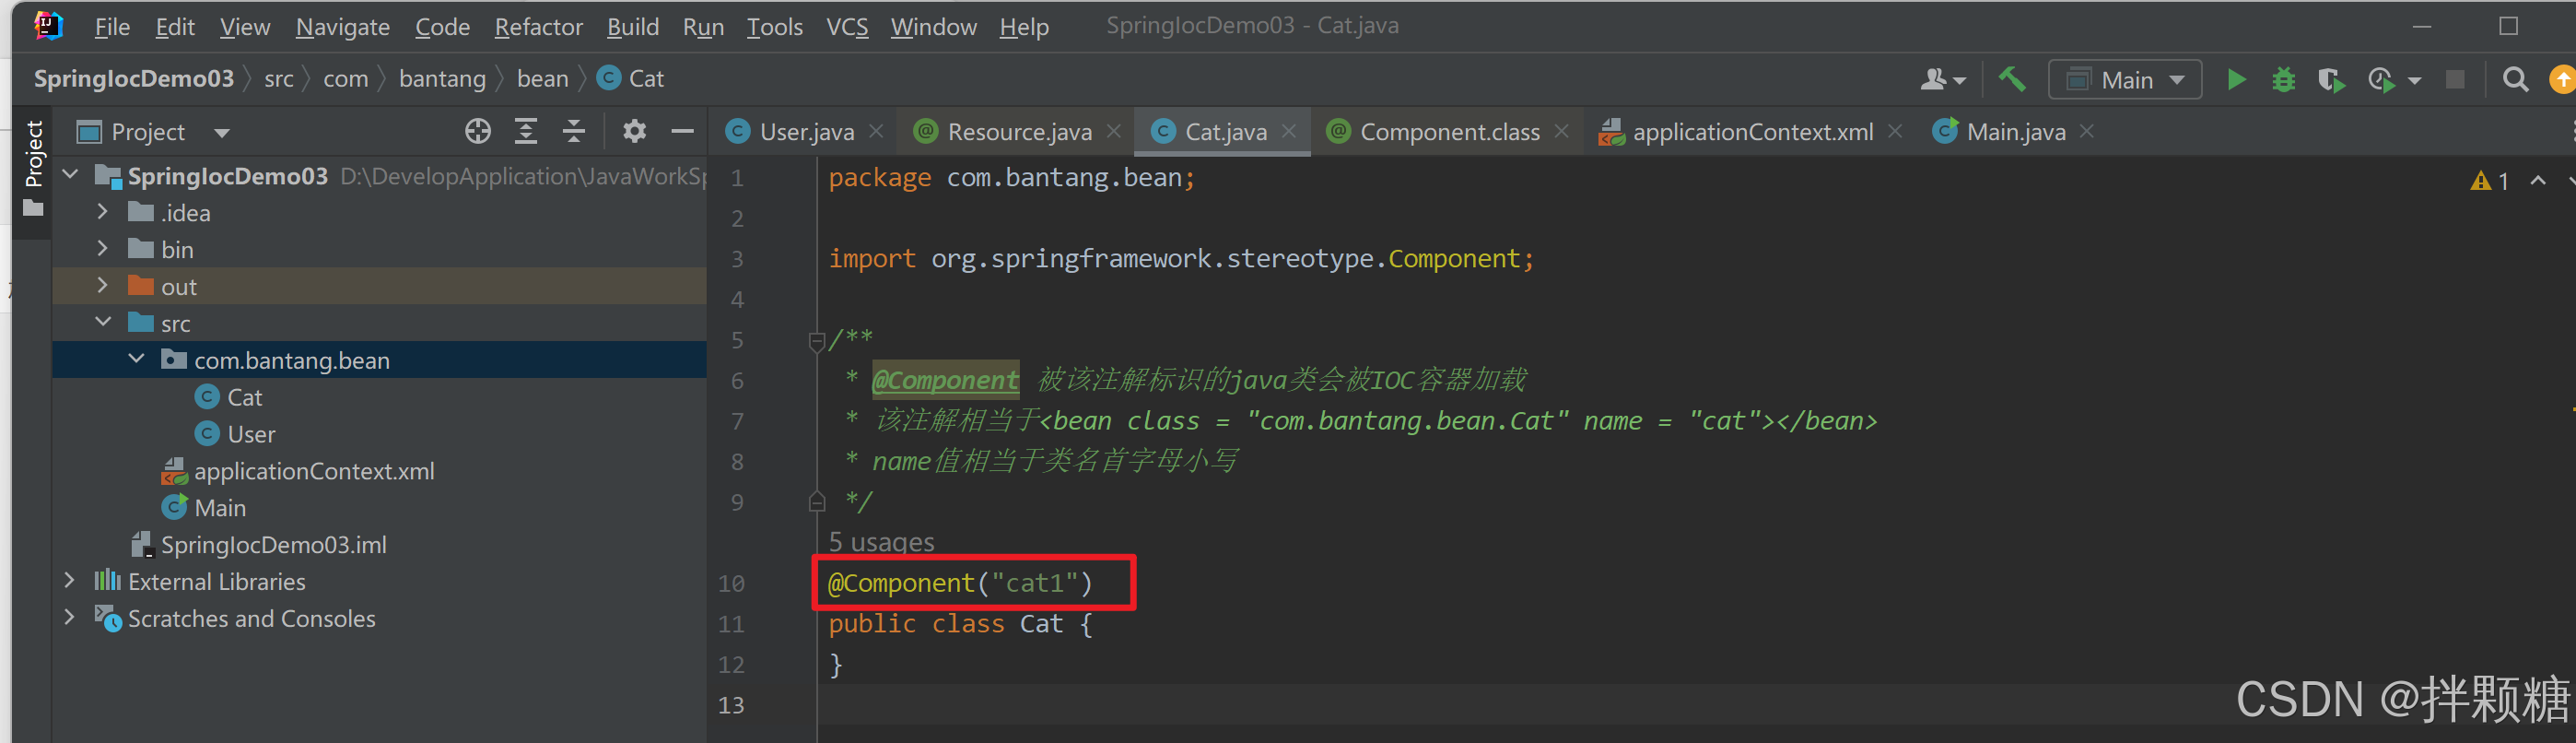
User类中的Cat属性起注入名cat
运行报错:
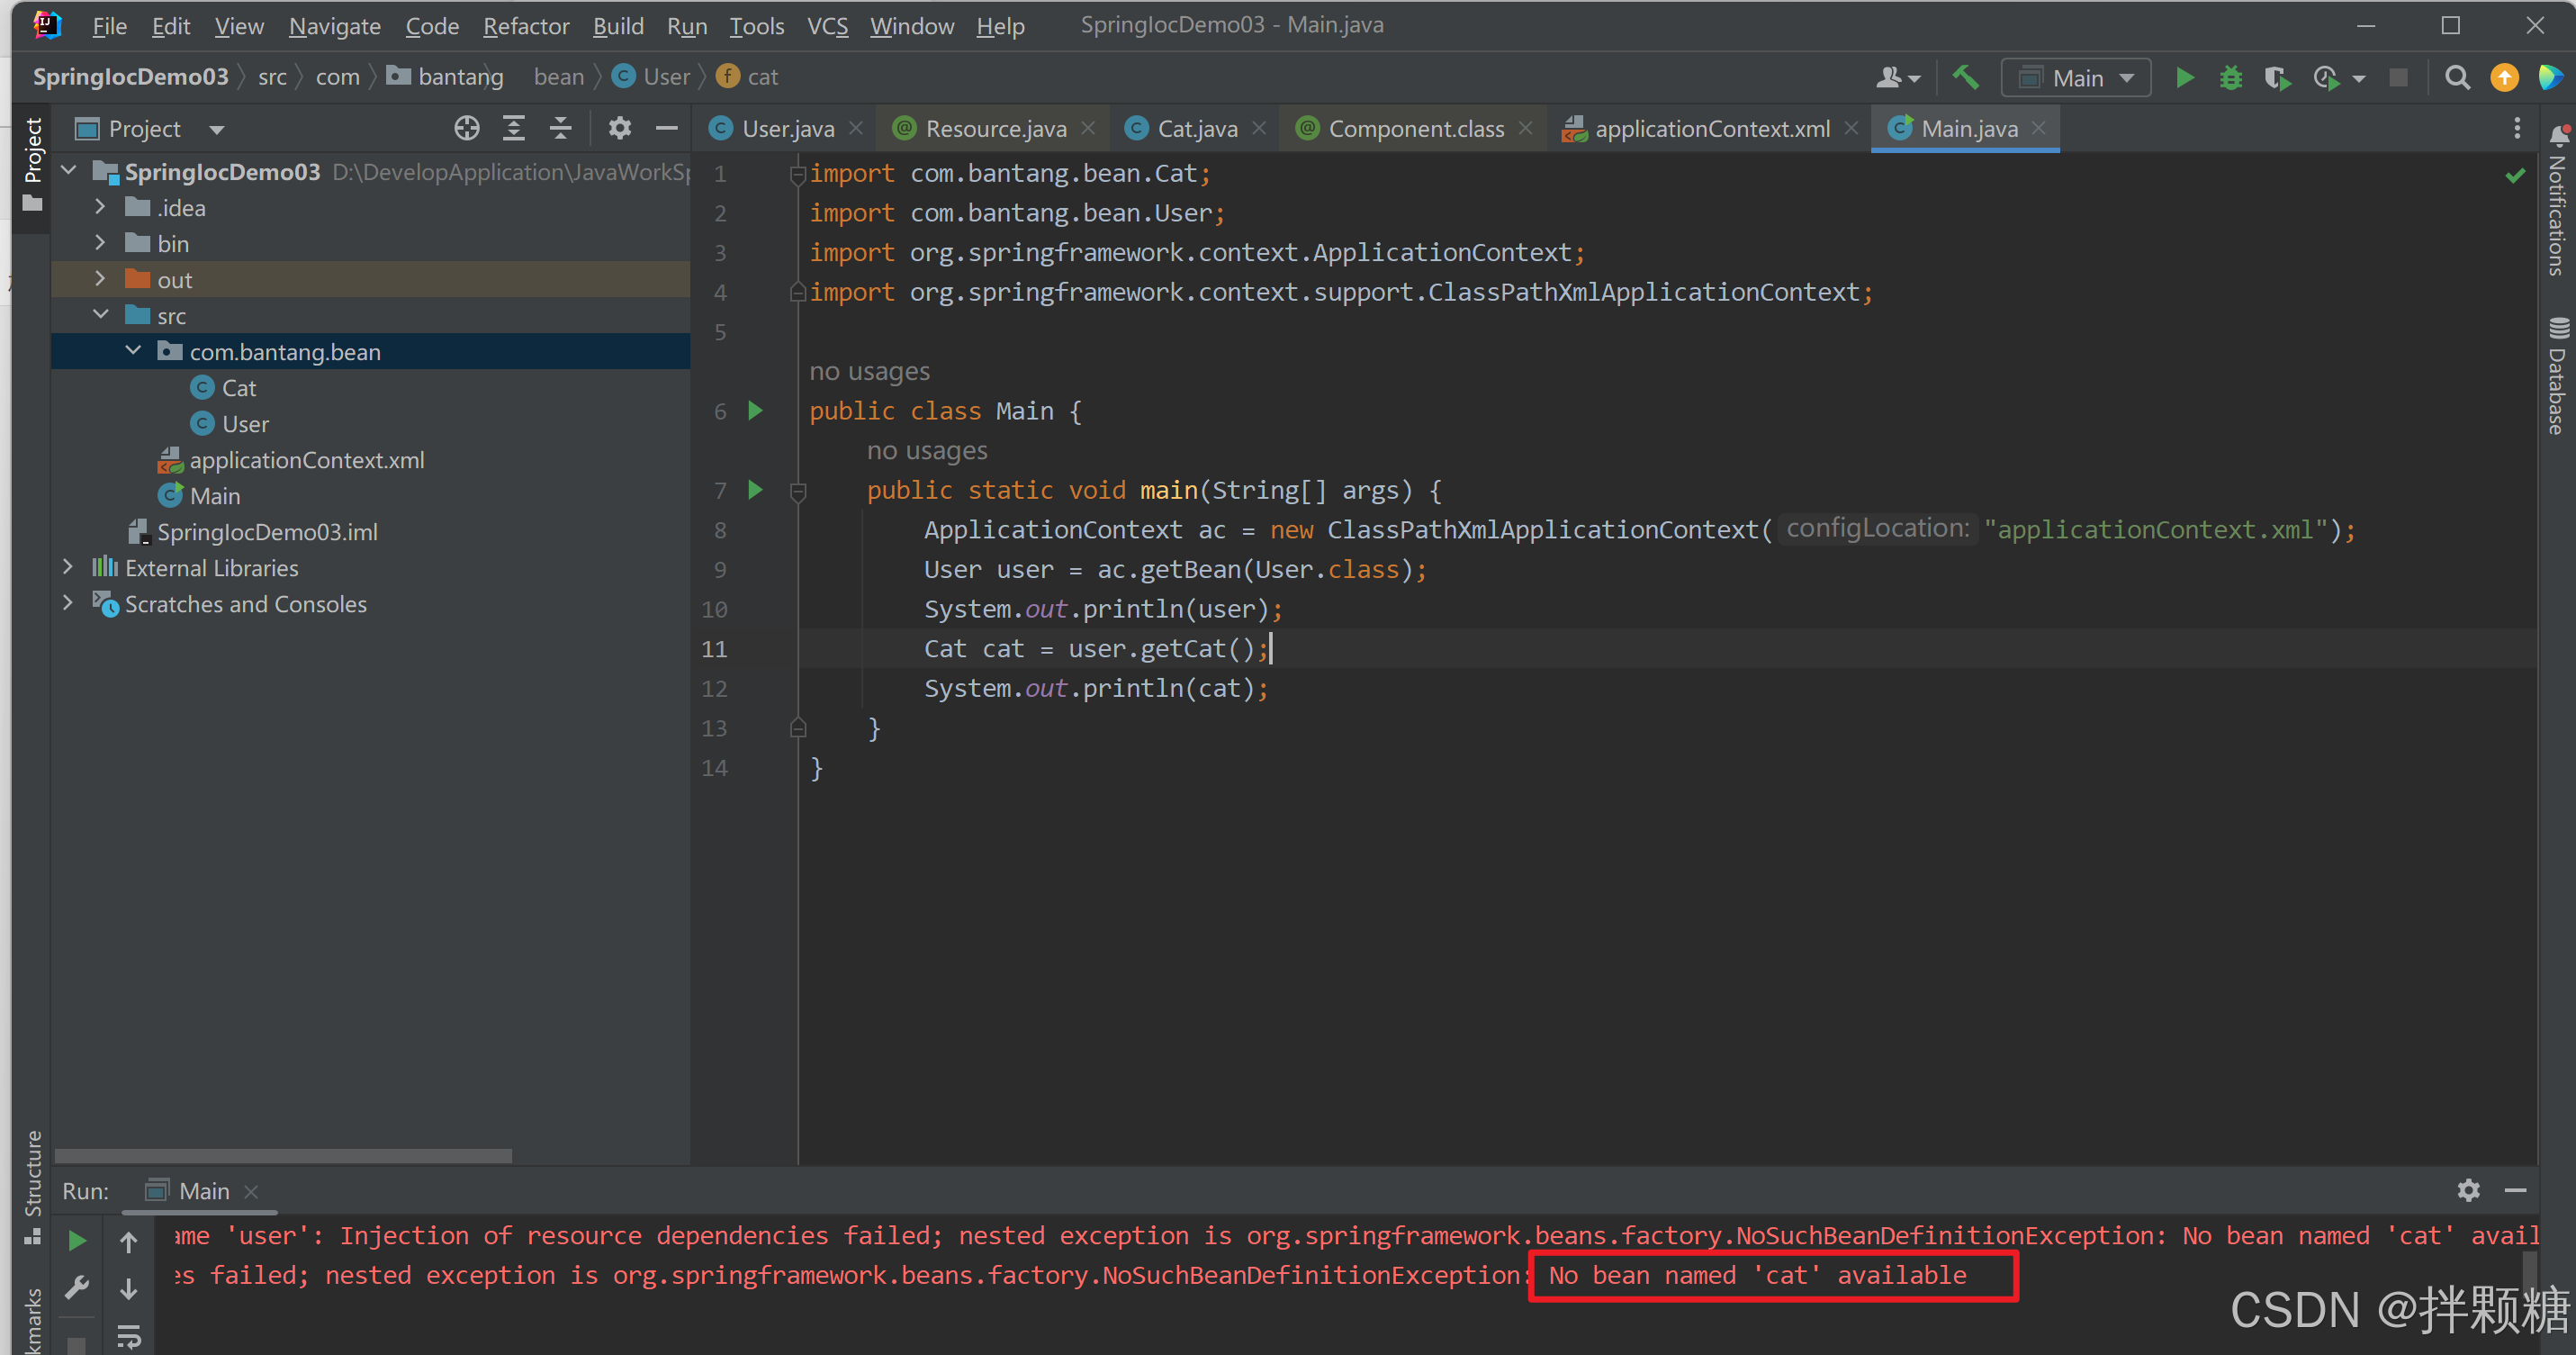
两者改为一致,即可
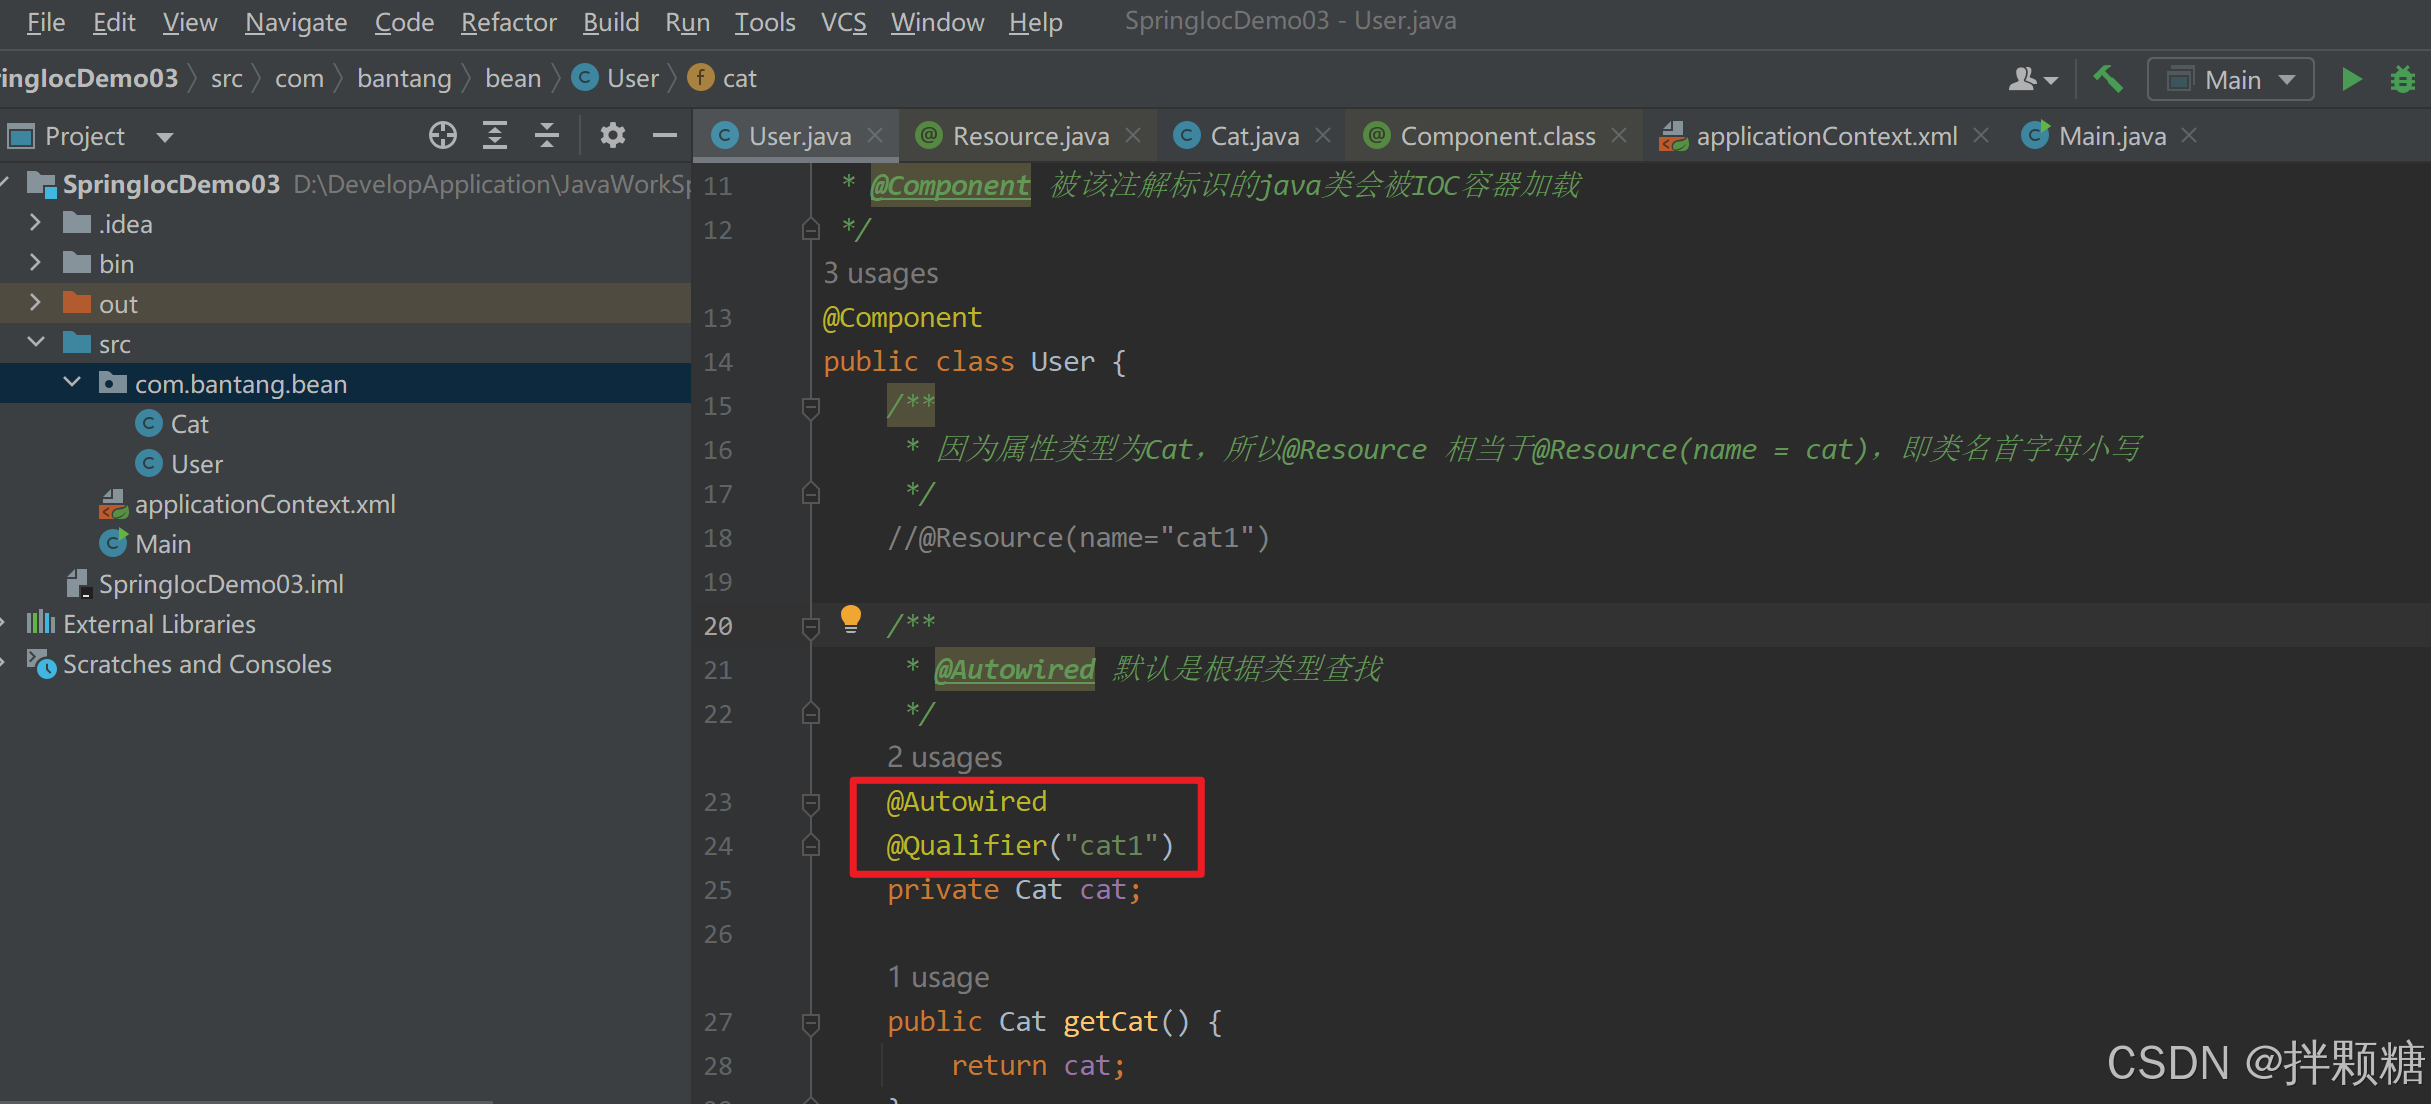
@Autowired注解
上面的@Resource注解是通过name注入,那还有没有别的方案?有的
@Autowired注解+@Qualifier注解的组合来实现注入,@Autowired注解查找扫描路径下的类类型,@Qualifier查找名字
基于注解 写一个小案例
简易图示

Bean
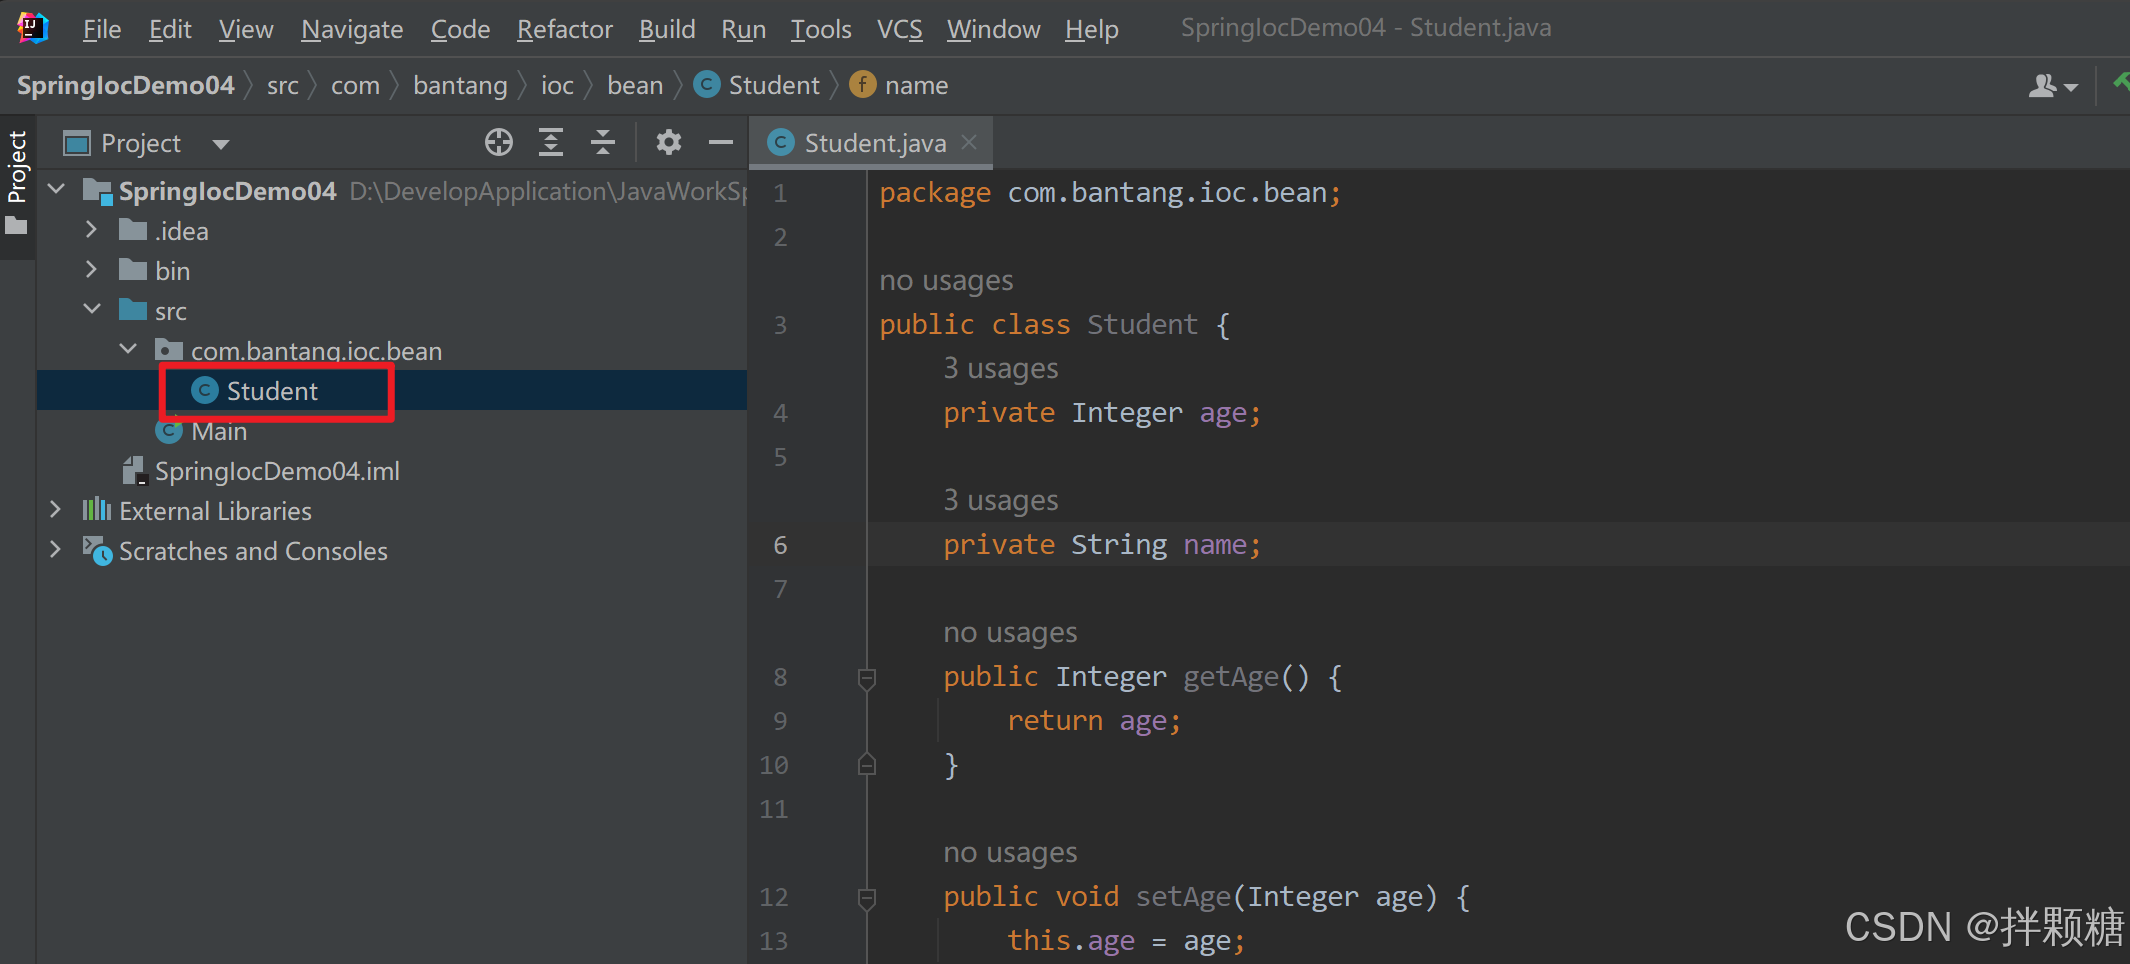
package com.bantang.ioc.bean;

public class Student {
	private Integer age;

	private String name;

	public Integer getAge() {
		return age;
	}

	public void setAge(Integer age) {
		this.age = age;
	}

	public String getName() {
		return name;
	}

	public void setName(String name) {
		this.name = name;
	}

	@Override
	public String toString() {
		return "Student{" +
				"age=" + age +
				", name='" + name + '\'' +
				'}';
	}
}
持久层
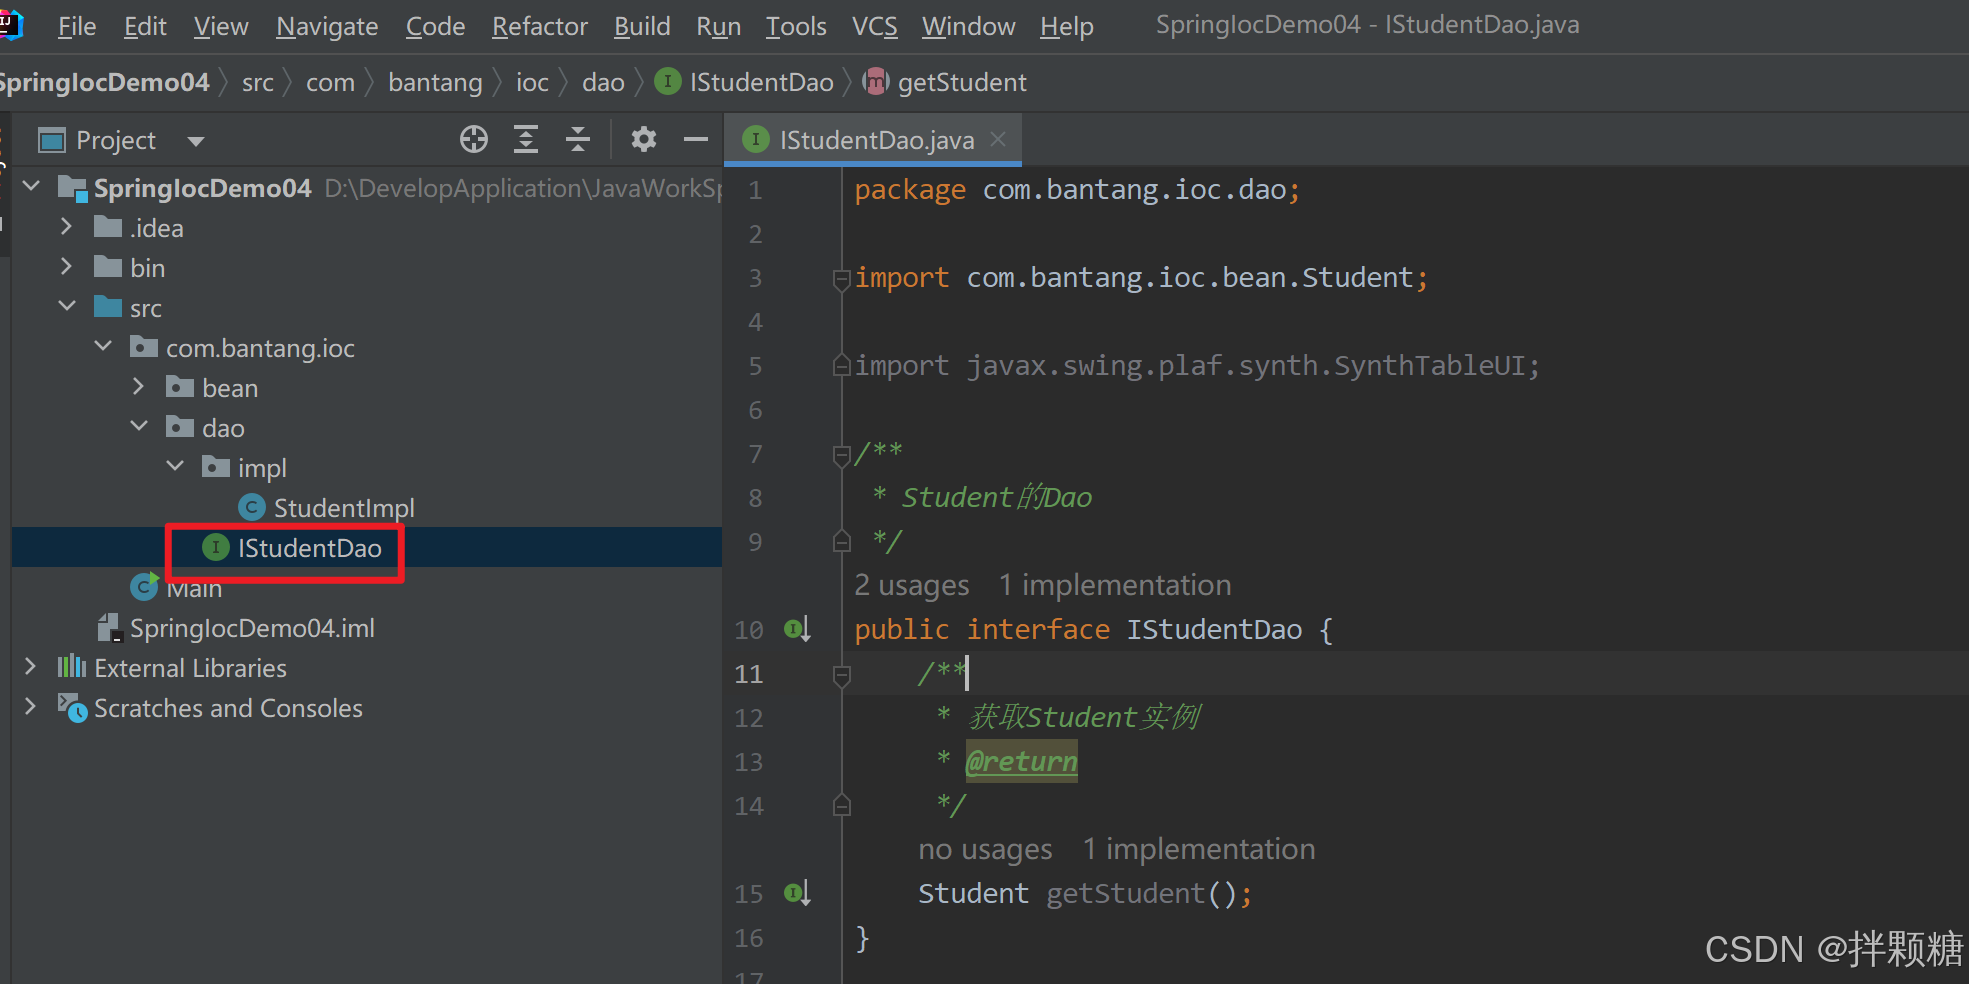
package com.bantang.ioc.dao;

import com.bantang.ioc.bean.Student;

import javax.swing.plaf.synth.SynthTableUI;

/**
 * Student的Dao
 */
public interface IStudentDao {
	/**
	 * 获取Student实例
	 * @return
	 */
	Student getStudent();
}
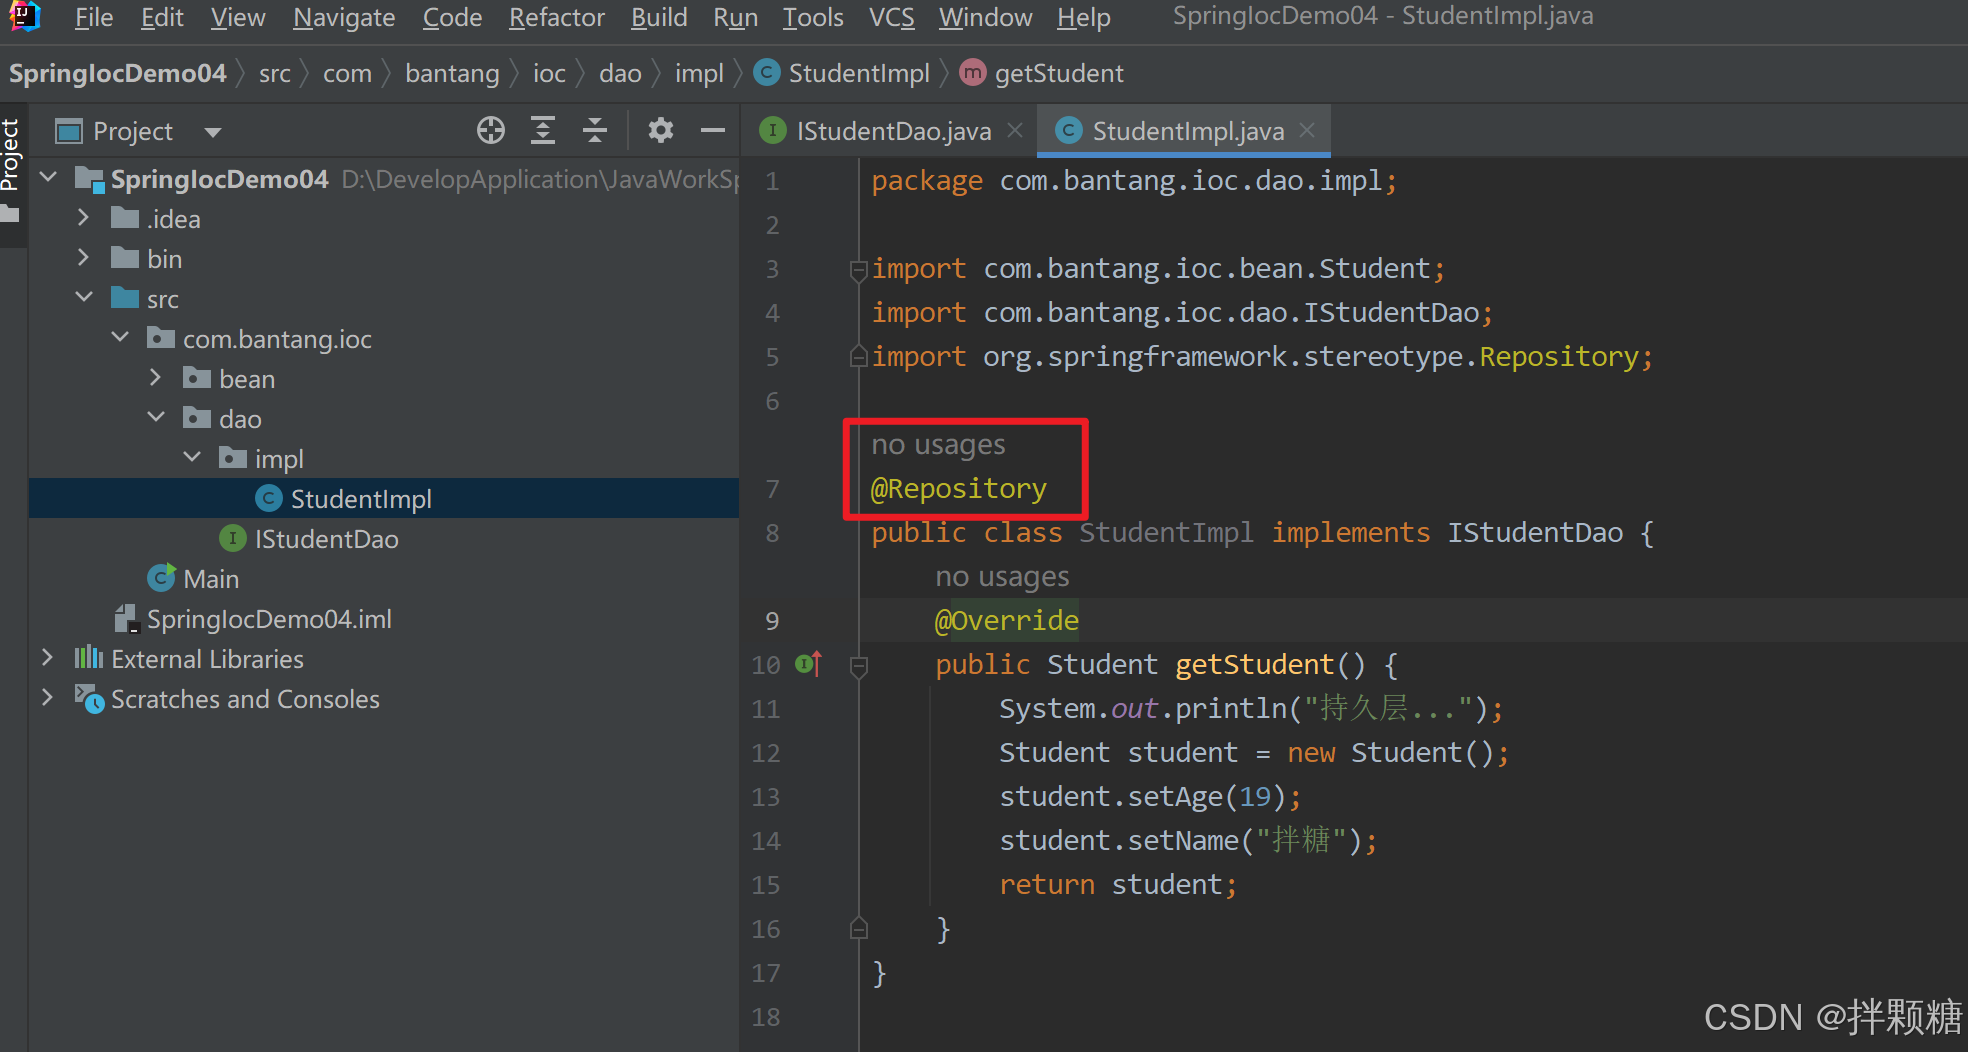
package com.bantang.ioc.dao.impl;
import com.bantang.ioc.bean.Student;
import com.bantang.ioc.dao.IStudentDao;
import org.springframework.stereotype.Repository;
/**
* Student的Dao实现
*/
@Repository
public class StudentDaoImpl implements IStudentDao {
@Override
public Student getStudent() {
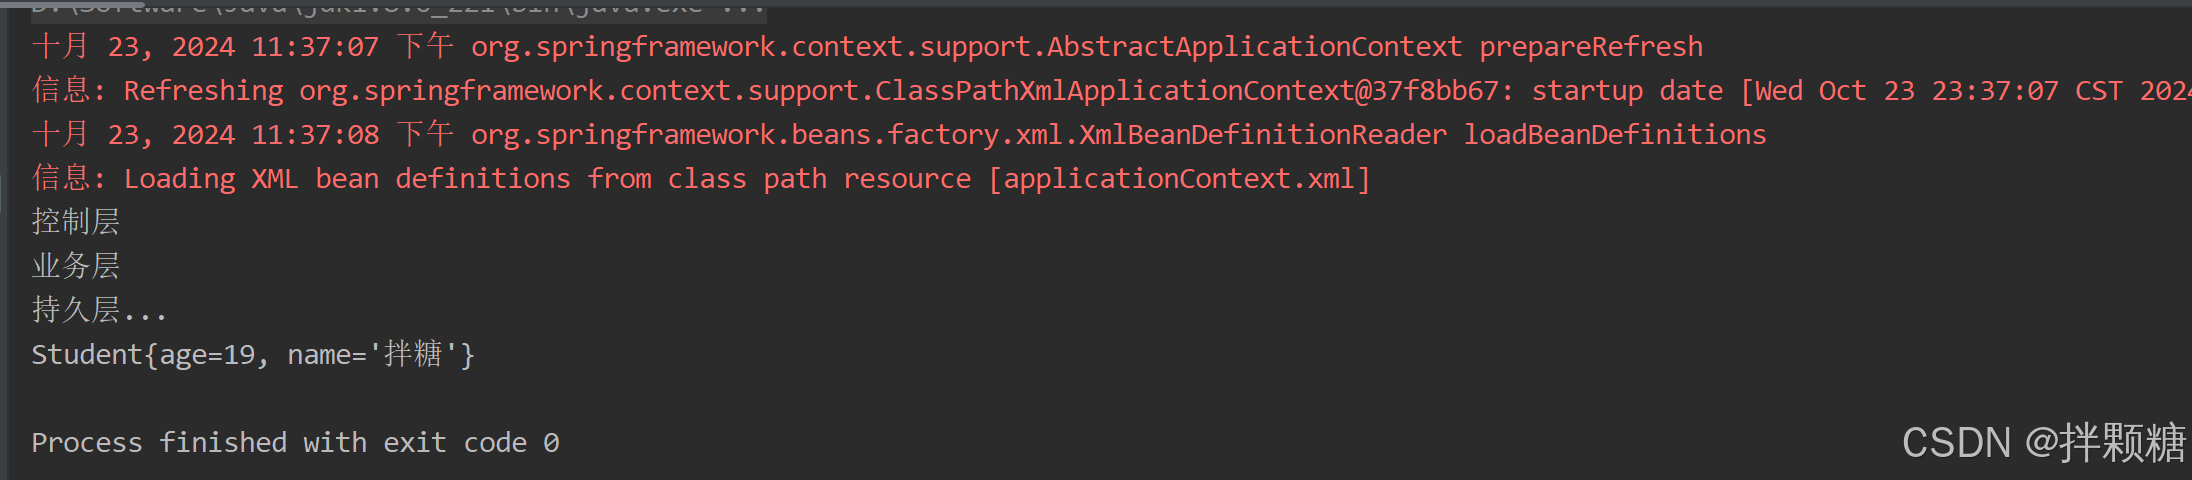
System.out.println("持久层...");
Student student = new Student();
student.setAge(19);
student.setName("拌糖");
return student;
}
}
业务层
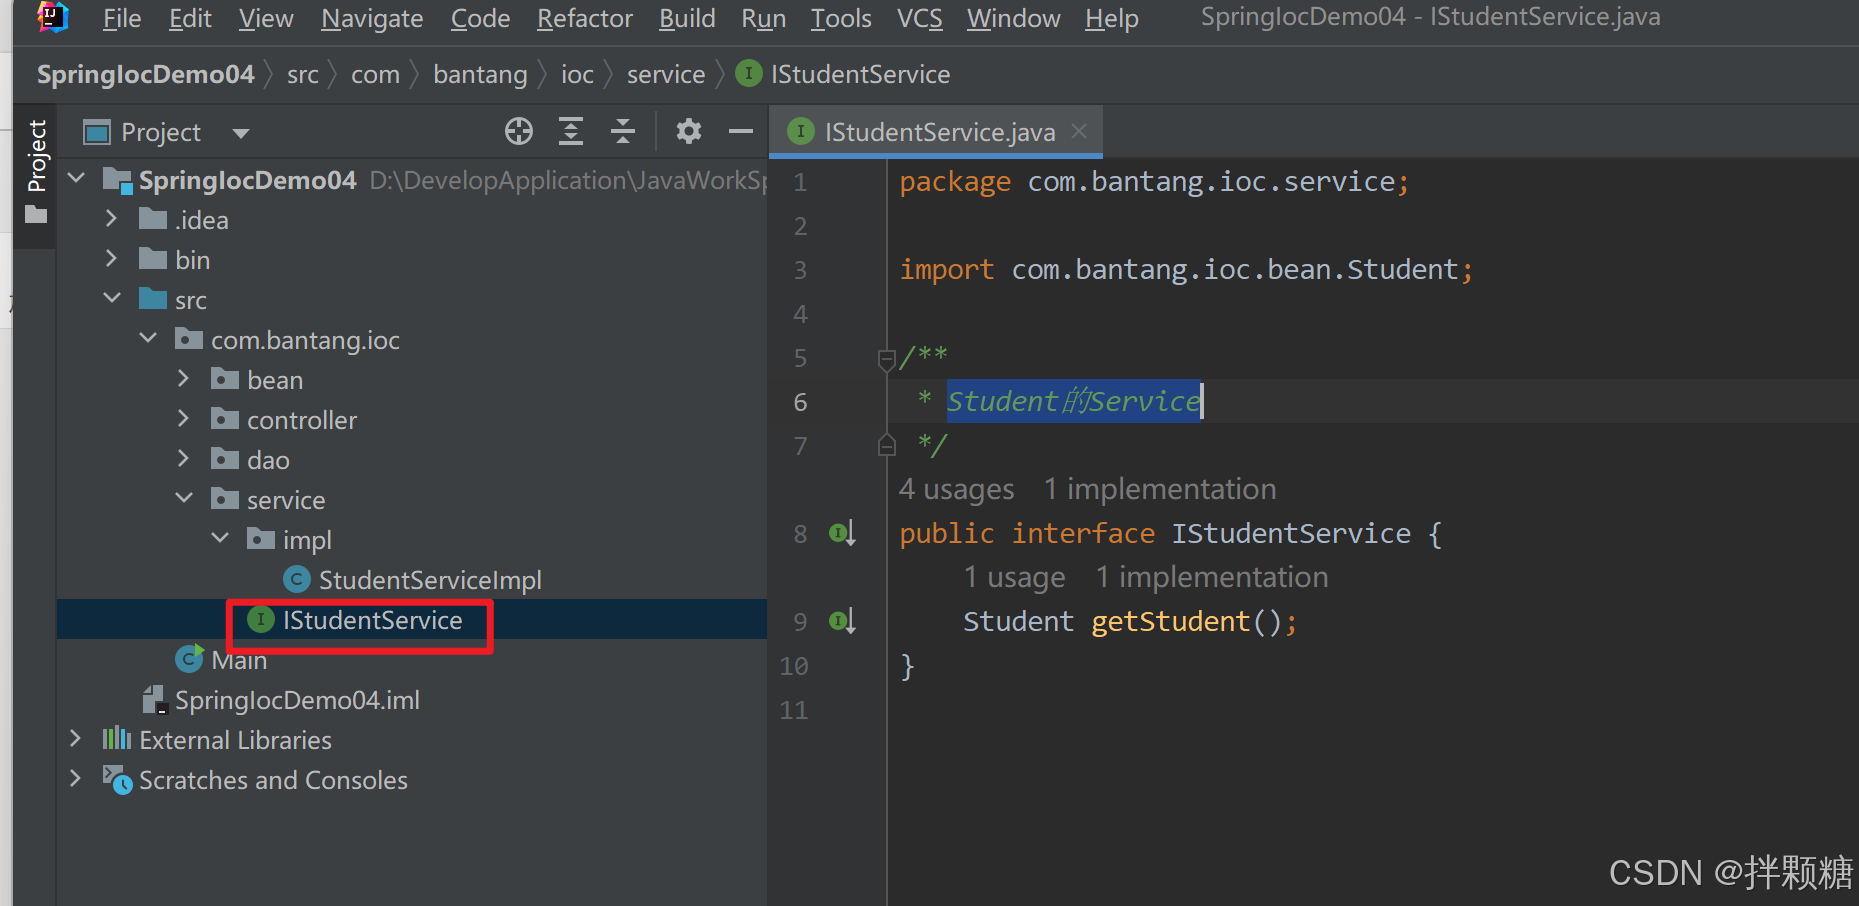
package com.bantang.ioc.service;

import com.bantang.ioc.bean.Student;

/**
 * Student的Service
 */
public interface IStudentService {
	Student getStudent();
}
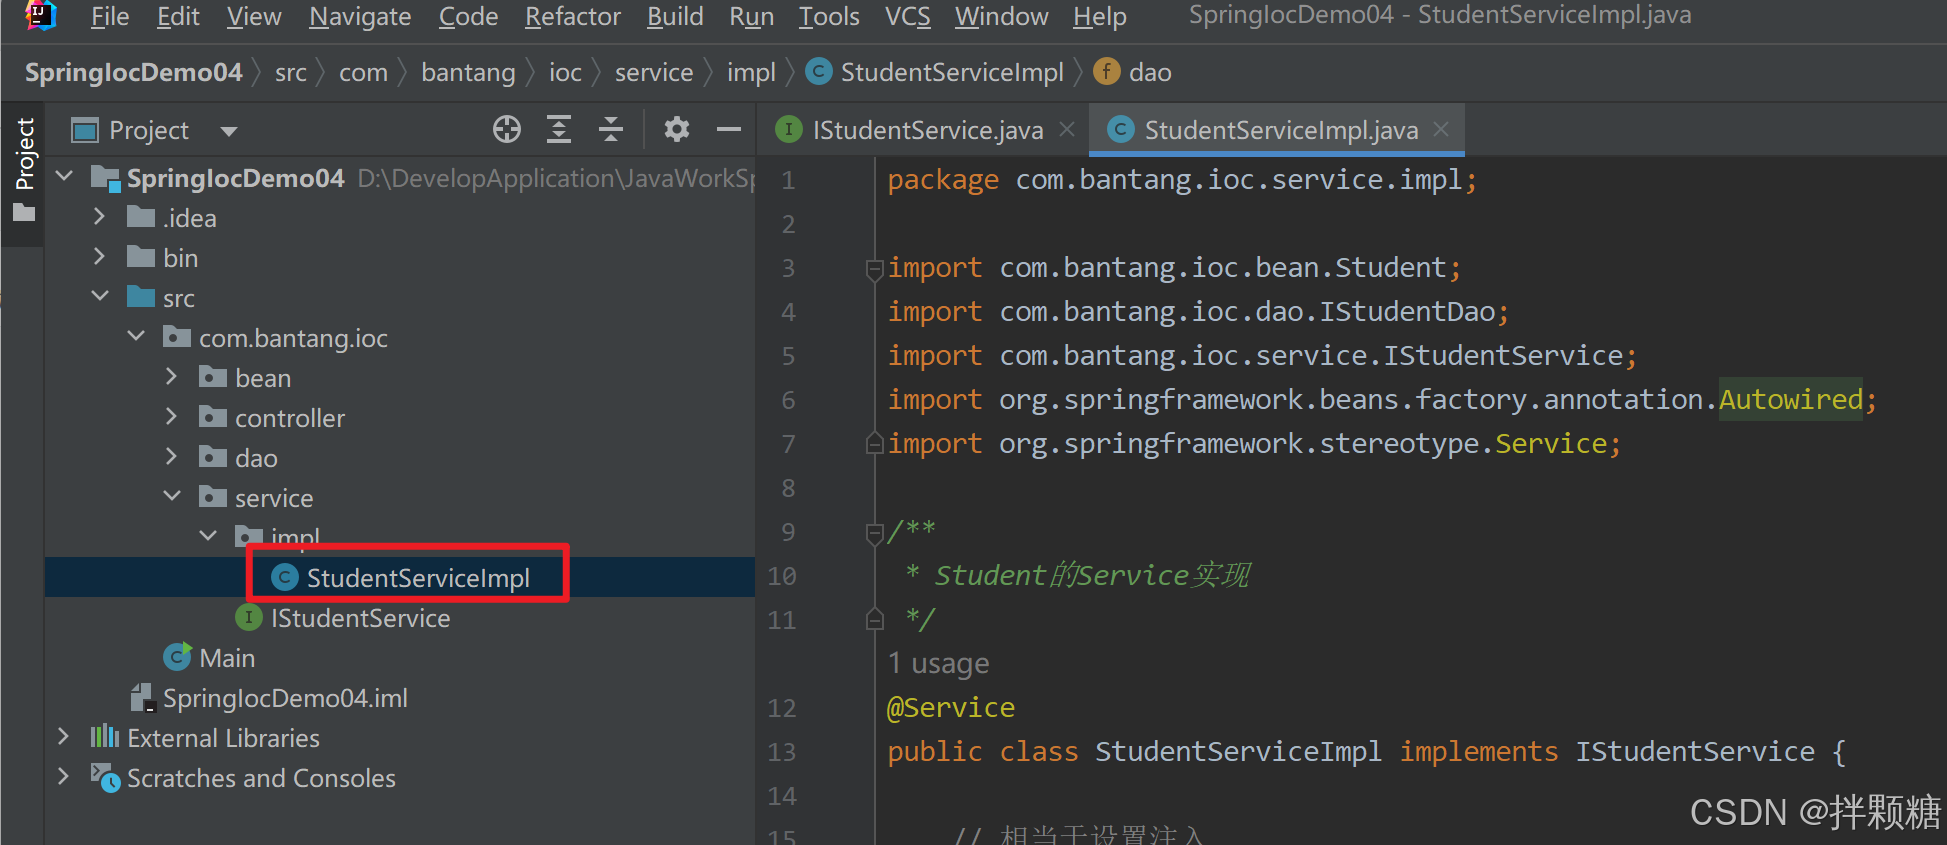
package com.bantang.ioc.service.impl;

import com.bantang.ioc.bean.Student;
import com.bantang.ioc.dao.IStudentDao;
import com.bantang.ioc.service.IStudentService;
import org.springframework.beans.factory.annotation.Autowired;
import org.springframework.stereotype.Service;

/**
 * Student的Service实现
 */
@Service
public class StudentServiceImpl implements IStudentService {

	// 相当于设置注入
	@Autowired
	private IStudentDao dao;

	@Override
	public Student getStudent() {
		System.out.println("业务层");
		return dao.getStudent();
	}
}
控制层
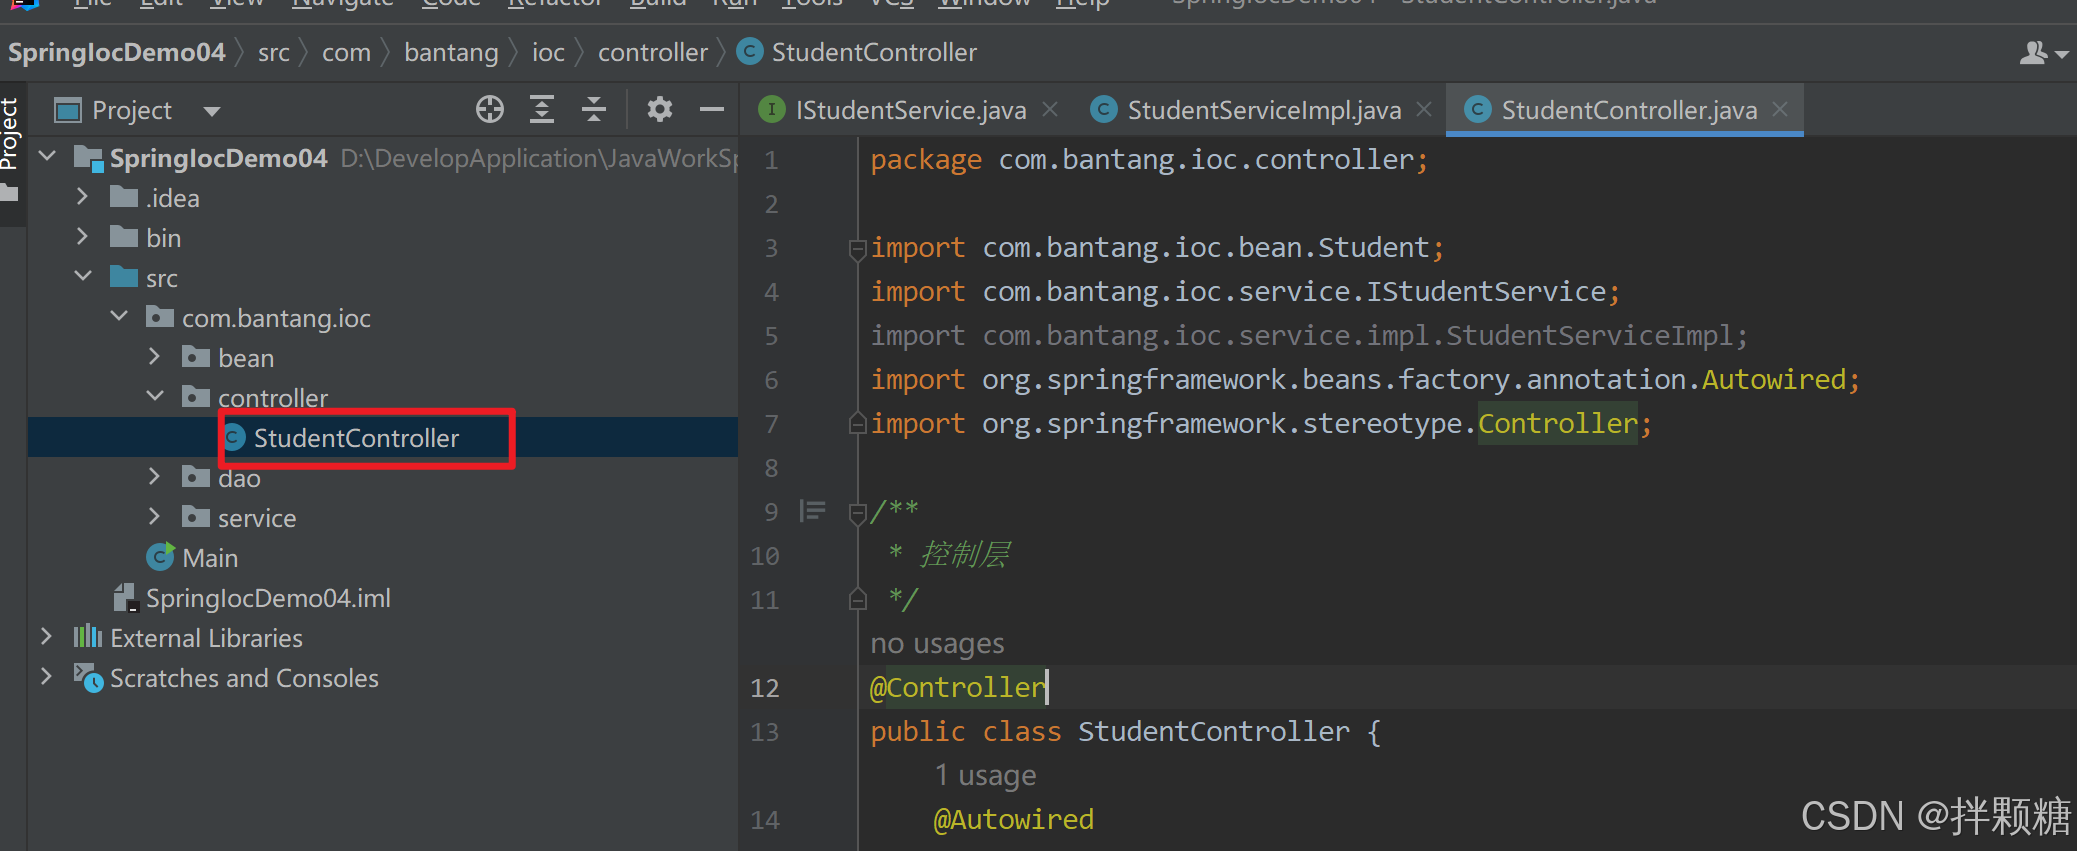
package com.bantang.ioc.controller;

import com.bantang.ioc.bean.Student;
import com.bantang.ioc.service.IStudentService;
import com.bantang.ioc.service.impl.StudentServiceImpl;
import org.springframework.beans.factory.annotation.Autowired;
import org.springframework.stereotype.Controller;

/**
 * 控制层
 */
@Controller
public class StudentController {
	@Autowired
	private IStudentService service;

	public Student queryStudent(){
		System.out.println("控制层");
		return service.getStudent();
	}
}
容器配置文件
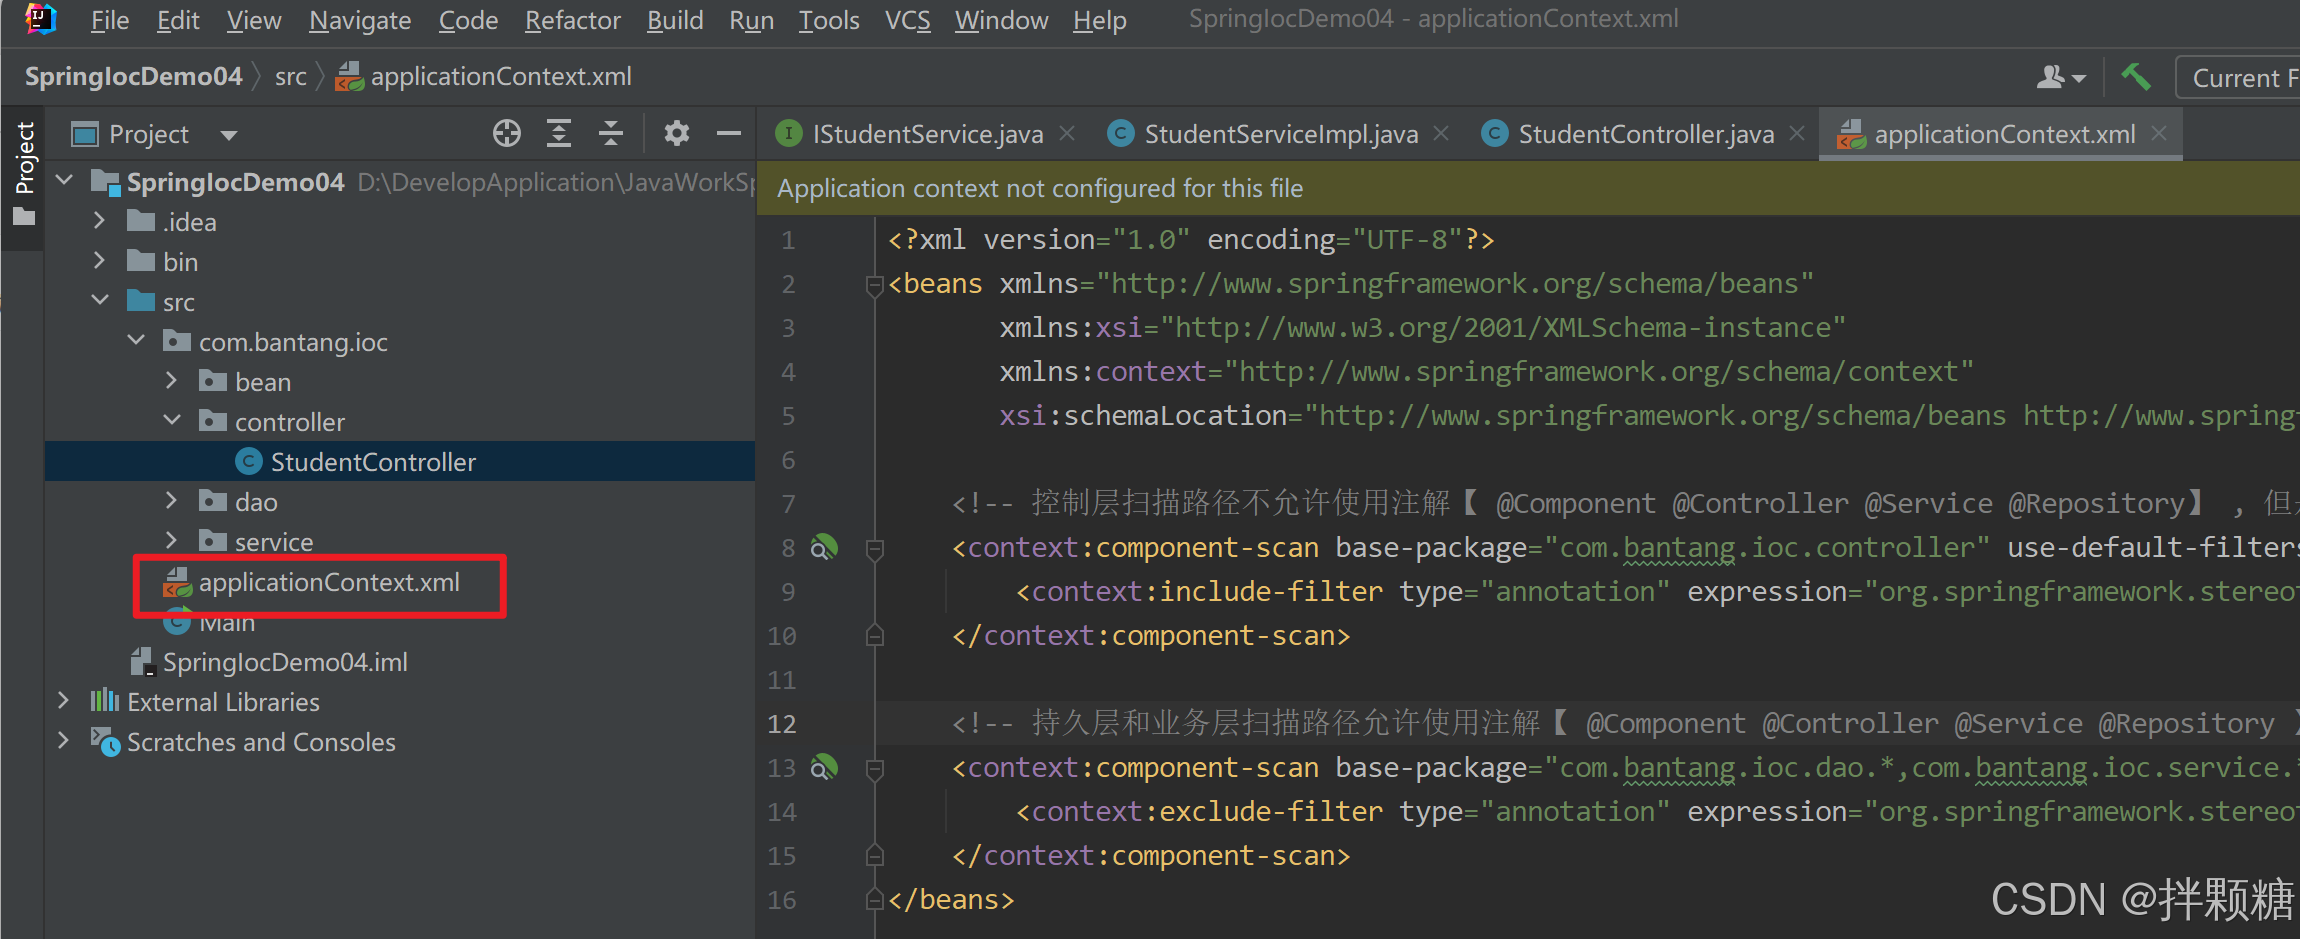
<?xml version="1.0" encoding="UTF-8"?>
<beans xmlns="http://www.springframework.org/schema/beans"
	   xmlns:xsi="http://www.w3.org/2001/XMLSchema-instance"
	   xmlns:context="http://www.springframework.org/schema/context"
	   xsi:schemaLocation="http://www.springframework.org/schema/beans http://www.springframework.org/schema/beans/spring-beans.xsd http://www.springframework.org/schema/context http://www.springframework.org/schema/context/spring-context.xsd">

	<!-- 控制层扫描路径不允许使用注解【 @Component @Controller @Service @Repository】 , 但是允许使用@Controller注解 -->
	<context:component-scan base-package="com.bantang.ioc.controller" use-default-filters="false">
		<context:include-filter type="annotation" expression="org.springframework.stereotype.Controller"/>
	</context:component-scan>

	<!-- 持久层和业务层扫描路径允许使用注解【 @Component @Controller @Service @Repository 】, 但是不允许使用@Controller注解 -->
	<context:component-scan base-package="com.bantang.ioc.dao.*,com.bantang.ioc.service.*" use-default-filters="true">
		<context:exclude-filter type="annotation" expression="org.springframework.stereotype.Controller"/>
	</context:component-scan>
</beans>
运行演示
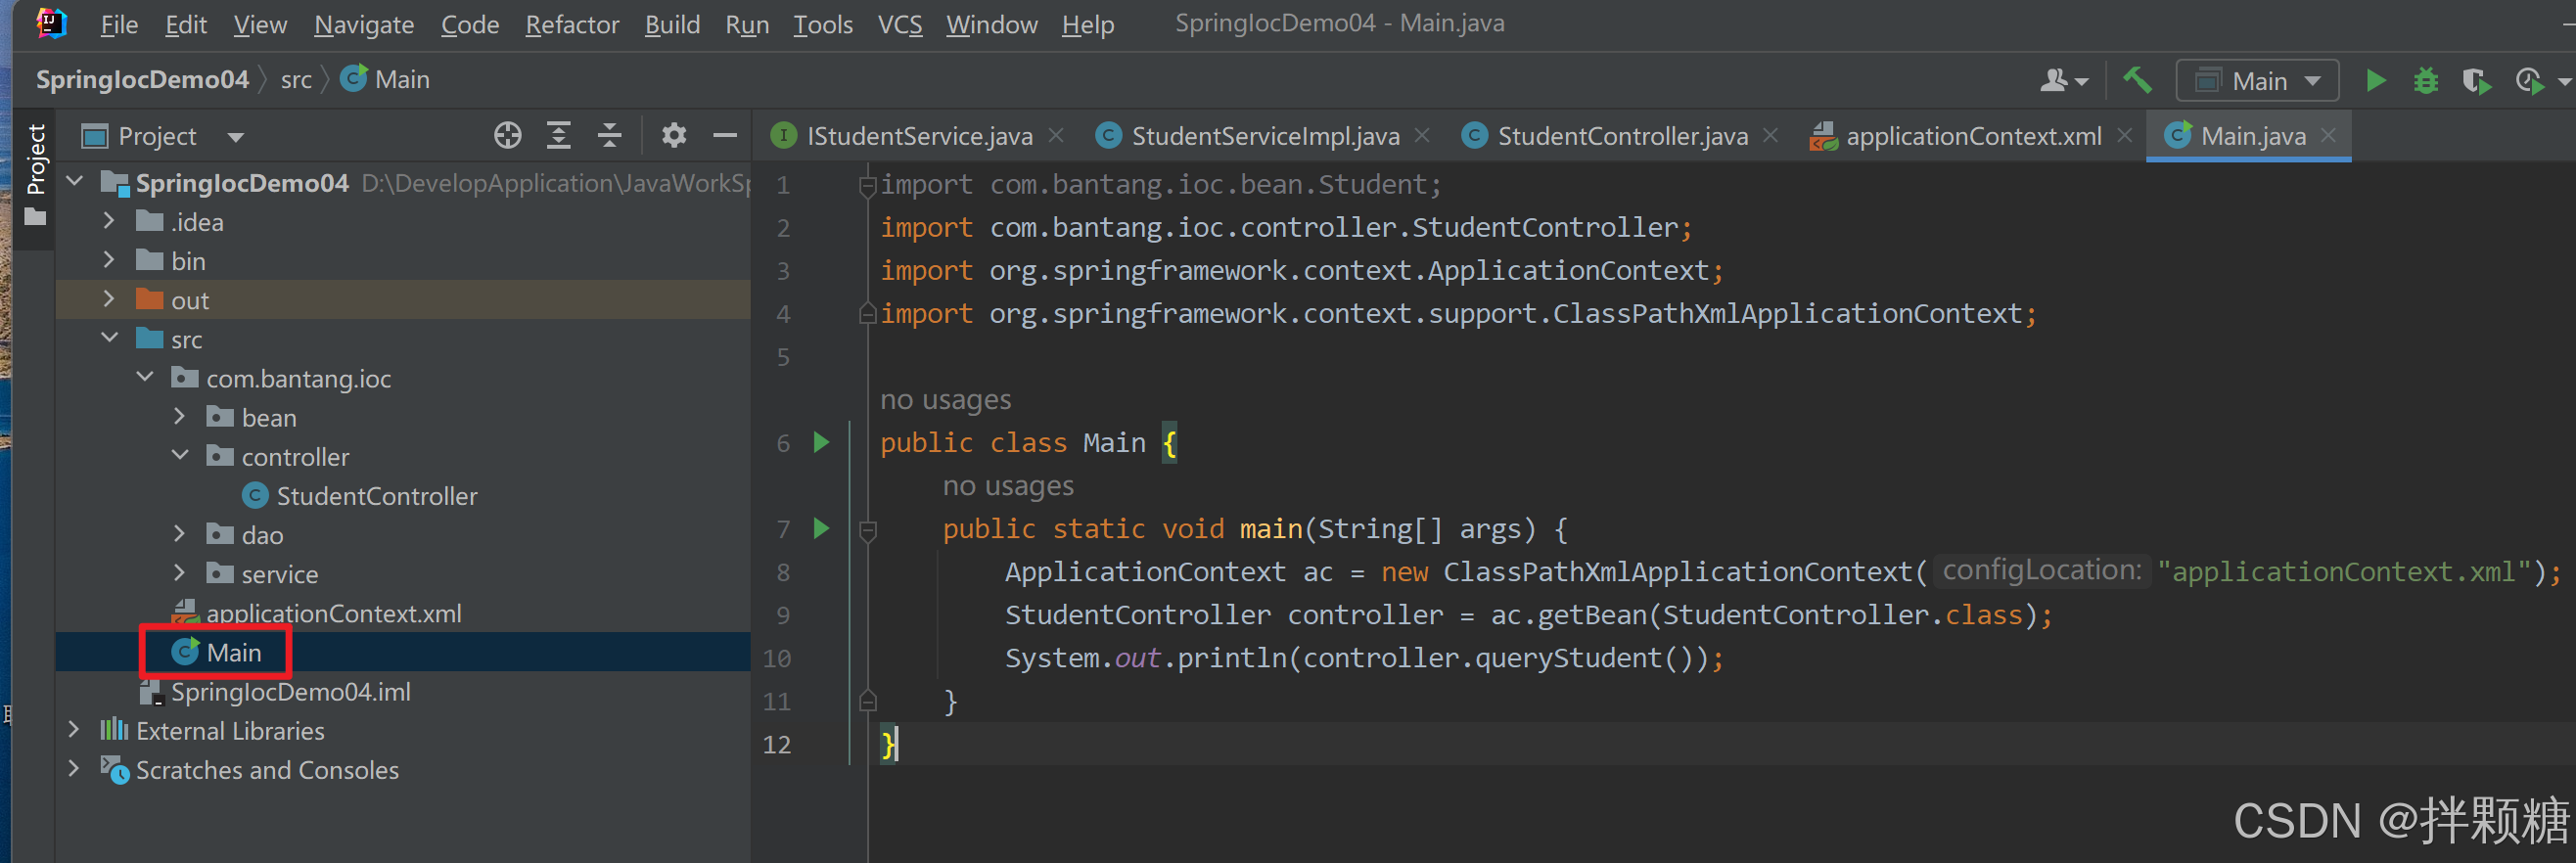
import com.bantang.ioc.bean.Student;
import com.bantang.ioc.controller.StudentController;
import org.springframework.context.ApplicationContext;
import org.springframework.context.support.ClassPathXmlApplicationContext;

public class Main {
	public static void main(String[] args) {
		ApplicationContext ac = new ClassPathXmlApplicationContext("applicationContext.xml");
		StudentController controller = ac.getBean(StudentController.class);
		System.out.println(controller.queryStudent());
	}
}
Java配置类
在xml容器配置文件中注册Bean是不是很麻烦
o( ̄︶ ̄)Spring官方肯定能想到
从3.x版本开始,因为配置类的形式,开始舍弃配置文件
@Configuration注解
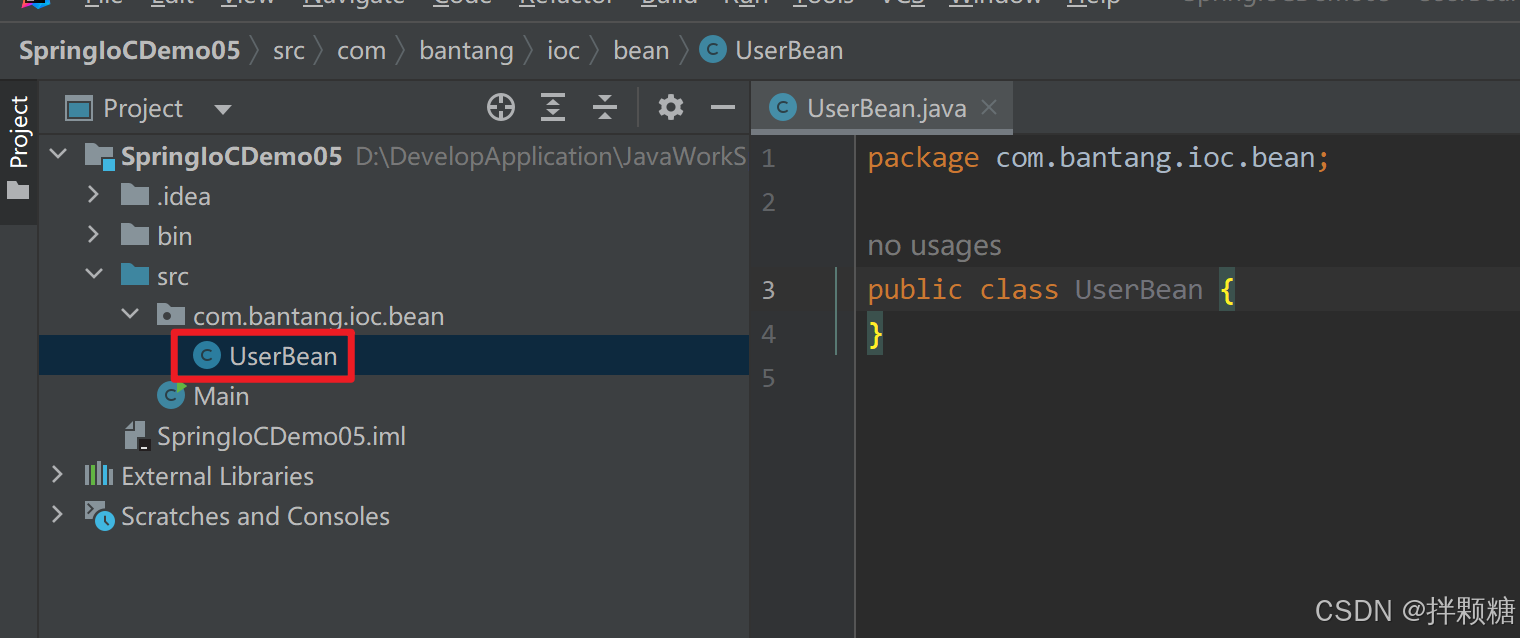
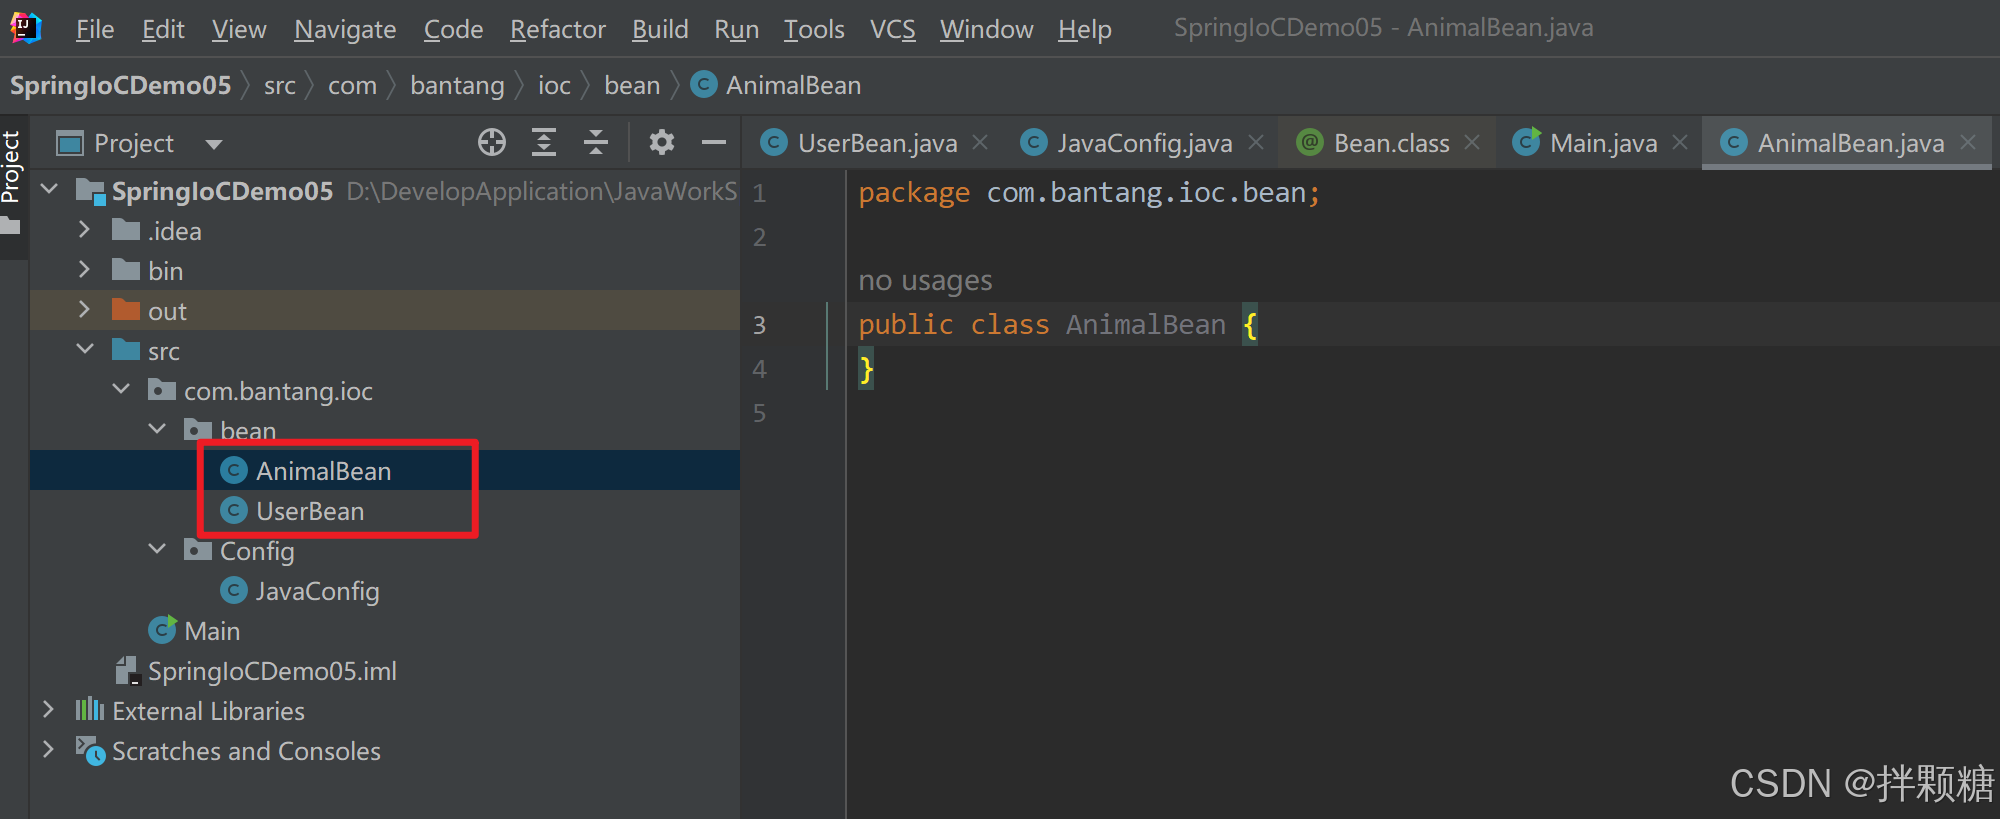
新建bean
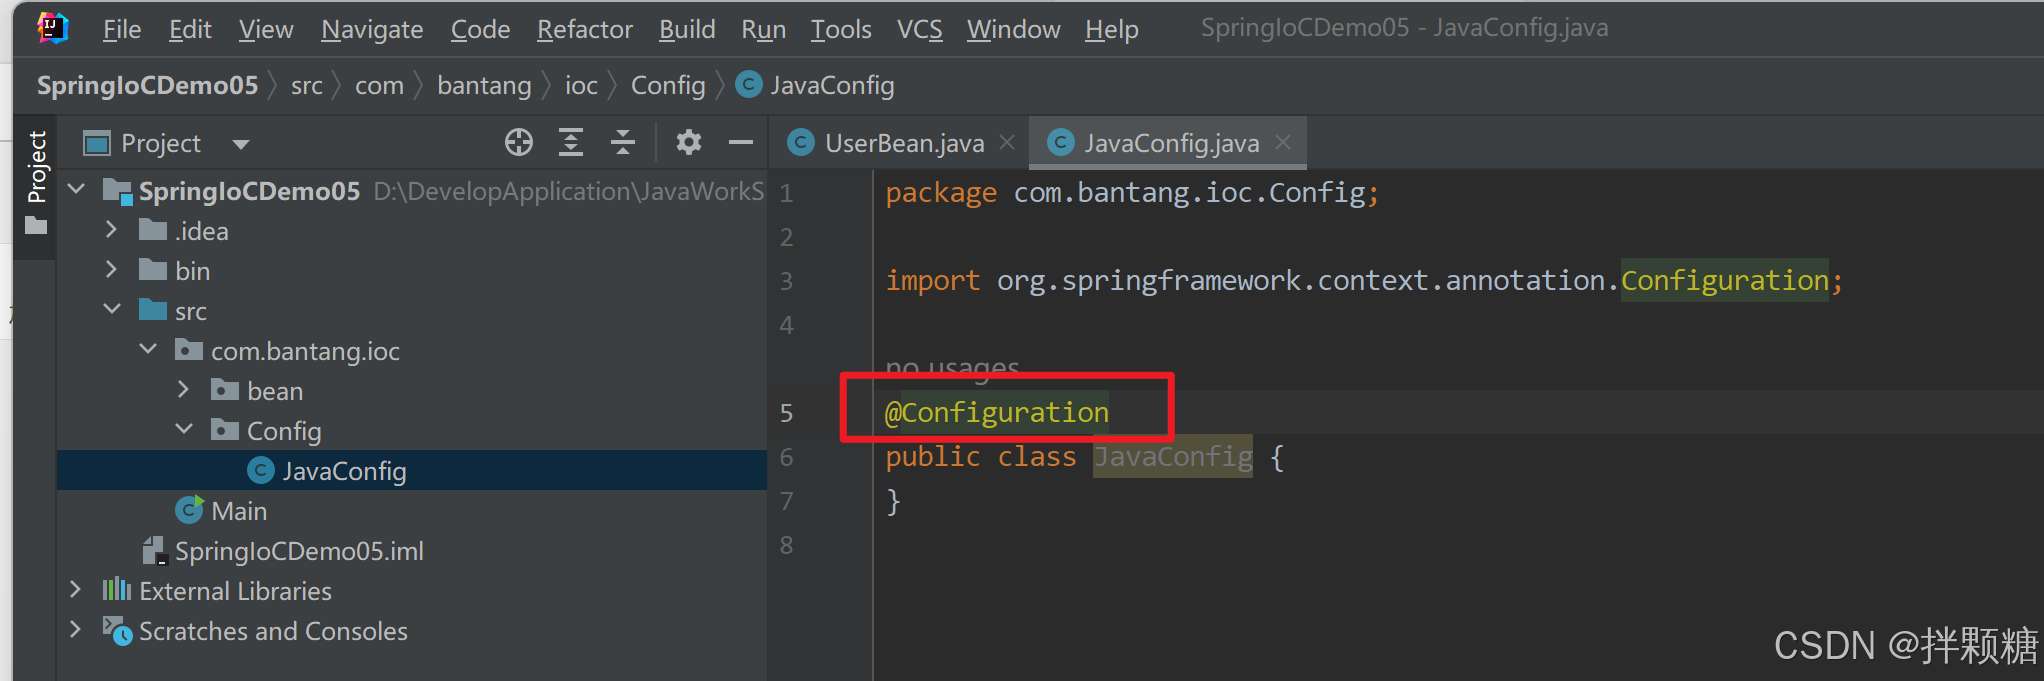
新建配置类 加上@Configuration注解 此时配置类就相当于是xml配置文件了
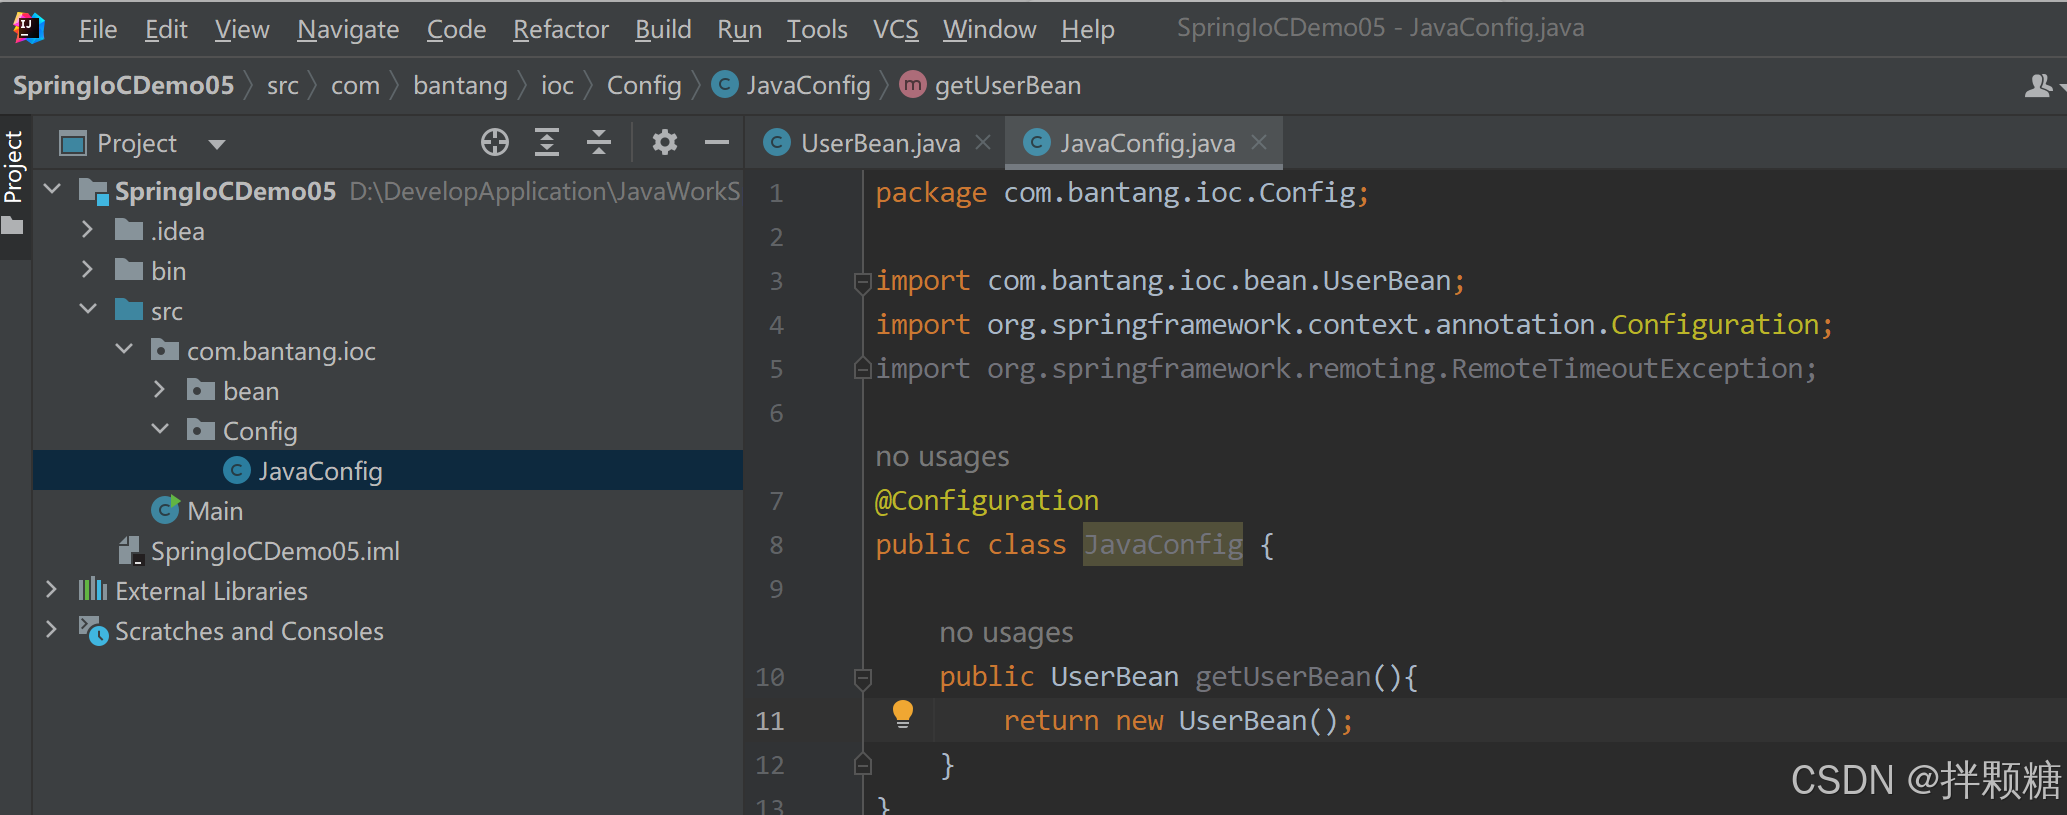
配置类中注册bean
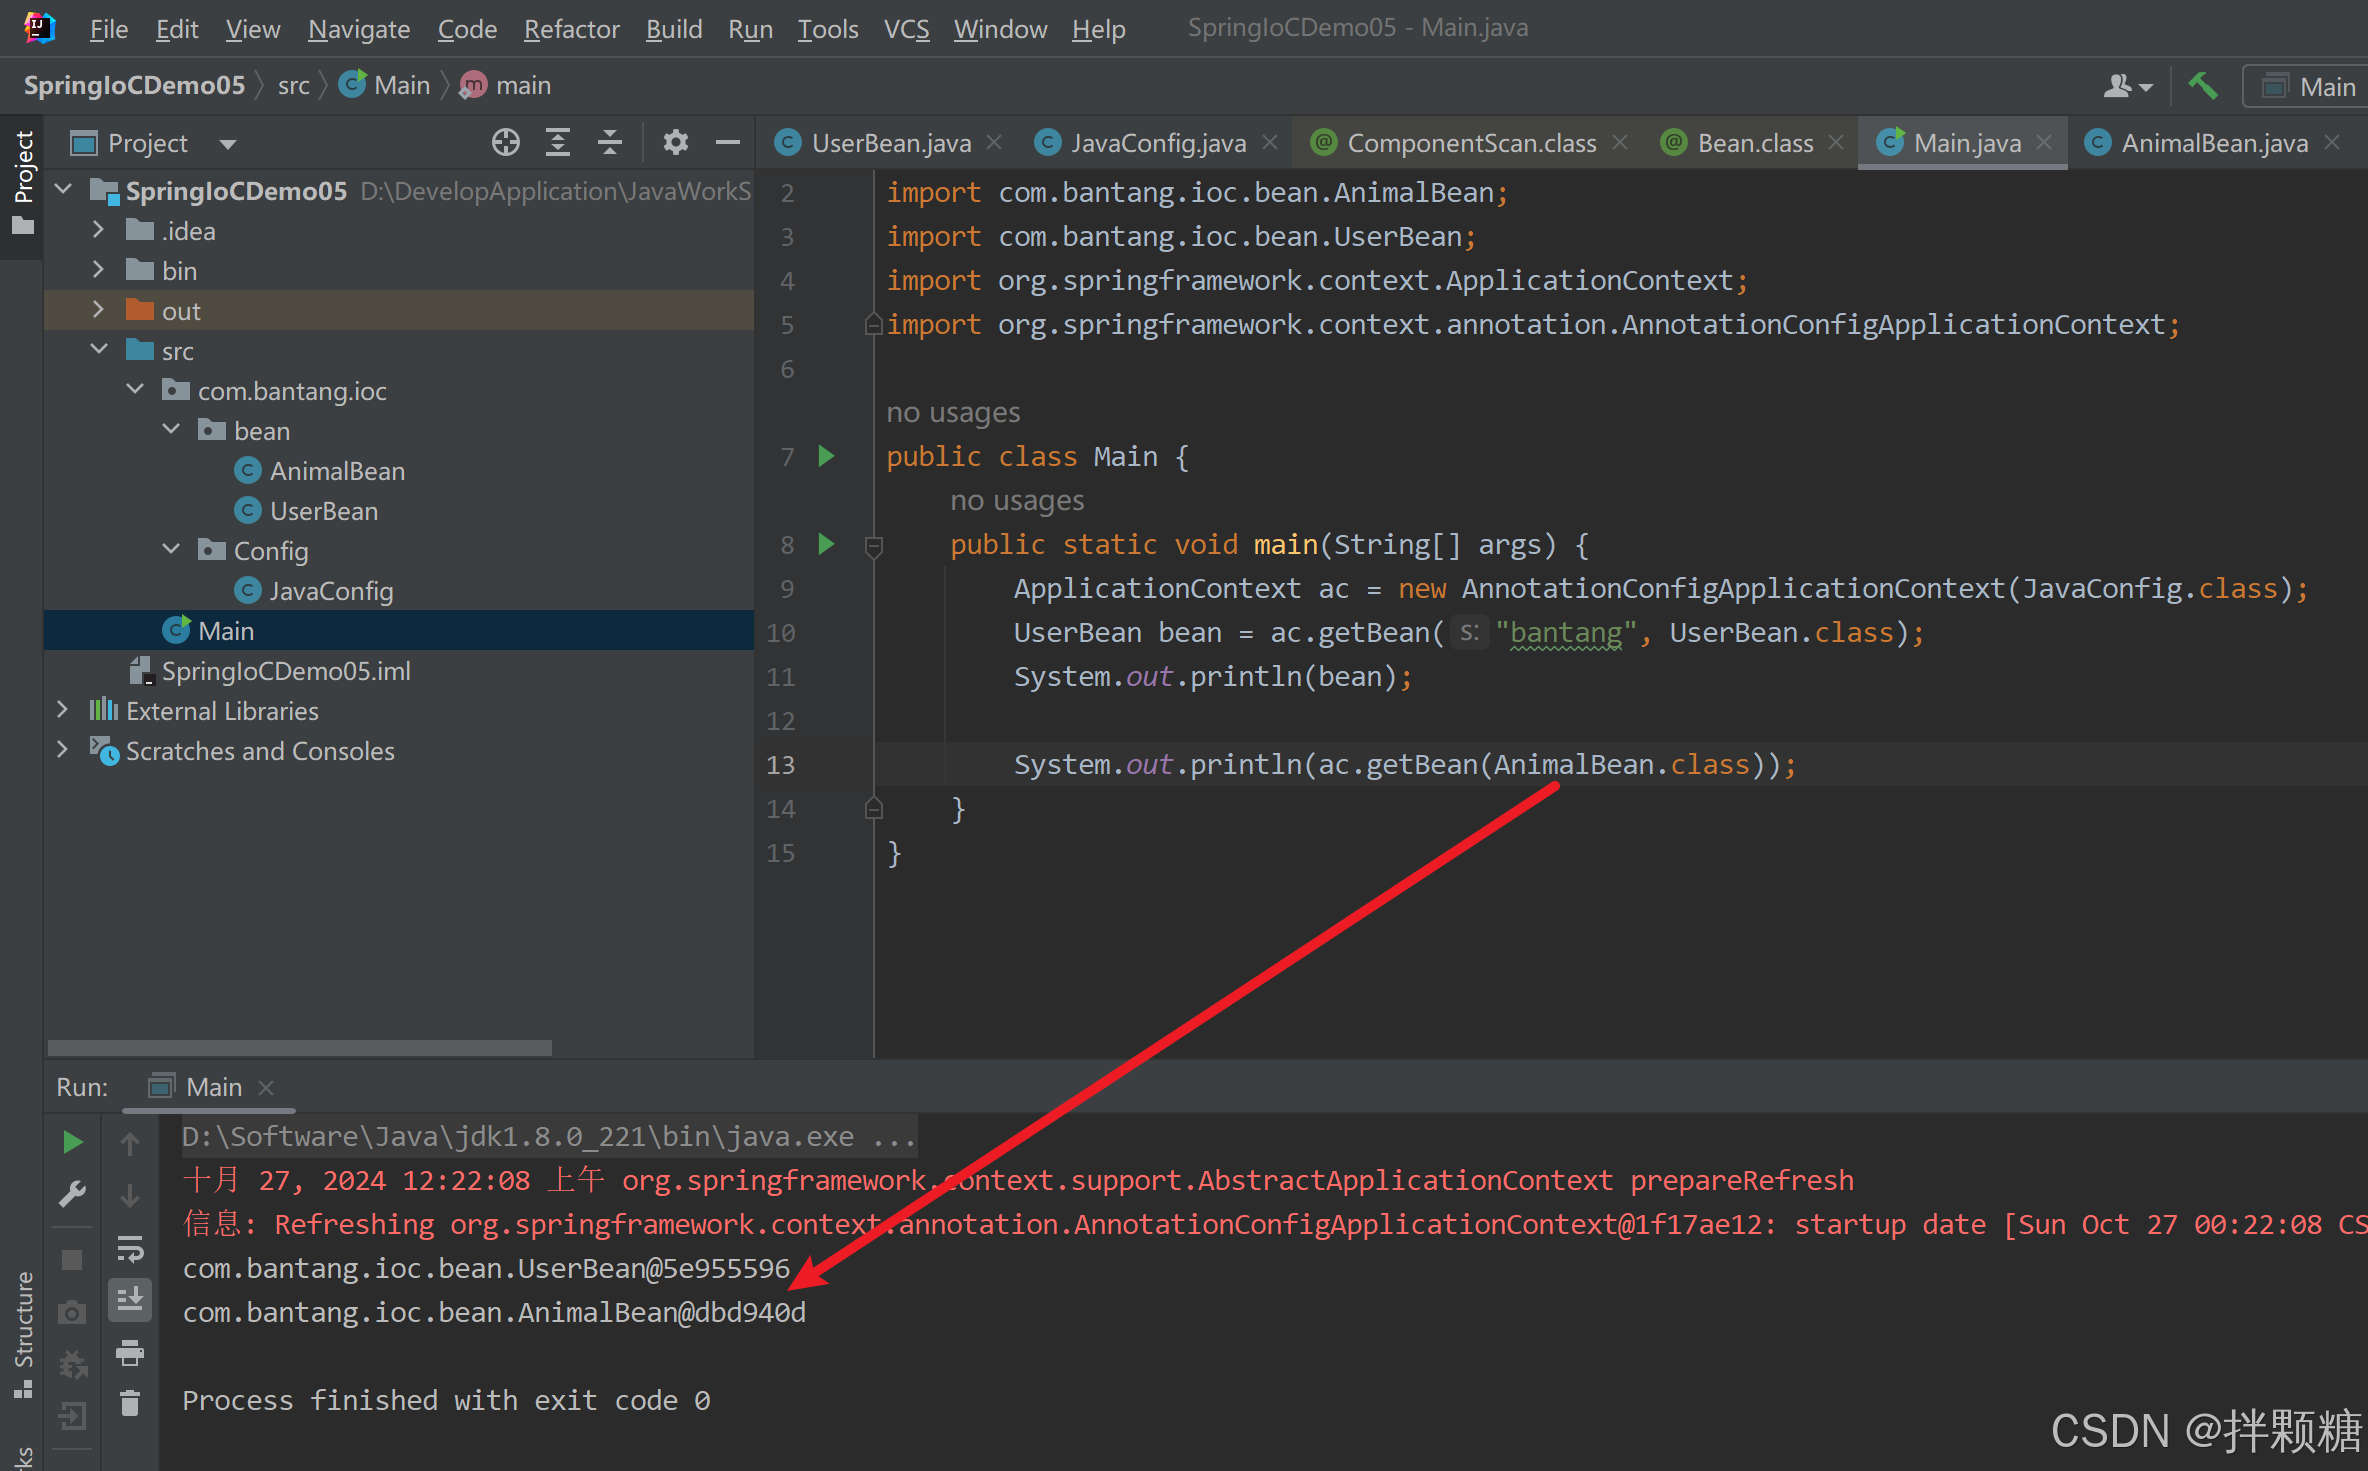
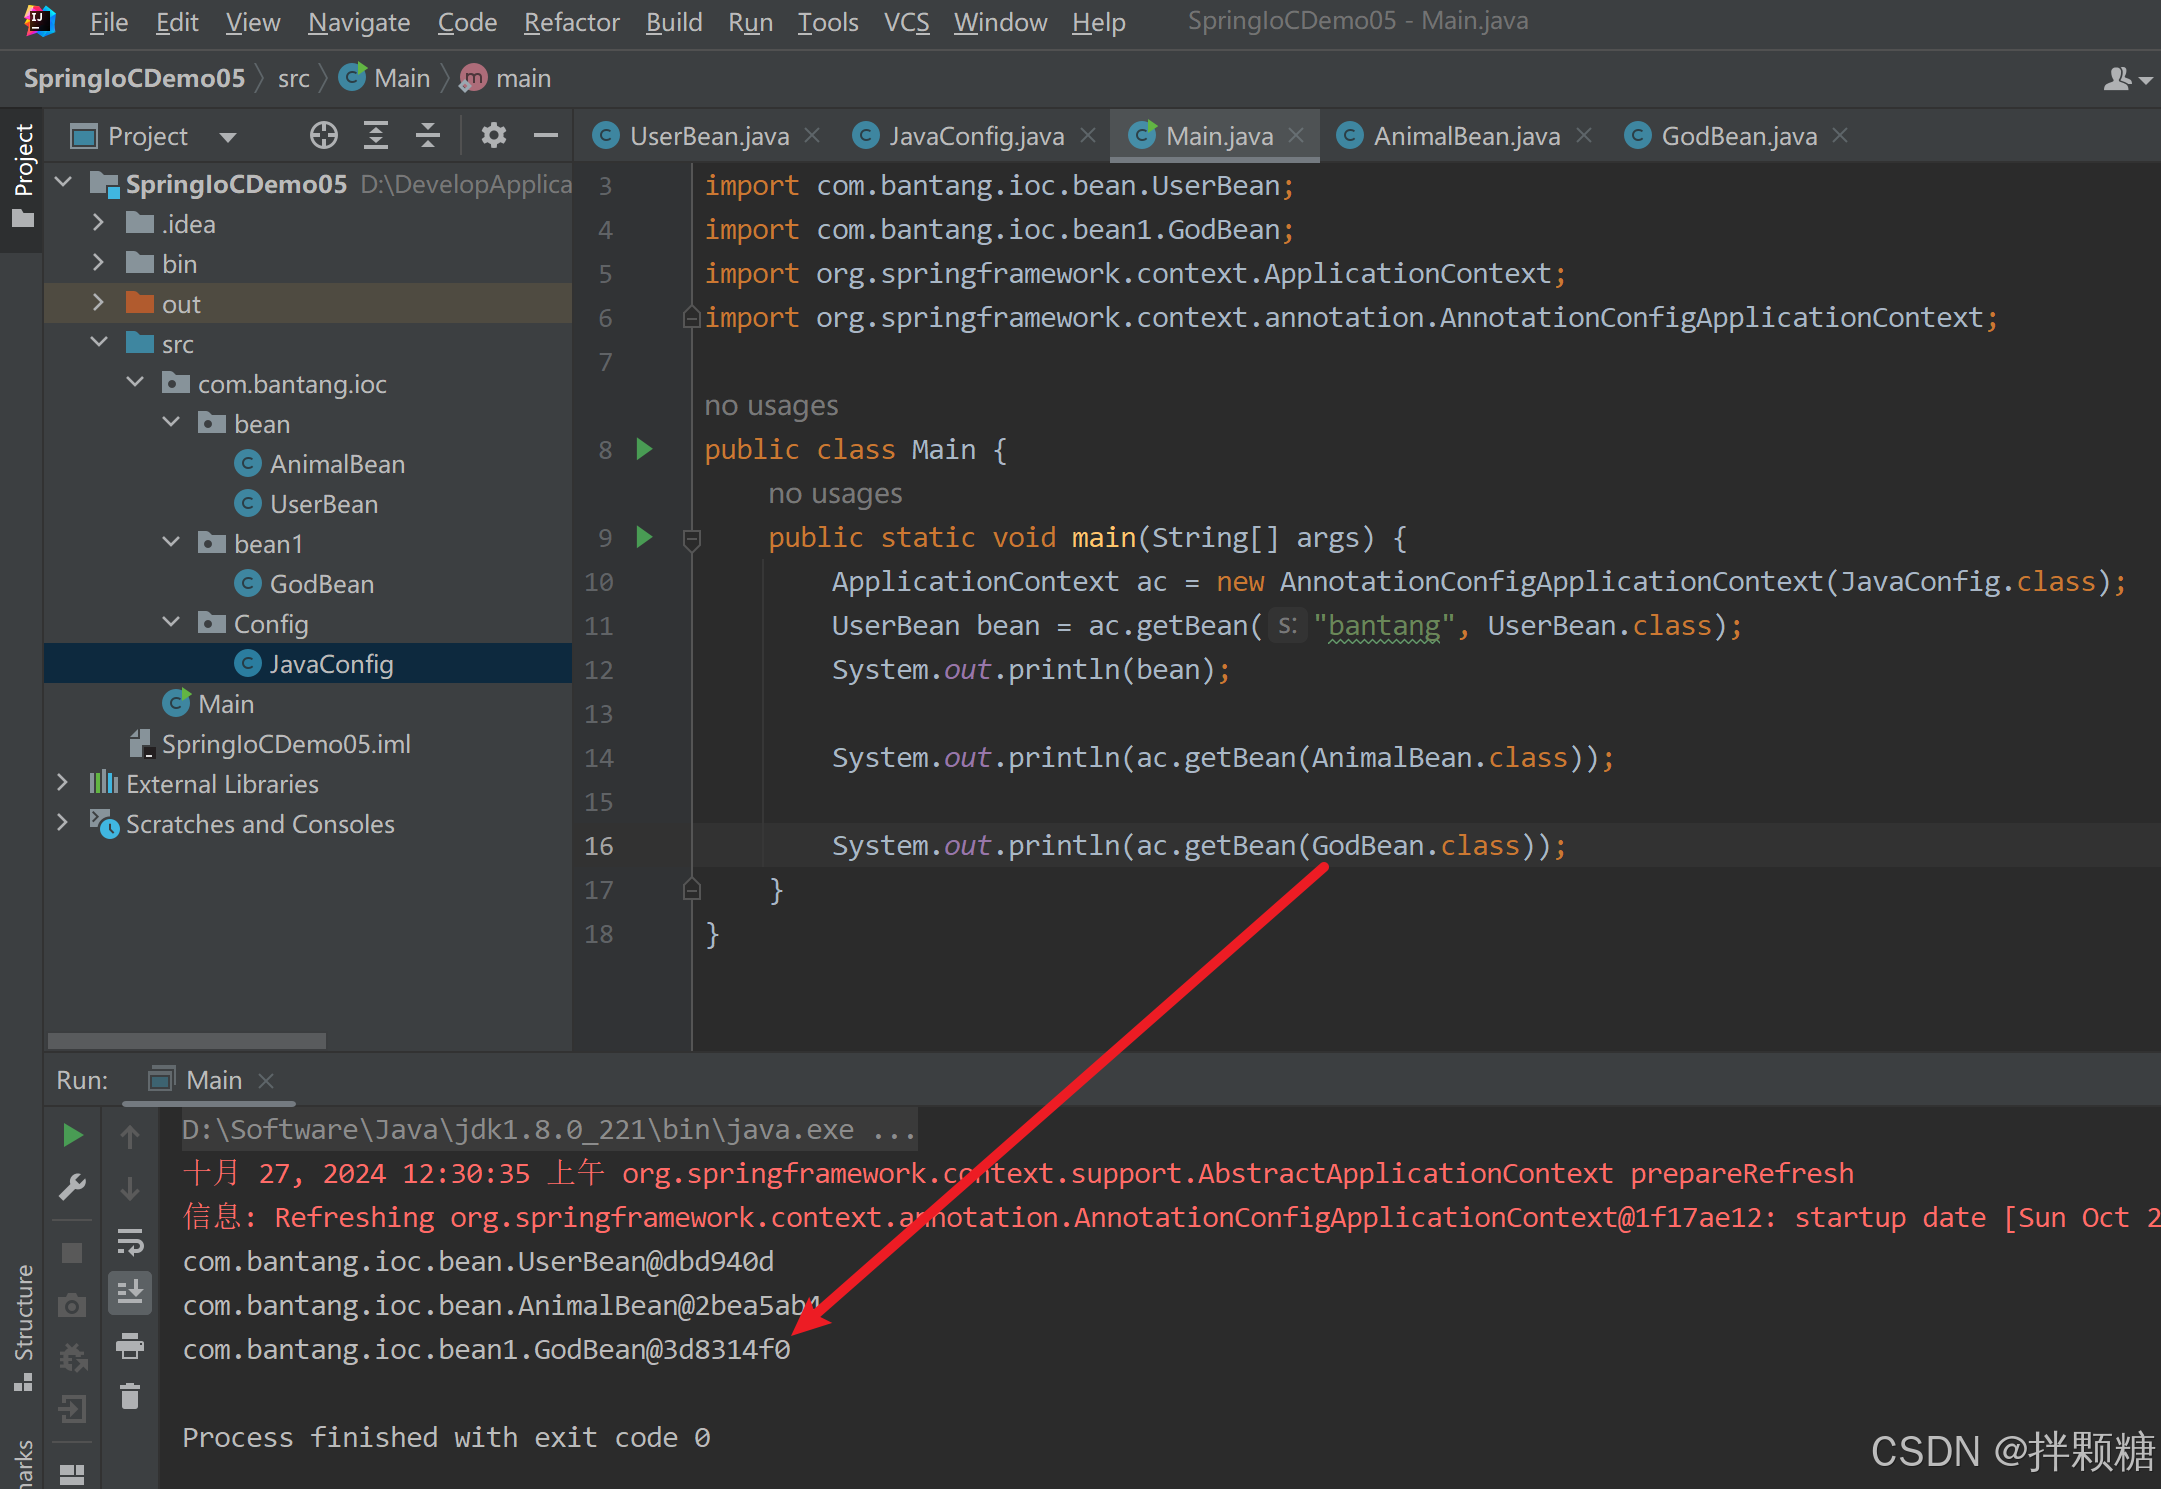
主类中通过加载Java配置类得到容器类,然后获取bean对象
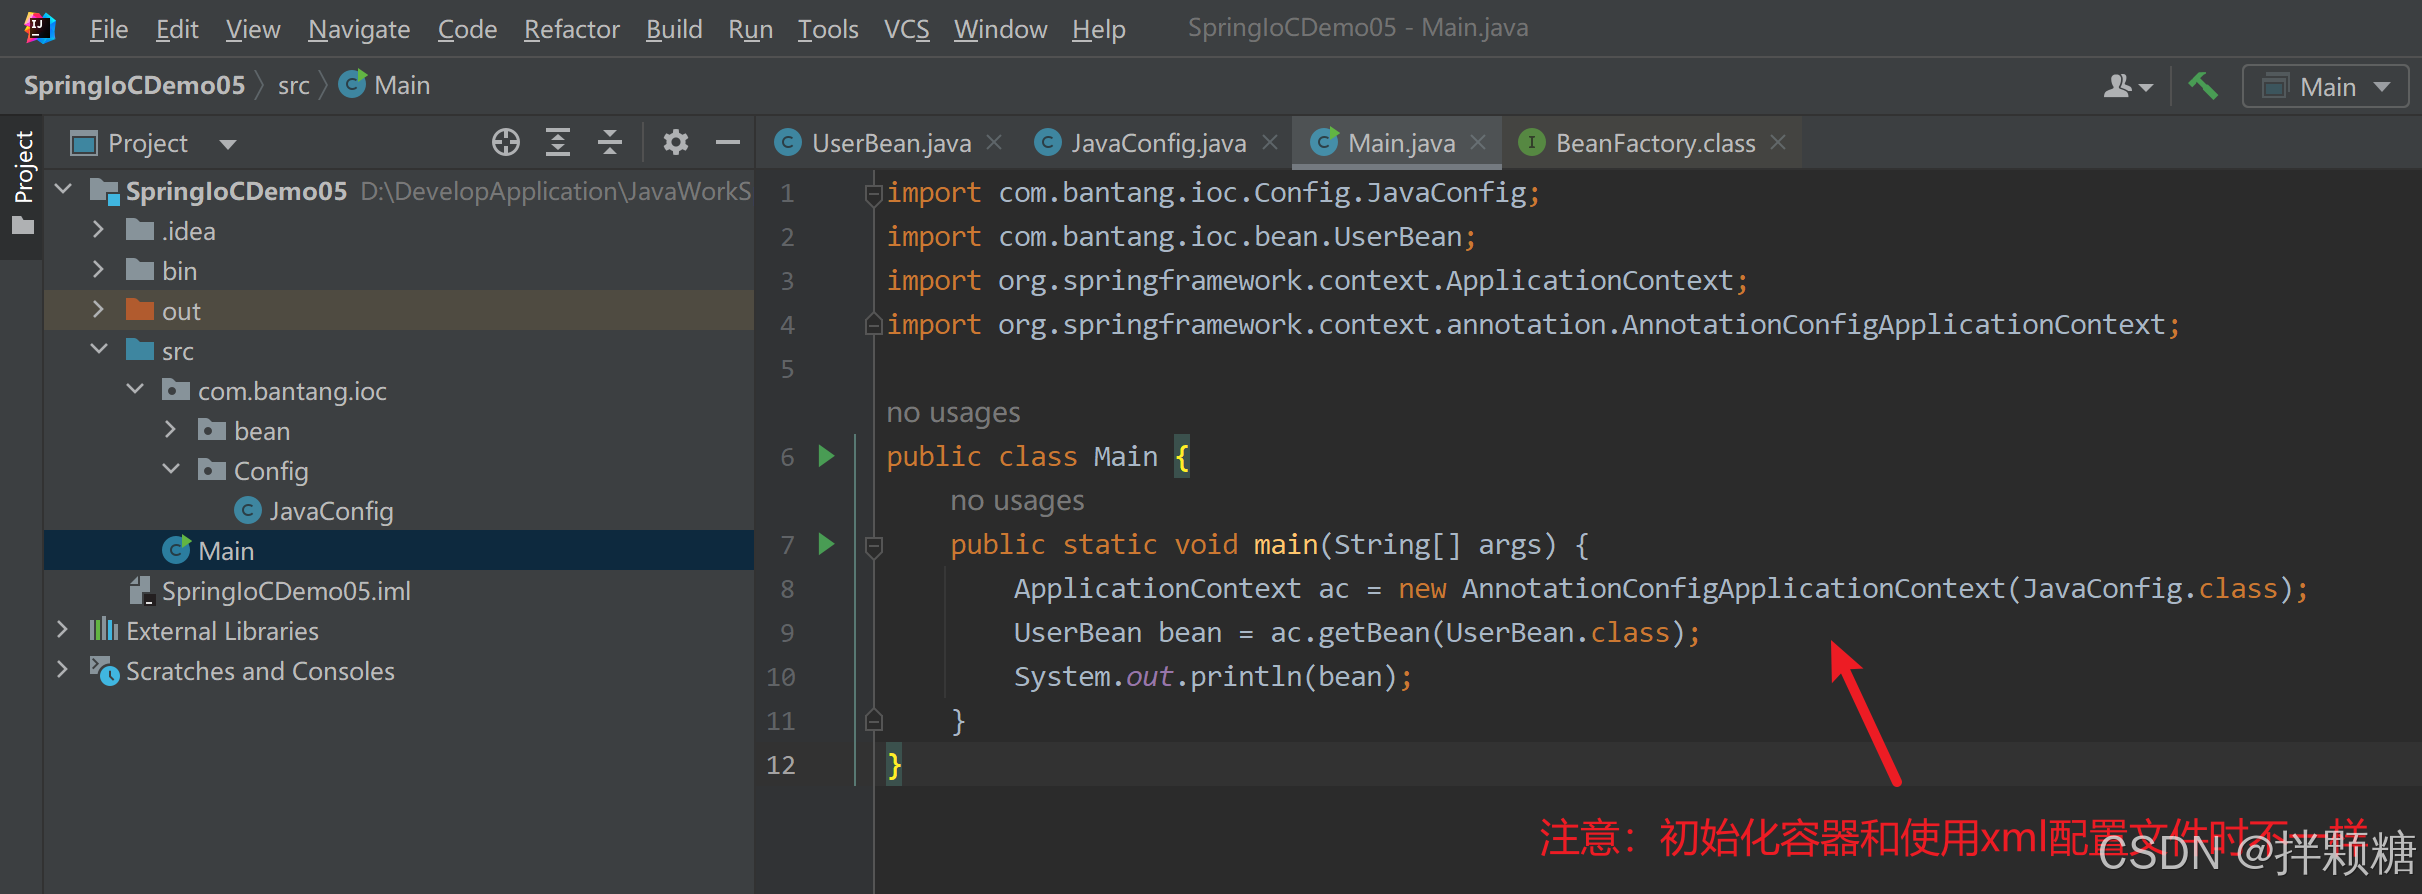
运行发现报错 说明UserBean没有注册进Java配置类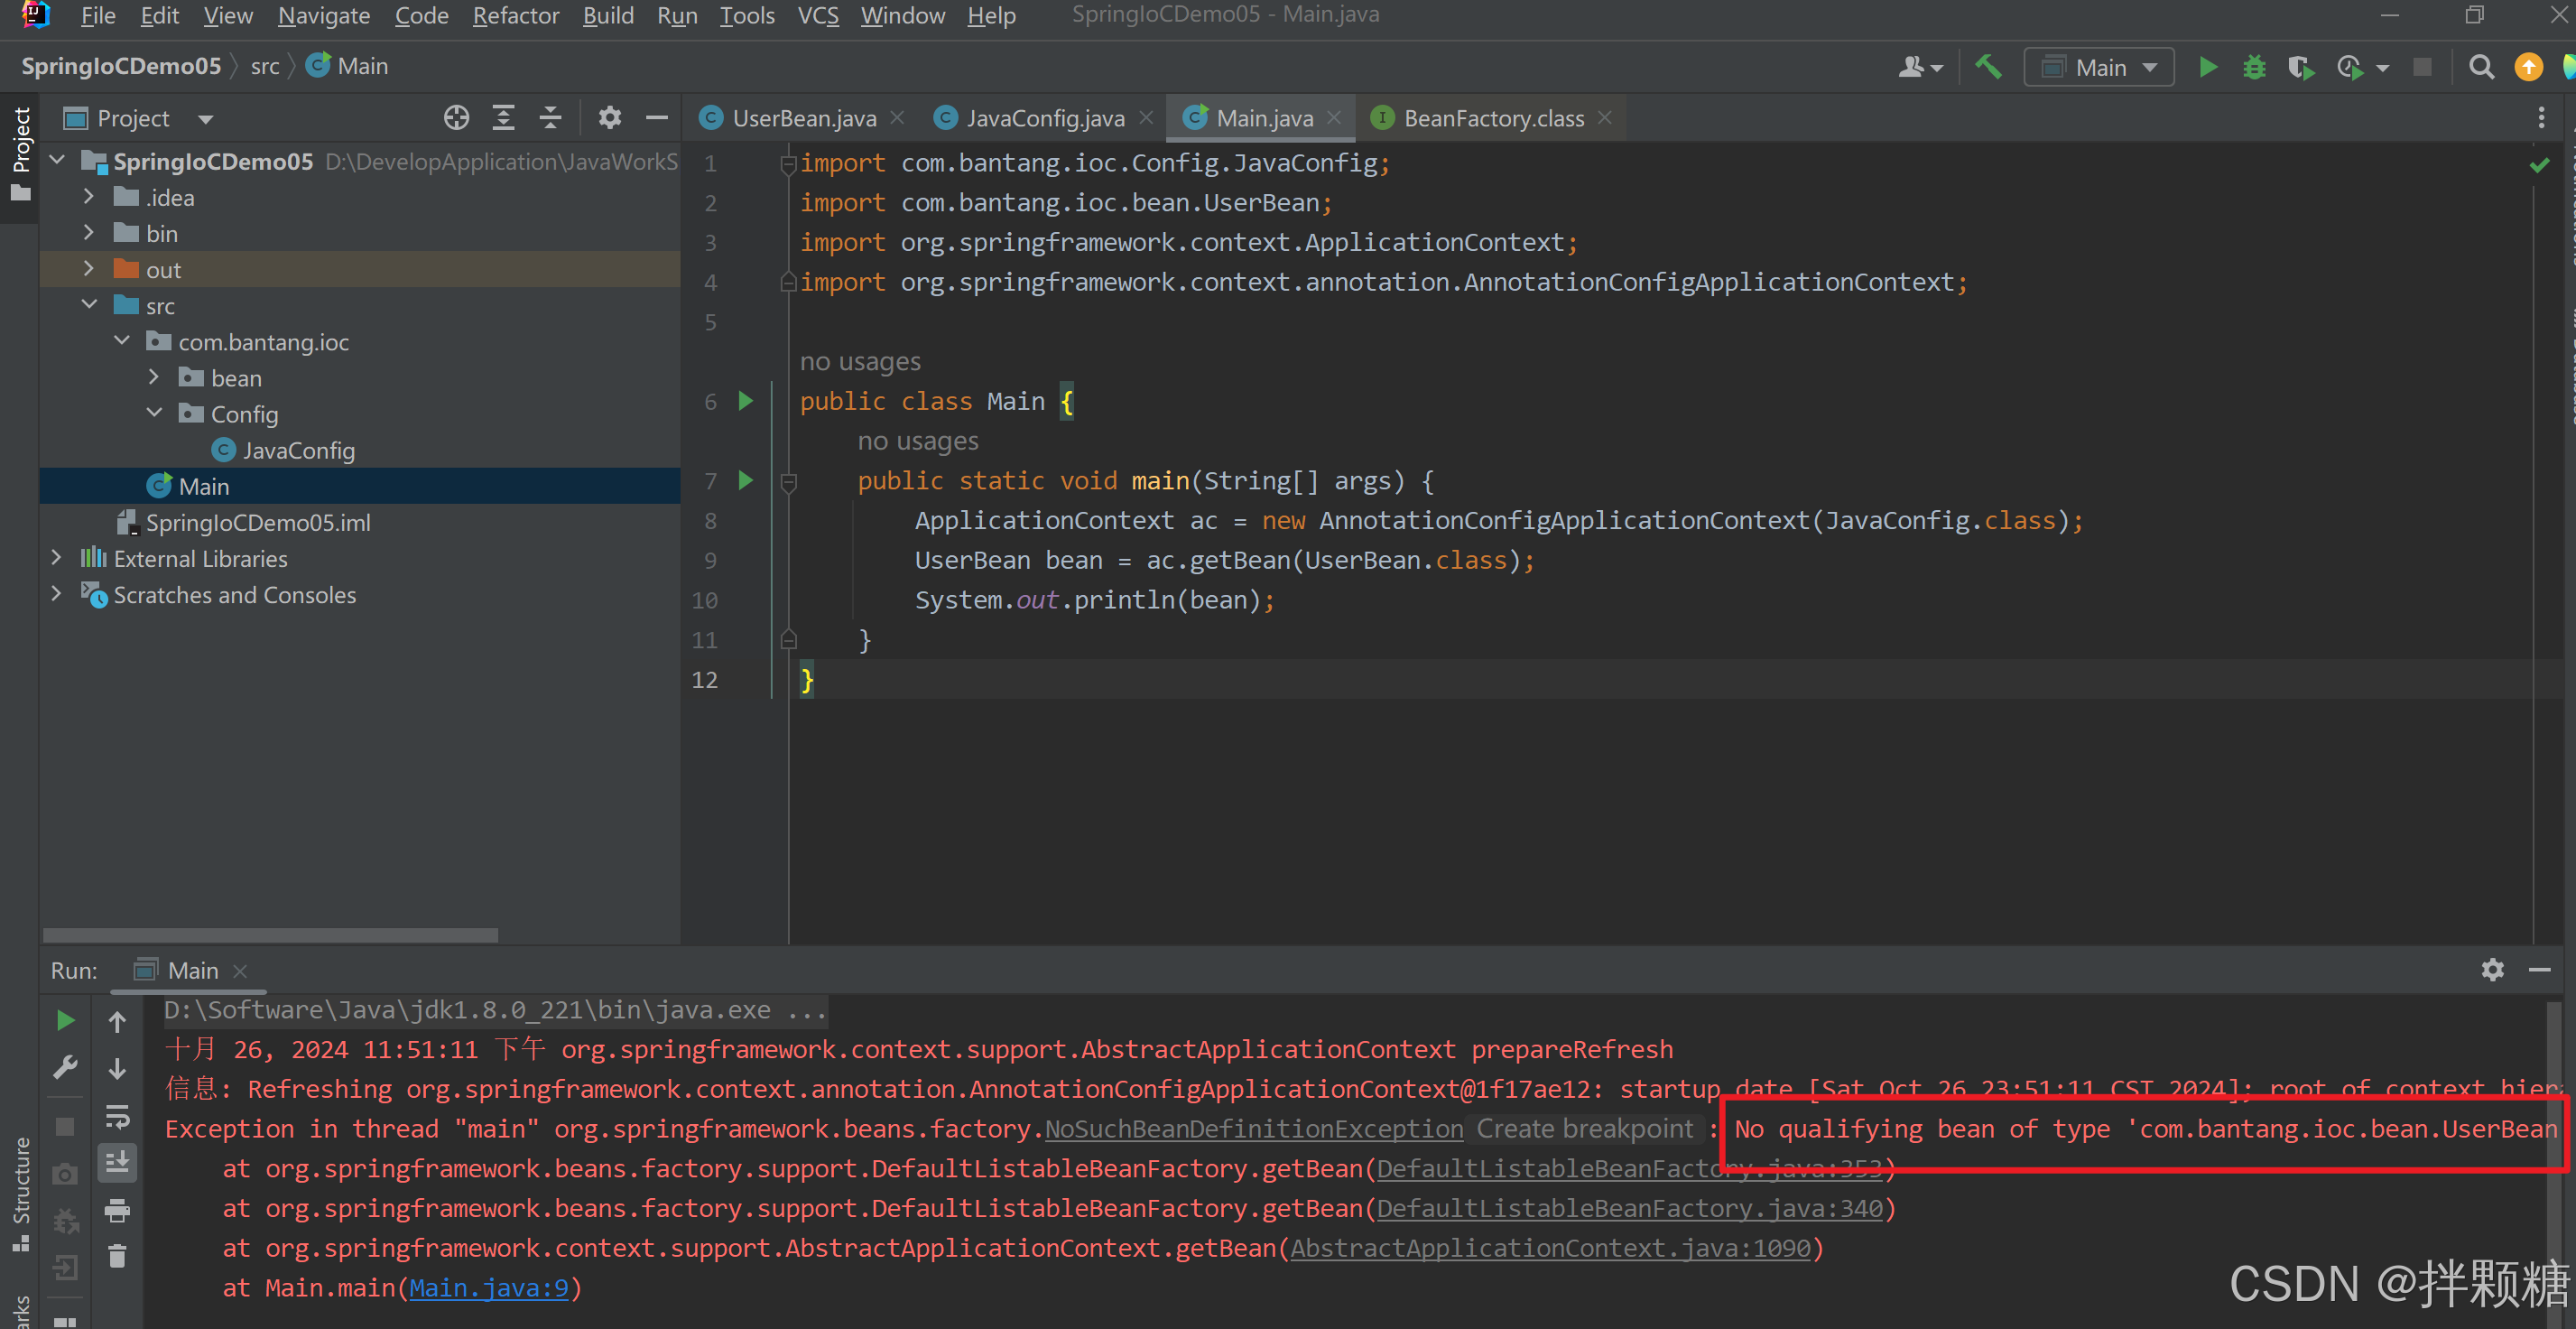
这就是涉及到新注解了
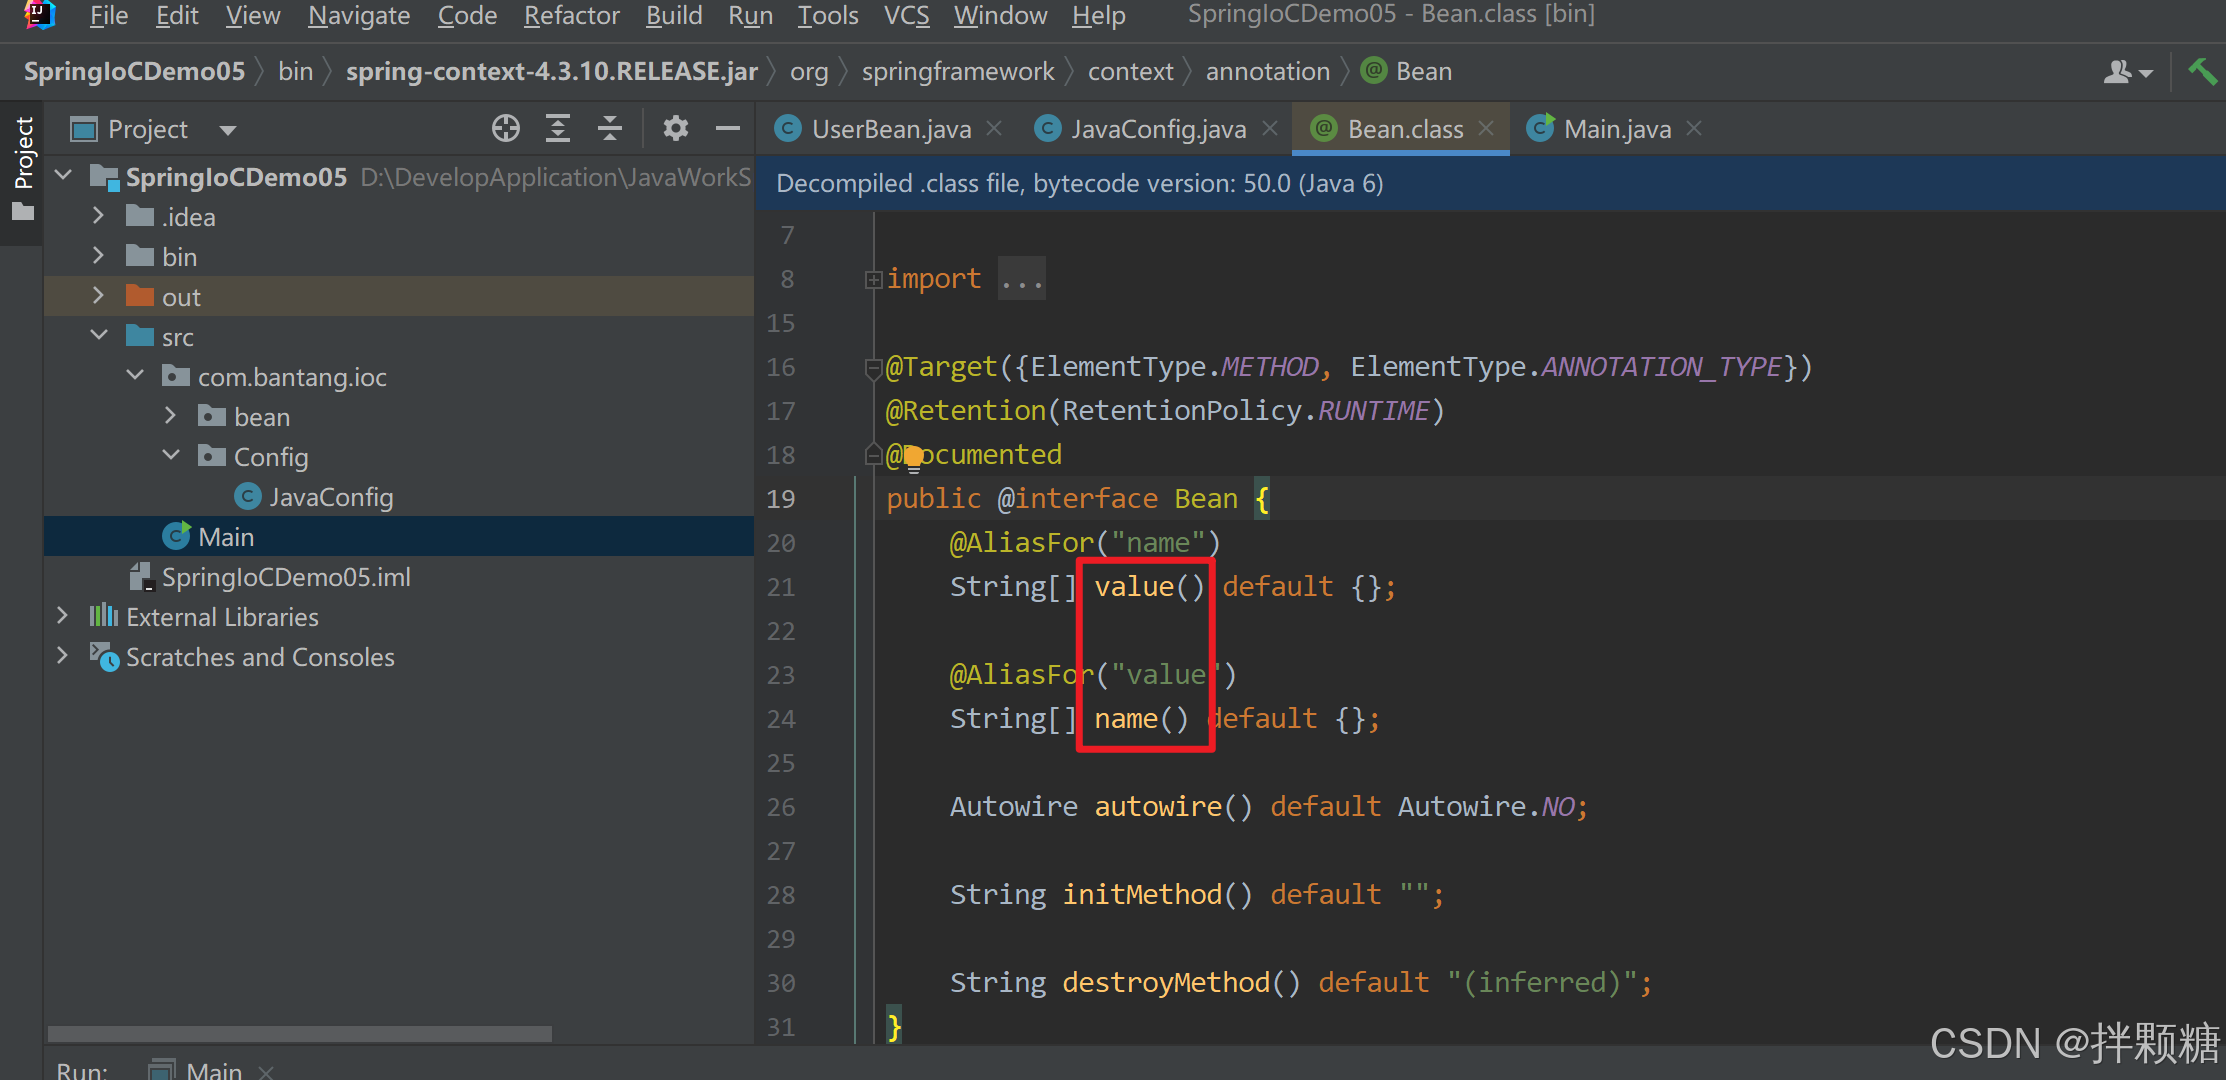
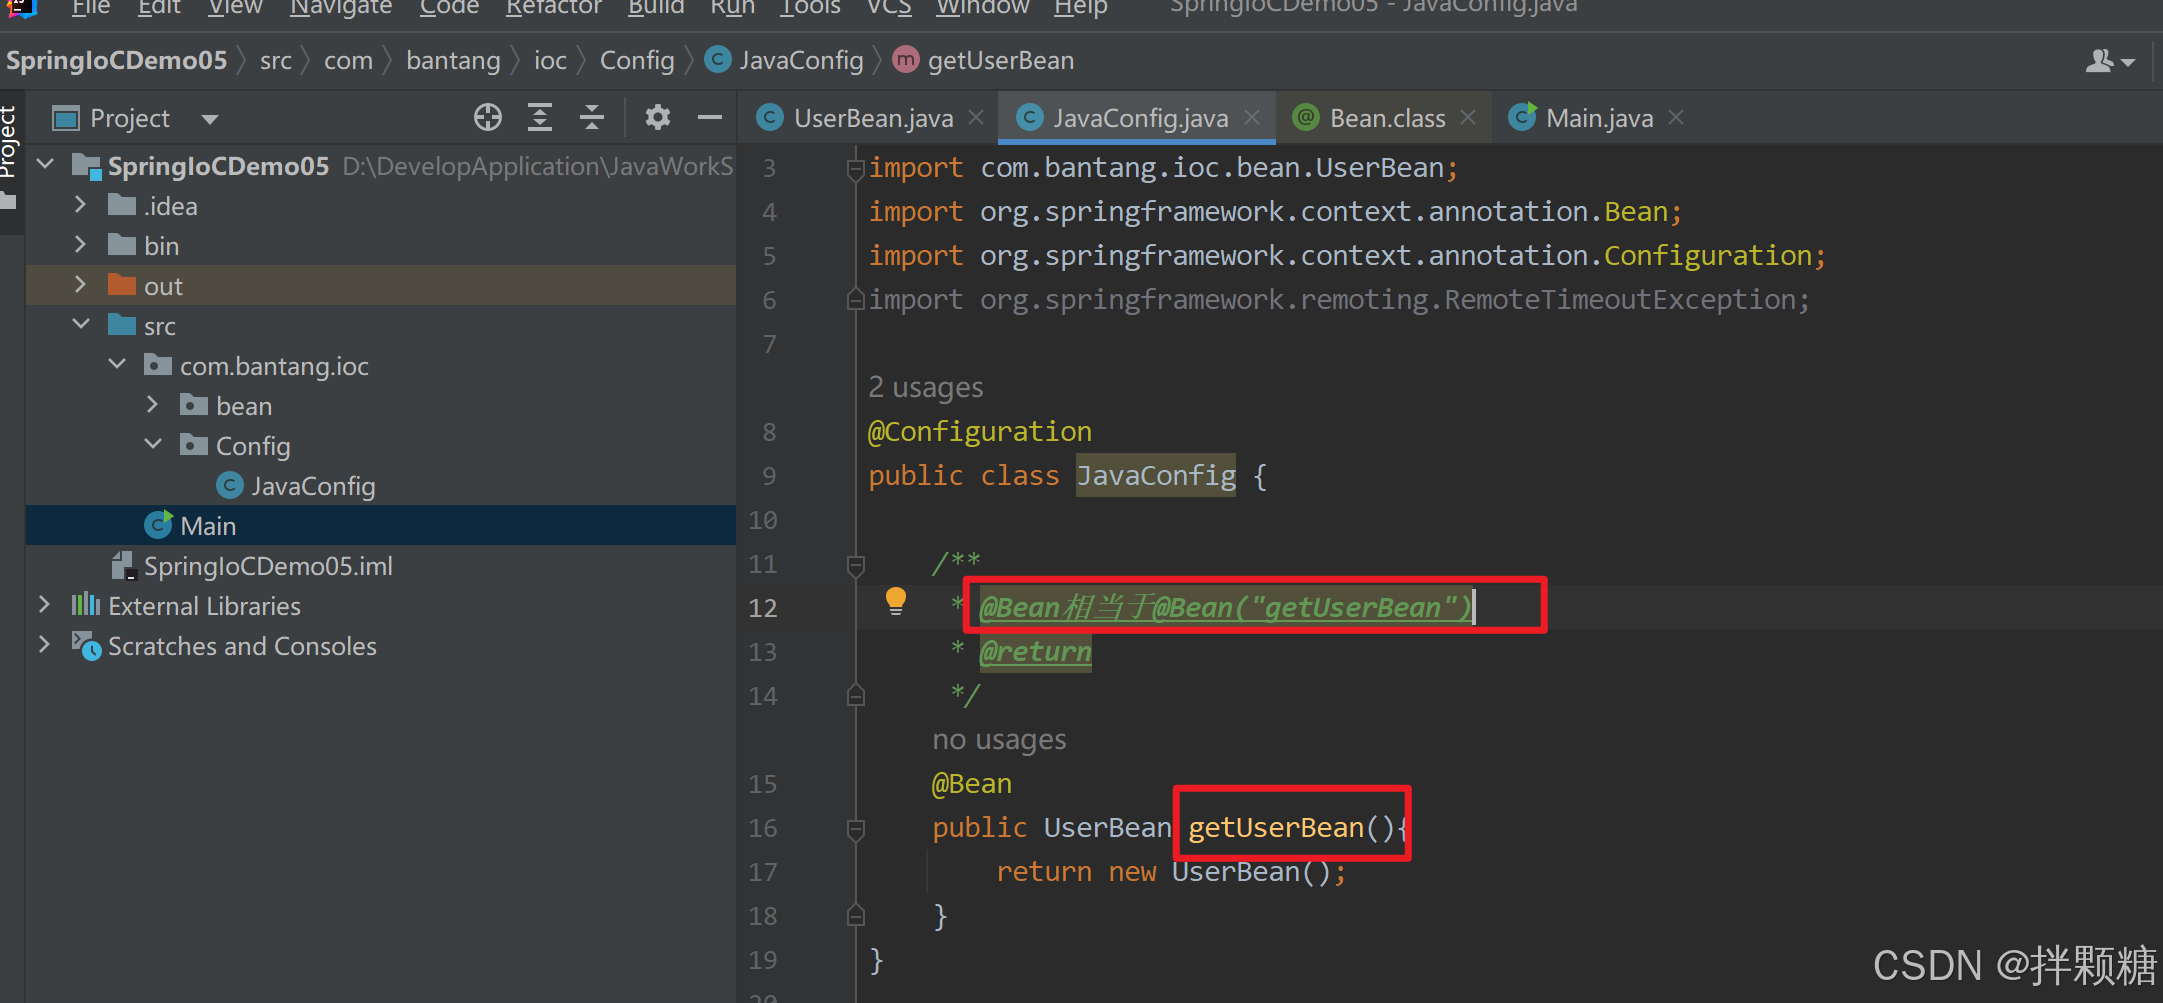
@Bean
加上@Bean注解后 才算是把bean注册进java配置类
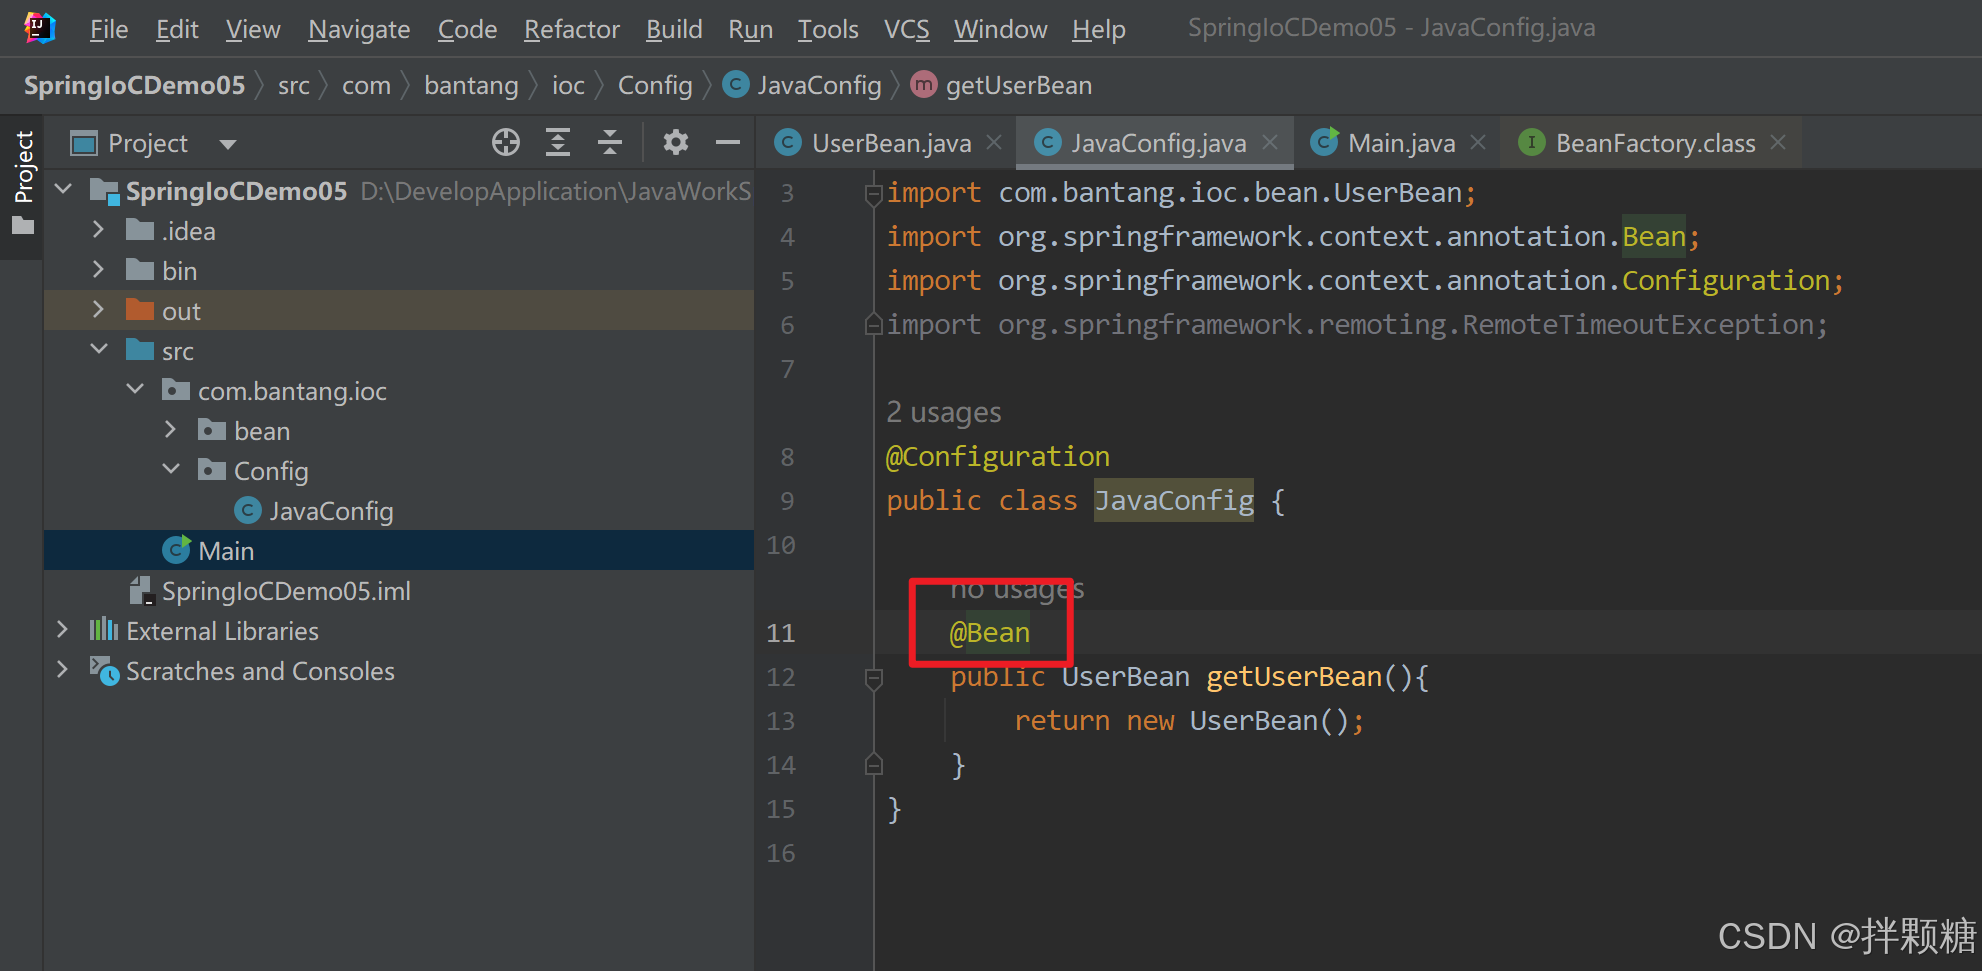
查看源码可知,@Bean注解有默认name和value 在我们的案例中,@Bean相当于@Bean(“getUserBean”)
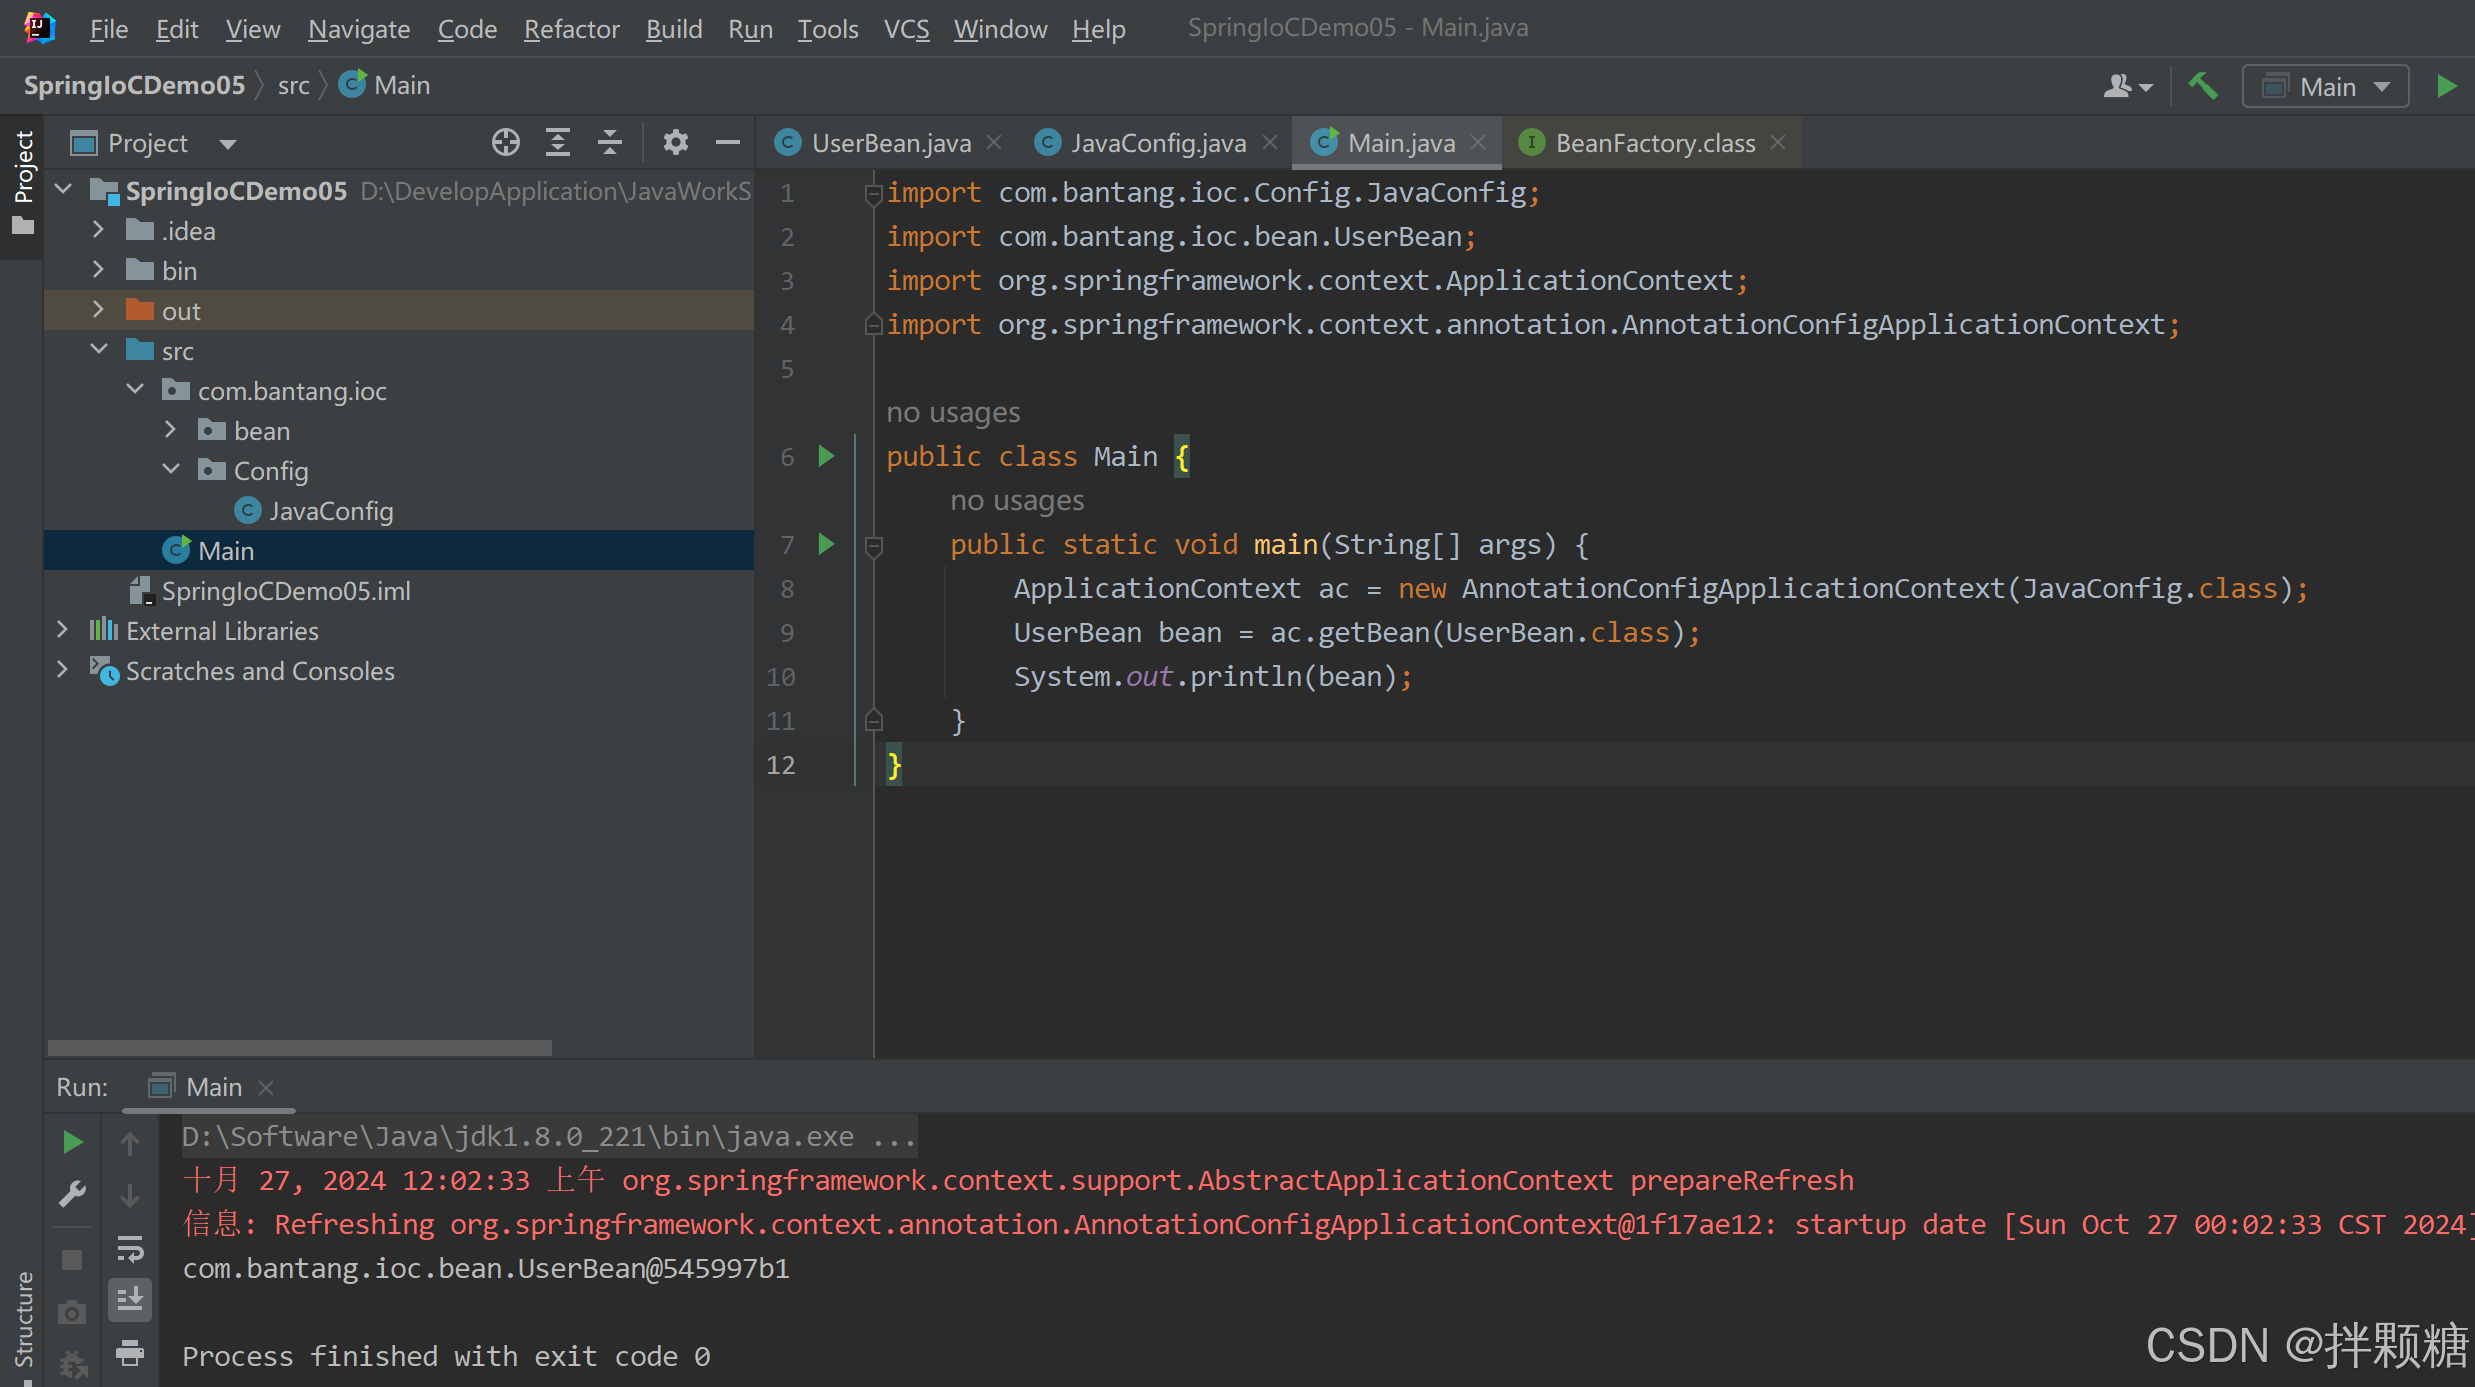
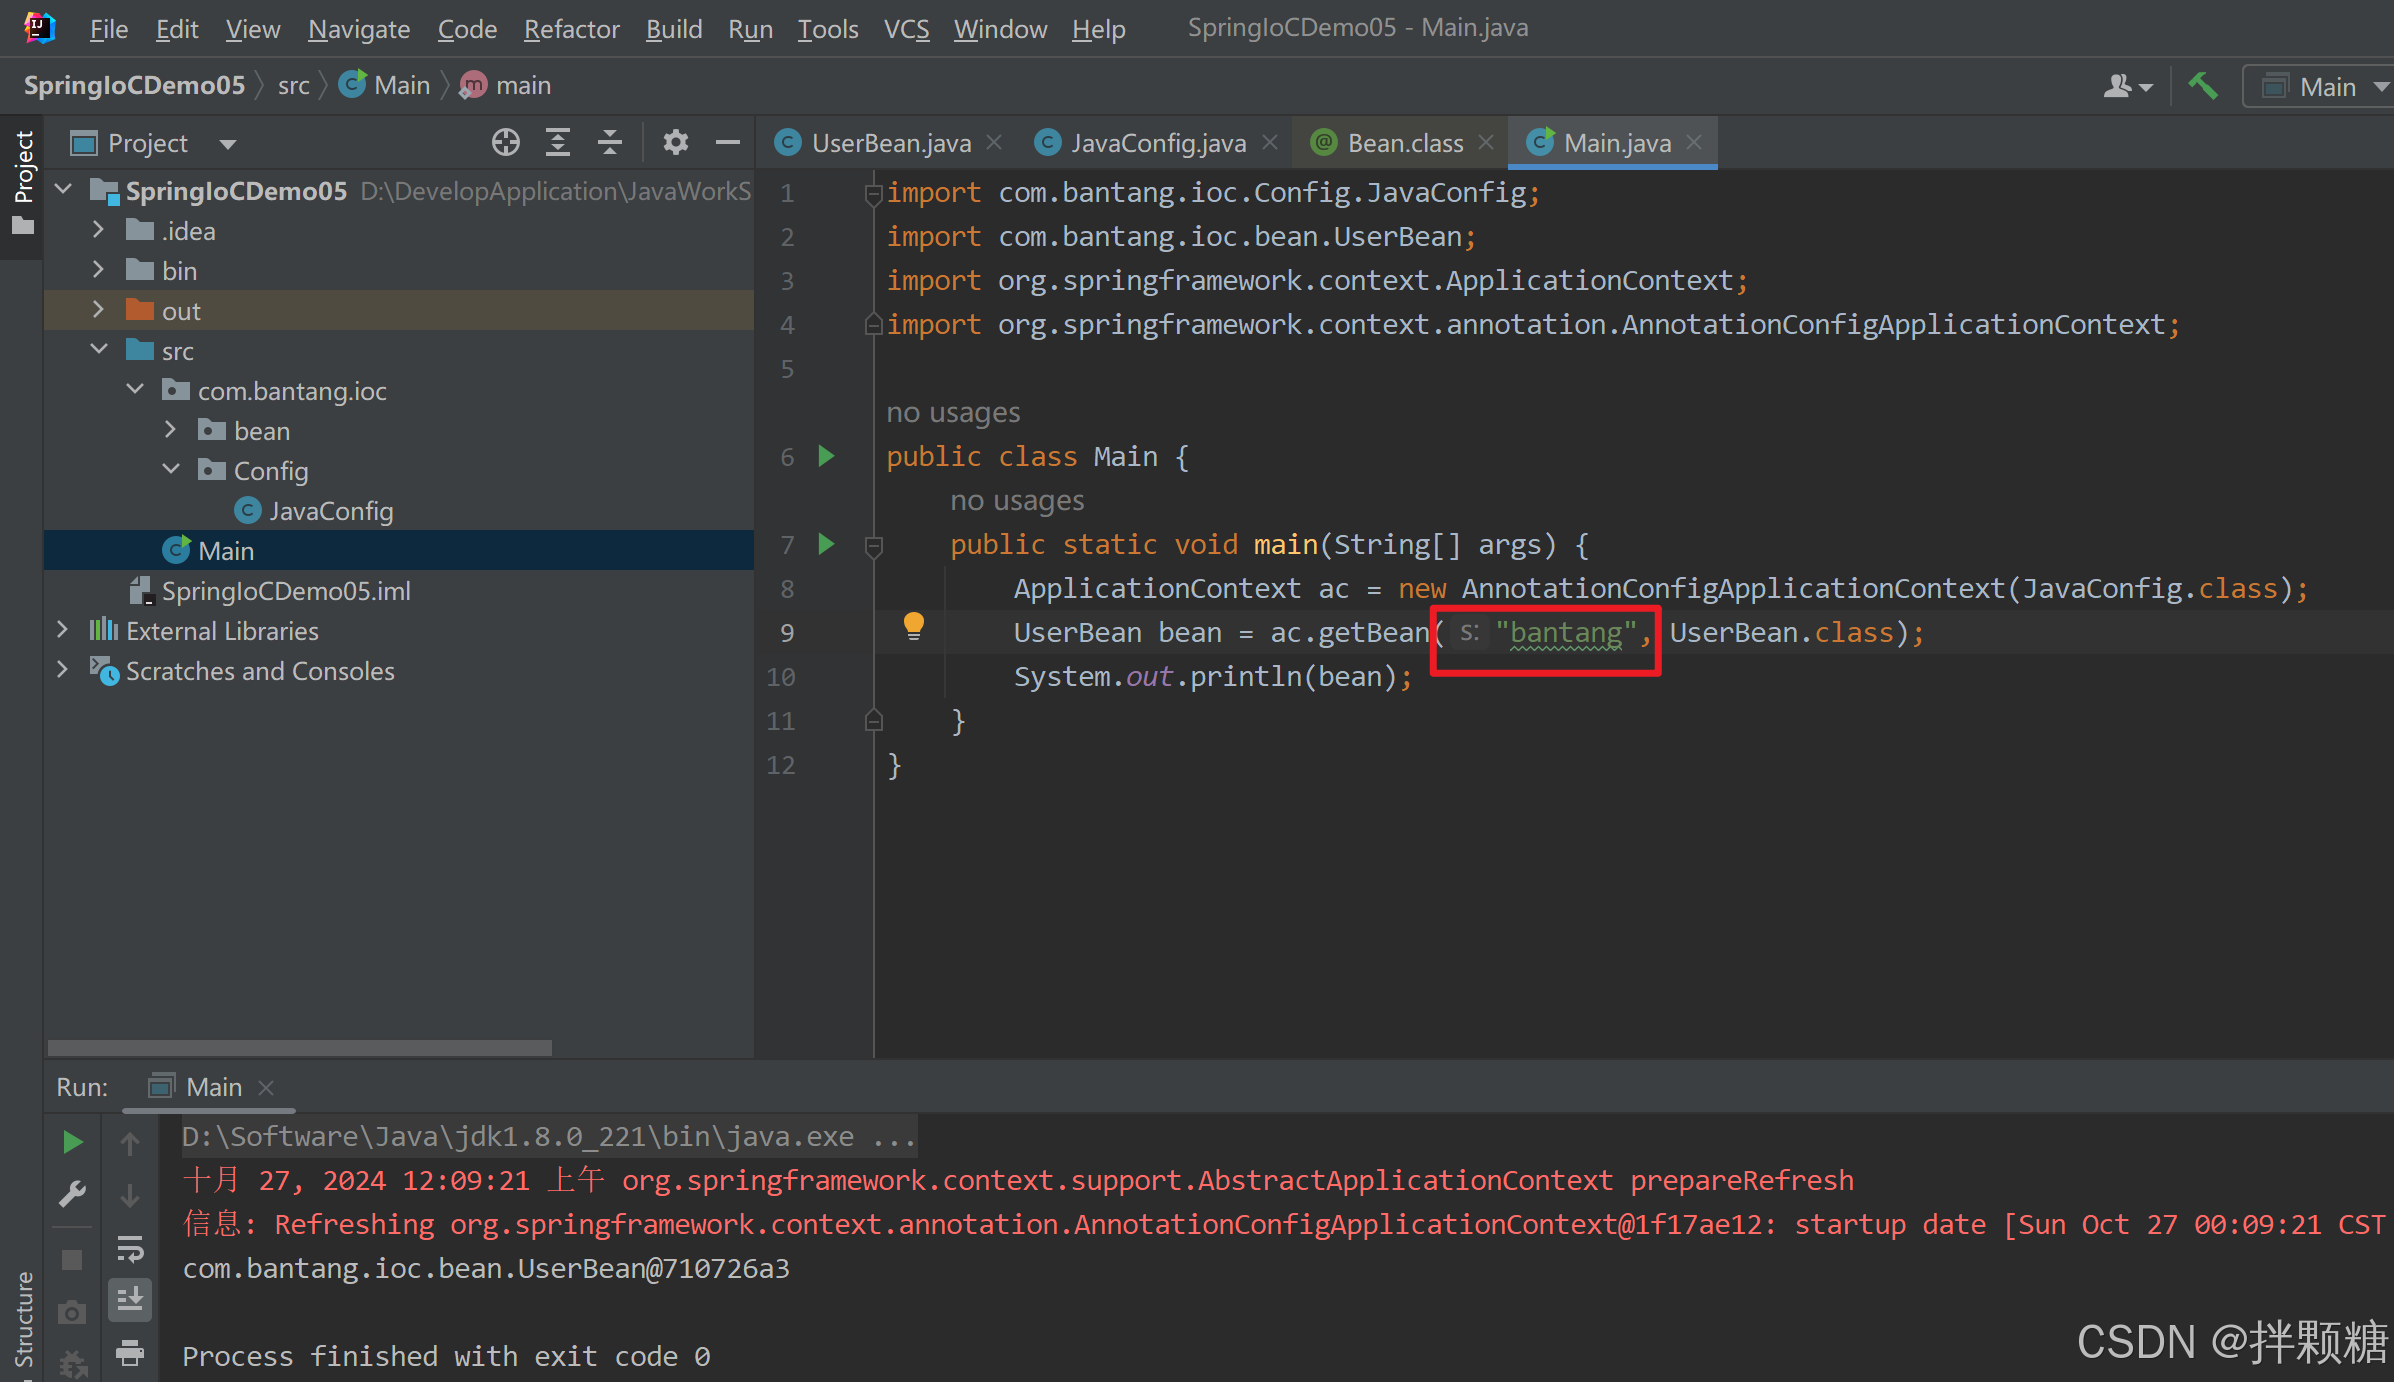
修改运行类的运行参数 正常

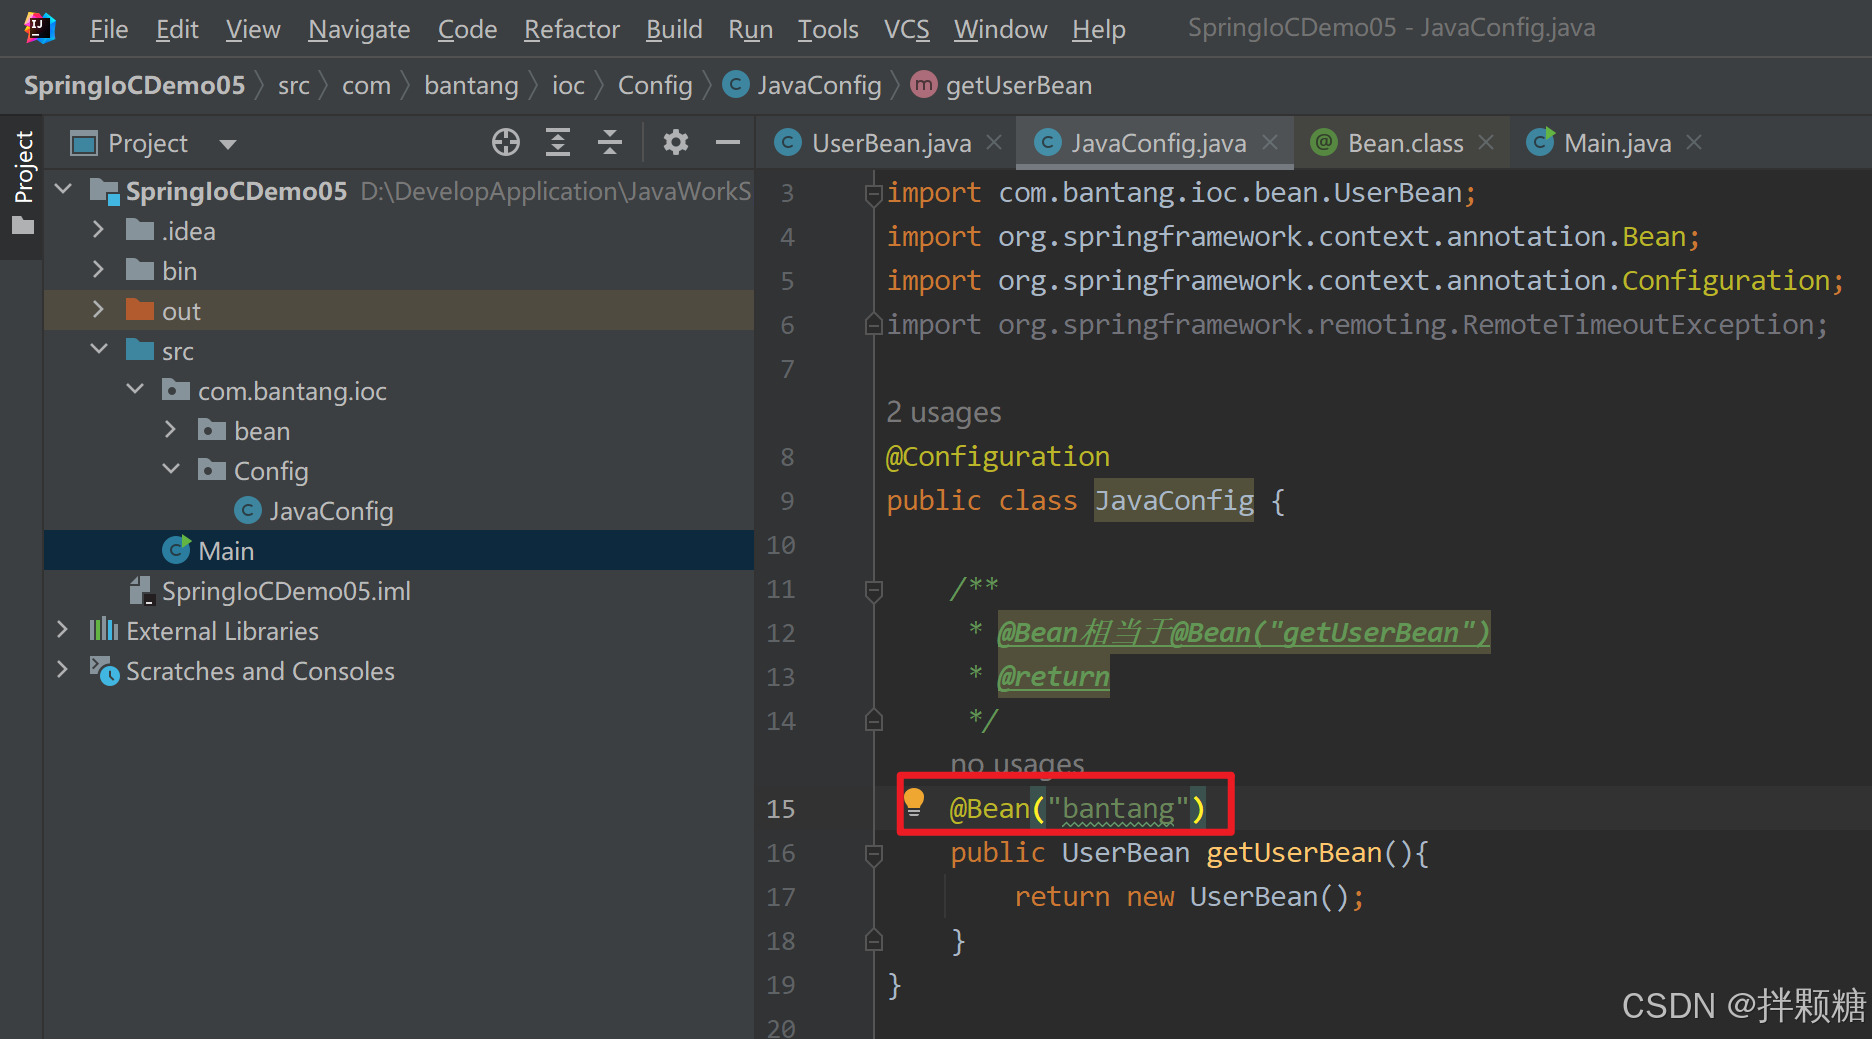
如果不想用默认的bean名 可以修改
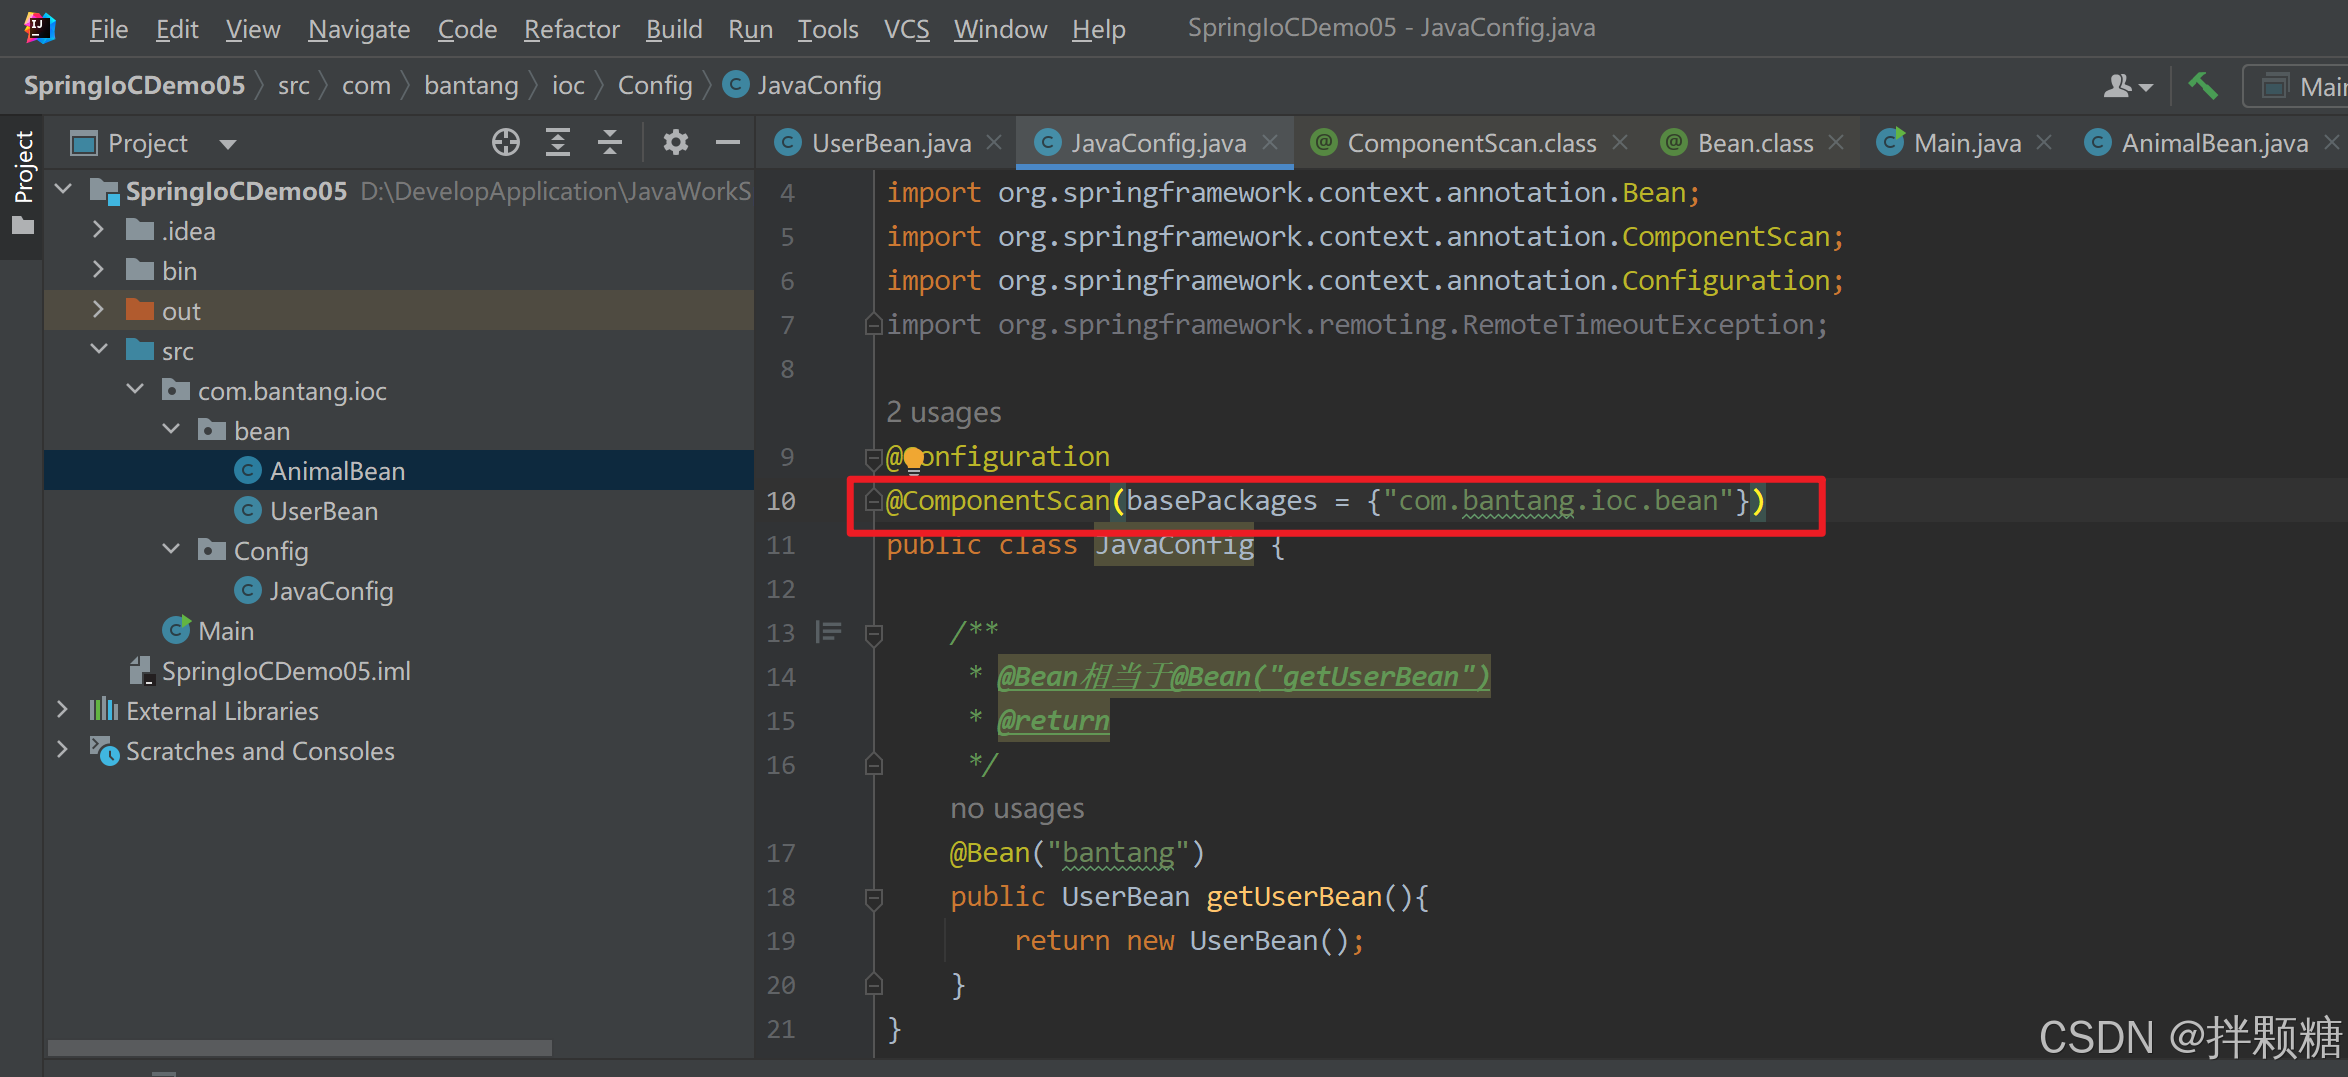
@ComponentScan @ComponentScans
有很多bean时,不想一个一个往配置类注册 哎 是不是想到了xml配置凡是的扫描注入
添加注解@ComponentScan 用来扫描单个包路径
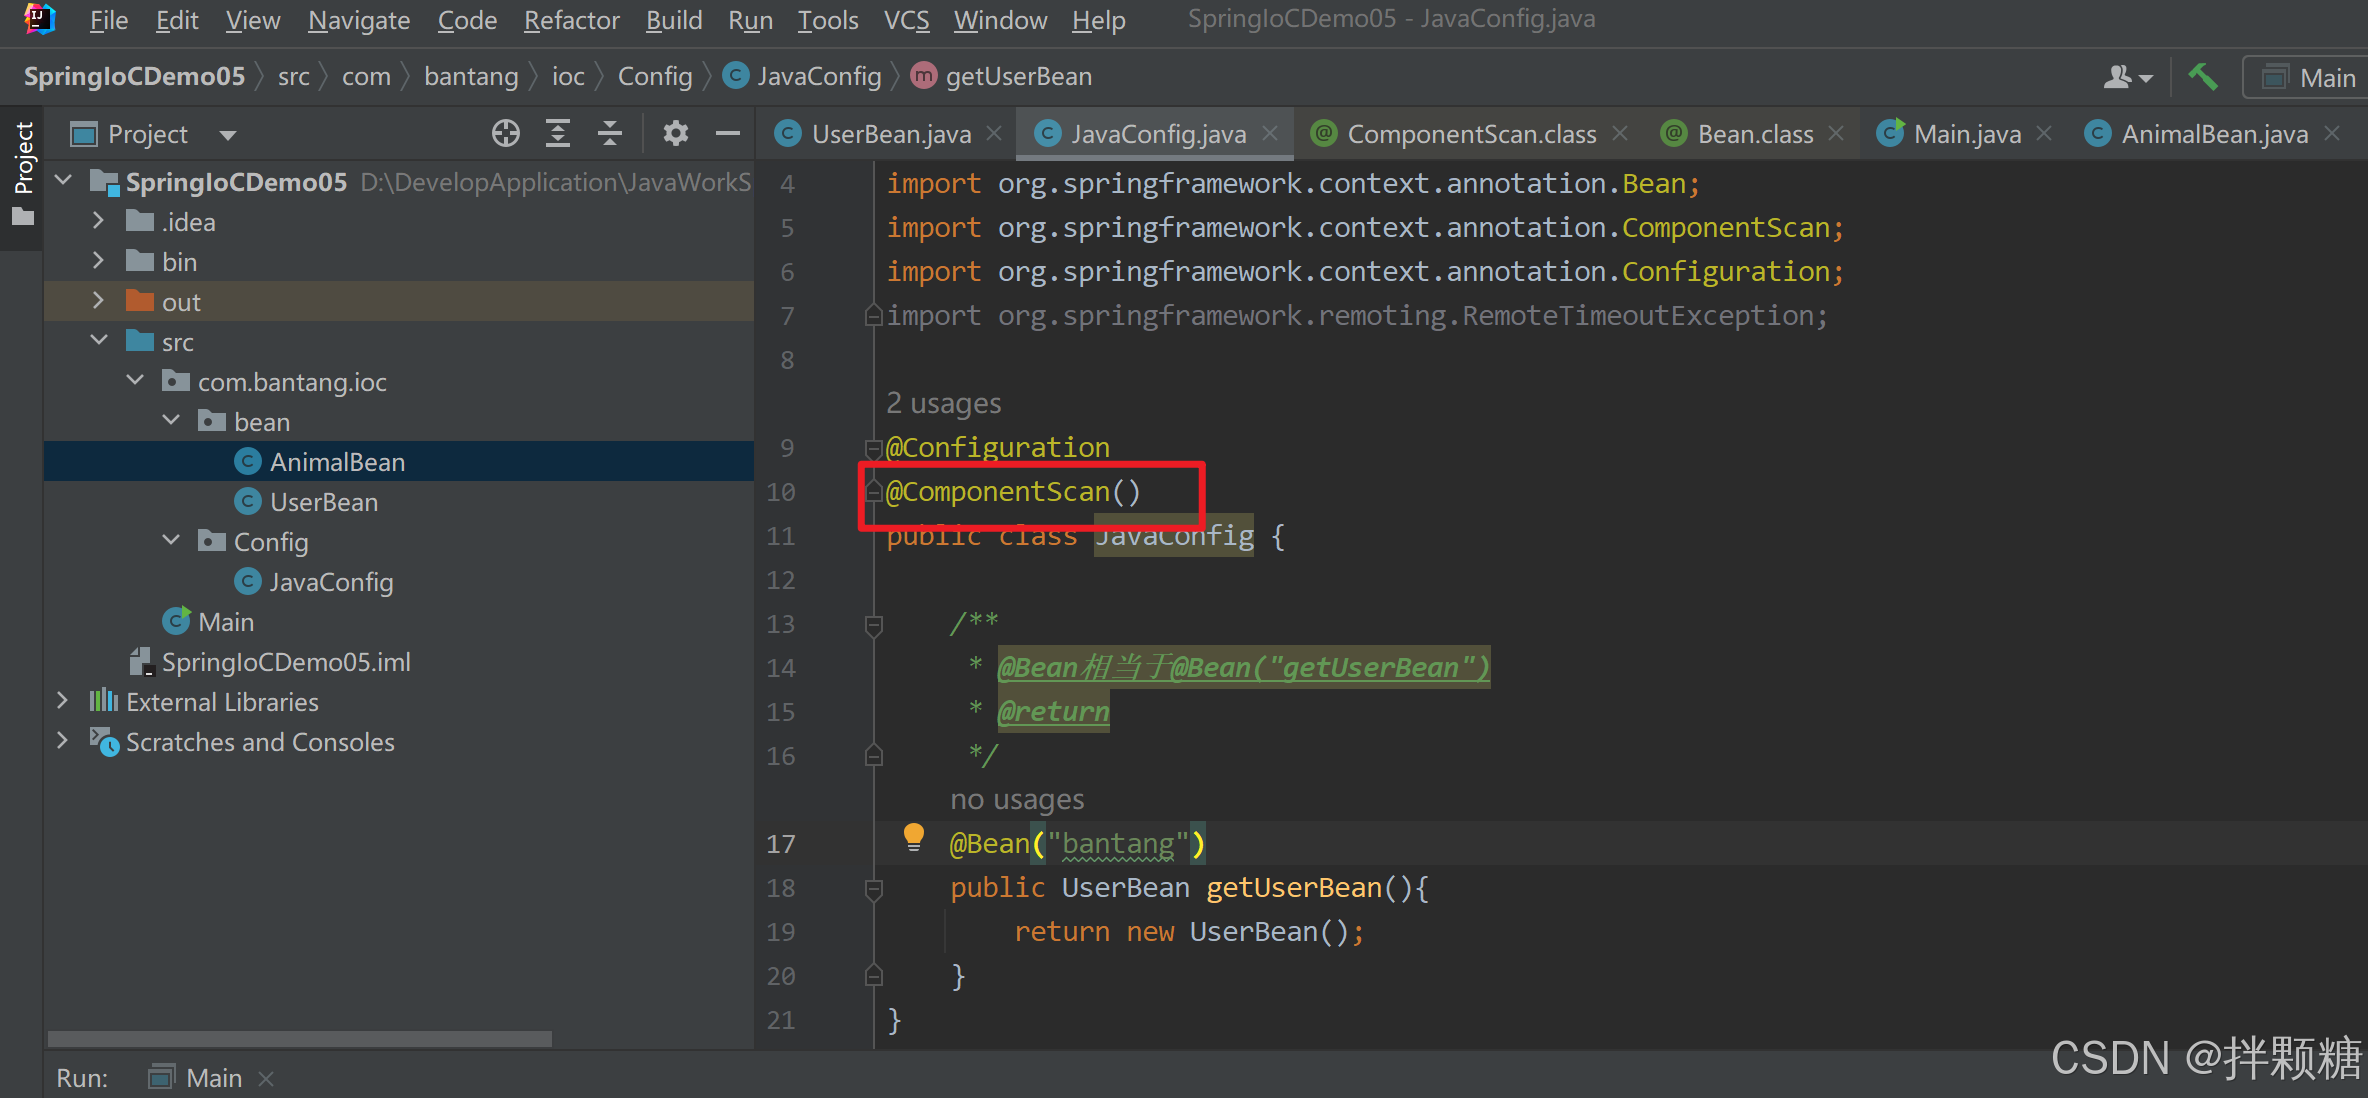
点进源码 需要传参basePackages
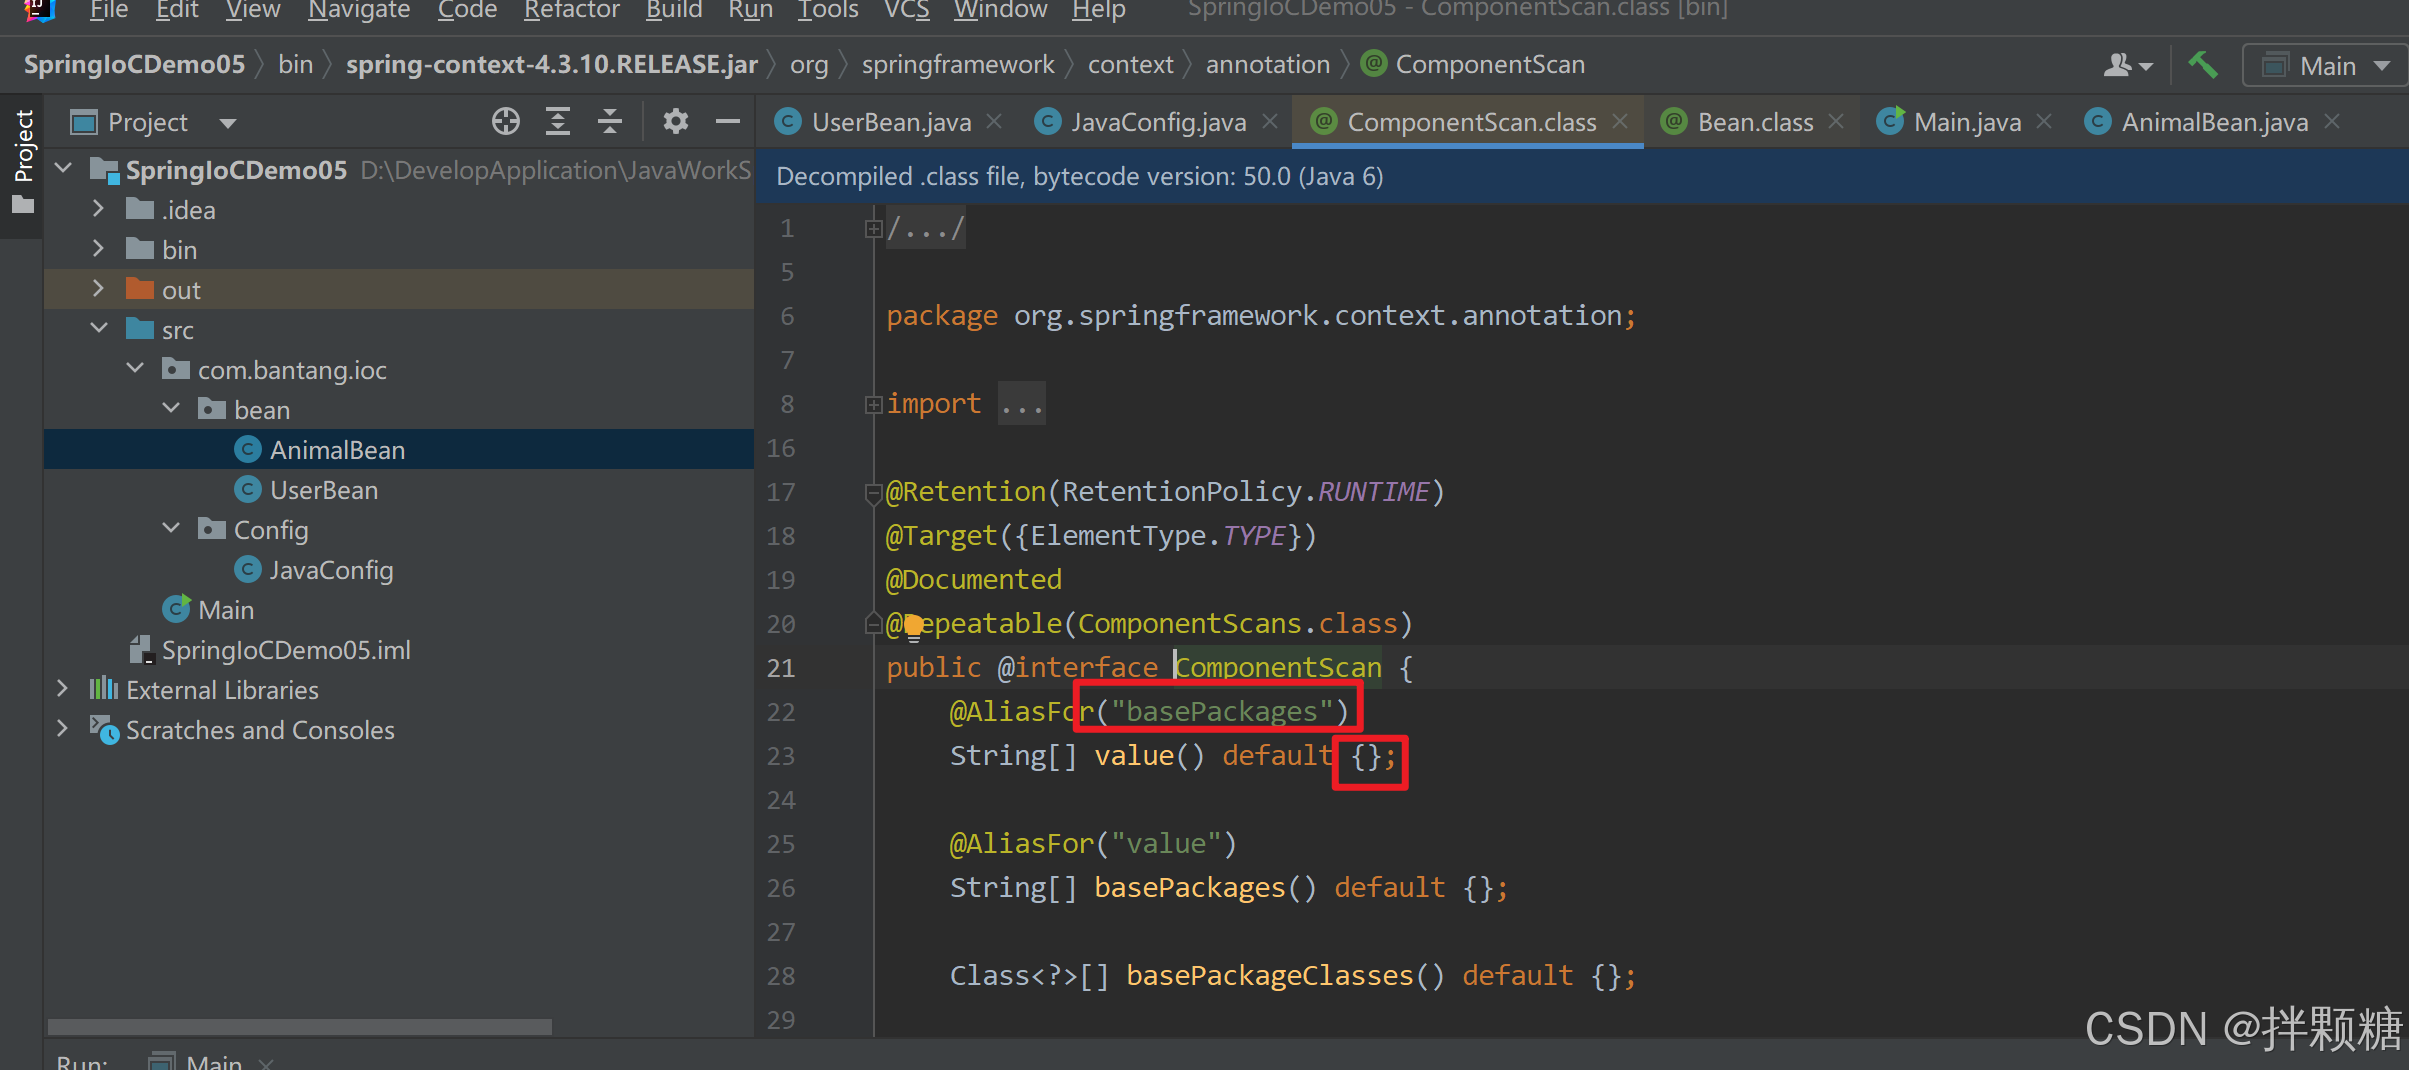
传参basePackages 即bean所在的包路径
为bean加入@Component以供扫描
运行验证
如果要扫描的包路径有多个呢
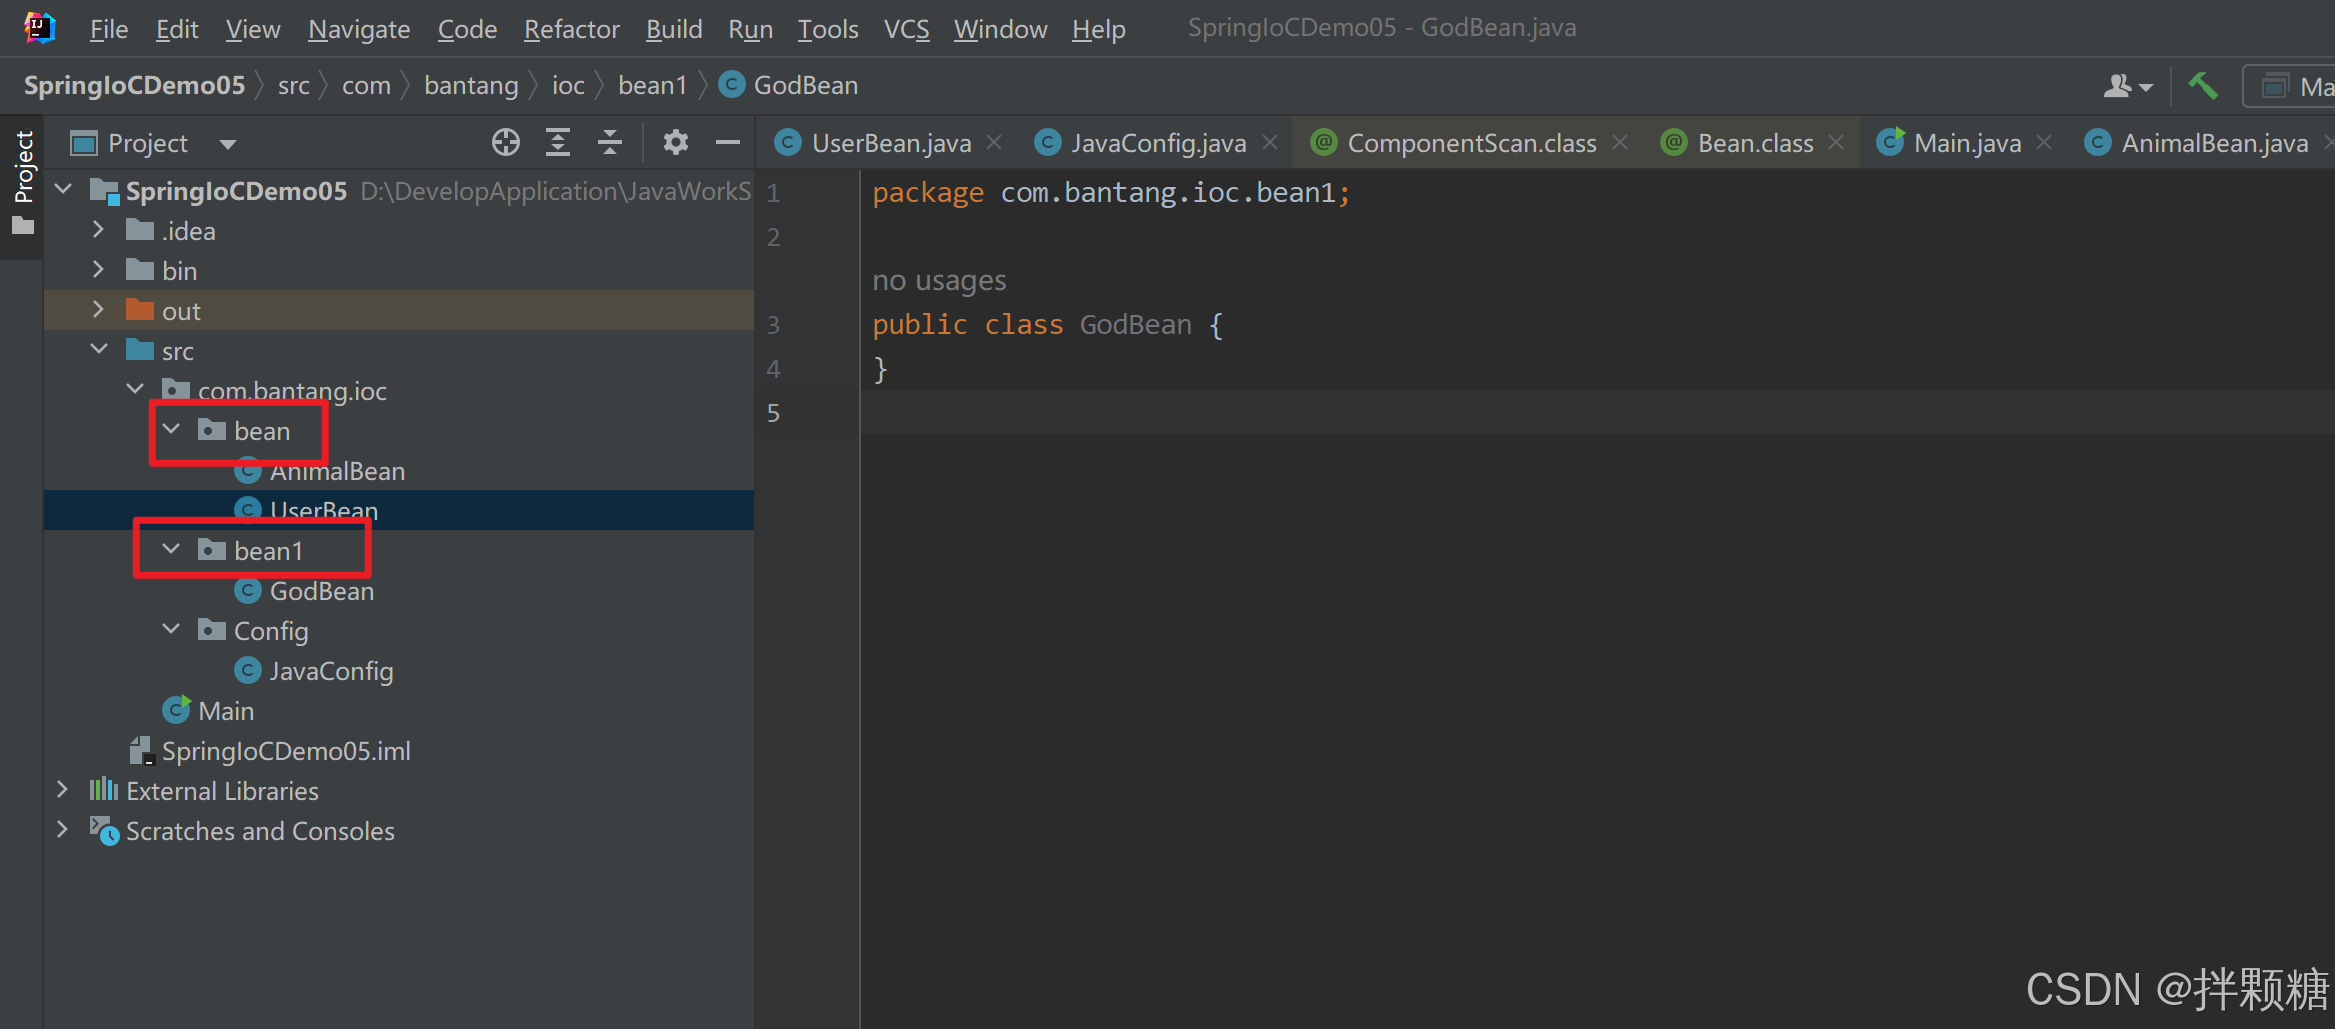
添加注解@ComponentScans 用来扫描多个包路径
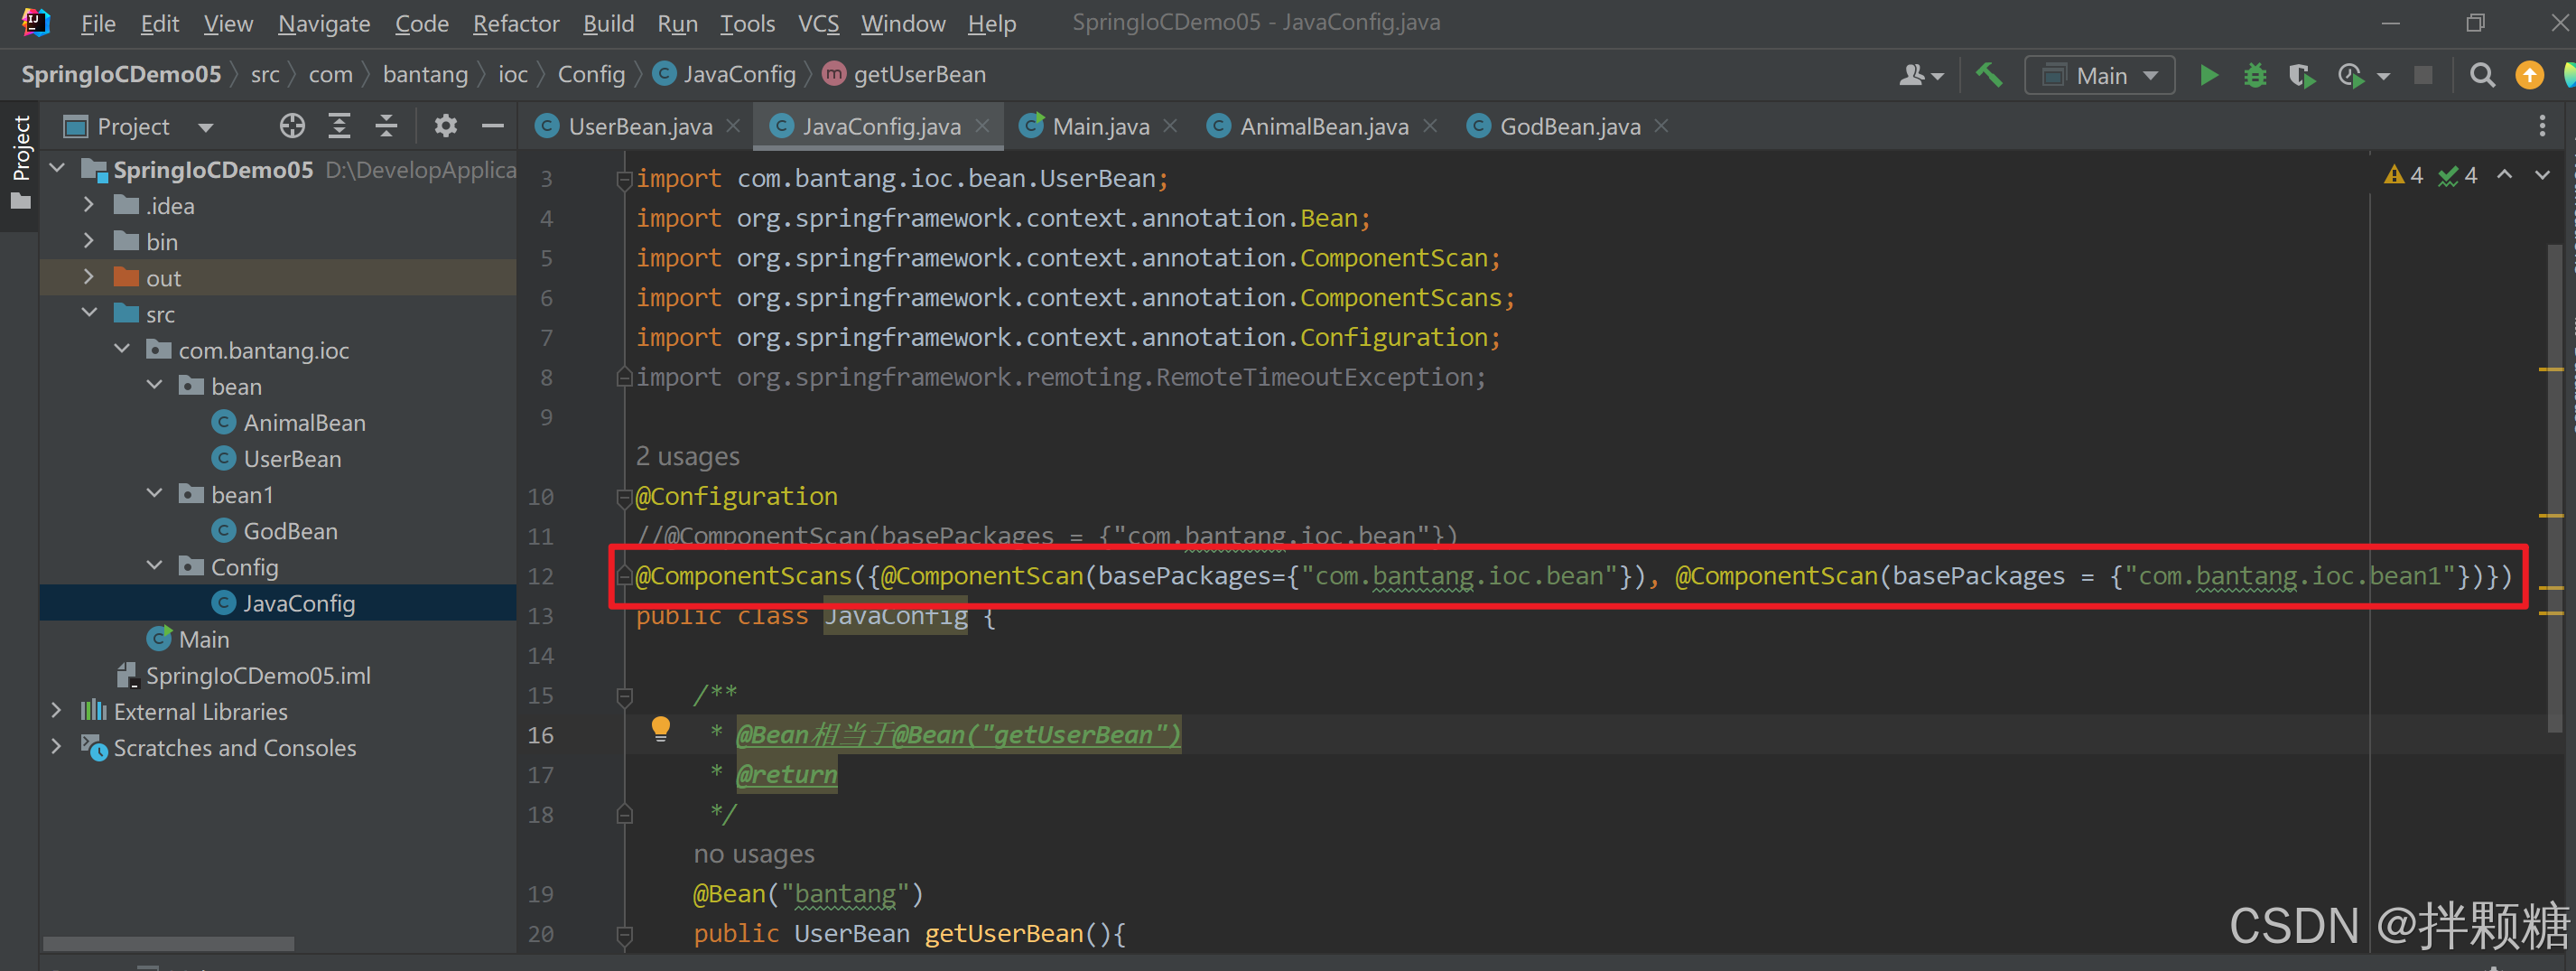
运行验证
如果不想让配置类扫描注册所有bean,需要根据实际的业务来决定呢?要怎麽办?哎 要使用条件注解
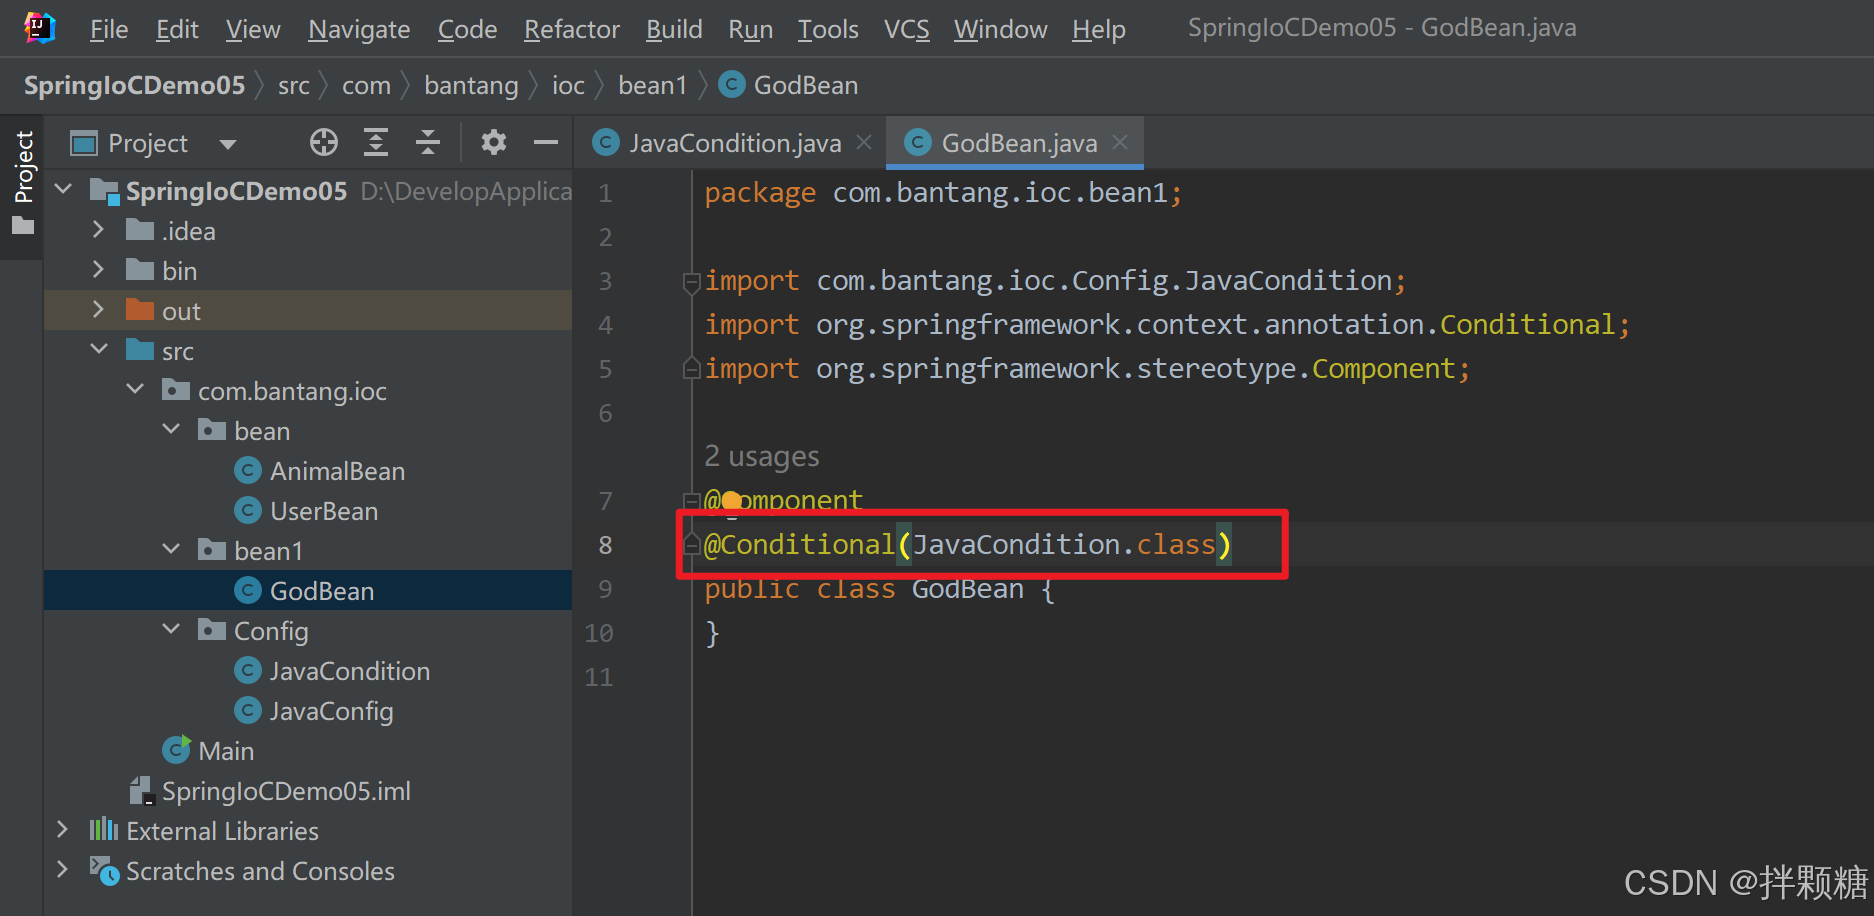
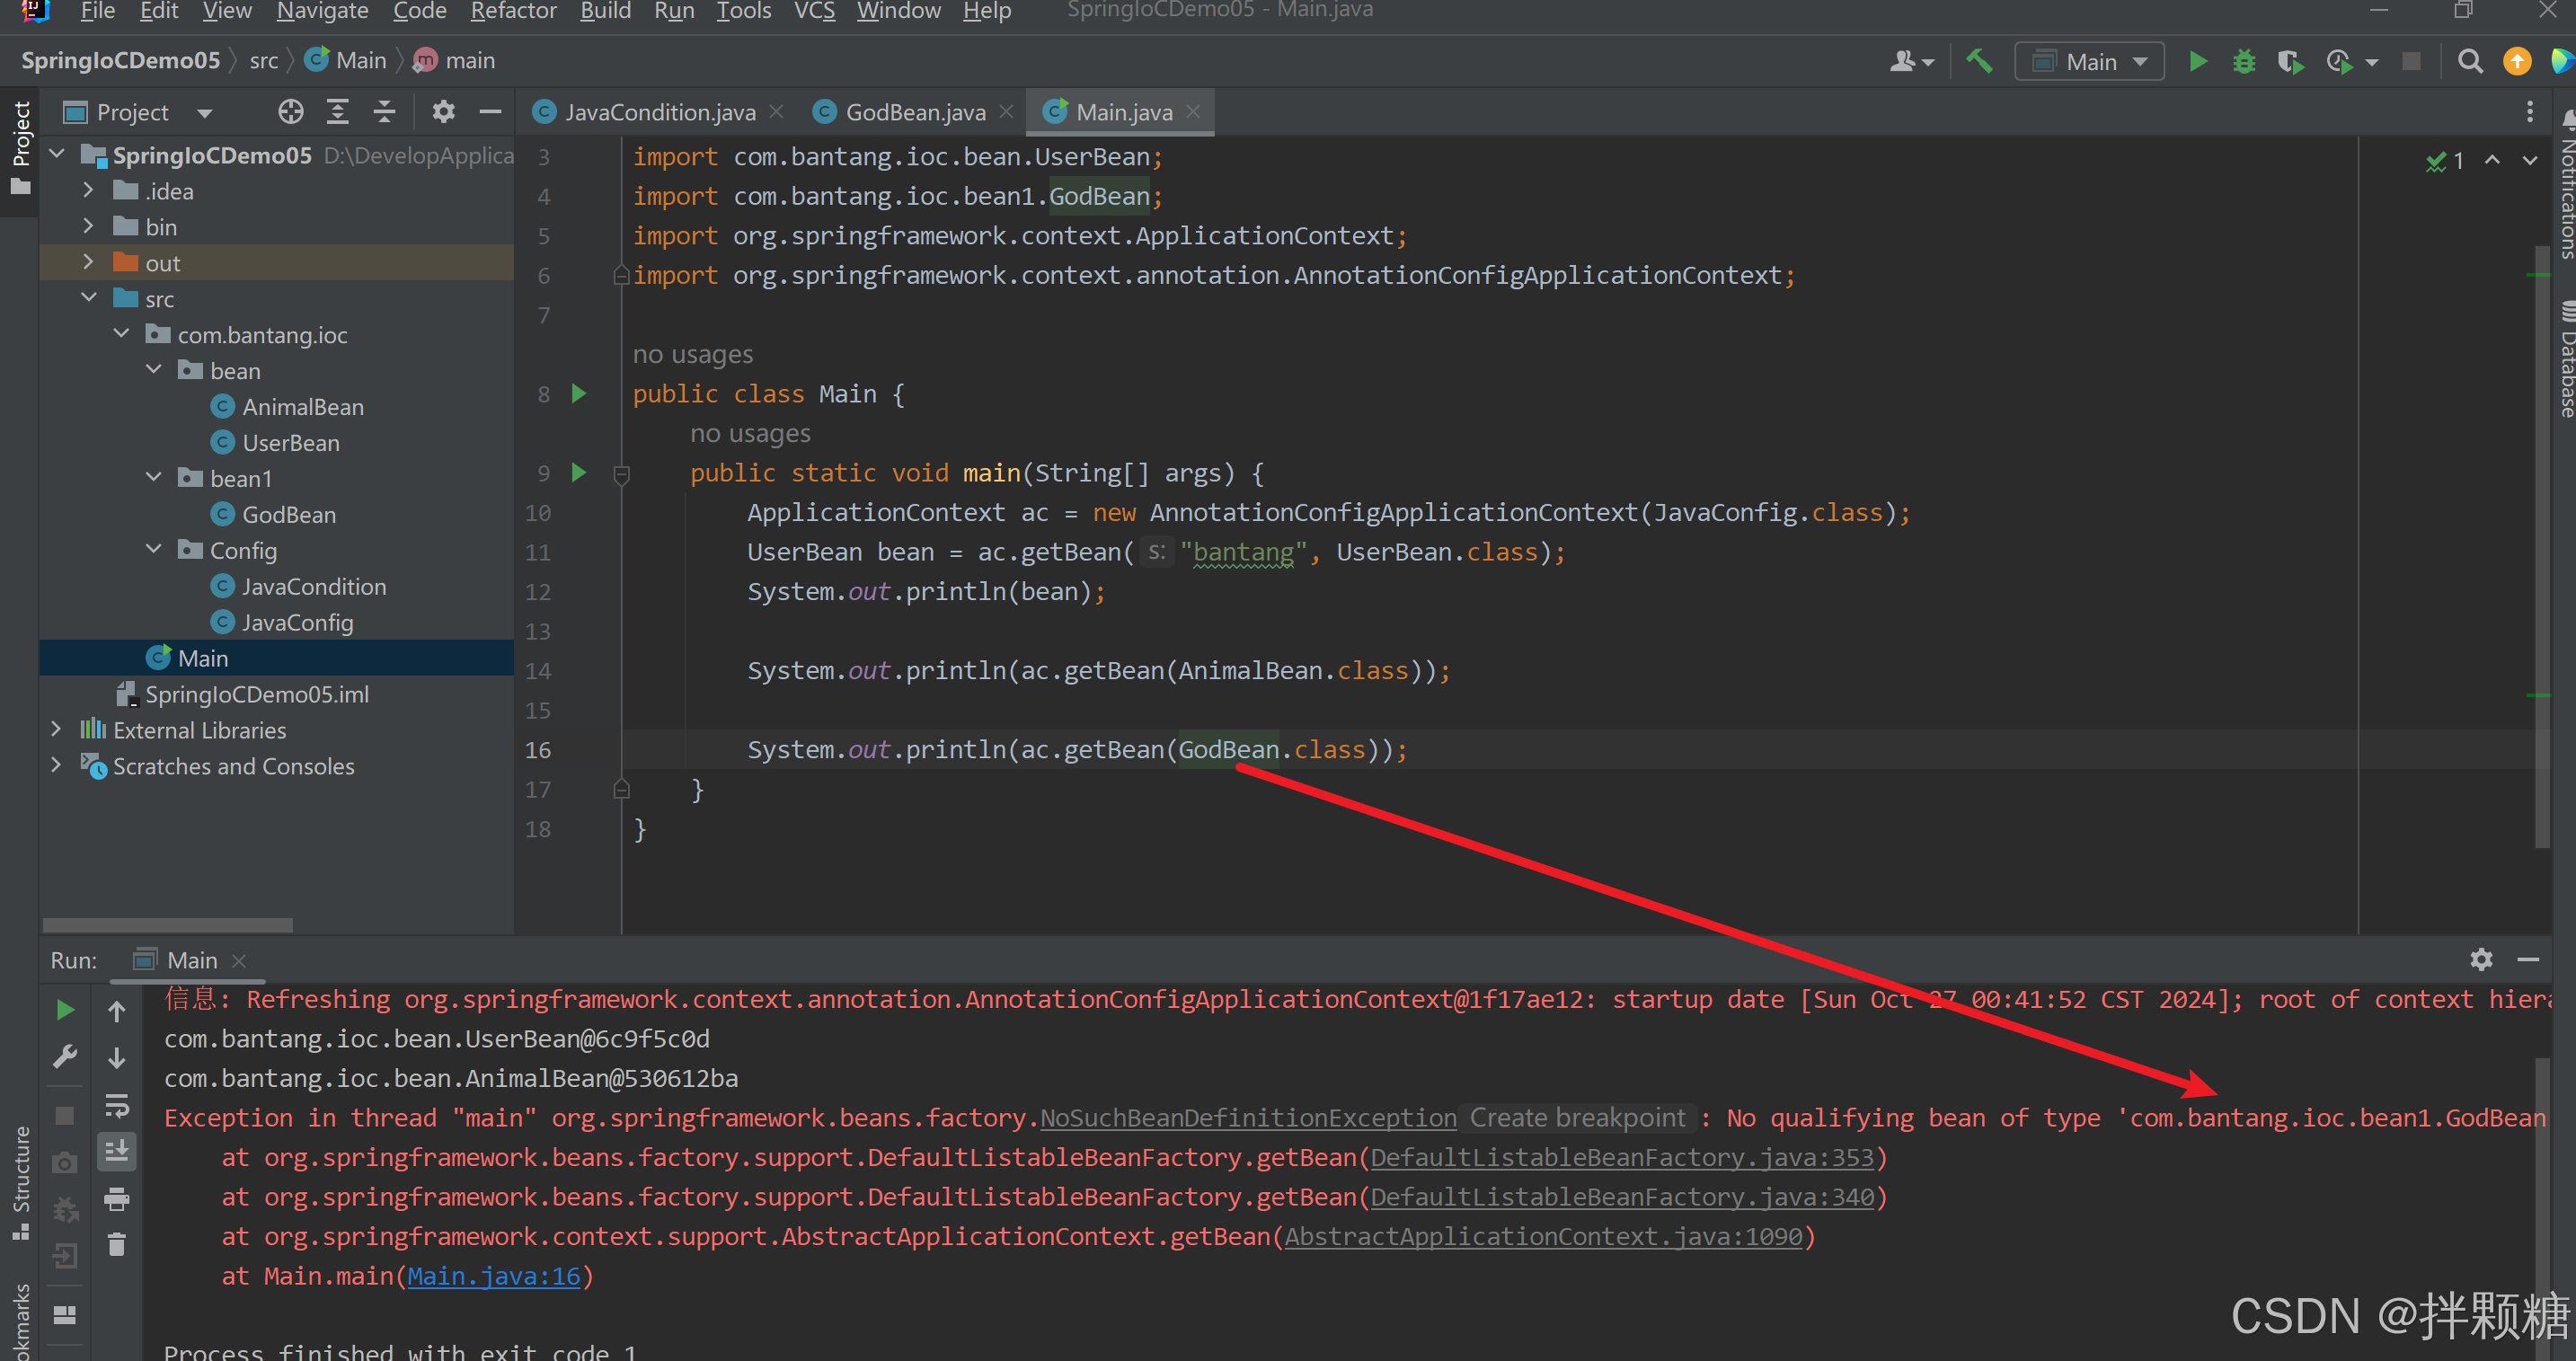
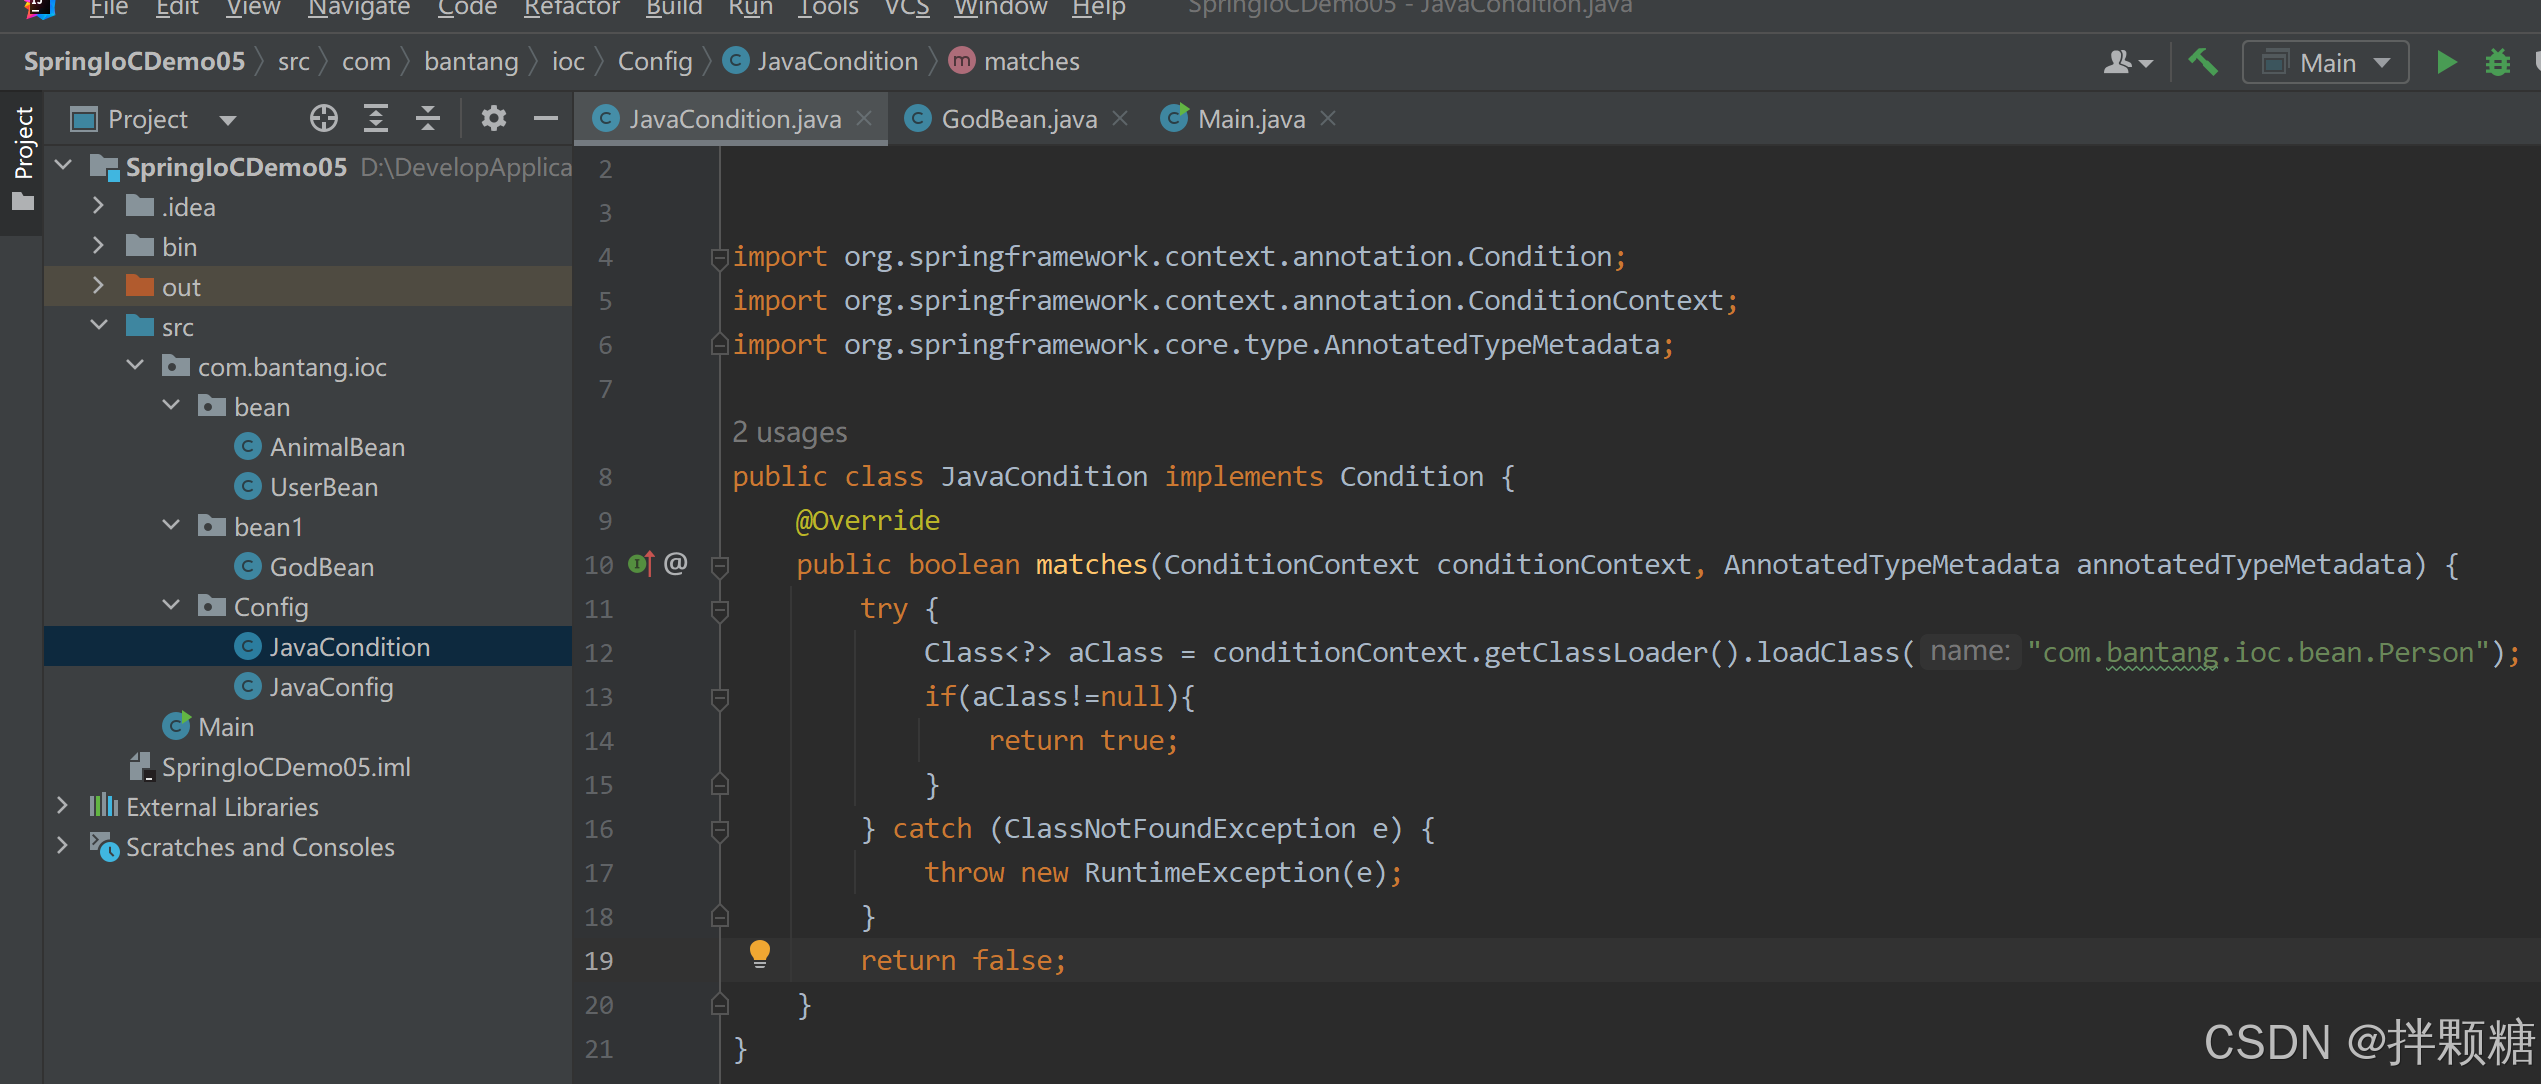
@Conditional
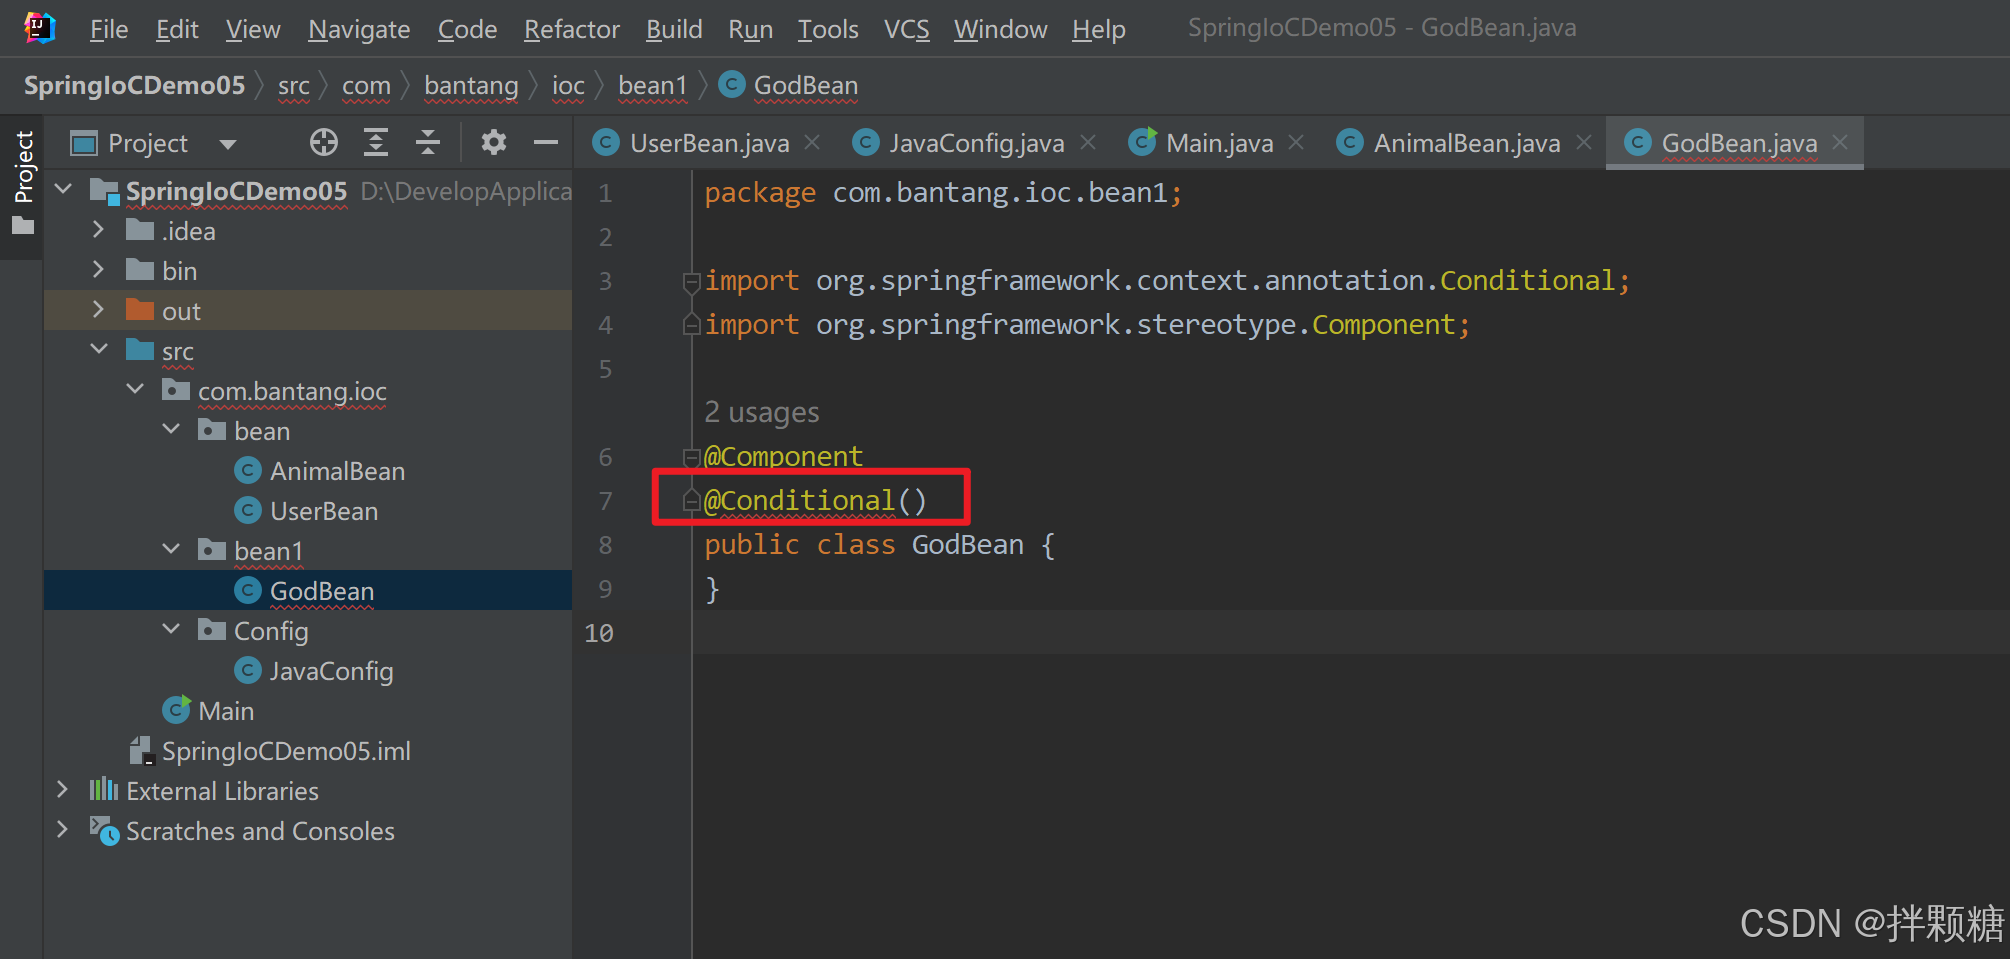
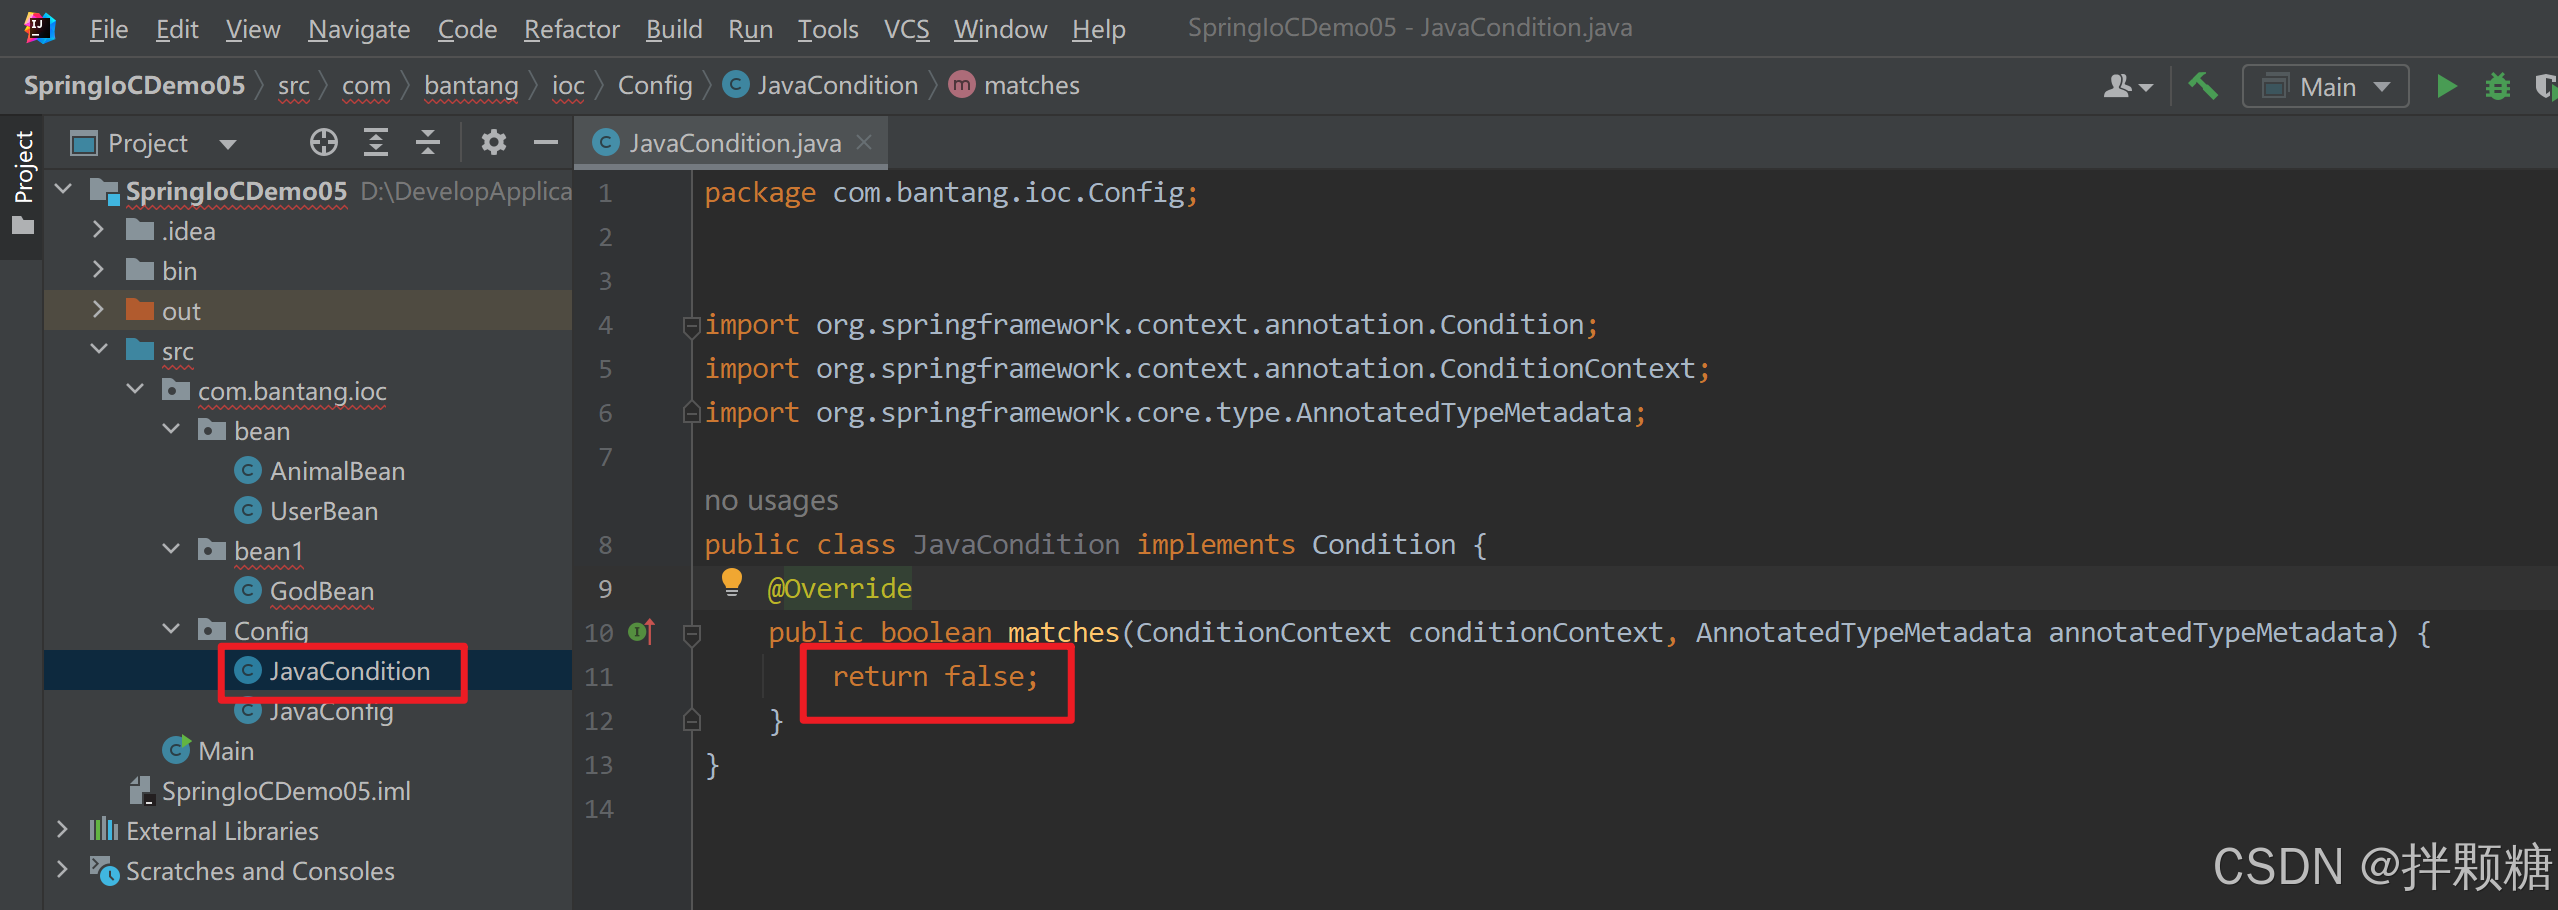
查看源码知,需要传参实现Condition接口的实现类

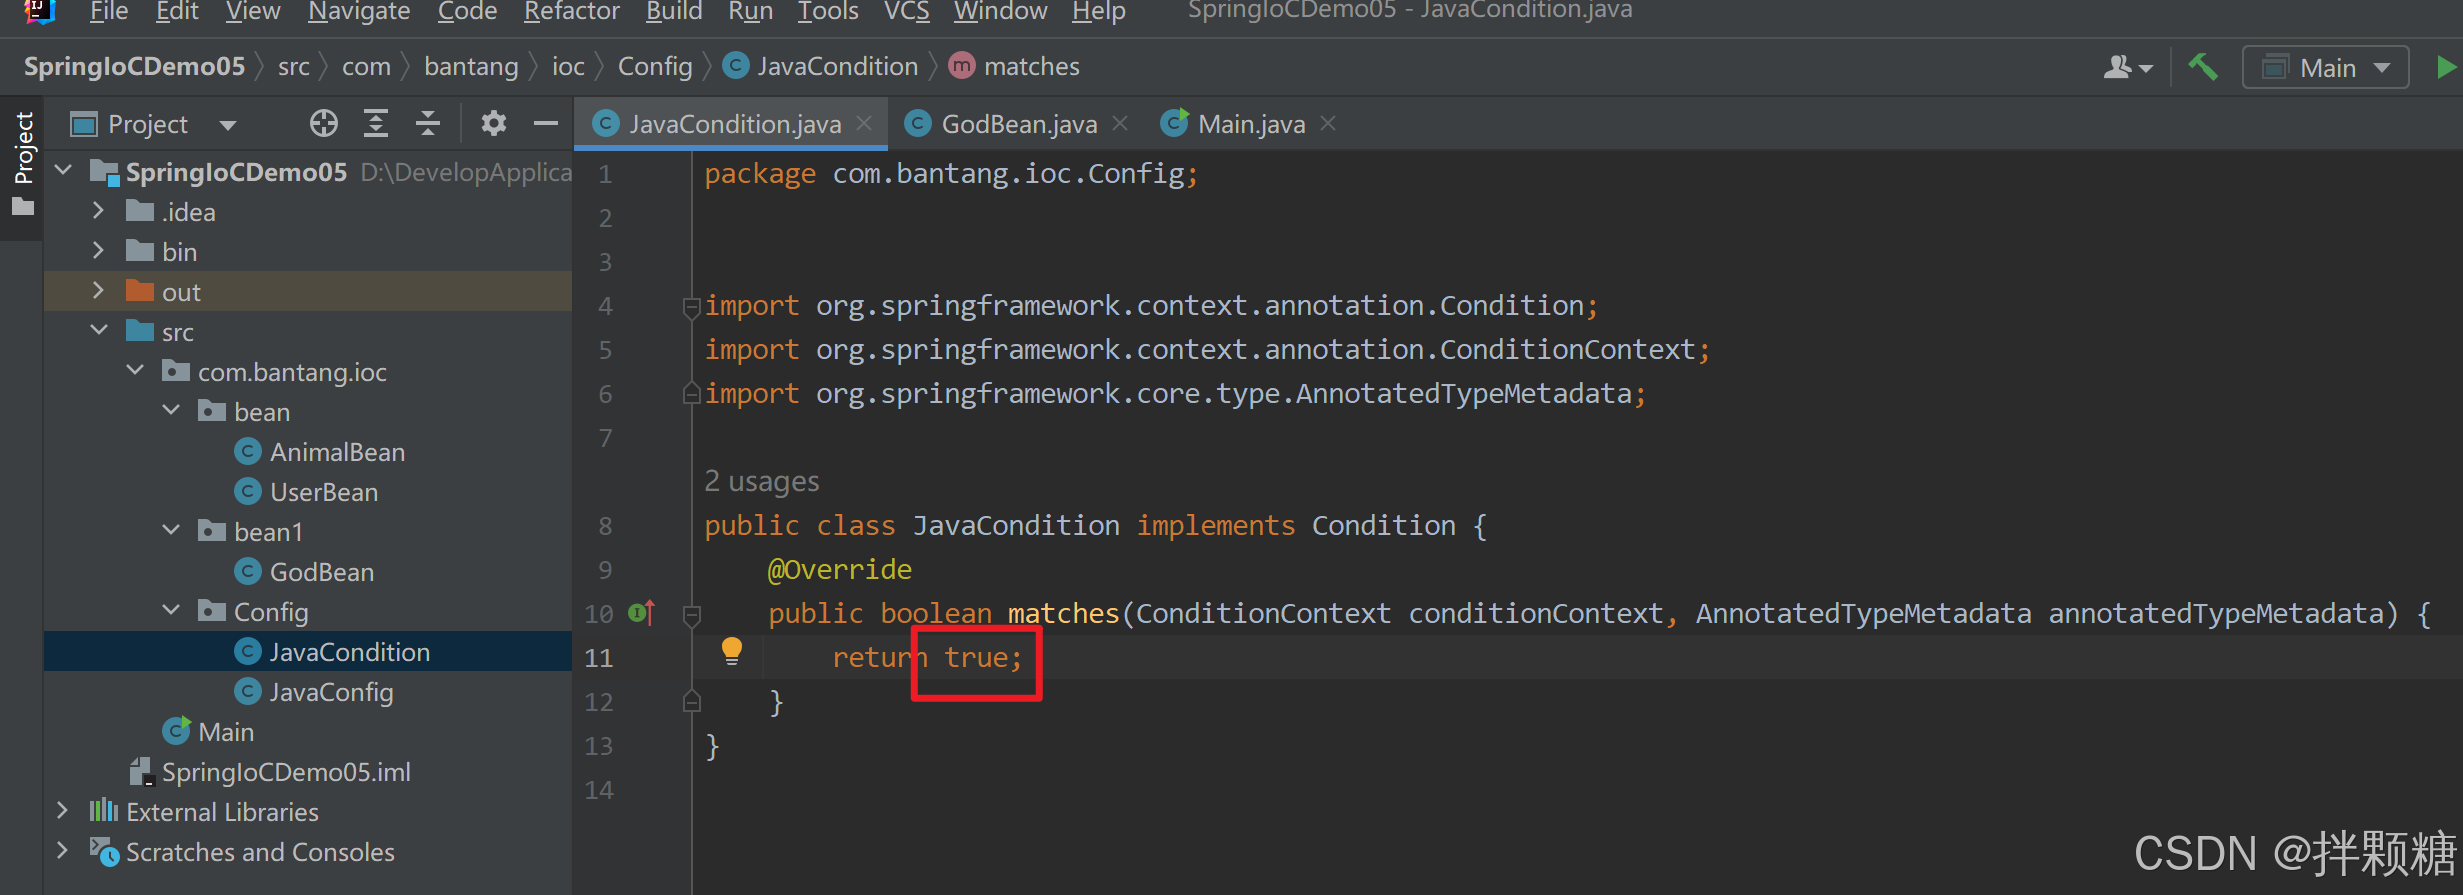
默认返回false so 获取GodBean实例会报错
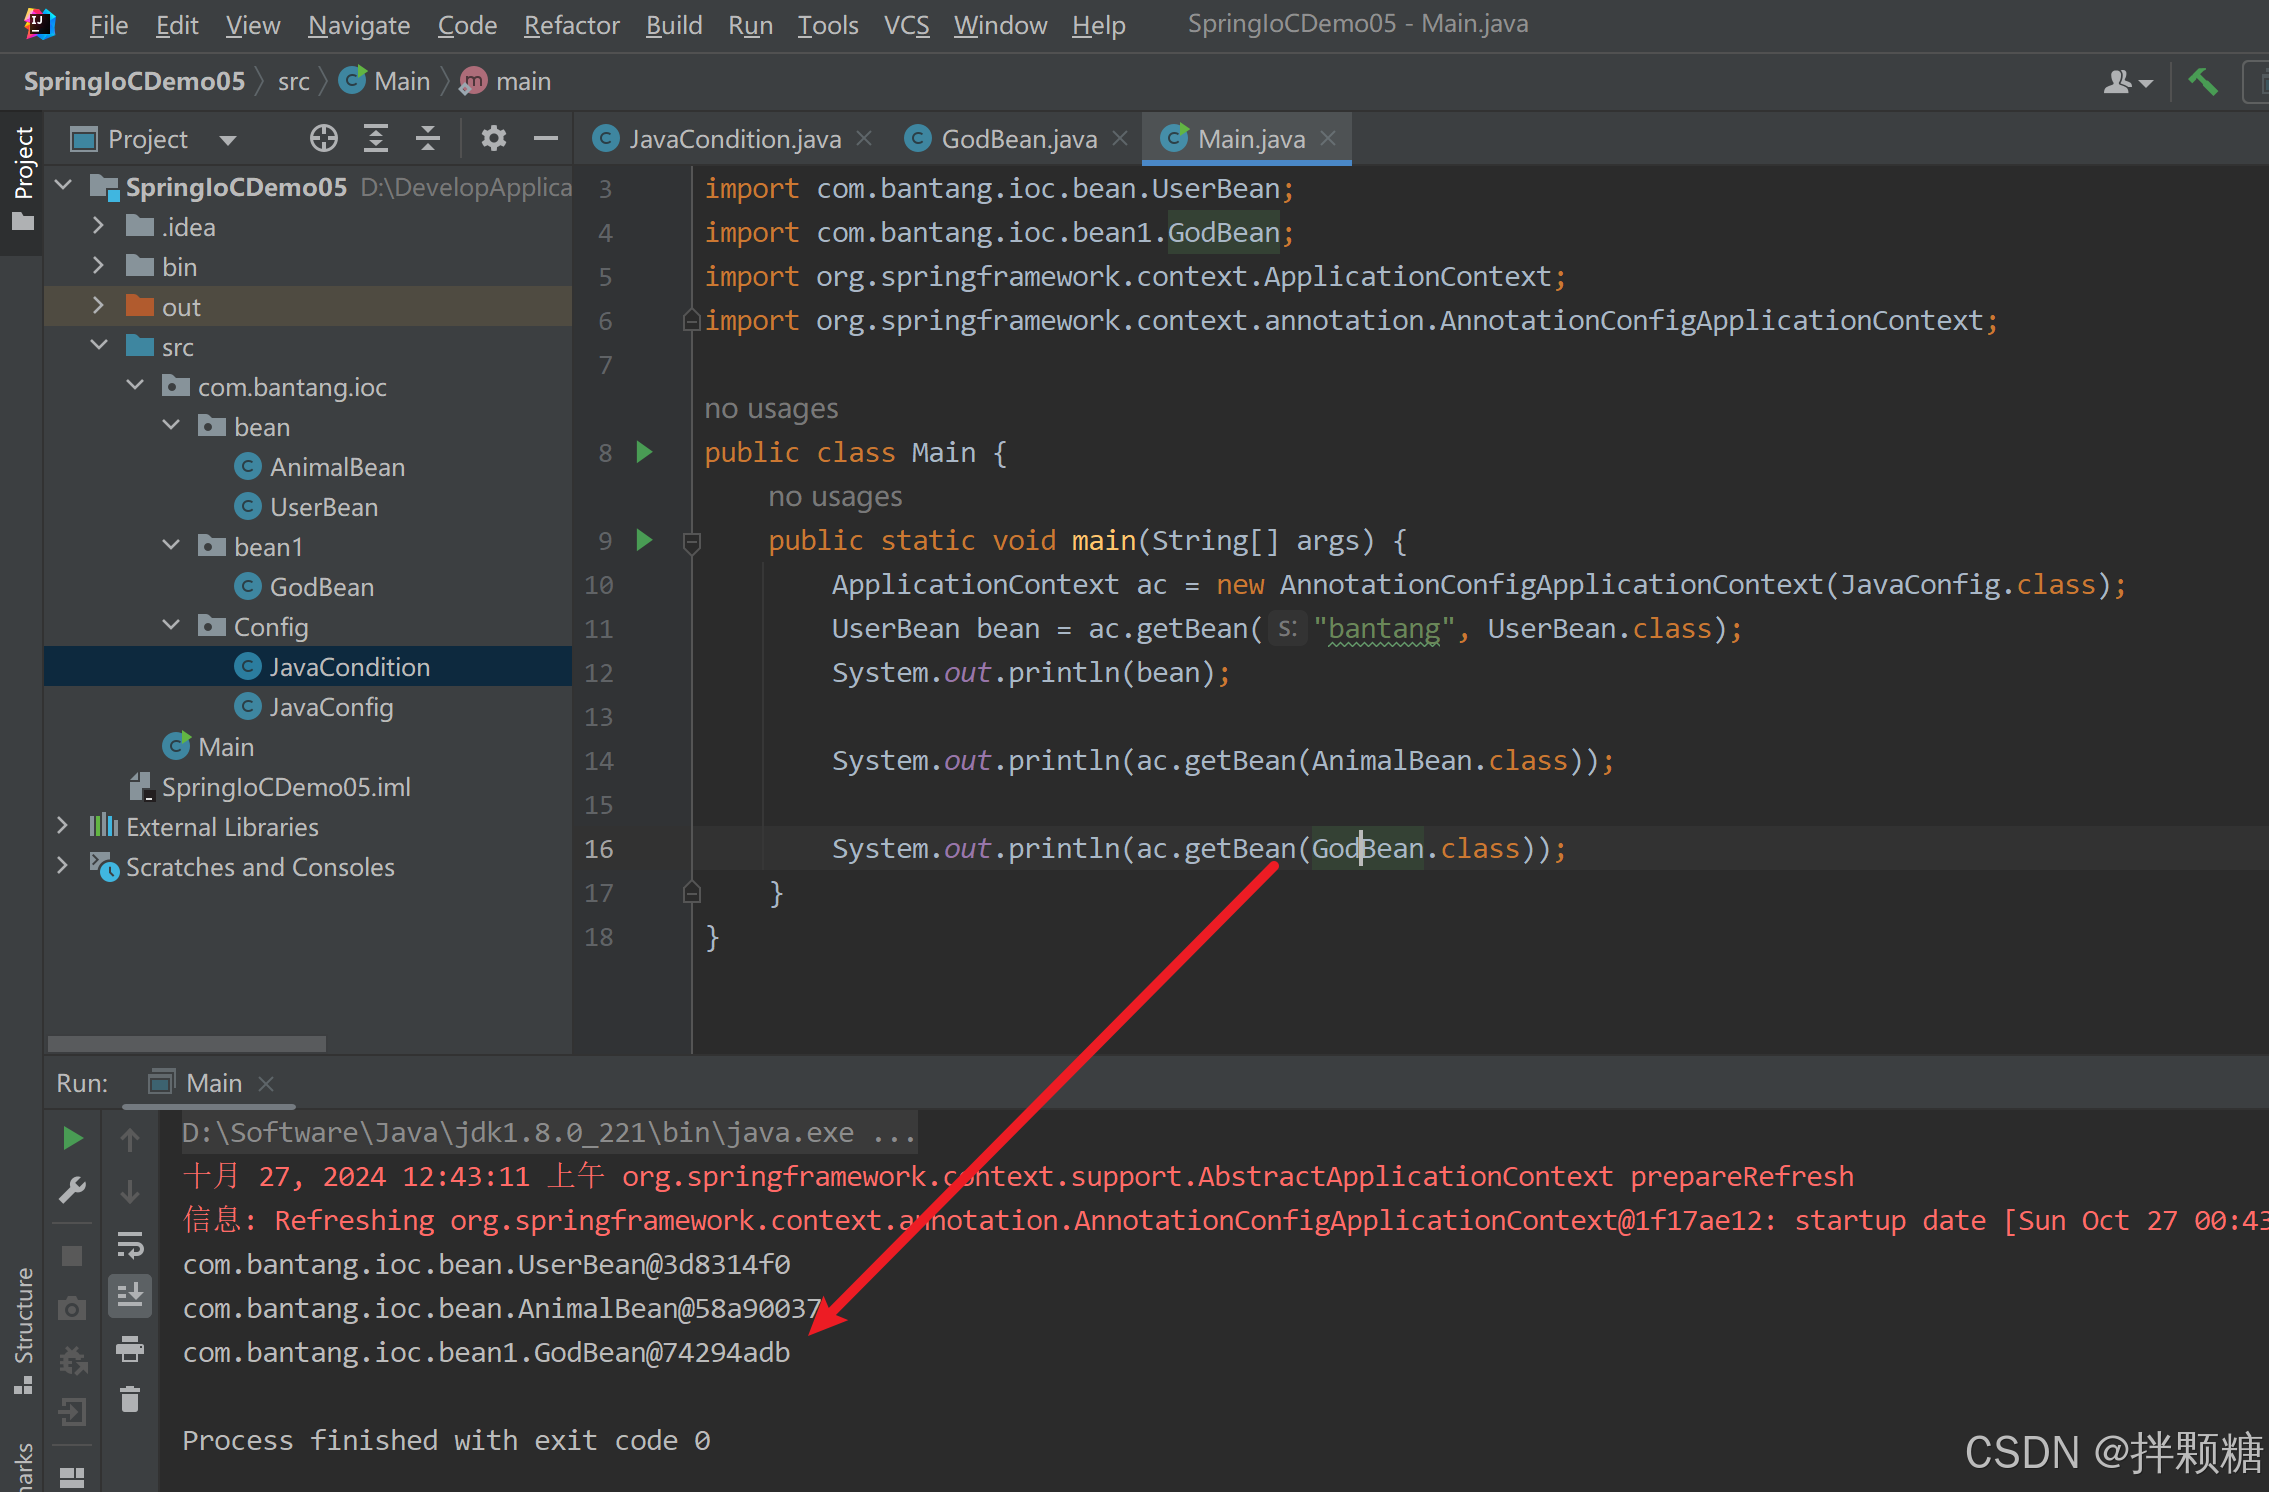
默认改为true后 获取GodBean实例正常了
如果不想使用默认条件值呢?哎 重写实现类的方法
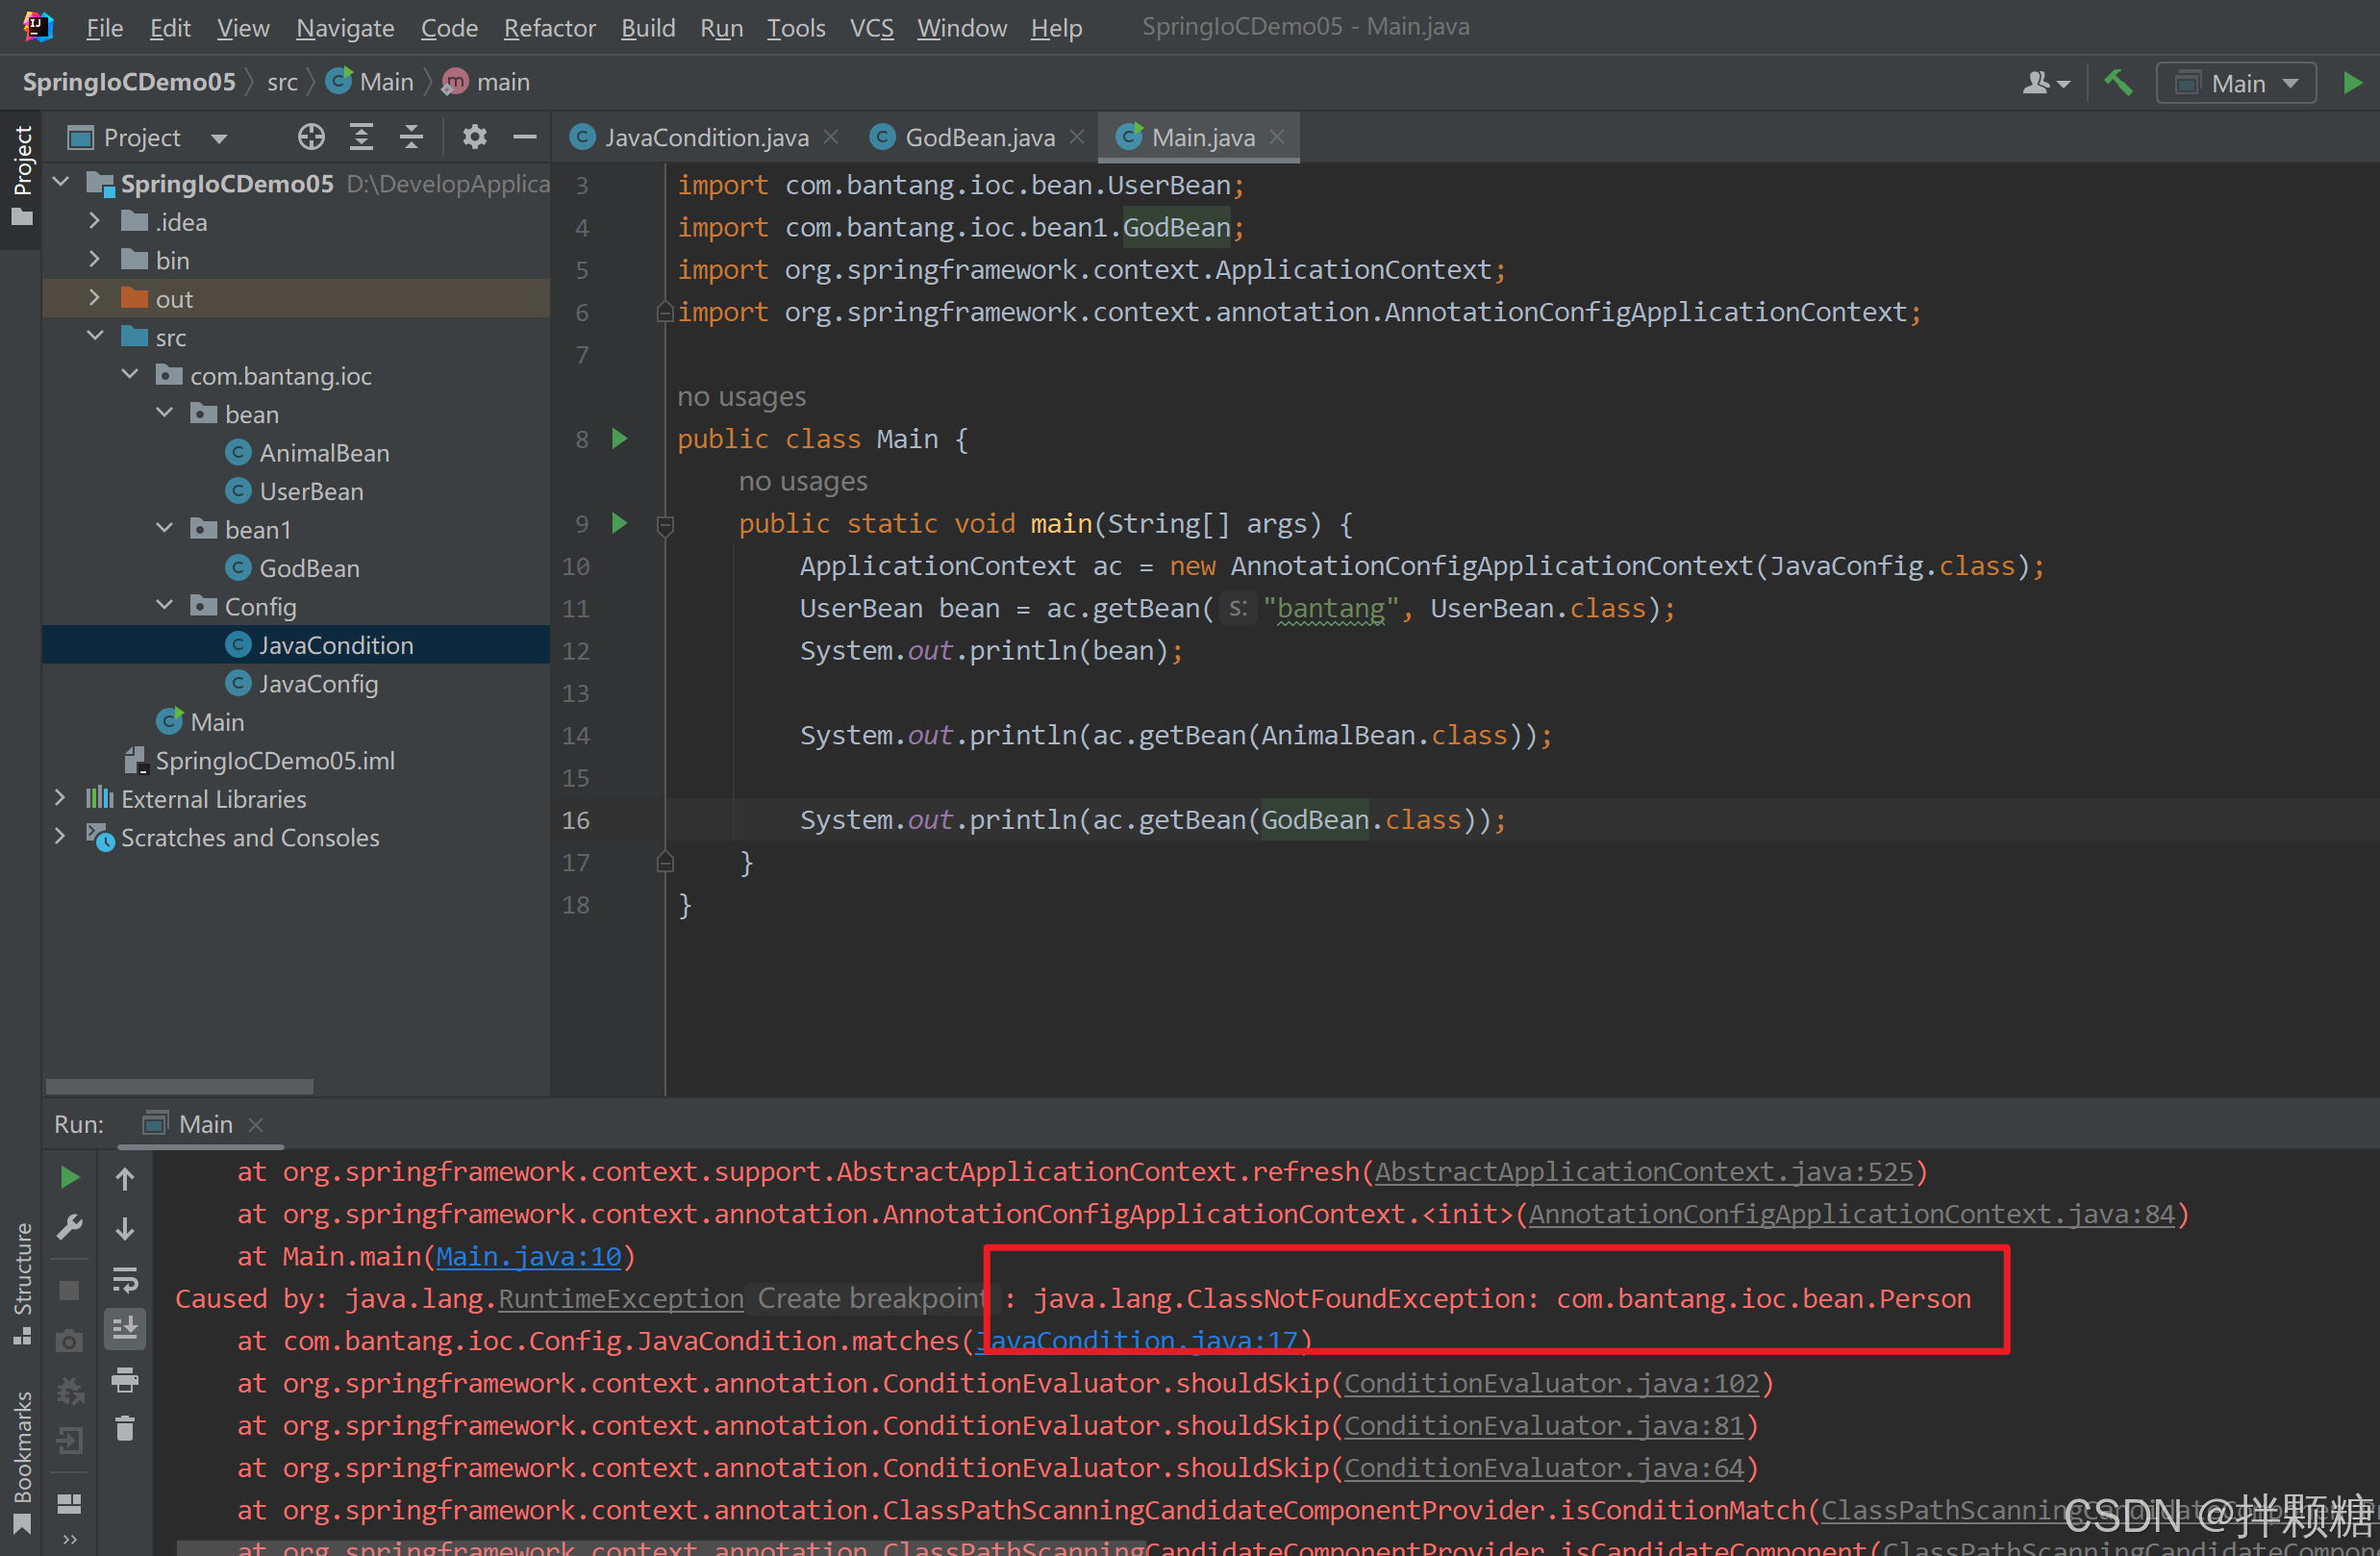
我们以判断有没有Person类作为判定条件
因为没有Person类,所以运行异常
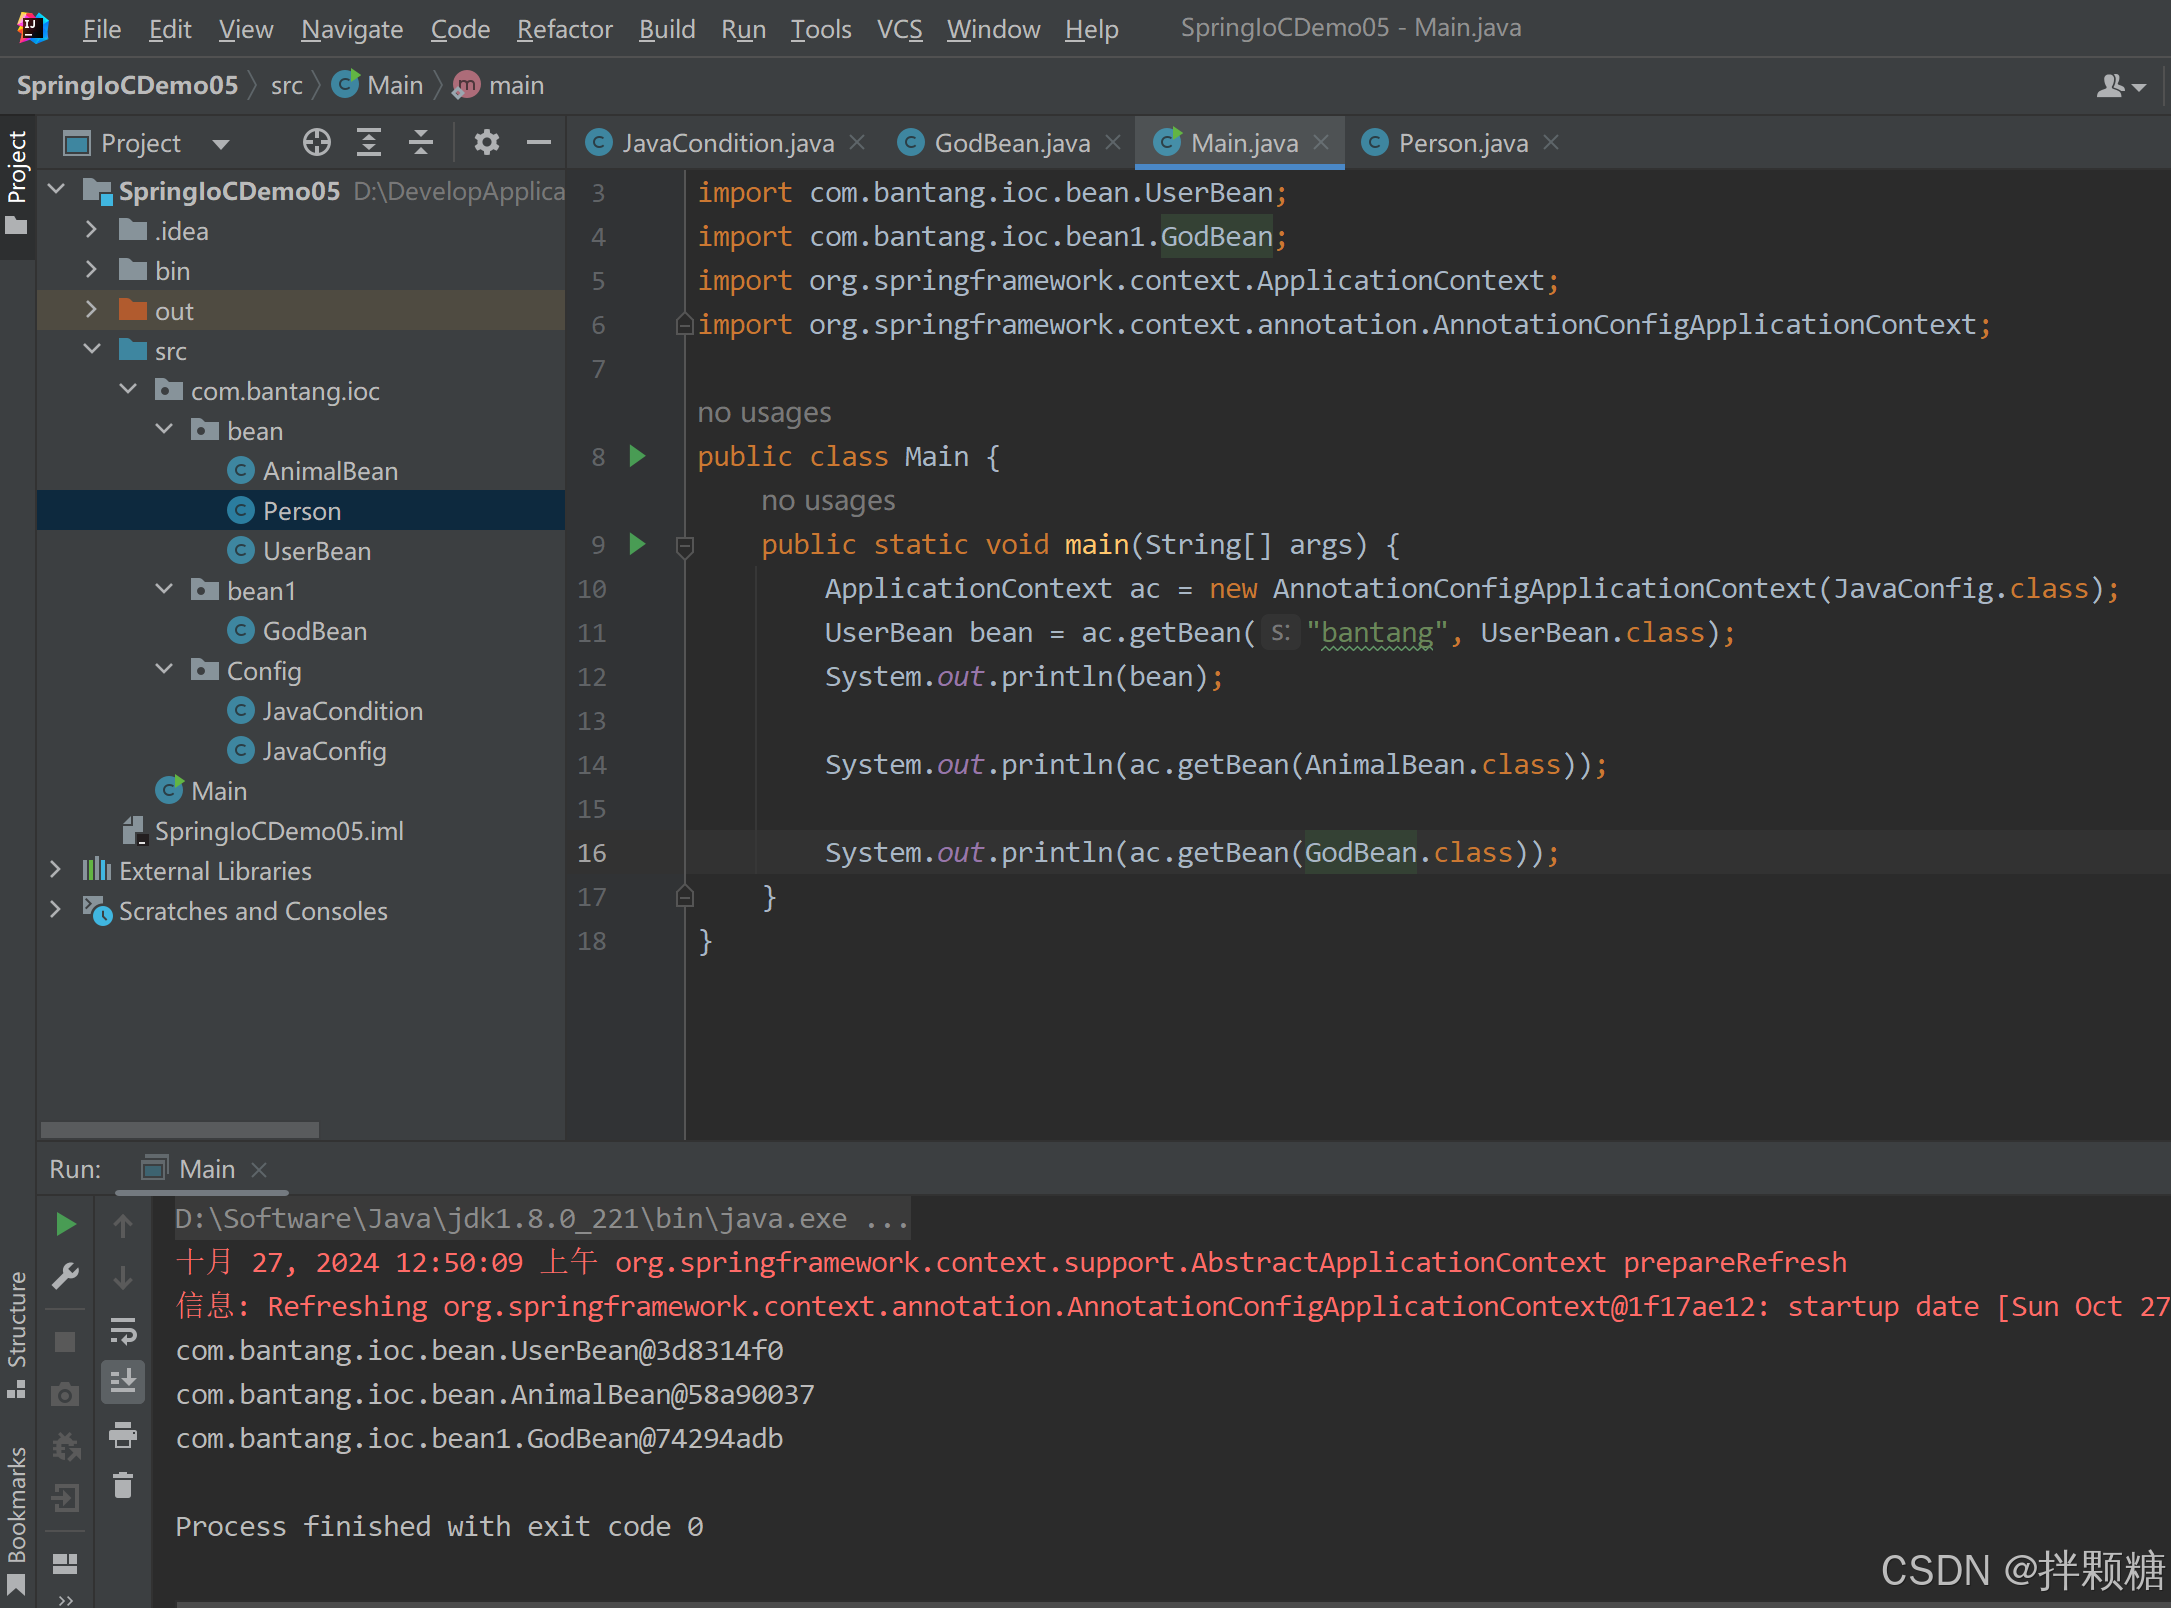
创建Person类后正常

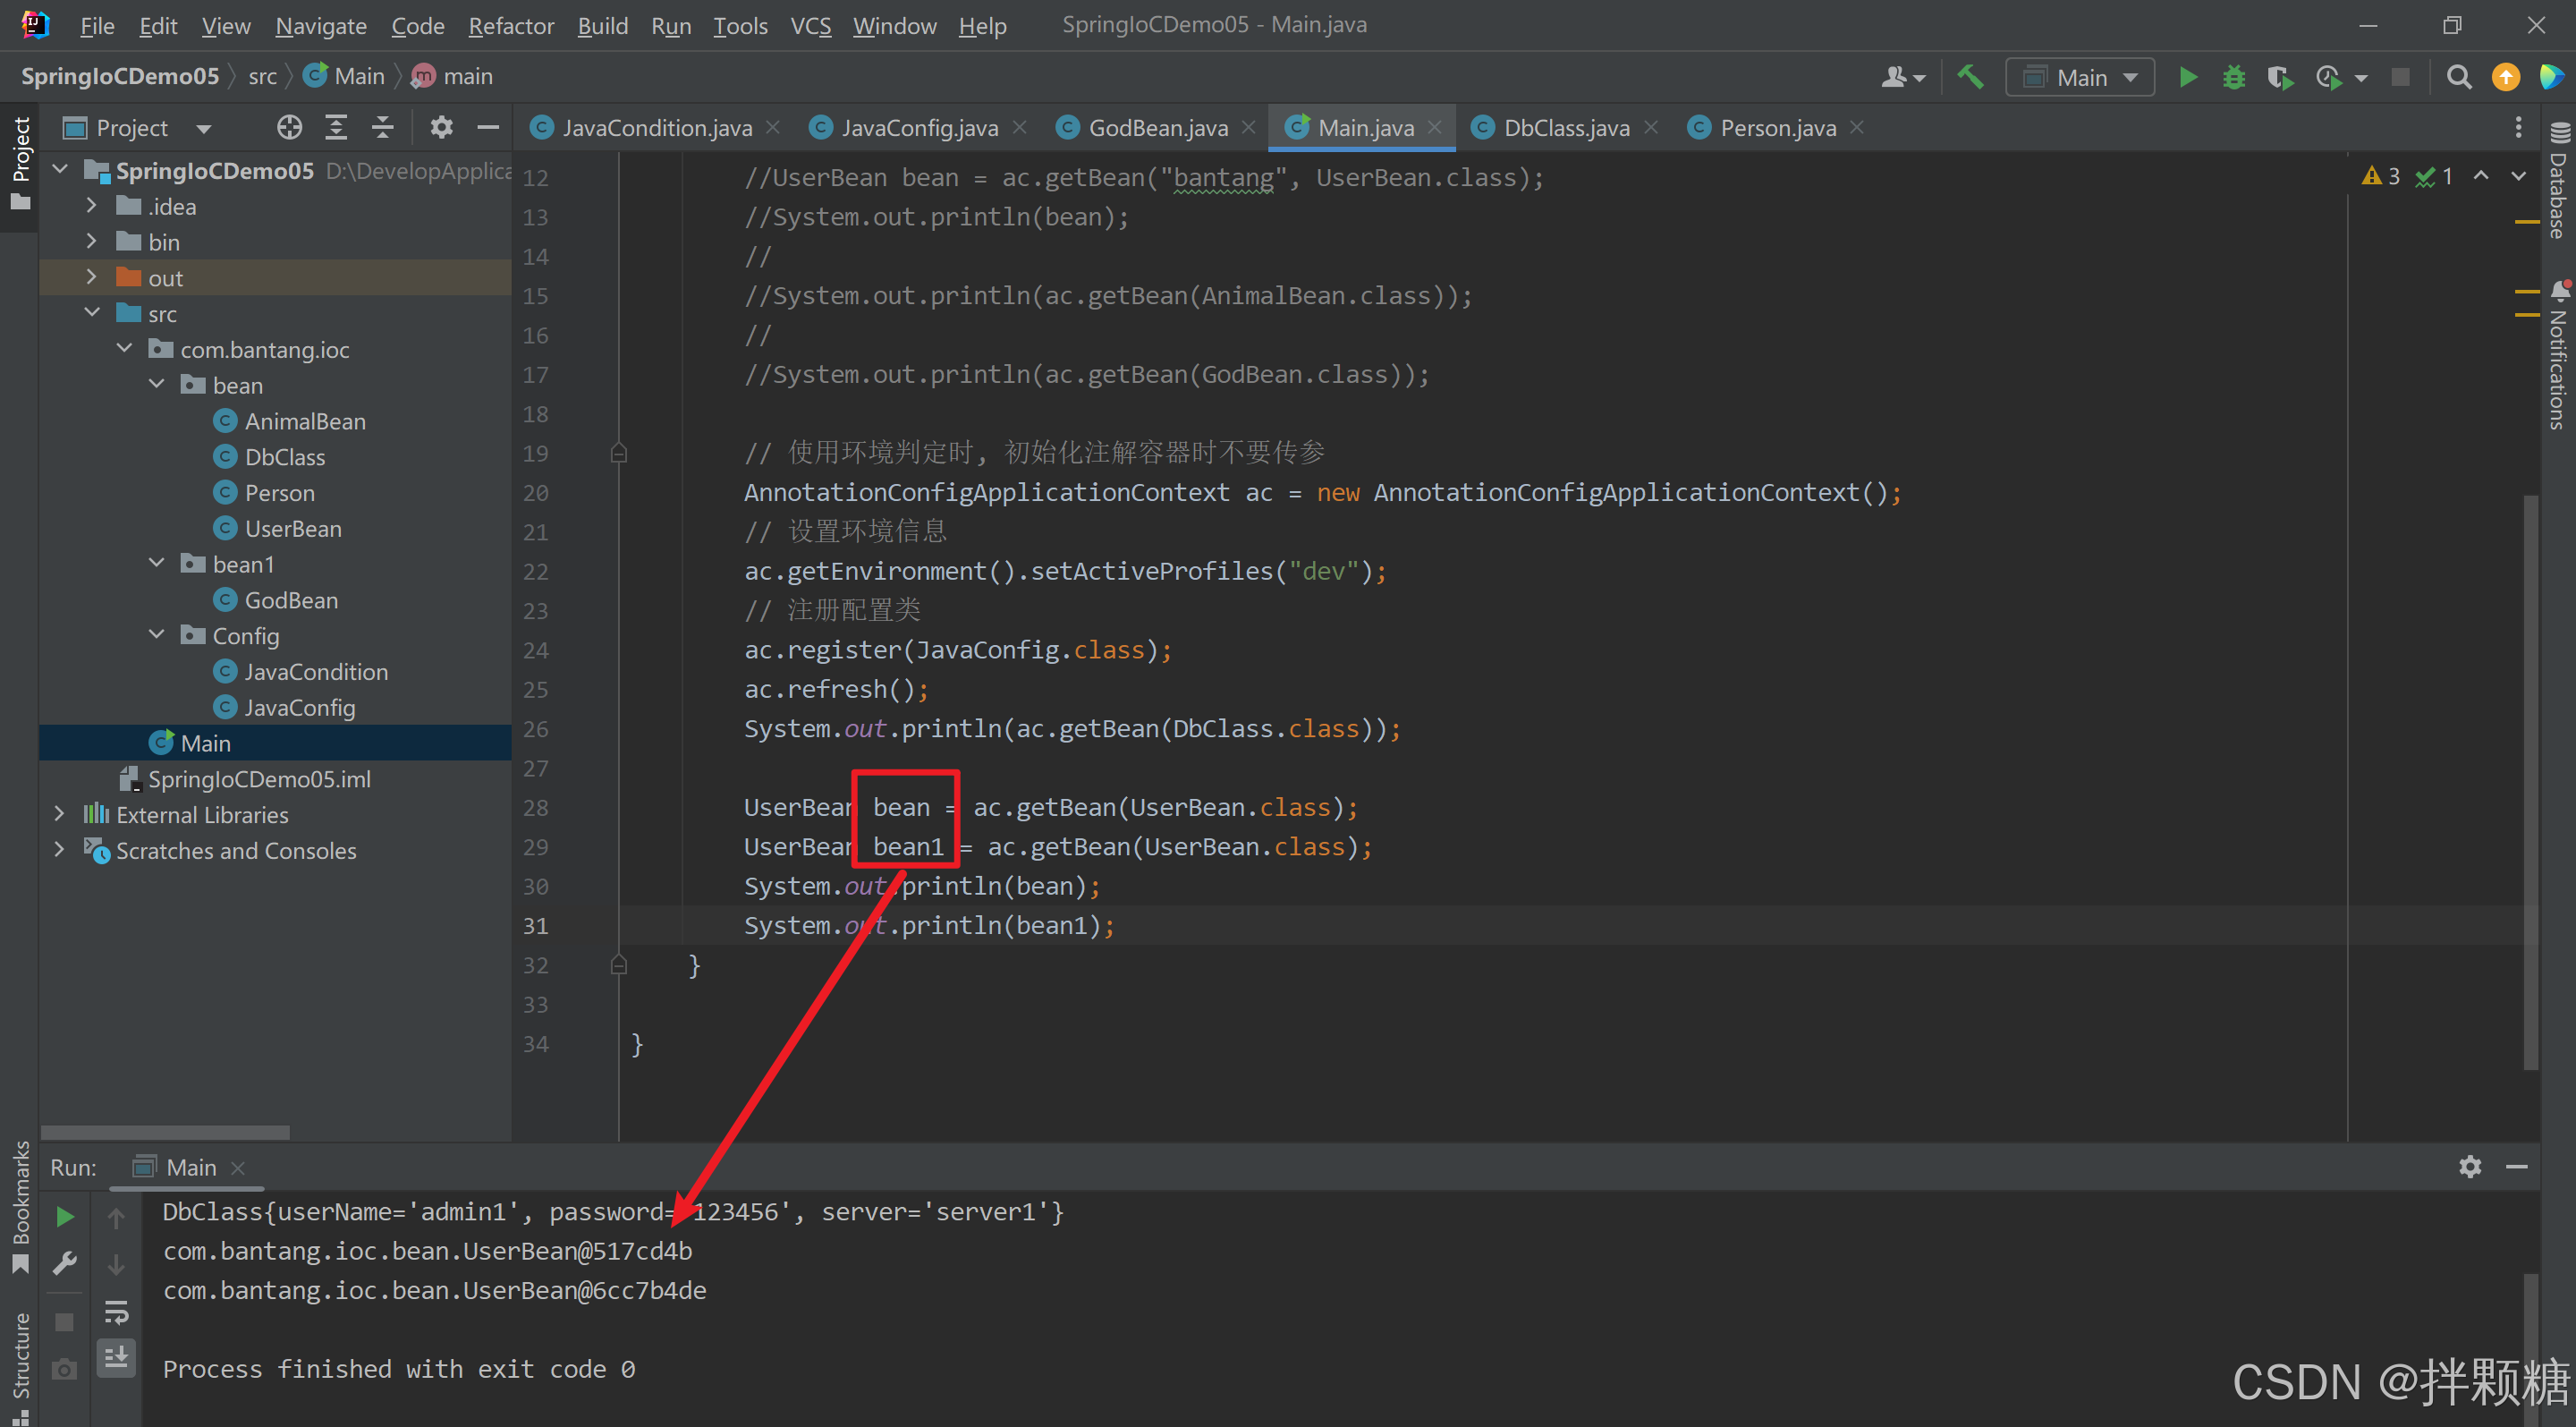
@Profile
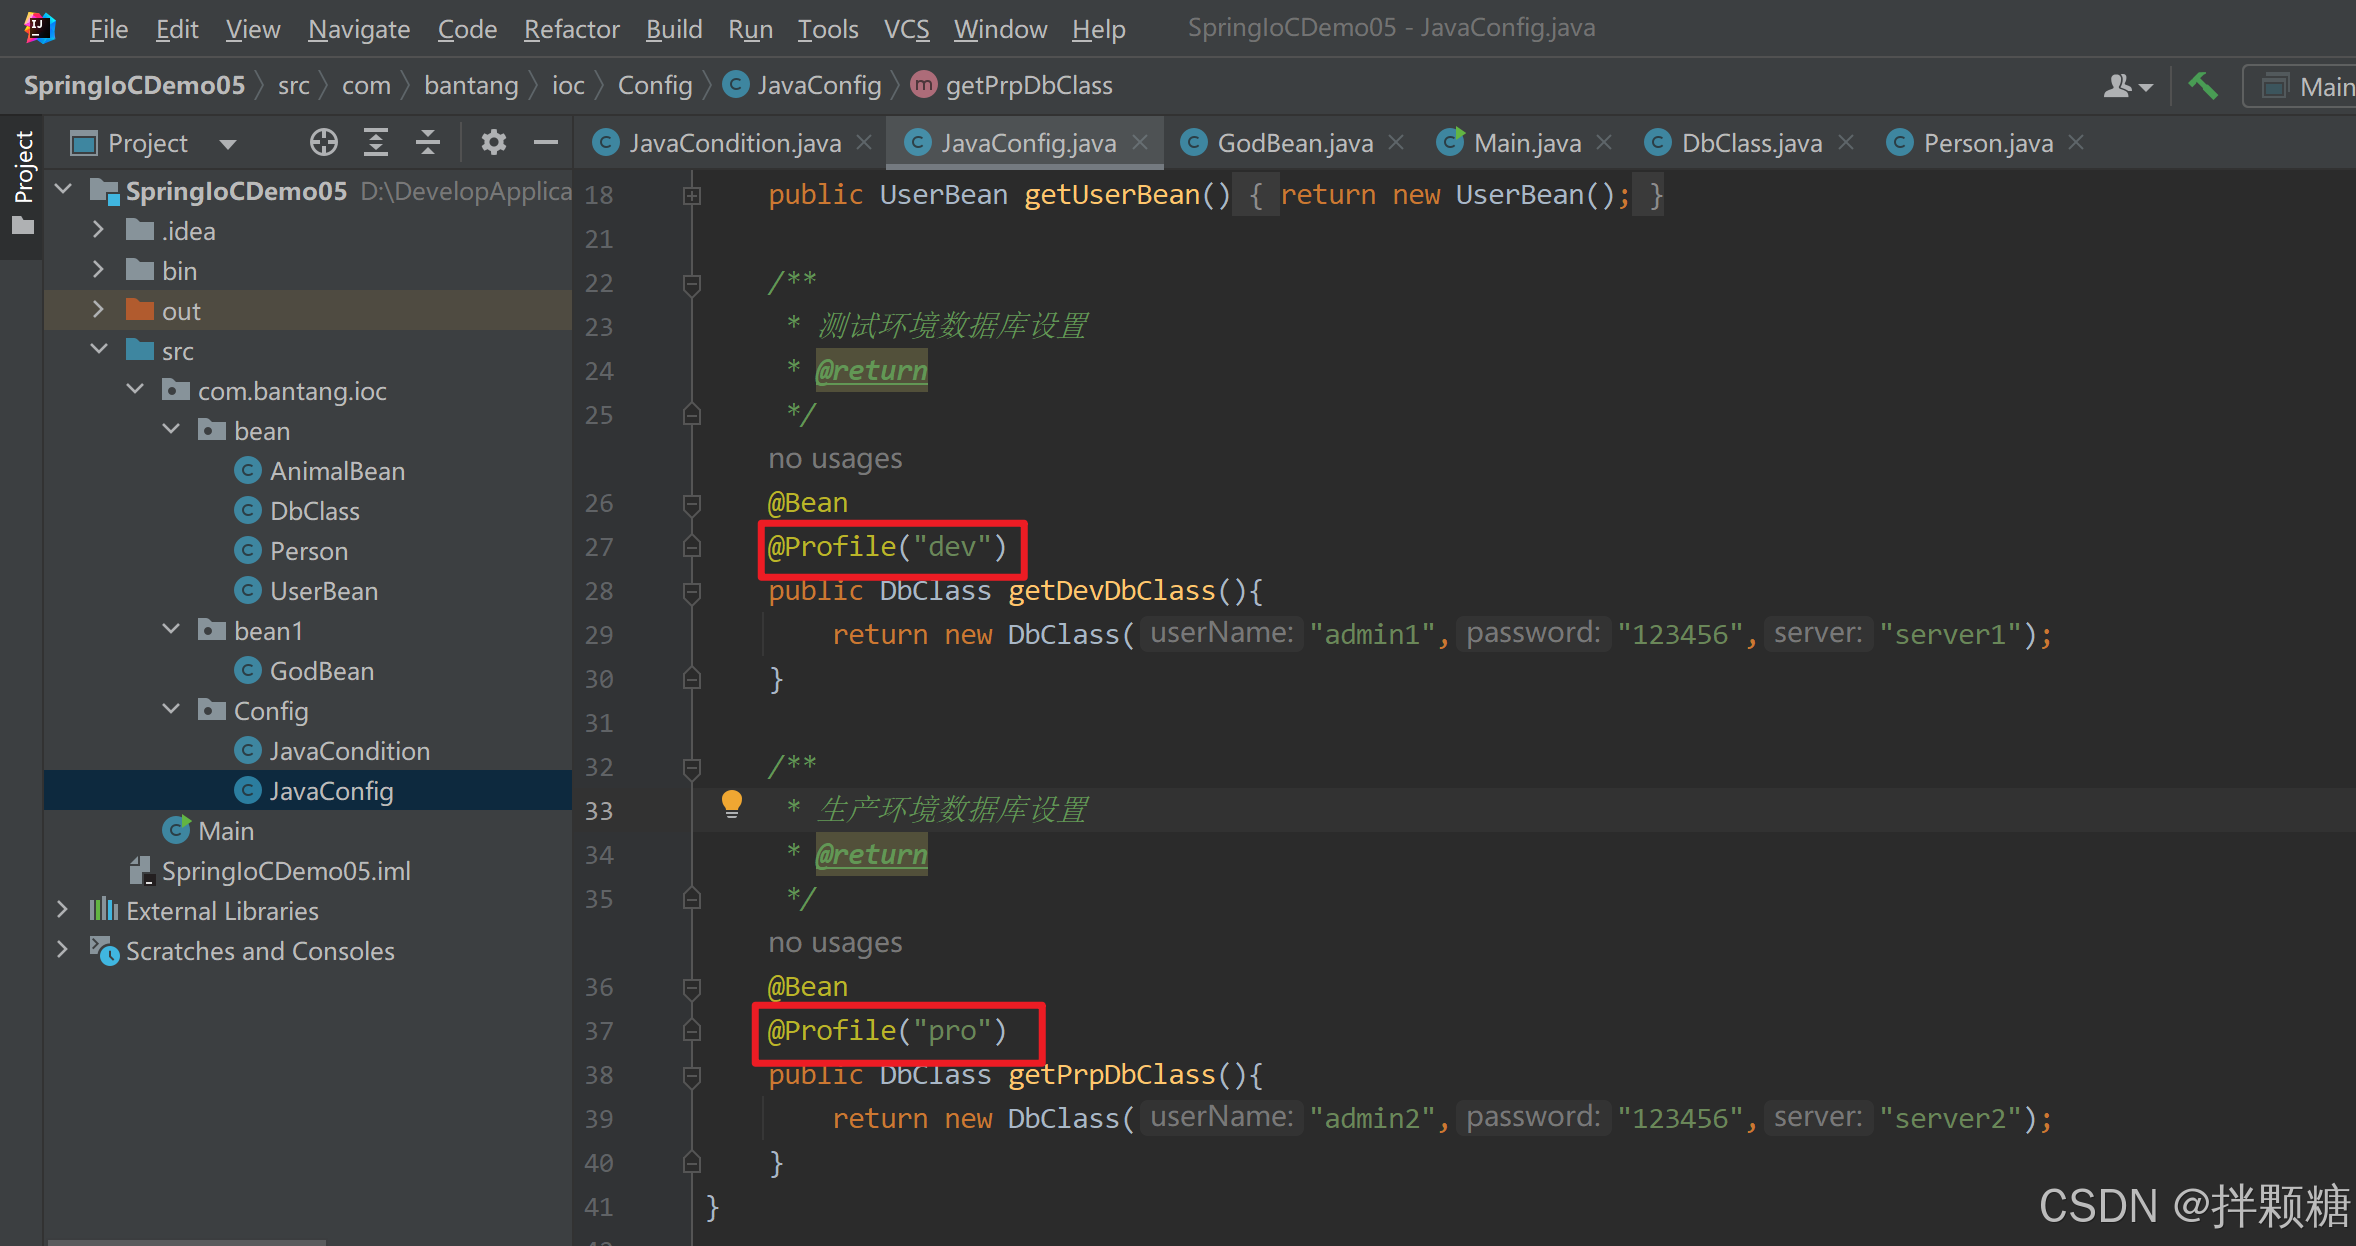
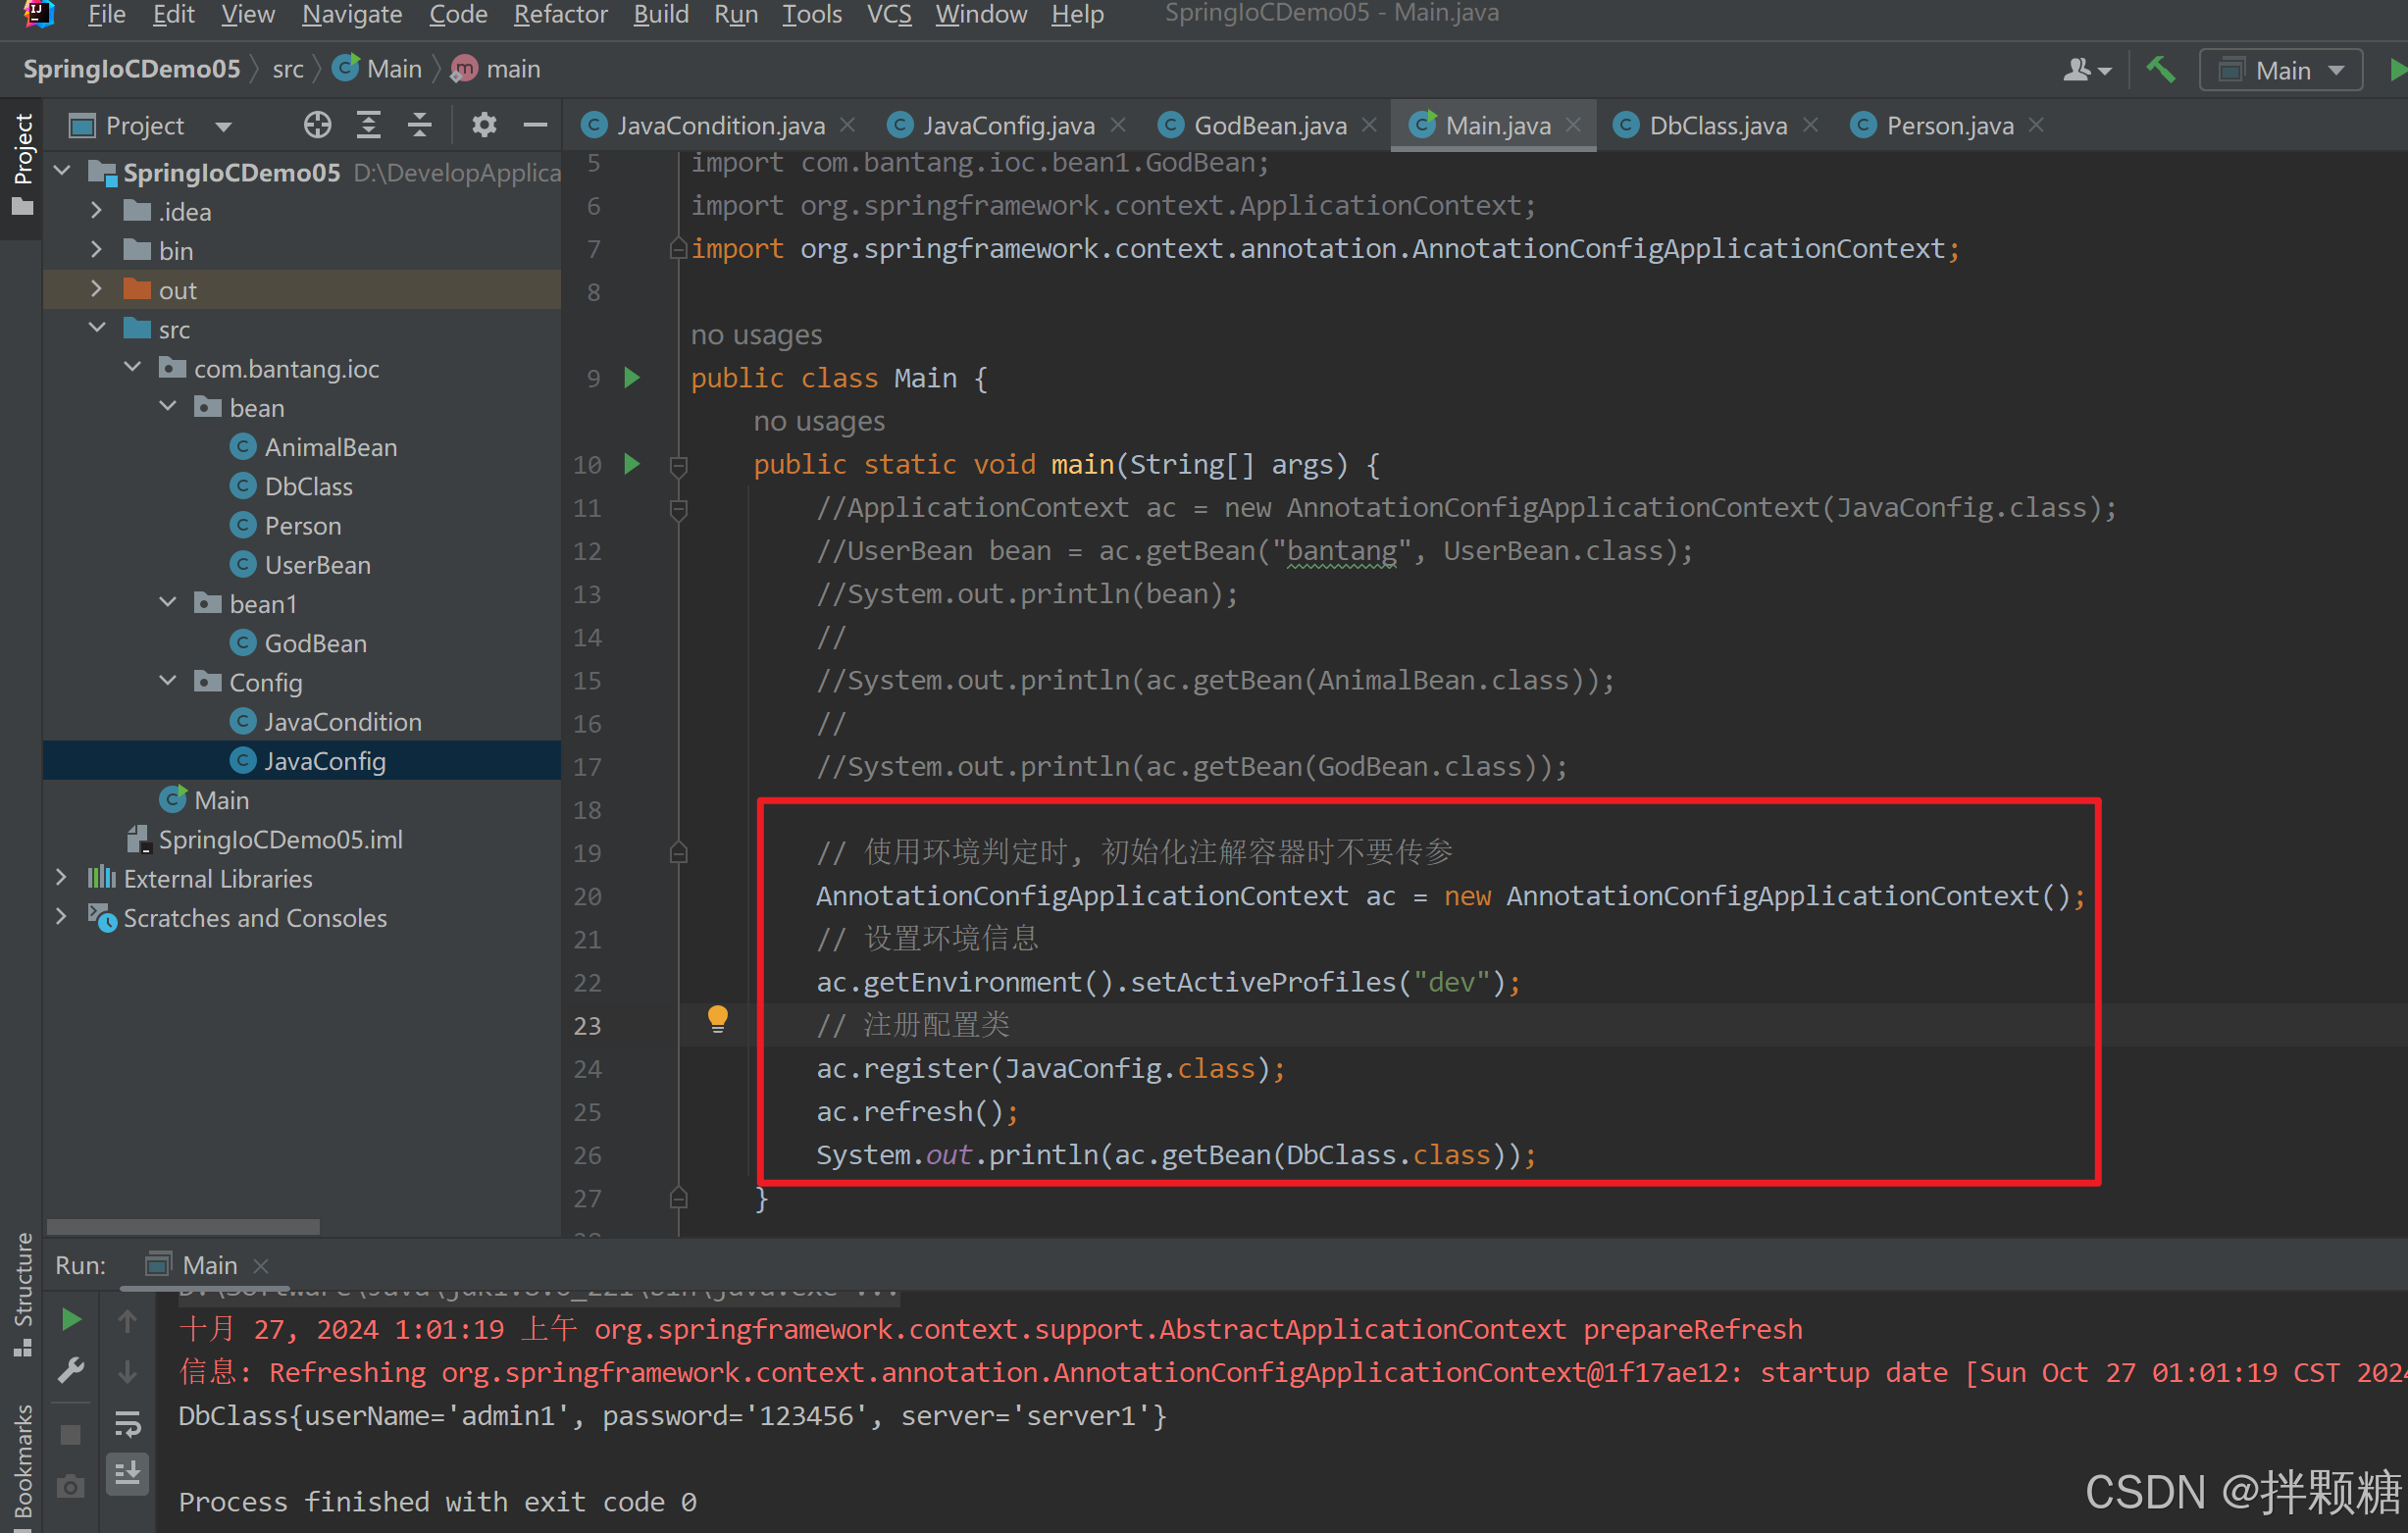
我们平时开发中 有些代码只允许在生产环境执行 测试环境是不允许执行的 那怎么做?哎 用@Profile注解
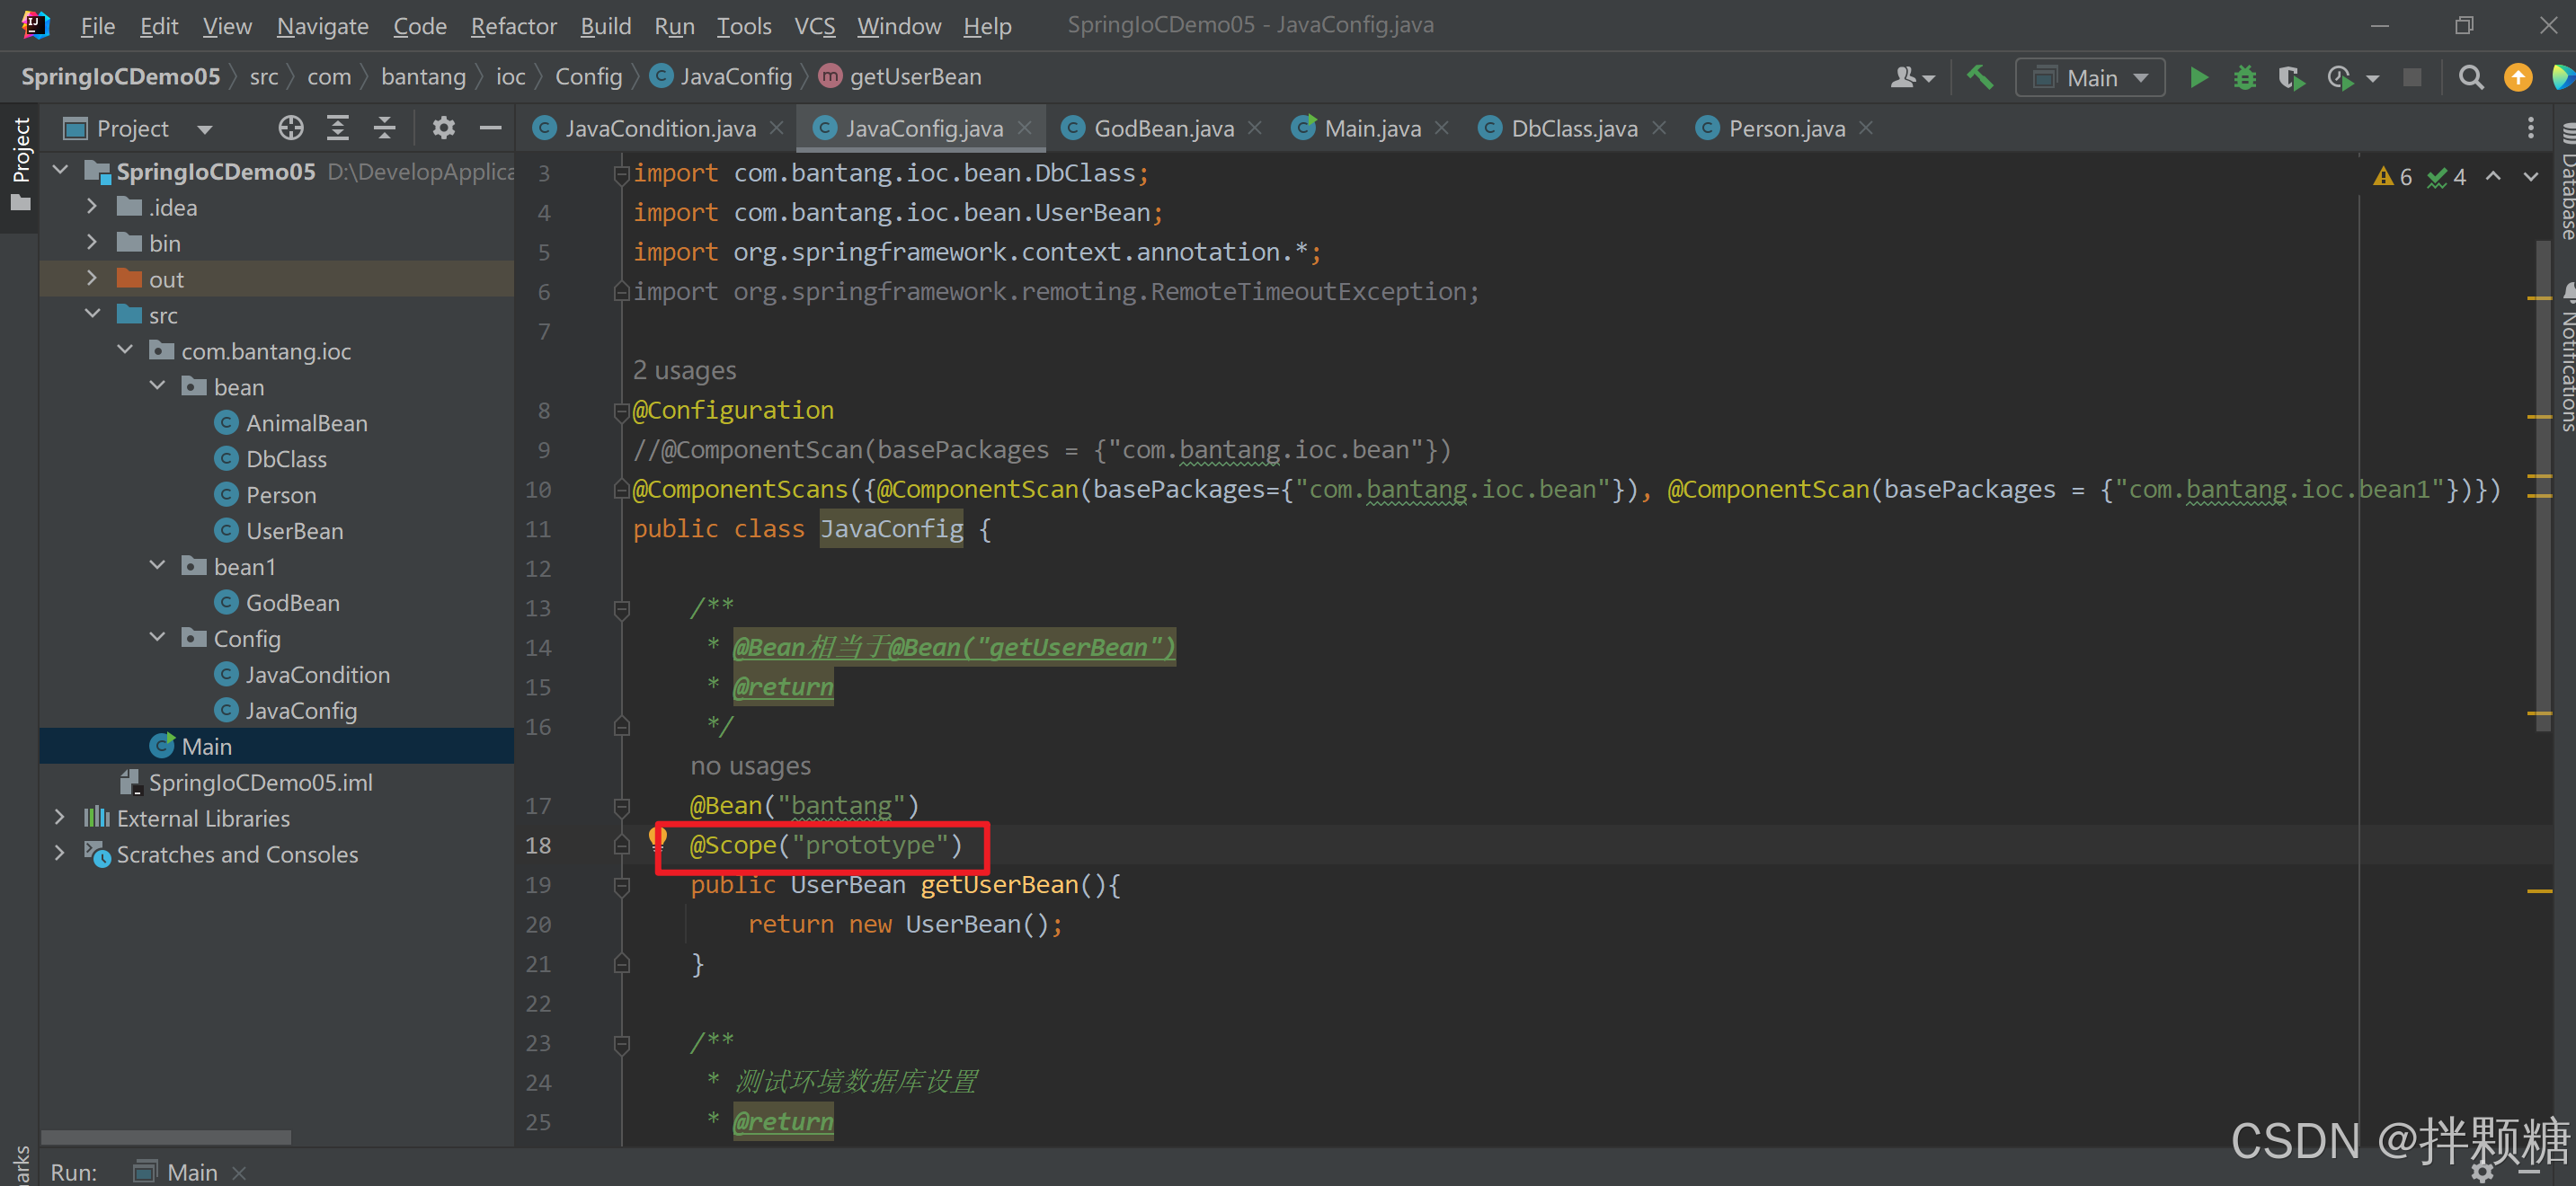
@Scope
测试发现 得到了2个一摸一样的bean实例
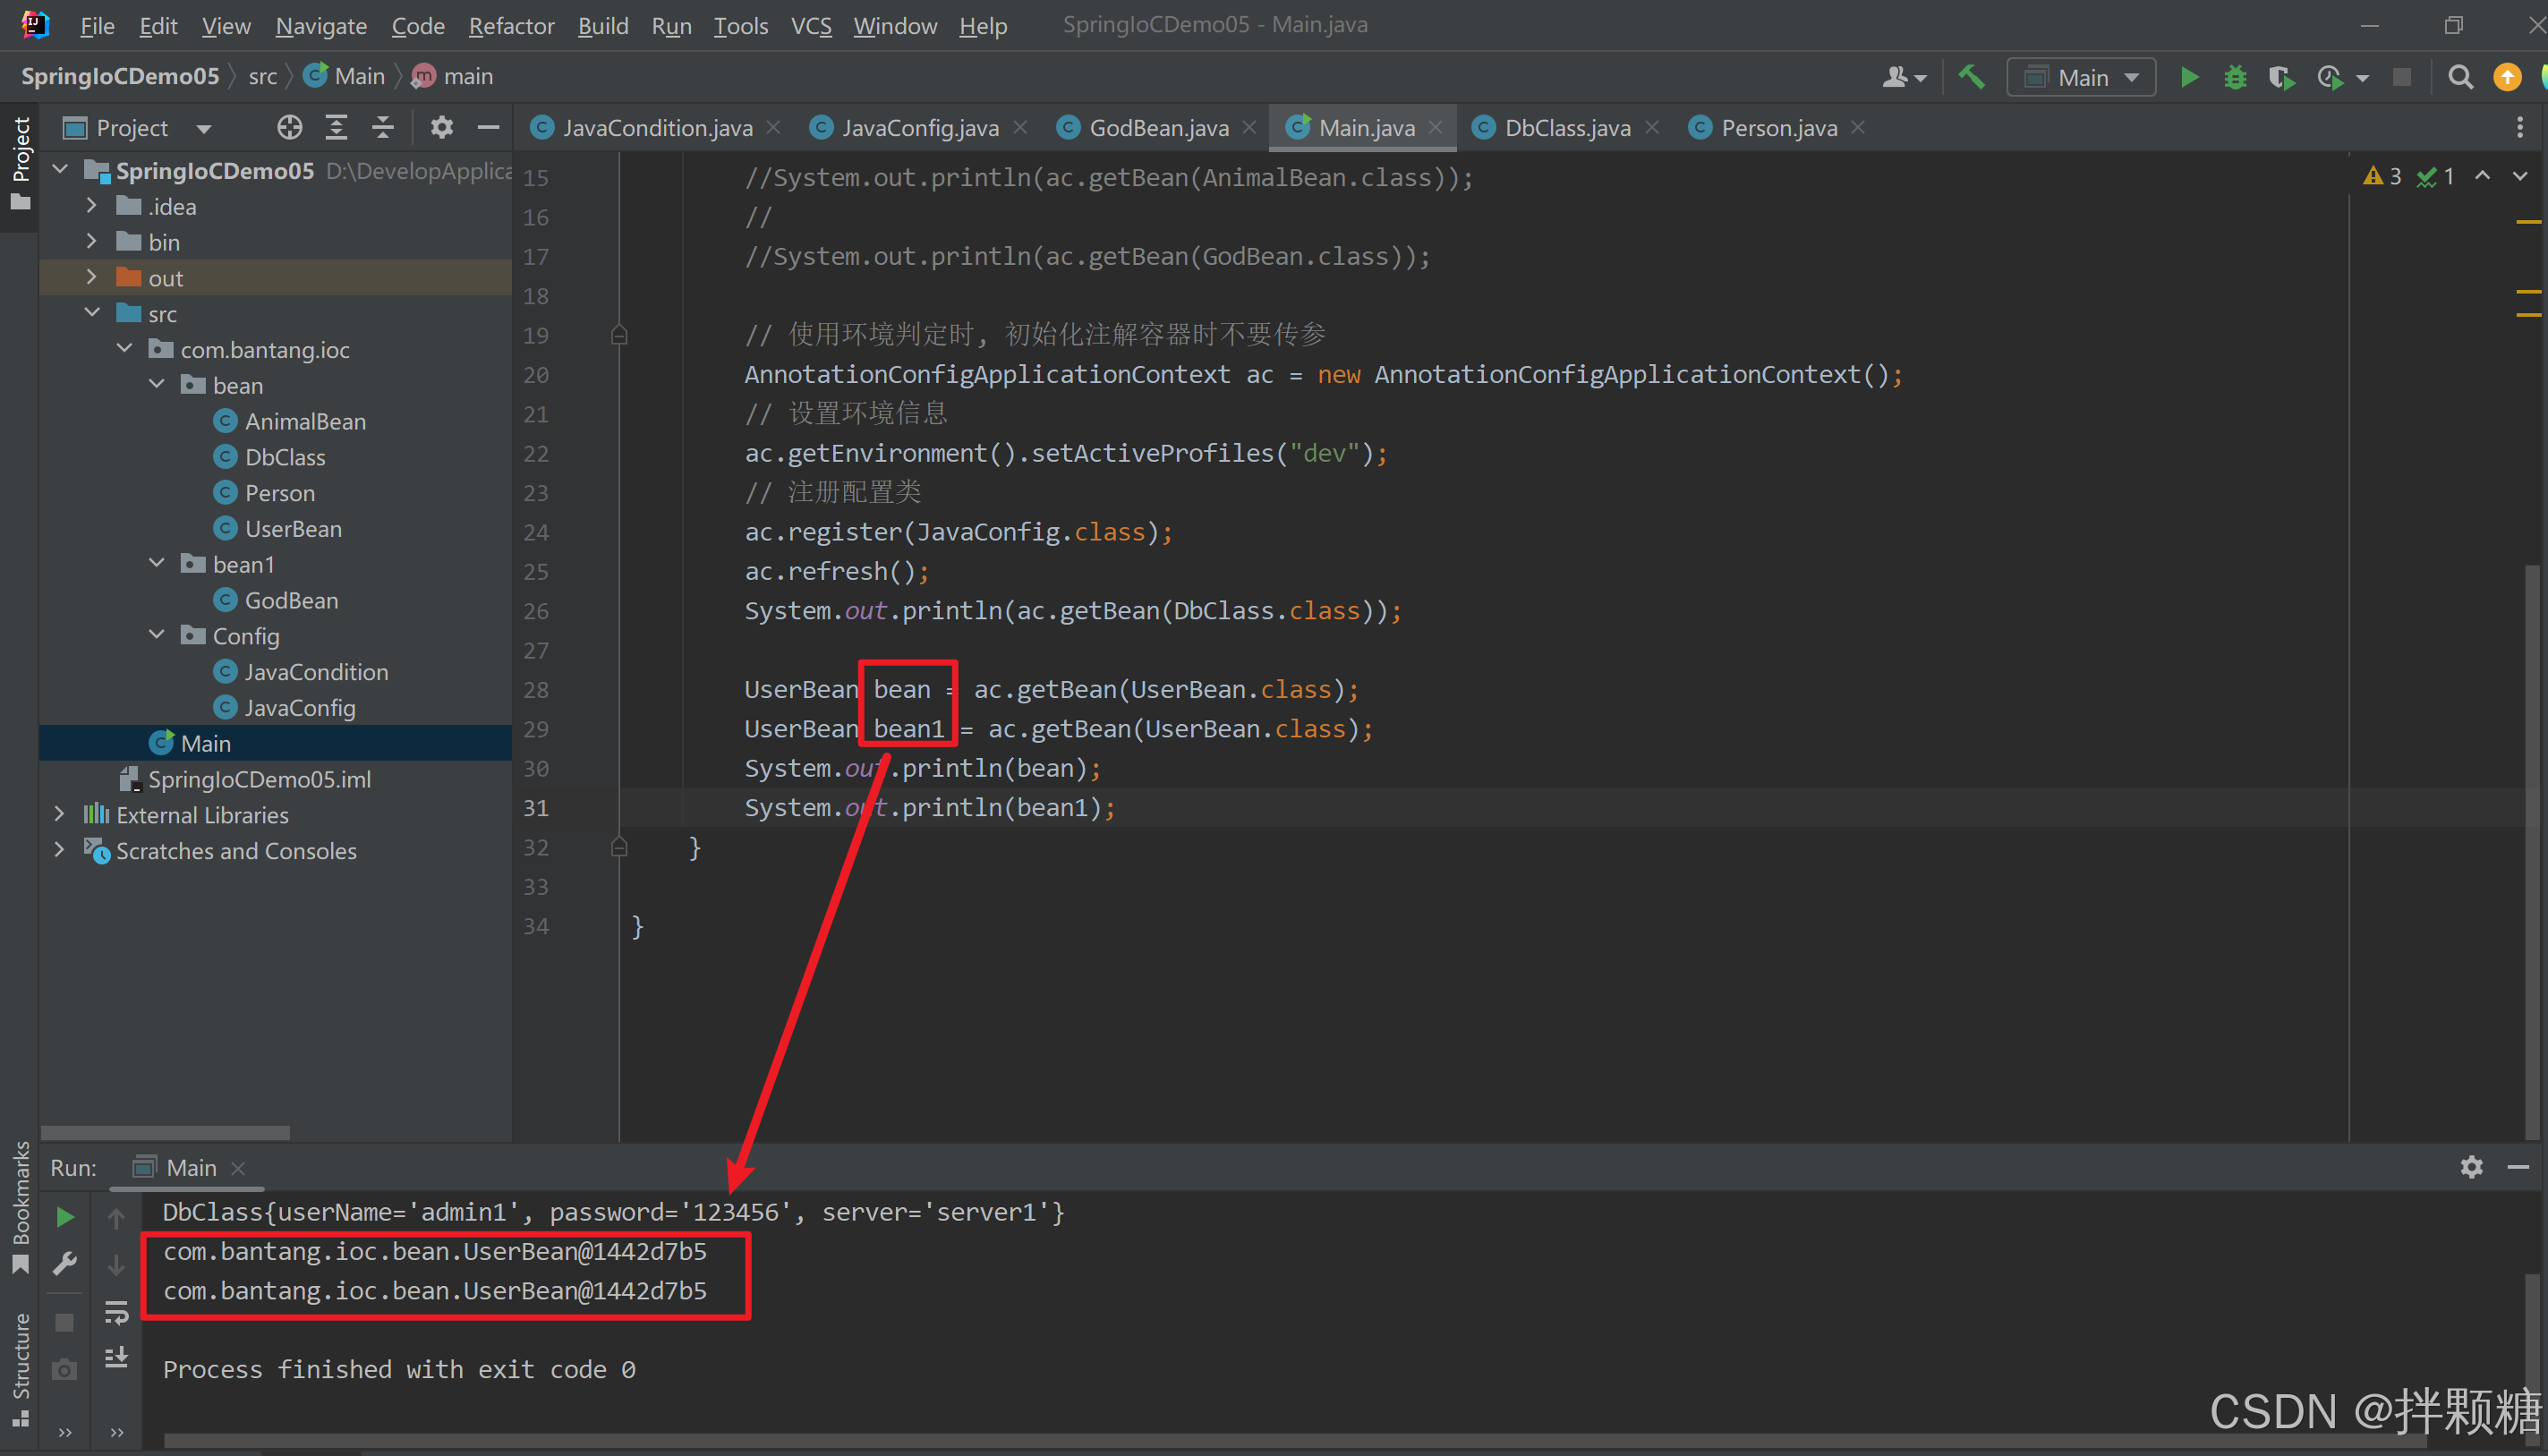
为什么?因为默认使用了单例模式
怎么解决?改为多例
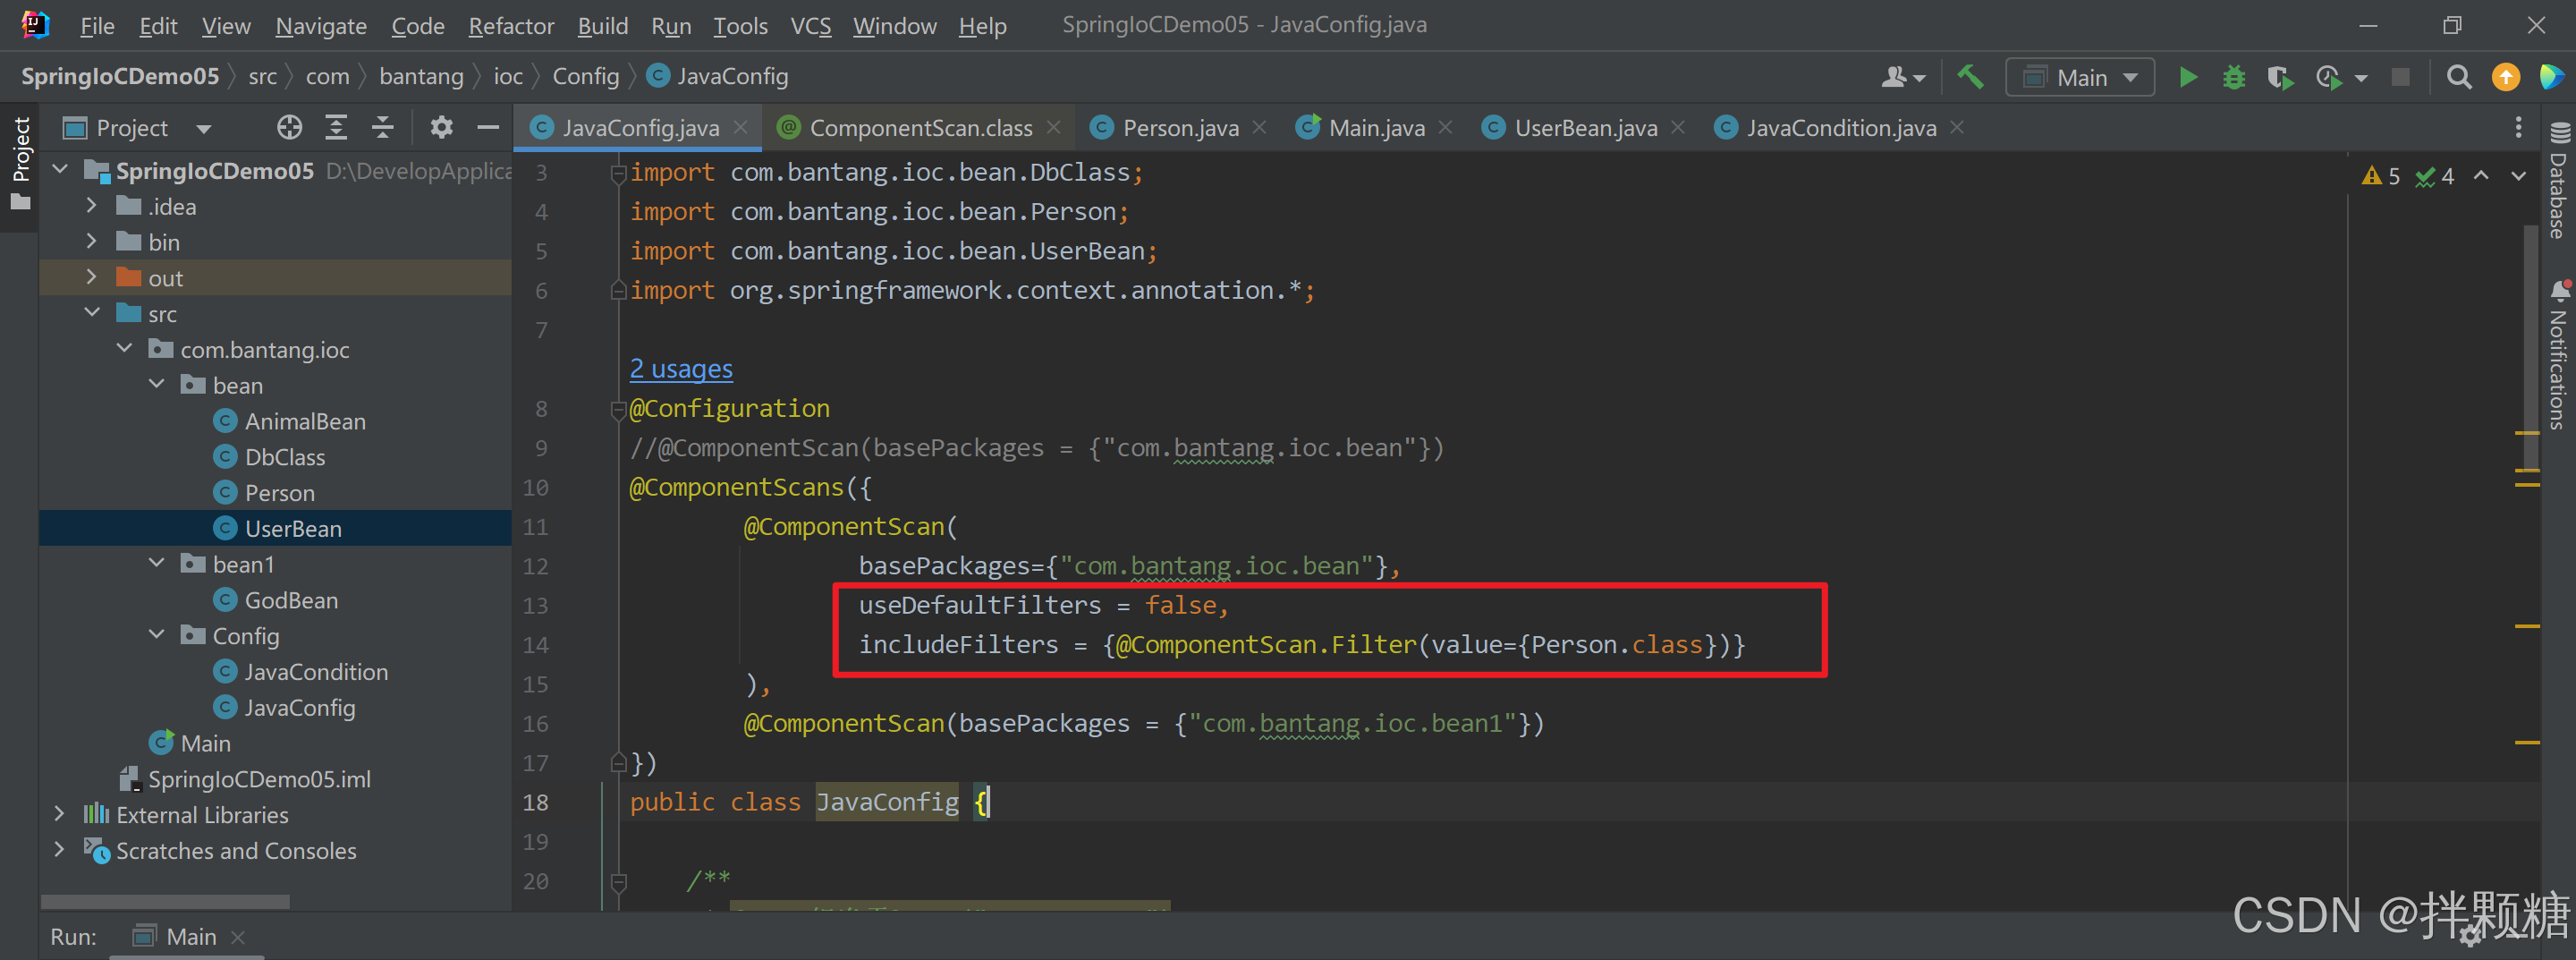
过滤器
实现xml中过滤器相同的功能


 被折叠的 条评论
为什么被折叠?
被折叠的 条评论
为什么被折叠?
 到【灌水乐园】发言


