


传统创建对象的方式
传统的在Java中创建对象的方式为使用new关键字创建对象
对象 对象名 = new 对象();
例如:
User user = new User();
Spring创建对象的方式
可以理解为将创建对象的过程托管给Spring,由Spring来创建对象,我们只需要被动接收对象,不需要主动创建对象。
1、简单的POJO对象
package indi.stitch.pojo;

public class Hello {

    private String str;

    public String getStr() {
        return str;
    }

    public void setStr(String str) {
        this.str = str;
    }

    @Override
    public String toString() {
        return "Hello{" +
                "str='" + str + '\'' +
                '}';
    }
}
2、Spring的xml配置文件
<?xml version="1.0" encoding="UTF-8"?>
<beans xmlns="http://www.springframework.org/schema/beans"
       xmlns:xsi="http://www.w3.org/2001/XMLSchema-instance"
       xsi:schemaLocation="http://www.springframework.org/schema/beans
        https://www.springframework.org/schema/beans/spring-beans.xsd">
    <!--
        id:Spring创建对象的对象名
        class:引用的POJO实体类
        propertry:实体类中的属性
        value:为实体类中的属性所赋的值

        Spring为实体类中的属性赋值是通过set方法实现的,如果实体类中没有属性的set方法,
        Spring无法完成属性的赋值,程序无法运行
    -->
    <bean id="hello" class="indi.stitch.pojo.Hello">
        <property name="str" value="hellospring!" />
    </bean>
</beans>
3、通过Spring上下文对象获取bean实例并输出其属性值
import indi.stitch.pojo.Hello;
import org.springframework.context.ApplicationContext;
import org.springframework.context.support.ClassPathXmlApplicationContext;

public class MyTest {
    public static void main(String[] args) {
        // 获取Spring上下文对象
        ApplicationContext context = new ClassPathXmlApplicationContext("beans.xml");
        // 在Spring上下文对象中获取注入到beans.xml中的POJO实例对象
        Hello bean = (Hello)context.getBean("hello");
        System.out.println(bean.toString());
    }
}
4、输出结果
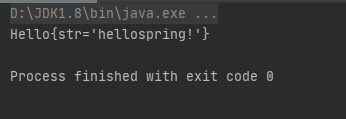
在Spring中,将对象的创建统一托管到某处,通过配置xml文件或者使用注解等其它方式完成对象的装配和创建,使程序从主动创建对象变为被动接收对象,达到了控制反转(IOC)的目的,需要更改注入的对象或者增加注入的对象时,修改配置文件、注解等即可,大大降低了代码的维护难度。
IOC创建对象的方式
- 默认调用POJO实体类的无参构造器创建对象
1、User实体类,调用无参构造器时将字符串打印到控制台
package indi.stitch.pojo;

public class User {

    public User() {
        System.out.println("调用User的无参构造器创建User对象");
    }

    private String name;

    public String getName() {
        return name;
    }

    public void setName(String name) {
        this.name = name;
    }

    public void show() {
        System.out.println("name = " + name);
    }
}
2、beans.xml配置文件
<?xml version="1.0" encoding="UTF-8"?>
<beans xmlns="http://www.springframework.org/schema/beans"
       xmlns:xsi="http://www.w3.org/2001/XMLSchema-instance"
       xsi:schemaLocation="http://www.springframework.org/schema/beans
        https://www.springframework.org/schema/beans/spring-beans.xsd">

    <bean id="user" class="indi.stitch.pojo.User">
        <property name="name" value="stitch" />
    </bean>
</beans>
3、MyTest测试类
import org.springframework.context.ApplicationContext;
import org.springframework.context.support.ClassPathXmlApplicationContext;

public class MyTest {

    public static void main(String[] args) {
        ApplicationContext context = new ClassPathXmlApplicationContext("beans.xml");
        context.getBean("user");
    }
}
4、输出结果
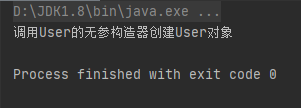
通过Spring上下文对象获取bean时,User实体类的无参构造器被执行,IOC在创建对象时默认调用实体类的无参构造器。
- 通过下标调用实体类的有参构造器创建对象
1、使用有参构造器替换无参构造器
package indi.stitch.pojo;

public class User {

    public User(String name) {
        this.name = name;
    }

    private String name;

    public String getName() {
        return name;
    }

    public void setName(String name) {
        this.name = name;
    }

    public void show() {
        System.out.println("name = " + name);
    }
}
2、beans.xml使用constructor-arg标签使用下标的方式为有参构造器传递参数
<?xml version="1.0" encoding="UTF-8"?>
<beans xmlns="http://www.springframework.org/schema/beans"
       xmlns:xsi="http://www.w3.org/2001/XMLSchema-instance"
       xsi:schemaLocation="http://www.springframework.org/schema/beans
        https://www.springframework.org/schema/beans/spring-beans.xsd">

    <!-- 下标构造 -->
    <bean id = "user" class="indi.stitch.pojo.User">
        <constructor-arg index="0" value="stitch" />
    </bean>

</beans>
3、MyTest测试类调用show方法输出name属性
import indi.stitch.pojo.User;
import org.springframework.context.ApplicationContext;
import org.springframework.context.support.ClassPathXmlApplicationContext;

public class MyTest {

    public static void main(String[] args) {
        ApplicationContext context = new ClassPathXmlApplicationContext("beans.xml");
        User user = (User)context.getBean("user");
        user.show();
    }
}
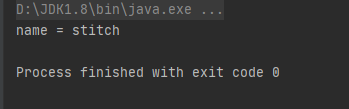
4、输出结果
- 通过类型调用实体类的有参构造器创建对象(不推荐,出现重复参数类型时会冲突)
相比上例只修改beans.xml
<?xml version="1.0" encoding="UTF-8"?>
<beans xmlns="http://www.springframework.org/schema/beans"
xmlns:xsi="http://www.w3.org/2001/XMLSchema-instance"
xsi:schemaLocation="http://www.springframework.org/schema/beans
https://www.springframework.org/schema/beans/spring-beans.xsd">
<!-- <!– 下标构造 –>-->
<!-- <bean id = "user" class="indi.stitch.pojo.User">-->
<!-- <constructor-arg index="0" value="stitch" />-->
<!-- </bean>-->
<!-- 类型构造 -->
<bean id = "user" class="indi.stitch.pojo.User">
<constructor-arg type = "java.lang.String" value="stitch" />
</bean>
</beans>
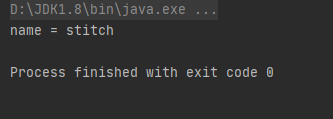
输出结果:
- 直接通过有参构造函数的参数名来设置值
相比上例只修改了beans.xml配置文件
<?xml version="1.0" encoding="UTF-8"?>
<beans xmlns="http://www.springframework.org/schema/beans"
xmlns:xsi="http://www.w3.org/2001/XMLSchema-instance"
xsi:schemaLocation="http://www.springframework.org/schema/beans
https://www.springframework.org/schema/beans/spring-beans.xsd">
<!-- <!– 下标构造 –>-->
<!-- <bean id = "user" class="indi.stitch.pojo.User">-->
<!-- <constructor-arg index="0" value="stitch" />-->
<!-- </bean>-->
<!-- <!– 类型构造 –>-->
<!-- <bean id = "user" class="indi.stitch.pojo.User">-->
<!-- <constructor-arg type = "java.lang.String" value="stitch" />-->
<!-- </bean>-->
<!-- 直接通过参数名来设置 -->
<bean id = "user" class="indi.stitch.pojo.User">
<constructor-arg name = "name" value = "stitch" />
</bean>
</beans>
输出结果:


 被折叠的 条评论
为什么被折叠?
被折叠的 条评论
为什么被折叠?
 到【灌水乐园】发言


