


 文章介绍了如何通过实现Spring的FactoryBean接口来定制Bean的实例化过程,以隐藏复杂细节并提高灵活性。文中提供了一个CarFactoryBean的例子,展示了如何创建并使用这个工厂类来生成和管理Car类型的Bean。此外,还给出了SpringUtil工具类用于获取ApplicationContext,以及一个测试接口CarController来演示获取不同类型的Bean。
闲来无事,研究了一下Spring 的FactoryBean接口,做了一个简单的小Demo。
首先我们来简单了解一点FactoryBean:
一般情况下,Spring会通过反射机制利用<bean>的class属性指定实现类实例化Bean。在传统方式,需要在<bean>中提供大量的配置信息。这种配置方式的灵活性是受限的,这是采用编码的方式有一个简单的方案。Spring为此提供了一个FactoryBean工厂类接口,我们可以通过实现工厂类接口来定制实例化Bean的逻辑。可以帮助我们隐藏一些复杂Bean实例化的细节,为上层应用调用带来便利。
Spring3.0后,FactoryBean接口开始支持泛型FactoryBean<T>,该接口中共有3个方法:
T getObject();返回由FactoryBean创建的Bean实例。
Class<?> getObjectType();返回FactoryBean创建Bean的类型
default boolean isSingleton() {
        return true;
}
确定由FactoryBean创建Bean是否是singleton
下面我们来写一个Demo
新建Car类
package govee.app.mall.common;

import lombok.Data;
import org.springframework.stereotype.Component;

@Data
// 交给Spring管理,命名为car,等价于<bean id = "car" class = "govee.app.mall.common.Car">
@Component(value = "car")
public class Car {
    private String name;
    private int price;
}
自定义CarFactoryBean类,封装隐藏复杂Bean Car的实例化过程
package govee.app.mall.common;

import org.springframework.beans.factory.FactoryBean;
import org.springframework.stereotype.Component;

@Component("car1")
public class CarFactoryBean implements FactoryBean<Car> {

    @Override
    public Car getObject(){
        Car car = new Car();
        car.setName("劳斯莱斯");
        car.setPrice(100000);
        System.out.println("CarFactoryBean:getObject()");
        return car;
    }

    @Override
    public Class<?> getObjectType() {
        return Car.class;
    }
}
写一个Spring工具类,获取Spring项目启动时上下文对象
package govee.app.mall.util;

import org.springframework.beans.BeansException;
import org.springframework.context.ApplicationContext;
import org.springframework.context.ApplicationContextAware;
import org.springframework.stereotype.Component;

import java.util.Map;

@Component
public class SpringUtil implements ApplicationContextAware {

    private static ApplicationContext applicationContext = null;

    @Override
    public void setApplicationContext(ApplicationContext applicationContext) throws BeansException {
        if (SpringUtil.applicationContext == null) {
            SpringUtil.applicationContext = applicationContext;
        }
    }

    public static ApplicationContext getApplicationContext() {
        return applicationContext;
    }

    public static Object getBean(String name) {
        return applicationContext.getBean(name);

    }

    public static <T> T getBean(Class<T> clazz) {
        return applicationContext.getBean(clazz);
    }

    public static <T> T getBean(String name, Class<T> clazz) {
        return applicationContext.getBean(name, clazz);
    }

    public static <T> Map<String, T> getBeansOfType(Class<T> type) {
        return applicationContext.getBeansOfType(type);
    }

}
最后写一个测试接口
package govee.app.mall.controller.back;
import govee.app.mall.util.SpringUtil;
import org.springframework.web.bind.annotation.GetMapping;
import org.springframework.web.bind.annotation.RequestMapping;
import org.springframework.web.bind.annotation.RestController;
@RestController
@RequestMapping(value = "/app-mall-backend/test")
public class CarController {
@GetMapping(value = "/car")
public String getCar() {
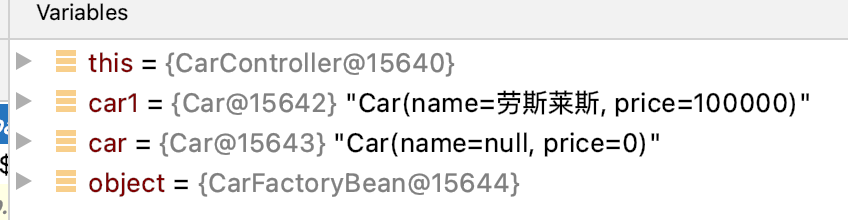
// 获取CarFactoryBean提供的Car类型
Object car1 = SpringUtil.getBean("car1");
// 获取Car类型
Object car = SpringUtil.getBean("car");
// 获取CarFactoryBean类型 ,需要显式的在name上加上“&”前缀
Object object = SpringUtil.getBean("&car1");
return car1.getClass().getName();
}
}
最后我们启动项目,调接口看一下结果:


 被折叠的 条评论
为什么被折叠?
被折叠的 条评论
为什么被折叠?
 到【灌水乐园】发言


