


1、Notification通知
创建一个NotificationManager
NotificationManager类是一个通知管理器类,这个对象是由系统维护的服务,是以单例模式的方式获得,所以一般并不直接实例化这个对象。在Activity中,可以使用Activity.getSystemService(String)方法获取NotificationManager对象,Activity.getSystemService(String)方法可以通过Android系统级服务的句柄,返回对应的对象。在这里需要返回NotificationManager,所以直接传递Context.NOTIFICATION_SERVICE即可。
使用Builder构造器来创建Notification 对象
使用NotificationCompat类的Builder构造器来创建Notification对象,可以保证程序在所有的版本上都能正常工作。Android8.0新增了通知渠道这个概念,如果没有设置,则通知无法在Android8.0的机器上显示。
1.1、res/layout 中文件
activity_main.xml 中设置两个按钮
<?xml version="1.0" encoding="utf-8"?>
<LinearLayout xmlns:android="http://schemas.android.com/apk/res/android"
    android:layout_width="match_parent"
    android:layout_height="match_parent"
    android:orientation="vertical">

    <Button
        android:id="@+id/send_notification"
        android:text="发出通知"
        android:layout_width="wrap_content"
        android:layout_height="wrap_content"/>

    <Button
        android:id="@+id/cancel_notification"
        android:text="取消通知"
        android:layout_width="wrap_content"
        android:layout_height="wrap_content"/>

</LinearLayout>
activity_notification.xml 为空页面
<?xml version="1.0" encoding="utf-8"?>
<androidx.constraintlayout.widget.ConstraintLayout xmlns:android="http://schemas.android.com/apk/res/android"
    xmlns:app="http://schemas.android.com/apk/res-auto"
    xmlns:tools="http://schemas.android.com/tools"
    android:layout_width="match_parent"
    android:layout_height="match_parent"
    tools:context=".NotificationActivity">

</androidx.constraintlayout.widget.ConstraintLayout>
1.2、Activity java代码
MainActivity 中设置点击事件
public class MainActivity extends AppCompatActivity {
private NotificationManager manager;
private Notification notification;
@Override
protected void onCreate(Bundle savedInstanceState) {
super.onCreate(savedInstanceState);
setContentView(R.layout.activity_main);
manager = (NotificationManager) getSystemService(NOTIFICATION_SERVICE);
// Builder 的 channelId 是8.0之后才有的,所以需要做一下版本判断
if (Build.VERSION.SDK_INT >= Build.VERSION_CODES.O){
// 第一个参数:id 需要与 NotificationCompat.Builder 中的channelId一致
// 第二个参数:点击通知时可以看到 第三个参数:通知等级
NotificationChannel channel = new NotificationChannel("wang", "测试通知,没在通知中看到这个字段",
NotificationManager.IMPORTANCE_HIGH);
manager.createNotificationChannel(channel);
}
// 获取 pendingIntent,设置点击通知后,跳转到NotificationActivity页面
Intent intent = new Intent(this, NotificationActivity.class);
PendingIntent pendingIntent = PendingIntent.getActivity(this, 0, intent, 0);
notification = new NotificationCompat.Builder(this, "wang")
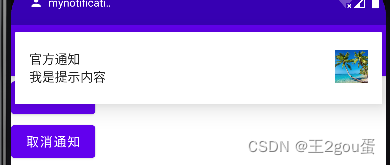
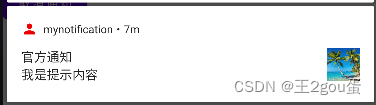
.setContentTitle("官方通知") // 标题
.setContentText("我是提示内容") // 内容
.setSmallIcon(R.drawable.ic_baseline_person_24) // 设置图片,不能是彩色
.setColor(Color.parseColor("#ff0000")) // ic_baseline_person_24 图标的颜色
.setLargeIcon(BitmapFactory.decodeResource(getResources(), R.drawable.test)) // 设置大图标,可以是彩色图片
.setContentIntent(pendingIntent) // 点击通知跳转到哪里
.setAutoCancel(true) // 点击后通知清除
// .setWhen(111111111) // 设置通知被创建的时间,不设置默认是当前时间,一般不用
.build();
Button send_notification = findViewById(R.id.send_notification);
Button cancel_notification = findViewById(R.id.cancel_notification);
send_notification.setOnClickListener(new View.OnClickListener() {
@Override
public void onClick(View v) {
// 发通知
manager.notify(1, notification);
}
});
cancel_notification.setOnClickListener(new View.OnClickListener() {
@Override
public void onClick(View v) {
// 清除通知
manager.cancel(1);
}
});
}
}
NotificationActivity 中设置log打印,当点击通知时打印log
public class NotificationActivity extends AppCompatActivity {

    @Override
    protected void onCreate(Bundle savedInstanceState) {
        super.onCreate(savedInstanceState);
        setContentView(R.layout.activity_notification);
        Log.e("Blake", "进入NotificationActivity");
    }
}
2、Toolbar
2.1、取消默认的Toolbar
在 res/values/themes.xml 文件中,将DarkActionBar 修改为 NoActionBar
<style name="Theme.Demo01" parent="Theme.MaterialComponents.DayNight.DarkActionBar">
改为:
<style name="Theme.Demo01" parent="Theme.MaterialComponents.DayNight.NoActionBar">
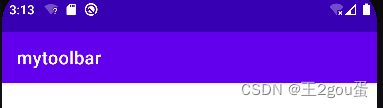
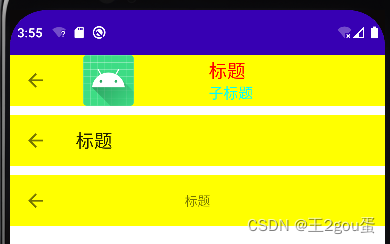
2.2、Toolbar常用属性
background:背景颜色
layout_width: 宽度
layout_height: 高度
app:navigationIcon: 设置左上角的返回图标
app:title: 设置标题
app:titleTextColor: 标题文本的颜色
app:titleMarginStart: 标题距离左边的距离
app:subtitle: 设置子标题
app:subtitleTextColor: 设置子标题的颜色
app:logo: 设置logo
<?xml version="1.0" encoding="utf-8"?>
<LinearLayout xmlns:android="http://schemas.android.com/apk/res/android"
    android:layout_width="match_parent"
    android:layout_height="match_parent"
    xmlns:app="http://schemas.android.com/apk/res-auto"
    android:orientation="vertical">

    <androidx.appcompat.widget.Toolbar
        android:id="@+id/tb"
        android:background="#ffff00"
        app:navigationIcon="@drawable/ic_baseline_arrow_back_24"
        app:title="标题"
        app:titleTextColor="#ff0000"
        app:titleMarginStart="90dp"
        app:subtitle="子标题"
        app:subtitleTextColor="#00ffff"
        app:logo="@mipmap/ic_launcher"
        android:layout_width="match_parent"
        android:layout_height="?attr/actionBarSize"/>

    <androidx.appcompat.widget.Toolbar
        android:id="@+id/tb2"
        android:layout_marginTop="10dp"
        android:background="#ffff00"
        android:layout_width="match_parent"
        android:layout_height="?attr/actionBarSize"/>

    <!-- 设置标题居中显示   -->
    <androidx.appcompat.widget.Toolbar
        app:navigationIcon="@drawable/ic_baseline_arrow_back_24"
        android:layout_marginTop="10dp"
        android:background="#ffff00"
        android:layout_width="match_parent"
        android:layout_height="?attr/actionBarSize">

        <TextView
            android:layout_gravity="center"
            android:text="标题"
            android:layout_width="wrap_content"
            android:layout_height="wrap_content"/>
    </androidx.appcompat.widget.Toolbar>
</LinearLayout>
package com.example.mytoolbar;

import androidx.appcompat.app.AppCompatActivity;
import androidx.appcompat.widget.Toolbar;

import android.os.Bundle;
import android.util.Log;
import android.view.View;

public class MainActivity extends AppCompatActivity {

    @Override
    protected void onCreate(Bundle savedInstanceState) {
        super.onCreate(savedInstanceState);
        setContentView(R.layout.activity_main);

        Toolbar toolbar = findViewById(R.id.tb);

        toolbar.setNavigationOnClickListener(new View.OnClickListener() {
            @Override
            public void onClick(View v) {
                Log.e("Blake", "toolbar被点击了");
            }
        });

        Toolbar toolbar2 = findViewById(R.id.tb2);
        // 设置返回图标
        toolbar2.setNavigationIcon(R.drawable.ic_baseline_arrow_back_24);
        // 设置标题
        toolbar2.setTitle("标题");
        // 设置点击事件
        toolbar2.setNavigationOnClickListener(new View.OnClickListener() {
            @Override
            public void onClick(View v) {
                Log.e("Blake", "toolbar222被点击了");
            }
        });

    }
}
3、AlertDiallog
res/layout/activity_main.xml
<?xml version="1.0" encoding="utf-8"?>
<LinearLayout xmlns:android="http://schemas.android.com/apk/res/android"
    android:layout_width="match_parent"
    android:layout_height="match_parent"
    android:orientation="vertical">

    <Button
        android:id="@+id/btn"
        android:text="显示对话框"
        android:layout_width="wrap_content"
        android:layout_height="wrap_content"/>
</LinearLayout>
res/layout/dialog_view.xml 设置dialog的自定义布局
<?xml version="1.0" encoding="utf-8"?>
<LinearLayout xmlns:android="http://schemas.android.com/apk/res/android"
    android:layout_width="match_parent"
    android:layout_height="match_parent"
    android:background="#ffff00"
    android:orientation="horizontal">

    <ImageView
        android:src="@mipmap/ic_launcher"
        android:layout_width="wrap_content"
        android:layout_height="wrap_content"/>

    <TextView
        android:text="天气很好"
        android:layout_width="wrap_content"
        android:layout_height="wrap_content"/>
</LinearLayout>
设置dialog内容和按钮
package com.example.myalertdialog;
import androidx.appcompat.app.AlertDialog;
import androidx.appcompat.app.AppCompatActivity;
import android.content.DialogInterface;
import android.os.Bundle;
import android.util.Log;
import android.view.View;
import android.widget.Button;
public class MainActivity extends AppCompatActivity {
@Override
protected void onCreate(Bundle savedInstanceState) {
super.onCreate(savedInstanceState);
setContentView(R.layout.activity_main);
Button btn = findViewById(R.id.btn);
AlertDialog.Builder builder = new AlertDialog.Builder(this);
btn.setOnClickListener(new View.OnClickListener() {
@Override
public void onClick(View v) {
View dialogView = getLayoutInflater().inflate(R.layout.dialog_view, null);
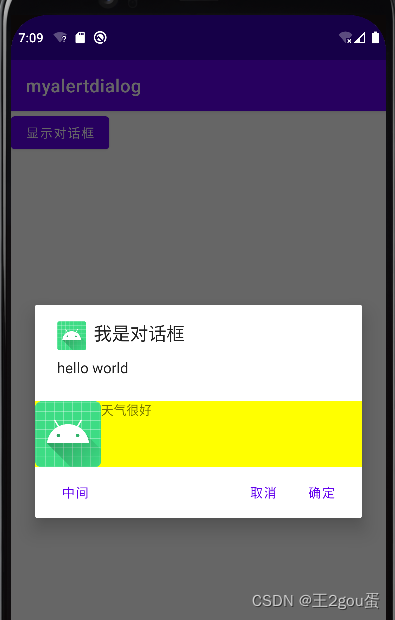
builder.setIcon(R.mipmap.ic_launcher) // 设置icon
.setTitle("我是对话框") // 标题
.setMessage("hello world") // 内容
.setView(dialogView) // 设置自定义布局
.setPositiveButton("确定", new DialogInterface.OnClickListener() {
@Override
public void onClick(DialogInterface dialog, int which) {
Log.e("Blake", "确定 button");
}
})
.setNegativeButton("取消", new DialogInterface.OnClickListener() {
@Override
public void onClick(DialogInterface dialog, int which) {
Log.e("Blake", "取消 button");
}
})
.setNeutralButton("中间", new DialogInterface.OnClickListener() {
@Override
public void onClick(DialogInterface dialog, int which) {
Log.e("Blake", "中间 button");
}
})
.create() // 创建
.show(); // 显示
}
});
}
}
4、PopupWindow
https://www.bilibili.com/video/BV13y4y1E7pF?p=14
res/layout/activity_main.xml
<?xml version="1.0" encoding="utf-8"?>
<LinearLayout android:layout_width="match_parent"
android:layout_height="match_parent"
android:orientation="vertical"
xmlns:android="http://schemas.android.com/apk/res/android">
<Button
android:id="@+id/btn"
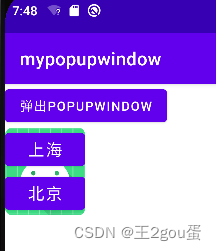
android:text="弹出popupwindow"
android:layout_width="wrap_content"
android:layout_height="wrap_content"/>
</LinearLayout>
res/layout/popup_view.xml 弹出页面
<?xml version="1.0" encoding="utf-8"?>
<LinearLayout xmlns:android="http://schemas.android.com/apk/res/android"
    android:layout_width="match_parent"
    android:layout_height="match_parent"
    android:background="@mipmap/ic_launcher"
    android:orientation="vertical">

    <Button
        android:id="@+id/btn1"
        android:padding="5dp"
        android:text="上海"
        android:textSize="18sp"
        android:layout_width="wrap_content"
        android:layout_height="wrap_content"/>

    <Button
        android:id="@+id/btn2"
        android:padding="5dp"
        android:text="北京"
        android:textSize="18sp"
        android:layout_width="wrap_content"
        android:layout_height="wrap_content"/>
</LinearLayout>
MainActivity
package com.example.mypopupwindow;

import androidx.appcompat.app.AppCompatActivity;

import android.os.Bundle;
import android.view.View;
import android.view.ViewGroup;
import android.widget.Button;
import android.widget.PopupWindow;

public class MainActivity extends AppCompatActivity {

    @Override
    protected void onCreate(Bundle savedInstanceState) {
        super.onCreate(savedInstanceState);
        setContentView(R.layout.activity_main);

        Button btn = findViewById(R.id.btn);
        btn.setOnClickListener(new View.OnClickListener() {
            @Override
            public void onClick(View v) {
                View popupView = getLayoutInflater().inflate(R.layout.popup_view, null);
                // PopupWindow 参数1 View是显示的内容,参数2、3是宽高,可以写死为整数,也可以设置为WRAP_CONTENT自适应
                PopupWindow popupWindow = new PopupWindow(popupView, ViewGroup.LayoutParams.WRAP_CONTENT, ViewGroup.LayoutParams.WRAP_CONTENT);
                popupWindow.showAsDropDown(v);
            }
        });
    }
}
https://www.bilibili.com/video/BV13y4y1E7pF?p=11
https://www.bilibili.com/video/BV13y4y1E7pF?p=12
https://www.bilibili.com/video/BV13y4y1E7pF?p=13
https://www.bilibili.com/video/BV13y4y1E7pF?p=14


 468
468

 被折叠的 条评论
为什么被折叠?
被折叠的 条评论
为什么被折叠?
 到【灌水乐园】发言


