


1. Mybatis简介
MyBatis 是一款优秀的持久层框架,它支持定制化 SQL、存储过程以及高级映射。MyBatis 避免了几乎所有的 JDBC 代码和手动设置参数以及获取结果集。MyBatis 可以使用简单的 XML 或注解来配置和映射原生信息,将接口和 Java 的 POJOs(Plain Ordinary Java Object,普通的 Java对象)映射成数据库中的记录。
换句话说,我觉得利用mybatis整合持久层要方便很多,比起以前编写jdbc代码操作数据库的一些连接,简直不要太爽。
2. 项目创建
创建一个简单的具有start-web依赖的SpringBoot项目,然后添加mybatis相关的依赖。
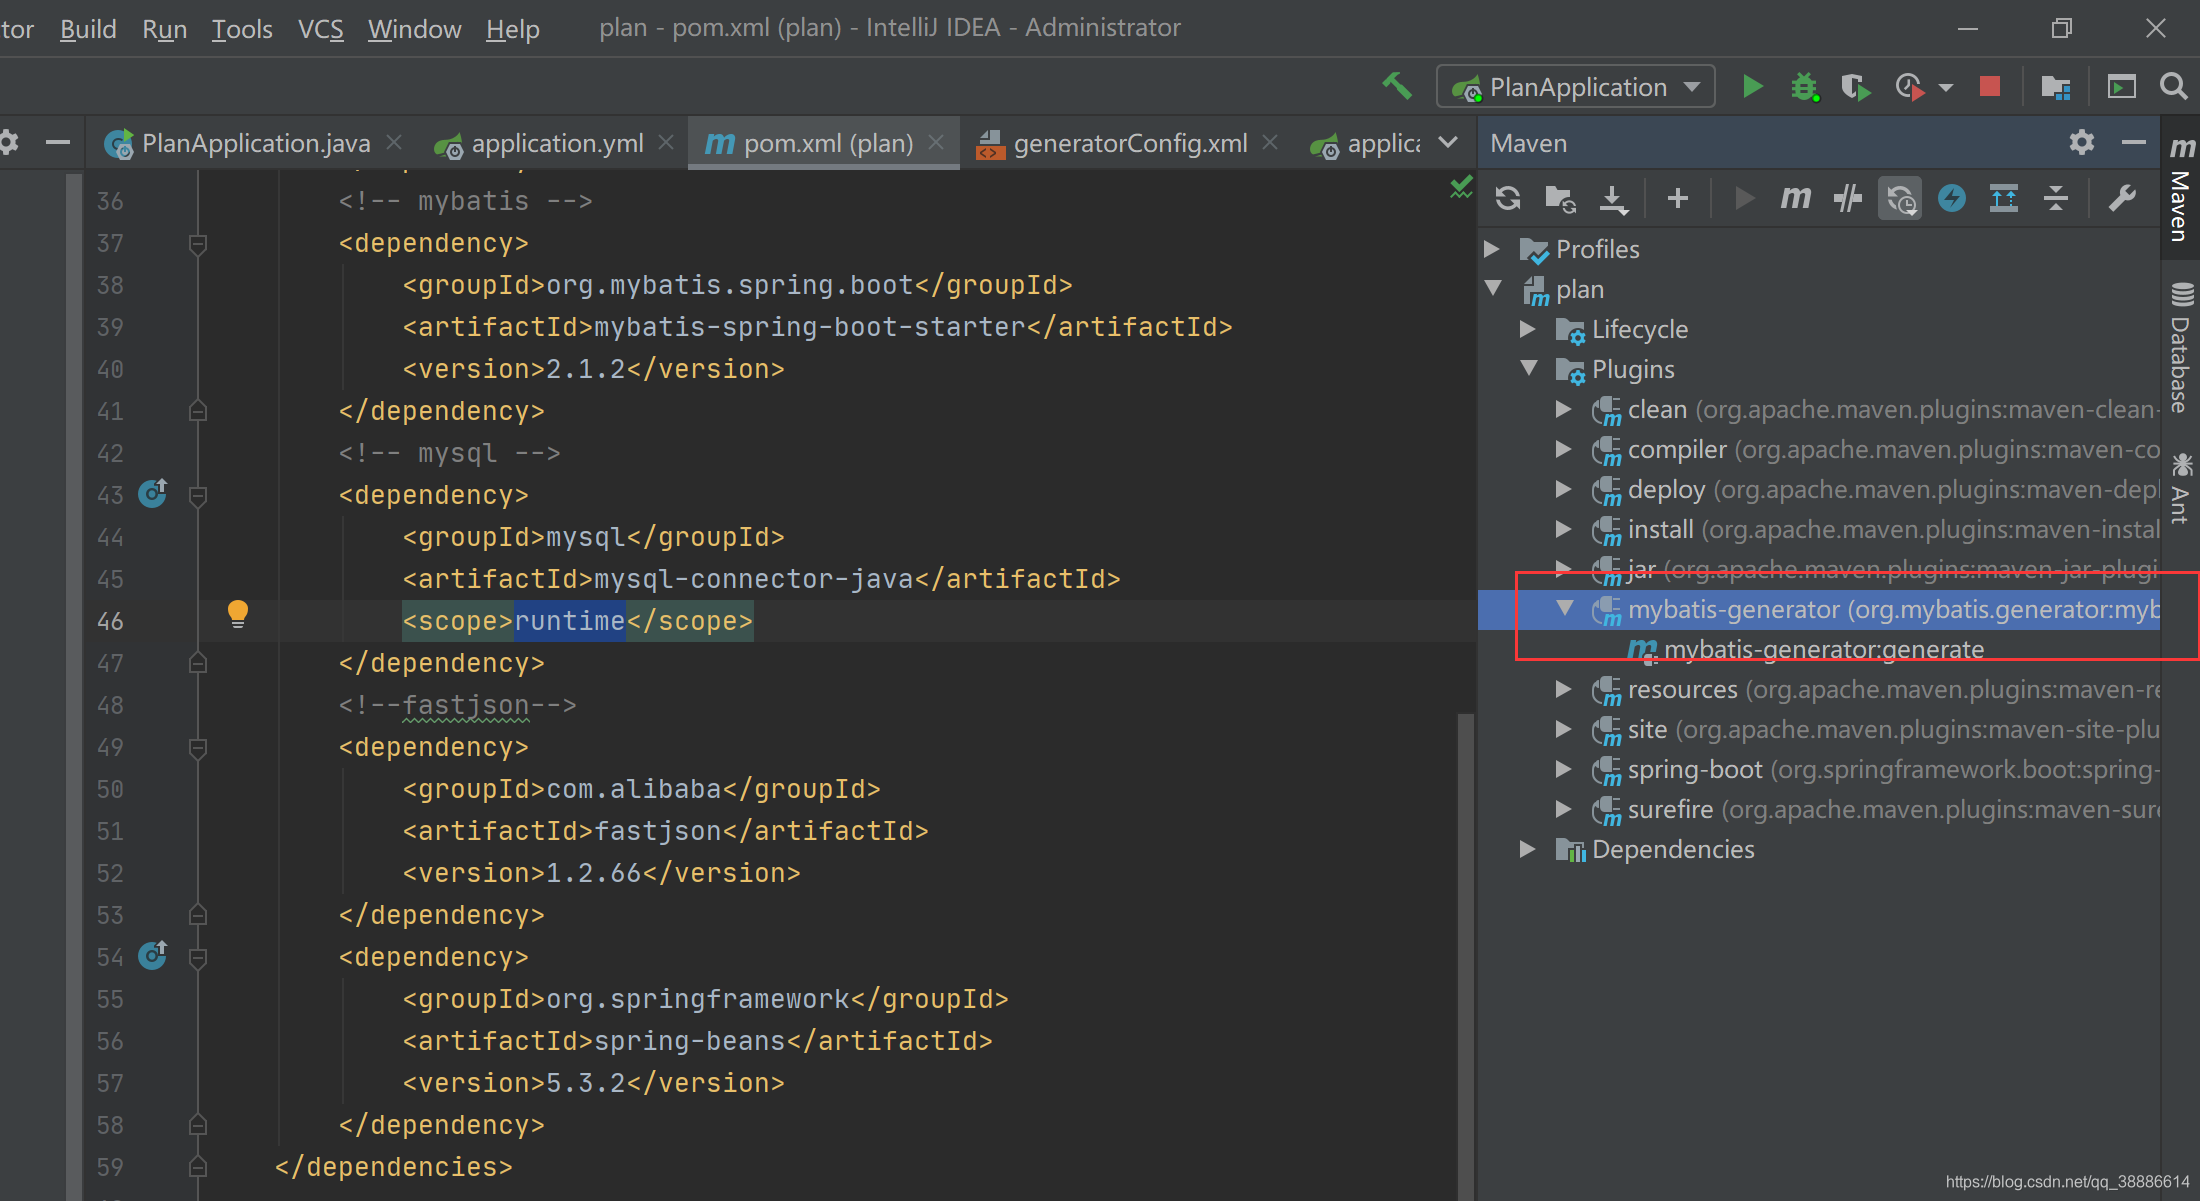
<dependency>
    <groupId>org.mybatis.spring.boot</groupId>
    <artifactId>mybatis-spring-boot-starter</artifactId>
    <version>2.1.2</version>
</dependency>

<dependency>
    <groupId>mysql</groupId>
    <artifactId>mysql-connector-java</artifactId>
    <scope>runtime</scope>
</dependency>
依赖下载完之后,在yml文件,也可以是properties文件里面配置连接数据库的相关配置。
spring:
  datasource:
    url: jdbc:mysql://localhost:3306/plant?serverTimezone=GMT
    username: admin
    password: admin
    driver-class-name: com.mysql.cj.jdbc.Driver
集成mybatis-generator-maven插件的
1.配置mybatis-generator-maven
打开项目的pom.xml文件添加
<!-- Mybatis generator代码生成插件 配置 -->
<plugin>
    <groupId>org.mybatis.generator</groupId>
    <artifactId>mybatis-generator-maven-plugin</artifactId>
    <version>1.3.1</version>
    <configuration>
        <configurationFile>src/main/resources/generatorConfig.xml</configurationFile>
        <overwrite>true</overwrite>
        <verbose>true</verbose>
    </configuration>
    <dependencies>
        <dependency>
            <groupId>mysql</groupId>
            <artifactId>mysql-connector-java</artifactId>
            <version>${mysql.version}</version>
        </dependency>
    </dependencies>
</plugin>
2.generatorConfig.xml配置
在resources文件下创建generatorConfig.xml文件,配置如下:
<!DOCTYPE<?xml version="1.0" encoding="UTF-8"?>
 generatorConfiguration
        PUBLIC "-//mybatis.org//DTD MyBatis Generator Configuration 1.0//EN"
        "http://mybatis.org/dtd/mybatis-generator-config_1_0.dtd">
<generatorConfiguration>
<!--数据库驱动包路ntime="MyBatis3"> <!--关闭注释 -->径 -->
<!--<classPathEntry location="D:\tool\apache-maven-3.6.3\maven-repository\mysql\mysql-connector-java\8.0.22\mysql-connector-java-8.0.22.jar"/>-->

<context id="DB2Tables" targetRu
<commentGenerator>
    <property name="suppressAllComments" value="true"/>
</commentGenerator>

<!--数据库连接信息 -->
<jdbcConnection driverClass="com.mysql.jdbc.Driver"
                connectionURL="jdbc:mysql://localhost:3306/plant?serverTimezone=GMT"
                userId="admin" password="admin">
</jdbcConnection>

<!--生成的model 包路径 -->
<javaModelGenerator targetPackage="com.ykt.plan.model" targetProject="src\main\java">
    <property name="enableSubPackages" value="ture"/>
    <property name="trimStrings" value="false"/>
</javaModelGenerator>

<!--生成xml mapper文件 路径 -->
<sqlMapGenerator targetPackage="/mapper" targetProject="src\main\resources">
    <property name="enableSubPackages" value="ture"/>
</sqlMapGenerator>

<!-- 生成的Dao接口 的包路径 -->
<javaClientGenerator type="XMLMAPPER" targetPackage="com.ykt.plan.dao" targetProject="src\main\java">
    <property name="enableSubPackages" value="ture"/>
</javaClientGenerator>
<!--对应数据库表名 tableName数据库表名称,domainObjectName生成model类的名称 -->
<table tableName="user_info">
</table>
</context>
</generatorConfiguration>
4.创建目录
#mybatis配置
mybatis:
  typeAliasesPackage: com.ykt.plan.model.*
  mapperLocations: classpath:mapper/*.xml
6.maven中plusgins中双击生成代码,注意不要重复生成,特别是xml不会删除,会重复追加
然后我们在数据库mybatis下面创建一个student表
DROP TABLE IF EXISTS `user_info`;
CREATE TABLE `user_info`  (
  `id` int(11) NOT NULL AUTO_INCREMENT,
  `user_name` varchar(255) CHARACTER SET utf8 COLLATE utf8_general_ci NULL DEFAULT NULL,
  `login_name` varchar(255) CHARACTER SET utf8 COLLATE utf8_general_ci NULL DEFAULT NULL,
  `password` varchar(255) CHARACTER SET utf8 COLLATE utf8_general_ci NULL DEFAULT NULL COMMENT 'md5',
  `telphone` varchar(255) CHARACTER SET utf8 COLLATE utf8_general_ci NULL DEFAULT NULL,
  `state` int(255) NULL DEFAULT 0 COMMENT '0 默认 1:禁用 2:删除',
  `create_time` datetime NULL DEFAULT CURRENT_TIMESTAMP ON UPDATE CURRENT_TIMESTAMP,
  PRIMARY KEY (`id`) USING BTREE
) ENGINE = InnoDB AUTO_INCREMENT = 3 CHARACTER SET = utf8 COLLATE = utf8_general_ci ROW_FORMAT = COMPACT;

SET FOREIGN_KEY_CHECKS = 1;
完成项目初始配置。
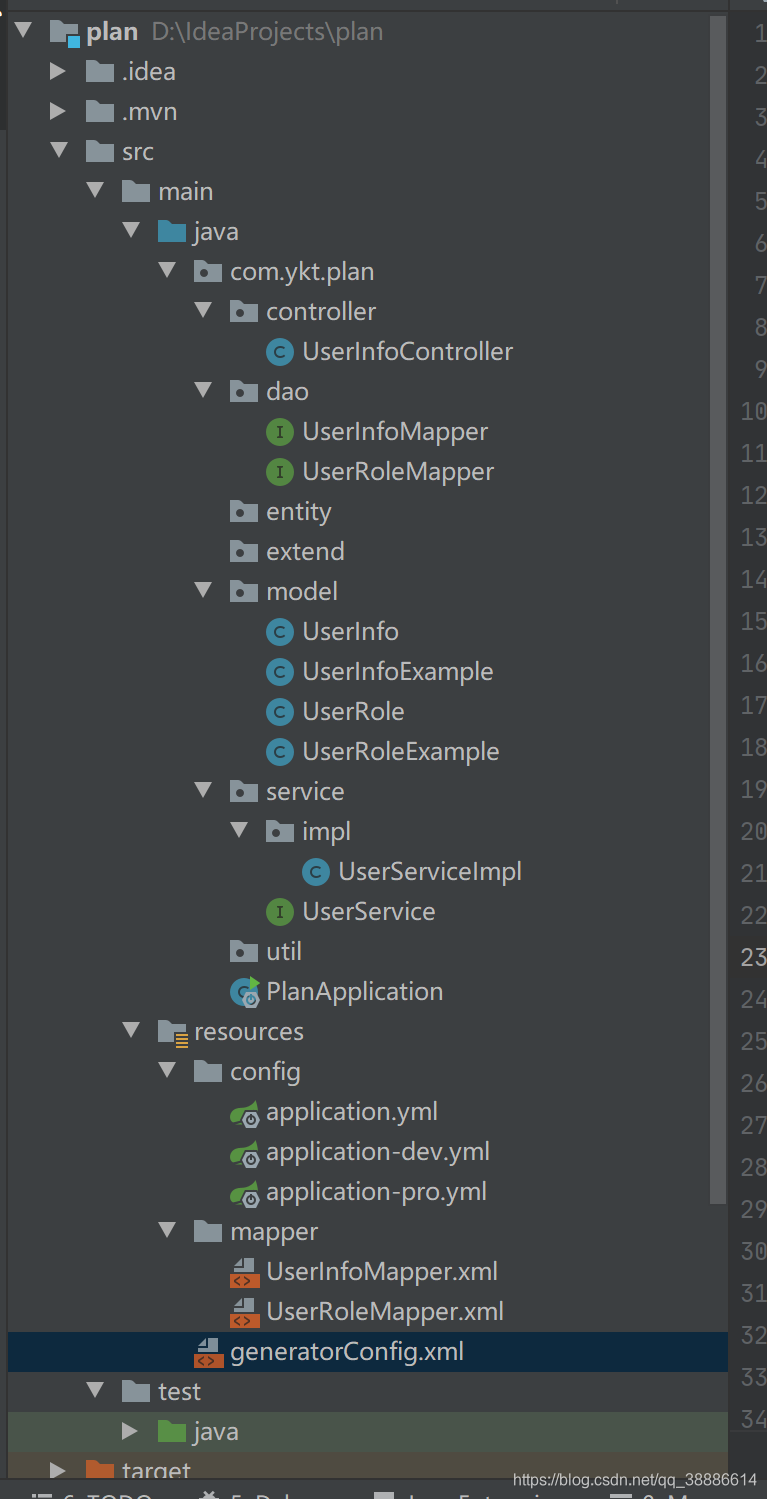
3. entity 实体类代码
package com.ykt.plan.model;

import java.util.Date;

public class UserInfo {
    private Integer id;

    private String userName;

    private String loginName;

    private String password;

    private String telphone;

    private Integer state;

    private Date createTime;

    public Integer getId() {
        return id;
    }

    public void setId(Integer id) {
        this.id = id;
    }

    public String getUserName() {
        return userName;
    }

    public void setUserName(String userName) {
        this.userName = userName;
    }

    public String getLoginName() {
        return loginName;
    }

    public void setLoginName(String loginName) {
        this.loginName = loginName;
    }

    public String getPassword() {
        return password;
    }

    public void setPassword(String password) {
        this.password = password;
    }

    public String getTelphone() {
        return telphone;
    }

    public void setTelphone(String telphone) {
        this.telphone = telphone;
    }

    public Integer getState() {
        return state;
    }

    public void setState(Integer state) {
        this.state = state;
    }

    public Date getCreateTime() {
        return createTime;
    }

    public void setCreateTime(Date createTime) {
        this.createTime = createTime;
    }
}
以上省略了get,以及set方法。
4. dao层代码
package com.ykt.plan.dao;

import com.ykt.plan.model.UserInfo;
import com.ykt.plan.model.UserInfoExample;
import java.util.List;

import org.apache.ibatis.annotations.Mapper;
import org.apache.ibatis.annotations.Param;
import org.springframework.stereotype.Repository;

import javax.annotation.Resource;
@Mapper
@Repository
public interface UserInfoMapper {
    int countByExample(UserInfoExample example);

    int deleteByExample(UserInfoExample example);

    int deleteByPrimaryKey(Integer id);

    int insert(UserInfo record);

    int insertSelective(UserInfo record);

    List<UserInfo> selectByExample(UserInfoExample example);

    UserInfo selectByPrimaryKey(Integer id);

    int updateByExampleSelective(@Param("record") UserInfo record, @Param("example") UserInfoExample example);

    int updateByExample(@Param("record") UserInfo record, @Param("example") UserInfoExample example);

    int updateByPrimaryKeySelective(UserInfo record);

    int updateByPrimaryKey(UserInfo record);
}
代码说明:dao层属于数据访问层,与mybatis 的xml文件相互映射,实现SQL语句的功能。注解说明:在dao层的类需要加上 @Mapper的注解,这个注解是mybatis提供的,标识这个类是一个数据访问层的bean,并交给spring容器管理。并且可以省去之前的xml映射文件。在编译的时候,添加了这个类也会相应的生成这个类的实现类。
如果你是用的idea,在serviceImpl中使用 @Autowired注入bean的时候,idea会报错,但是不影响运行,报错是因为 @mapper不是spring提供的,当需要自动注入这个bean的时候idea不能 预检测到这个bean是否可以注入到容器中,不知道新版的idea会不会有这种问题。如果想消除这个报错,你可以在dao层的类上面加上一个 @Repository,这个注解是spring提供的,这样就可以预检测到mapper的bean是可以注册到spring容器里面的。
你会发现在代码中,有的接口的参数是带了 @Param这个注解的,有的参数是没有这个注解的。如果你只有一个参数,这个注解可要可不要。当你有两个及其以上的注解时,你就需要用这个注解了,不然在对应的xml文件,它分辨不出来这个参数是哪一个就会报错,用这个注解的意思就是说标识这个参数的名称,以便让接受参数的一方更好的找到并利用这个值。
5. service层代码
package com.ykt.plan.service;

import com.ykt.plan.model.UserInfo;
import com.ykt.plan.model.UserInfoExample;
import org.springframework.stereotype.Service;

import java.util.List;


public interface UserService {
    int insert(UserInfo record);

    List<UserInfo> selectByExample(UserInfo userInfo);
}
代码说明:这是服务层的接口,serviceImpl对应服务层接口的实现。
6. serviceImpl层代码
package com.ykt.plan.service.impl; import com.ykt.plan.dao.UserInfoMapper; import com.ykt.plan.model.UserInfo; import com.ykt.plan.model.UserInfoExample; import com.ykt.plan.service.UserService; import org.springframework.beans.factory.annotation.Autowired; import org.springframework.stereotype.Service; import javax.annotation.Resource; import java.util.List; @Service public class UserServiceImpl implements UserService { @Resource private UserInfoMapper userInfoMapper; public int insert(UserInfo record){ return userInfoMapper.insertSelective(record); } @Override public List<UserInfo> selectByExample(UserInfo userInfo) { UserInfoExample userInfoExample=new UserInfoExample(); //userInfoExample.createCriteria().andIdEqualTo(1); return userInfoMapper.selectByExample(userInfoExample); } }代码说明:@Service标识这个bean是service层的,也就是服务层,并交给spring容器管理。参数的value属性是这个bean的名称,也可以不写,默认为类名。
这里我们可以说一下,@Resource与 @Autowired,前面我们在serviceImpl里面需要用到dao层的方法的时候,不是直接new一个对象,在哪需要就在哪new,而是利用注解,实现自定注入装配,利用spring容器管理这些bean,这样写出来的代码是松耦合的,类之间的耦合度更低,维护性就相对提高了。
@Resource与 @Autowired是可以起到一个相同的作用。根据包名就可以看到,他们不是一个包里面的。区别如下:
- @Autowired默认按类型装配,默认情况下必须要求依赖对象必须存在,如果要允许null值,可以设置它的required属性为false,如:@Autowired(required=false) ,这个注解是属于spring的,如果我们想使用名称装配可以结合 @Qualifier 注解进行使用。
- @Resource默认按照名称进行装配,名称可以通过name属性进行指定,如果没有指定name属性,当注解写在字段上时,默认取字段名进行安装名称查找,如果注解写在setter方法上默认取属性名进行装配。当找不到与名称匹配的bean时才按照类型进行装配。但是需要注意的是,如果name属性一旦指定,就只会按照名称进行装配。这个注解属于J2EE的。
7. mapper层代码
所谓的mapper层,就是xml文件,与dao层对应的。
<?xml version="1.0" encoding="UTF-8"?>
<!DOCTYPE mapper PUBLIC "-//mybatis.org//DTD Mapper 3.0//EN" "http://mybatis.org/dtd/mybatis-3-mapper.dtd">
<mapper namespace="com.ykt.plan.dao.UserInfoMapper">
  <resultMap id="BaseResultMap" type="com.ykt.plan.model.UserInfo">
    <id column="id" jdbcType="INTEGER" property="id" />
    <result column="user_name" jdbcType="VARCHAR" property="userName" />
    <result column="login_name" jdbcType="VARCHAR" property="loginName" />
    <result column="password" jdbcType="VARCHAR" property="password" />
    <result column="telphone" jdbcType="VARCHAR" property="telphone" />
    <result column="state" jdbcType="INTEGER" property="state" />
    <result column="create_time" jdbcType="TIMESTAMP" property="createTime" />
  </resultMap>
  <sql id="Example_Where_Clause">
    <where>
      <foreach collection="oredCriteria" item="criteria" separator="or">
        <if test="criteria.valid">
          <trim prefix="(" prefixOverrides="and" suffix=")">
            <foreach collection="criteria.criteria" item="criterion">
              <choose>
                <when test="criterion.noValue">
                  and ${criterion.condition}
                </when>
                <when test="criterion.singleValue">
                  and ${criterion.condition} #{criterion.value}
                </when>
                <when test="criterion.betweenValue">
                  and ${criterion.condition} #{criterion.value} and #{criterion.secondValue}
                </when>
                <when test="criterion.listValue">
                  and ${criterion.condition}
                  <foreach close=")" collection="criterion.value" item="listItem" open="(" separator=",">
                    #{listItem}
                  </foreach>
                </when>
              </choose>
            </foreach>
          </trim>
        </if>
      </foreach>
    </where>
  </sql>
  <sql id="Update_By_Example_Where_Clause">
    <where>
      <foreach collection="example.oredCriteria" item="criteria" separator="or">
        <if test="criteria.valid">
          <trim prefix="(" prefixOverrides="and" suffix=")">
            <foreach collection="criteria.criteria" item="criterion">
              <choose>
                <when test="criterion.noValue">
                  and ${criterion.condition}
                </when>
                <when test="criterion.singleValue">
                  and ${criterion.condition} #{criterion.value}
                </when>
                <when test="criterion.betweenValue">
                  and ${criterion.condition} #{criterion.value} and #{criterion.secondValue}
                </when>
                <when test="criterion.listValue">
                  and ${criterion.condition}
                  <foreach close=")" collection="criterion.value" item="listItem" open="(" separator=",">
                    #{listItem}
                  </foreach>
                </when>
              </choose>
            </foreach>
          </trim>
        </if>
      </foreach>
    </where>
  </sql>
  <sql id="Base_Column_List">
    id, user_name, login_name, password, telphone, state, create_time
  </sql>
  <select id="selectByExample" parameterType="com.ykt.plan.model.UserInfoExample" resultMap="BaseResultMap">
    select
    <if test="distinct">
      distinct
    </if>
    <include refid="Base_Column_List" />
    from user_info
    <if test="_parameter != null">
      <include refid="Example_Where_Clause" />
    </if>
    <if test="orderByClause != null">
      order by ${orderByClause}
    </if>
  </select>
  <select id="selectByPrimaryKey" parameterType="java.lang.Integer" resultMap="BaseResultMap">
    select
    <include refid="Base_Column_List" />
    from user_info
    where id = #{id,jdbcType=INTEGER}
  </select>
  <delete id="deleteByPrimaryKey" parameterType="java.lang.Integer">
    delete from user_info
    where id = #{id,jdbcType=INTEGER}
  </delete>
  <delete id="deleteByExample" parameterType="com.ykt.plan.model.UserInfoExample">
    delete from user_info
    <if test="_parameter != null">
      <include refid="Example_Where_Clause" />
    </if>
  </delete>
  <insert id="insert" parameterType="com.ykt.plan.model.UserInfo">
    insert into user_info (id, user_name, login_name,
      password, telphone, state,
      create_time)
    values (#{id,jdbcType=INTEGER}, #{userName,jdbcType=VARCHAR}, #{loginName,jdbcType=VARCHAR},
      #{password,jdbcType=VARCHAR}, #{telphone,jdbcType=VARCHAR}, #{state,jdbcType=INTEGER},
      #{createTime,jdbcType=TIMESTAMP})
  </insert>
  <insert id="insertSelective" parameterType="com.ykt.plan.model.UserInfo">
    insert into user_info
    <trim prefix="(" suffix=")" suffixOverrides=",">
      <if test="id != null">
        id,
      </if>
      <if test="userName != null">
        user_name,
      </if>
      <if test="loginName != null">
        login_name,
      </if>
      <if test="password != null">
        password,
      </if>
      <if test="telphone != null">
        telphone,
      </if>
      <if test="state != null">
        state,
      </if>
      <if test="createTime != null">
        create_time,
      </if>
    </trim>
    <trim prefix="values (" suffix=")" suffixOverrides=",">
      <if test="id != null">
        #{id,jdbcType=INTEGER},
      </if>
      <if test="userName != null">
        #{userName,jdbcType=VARCHAR},
      </if>
      <if test="loginName != null">
        #{loginName,jdbcType=VARCHAR},
      </if>
      <if test="password != null">
        #{password,jdbcType=VARCHAR},
      </if>
      <if test="telphone != null">
        #{telphone,jdbcType=VARCHAR},
      </if>
      <if test="state != null">
        #{state,jdbcType=INTEGER},
      </if>
      <if test="createTime != null">
        #{createTime,jdbcType=TIMESTAMP},
      </if>
    </trim>
  </insert>
  <select id="countByExample" parameterType="com.ykt.plan.model.UserInfoExample" resultType="java.lang.Integer">
    select count(*) from user_info
    <if test="_parameter != null">
      <include refid="Example_Where_Clause" />
    </if>
  </select>
  <update id="updateByExampleSelective" parameterType="map">
    update user_info
    <set>
      <if test="record.id != null">
        id = #{record.id,jdbcType=INTEGER},
      </if>
      <if test="record.userName != null">
        user_name = #{record.userName,jdbcType=VARCHAR},
      </if>
      <if test="record.loginName != null">
        login_name = #{record.loginName,jdbcType=VARCHAR},
      </if>
      <if test="record.password != null">
        password = #{record.password,jdbcType=VARCHAR},
      </if>
      <if test="record.telphone != null">
        telphone = #{record.telphone,jdbcType=VARCHAR},
      </if>
      <if test="record.state != null">
        state = #{record.state,jdbcType=INTEGER},
      </if>
      <if test="record.createTime != null">
        create_time = #{record.createTime,jdbcType=TIMESTAMP},
      </if>
    </set>
    <if test="_parameter != null">
      <include refid="Update_By_Example_Where_Clause" />
    </if>
  </update>
  <update id="updateByExample" parameterType="map">
    update user_info
    set id = #{record.id,jdbcType=INTEGER},
      user_name = #{record.userName,jdbcType=VARCHAR},
      login_name = #{record.loginName,jdbcType=VARCHAR},
      password = #{record.password,jdbcType=VARCHAR},
      telphone = #{record.telphone,jdbcType=VARCHAR},
      state = #{record.state,jdbcType=INTEGER},
      create_time = #{record.createTime,jdbcType=TIMESTAMP}
    <if test="_parameter != null">
      <include refid="Update_By_Example_Where_Clause" />
    </if>
  </update>
  <update id="updateByPrimaryKeySelective" parameterType="com.ykt.plan.model.UserInfo">
    update user_info
    <set>
      <if test="userName != null">
        user_name = #{userName,jdbcType=VARCHAR},
      </if>
      <if test="loginName != null">
        login_name = #{loginName,jdbcType=VARCHAR},
      </if>
      <if test="password != null">
        password = #{password,jdbcType=VARCHAR},
      </if>
      <if test="telphone != null">
        telphone = #{telphone,jdbcType=VARCHAR},
      </if>
      <if test="state != null">
        state = #{state,jdbcType=INTEGER},
      </if>
      <if test="createTime != null">
        create_time = #{createTime,jdbcType=TIMESTAMP},
      </if>
    </set>
    where id = #{id,jdbcType=INTEGER}
  </update>


</mapper>
这里面对应了SQL的增删改查语句,然后在dao层的方法,对应了每一个SQL语句,这里面SQL语句的id,对应dao层的每一个接口方法。
默认的配置是检测不到这个xml文件的,然后我们需要做以下的配置。
我把xml文件放在resources文件夹下面的dao文件夹下面。
然后我们在yml里面加上以下配置。在pom.xml中添加mybatis配置
#mybatis配置
mybatis:
  typeAliasesPackage: com.ykt.plan.model.*
  mapperLocations: classpath:mapper/*.xml
8. controller层代码
controller层的代码我们是用来测试的,一般也是返回数据给前端的地方。
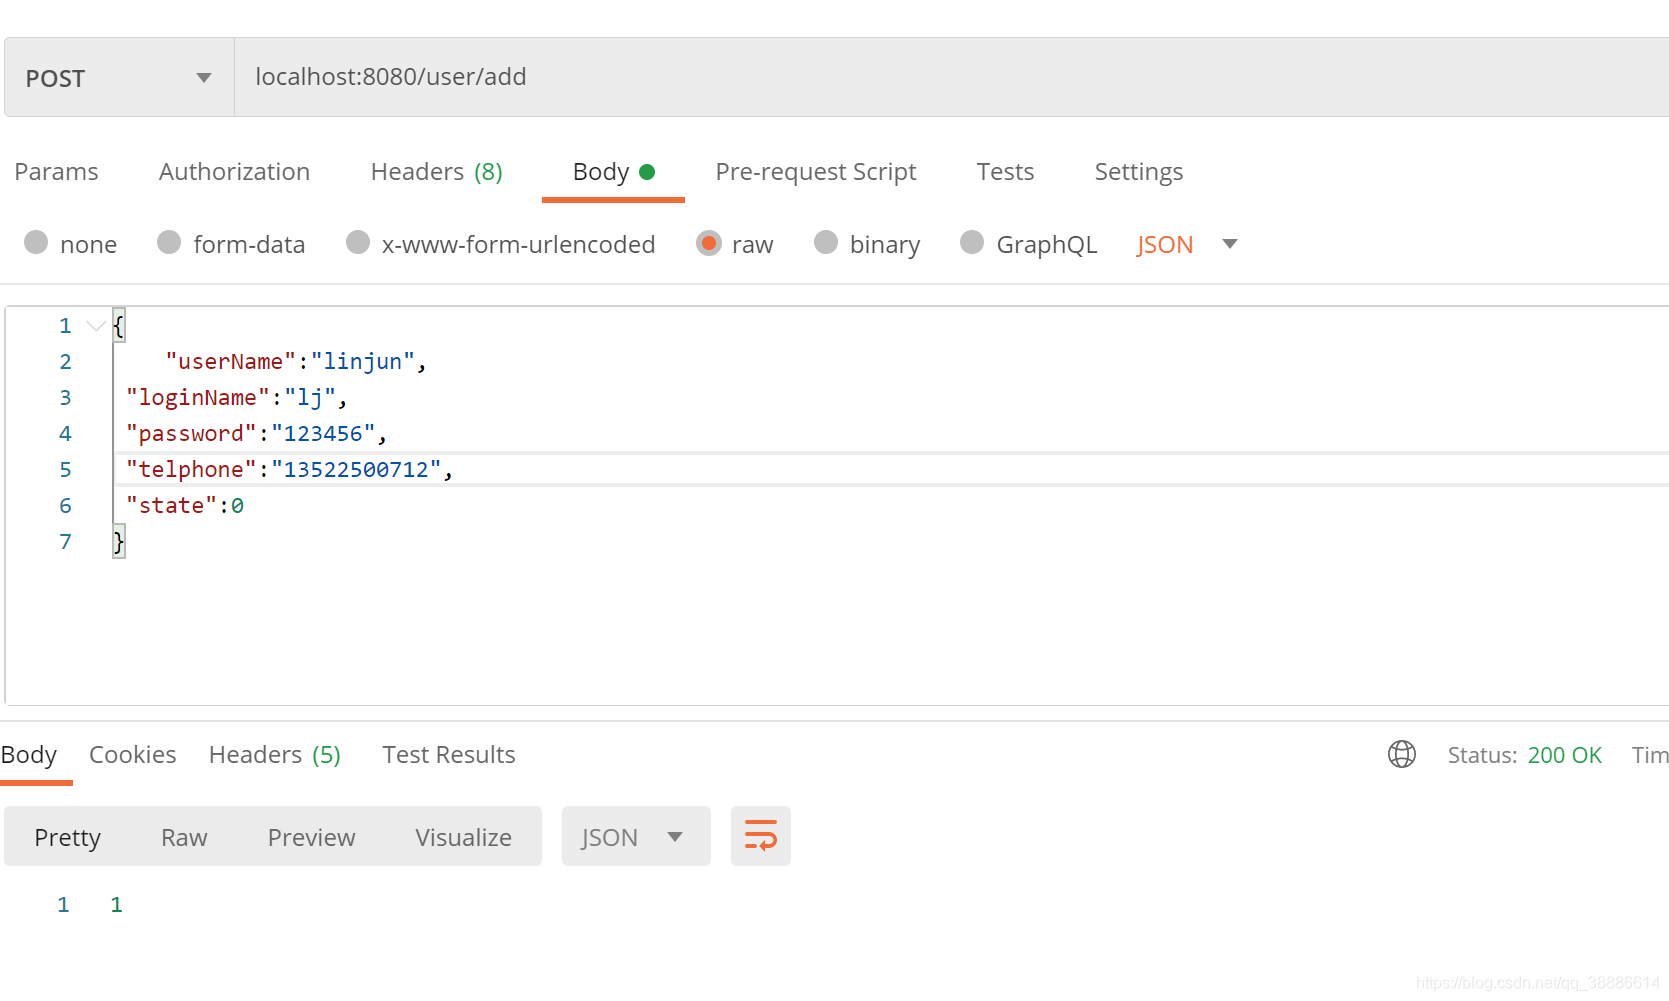
package com.ykt.plan.controller; import com.ykt.plan.model.UserInfo; import com.ykt.plan.service.UserService; import org.springframework.beans.factory.annotation.Autowired; import org.springframework.http.ResponseEntity; import org.springframework.stereotype.Controller; import org.springframework.web.bind.annotation.*; import javax.annotation.Resource; import java.util.List; @RestController @RequestMapping("/user") public class UserInfoController { @Resource private UserService userService; @PostMapping("/add") public ResponseEntity addUser(@RequestBody UserInfo userInfo){ return ResponseEntity.ok(userService.insert(userInfo)); } @GetMapping("/select") public ResponseEntity<List<UserInfo>> selectUser(@RequestBody UserInfo userInfo){ return ResponseEntity.ok(userService.selectByExample(userInfo)); } }代码说明:@RestController 这个注解等效于 @Controller加上 @ResponseBody,添加了这个注解就是让这个类返回json串,这是spring内部提供的json解析。@RequesMapping 注解是一个地址映射的注解。就是根据这个地址,可以找到这个方法,这个类,注解到类上,就相当于方法的父类地址。
postman测试一下。我们先在数据库里面添加一条数据
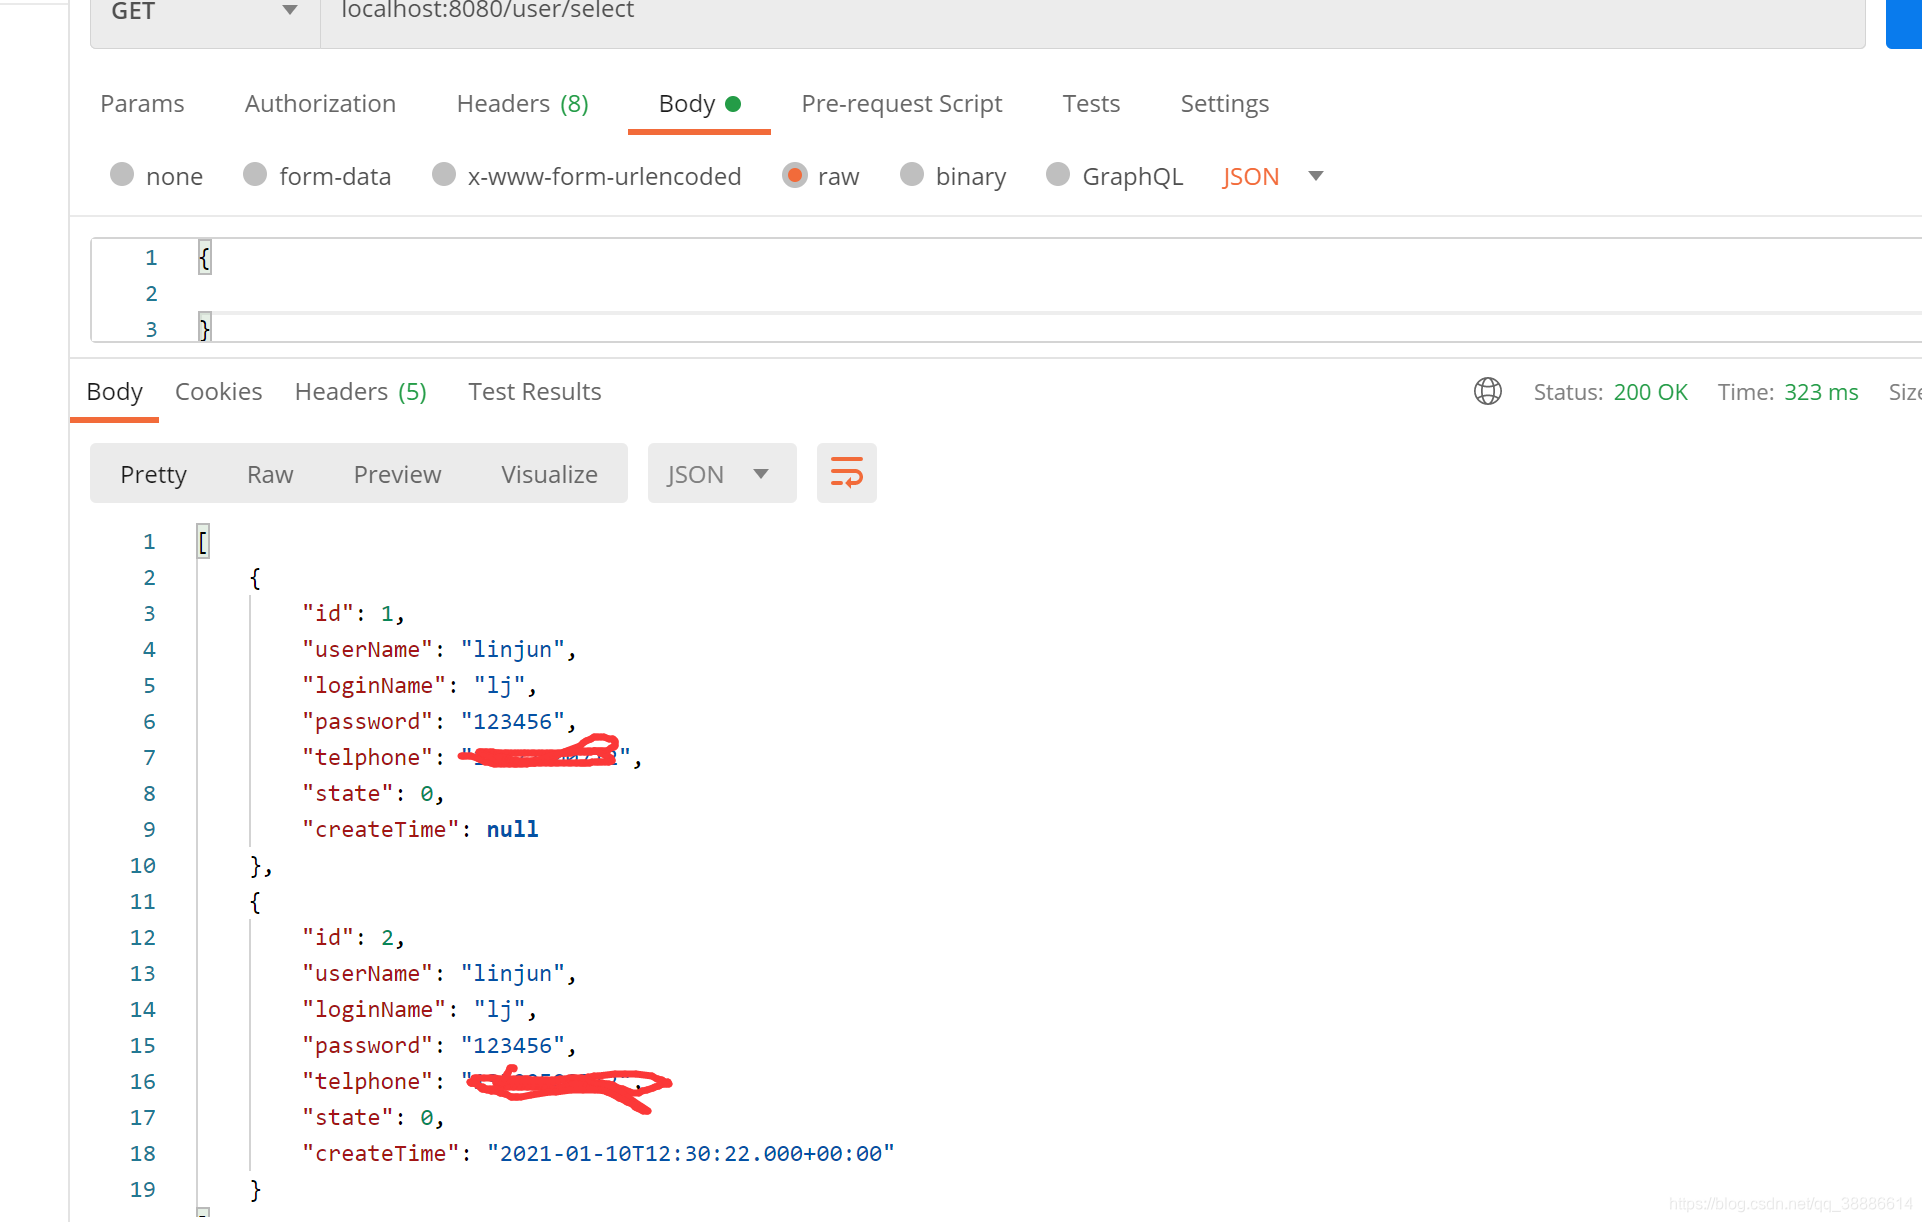
调用一下读取


03-10
 1120
1120
1120
12-31
1705
1705
09-26
1315
1315

 被折叠的 条评论
为什么被折叠?
被折叠的 条评论
为什么被折叠?
 到【灌水乐园】发言


