


注解基础
注解的定义
自定义注解非常简单,和定义接口很像,只需要在interface前面加一个@即可
public @interface AutoTest {
}

@AutoTest
public class MainActivity extends AppCompatActivity{
	//do somethings
}
元注解
元注解可以理解为用在注解类上的注解,主要用来限定注解的使用,一共又以下五种元注解:
1. @Retention 意味保留期,我们可以把它理解为注解的"生命周期",一共有三种参数
RetentionPolicy.SOURCE 注解只保留在源码文件中,当.java文件编译成.class文件注解并不会编译进去;
RetentionPolicy.CLASS 注解只保留到编译进行阶段,只保留到.class文件中并不会加载到Jvm中;
RetentionPolicy.RUNTIME 注解可以保留到程序运行时,它也会被加载进Jvm。
2. @Tager 意味目标,用来指定注解可以被运用在哪里(类、方法、参数等),共有以下八种参数:
ElementType.ANNOTATION_TYPE 可以给一个注解进行注解
ElementType.CONSTRUCTOR 可以给构造方法注解
ElementType.FIELD 可以给一个属性注解
ElementType.LOCAL_VARIABLE 可以给局部变量注解
ElementType.METHOD 可以给方法注解
ElementType.PACKAGE 可以给一个包注解
ElementType.PARAMETER 可以给方法中的参数注解
ElementType.TYPE 可以给一个类型进行注解,比如类、接口、枚举
3. @Documented 字面意思,肯定跟文档有关系,它的作用是能够将注解中的元素包含到 Javadoc 中去。
4. @Inherited 表示如果一个超类被@Inherited注解,那么他的子类没有被任何注解应用的话,他的子类将继承超类的注解。
5. @Repeatable 表示注解可以同时取多个值
注解属性
注解中可以定义属性,可以赋默认值,但是注解属性的类型必须是基本类型,外加一个注解本身类型的数组。
注解定义属性:
@Retention(RetentionPolicy.RUNTIME)
@Inherited
public @interface AutoTest {
    String type() default "默认值";
}

@AutoTest(type = "Activity")
public class MainActivity extends AppCompatActivity{
	//do somethings
}
注解的提取
注解可以通过反射获取,通过获取类的class对象,通过 isAnnotationPresent() 方法判断是否应用某个注解,通过getAnnotation()获取注解对象,或者是 getAnnotations() 方法获取全部注解
Class<MainActivity> mainActivityClass = MainActivity.class;
//判断是否使用某个注解
Log.e("是否使用了AutoTest注解", "" + mainActivityClass.isAnnotationPresent(AutoTest.class));
//获取指定注解对象
AutoTest autoTestClass = mainActivityClass.getAnnotation(AutoTest.class);
//获取注解数组
Annotation[] annotations = mainActivityClass.getAnnotations();
for (int i=0; i<annotations.length; i++){
    Log.e("遍历MainActivity注解", annotations[i].toString());
}
注解与APT
APT(Annotation Processing Tool) 是一种注解处理工具,它对源代码文件进行检测,找到其中对应的注解根据注解生成对应代码。
大体流程:我们自定义一些注解,并且设定这些注解的具体逻辑,将注解标注在类上或方法上。利用谷歌给我们提供的auto-service,在编译时,可以扫描我们指定的注解,获取一些相关信息,再通过square给我们提供的javapoet生成对应的java文件供我们使用。很多框架都是运用这个原理,比如:MvRx,ButterKnief。
手写"ButterKnief"
现在利用上面说到的 auto-service 和 javapoet 来实现一个简单的"ButterKnief",帮助我们去写findviewbyId。
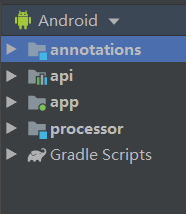
项目大体结构就是上面图片这样:
annotations:存放自定义的注解
api:定义注解的一些功能
app:就是主工程
processor:在编译时帮我们自动生成java文件
首先,创建annotations,自定义我们的注解:
@AutoBind:
/**
 * 用于识别需要处理那些Java文件
 * 注解在Activity上表示 需要bindview
 */
@Retention(RetentionPolicy.CLASS)
@Target(ElementType.TYPE)
public @interface AutoBind {
    String value();
}
@BindView:
/**
 * 和 ButterKnife 一样 这个注解用于标注在 View上
 */
@Retention(RetentionPolicy.CLASS)
@Target(ElementType.FIELD)
public @interface BindView {
    int value (); //用于接受 view 的 id
}
这里要注意以下,这个Module并不是android-library,而是一个java,看一下gradle文件:
//注意这里 是 java
apply plugin: 'java'

dependencies {
    implementation fileTree(dir: 'libs', include: ['*.jar'])
}
//转码
tasks.withType(JavaCompile){
    options.encoding = "UTF-8"
}

sourceCompatibility = JavaVersion.VERSION_1_8
targetCompatibility = JavaVersion.VERSION_1_8
接着创建api Module,里面定义我们注解的功能,这个module是一个android-library,不需要引入其他库,直接定义我们的注解功能即可:
定义ViewBinder接口抽象功能:
/**
 *  抽象功能
 *
 *  绑定 和 解绑
 */
public interface ViewBinder<T> {
	//T host -- view的容器 activity fragment等
	//Object obj -- view类型
	//ViewFinder finder -- 在容器中绑定view的类 下面创建
	//绑定view 方法
    public void bind(T host, Object obj, ViewFinder finder );

	//解绑view
    public void unBind(T host);
}
定义ViewFinder,用于在容器中绑定view
/**
 *  用于在 Activity中 查找 view
 */
public class ViewFinder {
    public View findView(Object obj, int viewId){
        return ( (Activity) obj).findViewById(viewId);
    }
}
定义MyButterKnife,实现接口中的功能
public class MyButterKnife {

    private static final ViewFinder finder = new ViewFinder();
    private static final Map<String, ViewBinder> binderMap = new LinkedHashMap<>();

    public static void bind(Activity activity){
        bind(activity, activity, finder);
    }

    /**
     * 注解绑定
     * @param host 表示需要注解的类 activity等等
     * @param obj 表示查找 View 的地方 Activity Fragment 等
     * @param finder ui绑定者提供接口
     */
    public static void bind(Object host, Object obj, ViewFinder finder){
        String className = host.getClass().getName();
        ViewBinder binder = binderMap.get(className);
        try {
            if(binder == null){
                Class clazz = Class.forName(className + "$AutoBind");
                binder = (ViewBinder) clazz.newInstance();
                binderMap.put(className, binder);
            }
            if (binder != null) {
                //把finder类跟使用注解类的 类 绑定
                binder.bind(host, obj, finder);
            }
        }catch (Exception e){
            Log.e("MyButterKnife.bind", e.toString());
        }
    }

    public static void unBind(Object host){
        String className = host.getClass().getName();
        ViewBinder binder = binderMap.get(className);
        if(binder != null){
            binder.unBind(host);
        }
        binderMap.remove(className);
    }
}
最后,创建processor Module,主要利用autoservice扫描注解,再通过javapoet生成对应的java文件,processor是一个java module,需要引入auto-service包和javapoet包,并且依赖前面创建的annotations模块。
gradle文件:
dependencies {
    implementation fileTree(dir: 'libs', include: ['*.jar'])

    implementation 'com.google.auto.service:auto-service:1.0-rc6'
    annotationProcessor 'com.google.auto.service:auto-service:1.0-rc6'
    implementation 'com.squareup:javapoet:1.7.0'
    implementation project(':annotations')
}
//转码
tasks.withType(JavaCompile){
    options.encoding = "UTF-8"
}

sourceCompatibility = JavaVersion.VERSION_1_8
targetCompatibility = JavaVersion.VERSION_1_8
定义MyProcessor,实现扫描注解和生成代码,类的代码比较多,代码中有大量注释。代码中有两个内部类,AnnotatedClass主要用于 自动生成 class 文件 写入类、方法代码,BindViewFieId 存放被注解 view 的信息;
MyProcessor继承AbstractProcessor,开启注解处理有两种方案,第一种是再META-INF/services 目录文件夹下创建 javax.annotation.processing.Processor 文件,文件中写入MyProcessor全类名;第二种就是再MyProcessor上使用注解@AutoService(Processor.class),这会在编译时帮我们生成第一种方案的文件。
继承自AbstractProcessor后,重写最重要的方法就是process,这个相当于是main方法,入口方法;
代码如下:
/**方案1
 * 运行注解处理器
 * 1、在 processors 库的 main 目录下新建 resources 资源文件夹;
 * 2、在 resources文件夹下建立 META-INF/services 目录文件夹;
 * 3、在 META-INF/services 目录文件夹下创建 javax.annotation.processing.Processor 文件;
 * 4、在 javax.annotation.processing.Processor 文件写入注解处理器的全称,包括包路径;
 */
/** 方案2
 * 每一个注解处理器类都必须有一个空的构造函数,默认不写就行;
 *  类前面标注 @AutoService(Processor.class)
 */
@AutoService(Processor.class)
public class MyProcessor extends AbstractProcessor {

    //Types是一个用来处理TypeMirror的工具
    private Types typeUtils;
    //Elements是一个用来处理Element的工具
    private Elements elementUtils;
    //生成java源码
    private Filer filer;
    //每个需要自动生成的类 对应一个生成类的操作对象
    private Map<String, AnnotatedClass> mAnnotatedClassMap;
    /**
     * Messager提供给注解处理器一个报告错误、警告以及提示信息的途径。
     * 它不是注解处理器开发者的日志工具,
     * 而是用来写一些信息给使用此注解器的第三方开发者的
     */
    private Messager messager;

    /**
     * init()方法会被注解处理工具调用,并输入ProcessingEnviroment参数。
     * ProcessingEnviroment提供很多有用的工具类Elements, Types 和 Filer
     * @param processingEnv 提供给 processor 用来访问工具框架的环境
     */
    @Override
    public synchronized void init(ProcessingEnvironment processingEnv) {
        super.init(processingEnv);
        typeUtils = processingEnv.getTypeUtils();
        elementUtils = processingEnv.getElementUtils();
        filer = processingEnv.getFiler();
        messager = processingEnv.getMessager();
        mAnnotatedClassMap = new TreeMap<>();
    }

    /**
     * 这相当于每个处理器的主函数main(),你在这里写你的扫描、评估和处理注解的代码,以及生成Java文件。
     * 输入参数RoundEnviroment,可以让你查询出包含特定注解的被注解元素
     * @param annotations   请求处理的注解类型
     * @param roundEnvironment  有关当前和以前的信息环境
     * @return  如果返回 true,则这些注解已声明并且不要求后续 Processor 处理它们;
     *          如果返回 false,则这些注解未声明并且可能要求后续 Processor 处理它们
     */
    @Override
    public boolean process(Set<? extends TypeElement> annotations, RoundEnvironment roundEnvironment) {
        /**
         * 首先需要把要生成的类所需要的信息都收集到
         *  如:类名,需要的view 和 view 的类型,view 的 resId 等等
         */
        try {
            mAnnotatedClassMap.clear();
            //获取被BindView注解的所有元素
            System.out.println("step ---> Get all @BindView element");
            for(Element element : roundEnvironment.getElementsAnnotatedWith(BindView.class)){
                TypeElement typeElement = (TypeElement) element.getEnclosingElement();
                //获取元素对应的类名
                String viewWithClassName = typeElement.getQualifiedName().toString();
                //如果这个元素对应的类还没添加进mAnnotatedClassMap 则添加进去
                System.out.println("step ---> Get annotatedClass");
                AnnotatedClass annotatedClass = mAnnotatedClassMap.get(viewWithClassName);
                if(annotatedClass == null){
                    annotatedClass = new AnnotatedClass(typeElement, elementUtils);
                    mAnnotatedClassMap.put(viewWithClassName, annotatedClass);
                }
                System.out.println("annotatedClass" + annotatedClass);
                // annotatedClass 中还有对应类中的view信息 根据element获取BindViewFieId对象
                System.out.println("step ---> Get bindViewField");
                BindViewFieId bindViewFieId = new BindViewFieId(element);
                annotatedClass.addField(bindViewFieId);
                System.out.println("bindViewFieId" + bindViewFieId);
            }
        }catch (IllegalArgumentException e){
            System.out.println("Auto bind view is error -----------");
            messager.printMessage(Diagnostic.Kind.ERROR, e.getMessage());
        }
        /**
         *  所有的信息都收集完了之后 开始生成类
         *   view 变量 信息 都在annotatedClass中, 所以 生成类的操作写在 annotatedClass中
         */
        for (AnnotatedClass annotatedClass : mAnnotatedClassMap.values()){
            try {
                System.out.println("step ---> Process start create class");
                System.out.println("annotatedClass:" + annotatedClass);
                annotatedClass.createFile().writeTo(filer);
            } catch (IOException e) {
                System.out.println("process create class error");
                //e.printStackTrace();
                messager.printMessage(Diagnostic.Kind.ERROR, e.getMessage());
            }
        }

        return true;
    }

    /**
     * 这里必须指定,这个注解处理器是注册给哪个注解的。注意,它的返回值是一个字符串的集合,包含本处理器想要处理的注解类型的合法全称
     * @return  注解器所支持的注解类型集合,如果没有这样的类型,则返回一个空集合
     */
    @Override
    public Set getSupportedAnnotationTypes() {
        Set annotataions = new LinkedHashSet();
        annotataions.add(AutoBind.class.getCanonicalName());
        return annotataions;
    }

    /**
     * 指定使用的Java版本,通常这里返回SourceVersion.latestSupported(),默认返回SourceVersion.RELEASE_6
     * @return  使用的Java版本
     */
    @Override
    public SourceVersion getSupportedSourceVersion() {
        return SourceVersion.latestSupported();
    }

    //主要用于 自动生成 class 文件 写入类、方法代码
    static class AnnotatedClass{

        TypeElement typeElement;
        Elements elements;
        //保存被注解 view 的信息
        ArrayList<BindViewFieId> viewList;

        AnnotatedClass(TypeElement typeElement, Elements elements){
            this.typeElement = typeElement;
            this.elements = elements;
            viewList = new ArrayList();
        }

        void addField(BindViewFieId bindViewFieId){
            viewList.add(bindViewFieId);
            System.out.println("AnnotatedClass.viewList : " + viewList);
        }

        static final ClassName BINDER = ClassName.get("com.example.api", "ViewBinder");
        static final ClassName PROVIDER = ClassName.get("com.example.api", "ViewFinder");

        JavaFile createFile(){
            //生成方法 生成自动绑定view的方法 bind
            System.out.println("step ---> createFile - ceate method");
            MethodSpec.Builder bindMethod = MethodSpec
                    .methodBuilder("bind")//方法名字
                    .addModifiers(Modifier.PUBLIC)//修饰符
                    .addAnnotation(Override.class)//方法注解
                    .addParameter(TypeName.get(typeElement.asType()),"host")//方法参数类型 参数名
                    .addParameter(TypeName.OBJECT, "obj")
                    .addParameter(PROVIDER, "viewFinder");
            //方法体 也就是findView
            for (BindViewFieId bindViewFieId : viewList){
                bindMethod.addStatement("host.$N = ($T)(viewFinder.findView(obj, $L))",
                        bindViewFieId.getName(),
                        ClassName.get(bindViewFieId.getType()),
                        bindViewFieId.getId());
            }

            //生成解绑方法 unBind
            MethodSpec.Builder unBindMethod = MethodSpec
                    .methodBuilder("unBind")
                    .addModifiers(Modifier.PUBLIC)
                    .addAnnotation(Override.class)
                    .addParameter(TypeName.get(typeElement.asType()), "host");
            //对绑定过的view 解绑 赋空值
            for (BindViewFieId bindViewFieId : viewList){
                unBindMethod.addStatement("host.$N = null",
                        bindViewFieId.getName());
            }

            //生成类
            System.out.println("step ---> createFile - ceate class");
            TypeSpec bindClass = TypeSpec
                    .classBuilder(typeElement.getSimpleName() + "$AutoBind")//类名
                    .addModifiers(Modifier.PUBLIC)//修饰符
                    .addSuperinterface(ParameterizedTypeName.get(BINDER, TypeName.get(typeElement.asType())))//添加实现的接口
                    .addMethod(bindMethod.build())//添加方法
                    .addMethod(unBindMethod.build())
                    .build();

            String packageName = elements.getPackageOf(typeElement).getQualifiedName().toString();
            JavaFile result = JavaFile.builder(packageName, bindClass).build();
            try {
                result.writeTo(System.out);
            } catch (IOException e) {
                e.printStackTrace();
            }
            return result;
        }
    }

    //被注解 view 的信息
    static class BindViewFieId{
        private VariableElement variableElement;
        private int resId;

        BindViewFieId(Element element){
            //判断是否注解的是 view 变量
            if(element.getKind() == ElementKind.FIELD){
                variableElement = (VariableElement) element;
                System.out.println("BindViewField variableElement: " + variableElement);
                BindView bindView = variableElement.getAnnotation(BindView.class);
                resId = bindView.value();
                System.out.println("BindViewField resId: " + resId);
                //如果 注解中的 view id 不正确 则抛出异常
                if(resId < 0){
                    throw new IllegalArgumentException("@BindView get value is invalid");
                }
            }else { //@BindView不是用在注解上 则抛出异常
                throw new IllegalArgumentException("@BindView only can be annotated with fields");
            }
        }

        // 获取 view 名称
        Name getName(){
            return variableElement.getSimpleName();
        }
        // 获取 view resId
        int getId(){
            return resId;
        }
        // 获取 view 类型
        TypeMirror getType(){
            return variableElement.asType();
        }
    }
}
以上创建完成后,我们在app中依赖三个模块,在gradle文件中添加:
dependencies {
	implementation project(':annotations')
    implementation project(':api')
    annotationProcessor project(':processor')
}
在MainActivity中使用我们的注解:
在这里插入代码片
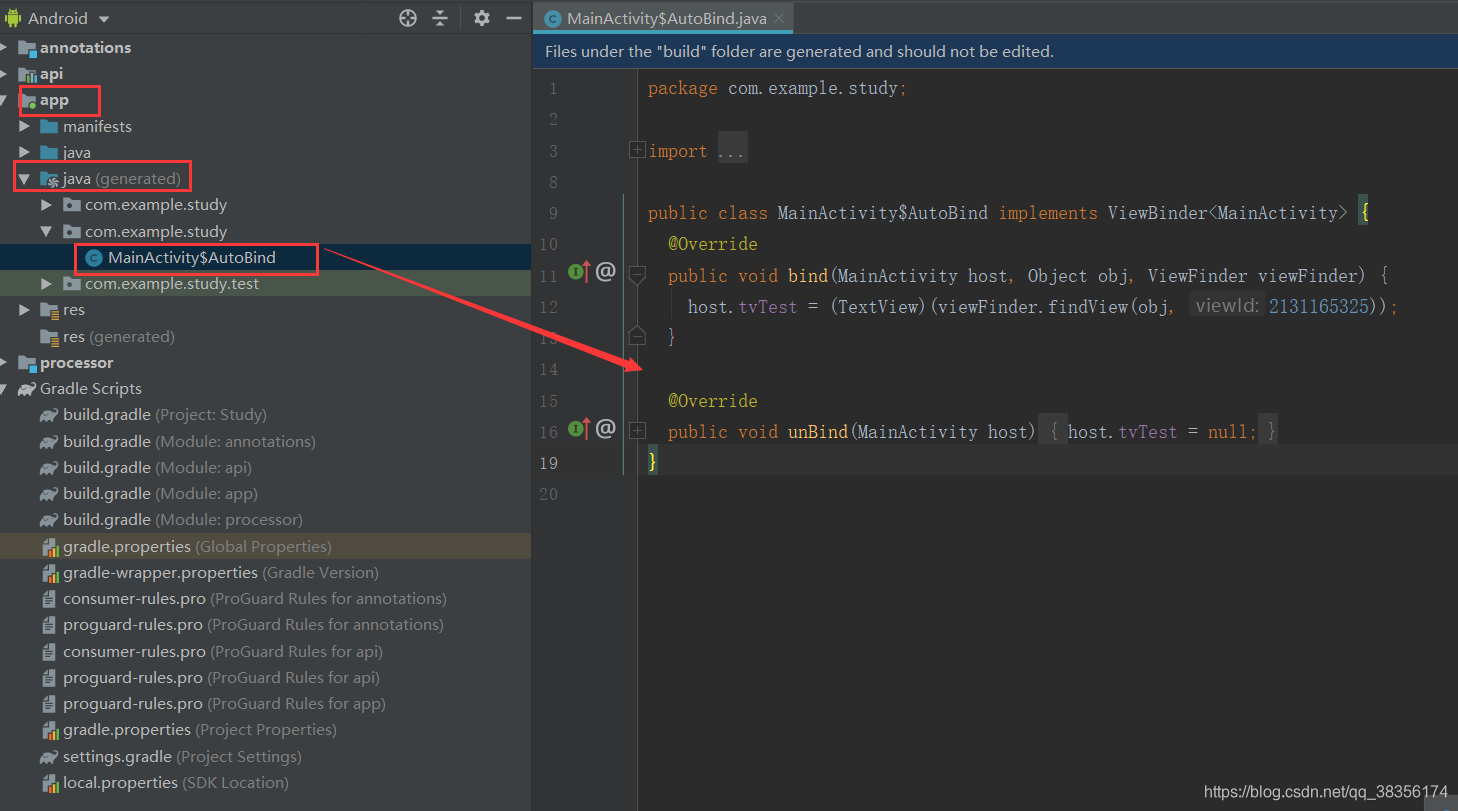
完成代码后,我们先build以下项目,会发现自动生成了Java文件:
运行效果:
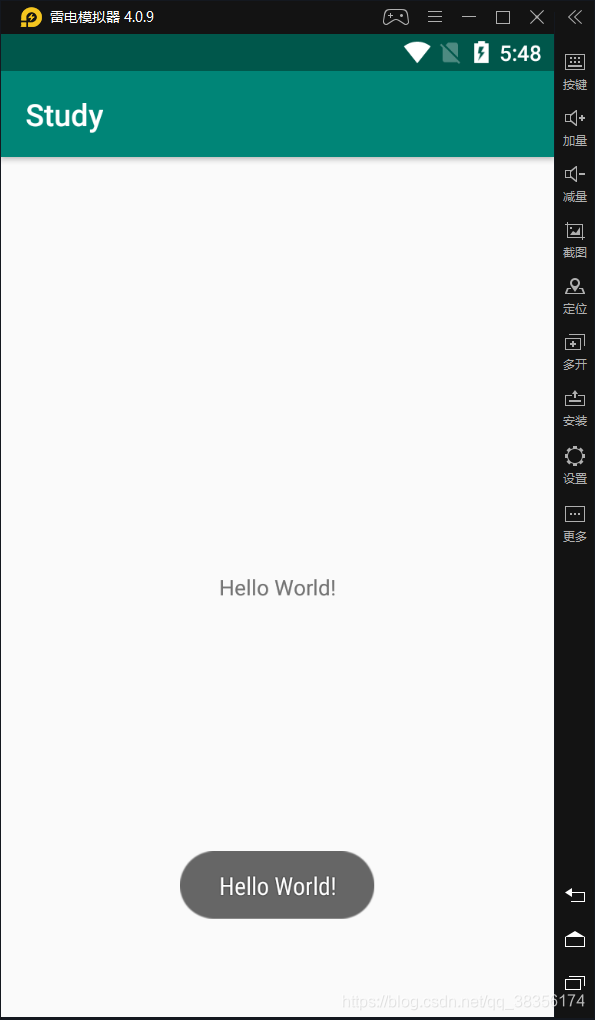
在MainActivity中并没有给TextView添加findviewbyid代码,直接可以设置单击事件。当然,这个demo只是为了熟悉apt流程,功能并不完整。
最后附上Demo的地址:https://github.com/RDSunhy/Study_APT


 被折叠的 条评论
为什么被折叠?
被折叠的 条评论
为什么被折叠?
 到【灌水乐园】发言


