


 本文详细介绍SSM(Spring、SpringMVC、MyBatis)框架整合的过程及案例实践,包括各层配置详解,如DAO层使用MyBatis进行数据访问,Service层实现业务逻辑并进行事务管理,以及Controller层如何响应前端请求。
1 SSM框架整合
1.1.1 Dao层
使用mybatis框架。创建SqlMapConfig.xml。
创建一个applicationContext-dao.xml
1、配置数据源
2、需要让spring容器管理SqlsessionFactory,单例存在。
3、把mapper的代理对象放到spring容器中。使用扫描包的方式加载mapper的代理对象。
1.1.2 Service层
1、事务管理
2、需要把service实现类对象放到spring容器中管理。
1.1.3 表现层
1、配置注解驱动
2、配置视图解析器
3、需要扫描controller
1.1.4 Web.xml
1、spring容器的配置
2、Springmvc前端控制器的配置
3、Post乱码过滤器
2 SSM框架案例模板
2.1 Dao层(mybatis)
1.使用mybatis框架,需要有maybatis核心配置文件,sqlMapConfig.xml,其他mapper.xml(配置sql语句)和mapper.java(java接口)都在mapper包下,使用spring容器扫描mapper包导入,并且管理mapper。在spring配置文件中配置。
sqlMapConfig.xml
<?xml version="1.0" encoding="UTF-8" ?>
<!DOCTYPE configuration
        PUBLIC "-//mybatis.org//DTD Config 3.0//EN"
        "http://mybatis.org/dtd/mybatis-3-config.dtd">
<configuration>

     /*为pojo(model)起别名,之后调用直接使用别名*/
    <typeAliases>
        <package name="model"/>
    </typeAliases>

</configuration>
2. mybatis操作Dao层需要数据库和会话,会话由会话工厂生成,使用spring配置文件来配置数据源,使用spring配置文件来配置sqlSessionFactory,让spring来管理sqlSessionFactory,spring管理mapper,使用扫描包的方式加载mapper代理对象,创建配置文件applicationContext-dao.xml配置数据源和sqlSessionFactory和mapper扫描
spring-dao.xml
<?xml version="1.0" encoding="UTF-8"?>
<beans xmlns="http://www.springframework.org/schema/beans"
       xmlns:context="http://www.springframework.org/schema/context" xmlns:p="http://www.springframework.org/schema/p"
       xmlns:aop="http://www.springframework.org/schema/aop" xmlns:tx="http://www.springframework.org/schema/tx"
       xmlns:xsi="http://www.w3.org/2001/XMLSchema-instance"
       xsi:schemaLocation="http://www.springframework.org/schema/beans http://www.springframework.org/schema/beans/spring-beans-4.0.xsd
   http://www.springframework.org/schema/context http://www.springframework.org/schema/context/spring-context-4.0.xsd
   http://www.springframework.org/schema/aop http://www.springframework.org/schema/aop/spring-aop-4.0.xsd http://www.springframework.org/schema/tx http://www.springframework.org/schema/tx/spring-tx-4.0.xsd
   http://www.springframework.org/schema/util http://www.springframework.org/schema/util/spring-util-4.0.xsd">

    <!--加载数据源属性-->
    <context:property-placeholder location="classpath*:db.properties"/>

    <!--配置数据源-->
    <bean id="dataBase" class="com.alibaba.druid.pool.DruidDataSource">
        <property name="url" value="${jdbc.url}"/>
        <property name="name" value="${jdbc.username}"/>
        <property name="password" value="${jdbc.password}" />
        <property name="driverClassName" value="${jdbc.driver}" />
        <property name="maxActive" value="10" />
        <property name="minIdle" value="5" />
    </bean>
    <!-- 配置sqlsessionFactory -->
    <bean id="sqlSessionFactory" class="org.mybatis.spring.SqlSessionFactoryBean">
        <property name="dataSource" ref="dataBase"/>
        <property name="configLocation" value="classpath:mybatis/SqlMapConfig.xml"/>
    </bean>

    <!-- 配置扫描包,加载mapper代理对象 -->
    <bean class="org.mybatis.spring.mapper.MapperScannerConfigurer">
        <property name="basePackage" value="dao.mapper"></property>
    </bean>


</beans>
db.properties
jdbc.driver=com.mysql.jdbc.Driver
jdbc.url=jdbc:mysql://127.0.0.1:3306/ssmtaotao
jdbc.username=root
jdbc.password=123456
log4j.properties
# Global logging configuration
#\u5728\u5f00\u53d1\u73af\u5883\u4e0b\u65e5\u5fd7\u7ea7\u522b\u8981\u8bbe\u7f6e\u6210DEBUG\uff0c\u751f\u4ea7\u73af\u5883\u8bbe\u7f6e\u6210info\u6216error
#在开发环境日志级别要设置为DEBUG,在生产环境设置成info或error
log4j.rootLogger=DEBUG, stdout
# Console output...
log4j.appender.stdout=org.apache.log4j.ConsoleAppender
log4j.appender.stdout.layout=org.apache.log4j.PatternLayout
log4j.appender.stdout.layout.ConversionPattern=%5p [%t] - %m%n
2.2 Service层(Spring)
1. spring在service层实现,spring的功能有IOC(控制反转:将对象创建交给spring实现)、DI(依赖注入:在对象创建时将属性注入到对象)、AOP(面向切面编程)。控制反转(@Component/Controller/Service/Respository)、依赖注入(@Autowired/Resource)、面向切面编程(@Aspect)可以使用注解。因为使用了注解,所以需要注解扫描。
在applicationContext-service.xml中进行配置。
spring-service.xml
<?xml version="1.0" encoding="UTF-8"?>
<beans xmlns="http://www.springframework.org/schema/beans"
       xmlns:context="http://www.springframework.org/schema/context" xmlns:p="http://www.springframework.org/schema/p"
       xmlns:aop="http://www.springframework.org/schema/aop" xmlns:tx="http://www.springframework.org/schema/tx"
       xmlns:xsi="http://www.w3.org/2001/XMLSchema-instance"
       xsi:schemaLocation="http://www.springframework.org/schema/beans http://www.springframework.org/schema/beans/spring-beans-4.0.xsd
   http://www.springframework.org/schema/context http://www.springframework.org/schema/context/spring-context-4.0.xsd
   http://www.springframework.org/schema/aop http://www.springframework.org/schema/aop/spring-aop-4.0.xsd http://www.springframework.org/schema/tx http://www.springframework.org/schema/tx/spring-tx-4.0.xsd
   http://www.springframework.org/schema/util http://www.springframework.org/schema/util/spring-util-4.0.xsd">

   <!--开启注解扫描,扫描service实现类-->
    <context:component-scan base-package="service"/>


</beans>
2. seivice层要进行事务管理,在spring中进行配置来管理事务。先配置事务管理器来管理事务,再使用事务管理器来配置建议事务,再写一个切面来使用建议事务。
spring-transaction.xml
<?xml version="1.0" encoding="UTF-8"?>
<beans xmlns="http://www.springframework.org/schema/beans"
       xmlns:context="http://www.springframework.org/schema/context" xmlns:p="http://www.springframework.org/schema/p"
       xmlns:aop="http://www.springframework.org/schema/aop" xmlns:tx="http://www.springframework.org/schema/tx"
       xmlns:xsi="http://www.w3.org/2001/XMLSchema-instance"
       xsi:schemaLocation="http://www.springframework.org/schema/beans http://www.springframework.org/schema/beans/spring-beans-4.0.xsd
   http://www.springframework.org/schema/context http://www.springframework.org/schema/context/spring-context-4.0.xsd
   http://www.springframework.org/schema/aop http://www.springframework.org/schema/aop/spring-aop-4.0.xsd http://www.springframework.org/schema/tx http://www.springframework.org/schema/tx/spring-tx-4.0.xsd
   http://www.springframework.org/schema/util http://www.springframework.org/schema/util/spring-util-4.0.xsd">

    <!-- 事务管理器 -->
    <bean id="transactionManager"
          class="org.springframework.jdbc.datasource.DataSourceTransactionManager">
        <!-- 数据源 -->
        <property name="dataSource" ref="dataBase"/>
    </bean>

    <!-- 通知 -->
    <!--事务建议-->
    <tx:advice id="txAdvice" transaction-manager="transactionManager">
        <!--事务建议属性-->
        <tx:attributes>
            <!-- 传播行为 -->
            <tx:method name="save*" propagation="REQUIRED" />
            <tx:method name="insert*" propagation="REQUIRED" />
            <tx:method name="add*" propagation="REQUIRED" />
            <tx:method name="create*" propagation="REQUIRED" />
            <tx:method name="delete*" propagation="REQUIRED" />
            <tx:method name="update*" propagation="REQUIRED" />
            <tx:method name="find*" propagation="SUPPORTS" read-only="true" />
            <tx:method name="select*" propagation="SUPPORTS" read-only="true" />
            <tx:method name="get*" propagation="SUPPORTS" read-only="true" />
        </tx:attributes>
    </tx:advice>
    <!-- 声明切面 -->
    <aop:config>
        <!--使用一个通知器:<aop:advisor/>把这个切面和tx:advice绑定在一起,表示当这个切面:执行时tx:advice定义的通知逻辑将被执行-->
        <aop:advisor advice-ref="txAdvice"
                     pointcut="execution(* service.*.*(..))" />
    </aop:config>


</beans>
2.3 表现层(web层:SpringMVC)
1. SpringMVC有四大组件,分别是前端控制器(地址接收回来之后指挥其他组件工作)、处理器映射器、处理器适配器、视图解析器。
处理器映射器和处理器适配器可以使用注解驱动<mvc:annotation-driven>加载,处理器映射器使用是使用注解(@RequestMapping)。注解扫描处理器映射器实现IOC。
视图解析器是在springMVC.xml中配置。
前端控制器是在web.xml中配置。
springMVC.xml中的配置
<?xml version="1.0" encoding="UTF-8"?>
<beans xmlns="http://www.springframework.org/schema/beans"
       xmlns:xsi="http://www.w3.org/2001/XMLSchema-instance" xmlns:p="http://www.springframework.org/schema/p"
       xmlns:context="http://www.springframework.org/schema/context"
       xmlns:mvc="http://www.springframework.org/schema/mvc"
       xsi:schemaLocation="http://www.springframework.org/schema/beans http://www.springframework.org/schema/beans/spring-beans.xsd
        http://www.springframework.org/schema/mvc http://www.springframework.org/schema/mvc/spring-mvc-4.0.xsd
        http://www.springframework.org/schema/context http://www.springframework.org/schema/context/spring-context.xsd">

    <!--注解扫描,实现IOC-->
    <context:component-scan base-package="controller"/>
    <!--注解驱动-->
    <mvc:annotation-driven/>


    <!--视图解析器-->
    <bean class="org.springframework.web.servlet.view.InternalResourceViewResolver">
        <property name="prefix" value="/WEB-INF/jsp/" />
        <property name="suffix" value=".jsp" />
    </bean>


</beans>
2.4 web.xml的配置
1. spring容器配置
2. springMVC前端控制器的配置
3. post乱码过滤器的配置
web.xml
<!DOCTYPE web-app PUBLIC
 "-//Sun Microsystems, Inc.//DTD Web Application 2.3//EN"
 "http://java.sun.com/dtd/web-app_2_3.dtd" >

<web-app xmlns:xsi="http://www.w3.org/2001/XMLSchema-instance"
         xmlns="http://xmlns.jcp.org/xml/ns/javaee"
         xsi:schemaLocation="http://xmlns.jcp.org/xml/ns/javaee
         http://xmlns.jcp.org/xml/ns/javaee/web-app_3_1.xsd"
         id="WebApp_ID" version="3.1" metadata-complete="false">

  <display-name>Archetype Created Web Application</display-name>


  <welcome-file-list>
    <welcome-file>index.html</welcome-file>
    <welcome-file>index.htm</welcome-file>
    <welcome-file>index.jsp</welcome-file>
    <welcome-file>default.html</welcome-file>
    <welcome-file>default.htm</welcome-file>
    <welcome-file>default.jsp</welcome-file>
  </welcome-file-list>
  <!-- 加载spring容器 -->
  <context-param>
    <param-name>contextConfigLocation</param-name>
    <param-value>classpath*:spring/spring-*.xml</param-value>
  </context-param>
  <listener>
    <listener-class>org.springframework.web.context.ContextLoaderListener</listener-class>
  </listener>
  <!-- 解决post乱码 -->
  <filter>
    <filter-name>CharacterEncodingFilter</filter-name>
    <filter-class>org.springframework.web.filter.CharacterEncodingFilter</filter-class>
    <init-param>
      <param-name>encoding</param-name>
      <param-value>utf-8</param-value>
    </init-param>
  </filter>
  <filter-mapping>
    <filter-name>CharacterEncodingFilter</filter-name>
    <url-pattern>/*</url-pattern>
  </filter-mapping>
  <!-- springmvc的前端控制器 -->
<!--  <servlet>
    <servlet-name>taotao-manager</servlet-name>
    <servlet-class>org.springframework.web.servlet.DispatcherServlet</servlet-class>
    <!– contextConfigLocation不是必须的, 如果不配置contextConfigLocation, springmvc的配置文件默认在:WEB-INF/servlet的name+"-servlet.xml" –>
    <init-param>
      <param-name>contextConfigLocation</param-name>
      <param-value>classpath:springMVC/springMVC.xml</param-value>
    </init-param>
    <load-on-startup>1</load-on-startup>
  </servlet>
  <servlet-mapping>
    <servlet-name>taotao-manager</servlet-name>
    <url-pattern>*.do</url-pattern>
  </servlet-mapping>-->

    <servlet>
    <servlet-name>springServlet</servlet-name>
    <servlet-class>org.springframework.web.servlet.DispatcherServlet</servlet-class>
    <init-param>
        <param-name>contextConfigLocation</param-name>
        <param-value>classpath*:springMVC/springMVC.xml</param-value>
    </init-param>
    <load-on-startup>1</load-on-startup>
    </servlet>
    <servlet-mapping>
        <servlet-name>springServlet</servlet-name>
    <url-pattern>/</url-pattern>
    </servlet-mapping>


</web-app>
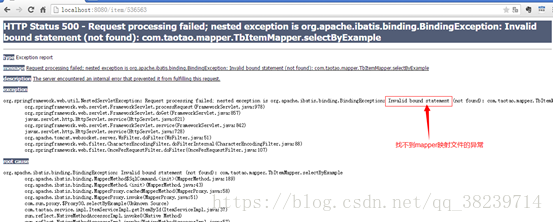
解决方法:
在pom文件中添加如下内容:
<!-- 如果不添加此节点mybatis的mapper.xml文件都会被漏掉。 -->
	<build>
		<resources>
            <resource>
                <directory>src/main/java</directory>
                <includes>
                    <include>**/*.properties</include>
                    <include>**/*.xml</include>
                </includes>
                <filtering>false</filtering>
            </resource>
        </resources>
	</build>
例子中使用这个
<resources>
<resource>
<directory>src/main/java</directory>
<includes>
<include>dao/mapper/**/*.xml</include>
</includes>
<filtering>false</filtering>
</resource>
</resources>
2.5 model,pojo类
TbItem.java
package model;


import java.util.Date;

public class TbItem {
    private Longid;

    private Stringtitle;

    private StringsellPoint;

    private Longprice;

    private Integernum;

    private Stringbarcode;

    private Stringimage;

    private Longcid;

    private Bytestatus;

    private Datecreated;

    private Dateupdated;

    public LonggetId() {
        return id;
   }

    public void setId(Longid) {
        this.id = id;
    }

    public StringgetTitle() {
        return title;
    }

    public void setTitle(Stringtitle) {
        this.title = title == null? null :title.trim();
    }

    public StringgetSellPoint() {
        return sellPoint;
    }

    public void setSellPoint(StringsellPoint) {
        this.sellPoint = sellPoint == null ? null : sellPoint.trim();
    }

    public LonggetPrice() {
        return price;
    }

    public void setPrice(Longprice) {
        this.price = price;
    }

    public IntegergetNum() {
        return num;
    }

    public void setNum(Integernum) {
        this.num = num;
    }

    public StringgetBarcode() {
        return barcode;
    }

    public void setBarcode(Stringbarcode) {
        this.barcode = barcode == null? null :barcode.trim();
    }

    public StringgetImage() {
        return image;
    }

    public void setImage(Stringimage) {
        this.image = image == null? null : image.trim();
    }

    public LonggetCid() {
        return cid;
    }

    public void setCid(Longcid) {
        this.cid = cid;
    }

    public BytegetStatus() {
        return status;
    }

    public void setStatus(Bytestatus) {
        this.status = status;
    }

    public DategetCreated() {
        return created;
    }

    public void setCreated(Datecreated) {
        this.created = created;
    }

    public DategetUpdated() {
        return updated;
    }

    public void setUpdated(Dateupdated) {
        this.updated = updated;
    }
}
2.6 mapper(dao层)
ItemsMapper.java
package dao.mapper;


import model.TbItem;

import java.util.List;

public interface ItemsMapper {
    TbItem findItemById(Long itemId) throws Exception;
    List<TbItem> findItems() throws Exception;
}


ItemsMapper.xml


<?xml version="1.0" encoding="UTF-8" ?>
<!DOCTYPEmapper
        PUBLIC"-//mybatis.org//DTD Mapper 3.0//EN"
        "http://mybatis.org/dtd/mybatis-3-mapper.dtd">


/*namespace很重要,是ItemsMapper.xml对应的ItemsMapper.java的地址 */
<mapper namespace="dao.mapper.ItemsMapper">
    <!-- 根据id查询商品信息 -->
    <select id="findItemById" parameterType="Long" resultType="tbItem">
        select * from tb_item
        <where>
            id=#{id}
        </where>
    </select>

    <!-- 查询商品信息 -->
    <select id="findItems" resultType="tbItem">
        select * from tb_item
    </select>


</mapper>
2.7 service层
ItemsService.java
package service.items;

import java.util.List;
import model.TbItem;

public interface ItemsService {
    TbItem findItemById(Long itemId)throws Exception;

    List<TbItem> findItems()throws Exception;
}

ItemsServiceImpl.java

package service.items;

import java.util.List;
import dao.mapper.ItemsMapper;
import model.TbItem;
import org.springframework.beans.factory.annotation.Autowired;
import org.springframework.stereotype.Service;

@Service
public class ItemsServiceImpl implements ItemsService {

    @Autowired
    private ItemsMapper itemsMapper;

    public TbItem findItemById(Long itemId) throws Exception {
        TbItem tbItem=itemsMapper.findItemById(itemId);
        return tbItem;
    }

    public List<TbItem> findItems() throws Exception {
        List<TbItem> tbItemList= (List<TbItem>) itemsMapper.findItems();
        return tbItemList;
    }
}
2.8 controller层
ItemsController.java
package controller.items;


import model.TbItem;
import org.springframework.beans.factory.annotation.Autowired;
import org.springframework.stereotype.Controller;
import org.springframework.web.bind.annotation.*;
import service.items.ItemsService;

import java.util.List;

/*@RequestMapping("/items")*/
@Controller
public class ItemsController {
    @Autowired
    private ItemsService itemsService;

    @RequestMapping("/findItemById.do")
    public TbItem findItemById(@PathVariable Long itemId) throws Exception {
        TbItem tbItem=itemsService.findItemById(itemId);
        return tbItem;
    }


    @RequestMapping(value = "/findItems.do",method = RequestMethod.GET)
    public List<TbItem> findItems() throws Exception {
        List<TbItem> tbItem=itemsService.findItems();
        System.out.println(tbItem);
        return tbItem;
    }


}
测试:http://localhost:8080/findItems.do


 1620
1620

 被折叠的 条评论
为什么被折叠?
被折叠的 条评论
为什么被折叠?
 到【灌水乐园】发言


