


目录
(1)activity的根布局是FrameLayout,其id为content
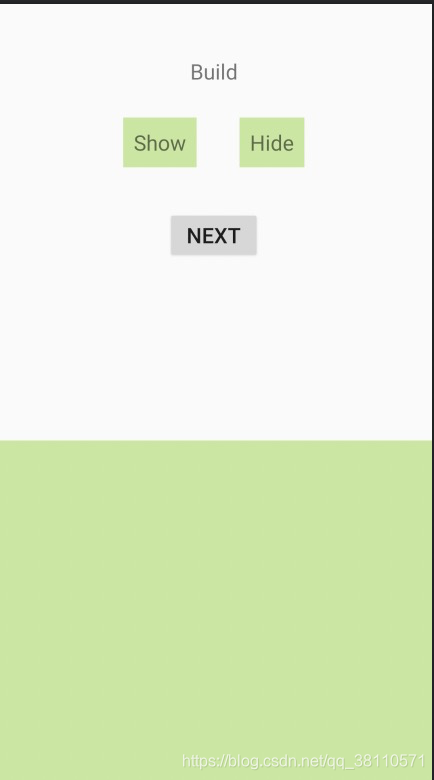
(2)在main_activity.xml中简单写下布局,预期在白绿交界处上层添加一个自定义view
2、自定义布局控件,将其添加至根布局中, 通过唯一标识添加view
1、创建一个名为layout_simple_floating.xml文件,在其中简单添加一个imageview
1、重写OnTouchListener:拖动过程为手指按下(ACTION_DOWN) --> 拖动(ACTION_MOBE) --> 手指拿开(ACTION_UP)
2、在之前build的代码中增加touchlistener的语句,回调弹出一个toast
一、目标
基于当前activity创建浮窗,生命周期与activity绑定,跳转至下一个activity将被遮盖
创建activity浮窗
二、代码实现
1、获取activity的根布局
(1)activity的根布局是FrameLayout,其id为content
FrameLayout rootLayout = getWindow().getDecorView().findViewById(android.R.id.content);(2)在main_activity.xml中简单写下布局,预期在白绿交界处上层添加一个自定义view
2、自定义布局控件,将其添加至根布局中, 通过唯一标识添加view
1、创建一个名为layout_simple_floating.xml文件,在其中简单添加一个imageview
<?xml version="1.0" encoding="utf-8"?>
<LinearLayout xmlns:android="http://schemas.android.com/apk/res/android"
    android:layout_width="wrap_content"
    android:layout_height="wrap_content">

    <ImageView
        android:id="@+id/ivFloatingImg"
        android:layout_width="wrap_content"
        android:layout_height="wrap_content"
        android:background="@drawable/floating_img" />
</LinearLayout>
2、通LayoutInflater.from(context).inflate(int layout, ViewGroup root)方法动态加载布局,并为其添加LayoutParams参数;通过addView(Viiew view)的方式将自定义布局添加到根布局中去
/**
* 分三步走
* [1]先判断当前是否已经创建了tag对应的view,如果tag为空或创建了view不做处理
* [2]获取activity根布局
* [3]自定义控件布局,将其添加至根布局中
*
* @param tag 标识view
*/
private void buildSimpleFloatingWindow(String tag) {
if (TextUtils.isEmpty(tag) || floatingMap == null || floatingMap.containsKey(tag)) {
Log.v(TAG, "tag为空或view已创建");
return;
}
FrameLayout rootLayout = getWindow().getDecorView().findViewById(android.R.id.content);
View view = LayoutInflater.from(this).inflate(R.layout.layout_simple_floating, null);
if (rootLayout == null || view == null) {
Log.v(TAG, "根布局或自定义布局为空,无法创建");
return;
}
LinearLayout.LayoutParams params = new LinearLayout.LayoutParams(ViewGroup.LayoutParams.MATCH_PARENT
, ViewGroup.LayoutParams.MATCH_PARENT);
params.gravity = Gravity.LEFT + Gravity.TOP;
params.topMargin = 1000;
params.leftMargin = 380;
view.setLayoutParams(params);
rootLayout.addView(view);
floatingMap.put(tag, view);
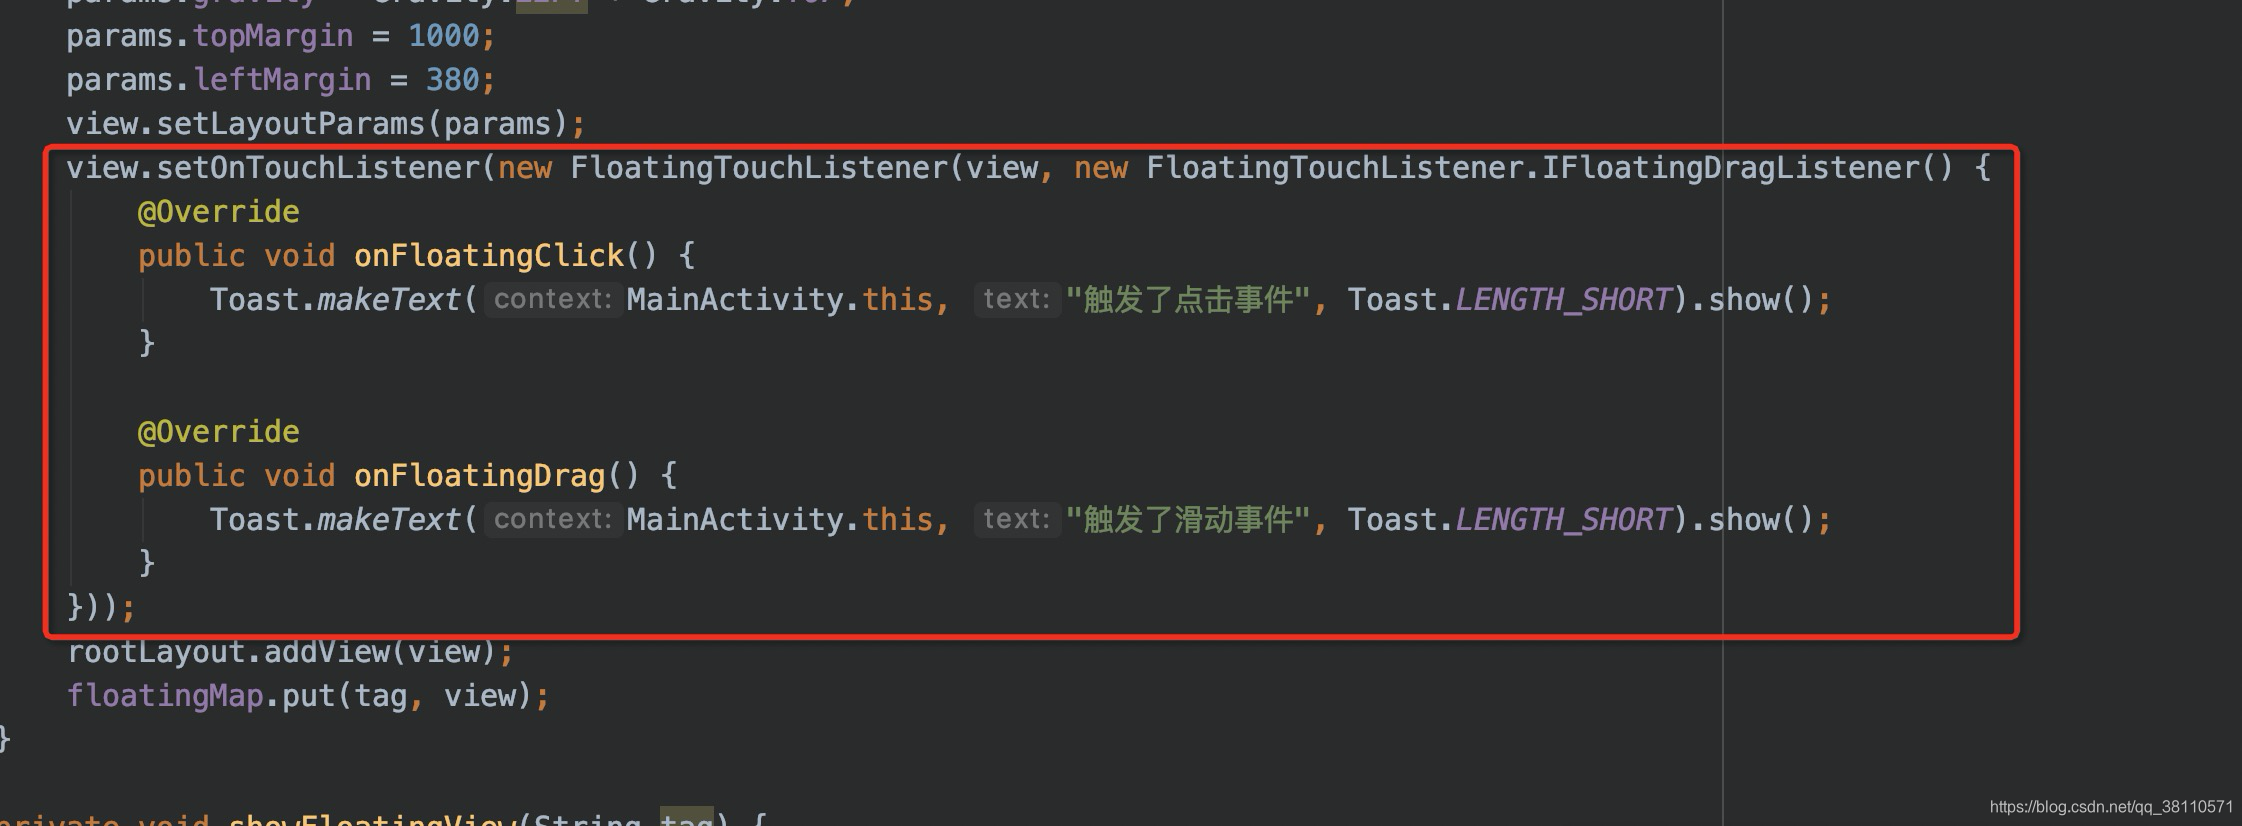
}3、添加控制其显示隐藏的方法
private void showFloatingView(String tag) {
        if (TextUtils.isEmpty(tag) || floatingMap == null || !floatingMap.containsKey(tag)) {
            Log.v(TAG, "tag为空或view未创建,无法显示");
            return;
        }
        floatingMap.get(tag).setVisibility(View.VISIBLE);
    }

    private void hideFloatingView(String tag) {
        if (TextUtils.isEmpty(tag) || floatingMap == null || !floatingMap.containsKey(tag)) {
            Log.v(TAG, "tag为空或view未创建,无法隐藏");
            return;
        }
        floatingMap.get(tag).setVisibility(View.INVISIBLE);
    }
3、对自定义布局添加滑动效果
1、重写OnTouchListener:拖动过程为手指按下(ACTION_DOWN) --> 拖动(ACTION_MOBE) --> 手指拿开(ACTION_UP)
public class FloatingTouchListener implements View.OnTouchListener {

    private static final String TAG = "FloatingTouchListener";

    private int downX;
    private int downY;
    private int downRawX;
    private int downRawY;
    private int screenWidth;
    private int screenHeight;
    private IFloatingDragListener mListener;

    public interface IFloatingDragListener {
        void onFloatingClick();

        void onFloatingDrag();
    }

    public FloatingTouchListener(View view, IFloatingDragListener listener) {
        WindowManager wm = (WindowManager) view.getContext().getSystemService(Context.WINDOW_SERVICE);
        this.screenWidth = wm.getDefaultDisplay().getWidth();
        this.screenHeight = wm.getDefaultDisplay().getHeight();
        this.mListener = listener;
    }

    @Override
    public boolean onTouch(View v, MotionEvent event) {
        if (v == null) {
            return false;
        }
        switch (event.getAction()) {
            case MotionEvent.ACTION_DOWN:
                downX = (int) event.getX();
                downY = (int) event.getY();
                downRawX = (int) event.getRawX();
                downRawY = (int) event.getRawY();
                break;
            case MotionEvent.ACTION_MOVE:
                int moveX = (int) event.getX() - downX;
                int moveY = (int) event.getY() - downY;
                int left, top, right, bottom;
                left = v.getLeft() + moveX;
                top = v.getTop() + moveY;
                right = left + v.getWidth();
                bottom = top + v.getHeight();
                //边界处理
                if (left < 0) {
                    left = 0;
                    right = left + v.getWidth();
                }
                if (right > screenWidth) {
                    right = screenWidth;
                    left = right - v.getWidth();
                }
                if (top < 0) {
                    top = 0;
                    bottom = top + v.getHeight();
                }
                if (bottom > screenHeight) {
                    bottom = screenHeight;
                    top = bottom - v.getHeight();
                }
                v.layout(left, top, right, bottom);
                break;
            case MotionEvent.ACTION_UP:
                int upX = (int) event.getRawX();
                int upY = (int) event.getRawY();
                if (Math.abs(upX - downRawX) < ViewConfiguration.get(v.getContext()).getScaledTouchSlop() &&
                        Math.abs(upY - downRawY) < ViewConfiguration.get(v.getContext()).getScaledTouchSlop()) {
                    Log.v(TAG, "点击事件");
                    if (mListener != null) {
                        mListener.onFloatingClick();
                    }
                } else {
                    Log.v(TAG, "拖动事件");
                    if (mListener != null) {
                        mListener.onFloatingDrag();
                    }
                }
                break;
        }
        return true;
    }
}
2、在之前build的代码中增加touchlistener的语句,回调弹出一个toast
三、效果展示
创建activity浮窗,控件可滑动
附上demo地址: FloatingWinowDemo.zip_如何将activity制作为固定浮窗-Android文档类资源-优快云下载


 303
303

 被折叠的 条评论
为什么被折叠?
被折叠的 条评论
为什么被折叠?
 到【灌水乐园】发言


