


 本文详细介绍了SSH框架的搭建与工作原理。提供了Struts2、Spring及Hibernate的jar包下载链接,解析了jar包结构,阐述了工程的三层架构。还介绍了多个配置文件的作用,最后说明了SSH框架从初始化、接收请求到响应用户的完整工作流程。
SSH框架(Struts2+Spring+Hibernate)整合工作原理
这里是我个人搭建项目的一些工具和经验,希望对大家有所帮助
一.Struts2、Spring及依赖包、Hibernate jar包下载
链接如下:
https://pan.baidu.com/s/1RVHTvcyhgcNvXLHRXElb7w hibernate3-jar包 提取码: luqp。
https://pan.baidu.com/s/1eQzjTGWnuAfySfw1T-cdUA spring-3.2.0-jar包 提取码: 71p1
https://pan.baidu.com/s/1kmlofREofckAy8LBOCgyOQ struts-2.3.2-jar包 提取码: wlti
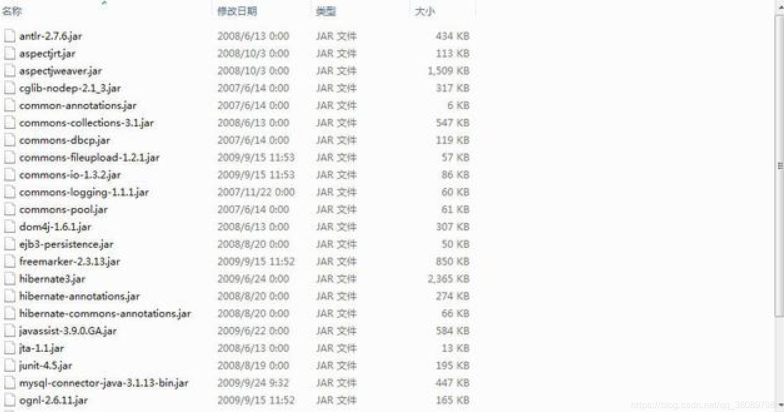
二.jar包结构及解析
jar包导入之后应该放在/WEB-INF/lib文件夹下。
我们的SSH工程jar包结构如下(具体作用解析请访问下面链接):
转载于:https://www.cnblogs.com/ys-wuhan/p/5800247.html
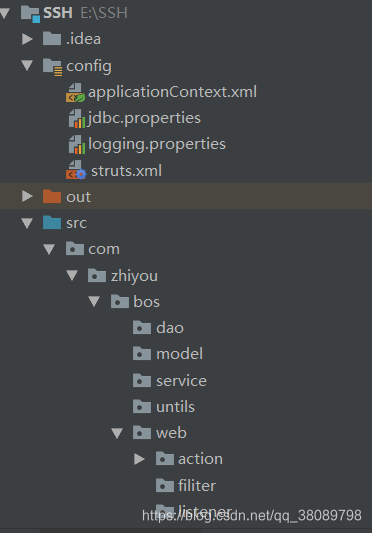
三.工程结构
接下来我们开始创建我们的工程,结构如下:
SSH:Struts(表示层)+Spring(业务层)+Hibernate(持久层)
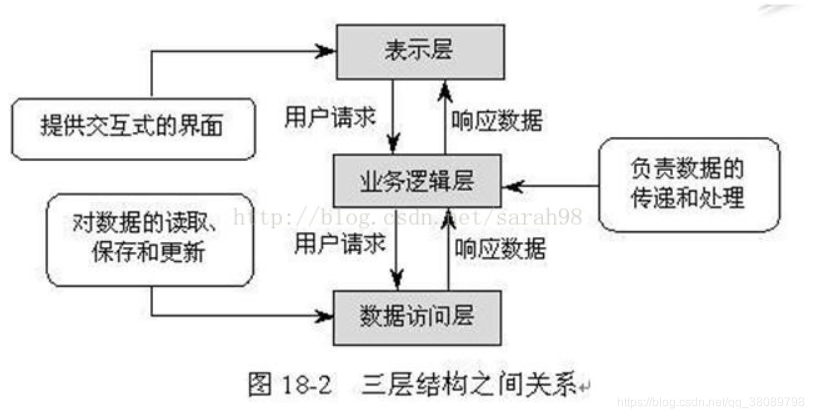
在项目开发的过程中,有时把整个项目分为三层架构,其中包括:
1、表示层(Web)、
2、业务逻辑层(Service)
3、数据访问层(Dao)。
三层的作用分别如下:
表示层(Web):为用户提供交互操作界面,这一点不论是对于Web还是WinForm都是如此,就是用户
界面操作。
业务逻辑层(Service):负责关键业务的处理和数据的传递。复杂的逻辑判断和涉及到数据库的数据验证都需要在此做出处理。根据传入的值返回用户想得到的值,或者处理相关的逻辑。
数据访问层(Dao):负责数据库数据的访问。主要为业务逻辑层提供数据,根据传入的值来操作数据库,增、删、改、查。
具体原理如下图:
当然其中还包括一些工具类和过滤器,这里我就不多说了。。
四.配置文件
1.applicationContext.xml
<?xml version="1.0" encoding="UTF-8"?>
<beans xmlns="http://www.springframework.org/schema/beans"
    xmlns:xsi="http://www.w3.org/2001/XMLSchema-instance"
    xmlns:aop="http://www.springframework.org/schema/aop"
    xmlns:tx="http://www.springframework.org/schema/tx"
    xmlns:context="http://www.springframework.org/schema/context"
    xsi:schemaLocation="http://www.springframework.org/schema/beans
                        http://www.springframework.org/schema/beans/spring-beans.xsd
                        http://www.springframework.org/schema/context
                        http://www.springframework.org/schema/context/spring-context.xsd
                        http://www.springframework.org/schema/aop
                        http://www.springframework.org/schema/aop/spring-aop.xsd
                        http://www.springframework.org/schema/tx
                        http://www.springframework.org/schema/tx/spring-tx.xsd">
    <bean id="test" class="com.zhiyou.bos.web.action.TestAction"></bean>

    <!--spring整合hibernate步骤-->

    <!--加载jdbc属性文件-->
    <context:property-placeholder location="classpath:jdbc.properties"/>

    <!--数据源-->
    <bean id="dataSource" class="com.mchange.v2.c3p0.ComboPooledDataSource">
        <property name="driverClass" value="${driverClass}"></property>
        <property name="jdbcUrl" value="${jdbcUrl}"></property>
        <property name="user" value="${user}"></property>
        <property name="password" value="${password}"></property>
    </bean>

    <!--Spring框架用于整合hibernate的工厂bean:配置sessionFactory-->
    <bean id="sessionFactory" class="org.springframework.orm.hibernate3.LocalSessionFactoryBean">
        <!--数据源-->
        <property name="dataSource" ref="dataSource"/>
        <!--hibernate其他配置-->
        <property name="hibernateProperties">
            <props>
                <prop key="hibernate.show_sql">true</prop>
                <prop key="hibernate.format_sql">true</prop>
                <prop key="hibernate.hbm2ddl.auto">update</prop>
                <prop key="hibernate.dialect">org.hibernate.dialect.MySQL5Dialect</prop>
            </props>
        </property>
        <!--hibernate映射文件-->
        <property name="mappingDirectoryLocations">
            <list>
                <!--<value>classpath:com/zhiyou/bos/model</value>-->
            </list>
        </property>
    </bean>

    <!--事务管理器-->
    <bean id="txManager" class="org.springframework.orm.hibernate3.HibernateTransactionManager">
        <property name="sessionFactory" ref="sessionFactory"></property>
    </bean>

    <!--组件扫描-解释注解,spring和下面的<context:annotation-config/>一起解释注解-->
    <context:component-scan base-package="com.zhiyou.bos"/>

    <!--引用注释解析器,可有可无-->
    <context:annotation-config/>

    <!--开启事务注解-->
    <tx:annotation-driven/>
</beans>
applicationContent.xml配置文件主要用于spring的注入包括数据库连接详细信息,以及需要ioc的类及其注入实例.
2.jdbc.properties
driverClass=com.mysql.jdbc.Driver<!--数据库驱动-->
jdbcUrl=jdbc:mysql:///bos<!--连接数据库名称-->
user=root<!--数据库用户名-->
password=123456<!--数据库用户密码-->
jdbc.properties配置文件用于加载数据库信息,对应路径在上述applicationContext.xml中的加载部分

3.logging.properties
handlers = org.apache.juli.FileHandler, java.util.logging.ConsoleHandler

org.apache.juli.FileHandler.level = FINE
org.apache.juli.FileHandler.directory = ${catalina.base}/logs
org.apache.juli.FileHandler.prefix = error-debug.

java.util.logging.ConsoleHandler.level = FINE
java.util.logging.ConsoleHandler.formatter = java.util.logging.SimpleFormatter
logging.properties配置文件主要是Tomcat日志系统,通过设定日志级别来显示更多程序日志信息,方便对程序执行过程,结果以及错误有一个更好的了解。具体包括如下:
①level:对应日志级别
②directory:日志的输出位置
③prefix:日志输出前缀,后面跟日期信息(yyyy-MM-dd)
④ConsoleHandler:控制台输出日志
4.struts.xml
<?xml version="1.0" encoding="UTF-8"?>
<!DOCTYPE struts PUBLIC
        "-//Apache Software Foundation//DTD Struts Configuation 2.3//EN"
        "http://struts.apache.org/dtds/struts-2.3.dtd">
<struts>

<!--注意把config文件夹 Mark Directory as -> Resources Root 配置成资源根路径才会打包到src的class文件-->


    <!--调试模式配置-->
    <constant name="struts.devMode" value="true"></constant>

    <package name="p1" extends="struts-default">
        <!--通过路径对应格式来访问jsp: localhost:8080/page_order_list对应INF下面的路径jsp-->
        <action name="pages_*_*" class="com.opensymphony.xwork2.ActionSupport"><!--这个类默认执行excute()返回success-->
            <result name="success">/WEB-INF/pages/{1}/{2}.jsp</result>
        </action>

        <action name="test" class="test" method="test">
            <result name="success">pages_user_list</result>
        </action>
    </package>
</struts>
struts.xml配置文件作用:
Struts是MVC的一种实现,它将 Servlet和 JSP 标记(属于 J2EE 规范)用作实现的一部分。
Struts的核心是ActionSevlet,ActionSevlet的核心是struts.xml。(这个xml文件作为ActionServlet的配置文件)
struts.xml解析:
(1).package作用形同Java中的包,用来区分模块。
(2).namespace决定了action的访问路径,默认为"",此时可以接受所有路径的action。namespace可以写成"/","/xxx",或者"/xxx/yyy",对应的action访问路径为/index.jsp,/xxx/index.jsp,/xxx/yyy/index.jsp。比如上述例子的路径就是WEB-INF/pages/{文件夹名}/{jsp名}.jsp。
5.Web.xml
<?xml version="1.0" encoding="UTF-8"?>
<web-app xmlns="http://xmlns.jcp.org/xml/ns/javaee"
xmlns:xsi="http://www.w3.org/2001/XMLSchema-instance"
xsi:schemaLocation="http://xmlns.jcp.org/xml/ns/javaee http://xmlns.jcp.org/xml/ns/javaee/web-app_3_1.xsd"
version="3.1">
<!--加载spring的配置文件-->
<!--配置文件路径-->
<context-param>
<param-name>contextConfigLocation</param-name>
<param-value>classpath:applicationContext.xml</param-value>
</context-param>
<!--启动监听器,加载applicationContext.xml配置信息-->
<listener>
<listener-class>org.springframework.web.context.ContextLoaderListener</listener-class>
</listener>
<!--配置Struts的拦截器-->
<filter>
<filter-name>strut2</filter-name>
<filter-class>org.apache.struts2.dispatcher.ng.filter.StrutsPrepareAndExecuteFilter</filter-class>
</filter>
<!--Struts对应映射-->
<filter-mapping>
<filter-name>strut2</filter-name>
<url-pattern>/*</url-pattern>
<!--配置请求和内部跳转都会经过Struts过滤器,默认只有请求拦截器-->
<dispatcher>REQUEST</dispatcher>
<dispatcher>FORWARD</dispatcher>
</filter-mapping>
<!--<!–配置字符编码过滤器–>-->
<!--<filter>-->
<!--<filter-name>characterEncodingFilter</filter-name>-->
<!--<!–只能解决POST中文乱码问题。针对Tomcat8一下的版本字符中文乱码问题–>-->
<!--<filter-class>org.springframework.web.filter.CharacterEncodingFilter</filter-class>-->
<!--<init-param>-->
<!--<param-name>encoding</param-name>-->
<!--<param-value>utf-8</param-value>-->
<!--</init-param>-->
<!--</filter>-->
<!--<filter-mapping>-->
<!--<filter-name>characterEncodingFilter</filter-name>-->
<!--<url-pattern>/*</url-pattern>-->
<!--</filter-mapping>-->
</web-app>
Web.xml配置文件作用作用:一个web中可以没有web.xml文件,也就是说,web.xml文件并不是web工程必须的。
web.xml文件是用来初始化配置信息:比如Welcome页面、servlet、servlet-mapping、filter、listener、启动加载级别等。
当你的web工程没用到这些时,你可以不用web.xml文件来配置你的Application。
五.SSH框架工作原理
1、初始化:struts框架的总控制器ActionServlet是一个Servlet,它在web.xml中配置成自动启动的Servlet,在启动时总控制器会读取配置文件(struts-config.xml)的配置信息,为struts中不同的模块初始化相应的对象。(面向对象思想)。例如:
当Tomcat收到client访问请求,比如http://localhost:8080/Struts2_01_Introduction/Hello_struts,会访问Struts2_01_Introduction项目下的web.xml
2、发送请求:用户提交表单或通过URL向WEB服务器提交请求,请求的数据用HTTP协议传给web服务器。
3、form填充:struts的总控制器ActionServlet在用户提交请求时将数据放到对应的form对象中的成员变量中。
4、派发请求:控制器根据配置信息对象ActionConfig将请求派发到具体的Action,对应的formBean一并传给这个Action中的excute()方法。
5、处理业务:Action一般只包含一个excute()方法,它负责执行相应的业务逻辑(调用其它的业务模块)完毕后返回一个ActionForward对象。服务器通过ActionForward对象进行转发工作。
6、返回响应:Action将业务处理的不同结果返回一个目标响应对象给总控制器。
7、查找响应:总控制器根据Action处理业务返回的目标响应对象,找到对应的资源对象,一般情况下为jsp页面。
8、响应用户:目标响应对象将结果传递给资源对象,将结果展现给用户。


 3万+
3万+

 被折叠的 条评论
为什么被折叠?
被折叠的 条评论
为什么被折叠?
 到【灌水乐园】发言


