


 本文深入解析AdaBoost算法的实现过程,包括弱分类器的选择、权重更新及最终分类器的组合策略。通过具体代码示例,展示如何使用决策树桩作为弱分类器,逐步提升模型性能。
link
创建一个Adaboost_Demonstration类:
初始化参数:
学习率,权重=1/N
class Adaboost_Demonstration:
	def __init__(self, X, y, learning_rate=1.):
        """
        输入的X为N*2矩阵, y为一维向量, y的值只能取1或-1
        :param X: 数据点
        :param y: 数据点标记
        """
        self.X = X
        self.y = y
        # 给每个弱分类器一个衰减, 避免过拟合
        self.learning_rate = learning_rate
        # 样本的个数
        self.num_samples = len(self.X)
        # 初始化数据样本的权重
        self.sample_weight = np.full(self.num_samples, 1 / self.num_samples)
        # python list用来存储所有的弱分类器对象
        self.classifiers = []
        # 储存在每一步的错误率
        self.errors_list = []
        # 定义弱分类器, 这里我们直接调用sklearn的决策树, max_depth=1代表着这是一个一层决策树, 也就是决策树桩
        self.alphas = []
- 将构建的弱分类器对象,和弱分类器的权重append到列表
- 预测:每次预测的时候,将所有弱分类器的预测结果*权重,
- 结合策略:再对结果用sign取符号或者取平均
	def predict(self, data=None, labels=None, reduction="sign"):
        """
        预测数据点的分类
        :param reduction: "sign"对弱分类的线性加权组合取符号, "mean"取平均
        """
        if data is None:
            data = self.X
            labels = self.y
        # 计算弱分类器线性加权组合的结果
        predictions = np.zeros([len(data)]).astype("float")
        for classifier, alpha in zip(self.classifiers, self.alphas):
            predictions += alpha * classifier.predict(data)
        # 对结果取符号
        if reduction == "sign":
            predictions = np.sign(predictions)
        # 对结果求均值
        elif reduction == "mean":
            predictions /= len(self.classifiers)
        # 如果可以的话获取f1 score
        if labels is not None and reduction == "sign":
            f1 = f1_score(predictions, labels)
            return predictions, f1
        else:
            return predictions
定义弱分类器,直接调用sklearn的决策树,实例化对象之后预测结果
- 再计算错误率error_rate:预测10个结果,猜错了4个,则错误率为0.4
error_rate = np.mean(np.average((predictions != self.y), weights=self.sample_weight))
- 计算alpha,即当前弱分类器的权重:
alpha = self.learning_rate * (np.log((1 - error_rate) / error_rate)) / 2
- 计算W_t+1,即下一个弱分类器的权重:
# 计算t+1的权重
self.sample_weight *= np.exp(-alpha * self.y * predictions)
# 归一化, 归一化因子为Z: sum(self.sample_weight)
self.sample_weight /= np.sum(self.sample_weight)
其中归一化因子Z:

#定义决策树
def __next__(self, reduction="mean", plot=True, plot_mode="2d"):
classifier = DecisionTreeClassifier(max_depth=1)
# 用弱分类器拟合数据
classifier.fit(self.X, self.y, sample_weight=self.sample_weight)
# 得到弱分类器对数据的推断, 也就是h(x)
predictions = classifier.predict(self.X)
# 计算错误率
error_rate = np.mean(np.average((predictions != self.y), weights=self.sample_weight))
# 计算alpha
alpha = self.learning_rate * (np.log((1 - error_rate) / error_rate)) / 2
# 计算t+1的权重
self.sample_weight *= np.exp(-alpha * self.y * predictions)
# 归一化, 归一化因子为Z: sum(self.sample_weight)
self.sample_weight /= np.sum(self.sample_weight)
# 记录当前弱分类器对象
self.classifiers.append(classifier)
# 记录当前弱分类器权重
self.alphas.append(alpha)
# 计算f1 score
_, f1 = self.predict()
# 画图
if plot:
return self.contour_plot(
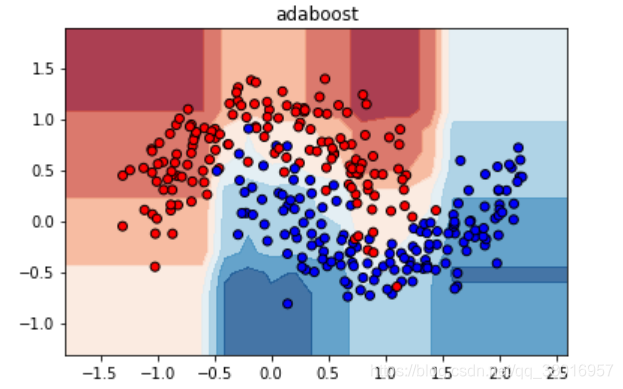
title="adaboost step " + str(len(self.classifiers)) + " f1 score: {:.2f}".format(f1), mode=plot_mode)
else:
return f1
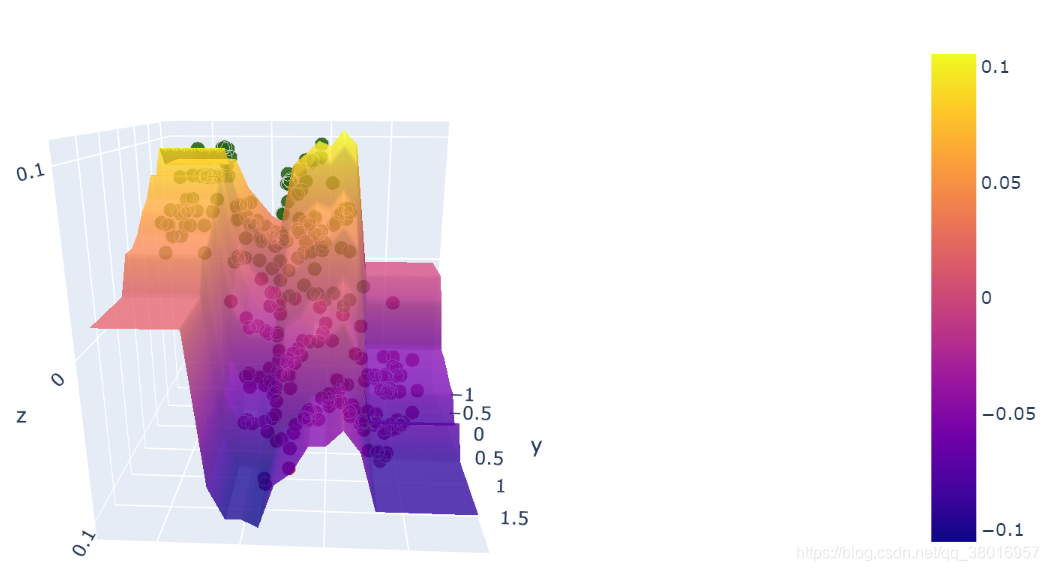
if __name__ == '__main__':
    # 测试
    X, y = make_moons(n_samples=300, noise=0.2, random_state=3)
    y[np.where(y == 0)] = -1
    model = Adaboost_Demonstration(X, y)
    for i in range(100):
        model.__next__(plot=False)
    model.contour_plot(mode="3d")


 897
897

 被折叠的 条评论
为什么被折叠?
被折叠的 条评论
为什么被折叠?
 到【灌水乐园】发言


