


介绍
Spring Boot中有一种非常解耦的扩展机制:Spring Factories。这种扩展机制实际上是仿照 Java 中的 SPI 扩展机制来实现的。它在META-INF/spring.factories文件中配置接口的实现类名称,然后在程序中读取这些配置文件并实例化。 这种自定义的 SPI 机制正是 Spring Boot Starter 实现的基础。
什么是SPI机制
SPI 的全名为Service Provider Interface。大多数开发人员可能不熟悉,因为这个是针对厂商或者插件的。在java.util.ServiceLoader的文档里有比较详细的介绍。
简单的总结一下 java SPI 机制的思想。我们系统里抽象的各个模块,往往有很多不同的实现方案,比如日志模块的方案,xml 解析模块的方案、jdbc 模块的方案等等。在面向的对象的设计里,我们一般推荐模块之间基于接口编程,模块之间不对实现类进行硬编码。一旦代码里涉及具体的实现类,就违反了可拔插的原则,如果需要替换一种实现,就需要修改代码。为了实现在模块装配的时候不在程序里动态指明实现类,这就需要一种服务发现机制。
java SPI 就是提供这样的一个机制:为某个接口寻找服务实现的机制。有点类似 IOC 的思想,就是将装配的控制权移到程序之外,在模块化设计中这个机制尤其重要。
自动装配
在 spring.factories 文件中,我们常常可以看到一些自动配置(AutoConfiguration)相关的类名,因此产生了一个疑问:“明明自动配置的类已经打上了@Configuration的注解,为什么还要写 spring.factories 文件?”
本文涉及spring-boot版本为2.3.9.RELEASE
这个话题需要从@SpringBootApplication注解开始说起。
查看@SpringBootApplication源码,我们能看到继承的以下注解:
@Target({ElementType.TYPE})
@Retention(RetentionPolicy.RUNTIME)
@Documented
@Inherited
@SpringBootConfiguration
@EnableAutoConfiguration
@ComponentScan(
    excludeFilters = {@Filter(
    type = FilterType.CUSTOM,
    classes = {TypeExcludeFilter.class}
), @Filter(
    type = FilterType.CUSTOM,
    classes = {AutoConfigurationExcludeFilter.class}
)}
)
public @interface SpringBootApplication {
// ......
}
其中比较重要的是@EnableAutoConfiguration和@ComponentScan两个注解。@ComponentScan注解的作用是扫描@SpringBootApplication所在的 Application 类(即spring-boot项目的入口类)所在的包(basepackage)下所有的@component注解(或拓展了@component的注解)标记的 bean,并注册到 spring 容器中。
看到这里也许会有个疑问,在spring-boot项目中pom文件里面添加的依赖中的bean(spring-boot项目外的bean)是如何注册到spring-boot项目的spring容器中的呢?
这就需要讨论@EnableAutoConfiguration的作用。查看@EnableAutoConfiguration源码:
@Target({ElementType.TYPE})
@Retention(RetentionPolicy.RUNTIME)
@Documented
@Inherited
@AutoConfigurationPackage
@Import({AutoConfigurationImportSelector.class})
public @interface EnableAutoConfiguration {
    String ENABLED_OVERRIDE_PROPERTY = "spring.boot.enableautoconfiguration";

    Class<?>[] exclude() default {};

    String[] excludeName() default {};
}
其中比较关键的代码是@Import(AutoConfigurationImportSelector.class),而AutoConfigurationImportSelector.class做了什么呢?查看其源码:
public class AutoConfigurationImportSelector implements DeferredImportSelector, BeanClassLoaderAware, ResourceLoaderAware, BeanFactoryAware, EnvironmentAware, Ordered {

    public String[] selectImports(AnnotationMetadata annotationMetadata) {
        if (!this.isEnabled(annotationMetadata)) {
            return NO_IMPORTS;
        } else {
            // 获取了spring-boot项目中需要自动配置的项(bean)
            AutoConfigurationImportSelector.AutoConfigurationEntry autoConfigurationEntry =
              this.getAutoConfigurationEntry(annotationMetadata);
            return StringUtils.toStringArray(autoConfigurationEntry.getConfigurations());
        }
    }

}
其中,getAutoConfigurationEntry()方法获取了spring-boot项目中需要自动配置的项(bean),查看其源码:
protected AutoConfigurationImportSelector.AutoConfigurationEntry getAutoConfigurationEntry(AnnotationMetadata annotationMetadata) {

  if (!this.isEnabled(annotationMetadata)) {
    return EMPTY_ENTRY;
  } else {
    AnnotationAttributes attributes = this.getAttributes(annotationMetadata);
    // 获取需要加载的bean
    List<String> configurations = this.getCandidateConfigurations(annotationMetadata, attributes);
    configurations = this.removeDuplicates(configurations);
    // 获取不需要加载的 bean
    Set<String> exclusions = this.getExclusions(annotationMetadata, attributes);
    this.checkExcludedClasses(configurations, exclusions);
    configurations.removeAll(exclusions);
    configurations = this.getConfigurationClassFilter().filter(configurations);
    this.fireAutoConfigurationImportEvents(configurations, exclusions);
    return new AutoConfigurationImportSelector.AutoConfigurationEntry(configurations, exclusions);
  }
}
其中最重要的部分为getCandidateConfigurations()方法,它获取了所有可能参与到项目的候选配置 bean,与之对应的,getExclusions获取了所有不需要加载的配置 bean。进一步查看getCandidateConfigurations方法的源码:
protected List<String> getCandidateConfigurations(
  AnnotationMetadata metadata, AnnotationAttributes attributes) {
  List<String> configurations = SpringFactoriesLoader.loadFactoryNames(this.getSpringFactoriesLoaderFactoryClass(), this.getBeanClassLoader());
  Assert.notEmpty(configurations, "No auto configuration classes found in META-INF/spring.factories. If you are using a custom packaging, make sure that file is correct.");
  return configurations;
}
这个方法的具体实现为:读取 spring-boot 项目的 classpath 下 META-INF/spring.factories 的内容。其实现原理就是我们前面说的【Spring Factories 实现原理】。
getCandidateConfigurations方法会获取需要自动配置的类,除去上面讲到的需要排除(exclude)的配置类,其他类将会注册到spring-boot 项目的 spring容器中。
看到这里,想必已经了解@EnableAutoConfiguration注解的工作原理,回到最初的话题,“为什么要写 spring.factories文件?”
结合前面提出的疑问——“在 spring-boot 项目中 pom 文件里面添加的依赖中的 bean 是如何注册到 spring-boot 项目的 spring 容器中的呢?”,不难得出 spring.factories 文件是帮助 spring-boot 项目包以外的 bean(即在pom文件中添加依赖中的bean)注册到 spring-boot 项目的 spring 容器中。由于@ComponentScan注解只能扫描 spring-boot 项目包内的 bean 并注册到 spring 容器中,因此需要@EnableAutoConfiguration注解来注册项目包外的 bean。而 spring.factories 文件,则是用来记录项目包外需要注册的 bean 类名。
Spring Factories 实现原理
spring-core 包里定义了SpringFactoriesLoader类,这个类实现了:检索META-INF/spring.factories文件,并获取指定接口的配置的功能,这个类中定义了两个对外的方法:
loadFactories:根据接口类获取其实现类的实例,这个方法返回的是对象列表。
public static <T> List<T> loadFactories(Class<T> factoryType, @Nullable ClassLoader classLoader) {
  Assert.notNull(factoryType, "'factoryType' must not be null");
  ClassLoader classLoaderToUse = classLoader;
  if (classLoader == null) {
    classLoaderToUse = SpringFactoriesLoader.class.getClassLoader();
  }

  // 根据接口获取其接口类的名称,这个方法返回的是类名的列表
  List<String> factoryImplementationNames = loadFactoryNames(factoryType, classLoaderToUse);
  if (logger.isTraceEnabled()) {
    logger.trace("Loaded [" + factoryType.getName() + "] names: " + factoryImplementationNames);
  }

  List<T> result = new ArrayList(factoryImplementationNames.size());
  Iterator var5 = factoryImplementationNames.iterator();

  while(var5.hasNext()) {
    String factoryImplementationName = (String)var5.next();
    result.add(instantiateFactory(factoryImplementationName, factoryType, classLoaderToUse));
  }

  AnnotationAwareOrderComparator.sort(result);
  return result;
}
loadFactoryNames:根据接口获取其接口类的名称,这个方法返回的是类名的列表。
public static List<String> loadFactoryNames(Class<?> factoryType, @Nullable ClassLoader classLoader) {
  String factoryTypeName = factoryType.getName();
  return (List)loadSpringFactories(classLoader).getOrDefault(factoryTypeName, Collections.emptyList());
}

private static Map<String, List<String>> loadSpringFactories(@Nullable ClassLoader classLoader) {
  MultiValueMap<String, String> result = (MultiValueMap)cache.get(classLoader);
  if (result != null) {
    return result;
  } else {
    try {
      // 读取配置文件 META-INF/spring.factories
      Enumeration<URL> urls = classLoader != null ? classLoader.getResources("META-INF/spring.factories") : ClassLoader.getSystemResources("META-INF/spring.factories");
      LinkedMultiValueMap result = new LinkedMultiValueMap();

      while(urls.hasMoreElements()) {
        URL url = (URL)urls.nextElement();
        UrlResource resource = new UrlResource(url);
        Properties properties = PropertiesLoaderUtils.loadProperties(resource);
        Iterator var6 = properties.entrySet().iterator();

        while(var6.hasNext()) {
          Entry<?, ?> entry = (Entry)var6.next();
          String factoryTypeName = ((String)entry.getKey()).trim();
          String[] var9 = StringUtils.commaDelimitedListToStringArray((String)entry.getValue());
          int var10 = var9.length;

          for(int var11 = 0; var11 < var10; ++var11) {
            String factoryImplementationName = var9[var11];
            result.add(factoryTypeName, factoryImplementationName.trim());
          }
        }
      }

      cache.put(classLoader, result);
      return result;
    } catch (IOException var13) {
      throw new IllegalArgumentException("Unable to load factories from location [META-INF/spring.factories]", var13);
    }
  }
}
上面的两个方法的关键都是从指定的 ClassLoader 中获取 spring.factories 文件,并解析得到类名列表。
从代码中我们可以知道,在这个方法中会遍历整个 ClassLoader 中所有jar包下的 spring.factories 文件。也就是说我们可以在自己的jar中配置 spring.factories 文件,不会影响到其它地方的配置,也不会被别人的配置覆盖。
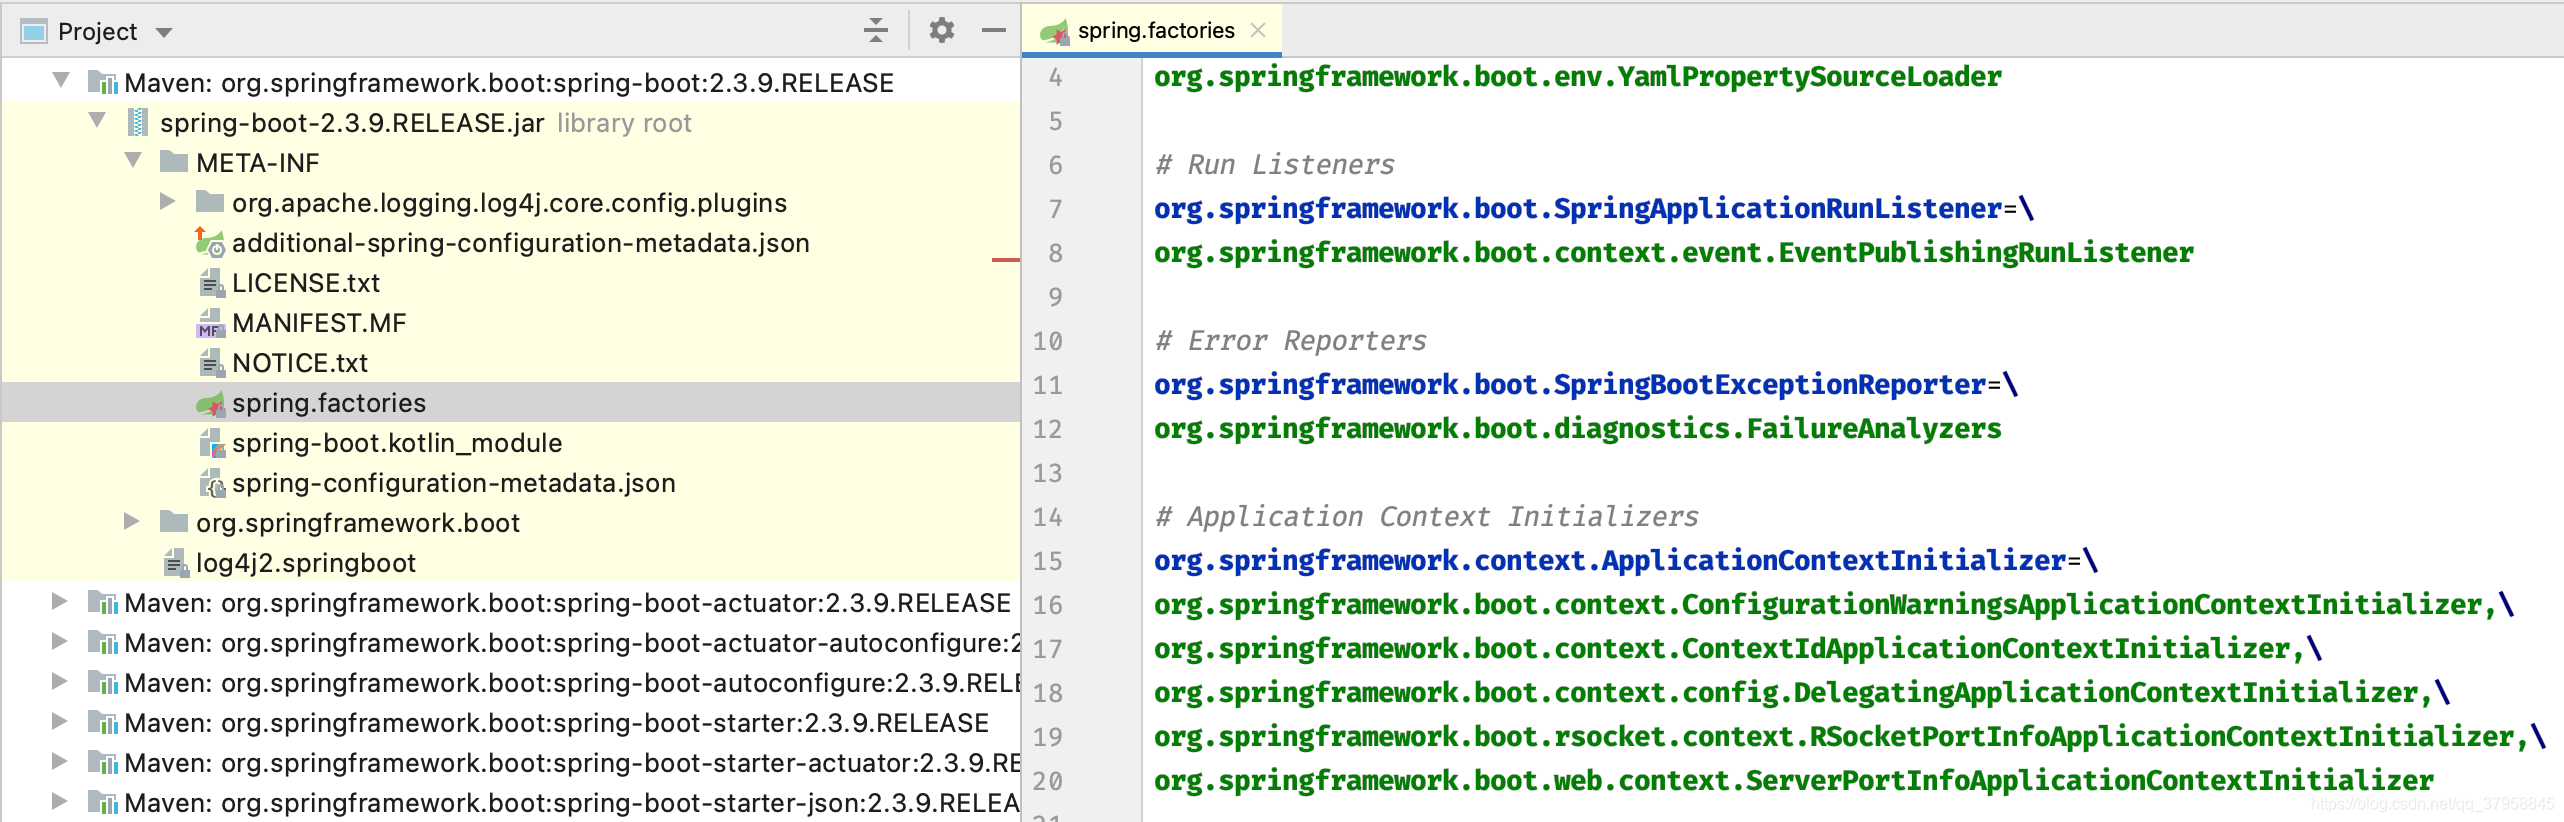
spring.factories 的是通过Properties解析得到的,所以文件内容的配置形式如下所示:
org.springframework.boot.xxxx=org.springframework.boot.xxx.classname
如果一个接口希望配置多个实现类,可以使用”,“进行分割。SpringBoot 中的部分 spring.factories 文件,如下图所示:


 7076
7076

 被折叠的 条评论
为什么被折叠?
被折叠的 条评论
为什么被折叠?
 到【灌水乐园】发言


