


一.spring和javaweb的整合
1.如果spring和javaweb没有整合,我们怎么处理?
提一个需求: 用户登录的需求
-
模拟用户登录, 编写dao层编写service,编写我们的web层. 用户直接访问web层即可
实现步骤:
1.导入jar
<?xml version="1.0" encoding="UTF-8"?>
<project xmlns="http://maven.apache.org/POM/4.0.0"
         xmlns:xsi="http://www.w3.org/2001/XMLSchema-instance"
         xsi:schemaLocation="http://maven.apache.org/POM/4.0.0 http://maven.apache.org/xsd/maven-4.0.0.xsd">
    <modelVersion>4.0.0</modelVersion>

    <groupId>com.itheima</groupId>
    <artifactId>day19_spring02</artifactId>
    <version>1.0-SNAPSHOT</version>
    <packaging>war</packaging>
    <dependencies>
        <!--spring-context的jar-->
        <dependency>
            <groupId>org.springframework</groupId>
            <artifactId>spring-context</artifactId>
            <version>4.2.4.RELEASE</version>
        </dependency>
        <!--spring整合web项目的jar包-->
        <dependency>
            <groupId>org.springframework</groupId>
            <artifactId>spring-web</artifactId>
            <version>4.2.4.RELEASE</version>
        </dependency>
        <!--junit测试用的jar-->
        <dependency>
            <groupId>junit</groupId>
            <artifactId>junit</artifactId>
            <version>4.12</version>
        </dependency>
        <!--servlet相关的3个jar包-->
        <dependency>
            <groupId>jstl</groupId>
            <artifactId>jstl</artifactId>
            <version>1.2</version>
            <scope>provided</scope>
        </dependency>

        <dependency>
            <groupId>javax.servlet</groupId>
            <artifactId>javax.servlet-api</artifactId>
            <version>3.1.0</version>
            <scope>provided</scope>
        </dependency>
        <dependency>
            <groupId>javax.servlet.jsp</groupId>
            <artifactId>javax.servlet.jsp-api</artifactId>
            <version>2.2.1</version>
            <scope>provided</scope>
        </dependency>
        <!--日志包-->
        <dependency>
            <groupId>org.slf4j</groupId>
            <artifactId>slf4j-log4j12</artifactId>
            <version>1.6.6</version>
        </dependency>
    </dependencies>

    <build>
        <plugins>
            <!--tomcat的插件-->
            <plugin>
                <groupId>org.apache.tomcat.maven</groupId>
                <artifactId>tomcat7-maven-plugin</artifactId>
                <version>2.2</version>
                <configuration>
                    <path>/</path>
                    <port>8080</port>
                </configuration>
            </plugin>
        </plugins>
    </build>

</project>
UserDao和UserDaoImpl
package com.itheima.dao;

public interface UserDao {
    //用户登录
    public void  daoLogin();
}


package com.itheima.dao;

import org.springframework.stereotype.Repository;

@Repository
public class UserDaoImpl implements UserDao {
    public void daoLogin() {
        System.out.println("用户登录完毕..");
    }
}
UserService和UserServiceImpl
package com.itheima.service;

public interface UserService {

    //用户登录
    public void serviceLogin();
}


package com.itheima.service;

import com.itheima.dao.UserDao;
import org.springframework.beans.factory.annotation.Autowired;
import org.springframework.stereotype.Service;

@Service
public class UserServiceImpl implements UserService {
    @Autowired
    private UserDao dao;

    public void serviceLogin() {
        //需要调用dao的登录方法
        System.out.println("service调用dao的登录方法...");
        dao.daoLogin();
    }
}
LoginServlet
package com.itheima.servlet;

import com.itheima.service.UserServiceImpl;
import org.springframework.context.ApplicationContext;
import org.springframework.context.support.ClassPathXmlApplicationContext;

import javax.servlet.ServletException;
import javax.servlet.annotation.WebServlet;
import javax.servlet.http.HttpServlet;
import javax.servlet.http.HttpServletRequest;
import javax.servlet.http.HttpServletResponse;
import java.io.IOException;

@WebServlet("/LoginServlet")
public class LoginServlet extends HttpServlet {
    protected void doPost(HttpServletRequest request, HttpServletResponse response) throws ServletException, IOException {
        /**
         * 1.加载配置文件,创建spring的容器对象
         * 2.获取容器中的service对象
         * 3.调用service的登录方法
         * 4.页面跳转登录成功
         */
        ApplicationContext context = new ClassPathXmlApplicationContext("bean1.xml");
        UserServiceImpl service = context.getBean("userServiceImpl", UserServiceImpl.class);
        service.serviceLogin();
        response.sendRedirect(request.getContextPath() + "/index.jsp");

    }

    protected void doGet(HttpServletRequest request, HttpServletResponse response) throws ServletException, IOException {
        doPost(request, response);
    }
}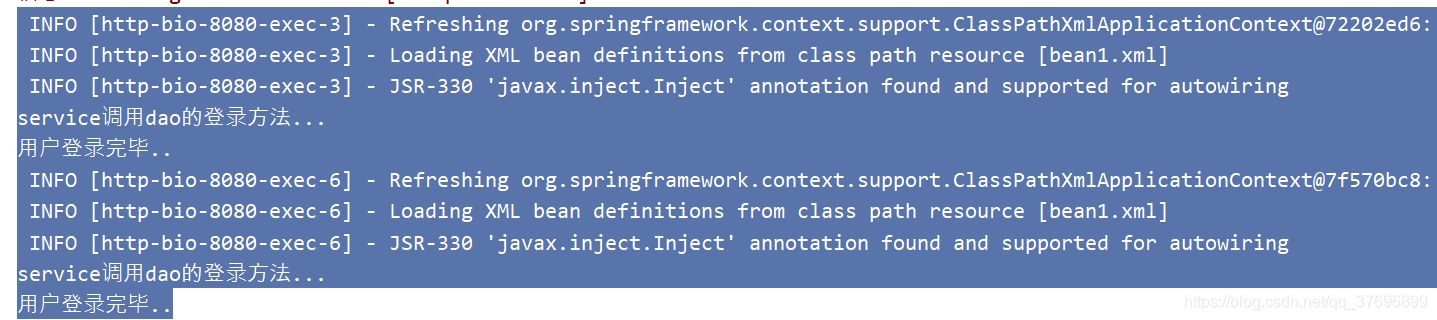
2.我们项目没有和spring整合的时候会有问题
问题:每次用户访问的Servlet的时候会会加载配置文件bean1.xml ; 引出的问题是,每次都会创建不必要的对象.
解决方案:
让想在的项目和spring整合,导入一个spring-web.jar 整合包.
帮我们提供了API.
解决策略:
1.tomcat启动的时候就加载我们的spring的配置文件 , 只加载一次.
2.将spring的容器放到web容器ServletContext中.
3.提供WebApplicationContext 等API的操作来修改Servlet层的代码.
3整合后修改代码
1.导入对应spring-web.jar
      <dependency>
            <groupId>org.springframework</groupId>
            <artifactId>spring-web</artifactId>
            <version>4.2.4.RELEASE</version>
        </dependency>
2.编写一个监听器,监听ServletContext的创建, 把spring容器放到该容器中
在web.xml中完成监听器的配置
<!DOCTYPE web-app PUBLIC
 "-//Sun Microsystems, Inc.//DTD Web Application 2.3//EN"
 "http://java.sun.com/dtd/web-app_2_3.dtd" >

<web-app>
  <display-name>Archetype Created Web Application</display-name>

  <!--指定加载spring配置文件的路径及名称-->
  <context-param>
    <param-name>contextConfigLocation</param-name>
    <param-value>classpath:bean1.xml</param-value>
  </context-param>

  <listener>
    <!--
      监听ServletContext对象创建,然后将spring容器放到该ServletContext中缓存起来
    -->
    <listener-class>org.springframework.web.context.ContextLoaderListener</listener-class>
  </listener>
</web-app>
现在,在tomcat启动的时候就已经加载了配置文件,并且将spring容器放到ServletContext中

3.问题是修改完了之后,访问Servlet还加载配置文件.
所有,修改Servlet中的代码.
LoginServlet的修改
package com.itheima.servlet;

import com.itheima.service.UserServiceImpl;
import org.springframework.context.ApplicationContext;
import org.springframework.context.support.ClassPathXmlApplicationContext;
import org.springframework.web.context.WebApplicationContext;

import javax.servlet.ServletException;
import javax.servlet.annotation.WebServlet;
import javax.servlet.http.HttpServlet;
import javax.servlet.http.HttpServletRequest;
import javax.servlet.http.HttpServletResponse;
import java.io.IOException;

@WebServlet("/LoginServlet")
public class LoginServlet extends HttpServlet {
    protected void doPost(HttpServletRequest request, HttpServletResponse response) throws ServletException, IOException {
        /**
         * 1.加载配置文件,创建spring的容器对象
         * 2.获取容器中的service对象
         * 3.调用service的登录方法
         * 4.页面跳转登录成功
         */
//        ApplicationContext context = new ClassPathXmlApplicationContext("bean1.xml");

        //修改代码,从servletContext中获取spring容器
        //方式1:使用工具类的方式来获取ServletContext中的spring容器
        //
        /*WebApplicationContext context
                = WebApplicationContextUtils.getWebApplicationContext(this.getServletContext());*/

        /**
         * 方式2:直接从ServletContext域中通过key值获取Spring容器获取
         */
        WebApplicationContext context =
                (WebApplicationContext) this.getServletContext().
                        getAttribute(WebApplicationContext.
                                ROOT_WEB_APPLICATION_CONTEXT_ATTRIBUTE);


        UserServiceImpl service = context.getBean("userServiceImpl", UserServiceImpl.class);
        service.serviceLogin();
        response.sendRedirect(request.getContextPath() + "/index.jsp");

    }

    protected void doGet(HttpServletRequest request, HttpServletResponse response) throws ServletException, IOException {
        doPost(request, response);
    }
}
二.spring和junit的整合
我们现在测试文件中如果要测试在代码中都要写
ApplicationContext context = new ClassPathXmlApplicationContext("applicationContext.xml");
 //2.获取对象
  User user2 = context.getBean("user2", User.class);
spring给我们提供了和测试整合的方案: 提供一个对应的spring-test.jar的jar ,jar包中提供了对应的注解,使用指定的注解就创建测试所需要的环境.
需求:测试PersonDao
实现步骤
-
导入定的spring-test.jar
        <dependency>
            <groupId>org.springframework</groupId>
            <artifactId>spring-test</artifactId>
            <version>4.2.4.RELEASE</version>
        </dependency>
package com;

import com.itheima.dao.UserDao;
import org.junit.Test;
import org.junit.runner.RunWith;
import org.springframework.beans.factory.annotation.Autowired;
import org.springframework.test.context.ContextConfiguration;
import org.springframework.test.context.junit4.SpringJUnit4ClassRunner;

//以什么方式运行: SpringJunit的方式运行
@RunWith(SpringJUnit4ClassRunner.class)
//加载的运行环境(加载spring的核心配置文件提供运行环境)
@ContextConfiguration("classpath:bean1.xml")
public class UserServiceTest {

    @Autowired
    private UserDao dao;

    @Test
    public void testPerson() {
        dao.daoLogin();
    }
}
三.jdbcTemplate spring对jdbc的封装
1.概念:
Spring对数据库的操作在jdbc上面做了深层次的封装,使用spring的注入功能,可以把DataSource注册到JdbcTemplate之中 (spring-jdbc.jar)
2.jdbcTemplate的入门程序
1)介绍jdbcTemplate的API
-
DrvierManagerDataSource spring-jdbc.jar中提供的一个连接池对象
-
连接池中可以设置driver驱动
-
连接池对象中可以设置url
-
连接池中设置用户名(数据库用户民)
-
连接池对象中设置数据库的密码
-
-
JdbcTemplate 核心处理对象(有对应的增删改查的方法)
-
update(sql, 实际传递的参数 ); 可以完成增删改
-
查询的方法
-
queryForObject(sql ,返回数据类型的字节码对象, 实际传递的参数); 查询指定的字段
-
queryForObject(sql, BeanPropertyRowMapper, 实际传递的参数) 查询对象
-
queryForMap(sql , 实际传递的参数) 返回的是一个Map , map对象中存放的是对象的数据, 以键值对方式存储
-
queryForList(sql , 实际参数) 返回的是List<Map<String,Object>> 查询一个List的结果,但是list中有map
-
query(sql,BeanPropertyRowMapper) 查询一个List<POJO对象>
-
-
2)环境准备
数据库的准备工作
#创建数据库
CREATE DATABASE day18_db DEFAULT CHARSET='utf8';
USE day18_db;
CREATE TABLE `stu` (
	`sid` DOUBLE ,
	`sname` VARCHAR (90),
	`schoolName` VARCHAR (300),
	`score` DOUBLE
);
INSERT INTO `stu` (`sid`, `sname`, `schoolName`, `score`) VALUES('1','赵四','吉林大学','300');
INSERT INTO `stu` (`sid`, `sname`, `schoolName`, `score`) VALUES('17','张三','交大','3000');
INSERT INTO `stu` (`sid`, `sname`, `schoolName`, `score`) VALUES('18','熊3','武大','3000');
INSERT INTO `stu` (`sid`, `sname`, `schoolName`, `score`) VALUES('19','张飞','交大','3000');
jar包准备
准备工作导入对应的jar
<!--
        spring JdbcTemplate
        1)mysql
        2)spring-context
        3)spring-jdbc
        4)spring-test
        5)junit
        6)lombok
    -->
    <dependencies>
        <dependency>
            <groupId>mysql</groupId>
            <artifactId>mysql-connector-java</artifactId>
            <version>5.1.46</version>
        </dependency>
        <dependency>
            <groupId>org.springframework</groupId>
            <artifactId>spring-context</artifactId>
            <version>4.2.4.RELEASE</version>
        </dependency>
        <dependency>
            <groupId>org.springframework</groupId>
            <artifactId>spring-jdbc</artifactId>
            <version>4.2.4.RELEASE</version>
        </dependency>
        <dependency>
            <groupId>org.springframework</groupId>
            <artifactId>spring-test</artifactId>
            <version>4.2.4.RELEASE</version>
        </dependency>
        <dependency>
            <groupId>junit</groupId>
            <artifactId>junit</artifactId>
            <version>4.12</version>
        </dependency>
        <dependency>
            <groupId>org.projectlombok</groupId>
            <artifactId>lombok</artifactId>
            <version>1.16.10</version>
        </dependency>
    </dependencies>
</project>
2)需求:
使用jdbcTemplate完成数据的插入
3)代码实现:
package com.itheima.jdbcTemplate;

import org.junit.Test;
import org.springframework.jdbc.core.JdbcTemplate;
import org.springframework.jdbc.datasource.DriverManagerDataSource;

public class Demo1_JdbcTemplate {

    @Test
    public void testInsert(){
        //1.首先创建数据库连接池对象 DataSource
        DriverManagerDataSource  dataSource = new DriverManagerDataSource();
        //2.设置DataSource的四个属性
        dataSource.setDriverClassName("com.mysql.jdbc.Driver");
        dataSource.setUrl("jdbc:mysql:///day25");
        dataSource.setUsername("root");
        dataSource.setPassword("123456");
        //3.创建JdbcTemplate 对象, 传递DataSource给该对象的构造方法
        JdbcTemplate jdbcTemplate = new JdbcTemplate(dataSource);
        //4.调用jdbcTemplate的update方法完成数据的插入
        jdbcTemplate.update("insert into stu values(? , ? ,? ,?)", 2,"刘能","清华大学",728);

    }
}
4).jdbcTemplate 对象由spring来管理
-
连接池对象DriverManagerDataSource 数据源对象有spring来管理,里面参数也有spring来注入
-
jdbcTemplate对象也由spring来管理 , 给该对象注入dataSource
-
测试代码中使用spring的环境, 注入jdbcTemplate, 直接测试.
改造的步骤
1.添加bean.xml配置文件, 目的是创建连接池和jdbcTemplate都交给spirng
<?xml version="1.0" encoding="UTF-8"?>
<beans xmlns="http://www.springframework.org/schema/beans"
       xmlns:xsi="http://www.w3.org/2001/XMLSchema-instance"
       xmlns:context="http://www.springframework.org/schema/context"
       xsi:schemaLocation="http://www.springframework.org/schema/beans http://www.springframework.org/schema/beans/spring-beans.xsd http://www.springframework.org/schema/context http://www.springframework.org/schema/context/spring-context.xsd">

    <!--1.创建连接池对象-->
    <bean id="dataSource" class="org.springframework.jdbc.datasource.DriverManagerDataSource">
        <property name="driverClassName" value="com.mysql.jdbc.Driver"/>
        <property name="url" value="jdbc:mysql:///day16"/>
        <property name="username" value="root"/>
        <property name="password" value="root"/>
    </bean>

    <!--2.创建JdbcTemplate对象-->
    <bean id="jdbcTemplate" class="org.springframework.jdbc.core.JdbcTemplate">
        <!--
            set方式注入  <property
            Constructor构造注入  <Constructor
        -->
        <constructor-arg name="dataSource" ref="dataSource"/>
    </bean>
</beans>
修改测试类
@RunWith(SpringJUnit4ClassRunner.class)
@ContextConfiguration("classpath:bean.xml")
public class Demo1_JdbcTemplate {

    @Autowired
    private JdbcTemplate jdbcTemplate;

    @Test
    public void testInsert02(){
        jdbcTemplate.update("insert into stu values(?,?,?,?)",4,"谢广坤","北大",715);
    }
}
3.使用外部数据源
添加了一个db.properties配置文件
jdbc.driver=com.mysql.jdbc.Driver
jdbc.url=jdbc:mysql:///day16
jdbc.username=root
jdbc.password=root
修改bean
    <!--0.引入外部数据源 db.properties-->
    <context:property-placeholder location="classpath:db.properties"/>
   <!--1.创建连接池对象-->
    <bean id="dataSource" class="org.springframework.jdbc.datasource.DriverManagerDataSource">
        <property name="driverClassName" value="${jdbc.driver}"/>
        <property name="url" value="${jdbc.url}"/>
        <property name="username" value="${jdbc.username}"/>
        <property name="password" value="${jdbc.password}"/>
    </bean>
5)使用jdbcTemplate完成修改和删除功能
需求1: 修改第一条学生信息
需求2: 删除第二条学生信息
   //修改第一个学生信息
    @Test
    public void  testUpdate(){
        jdbcTemplate.update("update stu set sname = ? , schoolName=  ? ,score = ? where sid = ?", "尼古拉斯赵四","吉林大学",580,1);
    }

    //删除第二条用户信息
    @Test
    public void  testDelete(){
        jdbcTemplate.update("delete from stu where sid = ? ", 2);
    }
6)使用jdbcTemplate完成查询功能
-
根据根据id查询学生name
-
查询一共有多少个学生数
-
查询id为7 的student对象,返回Student
-
查询id为8的student对象返回map
-
查询所有的student对象 返回List<Map<String ,Object>> queryForList
-
如果只想查询结果放到List<Bean> query
代码的实现
package com.itheima.jdbcTemplate;

import com.itheima.pojo.Student;
import org.junit.Test;
import org.junit.runner.RunWith;
import org.springframework.beans.factory.annotation.Autowired;
import org.springframework.jdbc.core.BeanPropertyRowMapper;
import org.springframework.jdbc.core.JdbcTemplate;
import org.springframework.jdbc.datasource.DriverManagerDataSource;
import org.springframework.test.context.ContextConfiguration;
import org.springframework.test.context.junit4.SpringJUnit4ClassRunner;

import java.util.List;
import java.util.Map;

@RunWith(SpringJUnit4ClassRunner.class)
@ContextConfiguration("classpath:bean.xml")
public class Demo1_JdbcTemplate_Query {

    @Autowired
    private JdbcTemplate jdbcTemplate;

    /*1. 根据根据id查询学生name
    2. 查询一共有多少个学生数
    3. 查询id为7 的student对象,返回Student
    4. 查询id为8的student对象返回map
    5. 查询所有的student对象 返回List<Map<String ,Object>>  queryForList
    6. 如果只想查询结果放到List<Bean>  query*/


    //1. 根据根据id查询学生name
    //queryForObject(sql ,返回数据类型的字节码对象, 实际传递的参数);  查询指定的字段
    @Test
    public void testQueryNameById(){
        String name = jdbcTemplate.queryForObject("select sname from stu where sid = ?", String.class, 1);
        System.out.println(name);
    }

    //2. 查询一共有多少个学生数  int
    //queryForObject(sql ,返回数据类型的字节码对象, 实际传递的参数);  查询指定的字段
    @Test
    public void testQueryCount(){
        Integer count = jdbcTemplate.queryForObject("select count(*) from stu ", Integer.class);
        System.out.println(count);
    }

    // 3. 查询id为7 的student对象,返回Student
    // queryForObject(sql, BeanPropertyRowMapper, 实际传递的参数)   查询对象
    @Test
    public void testQueryStuById(){
        Student student = jdbcTemplate.queryForObject("select * from stu where sid = ? ",
                new BeanPropertyRowMapper<Student>(Student.class), 18);
        System.out.println(student);
    }


    // 4. 查询id为3的student对象返回map
    //queryForMap(sql , 实际传递的参数)    返回的是一个Map  , map对象中存放的是对象的数据,  以键值对方式存储
    @Test
    public void testFindStuMap(){
        Map<String, Object> map = jdbcTemplate.queryForMap("select * from stu where sid = ? ", 3);
        System.out.println(map);
    }

    //5. 查询所有的student对象 返回List<Map<String ,Object>>  queryForList
    @Test
    public void testFindList(){
        List<Map<String, Object>> list = jdbcTemplate.queryForList("select * from stu ");
        for (Map<String, Object> map : list) {
            System.out.println(map);
        }
    }

    // 6. 如果只想查询结果放到List<Bean>  query
    //query(sql,BeanPropertyRowMapper)   查询一个List<POJO对象>
    @Test
    public void testFindStuList(){
        List<Student> list =
                jdbcTemplate.query("select * from stu", new BeanPropertyRowMapper<Student>(Student.class));
        for (Student student : list) {
            System.out.println(student);
        }
    }

}
四. AOP介绍
1.概念
AOP(Aspect Oriented Programming)是面向切面编程。就是通过预编译方式和运行期动态代理实现程序功能的统一维护的一种技术。
2.使用场景
-
权限的校验
-
日志的记录
-
事务的处理
-
性能的检测
3.AOP对功能的增强方式:
AOP对程序的扩展方式采用动态代理的方式. (JDK动态代理和Cglib动态代理两种方式)
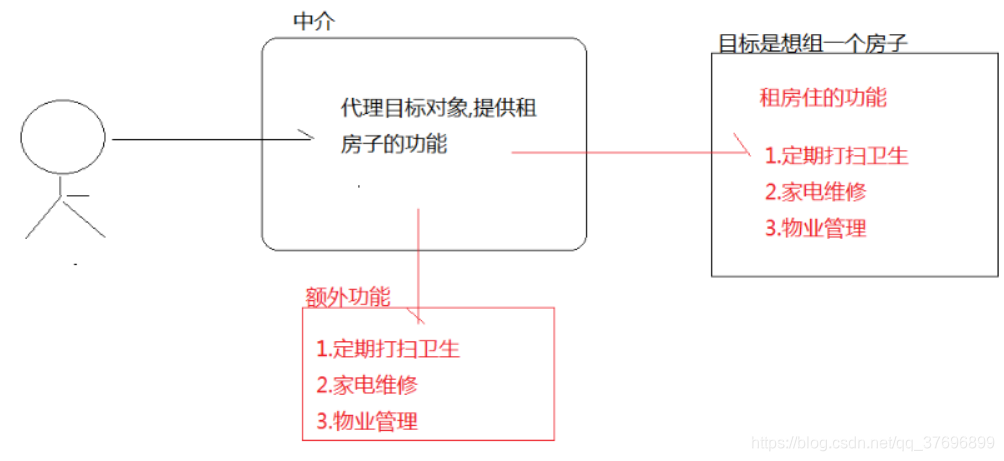
1)生活中的代理:
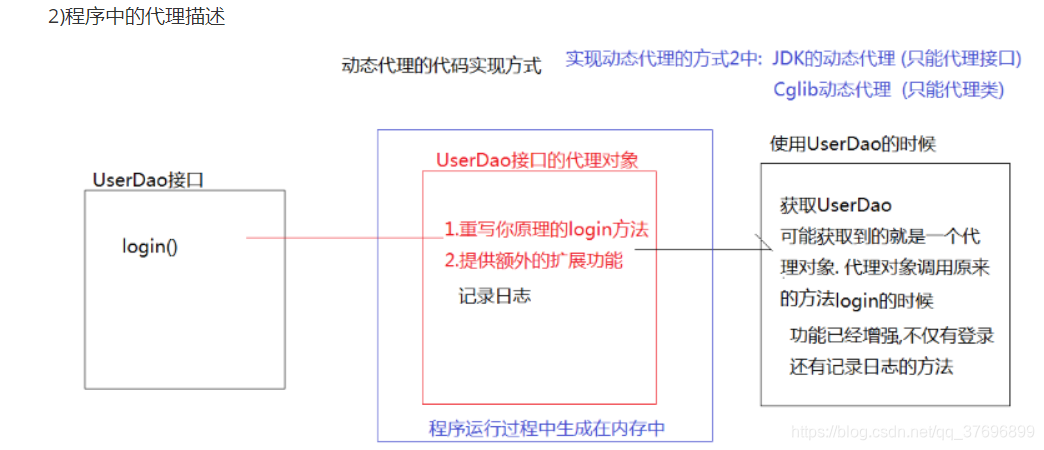
4.JDK的动态代理
介绍对应的API , 是java提供的Proxy类
Proxy类的静态方法可以创建代理对象
static Object newProxyInstance(ClassLoader loader, Class<?>[] interfaces, InvocationHandler h)
参数1:ClassLoader loader 类加载器 , 用来加载代理对象
参数2:Class<?>[] interfaces 目标类的字节码对象数组. 因为代理的是接口,需要知道接口中所有的方法
参数3:InvocationHandler h 执行句柄, 代理对象处理的核心逻辑就在该接口中
介绍接口 InvocationHandler
有一个方法
Object invoke(Object proxy, Method method, Object[] args) 当代理对象调用原来的目标方法的时候就会执行InvocationHandler 中的invoke方法
参数1: Object proxy 代理对象
参数2: Method method 当前调用方法的对象
参数3: Object[] args 实际传递的参数
需求:完成用户登录,记录日志
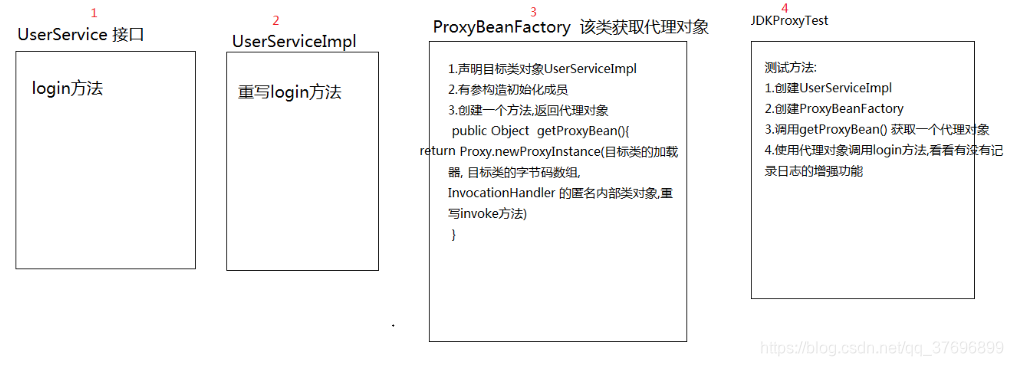
UserService和UserServiceImpl
package com.itheima.jdk_proxy;

public interface UserService {
    public void login();
}


package com.itheima.jdk_proxy;

public class UserServiceImpl implements UserService{
    public void login() {
        System.out.println("denglu");
    }
}
package com.itheima.jdk_proxy;

import java.lang.reflect.InvocationHandler;
import java.lang.reflect.Method;
import java.lang.reflect.Proxy;

/*
* 提供一个获取代理对象的方法
*
*
* 1.声明一个UserService  成员变量,  目的是获取Class字节码对象
* 2.提供有参构造,初始化成员变量
* 3.编写一个获取代理对象的方法
*
* */
public class ProxyBeanFactory {
    //1.声明一个UserService  成员变量,  目的是获取Class字节码对象
    private UserService service;

    //2.提供有参构造,初始化成员变量
    public ProxyBeanFactory(UserService service) {
        this.service = service;
    }
    //3.编写一个获取代理对象的方法
        /**
         * Proxy.newProxyInstance 返回一个代理对象
         * 参数1:类加载器
         * 参数2:接口的字节码数组对象
         * 参数3: InvocationHandler 接口的匿名内部类对象  代理对象执行的核心逻辑
         */
    public Object getProxyBean(){
        return Proxy.newProxyInstance(
                //1.传递类加载器
                service.getClass().getClassLoader(),
                //2.获取接口的字节码数组
                service.getClass().getInterfaces(),
                //3.传递InvocationHandler接口
                new InvocationHandler() {
                    /**
                     * 当代理对象调用login方法的时候,就会进入invoke方法
                     * 参数1:Object proxy 代理对象 在内存中生成
                     * 参数2:执行方法的对象
                     * 参数3:方法传递的实际参数
                     */
                    public Object invoke(Object proxy, Method method, Object[] args) throws Throwable {
                        //1.执行原来的方法
                        method.invoke(service);//反射调用原方法
                        //2.额外功能
                        System.out.println("额外记录日志");
                        return null;
                    }
                }
        );
    }
}
测试:
package com.itheima.jdkproxy;

public class UserDaoTest {

    public static void main(String[] args) {
        //1.创建UserDaoImpl
        UserDaoImpl target = new UserDaoImpl();
        //2.创建ProxyBeanFactory
        ProxyBeanFactory factory = new ProxyBeanFactory(target);
        //3.调用ProxyBeanFactory 获取代理对象的方法  getProxyBean
        UserDao proxyBean = (UserDao) factory.getProxyBean();
        //4.使用代理对象调用login方法看看是否有记录日志
        proxyBean.login();
    }
}
5.Cglib的动态代理
该实现代理的方式是spring提供. 索引要引入spring的依赖
准备:导入spring-context.jar
 <dependencies>
        <dependency>
            <groupId>org.springframework</groupId>
            <artifactId>spring-context</artifactId>
            <version>4.2.4.RELEASE</version>
        </dependency>
    </dependencies>
介绍API
Enhance cglib的核心类 ,主要作用就是创建代理对象
-
setSuperClass() 设置目标类的字节码对象
-
setCallback() 设置回调函数, 目的让代理对象执行的时候进入回调函数执行具体的逻辑 ; 该方法的参数
Callback 接口 , 我们传递的是子接口 MethodInceptor 匿名内部类
-
create() 创建代理对象的方法
需求:
使用Cgblib 来代理我们PersonService 类 , 给该类中的 work方法添加日志的增强.
分析
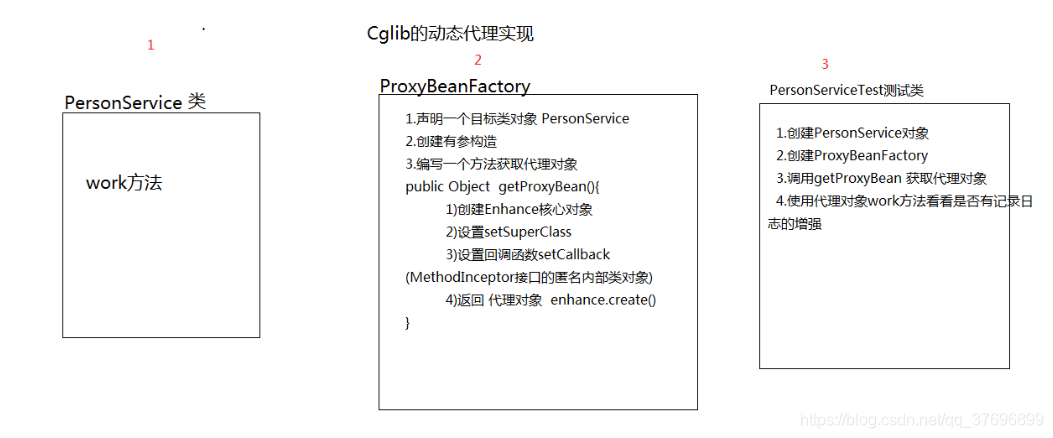
PersonService
package com.itheima.cjlib_proxy;

public class PersonService {
    public void work(){
        System.out.println("我爱加班");
    }
}
package com.itheima.cjlib_proxy;

import org.springframework.cglib.proxy.Enhancer;
import org.springframework.cglib.proxy.MethodInterceptor;
import org.springframework.cglib.proxy.MethodProxy;

import java.lang.reflect.Method;

/*
 * 该类用于生产代理对象
 * */
public class ProxyBeanFactory {
    //1.生成一个被代理对象
    private PersonService service;

    //2.初始化被代理对象
    public ProxyBeanFactory(PersonService service) {
        this.service = service;
    }

    //3.编写获取代理对象的方法
    public Object getProxyBean() {
        //1.创建Enhancer核心对象
        Enhancer enhancer = new Enhancer();
        //2.给Enhancer设置setSuperClass()
        enhancer.setSuperclass(service.getClass());
        //3.给Enhancer 设置回调函数
        enhancer.setCallback(new MethodInterceptor() {
            /**
             * intercept 函数当代理对象执行目标方法时,进入该拦截方法,执行里面的内容
             * 参数1:Object proxy 代理对象
             * 参数2:Method method 当前执行的方法对象
             * 参数3:原目标方法的实际传入的参数Object[] objects
             * 参数4: MethodProxy methodProxy 代理方法对象
             */
            public Object intercept(Object proxy, Method method, Object[] objects, MethodProxy methodProxy) throws Throwable {
                //1.执行原来的逻辑
                method.invoke(service);
                //2.补充日志
                System.out.println("日志来了");

                return null;
            }
        });
        //4.创建并返回代理对象
        return enhancer.create();
    }
}
测试
package com.itheima.cglibproxy;

public class PersonServiceTest {

    public static void main(String[] args) {
        PersonService service = new PersonService();
        ProxyBeanFactory factory = new ProxyBeanFactory(service);

        //获取代理对象
        PersonService proxyBean = (PersonService) factory.getProxyBean();
        proxyBean.work();
    }
}
6. AOP专业术语 (理解)
1、 目标类target:就是我们需要增强的那个类
2、 代理类proxy:就是自定义的代理的对象
3、 连接点joinPoint:程序执行的某个特定位置,Spring仅支持方法的连接点
4、 切入点pointCut:就是在目标类中实际增强的方法
5、 织入weave:就是将代理类中需要增强的方法放入到目标类中去执行的过程
6、 引介Introduction:引介是一种特殊的增强,它为类添加一些属性和方法(课程不使用)
7、 通知advice:将代理对象中的方法应用到目标类的过程中产生的结果。
8、 切面aspect:所有的连接点和代理对象的方法组成在一起 构成了切面
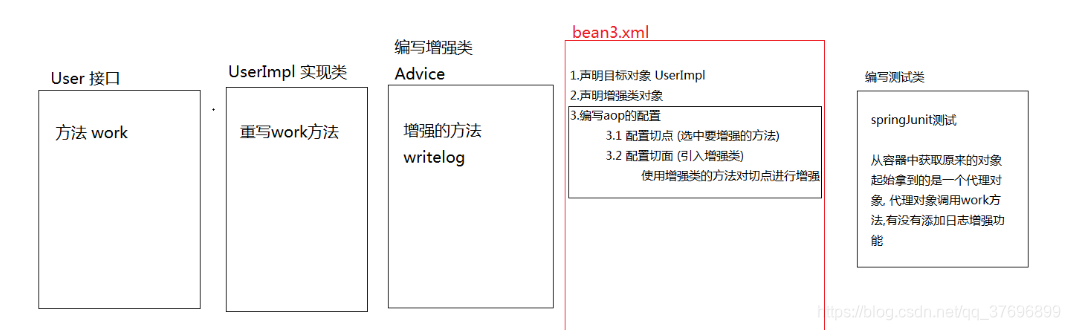
7.基于xml的方式实现spring的aop
需求:
使用Spring的aop完成User类的work方法的增强,添加记录日志功能 (不能修改源代码,只做配置)
准备工作
 <dependencies>
        <dependency>
            <groupId>org.springframework</groupId>
            <artifactId>spring-context</artifactId>
            <version>4.2.4.RELEASE</version>
        </dependency>

        <dependency>
            <groupId>org.aspectj</groupId>
            <artifactId>aspectjweaver</artifactId>
            <version>1.7.2</version>
        </dependency>

        <dependency>
            <groupId>junit</groupId>
            <artifactId>junit</artifactId>
            <version>4.12</version>
        </dependency>

        <dependency>
            <groupId>org.springframework</groupId>
            <artifactId>spring-test</artifactId>
            <version>4.2.4.RELEASE</version>
        </dependency>
    </dependencies>
分析
代码实现
User和UserImpl
package com.itheima.aop_xml;

public interface User {
    public void work();
}


package com.itheima.aop_xml;

public class UserImpl implements User{
    public void work(){
        System.out.println("我爱上班");
    }
}
Advice
package com.itheima.aop_xml;

//增强类
public class Advice {

    public void writeLog(){
        System.out.println("记录日志");
    }
}
<?xml version="1.0" encoding="UTF-8"?>
<beans xmlns="http://www.springframework.org/schema/beans"
xmlns:xsi="http://www.w3.org/2001/XMLSchema-instance" xmlns:aop="http://www.springframework.org/schema/aop"
xsi:schemaLocation="http://www.springframework.org/schema/beans http://www.springframework.org/schema/beans/spring-beans.xsd http://www.springframework.org/schema/aop http://www.springframework.org/schema/aop/spring-aop.xsd">
<!--1.创建UserImpl-->
<bean id="userImpl" class="com.itheima.aop_xml.UserImpl"></bean>
<!--2.创建增强类对象-->
<bean id="advice" class="com.itheima.aop_xml.Advice"></bean>
<!--3.配置aop-->
<aop:config>
<!--3.1配置切入点,筛选被增强的方法-->
<aop:pointcut id="pointcut01" expression="execution(* *..work(..))"/>
<!--3.2配置切面-->
<aop:aspect ref="advice">
<!--配置切点和增强的组合,使用增强类种的writeLog增强切点-->
<!--spring 给我的增强方式有5种
before 前置增强,增强的功能将会在目标方法之前执行
method 使用增强类中的哪个方法进行增强
-->
<aop:before method="writeLog" pointcut-ref="pointcut01"></aop:before>
</aop:aspect>
</aop:config>
</beans>8.切点表达式
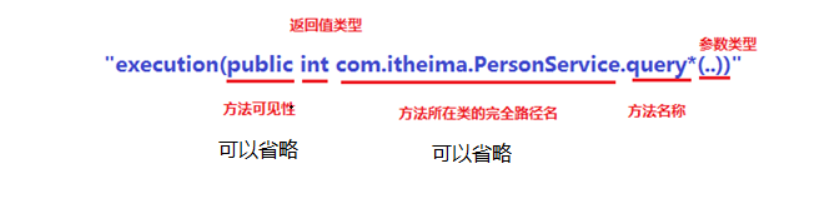
<aop:pointcut id="point01" expression="execution(* *.*(..))"/>
不推荐全部切, 建议切点表达式配置的时候最好加包名和类名方法名名.可以准确筛选切点
9.通知的方式
-
前置通知 : 增强的逻辑在目标方法之前执行
-
后置通知 : 增强的逻辑在目标方法之后执行
-
异常通知: 目标方法出现异常,则增项逻辑运行
-
环绕通知: 目标方法执行之前和之后,增强的逻辑都运行
-
最终通知: 增强的逻辑在目标方法之后执行,不管有没有异常都会执行.
通知方式演示
需求:
使用增强类中的不同方法
来增强我们目标类中的不同方法
User类
package com.itheima.aop_xml;

public interface User {

    public void work();

    public void addUser();  // 前置增强该方法

    public void deleteUser();  //后置增强该方法

    public void updateUser();  //异常增强

    public void queryUser();  //环绕增强

    public void batchDeleteUser();  //最终增强
}
UserImpl实现类
package com.itheima.aop_xml;

public class UserImpl implements User {

    public void work() {
        System.out.println("我爱加班!!");
    }

    public void addUser() {
        System.out.println("添加用户");
    }

    public void deleteUser() {
        System.out.println("删除用户");

    }

    public void updateUser() {
        System.out.println("修改用户");
        int i = 1/0;
    }

    public void queryUser() {
        System.out.println("查询用户");
    }

    public void batchDeleteUser() {
        System.out.println("批量删除用户");
        int i = 1/0;
    }
}
3.增强类
package com.itheima.aop_xml;

import org.aspectj.lang.ProceedingJoinPoint;

//增强类
public class Advice {

    public void writeLog(){
        System.out.println("记录日志");
    }

    public void before(){
        System.out.println("前面记录日志");
    }

    public void afterReturning(){
        System.out.println("后面记录日志");
    }

    public void throwable(){
        System.out.println("异常记录日志");
    }

    //..暂定
    public void  around(ProceedingJoinPoint joinPoint) throws Throwable {
        System.out.println("环绕增强前");
        joinPoint.proceed();  //切到原来的目标方法,进行执行
        System.out.println("环绕增强后");
    }

    public void  after(){
        System.out.println("最终记录日志");
    }
}
bean4.xml
<?xml version="1.0" encoding="UTF-8"?>
<beans xmlns="http://www.springframework.org/schema/beans"
       xmlns:xsi="http://www.w3.org/2001/XMLSchema-instance" xmlns:aop="http://www.springframework.org/schema/aop"
       xsi:schemaLocation="http://www.springframework.org/schema/beans http://www.springframework.org/schema/beans/spring-beans.xsd http://www.springframework.org/schema/aop http://www.springframework.org/schema/aop/spring-aop.xsd">

    <!--1.创建目标类对象-->
    <bean id="user" class="com.itheima.aop_xml.UserImpl"/>
    <!--2.创建增强类对象-->
    <bean id="advice" class="com.itheima.aop_xml.Advice"/>
    <!--3.配置aop-->
    <aop:config>
        <!--让增加方法变为切点-->
        <aop:pointcut id="add" expression="execution(* com.itheima..add*(..))"/>
        <!--让删除方法变为切点-->
        <aop:pointcut id="delete" expression="execution(* com.itheima..delete*(..))"/>
        <!--让修改方法变为切点-->
        <aop:pointcut id="update" expression="execution(* com.itheima..update*(..))"/>
        <!--让查询方法变为切点-->
        <aop:pointcut id="query" expression="execution(* com.itheima..query*(..))"/>
        <!--让批量删除法变为切点-->
        <aop:pointcut id="batch" expression="execution(* com.itheima..batch*(..))"/>

        <!--3.2配置切面-->
        <aop:aspect ref="advice">
            <!--spring 给我的增强方式有5种
                before 前置增强,增强的功能将会在目标方法之前执行
                method 使用增强类中的哪个方法进行增强
            -->
            <aop:before method="before" pointcut-ref="add" />
            <!--后置通知增强delete方法-->
            <aop:after-returning method="afterReturning" pointcut-ref="delete" />
            <!--异常通知增强修改-->
            <aop:after-throwing method="throwable" pointcut-ref="update"/>
            <!--环绕通知增强查询-->
            <aop:around method="around" pointcut-ref="query"/>
            <!--使用最终通知增强批量删除-->
            <aop:after method="after" pointcut-ref="batch"/>
        </aop:aspect>
    </aop:config>
</beans>
测试文件
package com.itheima.aop_xml;

import org.junit.Test;
import org.junit.runner.RunWith;
import org.springframework.beans.factory.annotation.Autowired;
import org.springframework.test.context.ContextConfiguration;
import org.springframework.test.context.junit4.SpringJUnit4ClassRunner;

@RunWith(SpringJUnit4ClassRunner.class)
@ContextConfiguration("classpath:bean4.xml")
public class UserTest {

    @Autowired
    private User user;

    @Test
    public void testUser(){
        //System.out.println(user.getClass());
        //user.work();
        //user.addUser();
        //user.deleteUser();
        //user.updateUser();
        //user.queryUser();
        user.batchDeleteUser();
    }
}
10. AOP基于注解实现 (掌握)
需求:使用增强类中的不同方法来增强Person类中的方法进行前置,后置,异常,环绕,最终增强
步骤:
1.配置文件配置
<?xml version="1.0" encoding="UTF-8"?>
<beans xmlns="http://www.springframework.org/schema/beans"
       xmlns:xsi="http://www.w3.org/2001/XMLSchema-instance"
       xmlns:context="http://www.springframework.org/schema/context"
       xmlns:aop="http://www.springframework.org/schema/aop"
       xsi:schemaLocation="http://www.springframework.org/schema/beans http://www.springframework.org/schema/beans/spring-beans.xsd http://www.springframework.org/schema/context http://www.springframework.org/schema/context/spring-context.xsd http://www.springframework.org/schema/aop http://www.springframework.org/schema/aop/spring-aop.xsd">

    <!--包扫描创建对象-->
    <context:component-scan base-package="com.itheima.aop_annotation"/>

    <!--开启自动代理-->
    <aop:aspectj-autoproxy/>
</beans>
2.Person 类
package com.itheima.aop_annotation;

public interface Person {

    public void work();

    public void addPerson();  // 前置增强该方法

    public void deletePerson();  //后置增强该方法

    public void updatePerson();  //异常增强

    public void queryPerson();  //环绕增强

    public void batchDeletePerson();  //最终增强
}
3.PersonImpl实现
package com.itheima.aop_annotation;

import org.springframework.stereotype.Component;

@Component
public class PersonImpl implements Person {

    public void work() {
        System.out.println("我爱加班!!");
    }

    public void addPerson() {
        System.out.println("添加用户");
    }

    public void deletePerson() {
        System.out.println("删除用户");

    }

    public void updatePerson() {
        System.out.println("修改用户");
        int i = 1/0;
    }

    public void queryPerson() {
        System.out.println("查询用户");
    }

    public void batchDeletePerson() {
        System.out.println("批量删除用户");
        int i = 1/0;
    }
}
3.增强类
package com.itheima.aop_annotation;

import org.aspectj.lang.ProceedingJoinPoint;
import org.aspectj.lang.annotation.*;
import org.springframework.stereotype.Component;

//增强类
@Component
@Aspect  //让本类作为一个切面
public class PersonAdvice {

    public void writeLog(){
        System.out.println("记录日志");
    }

    @Before("execution(* com.itheima.aop_annotation..add*(..))")
    public void before(){
        System.out.println("前面记录日志");
    }

    @AfterReturning("execution(* com.itheima.aop_annotation..delete*(..))")
    public void afterReturning(){
        System.out.println("后面记录日志");
    }

    @AfterThrowing("execution(* com.itheima.aop_annotation..update*(..))")
    public void throwable(){
        System.out.println("异常记录日志");
    }

    @Around("execution(* com.itheima.aop_annotation..query*(..))")
    public void  around(ProceedingJoinPoint joinPoint) throws Throwable {
        System.out.println("环绕增强前");
        joinPoint.proceed();  //切到原来的目标方法,进行执行
        System.out.println("环绕增强后");
    }

    @After("execution(* com.itheima.aop_annotation..bat*(..))")
    public void  after(){
        System.out.println("最终记录日志");
    }
}


 被折叠的 条评论
为什么被折叠?
被折叠的 条评论
为什么被折叠?
 到【灌水乐园】发言


