


使用 PyQt5 和 Python-docx 实现AIGC降重工具
在日常工作中,文档处理是一个常见的任务,尤其是对于需要批量处理文档内容的场景。今天,我将分享一个使用 PyQt5 和 Python-docx 库实现的简单文档处理工具。这个工具可以帮助用户选择文档文件,处理文档中的段落和表格内容,并实时显示处理进度。
项目背景
在开发文档处理工具时,我们常常需要一个直观的用户界面,让用户能够轻松选择文件、设置参数,并实时查看处理进度。PyQt5 是一个强大的跨平台 GUI 库,能够帮助我们快速构建用户界面。而 Python-docx 库则提供了对 .docx 文件的读写支持,使得文档处理变得简单高效。
功能介绍
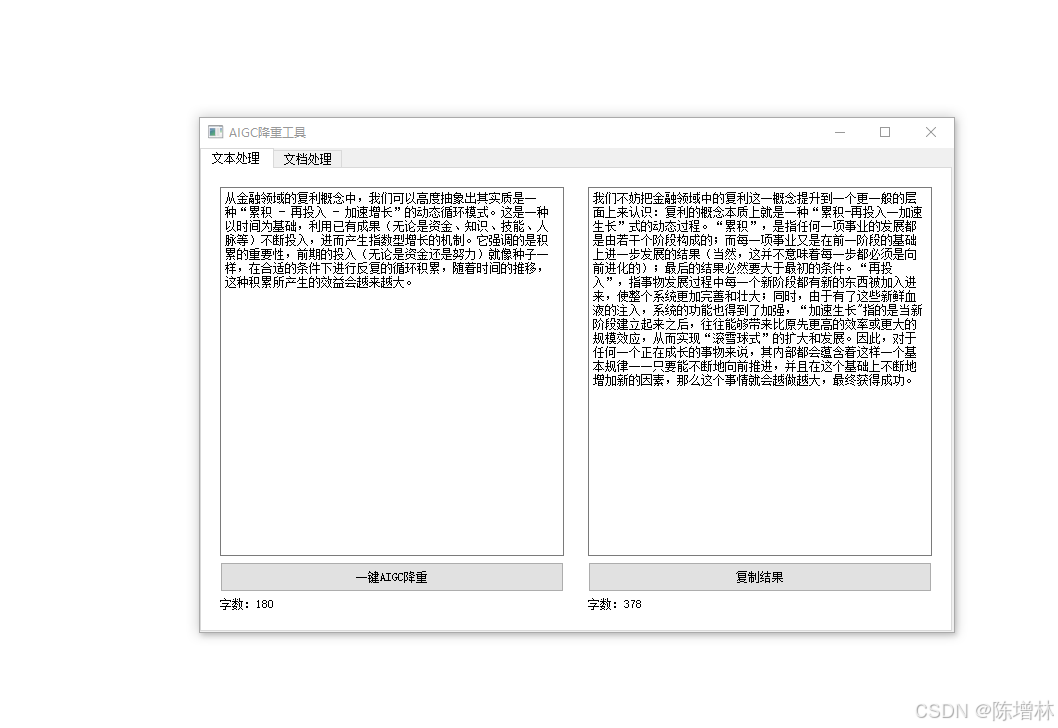
这个工具的主要功能包括:
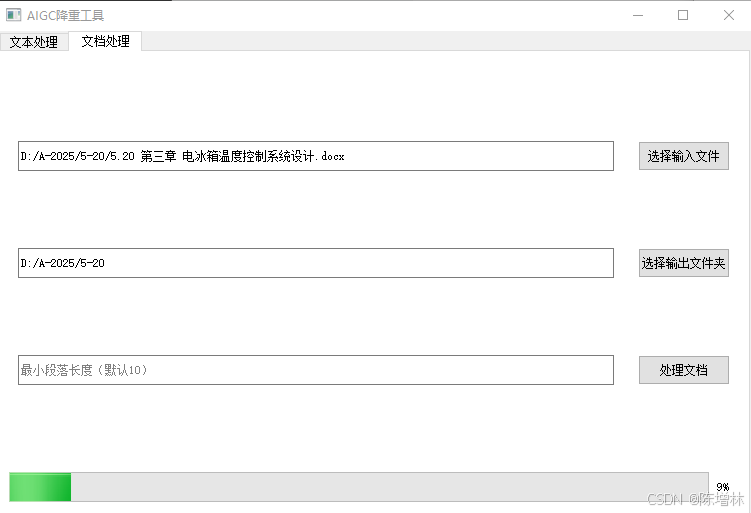
- 文件选择:用户可以选择需要处理的
.docx文件和输出文件夹。 - 文档处理:工具会逐段处理文档中的段落和表格内容,并将处理结果保存到新的文件中。
- 进度条:实时显示处理进度,让用户清楚了解当前处理状态。
技术栈
- PyQt5:用于构建用户界面。
- Python-docx:用于读取和修改
.docx文件。 - QThread:用于实现后台处理,避免阻塞主线程。
- requests:用于发送 HTTP 请求(如果需要调用外部 API)。
代码实现
以下是实现这个工具部分代码:
1. 主窗口类
import sys
import os
from PyQt5.QtWidgets import (
    QApplication, QMainWindow, QTextEdit, QPushButton, QVBoxLayout, QHBoxLayout, QWidget, QLabel, QMessageBox, QTabWidget,
    QFileDialog, QProgressBar, QLineEdit
)
from PyQt5.QtCore import Qt, QThread, pyqtSignal
from docx import Document  # 需要安装 python-docx 库

class MainWindow(QMainWindow):
    def __init__(self):
        super().__init__()
        self.setWindowTitle("文档处理工具")
        self.resize(800, 600)
        self.initUI()

    def initUI(self):
        # 创建 Tab 控件
        self.tab_widget = QTabWidget()
        self.setCentralWidget(self.tab_widget)

        # 第一个 Tab:文档处理
        self.doc_tab = QWidget()
        self.tab_widget.addTab(self.doc_tab, "文档处理")
        self.init_doc_tab()

    def init_doc_tab(self):
        # 主布局为垂直布局,包含左右布局和底部进度条
        main_layout = QVBoxLayout()

        # 左右布局
        horizontal_layout = QHBoxLayout()

        # 左侧布局
        left_widget = QWidget()
        left_layout = QVBoxLayout()

        self.input_file_path_var = QLineEdit()
        self.input_file_path_var.setReadOnly(True)
        self.input_file_path_var.setFixedHeight(30)  # 增加输入框高度
        left_layout.addWidget(self.input_file_path_var)

        self.output_file_path_var = QLineEdit()
        self.output_file_path_var.setReadOnly(True)
        self.output_file_path_var.setFixedHeight(30)  # 增加输入框高度
        left_layout.addWidget(self.output_file_path_var)

        self.min_paragraph_length_input = QLineEdit()
        self.min_paragraph_length_input.setPlaceholderText("最小段落长度(默认10)")
        self.min_paragraph_length_input.setFixedHeight(30)  # 增加输入框高度
        left_layout.addWidget(self.min_paragraph_length_input)

        left_widget.setLayout(left_layout)
        horizontal_layout.addWidget(left_widget)

        # 右侧布局
        right_widget = QWidget()
        right_layout = QVBoxLayout()

        self.choose_input_file_button = QPushButton("选择输入文件")
        self.choose_input_file_button.clicked.connect(self.choose_input_file)
        self.choose_input_file_button.setFixedHeight(30)  # 增加按钮高度
        right_layout.addWidget(self.choose_input_file_button)

        self.select_output_folder_button = QPushButton("选择输出文件夹")
        self.select_output_folder_button.clicked.connect(self.select_output_folder)
        self.select_output_folder_button.setFixedHeight(30)  # 增加按钮高度
        right_layout.addWidget(self.select_output_folder_button)

        self.process_doc_button = QPushButton("处理文档")
        self.process_doc_button.clicked.connect(self.process_document)
        self.process_doc_button.setFixedHeight(30)  # 增加按钮高度
        right_layout.addWidget(self.process_doc_button)

        right_widget.setLayout(right_layout)
        horizontal_layout.addWidget(right_widget)

        # 将左右布局添加到主布局
        main_layout.addLayout(horizontal_layout)

        # 底部进度条布局
        self.progress = QProgressBar()
        self.progress.setFixedHeight(30)  # 增加进度条高度
        main_layout.addWidget(self.progress)

        # 设置整个 Tab 的布局
        self.doc_tab.setLayout(main_layout)

    def choose_input_file(self):
        file_path, _ = QFileDialog.getOpenFileName(self, "选择输入文件", "", "Word文档 (*.docx)")
        if file_path:
            self.input_file_path_var.setText(file_path)

    def select_output_folder(self):
        folder_path = QFileDialog.getExistingDirectory(self, "选择输出文件夹")
        if folder_path:
            self.output_file_path_var.setText(folder_path)

    def process_document(self):
        file_path = self.input_file_path_var.text()
        output_path = self.output_file_path_var.text()
        min_paragraph_length = int(self.min_paragraph_length_input.text()) if self.min_paragraph_length_input.text() else 10

        if not file_path or not output_path:
            QMessageBox.warning(self, "警告", "请先选择输入文件和输出文件夹!")
            return

        try:
            doc = Document(file_path)
            paragraphs = doc.paragraphs[:]
            tables = doc.tables[:]
            total_elements = len(paragraphs) + sum(len(table.rows) * len(row.cells) for table in tables for row in table.rows)
            self.progress.setMaximum(total_elements)  # 设置进度条的最大值
        except Exception as e:
            QMessageBox.critical(self, "错误", f"无法打开文件:{e}")
            return

        self.worker_doc = DocumentProcessingThread(file_path, output_path, min_paragraph_length)
        self.worker_doc.finished.connect(self.on_doc_finished)
        self.worker_doc.error.connect(self.on_doc_error)
        self.worker_doc.progress.connect(self.progress.setValue)  # 连接信号到进度条的 setValue 方法
        self.worker_doc.start()

    def on_doc_finished(self, output_file_path):
        QMessageBox.information(self, "完成", f"已保存为 {output_file_path}")
        self.progress.setValue(0)  # 重置进度条

    def on_doc_error(self, error):
        QMessageBox.critical(self, "错误", error)
2. 文档处理线程类
class DocumentProcessingThread(QThread):
    """用于处理文档的线程"""
    finished = pyqtSignal(str)
    error = pyqtSignal(str)
    progress = pyqtSignal(int)  # 用于更新进度条的信号

    def __init__(self, file_path, output_path, min_paragraph_length):
        super().__init__()
        self.file_path = file_path
        self.output_path = output_path
        self.min_paragraph_length = min_paragraph_length

    def run(self):
        try:
            doc = Document(self.file_path)
        except Exception as e:
            self.error.emit(f"无法打开文件:{e}")
            return

        paragraphs = doc.paragraphs[:]
        tables = doc.tables[:]
        total_elements = len(paragraphs) + sum(len(table.rows) * len(row.cells) for table in tables for row in table.rows)
        self.progress.emit(0)  # 初始化进度条

        # 处理段落
        for i, para in enumerate(paragraphs, start=1):
            text = para.text.strip()
            if len(text) > self.min_paragraph_length:
                response = self.process_text(text)  # 假设有一个处理文本的函数
                if response is None:
                    self.error.emit("处理失败,请检查网络或输入内容!")
                    return
                para.clear()
                para.add_run(response)
            self.progress.emit(i)  # 更新进度条

        # 处理表格
        table_index = len(paragraphs)  # 从段落的最后一个索引开始
        for table in tables:
            for row in table.rows:
                for cell in row.cells:
                    for para in cell.paragraphs:
                        text = para.text.strip()
                        if len(text) > self.min_paragraph_length:
                            response = self.process_text(text)  # 假设有一个处理文本的函数
                            if response is None:
                                self.error.emit("处理失败,请检查网络或输入内容!")
                                return
                            para.clear()
                            para.add_run(response)
                        table_index += 1
                        self.progress.emit(table_index)  # 更新进度条

        output_file_path = os.path.join(self.output_path, os.path.basename(self.file_path).replace(".docx", "_processed.docx"))
        doc.save(output_file_path)
        self.finished.emit(output_file_path)

    def process_text(self, text):
        # 这里可以实现具体的文本处理逻辑
        # 例如调用外部 API 或进行本地处理
        return text.upper()  # 示例:将文本转换为大写
运行效果
-
用户界面:
- 用户可以选择输入文件和输出文件夹。
- 用户可以设置最小段落长度。
- 用户可以点击“处理文档”按钮开始处理。
-
进度条:
- 进度条会实时显示处理进度,从 0 开始,逐步增加到总元素数量。
-
处理结果:
- 处理完成后,生成的新文件会保存在指定的输出文件夹中。
总结
通过结合 PyQt5 和 Python-docx,我们可以轻松实现一个功能强大的文档处理工具。这个工具不仅提供了直观的用户界面,还能够高效处理文档内容,并实时显示处理进度。希望这篇文章能够帮助你更好地理解和使用这些工具。
如果你有任何问题或建议,欢迎在评论区留言!


 896
896

 被折叠的 条评论
为什么被折叠?
被折叠的 条评论
为什么被折叠?
 到【灌水乐园】发言


