


 本文介绍了Spring中Bean后置处理器的相关内容。该接口有两个方法,分别在初始化前后执行。在BeanFactory和ApplicationContext容器中,后置处理器的注册方式不同。通过demo分析了执行顺序,初始化和销毁时各步骤有明确的先后顺序。
一、
BeanPostProcessor接口(后置处理器)
Bean对象在实例化和依赖注入完毕后,在初始化方法的前后
注意是Bean实例化完毕后及依赖注入完成后触发的
可以根据业务需求在相关方法里添加逻辑
该接口只有两个方法:
postProcessBeforeInitialization:实例化和依赖注入完毕后,在初始化方法的前执行
postProcessAfterInitialization:实例化和依赖注入完毕后,在初始化方法的完成后执行
![[外链图片转存失败(img-wRWL89Rb-1563021207884)(https://img2018.cnblogs.com/blog/1611808/201905/1611808-20190528193109398-1311445339.png)]](https://i-blog.csdnimg.cn/blog_migrate/ea846edfb35e61a83d3d2de52e621f91.png)
二、
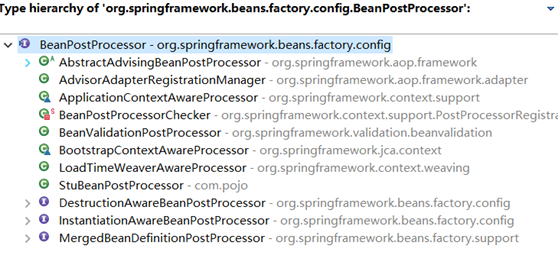
bean的后置处理器BeanPostProcessor 在BeanFactory和ApplicationContext两个容器中有些不同;
1、BeanFactory容器注册bean后置处理器时必须通过代码显示的注册,在IoC容器继承体系中的ConfigurableBeanFactory接口中定义了注册方法
![[外链图片转存失败(img-i1pkRAd7-1563021207885)(https://img2018.cnblogs.com/blog/1611808/201905/1611808-20190529105729319-1174921567.png)]](https://i-blog.csdnimg.cn/blog_migrate/ae795db444a379167a2d403199ff584c.png)
![[外链图片转存失败(img-qme3EGP9-1563021207886)(https://img2018.cnblogs.com/blog/1611808/201905/1611808-20190529110444492-151707575.png)]](https://i-blog.csdnimg.cn/blog_migrate/004abe0871c90c684f2e316999548d0f.png)
![[外链图片转存失败(img-5M8NfwgV-1563021207888)(https://img2018.cnblogs.com/blog/1611808/201905/1611808-20190529110451198-1723955334.png)]](https://i-blog.csdnimg.cn/blog_migrate/6b611503f0ccda33d019863a2dde43b7.png)
2、ApplicationContext容器会自动检测Spring配置文件中那些bean所对应的Java类实现了BeanPostProcessor接口,并自动把它们注册为后置处理器。在创建bean过程中调用它们,所以部署一个后置处理器跟普通的bean没有什么太大区别。
三、通过demo来分析
这是一个pojo类型,StudentA实现了InitializingBean以及DisposableBean还有注解@PostConstruct、@PreDestroy还有自定义方法;具体看我博客
package com.pojo;

import javax.annotation.PostConstruct;
import javax.annotation.PreDestroy;

import org.springframework.beans.factory.DisposableBean;
import org.springframework.beans.factory.InitializingBean;
public class StudentA implements InitializingBean,DisposableBean{
	private String name;
	private String stuId;

	public String getName() {
		return name;
	}

	public void setName(String name) {
		this.name = name;
		System.out.println("设值注入Name:"+name);
	}

 	public String getStuId() {
		return stuId;
	}

	public void setStuId(String stuId) {
		this.stuId = stuId;
		System.out.println("设值注入stuId:"+stuId);
	}

	public StudentA(String name, String stuId) {
		super();
		this.name = name;
		this.stuId = stuId;
	}

	public StudentA() {
		super();
		// TODO Auto-generated constructor stub
		System.out.println("通过无参构造...StudentA实例化");
	}

	@Override
	public String toString() {
		return "StudentA [name=" + name + ", stuId=" + stuId + "]";
	}

	/**
	 * 重写DisposableBean接口里的方法
	 * 在销毁前回调
	 */
	@Override
	public void destroy() throws Exception {
		// TODO Auto-generated method stub
		System.out.println("DisposableBean接口的destroy()");
	}

	/**
	 * 重写InitializingBean接口里的方法
	 * 在实例化并设值注入后初始化回调
	 */
	@Override
	public void afterPropertiesSet() throws Exception {
		// TODO Auto-generated method stub
		System.out.println("InitializingBean接口的afterPropertiesSet()");
	}

	/**
	 * 自定义初始化后回调
	 * 对应着bean里的init-method="start"
	 */
	public void start() {
		// TODO Auto-generated method stub
		System.err.println("自定义初始化回调...init-method=\"start\"");
	}

	/**
	 * 自定义销毁前回调
	 * 对应着bean里的destroy-method="end"
	 */
	public void end() {
		// TODO Auto-generated method stub
		System.out.println("自定义销毁回调...destroy-method=\"end\"");
	}

	/**
	 * 通过@PreDestroy注解
	 * 初始化后回调方法
	 */
	@PostConstruct
	public void postConstruct(){
		System.out.println("初始化后回调方法...@postConstruct注解");
	}


	/**
	 * 通过@PreDestroy注解
	 * 销毁前回调方法
	 */
	@PreDestroy
	public  void preDestory(){
		System.out.println("销毁前回调方法...@preDestory注解");
	}


}
StuBeanPostProcessor实现了BeanPostProcessor接口,重写了它的两个方法
import org.springframework.beans.BeansException;
import org.springframework.beans.factory.config.BeanPostProcessor;

public class StuBeanPostProcessor implements BeanPostProcessor {
	/**
	 * 实例化、依赖注入完毕,
     * 在调用显示的初始化之前完成一些定制的初始化任务
	 */
	@Override
	public Object postProcessBeforeInitialization(Object bean, String beanName) throws BeansException {
		// TODO Auto-generated method stub
		System.out.println("postProcessBeforeInitialization 实例化、依赖注入完毕,初始化之前执行");
		System.out.println("postProcessBeforeInitialization中bean:"+bean+",beanName:"+beanName);
		return bean;
	}

	/**
	 * 实例化、依赖注入、初始化完毕时执行
	 */
	@Override
	public Object postProcessAfterInitialization(Object bean, String beanName) throws BeansException {
		// TODO Auto-generated method stub
		System.out.println("postProcessAfterInitialization初始化完毕时执行");
		System.out.println("postProcessAfterInitialization中bean:"+bean+",beanName:"+beanName);
		return bean;
	}
}
applicationContext.xml
<?xml version="1.0" encoding="UTF-8"?>
<beans xmlns="http://www.springframework.org/schema/beans"
	xmlns:xsi="http://www.w3.org/2001/XMLSchema-instance"
	xmlns:aop="http://www.springframework.org/schema/aop"
	xmlns:context="http://www.springframework.org/schema/context"
	xsi:schemaLocation="http://www.springframework.org/schema/beans http://www.springframework.org/schema/beans/spring-beans-4.3.xsd
		http://www.springframework.org/schema/context http://www.springframework.org/schema/context/spring-context-4.3.xsd
		http://www.springframework.org/schema/aop http://www.springframework.org/schema/aop/spring-aop-4.3.xsd">


		<!-- 如果想使用@ Resource 、@ PostConstruct、@ PreDestroy等注解就必须声明CommonAnnotationBeanPostProcessor -->
	    <context:annotation-config/>

		<!-- 注册studentA对象 -->
		<bean class="com.pojo.StudentA" id="studentA" init-method="start" destroy-method="end">
			<!-- 设值注入 -->
			<property name="name" value="zsl"/>
			<property name="stuId" value="zsl33"/>
		</bean>

		<!-- 注册StuBeanPostProcessor,它继承了BeanPostProcessor -->
		<bean class="com.pojo.StuBeanPostProcessor"/>
</beans>
测试:
import org.springframework.context.ApplicationContext;
import org.springframework.context.support.ClassPathXmlApplicationContext;
import com.pojo.Dog;
import com.pojo.StudentA;
import org.springframework.beans.factory.BeanNameAware;
public class Test {
	@SuppressWarnings("resource")//去警告,问题不大不要慌
	public static void main(String[] args) {
		ClassPathXmlApplicationContext applicationContext =
				new ClassPathXmlApplicationContext("applicationContext.xml");

		StudentA bean = (StudentA) applicationContext.getBean("studentA");
System.out.println(bean);

		/**
		 * 在非web环境下需要手动关闭IOC容器,则需调用registerShutdownHook()方法
		 * 而web环境下已有相应的配置进行关闭IOC容器
		 */
		applicationContext.registerShutdownHook();
	}
}
结果:
![[外链图片转存失败(img-fW44MPkf-1563021207890)(https://img2018.cnblogs.com/blog/1611808/201905/1611808-20190528193122453-1861671825.png)]](https://i-blog.csdnimg.cn/blog_migrate/f0dfaed08c15a1dc3bfa4a323cd3e60a.png)
三、分析
由上面demo可知:
执行顺序:
初始化时:
构造函数Construct ->属性注入 -> postProcessBeforeInitialization接口
->@PostConstruct ->InitializingBean接口 ->bean的init-method自定义的方法 -> postProcessAfterInitialization接口
销毁时:@PreDestroy ->DisposableBean接口 ->bean的destoryMethod自定义的方法
再次强调说明:
BeanPostProcessor接口(后置处理器)
Bean对象在实例化和依赖注入完毕后,在初始化方法的前后
注意是Bean实例化完毕后及依赖注入完成后触发的


 97
97

 被折叠的 条评论
为什么被折叠?
被折叠的 条评论
为什么被折叠?
 到【灌水乐园】发言


