


 这篇博客详细介绍了AngularJS的基本概念和核心特性,包括模块的定义与组织,数据绑定,模板指令,元素与事件指令的使用,以及表单的处理与验证。通过实例演示了ng-bind、ng-model、ng-repeat、ng-if、ng-class等关键指令的用法,帮助读者深入理解AngularJS的应用。
一、一个简单的示例
test.html
<!DOCTYPE html>
<!--将AngularJS应用到HTML文件-->
<html ng-app="todoApp">
<head>
    <title>TO DO List</title>
    <link href="../bootstrap.css" rel="stylesheet"/>
    <link href="../bootstrap-theme.css" rel="stylesheet"/>
    <script src="../angular.js"></script>
    <script>
        // 创建一个数据模型
        var model = {
            user: "Adam",
            /*            items: [{action: "Buy Flowers", done: false},
                            {action: "Get Shoes", done: false},
                            {action: "Collect Tickets", done: true},
                            {action: "Call Joe", done: false}]*/
        };

        // AngularJS应用由一个或多个模块组成。模块是由调用angular.module方法而创建的,如下:
        var todoApp = angular.module("todoApp", []);

        // 创建一个控制器
        todoApp.controller("ToDoCtrl", function ($scope) {
            $scope.todo = model;
            // 创建控制器行为
            $scope.incompleteCount = function () {
                var count = 0;
                angular.forEach($scope.todo.items, function (item) {
                    if (!item.done) {
                        count++
                    }
                });
                return count;
            }
            // 创建依赖于其他行为的行为
            $scope.warningLevel = function () {
                return $scope.incompleteCount() < 3 ? "label-success" : "label-warning";
            }
            // 响应用户输入
            $scope.addNewItem = function (actionText) {
                $scope.todo.items.push({action: actionText, done: false});
            }
        })
        // 创建自定义过滤器
        todoApp.filter("checkedItems", function () {
            return function (items, showComplete) {
                var resultArr = [];
                angular.forEach(items, function (item) {
                    if (item.done == false || showComplete == true) {
                        resultArr.push(item);
                    }
                });
                return resultArr;
            }
        });

        todoApp.run(function ($http) {
            // 使用$http.get方法来创建一个HTTP.GET请求,向服务器请求todo.json文件
/*            调用success方法能够让指定一个将在发往服务器的Ajax请求已完成时被调用的函数,从而服务器获取到的JSON数据将会被解析并创建一个JavaScript对象,
            并传入给success函数作为data的参数,使用收到的data参数对模型进行更新*/
            $http.get("todo.json").success(function (data) {
                model.items = data;
            });
        });
    </script>
</head>
<body ng-controller="ToDoCtrl">
<div class="page-header">
    <h1>
        <!--创建视图1-->
        {{todo.user}}'s To Do List
        <span class="label label-default">total:{{todo.items.length}}</span>
        <span class="label label-default" ng-hide="incompleteCount() == 0" ng-class="warningLevel()">
            incompleteCount:{{incompleteCount()}}
        </span>

    </h1>
</div>
<div class="panel">
    <div class="input-group">
        <input class="form-control" ng-model="actionText"/>
        <span class="input-group-btn">
            <button class="btn btn-default" ng-click="addNewItem(actionText)">Add</button>
         </span>
    </div>
    <table class="table table-striped">
        <thead>
        <tr>
            <th>Description</th>
            <th>Done</th>
        </tr>
        </thead>
        <tbody>
        <!--创建视图2-->
        <!--使用自定义过滤器,对模型数据过滤和排序-->
        <tr ng-repeat="item in todo.items | checkedItems:showComplete | orderBy:'action'">
            <td>{{item.action}}</td>
            <!--使用双向绑定-->
            <td><input type="checkbox" ng-model="item.done"></td>
            <td>{{item.done}}</td>
        </tr>
        </tbody>
    </table>
    <div class="checkbox-inline">
        <!--增加一个复选框,使用ng-model指令来设置一个名为showComplete的模型值,该值通过表格中的ng-repeat指令传给自定义过滤器-->
        <label><input type="checkbox" ng_model="showComplete"> Show Complete</label>
    </div>
</div>
</body>
</html>
二、AngularJS应用剖析
(一)使用模块定义AngularJS组件
1. Module对象的成员方法
|
Name |
Description |
|
animation(name, factory) |
Supports the animation feature |
|
config(callback) |
Registers a function that can be used to configure a module when it is loaded. |
|
constant(key, value) |
Defines a service that returns a constant value. |
|
controller(name, constructor) |
Creates a controller. |
|
directive(name, factory) |
Creates a directive, which extends the standard HTML vocabulary. |
|
factory(name, provider) |
Creates a service. |
|
filter(name, factory) |
Creates a filter that formats data for display to the user. |
|
provider(name, type) |
Creates a service. |
|
name |
Returns the name of the module. |
|
run(callback)
|
Registers a function that is invoked after AngularJS has loaded and configured all of the modules. |
|
service(name, constructor) |
Creates a service. |
|
value(name, value) |
Defines a service that returns a constant value |
2. 示例
<!DOCTYPE html>
<html ng-app="exampleApp">
<head>
    <title>AngularJS Demo</title>
    <link href="../bootstrap.css" rel="stylesheet"/>
    <link href="../bootstrap-theme.css" rel="stylesheet"/>
    <script src="../angular.js"></script>
    <script>
        var myApp = angular.module("exampleApp", []);
        // 定义控制器
        myApp.controller("dayCtrl", function ($scope, days) {
            $scope.day = days.today;
        });
        myApp.controller("tomorrowCtrl", function ($scope, days) {
            $scope.day = days.tomorrow;
        });
/*        myApp.directive("highlight", function () {
            return function (scope, element, attrs) {
                if (scope.day == attrs["highlight"]) {
                    element.css("color", "red");
                }
            }
        });*/

/*        向指令的工厂函数里添加了一个$filter参数,这告诉AngularJS当我的函数被调用时要接受过滤器服务对象。
        $filter服务允许访问所有已定义的过滤器,包括前例中自定义的过滤器。通过名称获取过滤器:*/
        // 定义指令
        myApp.directive("highlight", function ($filter) {
            var dayFilter = $filter("dayName");

            return function (scope, element, attrs) {
                if (dayFilter(scope.day) == attrs["highlight"]) {
                    element.css("color", "red");
                }
            }
        });
        // 定义过滤器
        myApp.filter("dayName", function () {
            var dayNames = ["Sunday", "Monday", "Tuesday", "Wednesday",
                "Thursday", "Friday", "Saturday"];
            return function (input) {
                return angular.isNumber(input) ? dayNames[input] : input;
            };
        });
        var now = new Date();
        myApp.value("nowValue", now);
        // 定义服务
        myApp.service("days", function (nowValue) {
            this.today = nowValue.getDay();
            this.tomorrow = this.today + 1;
        });

    </script>
</head>
<body>
<div class="panel">
    <div class="page-header">
        <h3>AngularJS App</h3>
    </div>
    <h4 ng-controller="dayCtrl" highlight="Wednesday">
        Today is {{day || "(unknown)" | dayName}}
    </h4>
    <h4 ng-controller="tomorrowCtrl">
        Tomorrow is {{day || "(unknown)" | dayName}}
</div>
</body>
</html>
(二)使用模块组织代码
1. 示例
controllers.js
var controllersModule = angular.module("exampleApp.Controllers", []);

controllersModule.controller("dayCtrl", function ($scope, days) {
    $scope.day = days.today;
});

controllersModule.controller("tomorrowCtrl", function ($scope, days) {
    $scope.day = days.tomorrow;
});
filters.js
angular.module("exampleApp.Filters", []).filter("dayName", function () {
    var dayNames = ["Sunday", "Monday", "Tuesday", "Wednesday",
        "Thursday", "Friday", "Saturday"];
    return function (input) {
        return angular.isNumber(input) ? dayNames[input] : input;
    };
});
example.html
<!DOCTYPE html>
<html ng-app="exampleApp">
<head>
    <title>AngularJS Demo</title>
    <link href="../bootstrap.css" rel="stylesheet" />
    <link href="../bootstrap-theme.css" rel="stylesheet" />
    <script src="../angular.js"></script>
    <script src="controllers.js"></script>
    <script src="filters.js"></script>
    <script>
        // 为了对主模块声明依赖,将每个模块的名称添加到一个数组中,并传给模块作为第二个参数
        var myApp = angular.module("exampleApp",
            ["exampleApp.Controllers", "exampleApp.Filters",
                "exampleApp.Services", "exampleApp.Directives"]);

        // Module.confg和Module.run方法注册了那些在AngularJS应用的生命周期的关键时刻所调用的函数。
        // 传给config方法的函数在当前模块被加载后调用,传给run方法的函数在所有模块被加载后调用。
        myApp.constant("startTime", new Date().toLocaleTimeString());
        myApp.config(function (startTime) {
            console.log("Main module config: " + startTime);
        });
        myApp.run(function (startTime) {
            console.log("Main module run: " + startTime);
        });

        angular.module("exampleApp.Directives", [])
            .directive("highlight", function ($filter) {

                var dayFilter = $filter("dayName");

                return function (scope, element, attrs) {
                    if (dayFilter(scope.day) == attrs["highlight"]) {
                        element.css("color", "red");
                    }
                }
            });

        var now = new Date();
        myApp.value("nowValue", now);

        angular.module("exampleApp.Services", [])
            .service("days", function (nowValue) {
                this.today = nowValue.getDay();
                this.tomorrow = this.today + 1;
            })
            .config(function() {
                console.log("Services module config: (no time)");
            })
            .run(function (startTime) {
                console.log("Services module run: " + startTime);
            });
    </script>
</head>
<body>
<div class="panel">
    <div class="page-header">
        <h3>AngularJS App</h3>
    </div>
    <h4 ng-controller="dayCtrl" highlight="Monday">
        Today is {{day || "(unknown)" | dayName}}
    </h4>
    <h4 ng-controller="tomorrowCtrl">
        Tomorrow is {{day || "(unknown)" | dayName}}
    </h4>
</div>
</body>
</html>
其中,config和run回调函数的调用顺序:
(1) The config callback on the exampleApp.Services module
(2) The config callback on the exampleApp module
(3) The run callback on the exampleApp.Services module
(4) The run callback on the exampleApp module
控制台输出结果:

三、使用绑定和模板指令
(一)数据绑定
1. 指令
|
Directive |
Applied As |
Description |
|
ng-bind |
Attribute, class |
Binds the innerText property of an HTML element |
|
ng-bind-html |
Attribute, class |
Creates data bindings using the innerHTML property of an HTML element. This is potentially dangerous because it means that the browser will interpret the content as HTML, rather than content. |
|
ng-bind-template |
Attribute, class |
Similar to the ng-bind directive but allows for multiple template expressions to be specified in the attribute value. |
|
ng-model |
Attribute, class |
Creates a two-way data binding. |
|
ng-non-bindable |
Attribute, class |
Declares a region of content for which data binding will not be performed. |
2. 单向与双向数据绑定
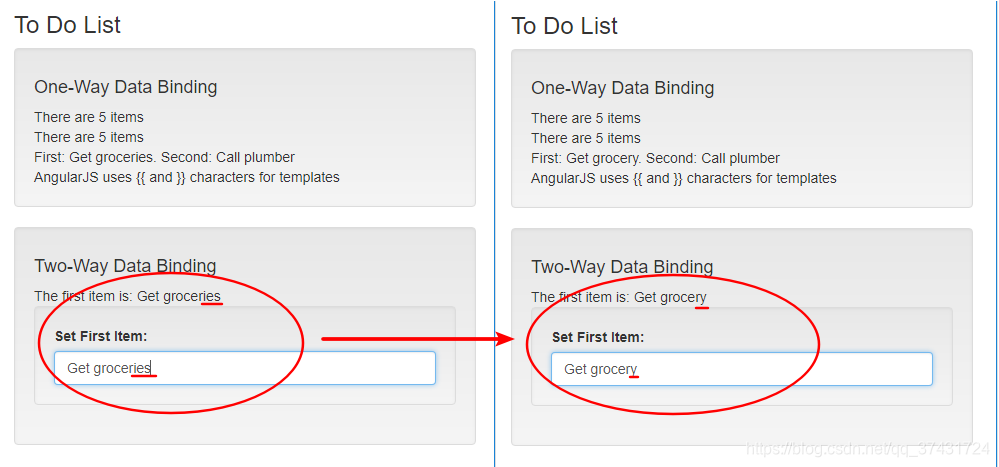
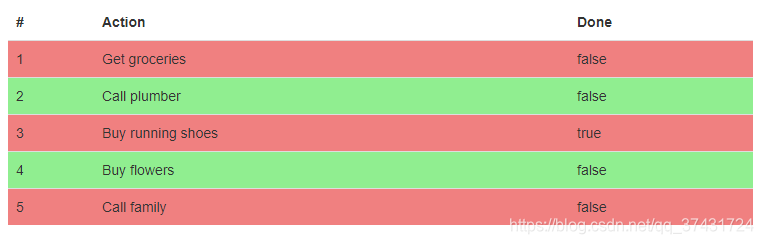
单向绑定,即从数据模型中获得值并插入到HTML元素中。ng-bind指令负责创建单向数据绑定。
双向数据绑定会从两个方向同时跟踪变化,允许元素从用户处收集数据以修改程序的状态。通过ng-model指令创建。
<!DOCTYPE html>
<html ng-app="exampleApp">
<head>
    <title>Directives</title>
    <script src="../angular.js"></script>
    <link href="../bootstrap.css" rel="stylesheet" />
    <link href="../bootstrap-theme.css" rel="stylesheet" />
    <script>
        angular.module("exampleApp", [])
            .controller("defaultCtrl", function ($scope) {
                $scope.todos = [
                    { action: "Get groceries", complete: false },
                    { action: "Call plumber", complete: false },
                    { action: "Buy running shoes", complete: true },
                    { action: "Buy flowers", complete: false },
                    { action: "Call family", complete: false }];
            });
    </script>
</head>
<body>
<div id="todoPanel" class="panel" ng-controller="defaultCtrl">
    <h3 class="panel-header">To Do List</h3>
    <!--创建单向数据绑定-->
    <div class="well">
        <h4>One-Way Data Binding</h4>
        <div>There are {{todos.length}} items</div>

        <div>
            There are <span ng-bind="todos.length"></span> items
        </div>

        <div ng-bind-template=
                     "First: {{todos[0].action}}. Second: {{todos[1].action}}">
        </div>
        <!--阻止内联绑定-->
        <div ng-non-bindable>
            AngularJS uses {{ and }} characters for templates
        </div>
    </div>
    <!--单向数据绑定完-->

    <!--创建双向数据绑定-->
    <div class="well">
        <h4>Two-Way Data Binding</h4>
        <div>The first item is: {{todos[0].action}}</div>
        <div class="form-group well">
            <label for="firstItem">Set First Item:</label>
            <input name="firstItem" class="form-control" ng-model="todos[0].action" />
        </div>
    </div>
    <!--双向数据绑定完-->
</div>
</body>
</html>
数据模型属性上的变化被传播到所有的相关绑定上以保证在整个应用中保持同步。
例如,对input元素的修改会更新数据模型,然后引起内联的单项绑定中所显示值进行更新。
(二)模板指令
1. 模板指令
|
Directive |
Applied As |
Description |
|
ng-cloak |
Attribute, class |
Applies a CSS style that hides inline binding expressions, which can be briefly visible when the document first loads |
|
ng-include |
Element, attribute, class |
Loads, processes, and inserts a fragment of HTML into the Document Object Model |
|
ng-repeat |
Attribute, class |
Generates new copies of a single element and its contents for each object in an array or property on an object |
|
ng-repeat-start |
Attribute, class |
Denotes the start of a repeating section with multiple top-level elements |
|
ng-repeat-end |
Attribute, class |
Denotes the end of a repeating section with multiple top-level elements |
|
ng-switch |
Element, attribute |
Changes the elements in the Document Object Model based on the value of data bindings |
2. 内置的ng-repeat变量
|
Variable |
Description |
|
$index |
Returns the position of the current object or property |
|
$first |
Returns true if the current object is the first in the collection |
|
$middle |
Returns true if the current object is neither the first nor last in the collection |
|
$last |
Returns true if the current object is the last in the collection |
|
$even |
Returns true for the even-numbered objects in a collection |
|
$odd |
Returns true for the odd-numbered objects in a collection |
3. ng-include指令的配置参数
|
Name |
Description |
|
src |
Specifies the URL of the content to load |
|
onload |
Specifies an expression to be evaluated when the content is loaded |
|
autoscroll |
Specifies whether AngularJS should scroll the viewport when the content is loaded |
4. 示例
TemplateDirectives.html
<!DOCTYPE html >
<html ng-app="exampleApp">
<head>
    <title>Directives</title>
    <meta charset="UTF-8">
    <script src="../angular.js"></script>
    <link href="../bootstrap.css" rel="stylesheet"/>
    <link href="../bootstrap-theme.css" rel="stylesheet"/>
    <script>
        angular.module("exampleApp", [])
            .controller("defaultCtrl", function ($scope) {
                $scope.data = {};
                $scope.todos = [
                    {action: "Get groceries", complete: false},
                    {action: "Call plumber", complete: false},
                    {action: "Buy running shoes", complete: true},
                    {action: "Buy flowers", complete: false},
                    {action: "Call family", complete: false}];

                $scope.viewFile = function () {
                    return $scope.showList ? "list.html" : "table.html";
                };
                $scope.reportChange = function () {
                    console.log("Displayed content: " + $scope.viewFile());
                }
            });
    </script>
    <style>
        .odd {
            background-color: beige
        }

        .even {
            background-color: #d6d6d6
        }
    </style>
</head>
<body>
<div ng-controller="defaultCtrl">
    <div class="panel">
        <h3 class="panel-header">To Do List</h3>
        <h4>重复操作对象属性</h4>
        <table class="table">
            <thead>
            <tr>
                <th>Action</th>
                <th>Done</th>
            </tr>
            </thead>
            <tbody>
            <tr ng-repeat="item in todos">
                <td ng-repeat="prop in item">{{prop}}</td>
            </tr>
            </tbody>
        </table>
    </div>

    <div class="panel">
        <h3 class="panel-header">To Do List</h3>
        <h4>使用数据对象的键值进行工作</h4>
        <table class="table">
            <thead>
            <tr>
                <th>Action</th>
                <th>Done</th>
            </tr>
            </thead>
            <tbody>
            <tr ng-repeat="item in todos">
                <td ng-repeat="(key,value) in item">{{key}}={{value}}</td>
            </tr>
            </tbody>
        </table>
    </div>

    <div class="panel">
        <h3 class="panel-header">To Do List</h3>
        <h4>使用内置变量工作</h4>
        <table class="table">
            <thead>
            <tr>
                <th>#</th>
                <th>Action</th>
                <th>Done</th>
            </tr>
            </thead>
            <!--用ng-class设置条纹效果表格-->
            <tr ng-repeat="item in todos" ng-class="$odd ? 'odd' : 'even'">
                <td>{{$index + 1}}</td>
                <td>{{item.action}}</td>
                <td><span ng-if="$first || $last">{{item.complete}}</span></td>
            </tr>
        </table>
    </div>

    <div class="panel">
        <h3 class="panel-header">To Do List</h3>
        <h4>重复生成多个顶层元素</h4>
        <table>
            <tbody>
            <tr ng-repeat-start="item in todos">
                <td>This is item {{$index}}</td>
            </tr>
            <tr>
                <td>The action is: {{item.action}}</td>
            </tr>
            <tr ng-repeat-end>
                <td>Item {{$index}} is {{$item.complete? '' : "not "}} complete</td>
            </tr>
            </tbody>
        </table>
    </div>

    <div class="panel">
        <h3 class="panel-header">To Do List</h3>
        <h4>使用局部视图</h4>
        <div class="well">
            <div class="checkbox">
                <label>
                    <input type="checkbox" ng-model="showList">
                    Use the list view
                </label>
            </div>
        </div>
        <!--src="viewFile()"动态地选择局部视图,onload="reportChange()"将ng-include指令用作属性-->
        <ng-include src="viewFile()" onload="reportChange()"></ng-include>
    </div>

    <div class="panel">
        <h3 class="panel-header">To Do List</h3>
        <h4>ng-switch</h4>
        <div class="well">
            <div class="radio" ng-repeat="button in ['None', 'Table', 'List']">
                <label ng-cloak>
                    <input type="radio" ng-model="data.mode"
                           value="{{button}}" ng-checked="$first"/>
                    {{button}}
                </label>
            </div>
        </div>

        <!--n-switch指令中使用了on属性指定了一个表达式,用于计算并决定哪部分内容被显示出来。
        本例制定了将使用dta.mode模型属性的值,而该值是由于那些单选按钮所管理的-->
        <!--ng-cloak能够在AngularJS结束对内容的处理之前先将其隐藏(隐藏未处理的内联模板绑定表达式)-->
        <div ng-switch on="data.mode" ng-cloak>
            <div ng-switch-when="Table">
                <table class="table">
                    <thead>
                    <tr>
                        <th>#</th>
                        <th>Action</th>
                        <th>Done</th>
                    </tr>
                    </thead>
                    <tr ng-repeat="item in todos" ng-class="$odd ? 'odd' : 'even'">
                        <td>{{$index + 1}}</td>
                        <td ng-repeat="prop in item">{{prop}}</td>
                    </tr>
                </table>
            </div>
            <div ng-switch-when="List">
                <ol>
                    <li ng-repeat="item in todos">
                        {{item.action}}<span ng-if="item.complete"> (Done)</span>
                    </li>
                </ol>
            </div>
            <div ng-switch-default>
                Select another option to display a layout
            </div>
        </div>
    </div>
</div>
</body>
</html>
table.html
<table class="table">
    <thead>
    <tr>
        <th>#</th>
        <th>Action</th>
        <th>Done</th>
    </tr>
    </thead>
    <!--用ng-class设置条纹效果表格-->
    <tr ng-repeat="item in todos" ng-class="$odd ? 'odd' : 'even'">
        <!--使用ng-repeat内置变量$index工作-->
        <td>{{$index + 1}}</td>
        <td ng-repeat="prop in item">{{prop}}</td>
    </tr>
</table>
list.html
<ol>
    <li ng-repeat="item in todos">
        {{item.action}}
        <span ng-if="item.complete"> (Done)</span>
    </li>
</ol>
四、使用元素与事件指令
(一)元素指令
|
Directive |
Applied As |
Description |
|
ng-if |
Attribute |
Adds and removes elements from the DOM |
|
ng-class |
Attribute, class |
Sets the class attribute for an element |
|
ng-class-even |
Attribute, class |
Sets the class attribute for even-numbered elements generated within the ng-repeat directive |
|
ng-class-odd |
Attribute, class |
Sets the class attribute for odd-numbered elements generated within the ng-repeat directive |
|
ng-hide |
Attribute, class |
Shows and hides elements in the DOM |
|
ng-show |
Attribute, class |
Shows and hides elements in the DOM |
|
ng-style |
Attribute, class |
Sets one or more CSS properties |
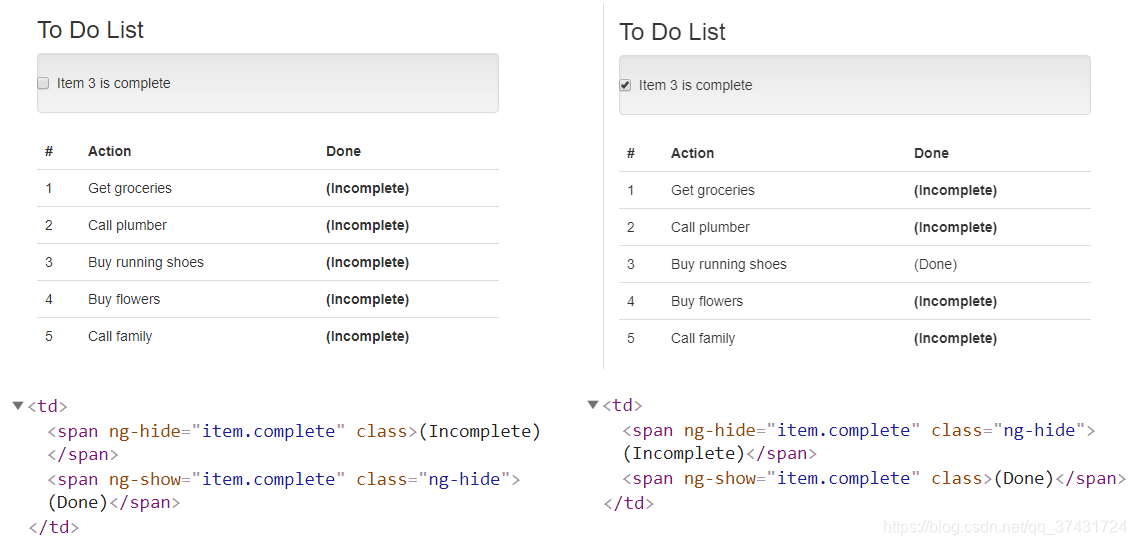
1. ng-hide和ng-show
ng-hide指令会将操作的元素保留在DOM中,这个类的CSS样式将display属性设为none,从而视图中移除该元素,对用户隐藏。
(1)示例
<!DOCTYPE html>
<html ng-app="exampleApp">
<head>
    <title>Directives</title>
    <script src="../angular.js"></script>
    <link href="../bootstrap.css" rel="stylesheet"/>
    <link href="../bootstrap-theme.css" rel="stylesheet"/>
    <script>
        angular.module("exampleApp", [])
            .controller("defaultCtrl", function ($scope) {
                $scope.todos = [
                    {action: "Get groceries", complete: false},
                    {action: "Call plumber", complete: false},
                    {action: "Buy running shoes", complete: true},
                    {action: "Buy flowers", complete: false},
                    {action: "Call family", complete: false}];
            });
    </script>
    <style>
        td > *:first-child {
            font-weight: bold
        }
    </style>
</head>
<body>
<div id="todoPanel" class="panel" ng-controller="defaultCtrl">
    <h3 class="panel-header">To Do List</h3>
    <div class="checkbox well">
        <label for="">
            <input type="checkbox" ng-model="todos[2].complete">
            Item 3 is complete
        </label>
    </div>
    <table class="table">
        <thead>
        <tr>
            <th>#</th>
            <th>Action</th>
            <th>Done</th>
        </tr>
        </thead>
        <tr ng-repeat="item in todos">
            <td>{{$index + 1}}</td>
            <td>{{item.action}}</td>
            <td>
                <span ng-hide="item.complete">(Incomplete)</span>
                <span ng-show="item.complete">(Done)</span>
            </td>
        </tr>
    </table>
</div>
</body>
</html>
(2)运行结果
2. ng-if
(1)示例
<td>
    <span ng-if="!item.complete">(Incomplete)</span>
    <span ng-if="item.complete">(Done)</span>
</td>
(2)运行结果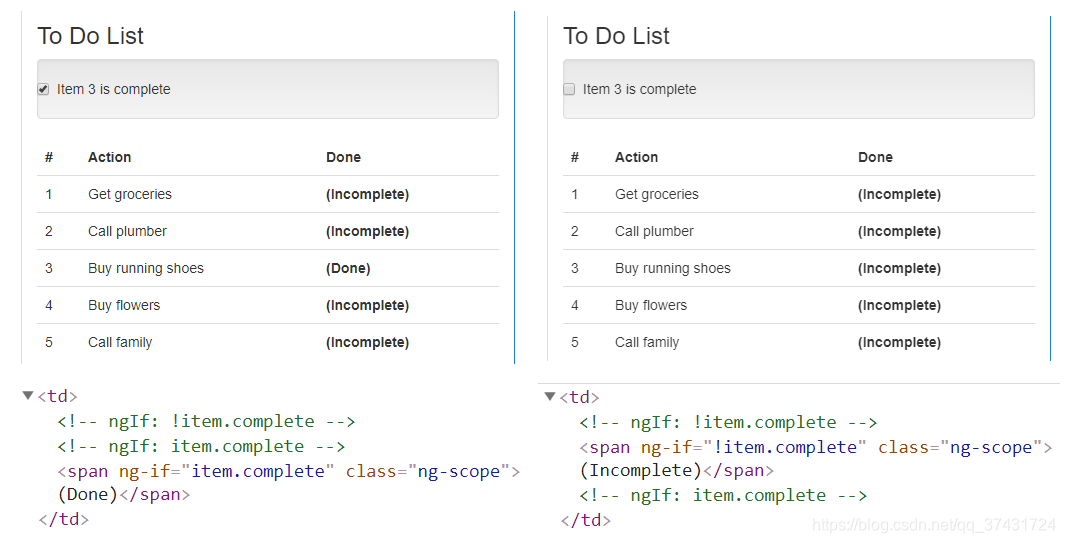
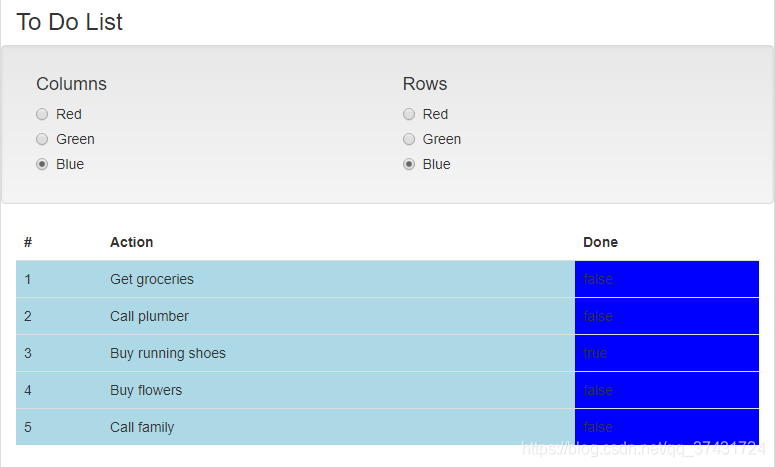
3. ng-class与ng-style
(1)示例
<!DOCTYPE html>
<html ng-app="exampleApp">
<head>
    <title>Directives</title>
    <script src="../angular.js"></script>
    <link href="../bootstrap.css" rel="stylesheet" />
    <link href="../bootstrap-theme.css" rel="stylesheet" />
    <script>
        angular.module("exampleApp", [])
            .controller("defaultCtrl", function ($scope) {
                $scope.todos = [
                    { action: "Get groceries", complete: false },
                    { action: "Call plumber", complete: false },
                    { action: "Buy running shoes", complete: true },
                    { action: "Buy flowers", complete: false },
                    { action: "Call family", complete: false }];

                $scope.buttonNames = ["Red", "Green", "Blue"];

                $scope.settings = {
                    Rows: "Red",
                    Columns: "Green"
                };
            });
    </script>
    <style>
        tr.Red { background-color: lightcoral; }
        tr.Green { background-color: lightgreen;}
        tr.Blue { background-color: lightblue; }
    </style>
</head>
<body>
<div id="todoPanel" class="panel" ng-controller="defaultCtrl">
    <h3 class="panel-header">To Do List</h3>

    <div class="row well">
        <div class="col-sm-6" ng-repeat="(key, val) in settings">
            <h4>{{key}}</h4>
            <div class="radio" ng-repeat="button in buttonNames">
                <label>
                    <input type="radio" ng-model="settings[key]"
                           value="{{button}}">{{button}}
                </label>
            </div>
        </div>
    </div>

    <table class="table">
        <thead>
        <tr><th>#</th><th>Action</th><th>Done</th></tr>
        </thead>
        <!--用ng-class配置行颜色-->
        <tr ng-repeat="item in todos" ng-class="settings.Rows">
            <td>{{$index + 1}}</td>
            <td>{{item.action}}</td>
            <!--用ng-style设置列颜色-->
            <td ng-style="{'background-color': settings.Columns}">
                {{item.complete}}
            </td>
        </tr>
    </table>
</div>
</body>
</html>
(2)运行结果
4. ng-class-even和ng-class-odd
(1)示例
<table class="table">
   <thead>
        <tr>
            <th>#</th>
            <th>Action</th>
            <th>Done</th>
        </tr>
    </thead>
    <tr ng-repeat="item in todos" ng-class-even="settings.Rows"
        ng-class-odd="settings.Columns">
        <td>{{$index + 1}}</td>
        <td>{{item.action}}</td>
        <td>{{item.complete}}</td>
    </tr>
</table>
(2)运行结果
(二)事件指令
|
Directive |
Applied As |
Description |
|
ng-blur |
Attribute, class
|
Specifies a custom behavior for the blur event, which is triggered when an element loses the focus. |
|
ng-change |
Attribute, class
|
Specifies a custom behavior for the change event, which is triggered by form elements when their state of content is changed (a check box being checked, the text in an input element being edited, and so on). |
|
ng-click |
Attribute, class
|
Specifies a custom behavior for the click event, which is triggered when the user clicks the mouse/pointer. |
|
ng-copy ng-cut ng-paste |
Attribute, class
|
Specifies a custom behavior for the copy, cut, and paste events.
|
|
ng-dblclick |
Attribute, class
|
Specifies a custom behavior for the dblclick event, which is triggered when the user double-clicks the mouse/pointer. |
|
ng-focus |
Attribute, class
|
Specifies a custom behavior for the focus event, which is triggered when an element gains the focus. |
|
ng-keydown ng-keypress ng-keyup |
Attribute, class
|
Specifies custom behavior for the keydown, keyup, and keypress events, which are triggered when the user presses/releases a key. |
|
ng-mousedown ng-mouseenter ng-mouseleave ng-mousemove ng-mouseover ng-mouseup |
Attribute, class
|
Specifies custom behavior for the six standard mouse events (mousedown, mouseenter, mouseleave, movemove, mouseover, and mouseup), which are triggered when the user interacts with an element using the mouse/pointer.
|
|
ng-submit |
Attribute, class
|
Specifies a custom behavior for the submit event, which is triggered when a form is submitted. |
1. 示例
<!DOCTYPE html>
<html ng-app="exampleApp">
<head>
    <title>Directives</title>
    <script src="../angular.js"></script>
    <link href="../bootstrap.css" rel="stylesheet" />
    <link href="../bootstrap-theme.css" rel="stylesheet" />
    <script>
        angular.module("exampleApp", [])
            .controller("defaultCtrl", function ($scope, $location) {
                $scope.todos = [
                    { action: "Get groceries", complete: false },
                    { action: "Call plumber", complete: false },
                    { action: "Buy running shoes", complete: true },
                    { action: "Buy flowers", complete: false },
                    { action: "Call family", complete: false }];
                $scope.buttonNames = ["Red", "Green", "Blue"];
                $scope.data = {
                    rowColor: "Blue",
                    columnColor: "Green"
                };
                $scope.handleEvent = function (e) {
                    console.log("Event type: " + e.type);
                    $scope.data.columnColor = e.type == "mouseover" ? "Green" : "Blue";
                };
                $scope.message = "Tap Me!";
            }).directive("tap", function () {
            return function (scope, elem, attrs) {
                elem.on("touchstart touchend", function () {
                    scope.$apply(attrs["tap"]);
                });
            }
        });
    </script>
    <style>
        .Red { background-color: lightcoral; }
        .Green { background-color: lightgreen; }
        .Blue { background-color: lightblue; }
    </style>
</head>
<body>
<div id="todoPanel" class="panel" ng-controller="defaultCtrl">
    <h3 class="panel-header">To Do List</h3>

    <div class="well" tap="message = 'Tapped!'">
        {{message}}
    </div>

    <div class="well">
        <span ng-repeat="button in buttonNames">
            <!--当按钮中任意一个被单机是,所指定的表达式将会被计算,直接更新数据模型中的值-->
            <button class="btn btn-info" ng-click="data.rowColor = button">
                {{button}}
            </button>
        </span>
    </div>

    <table class="table">
        <thead>
        <tr><th>#</th><th>Action</th><th>Done</th></tr>
        </thead>
        <!--使用ng-mouseente和ng-mouseleave指令,调用handleEvent行为-->
        <tr ng-repeat="item in todos" ng-class="data.rowColor"
            ng-mouseenter="handleEvent($event)"
            ng-mouseleave="handleEvent($event)">
            <td>{{$index + 1}}</td>
            <td>{{item.action}}</td>
            <td ng-class="data.columnColor">{{item.complete}}</td>
        </tr>
    </table>
</div>
</body>
</html>
(三)特殊属性
1. 布尔属性
(1)指令
|
Directive |
Applied As |
Description |
|
ng-checked |
Attribute |
Manages the checked attribute (used on input elements) |
|
ng-disabled |
Attribute |
Manages the disabled attribute (used on input and button elements) |
|
ng-open |
Attribute |
Manages the open attribute (used on details elements) |
|
ng-readonly |
Attribute |
Manages the readonly attribute (used on input elements) |
|
ng-selected |
Attribute |
Manages the selected attribute (used on option elements) |
|
ng-href |
Attribute |
Sets the href attribute on a elements. |
|
ng-src |
Attribute |
Sets the src attribute on img elements. |
|
ng-srcset |
Attribute |
Sets the srcset attribute on img elements. The srcset attribute is a draft standard |
(2)示例
<!DOCTYPE html>
<html ng-app="exampleApp">
<head>
<title>Directives</title>
<script src="angular.js"></script>
<link href="bootstrap.css" rel="stylesheet" />
<link href="bootstrap-theme.css" rel="stylesheet" />
<script>
angular.module("exampleApp", [])
.controller("defaultCtrl", function ($scope) {
$scope.dataValue = false;
});
</script>
</head>
<body>
<div id="todoPanel" class="panel" ng-controller="defaultCtrl">
<h3 class="panel-header">To Do List</h3>
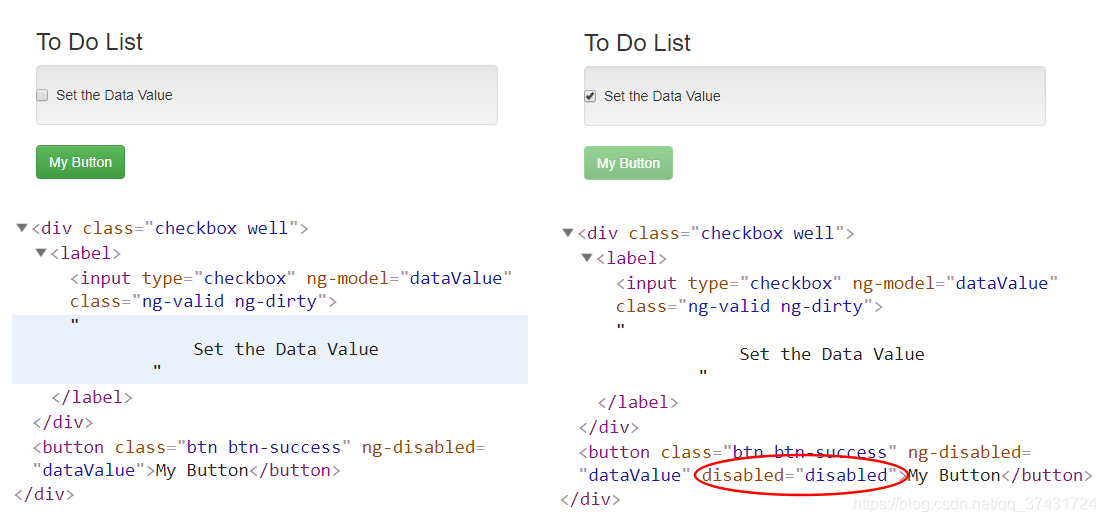
<div class="checkbox well">
<label>
<input type="checkbox" ng-model="dataValue">
Set the Data Value
</label>
</div>
<button class="btn btn-success" ng-disabled="dataValue">My Button</button>
</div>
</body>
</html>
(3)运行结果
四、使用表单
(一)表单元素使用双向数据绑定
1. 示例
<!DOCTYPE html>
<html ng-app="exampleApp">
<head>
<title>Forms</title>
<script src="../angular.js"></script>
<link href="../bootstrap.css" rel="stylesheet" />
<link href="../bootstrap-theme.css" rel="stylesheet" />
<script>
angular.module("exampleApp", [])
.controller("defaultCtrl", function ($scope) {
$scope.todos = [
{ action: "Get groceries", complete: false },
{ action: "Call plumber", complete: false },
{ action: "Buy running shoes", complete: true },
{ action: "Buy flowers", complete: false },
{ action: "Call family", complete: false }];
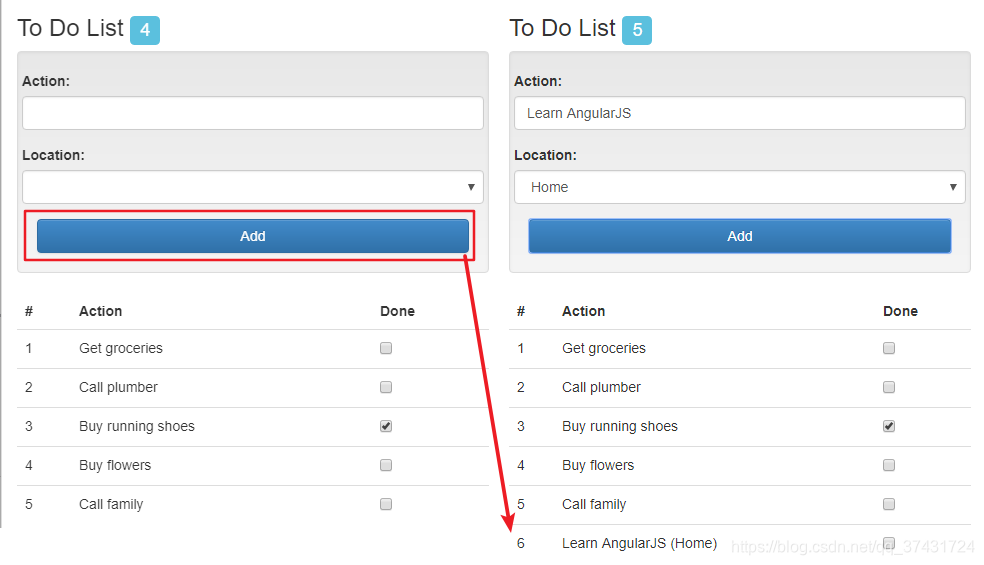
// 函数接收action和location属性的对象最为参数,并将一个新的对象添加到一个表示待办事项列表的数组里
$scope.addNewItem = function (newItem) {
if (angular.isDefined(newItem) && angular.isDefined(newItem.action)
&& angular.isDefined(newItem.location)) {
$scope.todos.push({
action: newItem.action + " (" + newItem.location + ")",
complete: false
});
}
};
});
</script>
</head>
<body>
<div id="todoPanel" class="panel" ng-controller="defaultCtrl">
<h3 class="panel-header">
To Do List
<span class="label label-info">
{{ (todos | filter: {complete: 'false'}).length}}
</span>
</h3>
<div class="row">
<div class="col-xs-6">
<div class="well">
<div class="form-group row">
<label for="actionText">Action:</label>
<!--使用ng-model指令用户更新未曾显式定义的模型属性值,不是领域模型的一部分,但在用户单击按钮元素后调用-->
<input id="actionText" class="form-control" ng-model="newTodo.action">
</div>
<div class="form-group row">
<label for="actionLocation">Location:</label>
<!--在上面input或select元素改变时,AngularJS将自动创建出newTode对象,并根据用户正在使用的具体元素赋值给对象的action或location属性-->
<select id="actionLocation" class="form-control" ng-model="newTodo.location">
<option>Home</option>
<option>Office</option>
<option>Mall</option>
</select>
</div>
<!--用ng-click指令将newTodo对象传递给addNewItem方法-->
<button class="btn btn-primary btn-block" ng-click="addNewItem(newTodo)">
Add
</button>
</div>
</div>
<div class="col-xs-6">
<table class="table">
<thead>
<tr><th>#</th><th>Action</th><th>Done</th></tr>
</thead>
<tr ng-repeat="item in todos">
<td>{{$index + 1}}</td>
<td>{{item.action}}</td>
<td>
<input type="checkbox" ng-model="item.complete">
</td>
</tr>
</table>
</div>
</div>
</div>
</body>
</html>
2.运行结果
(二)校验表单并提供校验反馈信息
1. 表单指令所定义的检验变量
|
Variable |
Description |
|
$pristine |
Returns true if the user has not interacted with the element/form |
|
$dirty |
Returns true if the user has interacted with the element/form |
|
$valid |
Returns true if the contents of the element/form are valid |
|
$invalid |
Returns true if the contents of the element/form are invalid |
|
$error |
Provides details of validation errors |
2. AngularJS校验中用到的类
|
Variable |
Description |
|
ng-pristine |
Elements that the user has not interacted are added to this class. |
|
ng-dirty |
Elements that the user has interacted are added to this class. |
|
ng-valid |
Elements that are valid are in this class. |
|
ng-invalid |
Elements that are not valid are in this class. |
3. 示例
<!DOCTYPE html>
<html ng-app="exampleApp">
<head>
    <title>Forms</title>
    <script src="../angular.js"></script>
    <link href="../bootstrap.css" rel="stylesheet" />
    <link href="../bootstrap-theme.css" rel="stylesheet" />
    <script>
        angular.module("exampleApp", [])
            .controller("defaultCtrl", function ($scope) {
                $scope.addUser = function (userDetails) {
                    $scope.message = userDetails.name
                        + " (" + userDetails.email + ") (" + userDetails.agreed + ")";
                }

                $scope.message = "Ready";

                $scope.getError = function (error) {
                    if (angular.isDefined(error)) {
                        if (error.required) {
                            return "Please enter a value";
                        } else if (error.email) {
                            return "Please enter a valid email address";
                        }
                    }
                };
            });
    </script>
    <style>
        form .ng-invalid.ng-dirty { background-color: lightpink; }
        form .ng-valid.ng-dirty { background-color: lightgreen; }
        span.summary.ng-invalid { color: red; font-weight: bold; }
        span.summary.ng-valid { color: green; }
        div.error {color: red; font-weight: bold;}
    </style>
</head>
<body>
<div id="todoPanel" class="panel" ng-controller="defaultCtrl">
    <form name="myForm" novalidate ng-submit="addUser(newUser)">
        <div class="well">
            <div class="form-group">
                <label>Name:</label>
                <input name="userName" type="text" class="form-control"
                       required ng-model="newUser.name">
            </div>
            <div class="form-group">
                <label>Email:</label>
                <input name="userEmail" type="email" class="form-control"
                       required ng-model="newUser.email">
                <!--为了减少反馈元素的数量,将信息统一合并到控制器行为中,并使用该方法-->
                <div class="error" ng-show="myForm.userEmail.$invalid && myForm.userEmail.$dirty">
                    {{getError(myForm.userEmail.$error)}}
                </div>
                <!--原方法如下,这样可能使页面标记中产生一大堆存在想用冗余信息的元素-->
<!--
                <div class="error"
                     ng-show="myForm.userEmail.$invalid && myForm.userEmail.$dirty">
                        <span ng-show="myForm.userEmail.$error.email">
                            Please enter a valid email address
                        </span>
                    <span ng-show="myForm.userEmail.$error.required">
                            Please enter a value
                        </span>
                </div>
-->
            </div>
            <div class="checkbox">
                <label>
                    <input name="agreed" type="checkbox"
                           ng-model="newUser.agreed" required>
                    I agree to the terms and conditions
                </label>
            </div>
            <button type="submit" class="btn btn-primary btn-block"
                    ng-disabled="myForm.$invalid">OK</button>
        </div>
        <div class="well">
            Message: {{message}}
            <div>
                Valid:
                <span class="summary"
                      ng-class="myForm.$valid ? 'ng-valid' : 'ng-invalid'">
                        {{myForm.$valid}}
                    </span>
            </div>
        </div>
    </form>
</div>
</body>
</html>
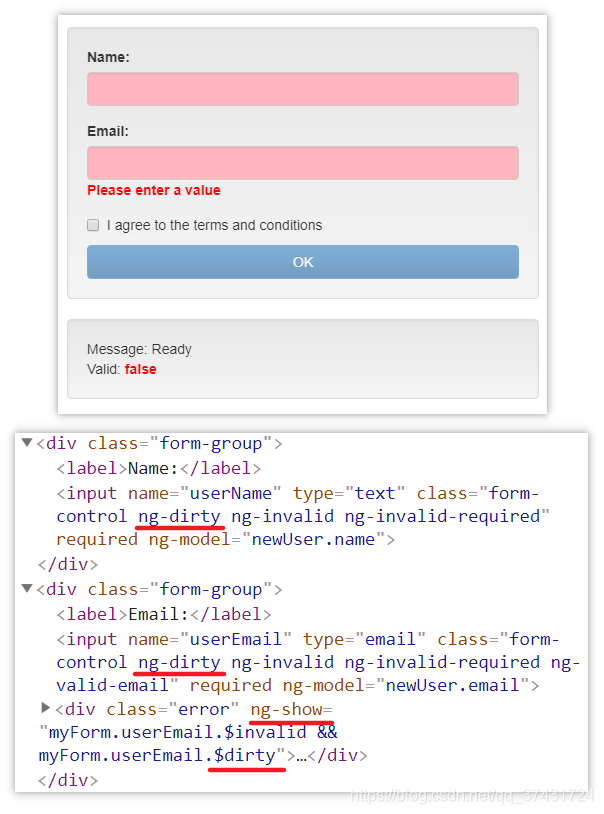
4. 运行结果
发生交互前,所有元素都是ng-pristine类成员。
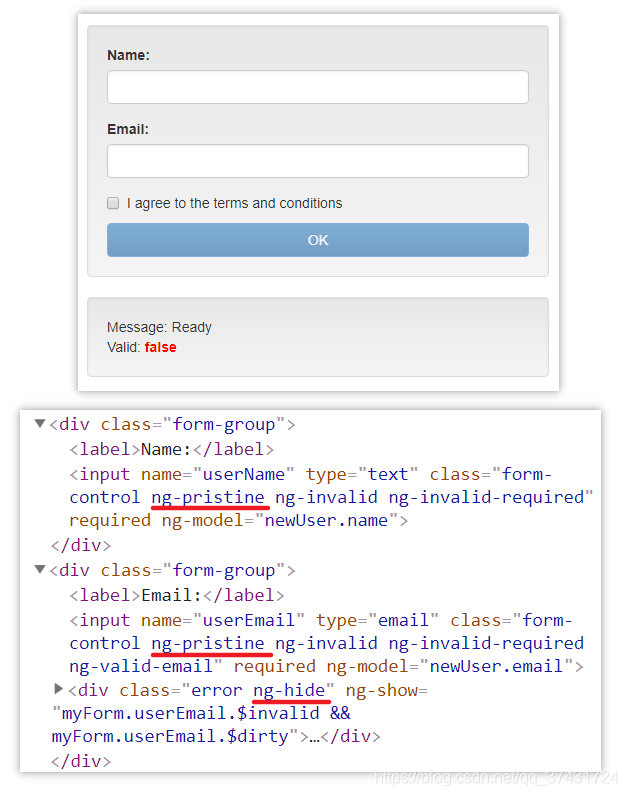
开始输入时,AngularJS将该元素从ng-pristine类中移到ng-dirty类中,并开始检验内容。
检验有效时,AngularJS将该元素从ng-invalid类中移除并添加到ng-valid中。
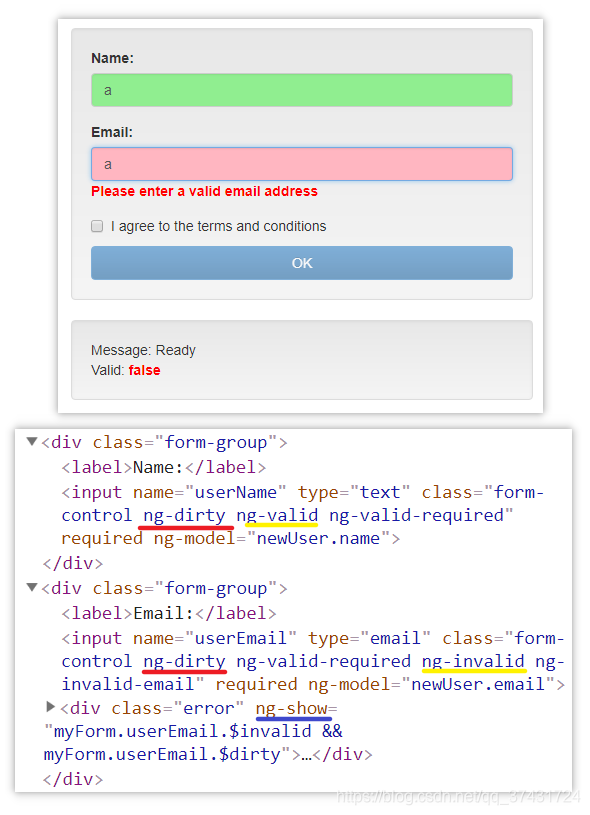
删除字符,元素仍在ng-dirty类中,可见内容一旦改变就无法回到ng-pristine中了
(三)延迟表单反馈
1. 示例
<!DOCTYPE html>
<html ng-app="exampleApp">
<head>
<title>Forms</title>
<script src="../angular.js"></script>
<link href="../bootstrap.css" rel="stylesheet" />
<link href="../bootstrap-theme.css" rel="stylesheet" />
<script>
angular.module("exampleApp", [])
.controller("defaultCtrl", function ($scope) {
$scope.addUser = function (userDetails) {
if (myForm.$valid) {
$scope.message = userDetails.name
+ " (" + userDetails.email + ") ("
+ userDetails.agreed + ")";
} else {
$scope.showValidation = true;
}
}
$scope.message = "Ready";
$scope.getError = function (error) {
if (angular.isDefined(error)) {
if (error.required) {
return "Please enter a value";
} else if (error.email) {
return "Please enter a valid email address";
}
}
}
});
</script>
<style>
form.validate .ng-invalid-required.ng-dirty { background-color: lightpink; }
form.validate .ng-invalid-email.ng-dirty {
background-color: lightgoldenrodyellow; }
div.error { color: red; font-weight: bold; }
</style>
</head>
<body>
<div id="todoPanel" class="panel" ng-controller="defaultCtrl">
<form name="myForm" novalidate ng-submit="addUser(newUser)"
ng-class="showValidation ? 'validate' : ''">
<div class="well">
<div class="form-group">
<label>Email:</label>
<input name="userEmail" type="email" class="form-control"
required ng-model="newUser.email">
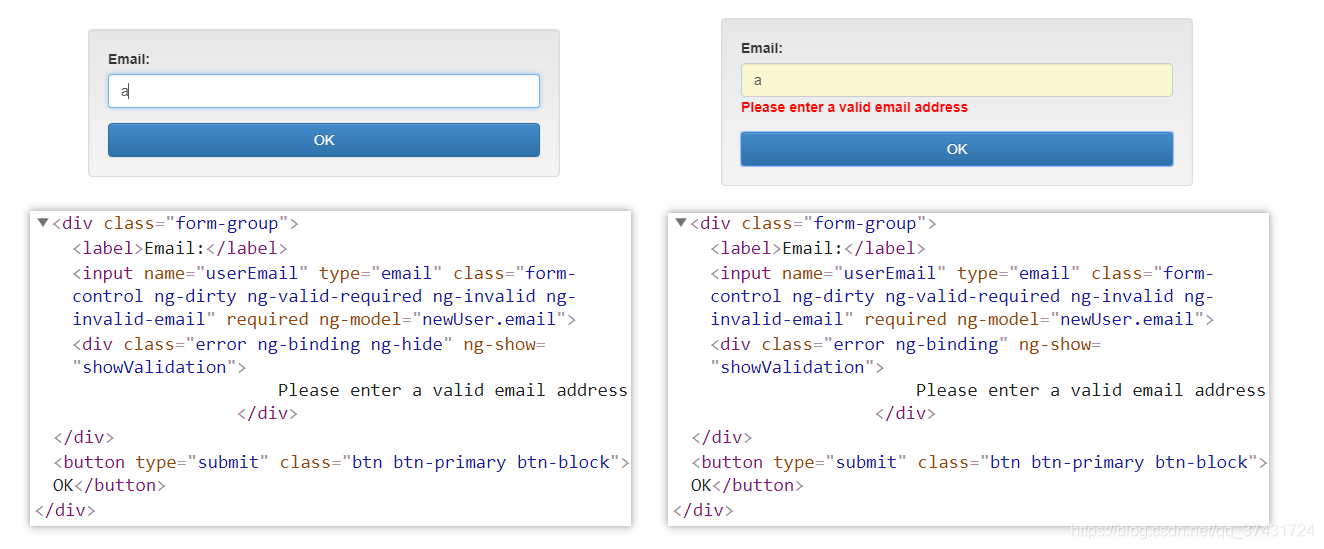
<div class="error" ng-show="showValidation">
{{getError(myForm.userEmail.$error)}}
</div>
</div>
<button type="submit" class="btn btn-primary btn-block">OK</button>
</div>
</form>
</div>
</body>
</html>
2. 运行结果
点击提交后才检验输入内容
(四)使用表单指令属性
1. 适用于input元素的属性
|
Name |
Description |
|
ng-model |
Specifies a two-model binding |
|
ng-change |
Specifies an expression that is evaluated when the contents of the element are changed |
|
ng-minlength |
Sets a minimum number of characters required for the element to be valid |
|
ng-maxlength |
Sets a maximum number of characters required for the element to be valid |
|
ng-pattern |
Sets a regular expression. The contents of the element must match this pattern in order to be valid |
|
ng-required |
Sets the value of the required attribute with a data binding |
2. 当type属性为checkbox时可适用于input元素的额外属性
|
Name |
Description |
|
ng-model |
Specifies a two-model binding, as described earlier in this chapter |
|
ng-change |
Specifies an expression that is evaluated when the contents of the element are changed |
|
ng-true-value |
Specifies the value that the model binding expression will be set to when the element is checked |
|
ng-false-value |
Specifies the value that the model binding expression will be set to when the element is unchecked |
3. 示例
<!DOCTYPE html>
<html ng-app="exampleApp">
<head>
<title>Forms</title>
<meta charset="UTF-8">
<script src="../angular.js"></script>
<link href="../bootstrap.css" rel="stylesheet" />
<link href="../bootstrap-theme.css" rel="stylesheet" />
<script>
angular.module("exampleApp", [])
.controller("defaultCtrl", function ($scope) {
$scope.requireValue = true;
$scope.matchPattern = new RegExp("^[a-z]");
$scope.todos = [
{ id: 100, place: "Store", action: "Get groceries", complete: false },
{ id: 200, place: "Home", action: "Call plumber", complete: false },
{ id: 300, place: "Store", action: "Buy running shoes", complete: true }];
});
</script>
</head>
<body>
<div id="todoPanel" class="panel" ng-controller="defaultCtrl">
<form name="myForm" novalidate>
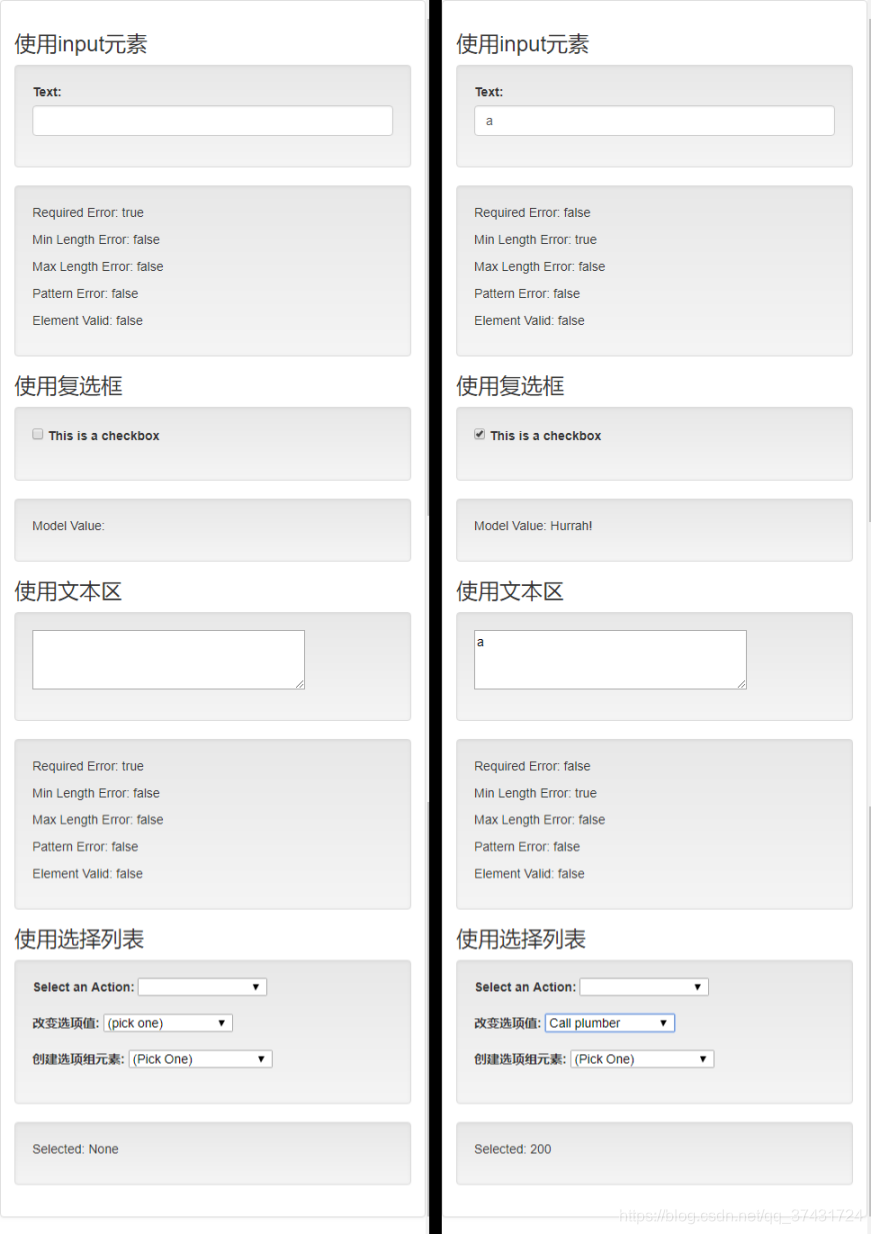
<h3>使用input元素</h3>
<div class="well">
<div class="form-group">
<label>Text:</label>
<input name="sample1" class="form-control" ng-model="inputValue"
ng-required="requireValue" ng-minlength="3"
ng-maxlength="10" ng-pattern="matchPattern">
</div>
</div>
<div class="well">
<p>Required Error: {{myForm.sample1.$error.required}}</p>
<p>Min Length Error: {{myForm.sample1.$error.minlength}}</p>
<p>Max Length Error: {{myForm.sample1.$error.maxlength}}</p>
<p>Pattern Error: {{myForm.sample1.$error.pattern}}</p>
<p>Element Valid: {{myForm.sample1.$valid}}</p>
</div>
<h3>使用复选框</h3>
<div class="well">
<div class="form-group">
<label>
<input name="sample2" type="checkbox" ng-model="inputValue2"
ng-true-value="Hurrah!" ng-false-value="Boo!">
This is a checkbox
</label>
</div>
</div>
<div class="well">
<p>Model Value: {{inputValue2}}</p>
</div>
<h3>使用文本区</h3>
<div class="well">
<div class="form-group">
<textarea name="sample3" cols="40" rows="3"
ng-model="textValue"
ng-required="requireValue" ng-minlength="3"
ng-maxlength="10" ng-pattern="matchPattern">
</textarea>
</div>
</div>
<div class="well">
<p>Required Error: {{myForm.sample3.$error.required}}</p>
<p>Min Length Error: {{myForm.sample3.$error.minlength}}</p>
<p>Max Length Error: {{myForm.sample3.$error.maxlength}}</p>
<p>Pattern Error: {{myForm.sample3.$error.pattern}}</p>
<p>Element Valid: {{myForm.sample3.$valid}}</p>
</div>
<h3>使用选择列表</h3>
<div class="well">
<div class="form-group">
<label>Select an Action:</label>
<select ng-model="selectValue"
ng-options="item.action for item in todos">
</select>
</div>
<div class="form-group">
<label>改变选项值:</label>
<select ng-model="selectValue"
ng-options="item.id as item.action for item in todos">
<option value="">(pick one)</option>
</select>
</div>
<div class="form-group">
<label>创建选项组元素:</label>
<select ng-model="selectValue"
ng-options="item.action group by item.place for item in todos">
<option value="">(Pick One)</option>
</select>
</div>
</div>
<div class="well">
<p>Selected: {{selectValue || 'None'}}</p>
</div>
</form>
</div>
</body>
</html>
4. 运行结果


 1781
1781

 被折叠的 条评论
为什么被折叠?
被折叠的 条评论
为什么被折叠?
 到【灌水乐园】发言


