


文章目录
- 一、分布式事务解决方案
- 二、SpringCloud Alibaba Sentinel
- 三、微服务整体概要及部署
一、分布式事务解决方案
1、本地事务注解【解读】
事务管理提供的注解,在一个方法中加上了@Transactional这个注解,这个方法就将是有事务的,方法内的操作要么一起提交、要么一起回滚
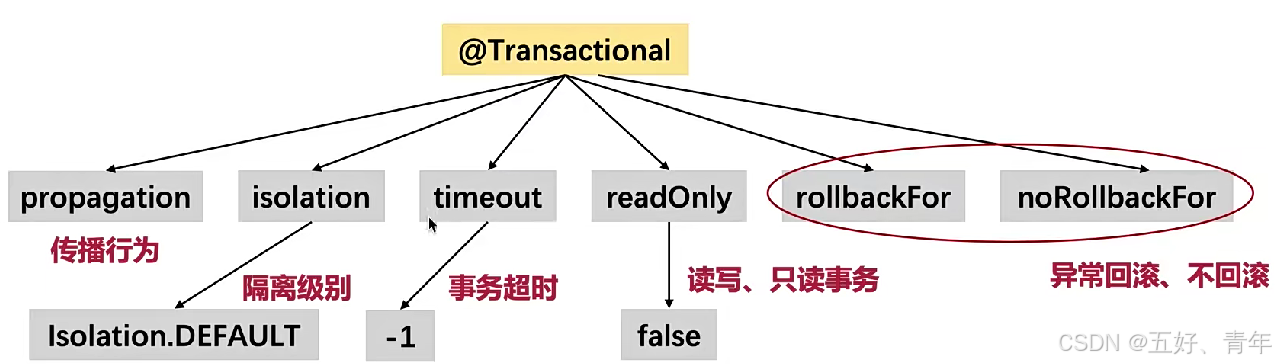
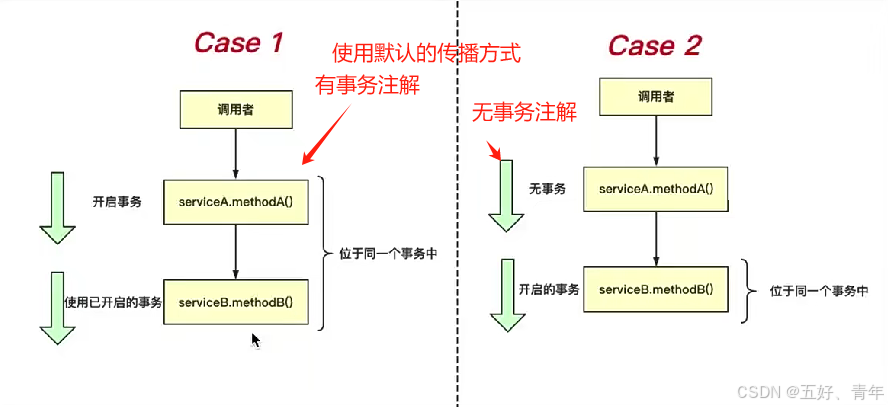
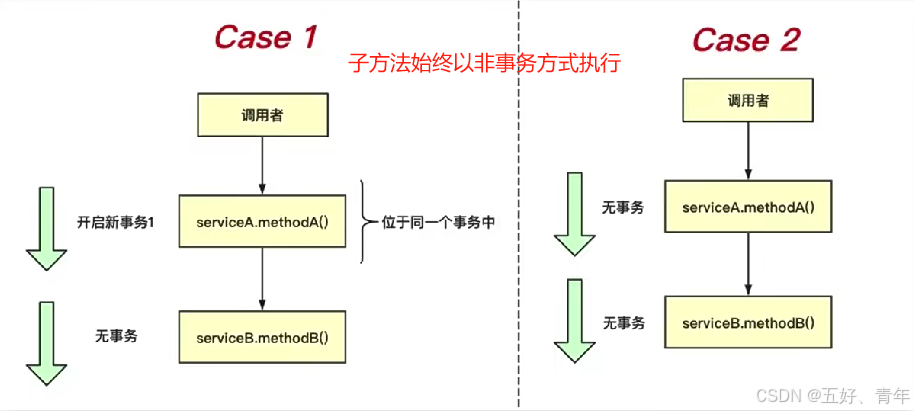
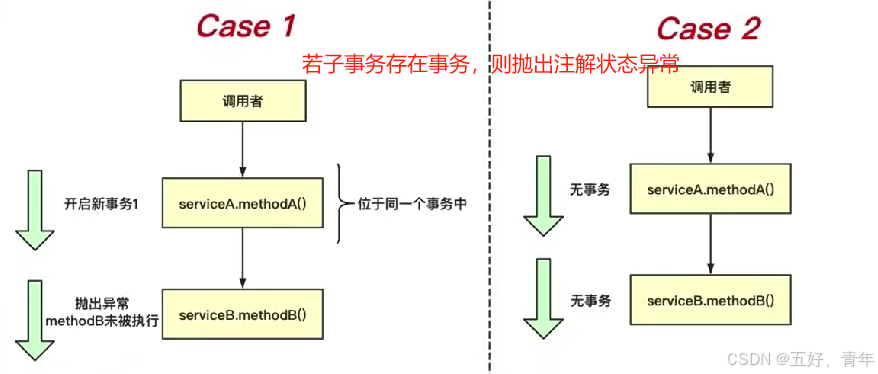
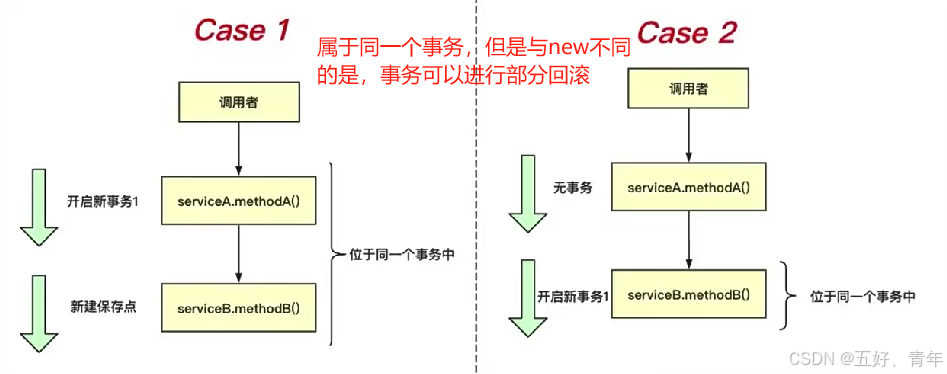
传播行为propagation:当一个事务传播行为修饰的方法被另一个方法调用时,事务如何进行传播
- 默认的传播行为:Propagation.REQUIRED
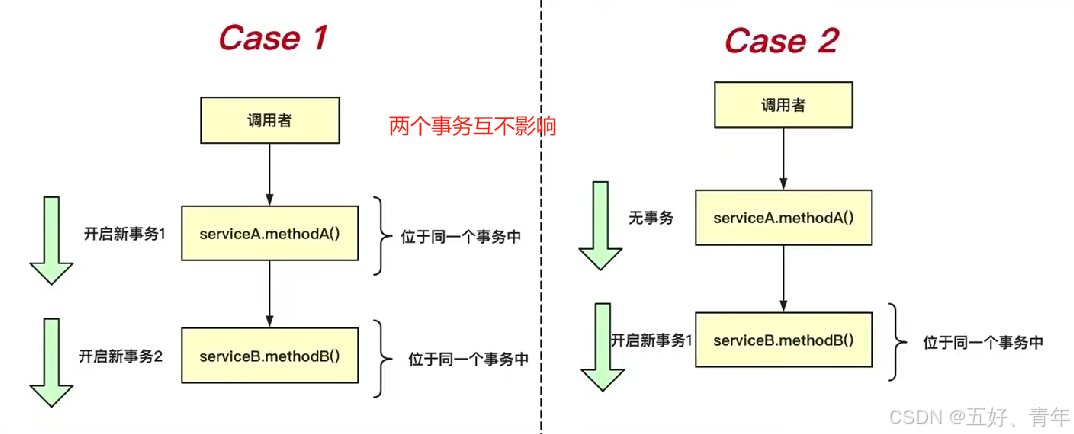
2. Propagation.REQUIRES_NEW
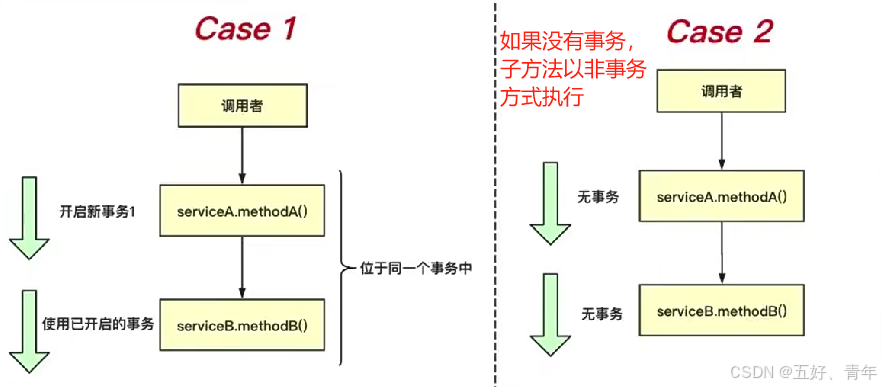
3. Propagation.SUPPORTS
4. Propagation.NOT_SUPPORTED
5. Propagation.NEVER
- Propagation.NESTED
2、本地事务注解【应用】
- 可以标注在类、方法和接口(不要这样用)上;且方法上的注解会覆盖类上的注解
- 标注在方法上,标识开启事务功能,正常则提交、异常则回滚
- 自行指定 rollbackFor 属性,让 Checked Exception 也能够实现回滚
- 让 TestCase 也能够实现回滚
测试方法中,无论方法中是否抛出异常,只要使用了@Transactional就会进行回滚
/**
 * <h1>Spring 事务管理测试</h1>
 * */
@RunWith(SpringRunner.class)
@SpringBootTest(classes = Application.class)
public class TransactionTest {

    @Autowired
    private SpringBootUserRepository springBootUserRepository;

    /**
     * <h2>测试保存数据表记录的事务问题</h2>
     * 1. 只有 @Test, 不会回滚
     * 2. 加上 @Transactional, 会回滚
     * 3. 如果已经有了 @Transactional 注解在类上面, 但是,
     * 还是想要不回滚某个单测, 加上 @Rollback(value = false)
     * */
    @Transactional
    @Test
    public void testCreateSpringBootUser() {

        JpaSpringBootUser springBootUser = new JpaSpringBootUser();
        springBootUser.setUsername("Whqn");
        springBootUserRepository.save(springBootUser);
    }
}
3、本地事务注解【失效场景】
- 把注解标注在非 public 修饰的方法上

- propagation(传播行为)属性配置错误(不合理)
- rollbackFor 属性设置错误
非检查型异常和error这种非检查型的异常才会发生回滚
若抛出其他异常,需要指定rollbackFor属性
@Transactional(rollbackFor = Exception.class) //没标注这个属性,不会出现回滚
    public void wrongRollbackFor() throws Exception {

        JpaSpringBootUser springBootUser = new JpaSpringBootUser();
        springBootUser.setUsername("Whqn");
        springBootUserRepository.save(springBootUser);

        // ....
        // 由于某种原因抛出了异常
        throw new IOException("throw io exception for check rollback");
    }
- 在同一个类中方法调用,导致事务失效
只有使用其他类中的方法调用,aop才会生产代理对象,对事务方法进行代理并执行
/**
     * <h2>同一个类中的方法调用</h2>
     * */
    public void wrongInnerCall() throws Exception {
        this.wrongRollbackFor();
    }
- 自己主动去 catch,代表「没有出现异常],导致事务失效
@Transactional(rollbackFor = Exception.class) //不进行回滚
    public void wrongTryCatch() {
        try {
            JpaSpringBootUser springBootUser = new JpaSpringBootUser();
            springBootUser.setUsername("Whqn");
            springBootUserRepository.save(springBootUser);

            // ....
            // 由于某种原因抛出了异常
            throw new IOException("throw io exception for check rollback");
        } catch (Exception ex) {
            log.error("has some error: [{}]", ex.getMessage(), ex);
        }
    }
- 数据库引擎本身就不支持事务(例如 MyISAM)
4、分布式事务【解决方案】
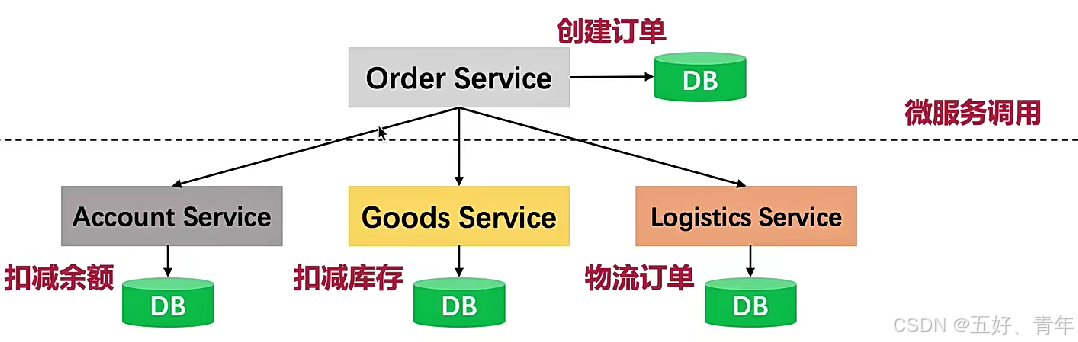
概念:分布式事务是来源于微服务的(或类似的场景),服务之间存在着调用,且整个调用链路上存在着多处(分布在不同的微服务上)写数据表的行为,那么,分布式事务就要保证这些操作要么全部成功,要么全部失败
业务特性
- 强一致性:任何一次读都能读到某个数据的最近一次写的数据(要求最高 ),所有节点在某个时刻的数据是相同的
- 弱一致性:数据更新后,能容忍后续的访问只能访问到部分或者全部访问不到,完全达不到事务原子性
- 最终一致性:不保证在任意时刻数据都是完整的(状态一致),但是,随时时间的推移,数据总是会达到一致的状态
解决方案一:两阶段提交(
强一致性策略的实现)
- 存在一个中央协调器负责协调各个分支事务
- 所有的本地事务都就绪,则都下发提交状态,若都提交成功则返回成功信息给中央,否则发生每次回滚
- 存在的问题:引入依赖,单点故障,资源阻塞

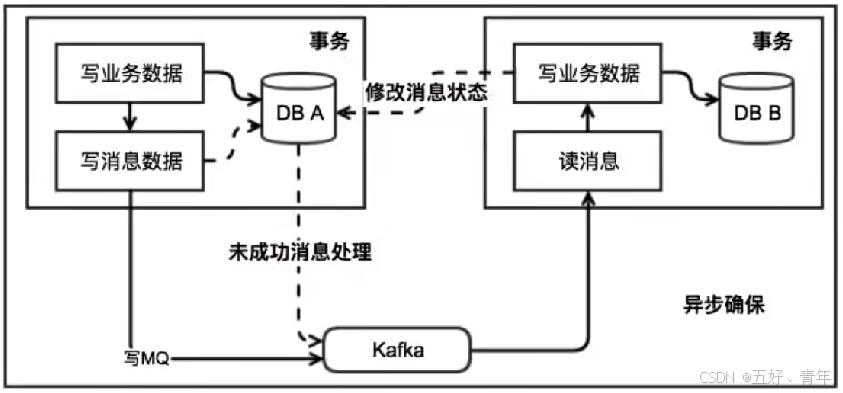
解决方案二:本地消息表(
最终一致性策略的实现)
- 存在一个中央协调器负责协调各个分支事务
- 该方案的核心是将需要分布式处理的任务通过消息日志的方式来异步执行
- 若成功,则直接将业务数据写入
- 若处理失败,则重试,否则通知A事务回滚事务
5、Seata AT 模式解读
概要:是一款开源的分布式事务解决方案
官网:http://seata.io/zh-cn/
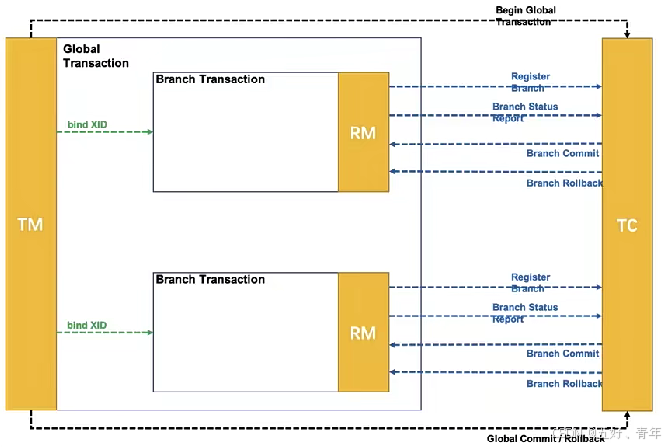
过程模型:
- TM:事务的发起者,相当于
注解,用于通知 TC,全同事务的开始、提交、回滚 - RM:事务资源,相当于
分支事务,每一个 RM 都会作为一个分支事务注册在 TC 上 - TC:事务协调者,
第三方,也就是中央协调器;用于接收事务的注册、提交、回滚
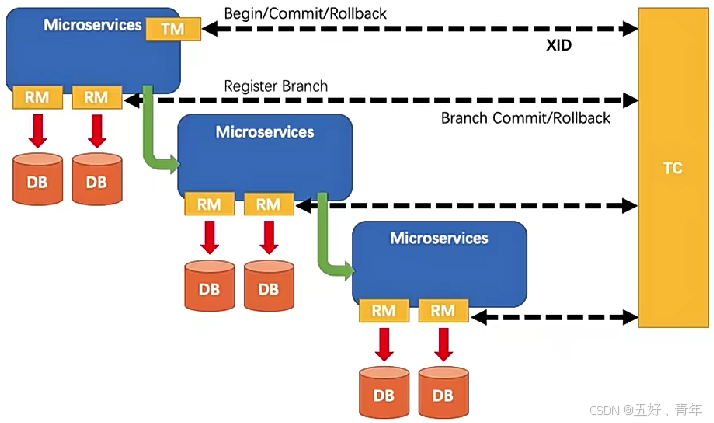
事务模式:
- TM 向 TC 请求
发起、提交、回滚全局事务 - TM 把代表全局事务的
XID 绑定到分支事务上 - RM 向 TC
注册,把分支事务关联到 XID上 - RM 把分支事务的执行结果
上报给 TC - TC 发送分支
提交或分支回滚命令给 RM
整体机制:
与传统2PC不同,传统2PC第一阶段,资源锁定到第二阶段结束。而AT模式则直接提交本地事务。
优势
- AT 对业务代码完全无侵入性,使用非常简单,改造成本低
- 我们只需要关注自己的业务SQL
- Seata会通过分析我们业务SQL,反向生成回滚数据
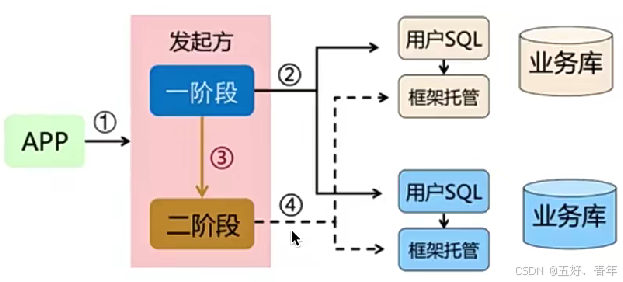
阶段
一阶段:业务数据和回滚日志记录在同一个本地事务中提交,释放本地锁和连接资源
二阶段:【提交异步化】,非常快速地完成,这里的提交主要完成删除undo log数据,同时分支事务处理完成后,释放全局锁
二阶段:【回滚】通过一阶段的回滚日志进行反向补偿,
工作示例(
单个全局事务):
有一张业务表
AT 分支事务的业务逻辑
update product set name = 'GTS' where name ='TXC'
 1、一阶段过程
插入回滚日志:把前后镜像数据以及业务 SQL 相关的信息组成一条回滚日志记录插入到 UNDO_LOG 表中
提交前【向 TC 注册分支】:申请 product 表中,主键值等于1的记录的全局锁
本地事务提交:【业务数据】的更新和前面步骤中生成的 【UNDO LOG】 【一并提交】
将本地事务提交的结果上报给 TC

-
解析 SQL:得到 SQL的类型(UPDATE),表(product),条件(where name =‘TXC’)等相关的信息
-
查询前镜像:根据解析得到的条件信息,生成查询语句,定位数据
select id, name, since from product where name ='TXC'
得到前镜像
- 执行业务 SQL:更新这条记录的 name 为GTS
- 查询后镜像:根据前镜像的结果,通过主键定位数据
select id, name, since from product where id = 1
- 得到后镜像
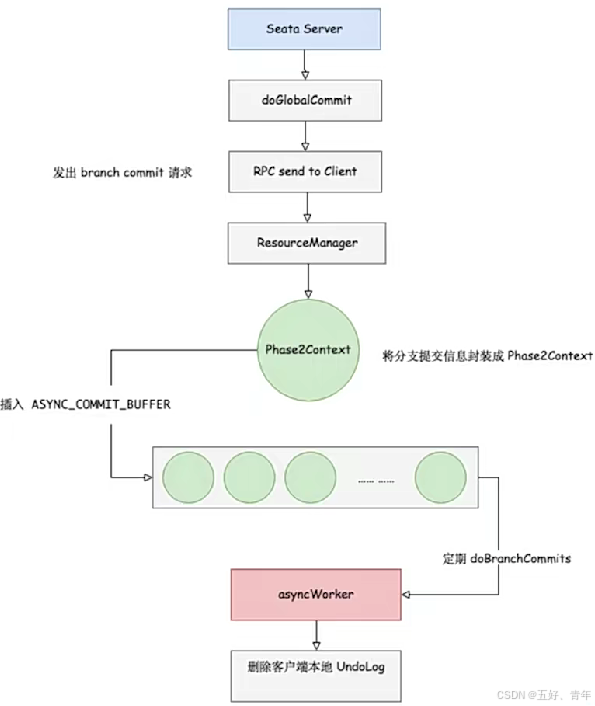
 2、二阶段【提交】
【信号】收到TC的分支提交请求,把请求放入一个异步任务的队列中,马上返回提交成功的结果给TC
【执行】异步任务阶段的分支提交请求将异步和批量地删除相应 UNDO LOG 记录

服务端:异步查询可以提交的全局事务,释放全局锁并删除事务日志,相当于删除那三张表
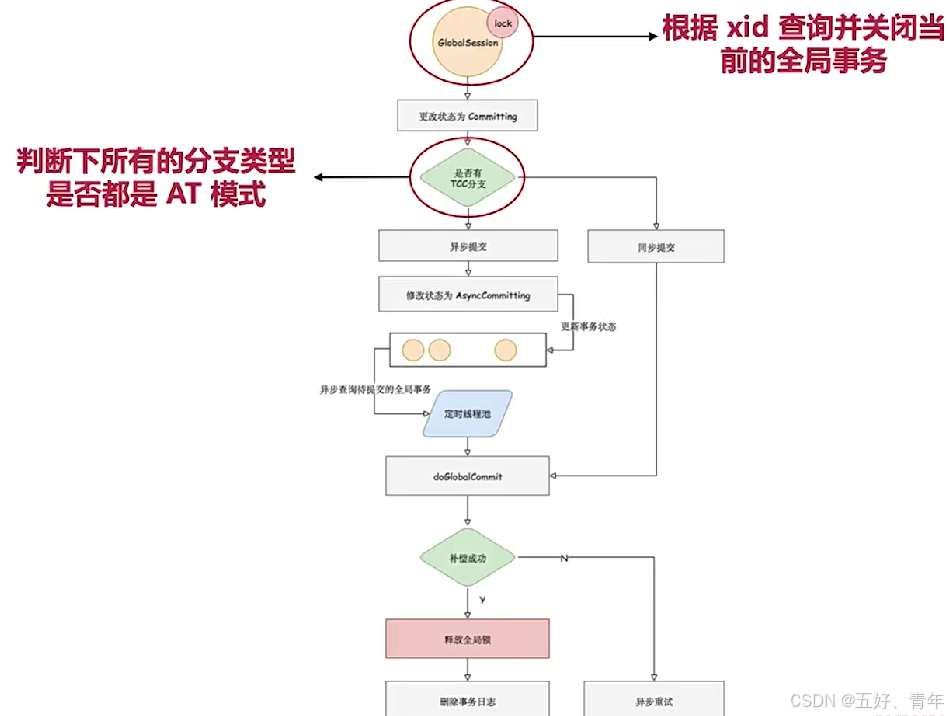
客户端:分别向各个分支事务发出提交申请,异步接收消息并执行第二段提交
 3、二阶段【回滚】
 收到 TC 的分支回滚请求,开启一个本地事务,执行如下操作

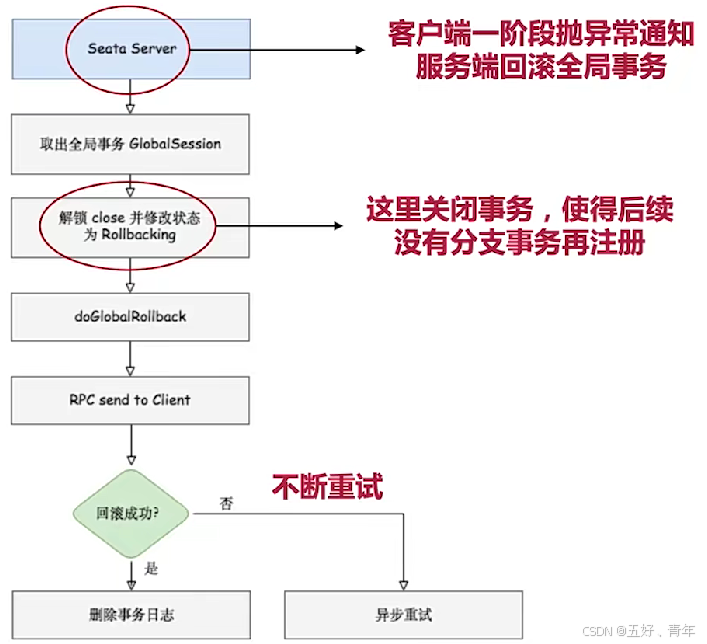
- 通过 XID 和 Branch ID 查找到相应的 UNDO LOG 记录
- 数据校验:拿 UNDO LOG 中的后镜像与当前数据进行比较,如果有不同,说明数据被当前全同事务之外的动作做了修改
- 根据 UNDO LOG 中的前镜像和业务 SQL的相关信息生成并执行回滚的语句
update product set name ='TXC' where id = 1:
- 提交本地事务,并把本地事务的执行结果(即分支事务回滚的结果)上报给TC
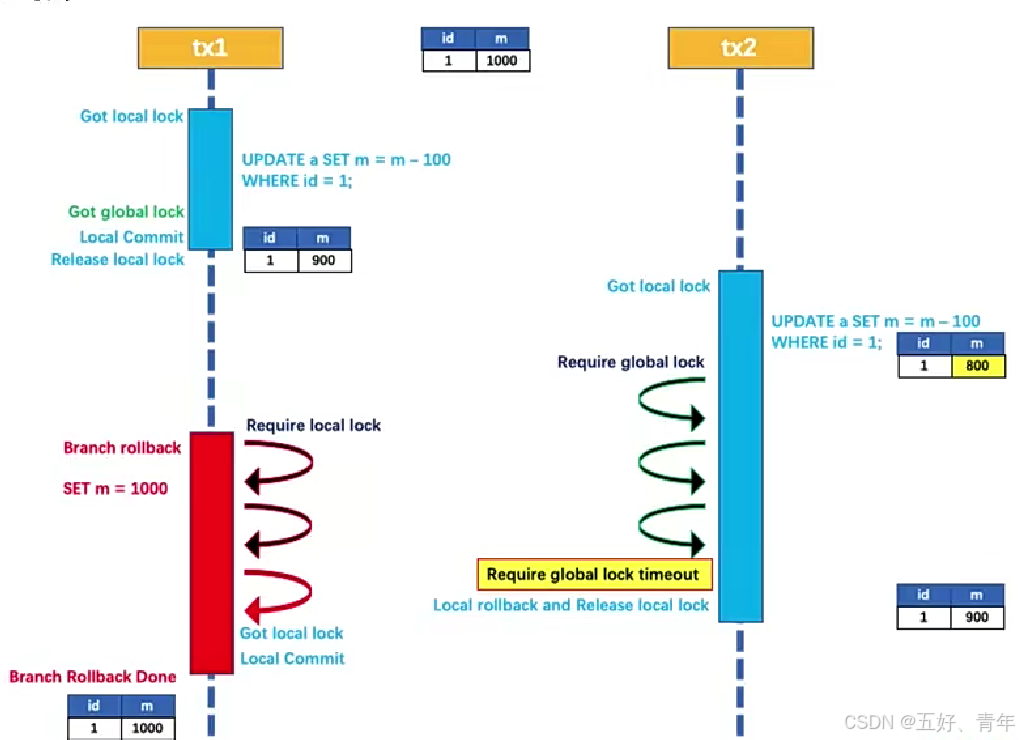
工作示例(
多个全局事务):
全局锁:实现分布式事务隔离性的关键机制,防止脏写
- 一阶段本地事务
提交前,需要确保先拿到全局锁 - 拿不到全局锁,不能提交本地事务
- 拿全局锁的尝试被限制在一定范围内,超出范围将放弃,并回滚本地事务,释放本地锁
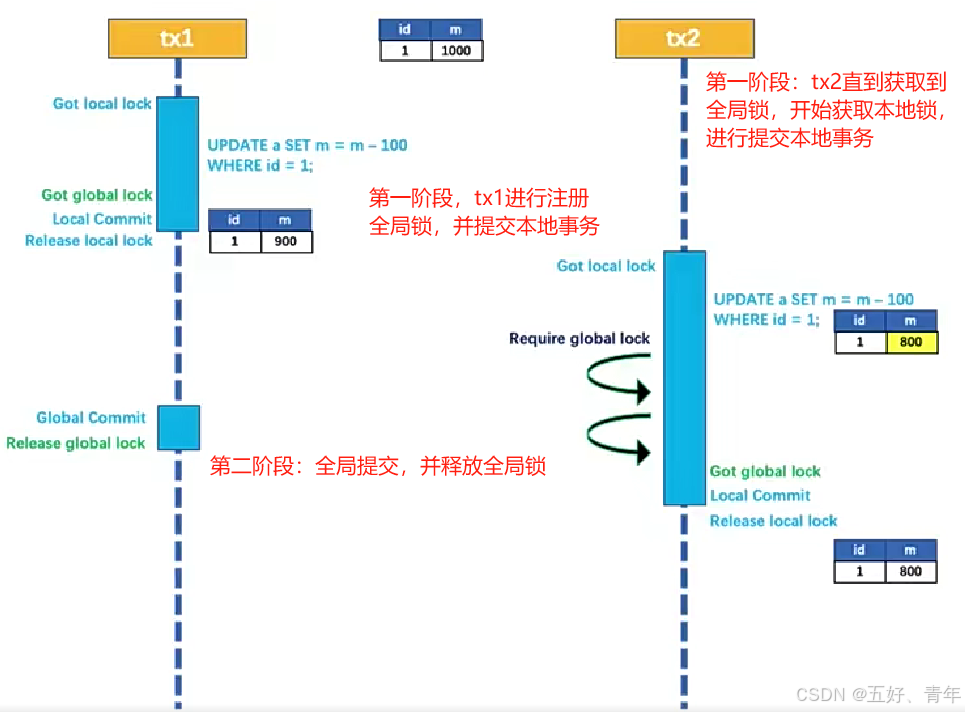
- 如果 tx1 的二阶段全局回滚,则 tx1 需要重新获取该数据的本地锁,进行反向补偿的更新操作,实现分支的回滚
- 在tx1结束之前,全局锁一直被tx1持有,所以不会有脏写的现象
- tx2在等待全局锁失败,回滚本地事务
6、Seata Server 单机与高可用模式搭建
下载地址【解压即可】:https://seata.apache.org/zh-cn/download/seata-server
seata目录
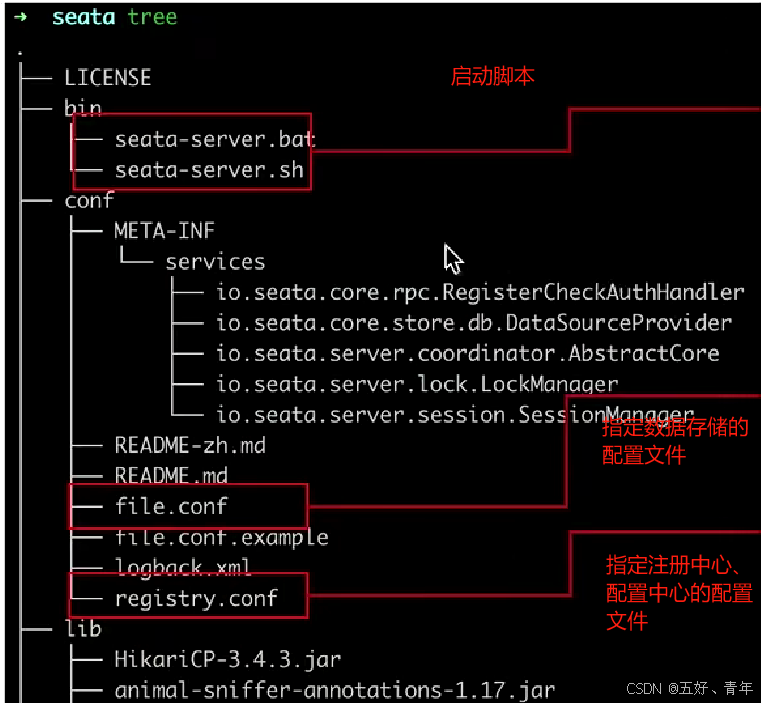
单机搭建
启动命令:
nohup sh bin/seata-server.sh -h 127.0.0.1 -p 8091 -m file &
-h:指定在注册中心注册的 `IP`;不指定时获取当前的 IP,外部访问部署在云环境和容器中的 server 建议指定
-p:端口号;默认端口号是 `8091`
-m:事务日志存储方式,支持 file、db、redis,默认为 `file`
数据库存储事务日志:
进入file.conf修改相关配置

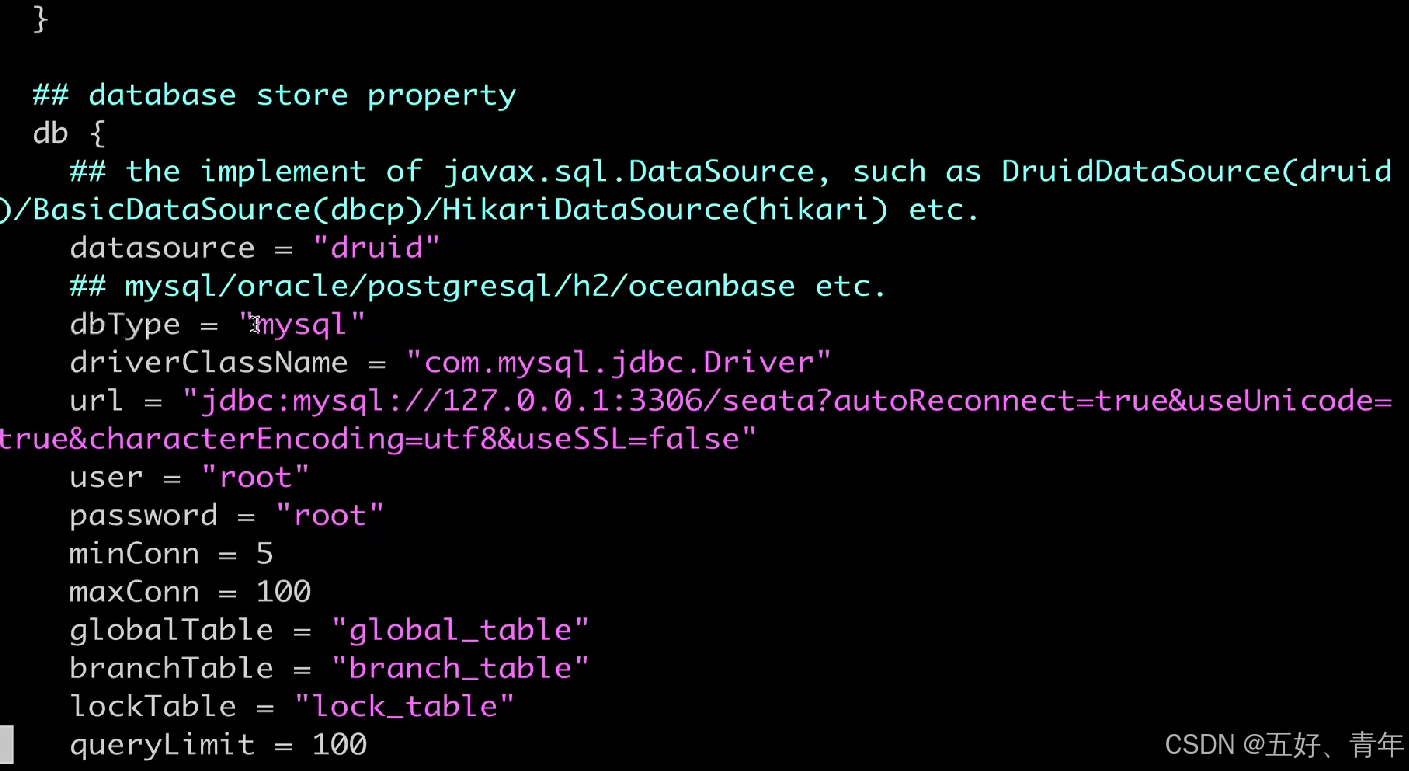
创建三张表
- global_table:全局事务表
- branch_table:分支事务表
- lock_table:全局锁表
CREATE TABLE IF NOT EXISTS `global_table`
(
    `xid`                       VARCHAR(128) NOT NULL,
    `transaction_id`            BIGINT,
    `status`                    TINYINT      NOT NULL,
    `application_id`            VARCHAR(32),
    `transaction_service_group` VARCHAR(32),
    `transaction_name`          VARCHAR(128),
    `timeout`                   INT,
    `begin_time`                BIGINT,
    `application_data`          VARCHAR(2000),
    `gmt_create`                DATETIME,
    `gmt_modified`              DATETIME,
    PRIMARY KEY (`xid`),
    KEY `idx_gmt_modified_status` (`gmt_modified`, `status`),
    KEY `idx_transaction_id` (`transaction_id`)
) ENGINE = InnoDB
  DEFAULT CHARSET = utf8;

-- the table to store BranchSession data
CREATE TABLE IF NOT EXISTS `branch_table`
(
    `branch_id`         BIGINT       NOT NULL,
    `xid`               VARCHAR(128) NOT NULL,
    `transaction_id`    BIGINT,
    `resource_group_id` VARCHAR(32),
    `resource_id`       VARCHAR(256),
    `branch_type`       VARCHAR(8),
    `status`            TINYINT,
    `client_id`         VARCHAR(64),
    `application_data`  VARCHAR(2000),
    `gmt_create`        DATETIME,
    `gmt_modified`      DATETIME,
    PRIMARY KEY (`branch_id`),
    KEY `idx_xid` (`xid`)
) ENGINE = InnoDB
  DEFAULT CHARSET = utf8;

-- the table to store lock data
CREATE TABLE IF NOT EXISTS `lock_table`
(
    `row_key`        VARCHAR(128) NOT NULL,
    `xid`            VARCHAR(96),
    `transaction_id` BIGINT,
    `branch_id`      BIGINT       NOT NULL,
    `resource_id`    VARCHAR(256),
    `table_name`     VARCHAR(32),
    `pk`             VARCHAR(36),
    `gmt_create`     DATETIME,
    `gmt_modified`   DATETIME,
    PRIMARY KEY (`row_key`),
    KEY `idx_branch_id` (`branch_id`)
) ENGINE = InnoDB
  DEFAULT CHARSET = utf8;
启动命令
nohup sh bin/seata-server.sh -h 127.0.0.1 -p 8091 -m db -n 1 &
-n:用于指定 seata-server 节点 ID;如 1、2、3..;默认为 1
注意:需要在 MySQL中创建库和表
集群 Seata Server,高可用模式
高可用模式除了存储方式使用 DB 之外,还需要注册到注册中心启动命令:
nohup sh bin/seata-server.sh -h 127.0.0.1 -p 8091 -m db -n 1 &
nohup sh bin/seata-server.sh -h 127.0.0.1 -p 8092 -m db -n 2 &
nohup sh bin/seata-server.sh -h 127.0.0.1 -p 8093 -m db -n 3 &
打开registry.conf文件,修改为nacos
registry {
  # file 、nacos 、eureka、redis、zk、consul、etcd3、sofa
  type = "nacos "
  loadBalance = "RandomLoadBalance"
  loadBalanceVirtualNodes = 10

  nacos {
    application = "seata-server"
    serverAddr = "127.0.0.1:8848"
    group = "SEATA_GROUP"
    namespace = ""
    cluster = "default"
    username = ""
    password = ""
  }
  #使用的是本地的配置文件,而不用注册中心的
  file {
    name = "file.conf"
  }
}


不是高可用模式,则使用本地注册
需要将seata中的两个文件复制在工程下
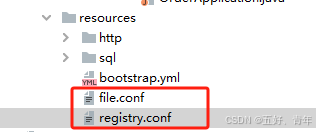
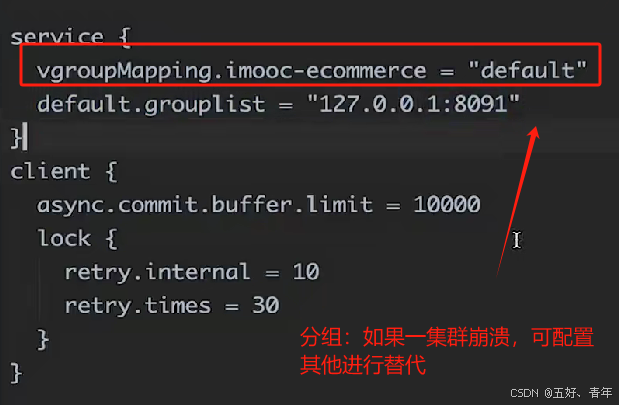
在file.conf中配置分组
service {
  vgroupMapping.imooc-ecommerce = "default"
  default.grouplist = "127.0.0.1:8091"
}
client {
  async.commit.buffer.limit = 10000
  lock {
    retry.internal = 10
    retry.times = 30
  }
}
在yml文件中配置分组
spring:
  cloud:
    alibaba:
      seata:
        tx-service-group: imooc-ecommerce # seata 全局事务分组
7、Seata AT模式应用
- pom.xml中引入依赖:spring-cloud-starter-alibaba-seata, HikariCP
		<!-- seata -->
        <dependency>
            <groupId>com.alibaba.cloud</groupId>
            <artifactId>spring-cloud-starter-alibaba-seata</artifactId>
        </dependency>
        <!-- 注册 Seata 数据源需要连接池 -->
        <dependency>
            <groupId>com.zaxxer</groupId>
            <artifactId>HikariCP</artifactId>
            <optional>true</optional>
        </dependency>
- 创建 undo_log 表(如果业务使用了多个数据库,每一个数据库都要有这张表)
CREATE TABLE `undo_log` (
  `id` bigint(20) NOT NULL AUTO_INCREMENT,
  `branch_id` bigint(20) NOT NULL,
  `xid` varchar(100) NOT NULL,
  `context` varchar(128) NOT NULL,
  `rollback_info` longblob NOT NULL,
  `log_status` int(11) NOT NULL,
  `log_created` datetime NOT NULL,
  `log_modified` datetime NOT NULL,
  `ext` varchar(100) DEFAULT NULL,
  PRIMARY KEY (`id`),
  UNIQUE KEY `ux_undo_log` (`xid`,`branch_id`)
) ENGINE=InnoDB AUTO_INCREMENT=1 DEFAULT CHARSET=utf8;
- 配置事务分组
- 配置 Seata 数据源代理
可实现sql解析,反向sql生成
/**
 * <h1>Seata 所需要的数据源代理配置类</h1>
 * */
@Configuration
public class DataSourceProxyAutoConfiguration {

    private final DataSourceProperties dataSourceProperties;

    public DataSourceProxyAutoConfiguration(DataSourceProperties dataSourceProperties) {
        this.dataSourceProperties = dataSourceProperties;
    }

    /**
     * <h2>配置数据源代理, 用于 Seata 全局事务回滚</h2>
     * before image + after image -> undo_log
     * */
    @Primary
    @Bean("dataSource")
    public DataSource dataSource() {

        HikariDataSource dataSource = new HikariDataSource();
        dataSource.setJdbcUrl(dataSourceProperties.getUrl());
        dataSource.setUsername(dataSourceProperties.getUsername());
        dataSource.setPassword(dataSourceProperties.getPassword());
        dataSource.setDriverClassName(dataSourceProperties.getDriverClassName());

        return new DataSourceProxy(dataSource);
    }
}
- 加载拦截器 SeataHandlerInterceptor, 实现微服务之间 xid 的传递
Seata 传递 xid 事务 id 给其他的微服务
只有这样, 其他的服务才会写 undo_log, 才能够实现回滚
 /**
     * <h2>添加拦截器配置</h2>
     * */
    @Override
    protected void addInterceptors(InterceptorRegistry registry) {

        // 添加用户身份统一登录拦截的拦截器
        registry.addInterceptor(new LoginUserInfoInterceptor())
                .addPathPatterns("/**").order(0);

        registry.addInterceptor(new SeataHandlerInterceptor()).addPathPatterns("/**");
    }
- 将 @GlobalTransactional 注解标注在需要分布式事务的方法上
无代码侵入

二、SpringCloud Alibaba Sentinel
1、概览及搭建
其实就是在Hystrix基础上加上了流量控制
是面向分布式服务架构的流量控制组件
主要以流量为切入点,从流量控制熔断降级、系统自适应保护等多个维度来帮助您保障微服务的稳定性
基础概念
资源:可以是 Java 应用程序中的任何内容(api包装)
例如,由应用程序提供的服务,或由应用程序调用的其它应用提供的服务,甚至可以是一段代码(方法签名、URL、服务名)
规则:围绕资源的实时状态设定的规则,可以包括流量控制规则、熔断降级规则以及系统保护规则;且所有规则可以动态实时调整
搭建 SpringCloud Alibaba Sentinel 控制台
Sentinel 提供一个轻量级的开源控制台它提供机器发现以及健康情况管理、监控(单机和集群),规则管理和推送的功能
获取并启动 Sentinel Dashboard(控制台)
- 下载控制台 Jar 包:https://github.com/alibaba/Sentinel/releases
- 开启应用
java -Dserver.port=7777 -Dcsp.sentinel.dashboard.server=localhost:7777 -Dproject.name=imooc-whqn-sentinel-dashboard -jar sentinel-dashboard-1.8.1.jar
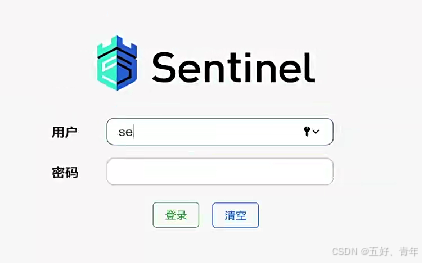
- 从 Sentinel 1.6.0 起,Sentinel Dashboard 引入了基本的登录功能,默认的
用户名密码都是 sentinel
SpringCloud Alibaba Sentinel 控制台的能力
- 查看机器列表以及健康情况:收集 Sentinel 客户端发送的
心跳包,用于判断机器是否在线 - 监控(单机和集群聚合):通过 Sentinel 客户端暴露的监控 API,定期拉取并且聚合应用监控信息,最终可以实现
秒级的实时监控 - 规则管理和推送:统一管理
推送规则
2、基于硬编码应用 Sentinel 的限流功能
流量控制方向
- 资源的调用关系,例如资源的调用
链路,资源和资源之间的关系 - 运行指标,例如
QPS、线程池、系统负载等 - 控制的效果,例如
直接限流、冷启动、排队等
步骤一:启动Sentinel
步骤二:引入maven依赖
		<dependency>
            <groupId>com.alibaba.cloud</groupId>
            <artifactId>spring-cloud-starter-alibaba-sentinel</artifactId>
        </dependency>
步骤三:编写pom文件
spring:
    sentinel:
      # 配置 sentinel dashboard 地址
      transport:
        dashboard: 127.0.0.1:7777
        port: 8719 # 会在应用对应的机器上启动一个 Http Server, 该 Server 会与 Sentinel 控制台做交互
      datasource:
        # 名称任意, 代表数据源
        ds:
          nacos:
            # NacosDataSourceProperties.java 中定义
            server-addr: ${spring.cloud.nacos.discovery.server-addr}
            dataId: ${spring.application.name}-sentinel
            namespace: ${spring.cloud.nacos.discovery.namespace}
            groupId: DEFAULT_GROUP
            data-type: json
            # 规则类型: com.alibaba.cloud.sentinel.datasource.RuleType
            # FlowRule 就是限流规则
            rule-type: flow
      # 服务启动直接建立心跳连接
      eager: true
步骤四:初始化流控规则
@PostConstruct
    public void init() {

        // 流控规则集合
        List<FlowRule> flowRules = new ArrayList<>();
        // 创建流控规则
        FlowRule flowRule = new FlowRule();
        // 设置流控规则 QPS, 限流阈值类型 (QPS, 并发线程数)
        flowRule.setGrade(RuleConstant.FLOW_GRADE_QPS);
        // 流量控制手段
        flowRule.setControlBehavior(RuleConstant.CONTROL_BEHAVIOR_DEFAULT);
        // 设置受保护的资源
        flowRule.setResource("flowRuleCode");
        // 设置受保护的资源的阈值
        flowRule.setCount(1);
        flowRules.add(flowRule);

        // 加载配置好的规则
        FlowRuleManager.loadRules(flowRules);
    }
步骤五:采用硬编码限流规则的 Controller 方法,value为需要保护的资源
	@GetMapping("/flow-rule")
    @SentinelResource(value = "flowRuleCode")
    public CommonResponse<String> flowRuleCode() {
        log.info("request flowRuleCode");
        return new CommonResponse<>(0, "", "imooc-whqn-ecommerce");
    }
启动后
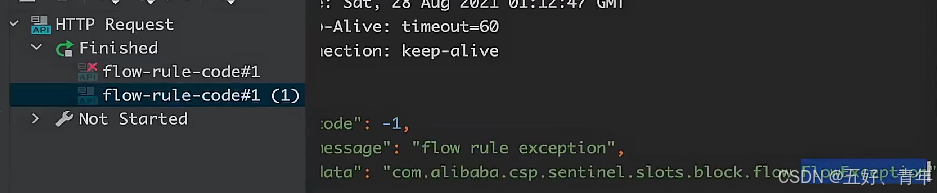
快速点击两次后控制台报错,接口返回全局异常捕获数据


编写自定义兜底策略
@SentinelResource(value = "flowRuleCode", blockHandler = "handleException")
public CommonResponse<String> handleException(BlockException exception) {
        log.error("has block exception: [{}]", JSON.toJSONString(exception.getRule()));
        return new CommonResponse<>(
                -1,
                "flow rule exception",
                exception.getClass().getCanonicalName()
        );
    }
快速点击两次后控制台不发生报错,接口返回兜底策略
编写自定义兜底策略(其他类)
必须是静态方法
@SentinelResource(
            value = "flowRuleCode", blockHandler = "whqnHandleBlockException",
            blockHandlerClass = WhqnBlockHandler.class
    )
@Slf4j
public class WhqnBlockHandler {

    public static CommonResponse<String> whqnHandleBlockException(BlockException exception) {

        log.error("trigger whqn block handler: [{}], [{}]",
                JSON.toJSONString(exception.getRule()), exception.getRuleLimitApp());
        return new CommonResponse<>(
                -1,
                "flow rule trigger block exception",
                null
        );
    }
}
快速点击两次后控制台不发生报错,接口返回兜底策略
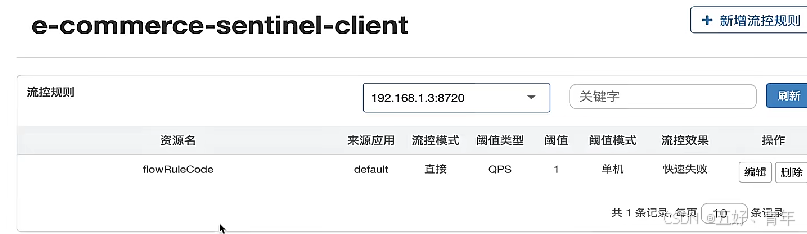
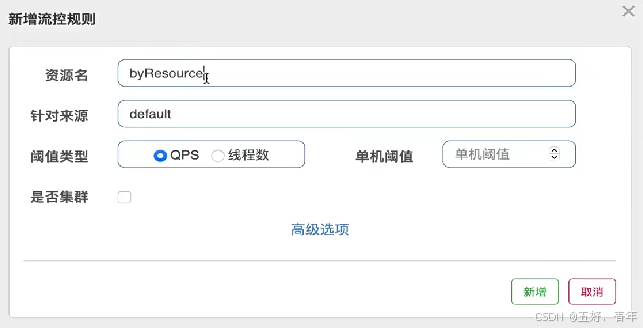
3、Sentinel Dashboard 配置工程流控规则
一、在 dashboard 中 “流控规则” 中按照资源名称新增流控规则
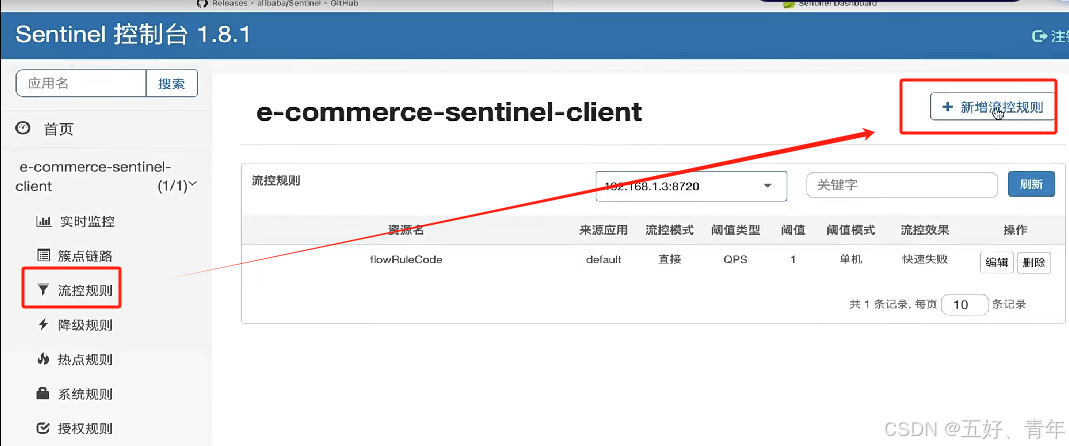
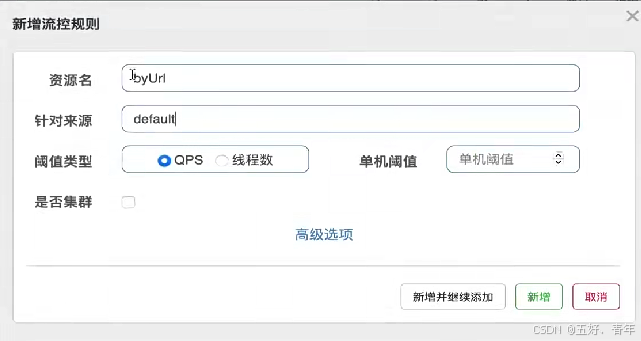
二、在 “簇点链路” 中给 url 添加流控规则

4、Sentinel 对服务调用的保护 - RestTemplate
Sentinel 支持对 RestTemplate 服务调用进行保护,实现
流控降级和异常降级

第一步:配置文件加入配置项
# 开启或关闭 @SentinelRestTemplate 注解
resttemplate:
  sentinel:
    enabled: true
第二步:包装并增强restTemplate功能,并注入IOC容器中
@Slf4j
@Configuration
public class SentinelConfig {

    @Bean
    @SentinelRestTemplate
    public RestTemplate restTemplate() {
        return new RestTemplate();  // 可以对其做一些业务相关的配置
    }
}
创建RestTemplate 在限流或异常时的兜底方法
@Slf4j
public class RestTemplateExceptionUtil {

    /**
     * <h2>限流后的处理方法</h2>
     * */
    public static SentinelClientHttpResponse handleBlock(HttpRequest request,
                                                         byte[] body,
                                                         ClientHttpRequestExecution execution,
                                                         BlockException ex) {
        log.error("Handle RestTemplate Block Exception: [{}], [{}]",
                request.getURI().getPath(), ex.getClass().getCanonicalName());
        return new SentinelClientHttpResponse(
                JSON.toJSONString(new JwtToken("whqn-imooc-block"))
        );
    }

    /**
     * <h2>异常降级之后的处理方法</h2>
     * */
    public static SentinelClientHttpResponse handleFallback(HttpRequest request,
                                                            byte[] body,
                                                            ClientHttpRequestExecution execution,
                                                            BlockException ex) {
        log.error("Handle RestTemplate Fallback Exception: [{}], [{}]",
                request.getURI().getPath(), ex.getClass().getCanonicalName());
        return new SentinelClientHttpResponse(
                JSON.toJSONString(new JwtToken("whqn-imooc-block"))
        );
    }
}
第三步:在第二步注释中加入兜底策略
    @SentinelRestTemplate(
            fallback = "handleFallback", fallbackClass = RestTemplateExceptionUtil.class,
            blockHandler = "handleBlock", blockHandlerClass = RestTemplateExceptionUtil.class
    )
第四步:注入增强的restemplate,并使用
- 流控降级:是针对于簇点链路中的
http://127.0.0.1:7000/ecommerce-authority-center/authority/token- 容错降级: 对于服务
不可用时不能生效
/**
     * <h2>从授权服务中获取 JwtToken</h2>
     * */
    @PostMapping("/get-token")
    public JwtToken getTokenFromAuthorityService(
            @RequestBody UsernameAndPassword usernameAndPassword) {

        String requestUrl =
                "http://127.0.0.1:7000/ecommerce-authority-center/authority/token";
        log.info("RestTemplate request url and body: [{}], [{}]",
                requestUrl, JSON.toJSONString(usernameAndPassword));

        HttpHeaders headers = new HttpHeaders();
        headers.setContentType(MediaType.APPLICATION_JSON);
        return restTemplate.postForObject(
                requestUrl,
                new HttpEntity<>(JSON.toJSONString(usernameAndPassword), headers),
                JwtToken.class
        );
    }
若授权服务未启动则控制台保持,并返回全局异常报错
若已经启动,则控制台不报错,返回自定义异常信息
5、Sentinel 实现熔断降级
(1)、使用@SentinelResource的fallback和fallbackClass
创建自定义熔断类,
必须是静态方法
Slf4j
public class WhqnFallbackHandler {

    /**
     * <h2>getTokenFromAuthorityService 方法的 fallback</h2>
     * */
    public static JwtToken getTokenFromAuthorityServiceFallback(
            UsernameAndPassword usernameAndPassword
    ) {
        log.error("get token from authority service fallback: [{}]",
                JSON.toJSONString(usernameAndPassword));
        return new JwtToken("imooc-whqn-fallback");
    }

    /**
     * <h2>ignoreException 方法的 fallback</h2>
     * */
    public static JwtToken ignoreExceptionFallback(Integer code) {
        log.error("ignore exception input code: [{}] has trigger exception", code);
        return new JwtToken("imooc-whqn-fallback");
    }
}
创建Sentinel方法,这个方法不是服务间的调用,发出异常时即可使用兜底策略
/** 注入没有增强的 RestTemplate */
    private final RestTemplate restTemplate;

    public SentinelFallbackController(RestTemplate restTemplate) {
        this.restTemplate = restTemplate;
    }

    @PostMapping("/get-token")
    @SentinelResource(
            value = "getTokenFromAuthorityService",
            fallback = "getTokenFromAuthorityServiceFallback",
            fallbackClass = { WhqnFallbackHandler.class }
    )
    public JwtToken getTokenFromAuthorityService(
            @RequestBody UsernameAndPassword usernameAndPassword) {

        String requestUrl =
                "http://127.0.0.1:7000/ecommerce-authority-center/authority/token";
        log.info("RestTemplate request url and body: [{}], [{}]",
                requestUrl, JSON.toJSONString(usernameAndPassword));

        HttpHeaders headers = new HttpHeaders();
        headers.setContentType(MediaType.APPLICATION_JSON);
        return restTemplate.postForObject(
                requestUrl,
                new HttpEntity<>(JSON.toJSONString(usernameAndPassword), headers),
                JwtToken.class
        );
    }
创建Sentinel方法,这个方法忽略了自定异常,使其报错时,不返回兜底策略,而直接报错
@GetMapping("/ignore-exception")
    @SentinelResource(
            value = "ignoreException",
            fallback = "ignoreExceptionFallback",
            fallbackClass = { WhqnFallbackHandler.class },
            exceptionsToIgnore = { NullPointerException.class }
    )
    public JwtToken ignoreException(@RequestParam Integer code) {

        if (code % 2 == 0) {
            throw new NullPointerException("yout input code is: " + code);
        }

        return new JwtToken("whqn-imooc");
    }
(2)、对 OpenFeign 熔断降级的支持
开启配置项
# 打开 Sentinel 对 Feign 的支持
feign:
  sentinel:
    enabled: true
引入依赖
		<!-- Sentinel 适配了 Feign, 可以实现服务间调用的保护 -->
        <dependency>
            <groupId>org.springframework.cloud</groupId>
            <artifactId>spring-cloud-starter-openfeign</artifactId>
        </dependency>
以下做法与Hystrix一致
1、创建Feign方法类
2、创建Feign接口实现兜底策略
@FeignClient(
        value = "e-commerce-imooc",
        fallback = SentinelFeignClientFallback.class
)
public interface SentinelFeignClient {

    @RequestMapping(value = "whqn", method = RequestMethod.GET)
    CommonResponse<String> getResultByFeign(@RequestParam Integer code);
}
@Slf4j
@Component
public class SentinelFeignClientFallback implements SentinelFeignClient {

    @Override
    public CommonResponse<String> getResultByFeign(Integer code) {

        log.error("request supply for test has some error: [{}]", code);
        return new CommonResponse<>(
                -1,
                "sentinel feign fallback",
                "input code: "+ code
        );
    }
}
与restemplate不同的是:服务不可用,直接返回兜底策略,而不是报错
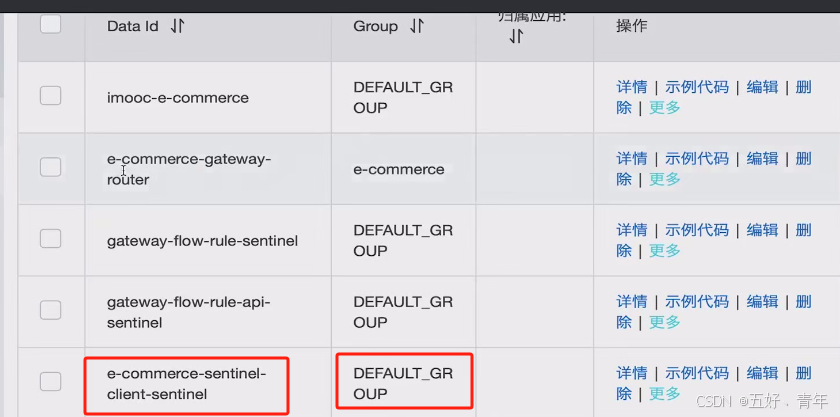
6、Sentinel结合Nacos实现限流
1、外部持久化方案的实现:Sentinel Dashboard 将规则保存在内存中,重启之后就会丢失,所以,保持至Nacos
2、在 Nacos 中创建规则,Nacos 会推送到客户端
3、Sentinel Dashboard 也会从 Nacos 去获取配置信息
Sentinel Dashboard → Nacos → 工程(客户端)
数据结构
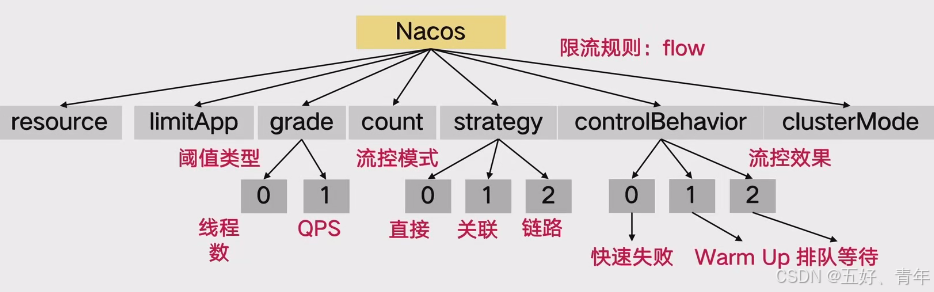
Nacos中的配置
添加依赖
<!-- Sentinel 使用 Nacos 存储规则 -->
        <dependency>
            <groupId>com.alibaba.csp</groupId>
            <artifactId>sentinel-datasource-nacos</artifactId>
        </dependency>
添加配置项
spring:
	application:
      name: e-commerce-sentinel-client
    sentinel:
      datasource:
        # 名称任意, 代表数据源
        ds:
          nacos:
            server-addr: ${spring.cloud.nacos.discovery.server-addr}
            dataId: ${spring.application.name}-sentinel
            namespace: ${spring.cloud.nacos.discovery.namespace}
            groupId: DEFAULT_GROUP
            data-type: json
            # 规则类型: com.alibaba.cloud.sentinel.datasource.RuleType
            # FlowRule 就是限流规则
            rule-type: flow
项目启动后

修改QPS流控值发布后

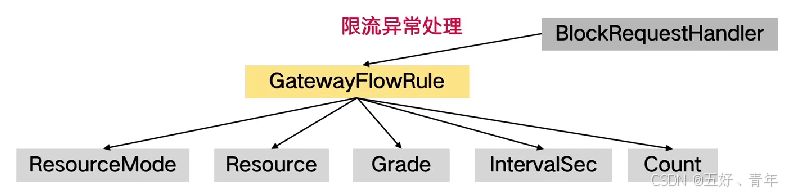
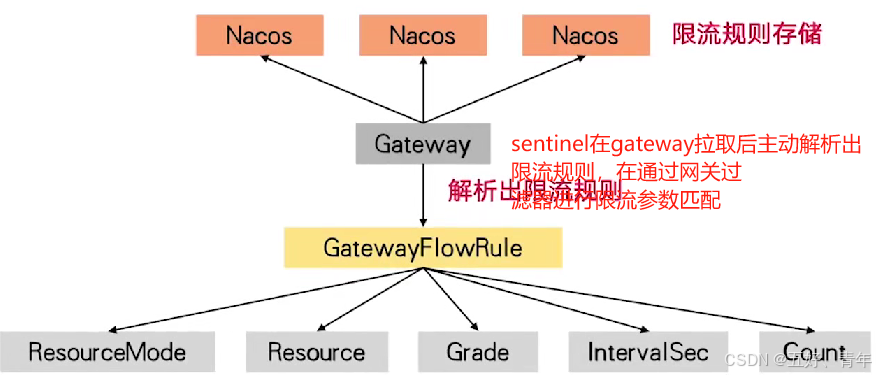
7、Sentinel实现网关Gateway概览
ResoureceMode:选择是微服务,还是api分组
resource:资源名称
Grade:选择并发线程数还是QPS
IntervalSec:窗口数
Count:窗口数经过的数量,例如每60秒可以访问3次
BlockRequestHandler:异常处理器
常见的算法
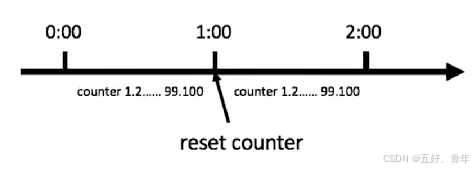
- 计数器算法:对请求计数(存在漏洞:刚好在1分钟时大量访问;前半分钟大量访问导致后半分钟无法访问)
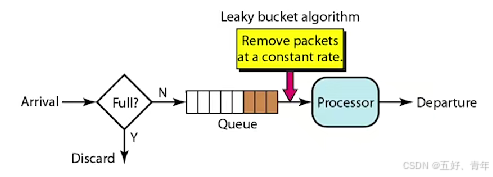
- 漏桶算法:以任意速率流入水,以一定速率流出水,当水超过桶流量则丢弃,因为桶容量是不变的,保证了整体的速率,同样突发调用会导致漏洞
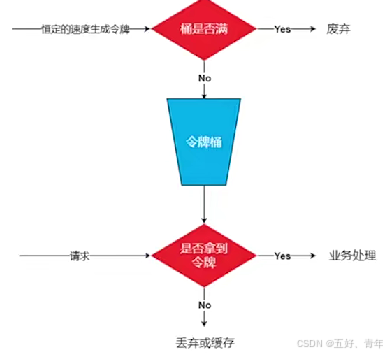
3、令牌桶算法:是对漏桶算法的改进,漏桶算法能够限制请求调用的速率,而令牌算法能够在限制调用的平均速率的同时还允许一定程度的突发调用
三种方式
- 在网关内硬编码实现对请求的限流 硬编码工作较多,且相对来说比较繁琐
- 熟悉了之后,可以进一步使用配置文件的形式硬编码与配置文件都属于静态限流
- 如果想要实现动态(随时修改)限流,那么,需要结合 Nacos
原理
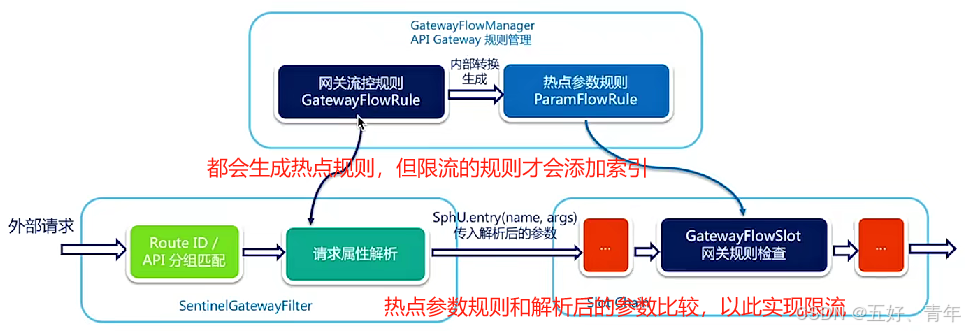
Sentinel 通过实现 网关的Fiter,对路由/API分组匹配、请求属性解析和参数组装实现限流
8、Gateway 集成 Sentinel 实现网关限流(硬编码)
添加依赖
        <!-- 集成 Sentinel, 在网关层面实现限流 -->
        <dependency>
            <groupId>com.alibaba.cloud</groupId>
            <artifactId>spring-cloud-starter-alibaba-sentinel</artifactId>
        </dependency>
        <dependency>
            <groupId>com.alibaba.cloud</groupId>
            <artifactId>spring-cloud-alibaba-sentinel-gateway</artifactId>
        </dependency>
        <!-- Sentinel 使用 Nacos 存储规则 -->
        <dependency>
            <groupId>com.alibaba.csp</groupId>
            <artifactId>sentinel-datasource-nacos</artifactId>
        </dependency>
添加配置项
spring:
    sentinel:
      eager: true
      transport:
        port: 8720
        dashboard: 127.0.0.1:7777
启动sentinel,添加了-Dcsp.sentinel.app.type=1实现网关限流
sentinel java -Dcsp.sentinel.app.type=1 -Dserver.port=7777 -Dcsp.sentinel.dashboard.server=localhost:7777 -Dproject.name=e-commerce-gateway sentinel-dashboard-1.8.1.jar
配置
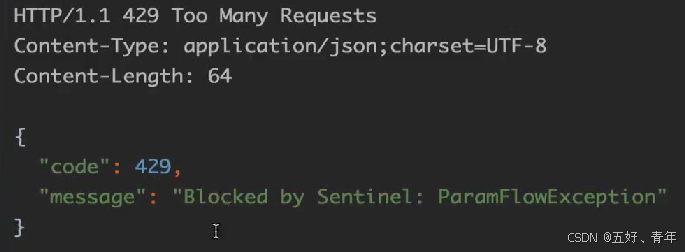
限流异常处理器, 限流异常出现时, 执行到这个 handler
    @Bean
    @Order(Ordered.HIGHEST_PRECEDENCE)
    public SentinelGatewayBlockExceptionHandler sentinelGatewayBlockExceptionHandler() {
        // 默认会返回错误 message, code 429
        return new SentinelGatewayBlockExceptionHandler(
                this.viewResolvers,
                this.serverCodecConfigurer
        );
    }
配置
限流过滤器, 是 Gateway 全局过滤器, 优先级定义为最高
    @Bean
    @Order(Ordered.HIGHEST_PRECEDENCE)
    public GlobalFilter sentinelGatewayFilter() {
        return new SentinelGatewayFilter();
    }
编写网关限流规则,这里使用的是
service_id,使得访问服务内每个接口都进行限流
/**
     * <h2>硬编码网关限流规则</h2>
     * */
    private void initGatewayRules() {

        Set<GatewayFlowRule> rules = new HashSet<>();

        GatewayFlowRule rule = new GatewayFlowRule();
        // 指定限流模式, 根据 route_id 做限流, 默认的模式
        rule.setResourceMode(SentinelGatewayConstants.RESOURCE_MODE_ROUTE_ID);
        // 指定 route_id -> service id
        rule.setResource("e-commerce-nacos-client");
        // 按照 QPS 限流
        rule.setGrade(RuleConstant.FLOW_GRADE_QPS);
        // 统计窗口和限流阈值
        rule.setIntervalSec(60);
        rule.setCount(3);

        rules.add(rule);

        // 加载到网关中
        GatewayRuleManager.loadRules(rules);
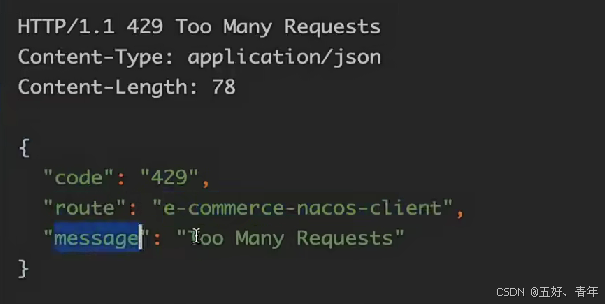
配置自定义限流异常处理器
private void initBlockHandler() {

        // 自定义 BlockRequestHandler
        BlockRequestHandler blockRequestHandler = new BlockRequestHandler() {
            @Override
            public Mono<ServerResponse> handleRequest(ServerWebExchange serverWebExchange,
                                                      Throwable throwable) {

                log.error("------------- trigger gateway sentinel rule -------------");

                Map<String, String> result = new HashMap<>();
                result.put("code", String.valueOf(HttpStatus.TOO_MANY_REQUESTS.value()));
                result.put("message", HttpStatus.TOO_MANY_REQUESTS.getReasonPhrase());
                result.put("route", "e-commerce-nacos-client");

                return ServerResponse
                        .status(HttpStatus.TOO_MANY_REQUESTS)
                        .contentType(MediaType.APPLICATION_JSON)
                        .body(BodyInserters.fromValue(result));
            }
        };

        // 设置自定义限流异常处理器
        GatewayCallbackManager.setBlockHandler(blockRequestHandler);
    }
上面定义的规则太大,包括了整个微服务,以下进行局部规则使用
先去找规则定义,再去找规则中定义的分组
定义分组网关限流规则
Set<GatewayFlowRule> rules = new HashSet<>();

        GatewayFlowRule rule = new GatewayFlowRule();

        // 限流分组, Sentinel 先去找规则定义, 再去找规则中定义的分组
        rules.add(
                new GatewayFlowRule("nacos-client-api-1")
                        .setCount(3).setIntervalSec(60)
        );
        rules.add(
                new GatewayFlowRule("nacos-client-api-2")
                        .setCount(1).setIntervalSec(60)
        );

        // 加载到网关中(先定义规则)
        GatewayRuleManager.loadRules(rules);

        // 加载限流分组(后定义分组)
        initCustomizedApis();
定义分组,注:haspset java8的应用
private void initCustomizedApis() {

        Set<ApiDefinition> definitions = new HashSet<>();

        // nacos-client-api 组, 最大的限制,与微服务定义一致(模糊匹配)
        ApiDefinition api = new ApiDefinition("nacos-client-api")
                .setPredicateItems(new HashSet<ApiPredicateItem>() {{
                    // 模糊匹配 /imooc/ecommerce-nacos-client/ 及其子路径的所有请求
                    add(new ApiPathPredicateItem() //java8的应用
                            .setPattern("/imooc/ecommerce-nacos-client/**")
                            // 根据前缀匹配
                    .setMatchStrategy(SentinelGatewayConstants.URL_MATCH_STRATEGY_PREFIX));
                }});

        // nacos-client-api-1 分组(精确匹配)
        ApiDefinition api1 = new ApiDefinition("nacos-client-api-1")
                .setPredicateItems(new HashSet<ApiPredicateItem>() {{
                    add(new ApiPathPredicateItem()
                            // 精确匹配 /imooc/ecommerce-nacos-client/nacos-client/service-instance
                            .setPattern("/imooc/ecommerce-nacos-client" +
                                    "/nacos-client/service-instance"));
                }});

        // nacos-client-api-2 分组(精确匹配)
        ApiDefinition api2 = new ApiDefinition("nacos-client-api-2")
                .setPredicateItems(new HashSet<ApiPredicateItem>() {{
                    add(new ApiPathPredicateItem()
                            // 精确匹配 /imooc/ecommerce-nacos-client/nacos-client/project-config
                            .setPattern("/imooc/ecommerce-nacos-client" +
                                    "/nacos-client/project-config"));
                }});

        definitions.add(api1);
        definitions.add(api2);

        // 加载限流分组
        GatewayApiDefinitionManager.loadApiDefinitions(definitions);
    }
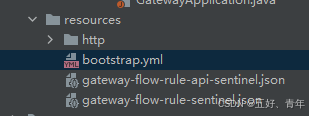
9、Gateway 集成 Sentinel 实现网关限流(本地文件)
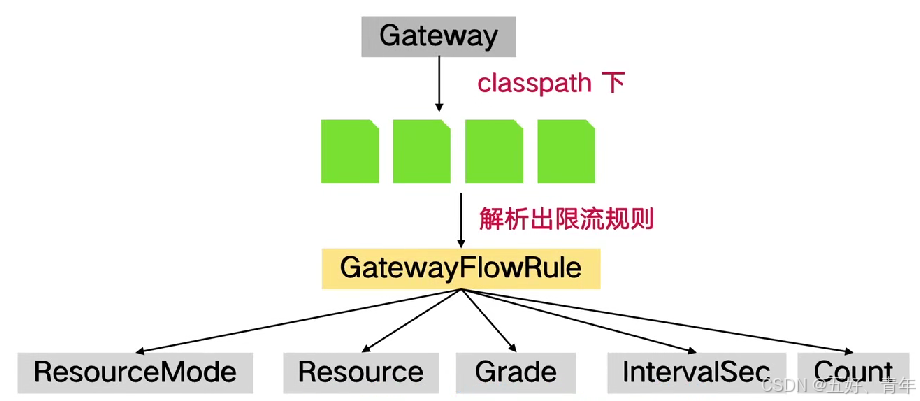
在配置文件中,先添加两个文件
dsl.file:定义规则
ds2.file:定义分组
spring:
    sentinel:
      datasource:
        # 通过本地文件方式, 基于服务级别的配置
        dsl.file:
          file: classpath:gateway-flow-rule-sentinel.json
          # 代表服务级别的限流, 一步步点进去看, 文件类型
          ruleType: gw-flow
        # 通过本地文件方式, 细粒度对指定 api 进行配置
        ds2.file:
          file: classpath:gateway-flow-rule-api-sentinel.json
          # 代表 API 分组, 一步步点进去看, 文件类型
          ruleType: gw-api-group
将两个文件放置resource下
定义
分组定义gateway-flow-rule-api-sentinel.json
[
  {
    "apiName": "nacos-client-api",
    "predicateItems": [
      {
        "pattern": "/imooc/ecommerce-nacos-client/nacos-client/project-config"
      },
      {
        "pattern": "/imooc/ecommerce-nacos-client/**",
        "matchStrategy": 1
      }
    ]
  }
]
定义
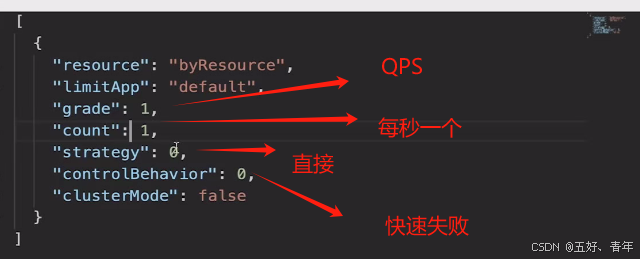
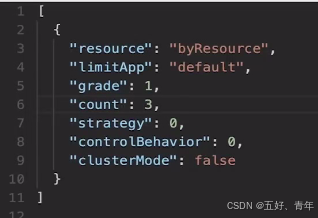
规则定义gateway-flow-rule-sentinel.json
[
  {
    "resource": "e-commerce-nacos-client",
    "resourceMode": 0,
    "count": 3,
    "intervalSec": 60
  },
  {
    "resource": "nacos-client-api",
    "resourceMode": 1,
    "count": 1,
    "intervalSec": 60
  }
]
10、Gateway 集成 Sentinel 实现网关限流(Nacos)
Nacos中定义两个配置文件,与上述文件定义一致

配置项中配置Nacos的动态配置文件
spring:
    sentinel:
      datasource:
        ds1:
          nacos:
            server-addr: ${spring.cloud.nacos.discovery.server-addr}
            namespace: ${spring.cloud.nacos.discovery.namespace}
            # 测试时, 看看 Nacos 中修改是否能让 dashboard 生效, 就把第二个 count 也修改为 3
            data-id: gateway-flow-rule-sentinel
            group-id: DEFAULT_GROUP
            data-type: json
            rule-type: gw-flow
        ds2:
          nacos:
            server-addr: ${spring.cloud.nacos.discovery.server-addr}
            namespace: ${spring.cloud.nacos.discovery.namespace}
            data-id: gateway-flow-rule-api-sentinel
            group-id: DEFAULT_GROUP
            data-type: json
            rule-type: gw-api-group
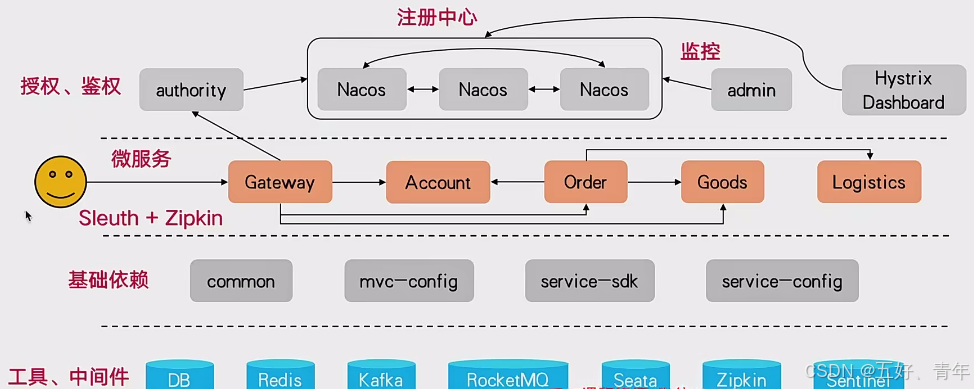
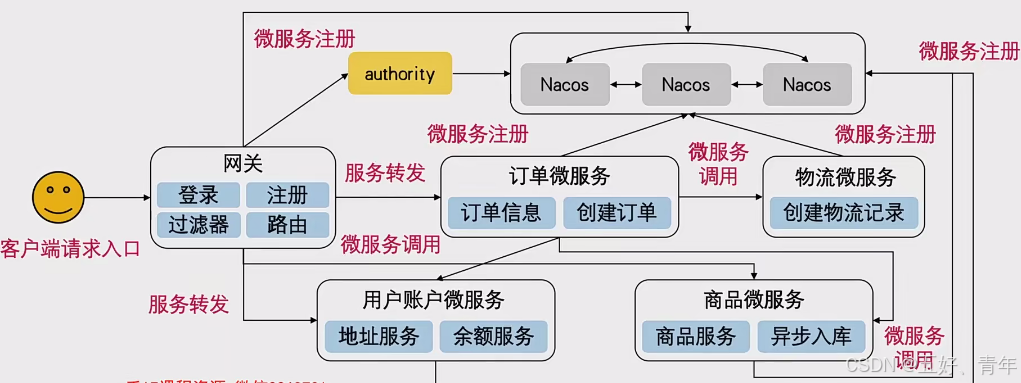
三、微服务整体概要及部署
1、整体工程概要
2、工程配置与部署
电商工程配置
- 工程参数配置:
bootstrap.yml、application.yml等等 - 日志配置:logback.xml
网关路由配置:route-all.json(准备工作)- 限流规则:需要根据业务需要、
实际的场景去设定,不一定是需要 - (微服务、工具)数据库、数据表,及其预置数据
编译打包 - 每一个微服务模块都是
独立的 SpringBoot 工程
微服务启动前置依赖
数据存储服务:MySQL、Redis消息队列:Kafka、RocketMQ 等等(选择任意一个就可以,建议不要多选)分布式日志追踪:Dashboard:Zipkin Server服务注册、发现中心:Nacos Server
自动化启动脚本
#!/bin/bash
JDK_HOME="/home/jdk1.8.0_181.jdk/bin"
VM_OPTS="-Xms2048m -Xmx2048m"
SPB_OPTS="--spring.profiles.active=dev"
APP_LOCATION="/Users/qinyizhang/QinyiZhang/imooc/springcloud-alibaba/imooc-e-commerce/e-commerce-springcloud/e-commerce-admin/target/e-commerce-admin.jar"
APP_NAME="e-commerce-admin"
PID_CMD="ps -ef |grep $APP_NAME |grep -v grep |awk '{print \$2}'"

start() {
 echo "=============================start=============================="
 PID=$(eval "$PID_CMD")
 if [[ -n $PID ]]; then
    echo "$APP_NAME is already running, PID is $PID"
 else
    # nohup $JDK_HOME "$VM_OPTS" -jar $APP_LOCATION $SPB_OPTS >/dev/null 2>\$1 &
    nohup $JDK_HOME -jar $APP_LOCATION >/dev/null 2>\$1 &
    echo "nohup $JDK_HOME -jar $APP_LOCATION >/dev/null 2>\$1 &"
    PID=$(eval "$PID_CMD")
    if [[ -n $PID ]]; then
       echo "Start $APP_NAME successfully, PID is $PID"
    else
       echo "Failed to start $APP_NAME !!!"
    fi
 fi
 echo "=============================start=============================="
}

stop() {
 echo "=============================stop=============================="
 PID=$(eval "$PID_CMD")
 if [[ -n $PID ]]; then
    kill -15 "$PID"
    sleep 2
    PID=$(eval "$PID_CMD")
    if [[ -n $PID ]]; then
      echo "Stop $APP_NAME failed by kill -15 $PID, begin to kill -9 $PID"
      kill -9 "$PID"
      sleep 2
      echo "Stop $APP_NAME successfully by kill -9 $PID"
    else
      echo "Stop $APP_NAME successfully by kill -15 $PID"
    fi
 else
    echo "$APP_NAME is not running!!!"
 fi
 echo "=============================stop=============================="
}

restart() {
  echo "=============================restart=============================="
  stop
  start
  echo "=============================restart=============================="
}

status() {
  echo "=============================status=============================="
  PID=$(eval "$PID_CMD")
  if [[ -n $PID ]]; then
       echo "$APP_NAME is running, PID is $PID"
  else
       echo "$APP_NAME is not running!!!"
  fi
  echo "=============================status=============================="
}

info() {
  echo "=============================info=============================="
  echo "APP_LOCATION: $APP_LOCATION"
  echo "APP_NAME: $APP_NAME"
  echo "JDK_HOME: $JDK_HOME"
  echo "VM_OPTS: $VM_OPTS"
  echo "SPB_OPTS: $SPB_OPTS"
  echo "=============================info=============================="
}

help() {
   echo "start: start server"
   echo "stop: shutdown server"
   echo "restart: restart server"
   echo "status: display status of server"
   echo "info: display info of server"
   echo "help: help info"
}

case $1 in
start)
    start
    ;;
stop)
    stop
    ;;
restart)
    restart
    ;;
status)
    status
    ;;
info)
    info
    ;;
help)
    help
    ;;
*)
    help
    ;;
esac
exit $?
配置nginx反向代理,与host域名,将127.0.0.1直接转发到一个自定义域名
作用:
1.可以实现负载均衡
2.动静分离,客户端访问静态资源时,不请求 Tomcat,减小服务器压力
3.拦截恶意请求,避免后端服务被流量冲垮
注意事项
- 正确的工程配置是工程能够
正常启动、稳定运行的基础,一定要多做检查 - MySQL、Redis、Kafka、Nacos、Zipkin、Seata等等
工具和中间件的地址配置一定要正确 - 预置的数据要提前准备好,且要在服务启动之前就已经录入到系统(MVSQL、Redis 等等)中
- 依赖的工具、中间件要提前配置好,并在
微服务启动之前就启动好(验证可用)


 被折叠的 条评论
为什么被折叠?
被折叠的 条评论
为什么被折叠?
 到【灌水乐园】发言


