


Spring5
一、Spring5入门
1.1、Spring概念
https://repo.spring.io/ui/native/release/org/springframework/spring/
Spring是一个JavaEE开源的轻量级别的框架,可以解决我们企业开发中遇到的难题,
能够让编码变的更加简单,核心组件 IOC容器和Aop面向切面编程。
1.2、Spring 特点
(1)方便解耦,简化开发
(2)Aop 编程支持
(3)方便程序测试
(4)方便和其他框架进行整合
(5)方便进行事务操作
(6)降低 API 开发难度
1.3、Spring 有两个核心部分:IOC 和 Aop
- IOC 控制反转:把整个对象创建的过程,统一交给我们SpringIOC容器来实现管理,底层使用反射+工厂模式实现。
- AOP面向切面编程:不修改源代码对我们功能(方法)前后实现增强,比如打印日志、事务原理、权限管理,底层是基于动态代理模式实现的,减少代码的冗余性问题。
1.4、Spring与SpringBoot关系
SpringBoot直接采用注解化的方式启动,底层会依赖于Spring/SpringMVC注解方式启动。
总结:SpringBoot底层基于Spring/SpringMVC注解化方式实现包装。
1.5、Spring5 入门案例
maven
 <dependencies>
    <!--spring-->
    <dependency>
        <groupId>org.springframework</groupId>
        <artifactId>spring-context</artifactId>
        <version>5.3.9</version>
    </dependency>
</dependencies>
spring-content.xml
<?xml version="1.0" encoding="UTF-8"?>
<beans xmlns="http://www.springframework.org/schema/beans"
       xmlns:xsi="http://www.w3.org/2001/XMLSchema-instance"
       xsi:schemaLocation="http://www.springframework.org/schema/beans http://www.springframework.org/schema/beans/spring-beans.xsd">

    <bean id="user" class="com.java521.domain.User"></bean>
</beans>
domain
public class User {
    private String name;
    private Integer age;

    public User() {
    }

    public User(String name, Integer age) {
        this.name = name;
        this.age = age;
    }

    public String getName() {
        return name;
    }

    public void setName(String name) {
        this.name = name;
    }

    public Integer getAge() {
        return age;
    }

    public void setAge(Integer age) {
        this.age = age;
    }

    @Override
    public String toString() {
        return "User{" +
                "name='" + name + '\'' +
                ", age=" + age +
                '}';
    }
}
测试 Test01
public class Test01 {
    public static void main(String[] args) {
        ClassPathXmlApplicationContext context = new ClassPathXmlApplicationContext("spring-content.xml");
        User user = context.getBean("user", User.class);
        System.out.println("user = " + user);
    }
}
二、IOC(概念和原理)
2.1、什么是 IOC
控制反转,把对象创建和对象之间的调用过程,交给 Spring 进行管理
使用 IOC 目的:为了耦合度降低
2.2、IOC容器底层实现原理
-
IOC容器中非常核心的接口 BeanFactory
BeanFactory
Bean对象 Factory工厂 -
IOC容器基本的概念:控制反转
把对象的创建过程与使用统一都交给我们的Spring来进行原理。
不需要开发者自己去new对象 -
IOC容器底层实现技术:反射技术、解析xml、工厂模式
-
IOC作用 降低我们代码的耦合度。
2.3、创建对象的方式有那些:
-
单独new方式—耦合度太高了
每次单独new对象,没有实现统一管理对象,如果后期userDao的名称信息发生变化的情况下,需要改变的引用地方比较多,耦合度太高。 -
工厂模式—降低我们耦合度
统一的管理和维护我们每个对象创建与使用的过程。不需要自己new对象。 -
反射的方式
降低代码的-耦合度
SpringIOC容器底层实现原理:反射+工厂模式+解析xml技术实现
- 使用解析xml技术 解析spring.xml配置文件;
- 获取
<bean id="" class=""/>类的完整路径地址 - 使用到反射技术初始化对象
- 需要使用工厂模式封装初始化对象
2.4、IOC核心的接口
IOC的核心思想底层基于反射+工厂模式实现
Spring提供IOC容器实现两种方式:
- BeanFactory IOC容器基本的实现,是spring内部自己使用的接口,不提供给开发者使用。
加载配置文件过程的时候,不会创建对象,当我们在获取对象的时候才会获取创建对象。 - ApplicationContext BeanFactory 接口的子接口,提供更多的强大功能,适合于开发者使用。
当我们在加载配置文件的过程中,就会将配置文件中的对象创建。
在做服务器端开发的时候,使用ApplicationContext 比较多,因为所有bean初始化操作在项目启动完成之前都已经初始化了。
##2.5、ApplicationContext主要实现类
ClassPathXmlApplicationContext:对应类路径下的XML格式的配置文件
FileSystemXmlApplicationContext:对应文件系统中的XML格式的配置文件
ConfigurableApplicationContext 是ApplicationContext的子接口,包含一些扩展方法
refresh()和close()让ApplicationContext具有启动、关闭和刷新上下文的能力。所以要关闭ApplicationContext需要new此接口的对象调用close()方法
WebApplicationContext 专门为WEB应用而准备的,它允许从相对于WEB根目录的路径中完成初始化工作
三、DI 依赖注入
3.1、基于 xml 方式创建对象
<bean id="user" class="com.java521.domain.User"></bean>
3.2、使用 set 方法进行注入
<bean id="user2" class="com.java521.domain.User">
    <property name="name" value="哈哈"></property>
    <property name="age" value="27"></property>
</bean>
3.3、基于有参构造方式注入属性
<!--constructor-arg name  指定参数列表名称-->
<bean id="user3" class="com.java521.domain.User">
    <constructor-arg name="name" value="java521"></constructor-arg>
    <constructor-arg name="age" value="25"></constructor-arg>
</bean>

<!--constructor-arg index 指定参数列表索引-->
<bean id="user4" class="com.java521.domain.User">
    <constructor-arg index="0" value="hello"></constructor-arg>
    <constructor-arg index="1" value="18"></constructor-arg>
</bean>
3.4、p名称空间注入
使用p标签为属性注入值:调用set方法注入值
- Xml头部引入P标签:
<?xml version="1.0" encoding="UTF-8"?>
<beans xmlns="http://www.springframework.org/schema/beans"
       xmlns:xsi="http://www.w3.org/2001/XMLSchema-instance"
       xmlns:p="http://www.springframework.org/schema/p"
       xsi:schemaLocation="http://www.springframework.org/schema/beans http://www.springframework.org/schema/beans/spring-beans.xsd">
	<bean id="user5" class="com.java521.domain.User" p:name="我是p名称空间" p:age="19"></bean>
</beans>
3.5、注入空值属性
<bean id="user6" class="com.java521.domain.User">
    <property name="name" value="zhangsan"></property>
    <property name="age">
        <null></null>
    </property>
</bean>
3.6、注入特殊符号
<bean id="user7" class="com.java521.domain.User">
<property name="name" value=">>zhangsan<<"></property>
<property name="age">
<null></null>
</property>
</bean>
3.7、CDATA注入方式
<![CDATA[<<>>]]><bean id="user8" class="com.java521.domain.User">
<property name="name" >
<value>
<![CDATA[56wq<<!@#$%^^&*(){}[];';.,`/>>]]>
</value>
</property>
<property name="age">
<null></null>
</property>
</bean>
3.8、注入外部 bean
public class UserService {
    //创建 UserDao 类型属性,生成 set 方法
    private UserDao userDao;

    public void setUserDao(UserDao userDao) {
        this.userDao = userDao;
    }

    public void add() {
        System.out.println("service add......");
        userDao.update();
    }
}
public interface UserDao {
    void update();
}
public class UserDaoImpl implements UserDao {
    @Override
    public void update() {
        System.out.println("dao update......");
    }
}
<bean id="userService" class="com.java521.demo02.service.UserService">
    <property name="userDao" ref="userDao"></property>
</bean>

<bean id="userDao" class="com.java521.demo02.dao.impl.UserDaoImpl"></bean>
public class Test01 {
    public static void main(String[] args) {
        ClassPathXmlApplicationContext context = new ClassPathXmlApplicationContext("spring-content.xml");
        UserService userService = context.getBean("userService", UserService.class);
        userService.add();
    }
}
3.9、注入内部 bean
public class Dept {
    private String name;

    @Override
    public String toString() {
        return "Dept{" +
                "name='" + name + '\'' +
                '}';
    }

    public String getName() {
        return name;
    }

    public void setName(String name) {
        this.name = name;
    }

    public Dept() {
    }

    public Dept(String name) {
        this.name = name;
    }
}
public class Emp {
    private String name;
    private Integer age;
    private  Dept dept;

    public Emp() {
    }

    public Emp(String name, Integer age, Dept dept) {
        this.name = name;
        this.age = age;
        this.dept = dept;
    }

    public String getName() {
        return name;
    }


    public void setName(String name) {
        this.name = name;
    }

    public Integer getAge() {
        return age;
    }

    public void setAge(Integer age) {
        this.age = age;
    }

    public Dept getDept() {
        return dept;
    }

    public void setDept(Dept dept) {
        this.dept = dept;
    }

    @Override
    public String toString() {
        return "Emp{" +
                "name='" + name + '\'' +
                ", age=" + age +
                ", dept=" + dept +
                '}';
    }
}
<bean id="emp" class="com.java521.domain.Emp">
    <property name="name" value="lisi"></property>
    <property name="age" value="19"></property>
    <property name="dept">
        <bean id="dept" class="com.java521.domain.Dept">
            <property name="name" value="开发部"></property>
        </bean>
    </property>
</bean>
public class Test02 {
    public static void main(String[] args) {
        ClassPathXmlApplicationContext context = new ClassPathXmlApplicationContext("spring-content.xml");
        Emp emp = context.getBean("emp", Emp.class);
        System.out.println("emp = " + emp);
    }
}
3.10、注入级联赋值
<!--写法1-->
<bean id="emp" class="com.java521.domain.Emp">
    <property name="name" value="lisi"></property>
    <property name="age" value="19"></property>
    <property name="dept">
        <bean id="dept" class="com.java521.domain.Dept">
            <property name="name" value="开发部"></property>
        </bean>
    </property>
</bean>

<!--写法2-->
<bean id="emp2" class="com.java521.domain.Emp">
    <property name="name" value="wangwu"></property>
    <property name="age" value="22"></property>
    <property name="dept" ref="dept"></property>
</bean>

<bean id="dept" class="com.java521.domain.Dept">
    <property name="name" value="项目部"></property>
</bean>
3.11、注入集合属性
- 注入数组类型属性
- 注入 List 集合类型属性
- 注入 Map 集合类型属性
<bean id="stu" class="com.java521.domain.Stu">
    <property name="courses">
        <array>
            <value>java</value>
            <value>php</value>
            <value>python</value>
        </array>
    </property>

    <property name="list">
        <list>
            <value>reading</value>
            <value>sporting</value>
        </list>
    </property>

    <property name="sets">
        <set>
            <value>旅游</value>
            <value>美食</value>
        </set>
    </property>
    <property name="maps">
        <map>
            <entry key="php" value="no.1"></entry>
            <entry key="java" value="no.2"></entry>
            <entry key="c" value="no.3"></entry>
        </map>
    </property>
</bean>
public class Stu {
    //1 数组类型属性
    private String[] courses;
    //2 list 集合类型属性
    private List<String> list;
    //3 map 集合类型属性
    private Map<String,String> maps;
    //4 set 集合类型属性
    private Set<String> sets;

    public void setCourses(String[] courses) {
        this.courses = courses;
    }

    public void setList(List<String> list) {
        this.list = list;
    }

    public void setMaps(Map<String, String> maps) {
        this.maps = maps;
    }

    public void setSets(Set<String> sets) {
        this.sets = sets;
    }

    @Override
    public String toString() {
        return "Stu{" +
                "courses=" + Arrays.toString(courses) +
                ", list=" + list +
                ", maps=" + maps +
                ", sets=" + sets +
                '}';
    }
}
public class Test03 {
    public static void main(String[] args) {
        ClassPathXmlApplicationContext context = new ClassPathXmlApplicationContext("spring-content.xml");

        Stu stu = context.getBean("stu", Stu.class);
        System.out.println("stu = " + stu);
    }
}
四、FactoryBean
4.1、Bean的分类
1、Spring 有两种类型 bean,一种普通 bean,另外一种工厂 bean(FactoryBean)
2、普通 bean:在配置文件中定义 bean 类型就是返回类型
3、工厂 bean:在配置文件定义 bean 类型可以和返回类型不一样
第一步 创建类,让这个类作为工厂 bean,实现接口 FactoryBean
第二步 实现接口里面的方法,在实现的方法中定义返回的 bean 类型
public class MyBean implements FactoryBean<User> {
    @Override
    public User getObject() throws Exception {
        User user = new User();
        user.setName("zhangsan");
        return user;
    }

    @Override
    public Class<?> getObjectType() {
        return null;
    }

	@Override
    public boolean isSingleton() {
        return false;
    }
}
<bean id="myBean" class="com.java521.demo02.MyBean"></bean>
public class Test05 {
    public static void main(String[] args) {
        ClassPathXmlApplicationContext context = new ClassPathXmlApplicationContext("spring-content.xml");
        User user= context.getBean("myBean", User.class);
        System.out.println(user);
    }
}
4.2、bean的name属性
| 类别 | 描述 |
|---|---|
| 名称 | name |
| 类型 | 属性 |
| 所属 | bean标签 |
| 功能 | 定义bean的别名,可定义多个,使用逗号(,)分号(;)空格( )分隔 |
| 范例 | <bean id=“bookDao” name=“dao dao2 dao3” class=“com.java521.service.impl.BookDaoImpl”/> |
4.3、为什么bean默认为单例?
- bean为单例的意思是在Spring的IOC容器中只会有该类的一个对象
- bean对象只有一个就避免了对象的频繁创建与销毁,达到了bean对象的复用,性能高
4.4、bean在容器中是单例的,会不会产生线程安全问题?
- 如果对象是有状态对象,即该对象有成员变量可以用来存储数据的,
- 因为所有请求线程共用一个bean对象,所以会存在线程安全问题。
- 如果对象是无状态对象,即该对象没有成员变量没有进行数据存储的,
- 因方法中的局部变量在方法调用完成后会被销毁,所以不会存在线程安全问题。
4.5、哪些bean对象适合/不适合交给容器进行管理?
适合
- 表现层对象
- 业务层对象
- 数据层对象
- 工具对象
不适合
- 封装实例的域对象,因为会引发线程安全问题,所以不适合。
4.6、bean实例化
实例化bean的三种方式,构造方法、静态工厂和实例工厂。
bean本质上就是对象,对象在new的时候会使用构造方法完成,那创建bean也是使用构造方法完成的。
五、bean 作用域
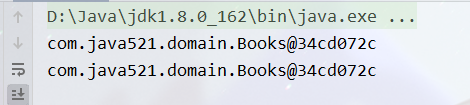
在 Spring 里面,默认情况下,bean 是单实例对象
public class Books {
    private String name;
    private Double price;

    public void setName(String name) {
        this.name = name;
    }

    public void setPrice(Double price) {
        this.price = price;
    }
}
<bean id="books" class="com.java521.domain.Books"></bean>
public class Test06 {
    public static void main(String[] args) {
        ClassPathXmlApplicationContext context = new ClassPathXmlApplicationContext("spring-content.xml");
        Books books1 = context.getBean("books", Books.class);
        Books books2 = context.getBean("books", Books.class);
        System.out.println(books1);
        System.out.println(books2);
    }
}
如何设置单实例还是多实例
- 在 spring 配置文件 bean 标签里面有属性(scope)用于设置单实例还是多实例
- scope 属性值
singleton,默认值,表示是单实例对象
prototype,表示是多实例对象
<bean id="books" class="com.java521.domain.Books" scope="prototype"></bean>
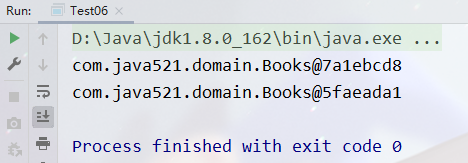
singleton 和 prototype 区别:singleton 单实例,prototype 多实例
- 设置 scope 值是 singleton 时候,加载 spring 配置文件时候就会创建单实例对象
- 设置 scope 值是 prototype 时候,不是在加载 spring 配置文件时候创建 对象,在调用getBean 方法时候创建多实例对象
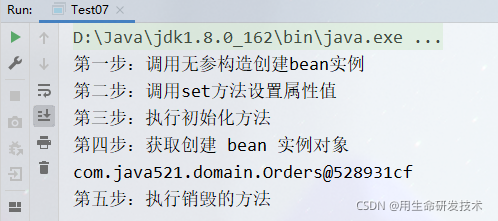
六、bean 生命周期
生命周期:从对象创建到对象销毁的过程
bean 生命周期
- 通过构造器创建 bean 实例(无参数构造)
- 为 bean 的属性设置值和对其他 bean 引用(调用 set 方法)
- 调用 bean 的初始化的方法(需要进行配置初始化的方法)
- bean 可以使用了(对象获取到了)
- 当容器关闭时候,调用 bean 的销毁的方法(需要进行配置销毁的方法)
public class Orders {

    private String name;

    public Orders() {
        System.out.println("第一步:调用无参构造创建bean实例");
    }

    public void setName(String name) {
        this.name = name;
        System.out.println("第二步:调用set方法设置属性值");
    }

    public void initMethod(){
        System.out.println("第三步:执行初始化方法");
    }

    public void desotryMethod(){
        System.out.println("第五步:执行销毁的方法");
    }
}
<bean id="orders" class="com.java521.domain.Orders" init-method="initMethod" destroy-method="desotryMethod">
    <property name="name" value="huawei"></property>
</bean>
public class Test07 {
    public static void main(String[] args) {
        ClassPathXmlApplicationContext context = new ClassPathXmlApplicationContext("spring-content.xml");
        Orders orders = context.getBean("orders", Orders.class);
        System.out.println("第四步:获取创建 bean 实例对象");
        System.out.println(orders);
        context.close();
    }
}
bean 的后置处理器,bean 生命周期有七步
- 通过构造器创建 bean 实例(无参数构造)
- 为 bean 的属性设置值和对其他 bean 引用(调用 set 方法)
- 把 bean 实例传递 bean 后置处理器的方法 postProcessBeforeInitialization
- 调用 bean 的初始化的方法(需要进行配置初始化的方法)
- 把 bean 实例传递 bean 后置处理器的方法 postProcessAfterInitialization
- bean 可以使用了(对象获取到了)
- 当容器关闭时候,调用 bean 的销毁的方法(需要进行配置销毁的方法)
public class Orders {

    private String name;

    public Orders() {
        System.out.println("第一步:调用无参构造创建bean实例");
    }

    public void setName(String name) {
        this.name = name;
        System.out.println("第二步:调用set方法设置属性值");
    }

    public void initMethod() {
        System.out.println("第四步:执行初始化方法");
    }

    public void desotryMethod() {
        System.out.println("第七步:执行销毁的方法");
    }
}
spring-content2.xml
<?xml version="1.0" encoding="UTF-8"?>
<beans xmlns="http://www.springframework.org/schema/beans"
       xmlns:xsi="http://www.w3.org/2001/XMLSchema-instance"
       xmlns:p="http://www.springframework.org/schema/p"
       xsi:schemaLocation="http://www.springframework.org/schema/beans http://www.springframework.org/schema/beans/spring-beans.xsd">


    <bean id="orders" class="com.java521.domain.Orders" init-method="initMethod" destroy-method="desotryMethod">
        <property name="name" value="xiaomi"></property>
    </bean>

    <!--配置后置处理器-->
    <bean id="myBeanPost" class="com.java521.demo02.MyBeanPost"></bean>
</beans>
public class Test08 {
    public static void main(String[] args) {
        ClassPathXmlApplicationContext context = new ClassPathXmlApplicationContext("spring-content2.xml");
        Orders orders = context.getBean("orders", Orders.class);
        System.out.println("第六步:获取创建 bean 实例对象");
        System.out.println(orders);
        context.close();
    }
}
七、xml 自动装配
自动装配是根据指定装配规则(属性名称或者属性类型),Spring 自动将匹配的属性值进行注入
bean 标签属性 autowire,配置自动装配,autowire 属性常用两个值
- byName 根据属性名称注入 ,注入值 bean 的 id 值和类属性名称一样
<bean id="emp" class="com.java521.domain.Emp" autowire="byName"></bean>
<bean id="dept" class="com.java521.domain.Dept" autowire="byName">
public class Test01 {
    public static void main(String[] args) {
        ClassPathXmlApplicationContext context = new ClassPathXmlApplicationContext("spring-content3.xml");
        Emp emp = context.getBean("emp", Emp.class);
        System.out.println("emp = " + emp);
    }
}
- byType 根据属性类型注入(相同类型的bean只能有一个)
<bean id="emp" class="com.java521.domain.Emp" autowire="byType"></bean>
<bean id="dept" class="com.java521.domain.Dept" autowire="byType">
八、外部属性文件
1、直接配置数据库信息
(1)配置德鲁伊连接池
(2)引入德鲁伊连接池依赖 jar 包
<bean id="dataSource" class="com.alibaba.druid.pool.DruidDataSource">
    <property name="driverClassName" value="com.mysql.jdbc.Driver"></property>
    <property name="url" value="jdbc:mysql://127.0.0.1/user"></property>
    <property name="username" value="root"></property>
    <property name="password" value="root"></property>
</bean>
2、引入外部属性文件配置数据库连接池
(1)创建外部属性文件,properties 格式文件,写数据库信息
jdbc.driverClassName=com.mysql.jdbc.Driver
jdbc.url=jdbc:mysql://127.0.0.1/user
jdbc.username=root
jdbc.password=root
<context:property-placeholder location="classpath:jdbc.properties"></context:property-placeholder>
 <bean id="dataSource" class="com.alibaba.druid.pool.DruidDataSource">
     <property name="driverClassName" value="${jdbc.driverClassName}"></property>
     <property name="url" value="${jdbc.url}"></property>
     <property name="username" value="${jdbc.username}"></property>
     <property name="password" value="${jdbc.password}"></property>
 </bean>
九、基于注解方式
什么是注解
- 注解是代码特殊标记,格式:@注解名称(属性名称=属性值, 属性名称=属性值…)
- 使用注解,注解作用在类上面,方法上面,属性上面
- 使用注解目的:简化 xml 配置
Spring 针对 Bean 管理中创建对象提供注解
- @Component
- @Service
- @Controller
- @Repository
上面四个注解功能是一样的,都可以用来创建 bean 实例
3、基于注解方式实现对象创建
第一步 引入依赖
<!--spring aop-->
<dependency>
    <groupId>org.springframework</groupId>
    <artifactId>spring-aop</artifactId>
    <version>5.3.9</version>
</dependency>
第二步 开启组件扫描
<!--开启组件扫描
     1 如果扫描多个包,多个包使用逗号隔开
     2 扫描包上层目录
-->
<context:component-scan base-package="com.java521"/>
第三步 创建类,在类上面添加创建对象注解
@Component(value = "userService")
public class UserService {

    public void add(){
        System.out.println("service add ......");
    }
}
public class Test01 {
    public static void main(String[] args) {
        ClassPathXmlApplicationContext context = new ClassPathXmlApplicationContext("spring-content5.xml");
        UserService userService = context.getBean("userService", UserService.class);
        System.out.println(userService);
        userService.add();
    }
}
4、开启组件扫描细节配置
<!--开启组件扫描
     1 如果扫描多个包,多个包使用逗号隔开
     2 扫描包上层目录
-->
<context:component-scan base-package="com.java521"/>

<!--示例 1
    use-default-filters="false" 表示现在不使用默认filter, 自己配置filter
    context:include-filter  设置扫描哪些内容
-->
<context:component-scan base-package="com.java521" use-default-filters="false">
    <context:include-filter type="annotation" expression="org.springframework.stereotype.Component"/>
</context:component-scan>

<!--示例 2
    context:exclude-filter  设置哪些内容不进行扫描
-->
<context:component-scan base-package="com.java521" use-default-filters="false">
    <context:exclude-filter type="annotation" expression="org.springframework.stereotype.Component"/>
</context:component-scan>
5、基于注解方式实现属性注入
- @Autowired:根据属性类型进行自动装配
- @Qualifier:根据名称进行注入
- @Resource:可以根据类型注入,可以根据名称注入
- @Value:注入普通类型属性
(1)@Autowired:根据属性类型进行自动装配
第一步 把 service 和 dao 对象创建,在 service 和 dao 类添加创建对象注解
第二步 在 service 注入 dao 对象,在 service 类添加 dao 类型属性,在属性上面使用注解
public interface UserDao {
    void add();
}
@Repository
public class UserDaoImpl implements UserDao {
    @Override
    public void add() {
        System.out.println("userDao  add  ...");
    }
}
@Service
public class UserService {

    @Autowired
    private UserDao userDao;

    public void add() {
        System.out.println("service add ......");
        userDao.add();
    }
}
(2)@Qualifier:根据名称进行注入
这个@Qualifier 注解的使用,和上面@Autowired 一起使用
@Service
public class UserService {

    @Autowired
    @Qualifier(value = "userDaoImpl1")
    private UserDao userDao;

    public void add() {
        System.out.println("service add ......");
        userDao.add();
    }
}
@Repository(value = "userDaoImpl1")
public class UserDaoImpl implements UserDao {
    @Override
    public void add() {
        System.out.println("userDao  add  ...");
    }
}
(3)@Resource:可以根据类型注入,可以根据名称注入
@Service
public class UserService {
    //根据类型注入
    //@Resource
    //根据名称注入
    @Resource(name = "userDaoImpl1")
    private UserDao userDao;
    public void add() {
        System.out.println("service add ......");
        userDao.add();
    }
}
(4)@Value:注入普通类型属性
@Service
public class UserService {
    //根据类型注入
    //@Resource
    //根据名称注入
    @Resource(name = "userDaoImpl1")
    private UserDao userDao;

    @Value(value = "abc")
    private String name;

    public void add() {
        System.out.println("service add ......" + name);
        userDao.add();
    }
}
6、完全注解开发
(1)创建配置类,替代 xml 配置文件
@Configuration
@ComponentScan(basePackages = "com.java521")
public class SpringConfig {
}
(2)编写测试类
public class Test02 {
    public static void main(String[] args) {
        AnnotationConfigApplicationContext context = new AnnotationConfigApplicationContext(SpringConfig.class);
        UserService userService = context.getBean("userService", UserService.class);
        System.out.println(userService);
        userService.add();
    }
}
十、AOP(概念)
10.1、什么是 AOP
面向切面编程(方面),利用 AOP 可以对业务逻辑的各个部分进行隔离,从而使得业务逻辑各部分之间的耦合度降低,提高程序的可重用性,同时提高了开发的效率。
通俗描述:不通过修改源代码方式,在主干功能里面添加新功能
使用登录例子说明 AOP

10.2、AOP底层原理
AOP 底层使用动态代理
(1)有两种情况动态代理
-
有接口情况,使用 JDK 动态代理
创建接口实现类代理对象,增强类的方法 -
没有接口情况,使用 CGLIB 动态代理
创建子类的代理对象,增强类的方法
10.3、AOP术语
-
连接点
类里面哪些方法可以被增强,这些方法称为连接点 -
切入点
实际被真正增强的方法,称为切入点 -
通知(增强)
实际增强的逻辑部分称为通知(增强)
通知有多种类型
– 前置通知
– 后置通知
– 环绕通知
– 异常通知
– 最终通知 -
切面
是动作,把通知应用到切入点过程
10.4、准备工作
1、Spring 框架一般都是基于 AspectJ 实现 AOP 操作
AspectJ 不是 Spring 组成部分,独立 AOP 框架,一般把 AspectJ 和 Spirng 框架一起使用,进行 AOP 操作
2、基于 AspectJ 实现 AOP 操作
(1)基于 xml 配置文件实现
(2)基于注解方式实现(使用)
3、在项目工程里面引入 AOP 相关依赖
<dependency>
    <groupId>org.springframework</groupId>
    <artifactId>spring-context</artifactId>
    <version>5.3.9</version>
</dependency>

<!--spring aop-->
<dependency>
    <groupId>org.springframework</groupId>
    <artifactId>spring-aop</artifactId>
    <version>5.3.9</version>
</dependency>

<dependency>
    <groupId>org.springframework</groupId>
    <artifactId>spring-aspects</artifactId>
    <version>5.3.9</version>
</dependency>
4、切入点表达式
切入点表达式作用:知道对哪个类里面的哪个方法进行增强
语法结构: execution([权限修饰符] [返回类型] [类全路径] 方法名称 )
举例 1:对 com.java521.dao.BookDao 类里面的 add 进行增强
execution(* com.java521.dao.BookDao.add(..))
举例 2:对 com.java521.dao.BookDao 类里面的所有的方法进行增强
execution(* com.java521.dao.BookDao.* (..))
举例 3:对 com.java521.dao 包里面所有类,类里面所有方法进行增强
execution(* com.java521.dao.*.* (..))
10.5、AspectJ 注解
1、创建类,在类里面定义方法
public class User {
    public void add(){
        System.out.println("user add ...");
    }
}
2、创建增强类(编写增强逻辑)
在增强类里面,创建方法,让不同方法代表不同通知类型
public class UserProxy {
    //前置通知
    public void before() {
        System.out.println("user before...");
    }
}
3、进行通知的配置
在 spring 配置文件中,开启注解扫描
<?xml version="1.0" encoding="UTF-8"?>
<beans xmlns="http://www.springframework.org/schema/beans"
       xmlns:xsi="http://www.w3.org/2001/XMLSchema-instance"
       xmlns:context="http://www.springframework.org/schema/context"
       xsi:schemaLocation="http://www.springframework.org/schema/beans http://www.springframework.org/schema/beans/spring-beans.xsd http://www.springframework.org/schema/context https://www.springframework.org/schema/context/spring-context.xsd">

    <context:component-scan base-package="com.java521.anpanno"></context:component-scan>
</beans>
使用注解创建 User 和 UserProxy 对象
@Component
public class User {

@Component
public class UserProxy {
在增强类上面添加注解 @Aspect
@Component
@Aspect //生成代理对象
public class UserProxy {
在 spring 配置文件中开启生成代理对象
<?xml version="1.0" encoding="UTF-8"?>
<beans xmlns="http://www.springframework.org/schema/beans"
       xmlns:xsi="http://www.w3.org/2001/XMLSchema-instance"
       xmlns:context="http://www.springframework.org/schema/context"
       xmlns:aop="http://www.springframework.org/schema/aop"
       xsi:schemaLocation="http://www.springframework.org/schema/beans http://www.springframework.org/schema/beans/spring-beans.xsd http://www.springframework.org/schema/context https://www.springframework.org/schema/context/spring-context.xsd http://www.springframework.org/schema/aop https://www.springframework.org/schema/aop/spring-aop.xsd">

    <context:component-scan base-package="com.java521.anpanno"></context:component-scan>

    <aop:aspectj-autoproxy></aop:aspectj-autoproxy>
</beans>
4、配置不同类型的通知
在增强类的里面,在作为通知方法上面添加通知类型注解,使用切入点表达式配置
@Component
@Aspect //生成代理对象
public class UserProxy {
    //前置通知
    @Before(value = "execution(* com.java521.anpanno.User.add(..))")
    public void before() {
        System.out.println("user before...");
    }

    //后置通知(返回通知)
    @AfterReturning(value = "execution(* com.java521.anpanno.User.add(..))")
    public void afterReturning() {
        System.out.println("afterReturning.........");
    }
    //最终通知
    @After(value = "execution(* com.java521.anpanno.User.add(..))")
    public void after() {
        System.out.println("after.........");
    }
    //异常通知
    @AfterThrowing(value = "execution(* com.java521.anpanno.User.add(..))")
    public void afterThrowing() {
        System.out.println("afterThrowing.........");
    }
    //环绕通知
    @Around(value = "execution(* com.java521.anpanno.User.add(..))")
    public void around(ProceedingJoinPoint proceedingJoinPoint) throws
            Throwable {
        System.out.println("环绕之前.........");
        //被增强的方法执行
        proceedingJoinPoint.proceed();
        System.out.println("环绕之后.........");
    }
}
相同的切入点抽取
@Component
@Aspect //生成代理对象
public class UserProxy {
    //相同切入点抽取
    @Pointcut(value = "execution(* com.java521.anpanno.User.add(..))")
    public void pointdemo() {
    }

    //前置通知
    @Before(value = "pointdemo()")
    public void before() {
        System.out.println("user before...");
    }
    //后置通知(返回通知)
    @AfterReturning(value = "execution(* com.java521.anpanno.User.add(..))")
    public void afterReturning() {
        System.out.println("afterReturning.........");
    }
    //最终通知
    @After(value = "execution(* com.java521.anpanno.User.add(..))")
    public void after() {
        System.out.println("after.........");
    }
    //异常通知
    @AfterThrowing(value = "execution(* com.java521.anpanno.User.add(..))")
    public void afterThrowing() {
        System.out.println("afterThrowing.........");
    }
    //环绕通知
    @Around(value = "execution(* com.java521.anpanno.User.add(..))")
    public void around(ProceedingJoinPoint proceedingJoinPoint) throws
            Throwable {
        System.out.println("环绕之前.........");
        //被增强的方法执行
        proceedingJoinPoint.proceed();
        System.out.println("环绕之后.........");
    }
}
6、有多个增强类多同一个方法进行增强,设置增强类优先级
在增强类上面添加注解 @Order(数字类型值),数字类型值越小优先级越高
@Component
@Aspect
@Order(1)
public class PersonProxy {
    //前置通知
    @Before(value = "execution(* com.java521.anpanno.User.add(..))")
    public void before() {
        System.out.println("person before...");
    }
}
7、完全使用注解开发
创建配置类,不需要创建 xml 配置文件
@Configuration
@ComponentScan(basePackages = {"com.java521"})
@EnableAspectJAutoProxy(proxyTargetClass = true)
public class ConfigAop {
}
10.6、AspectJ 配置文件
1、创建两个类,增强类和被增强类,创建方法
public class Book {
    public void buy(){
        System.out.println("book buy ...");
    }
}
public class BookProxy {
    public void before() {
        System.out.println("BookProxy buy before ...");
    }
}
2、在 spring 配置文件中创建两个类对象
<!--创建对象-->
<bean id="book" class="com.java521.aopxml.Book"></bean>
<bean id="bookProxy" class="com.java521.aopxml.BookProxy"></bean>
3、在 spring 配置文件中配置切入点
<?xml version="1.0" encoding="UTF-8"?>
<beans xmlns="http://www.springframework.org/schema/beans"
       xmlns:xsi="http://www.w3.org/2001/XMLSchema-instance"
       xmlns:context="http://www.springframework.org/schema/context"
       xmlns:aop="http://www.springframework.org/schema/aop"
       xsi:schemaLocation="http://www.springframework.org/schema/beans http://www.springframework.org/schema/beans/spring-beans.xsd http://www.springframework.org/schema/context https://www.springframework.org/schema/context/spring-context.xsd http://www.springframework.org/schema/aop https://www.springframework.org/schema/aop/spring-aop.xsd">

    <!--创建对象-->
    <bean id="book" class="com.java521.aopxml.Book"></bean>
    <bean id="bookProxy" class="com.java521.aopxml.BookProxy"></bean>


    <!--配置 aop 增强-->

    <aop:config>
        <aop:pointcut id="p" expression="execution(* com.java521.aopxml.Book.buy(..)))"/>
        <aop:aspect ref="bookProxy">
            <aop:before method="before" pointcut-ref="p"/>
        </aop:aspect>
    </aop:config>
</beans>
测试类
public class Test01 {
    public static void main(String[] args) {
        ClassPathXmlApplicationContext context = new ClassPathXmlApplicationContext("spring-content7.xml");
        Book book = context.getBean("book", Book.class);
        book.buy();
    }
}
十一、JdbcTemplate
什么是 JdbcTemplate
Spring 框架对 JDBC 进行封装,使用 JdbcTemplate 方便实现对数据库操作
11.1、准备工作
导入依赖
<dependencies>
    <!--mysql-->
    <dependency>
        <groupId>mysql</groupId>
        <artifactId>mysql-connector-java</artifactId>
        <version>8.0.26</version>
    </dependency>

    <!--druid-->
    <dependency>
        <groupId>com.alibaba</groupId>
        <artifactId>druid</artifactId>
        <version>1.2.6</version>
    </dependency>


    <!--事务-->
    <dependency>
        <groupId>org.springframework</groupId>
         <artifactId>spring-tx</artifactId>
         <version>5.3.9</version>
     </dependency>

    <!--orm-->
    <dependency>
        <groupId>org.springframework</groupId>
        <artifactId>spring-orm</artifactId>
        <version>5.3.9</version>
    </dependency>

    <!--spring-->
    <dependency>
        <groupId>org.springframework</groupId>
        <artifactId>spring-context</artifactId>
        <version>5.3.9</version>
    </dependency>

    <!--spring aop-->
    <dependency>
        <groupId>org.springframework</groupId>
        <artifactId>spring-aop</artifactId>
        <version>5.3.9</version>
    </dependency>

    <dependency>
        <groupId>org.springframework</groupId>
        <artifactId>spring-aspects</artifactId>
        <version>5.3.9</version>
    </dependency>

    <!--lombok-->
    <dependency>
        <groupId>org.projectlombok</groupId>
        <artifactId>lombok</artifactId>
        <version>1.18.20</version>
        <scope>provided</scope>
    </dependency>
</dependencies>
在 spring 配置文件配置数据库连接池
<bean id="dataSource" class="com.alibaba.druid.pool.DruidDataSource">
    <property name="driverClassName" value="${jdbc.driverClassName}"></property>
    <property name="url" value="${jdbc.url}"></property>
    <property name="username" value="${jdbc.username}"></property>
    <property name="password" value="${jdbc.password}"></property>
</bean>
配置 JdbcTemplate 对象,注入 DataSource
<bean id="jdbcTemplate" class="org.springframework.jdbc.core.JdbcTemplate">
    <property name="dataSource" ref="dataSource"></property>
</bean>
组件扫描
<!-- 组件扫描 -->
<context:component-scan base-package="com.java521"></context:component-scan>
创建 service 类,创建 dao 类,在 dao 注入 jdbcTemplate 对象
public class UserService {
    //注入 dao
    @Autowired
    private UserDao userDao;
}
public interface UserDao {

}
@Repository
public class UserDaoImpl implements UserDao {
    //注入 JdbcTemplate
    @Autowired
    private JdbcTemplate jdbcTemplate;
}
11.2、JdbcTemplate 操作数据库(添加)
1、对应数据库创建实体类
@Data
public class User {
    private int id;
    private String name;
    private int age;
    private String email;
}
2、编写 service 和 dao
public class UserService {
    //注入 dao
    @Autowired
    private UserDao userDao;

    public void addUser(User user){
        userDao.addUser(user);
    }
}
在 dao 进行数据库添加操作
调用 JdbcTemplate 对象里面 update 方法实现添加操作
有两个参数
- 第一个参数:sql 语句
- 第二个参数:可变参数,设置 sql 语句值
public interface UserDao {
    void addUser(User user);
}
@Repository
public class UserDaoImpl implements UserDao {
    //注入 JdbcTemplate
    @Autowired
    private JdbcTemplate jdbcTemplate;

    @Override
    public void addUser(User user) {
        String sql = "insert into user values(?, ?, ?, ?)";
        Object[] args = {user.getId(), user.getName(), user.getAge(), user.getEmail()};

        jdbcTemplate.update(sql, args);
    }
}
xml汇总
<?xml version="1.0" encoding="UTF-8"?>
<beans xmlns="http://www.springframework.org/schema/beans"
       xmlns:xsi="http://www.w3.org/2001/XMLSchema-instance"
       xmlns:context="http://www.springframework.org/schema/context"
       xsi:schemaLocation="http://www.springframework.org/schema/beans http://www.springframework.org/schema/beans/spring-beans.xsd http://www.springframework.org/schema/context https://www.springframework.org/schema/context/spring-context.xsd">

    <!-- 组件扫描 -->
    <context:component-scan base-package="com.java521"></context:component-scan>

    <bean id="userService" class="com.java521.jdbc.UserService"/>

    <bean id="dataSource" class="com.alibaba.druid.pool.DruidDataSource">
        <property name="driverClassName" value="com.mysql.jdbc.Driver"></property>
        <property name="url" value="jdbc:mysql://127.0.0.1/user"></property>
        <property name="username" value="root"></property>
        <property name="password" value="root"></property>
    </bean>

    <bean id="jdbcTemplate" class="org.springframework.jdbc.core.JdbcTemplate">
        <property name="dataSource" ref="dataSource"></property>
    </bean>
</beans>
测试
public class TestJdbcTemplate {

    public static void main(String[] args) {

        ClassPathXmlApplicationContext context = new ClassPathXmlApplicationContext("spring-jdbc.xml");
        UserService userService = context.getBean("userService", UserService.class);
        User user = new User();
        user.setId(7);
        user.setName("张三");
        user.setAge(18);
        user.setEmail("123456@163.com");
        userService.addUser(user);
    }
}
11.3、修改和删除
1、修改
@Test
public void updateUser() {
    ClassPathXmlApplicationContext context = new ClassPathXmlApplicationContext("spring-jdbc.xml");
    UserService userService = context.getBean("userService", UserService.class);
    User user = new User();
    user.setId(7);
    user.setName("张三三");
    user.setAge(19);
    user.setEmail("123456@qq.com");
    userService.updateUser(user);
}
@Override
public void updateUser(User user) {

    String sql = "update user set name= ?, age =?, email=? where id = ?";
    Object[] args = {user.getName(), user.getAge(), user.getEmail(), user.getId()};

    int update = jdbcTemplate.update(sql, args);
    System.out.println(update);
}
2、删除
@Test
public void deleteUser() {
    ClassPathXmlApplicationContext context = new ClassPathXmlApplicationContext("spring-jdbc.xml");
    UserService userService = context.getBean("userService", UserService.class);
    int id = 7;
    userService.deleteUser(id);
}
@Override
public void deleteUser(int id) {
    String sql = "delete from user where id = ?";
    int update = jdbcTemplate.update(sql, id);
    System.out.println(update);
}
11.4、查询返回某个值
1、查询表里面有多少条记录,返回是某个值
2、使用 JdbcTemplate 实现查询返回某个值代码,有两个参数
- 第一个参数:sql 语句
- 第二个参数:返回类型 Clas
@Test
public void selectCount() {
    ClassPathXmlApplicationContext context = new ClassPathXmlApplicationContext("spring-jdbc.xml");
    UserService userService = context.getBean("userService", UserService.class);
    int count = userService.selectCount();
    System.out.println(count);
}
@Override
public int selectCount() {
    String sql = "select count(*) from user";
    Integer count = jdbcTemplate.queryForObject(sql, Integer.class);
    return count;
}
11.5、查询返回对象
1、场景:查询图书详情
2、JdbcTemplate 实现查询返回对象,有三个参数
- 第一个参数:sql 语句
- 第二个参数:RowMapper 是接口,针对返回不同类型数据,使用这个接口里面实现类完成数据封装
- 第三个参数:sql 语句值
@Test
public void findUserById() {
    ClassPathXmlApplicationContext context = new ClassPathXmlApplicationContext("spring-jdbc.xml");
    UserService userService = context.getBean("userService", UserService.class);
    int id = 6;
    User user = userService.findUserById(id);
    System.out.println(user);
}
@Override
public User findUserById(int id) {
    String sql = "select * from user where id =?";
    User user = jdbcTemplate.queryForObject(sql, new BeanPropertyRowMapper<User>(User.class), id);
    return user;
}
11.6、查询返回集合
1、场景:查询图书列表分页…
2、调用 JdbcTemplate 方法实现查询返回集合, 有三个参数
- 第一个参数:sql 语句
- 第二个参数:RowMapper 是接口,针对返回不同类型数据,使用这个接口里面实现类完成数据封装
- 第三个参数:sql 语句值
@Test
public void getUserList() {
    ClassPathXmlApplicationContext context = new ClassPathXmlApplicationContext("spring-jdbc.xml");
    UserService userService = context.getBean("userService", UserService.class);
    List<User> userList = userService.getUserList();
    System.out.println(userList);
}
@Override
public List<User> getUserList() {
    String sql = "select * from user";
    List<User> userList = jdbcTemplate.query(sql, new BeanPropertyRowMapper<User>(User.class));
    return userList;
}
11.7、批量操作
1、批量操作:操作表里面多条记录
2、JdbcTemplate 实现批量添加操作,有两个参数
- 第一个参数:sql 语句
- 第二个参数:List 集合,添加多条记录数据
@Test
public void batchAddUser() {
    ClassPathXmlApplicationContext context = new ClassPathXmlApplicationContext("spring-jdbc.xml");
    UserService userService = context.getBean("userService", UserService.class);
    List<Object[]> list = new ArrayList<>();

    Object[] o1 = {10, "java", 19, "123456@163.com"};
    Object[] o2 = {11, "php", 24, "12345@163.com"};
    Object[] o3 = {12, "python", 18, "1234@163.com"};
    list.add(o1);
    list.add(o2);
    list.add(o3);
    userService.batchAddUser(list);
}
@Override
public void batchAddUser(List<Object[]> list) {
    String sql = "insert into user values(?,?,?,?)";
    int[] ints = jdbcTemplate.batchUpdate(sql, list);
    System.out.println(Arrays.toString(ints));
}
3、JdbcTemplate 实现批量修改操作
@Test
public void batchUpdateUser() {
    ClassPathXmlApplicationContext context = new ClassPathXmlApplicationContext("spring-jdbc.xml");
    UserService userService = context.getBean("userService", UserService.class);
    List<Object[]> list = new ArrayList<>();

    Object[] o1 = {"java", 22, "123456@163.com", 10};
    Object[] o2 = {"php", 22, "123456@163.com", 11};
    Object[] o3 = {"python", 22, "123456@163.com", 12};
    list.add(o1);
    list.add(o2);
    list.add(o3);
    userService.batchUpdateUser(list);
}
@Override
public void batchUpdateUser(List<Object[]> list) {
    String sql = "update user set name=?, age=?, email=? where id = ?";
    int[] ints = jdbcTemplate.batchUpdate(sql, list);
    System.out.println(Arrays.toString(ints));
}
4、JdbcTemplate 实现批量删除操作
@Test
public void batchDeleteUser() {
    ClassPathXmlApplicationContext context = new ClassPathXmlApplicationContext("spring-jdbc.xml");
    UserService userService = context.getBean("userService", UserService.class);
    List<Object[]> list = new ArrayList<>();

    Object[] o1 = {10};
    Object[] o2 = {11};
    Object[] o3 = {12};
    list.add(o1);
    list.add(o2);
    list.add(o3);
    userService.batchDeleteUser(list);
}
@Override
public void batchDeleteUser(List<Object[]> list) {
    String sql = "delete from user where id=?";
    int[] ints = jdbcTemplate.batchUpdate(sql, list);
    System.out.println(Arrays.toString(ints));
}
十二、事务操作
12.1、事务概念
什么事务
事务是数据库操作最基本单元,逻辑上一组操作,要么都成功,如果有一个失败所有操
作都失败
典型场景:银行转账
lucy 转账 100 元 给 mary
lucy 少 100,mary 多 100
事务四个特性(ACID)
- 原子性
- 一致性
- 隔离性
- 持久性
2、环境搭建
创建sq语句
CREATE TABLE `user`.`Untitled`  (
  `name` varchar(20) CHARACTER SET utf8mb4 COLLATE utf8mb4_general_ci NOT NULL,
  `money` int(10) NULL DEFAULT NULL,
  PRIMARY KEY (`name`) USING BTREE
) ENGINE = InnoDB CHARACTER SET = utf8mb4 COLLATE = utf8mb4_general_ci ROW_FORMAT = Dynamic;

INSERT INTO `user`.`account`(`name`, `money`) VALUES ('zhangsan', 1000);
INSERT INTO `user`.`account`(`name`, `money`) VALUES ('lisi', 1000);
配置文件
<?xml version="1.0" encoding="UTF-8"?>
<beans xmlns="http://www.springframework.org/schema/beans"
       xmlns:xsi="http://www.w3.org/2001/XMLSchema-instance"
       xmlns:context="http://www.springframework.org/schema/context"
       xsi:schemaLocation="http://www.springframework.org/schema/beans http://www.springframework.org/schema/beans/spring-beans.xsd http://www.springframework.org/schema/context https://www.springframework.org/schema/context/spring-context.xsd">

    <!-- 组件扫描 -->
    <context:component-scan base-package="com.java521"></context:component-scan>

    <bean id="userService" class="com.java521.transactional.UserService"/>

    <bean id="dataSource" class="com.alibaba.druid.pool.DruidDataSource">
        <property name="driverClassName" value="com.mysql.jdbc.Driver"></property>
        <property name="url" value="jdbc:mysql://127.0.0.1/user"></property>
        <property name="username" value="root"></property>
        <property name="password" value="root"></property>
    </bean>

    <bean id="jdbcTemplate" class="org.springframework.jdbc.core.JdbcTemplate">
        <property name="dataSource" ref="dataSource"></property>
    </bean>
</beans>
@Service
public class UserService {
    @Autowired
    private UserDao userDao;

 	public void accountMoney() {
		userDao.reduceMoney();
        userDao.addMoney();
    }
}
@Repository
public class UserDaoImpl implements UserDao {
    @Autowired
    private JdbcTemplate jdbcTemplate;

    @Override
    public void reduceMoney() {
        String sql = "update account set money = money - ? where name = ?";
        int update = jdbcTemplate.update(sql, 100, "zhangsan");
        System.out.println("减钱成功条数: " + update);
    }

    @Override
    public void addMoney() {
        String sql = "update account set money = money + ? where name = ?";
        int update = jdbcTemplate.update(sql, 100, "lisi");
        System.out.println("加钱成功条数: " + update);
    }
}
public class TransactionalTest {
    @Test
    public void accountMoney1() {
        ClassPathXmlApplicationContext context = new ClassPathXmlApplicationContext("spring-transactional.xml");
        UserService userService = context.getBean("userService", UserService.class);
        userService.accountMoney();

    }
}
上面代码,如果正常执行没有问题的,但是如果代码执行过程中出现异常,有问题
zhangsan减了100,而lisi却没有增加
@Service
public class UserService {
@Autowired
private UserDao userDao;
public void accountMoney() {
userDao.reduceMoney();
System.out.println(1/0);
userDao.addMoney();
}
}
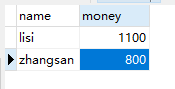
遇到这样题可以使用事务进行解决
事务操作过程
public class TransactionalTest {
    @Test
    public void accountMoney() {
        ClassPathXmlApplicationContext context = new ClassPathXmlApplicationContext("spring-transactional.xml");
        UserService userService = context.getBean("userService", UserService.class);
        try {
            //1.开启事务

            //2.进行业务操作
            userService.reduceMoney();
            //模拟异常
            System.out.println(1/0);
            userService.addMoney();
            //3.没有发生异常, 提交事务

        } catch (Exception e) {
            //4.发生异常, 回滚事务
            e.printStackTrace();
        }
    }
}
12.2、Spring 事务管理介绍
事务添加到 JavaEE 三层结构里面 Service 层(业务逻辑层)
在 Spring 进行事务管理操作有两种方式
- 编程式事务管理
- 声明式事务管理(使用)
声明式事务管理
- 基于注解方式(使用)
- 基于 xml 配置文件方式
在 Spring 进行声明式事务管理,底层使用 AOP 原理
Spring 事务管理 API
提供一个接口,代表事务管理器,这个接口针对不同的框架提供不同的实现类
12.3、注解声明式事务管理
<!--开启事务注解-->
<tx:annotation-driven transaction-manager="transactionManager"></tx:annotation-driven>

<!--创建事务管理器-->
<bean id="transactionManager" class="org.springframework.jdbc.datasource.DataSourceTransactionManager">
    <property name="dataSource" ref="dataSource"></property>
</bean>
1、在 service 类上面(或者 service 类里面方法上面)添加事务注解
- @Transactional,这个注解添加到类上面,也可以添加方法上面
- 如果把这个注解添加类上面,这个类里面所有的方法都添加事务
- 如果把这个注解添加方法上面,为这个方法添加事务
@Repository
@Transactional(propagation = Propagation.REQUIRED, isolation = Isolation.REPEATABLE_READ)
public class UserDaoImpl implements UserDao {
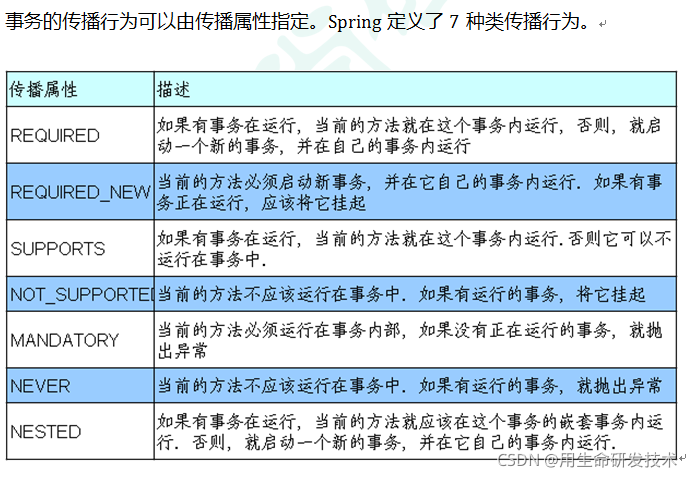
2、propagation:事务传播行为
多事务方法直接进行调用,这个过程中事务 是如何进行管理的
事务的传播行为可以由传播属性指定,Spring定义了7种传播行为
3、ioslation:事务隔离级别
事务有特性为隔离性,多事务操作之间不会产生影响。不考虑隔离性产生很多问题
有三个读问题:脏读、不可重复读、虚(幻)读
- 脏读:一个未提交事务读取到另一个未提交事务的数据
- 不可重复读:一个未提交事务读取到另一提交事务修改数据
- 虚读:一个未提交事务读取到另一提交事务添加数据
解决:通过设置事务隔离级别,解决读问题
| 脏 读 | 不可重复读 | 幻 读 | |
|---|---|---|---|
| READ UNCOMMITTED (读末提交) | 有 | 有 | 有 |
| READ COMMITTED (读已提交) | 无 | 有 | 有 |
| REPEATABLE READ (可重复读) | 无 | 无 | 有 |
| SERIALIZABLE (串行化) | 无 | 无 | 无 |
4、timeout:超时时间
(1)事务需要在一定时间内进行提交,如果不提交进行回滚
(2)默认值是 -1 ,设置时间以秒单位进行计算
5、readOnly:是否只读
(1)读:查询操作,写:添加修改删除操作
(2)readOnly 默认值 false,表示可以查询,可以添加修改删除操作
(3)设置 readOnly 值是 true,设置成 true 之后,只能查询
6、rollbackFor:回滚
设置出现哪些异常进行事务回滚
7、noRollbackFor:不回滚
设置出现哪些异常不进行事务回滚
12.4、XML 声明式事务管理
1、在 spring 配置文件中进行配置
第一步 配置事务管理器
第二步 配置通知
第三步 配置切入点和切面
<?xml version="1.0" encoding="UTF-8"?>
<beans xmlns="http://www.springframework.org/schema/beans"
       xmlns:xsi="http://www.w3.org/2001/XMLSchema-instance"
       xmlns:context="http://www.springframework.org/schema/context" xmlns:tx="http://www.springframework.org/schema/tx"
       xmlns:aop="http://www.springframework.org/schema/aop"
       xsi:schemaLocation="http://www.springframework.org/schema/beans http://www.springframework.org/schema/beans/spring-beans.xsd http://www.springframework.org/schema/context https://www.springframework.org/schema/context/spring-context.xsd http://www.springframework.org/schema/tx http://www.springframework.org/schema/tx/spring-tx.xsd http://www.springframework.org/schema/aop https://www.springframework.org/schema/aop/spring-aop.xsd">

    <!-- 组件扫描 -->
    <context:component-scan base-package="com.java521"></context:component-scan>

    <bean id="userService" class="com.java521.transactional.UserService"/>

    <bean id="dataSource" class="com.alibaba.druid.pool.DruidDataSource">
        <property name="driverClassName" value="com.mysql.jdbc.Driver"></property>
        <property name="url" value="jdbc:mysql://127.0.0.1/user"></property>
        <property name="username" value="root"></property>
        <property name="password" value="root"></property>
    </bean>

    <bean id="jdbcTemplate" class="org.springframework.jdbc.core.JdbcTemplate">
        <property name="dataSource" ref="dataSource"></property>
    </bean>

    <!--1 创建事务管理器-->
    <bean id="transactionManager" class="org.springframework.jdbc.datasource.DataSourceTransactionManager">
        <property name="dataSource" ref="dataSource"></property>
    </bean>

    <!--2 配置通知-->
    <tx:advice id="txadvice">
        <tx:attributes>
            <!--指定哪种规则的方法上面添加事务-->
            <tx:method name="accountMoney" propagation="REQUIRED"/>
        </tx:attributes>
    </tx:advice>

    <!--3 配置切入点和切面-->
    <aop:config>
        <aop:pointcut id="pt" expression="execution(* com.java521.transactional.UserService.*(..))"/>

        <aop:advisor advice-ref="txadvice" pointcut-ref="pt"/>
    </aop:config>
</beans>
public class TransactionalTest {
    @Test
    public void accountMoney() {
        ClassPathXmlApplicationContext context = new ClassPathXmlApplicationContext("spring-transactional2.xml");
        UserService userService = context.getBean("userService", UserService.class);
        userService.accountMoney();
    }
}
12.5、完全注解声明式事务管理
创建配置类,使用配置类替代 xml 配置文件
@Configuration
@ComponentScan(basePackages = "com.java521")
@EnableTransactionManagement
public class TxConfig {

    @Bean
    public DruidDataSource getDruidDataSource() {
        DruidDataSource dataSource = new DruidDataSource();
        dataSource.setDriverClassName(("com.mysql.jdbc.Driver"));
        dataSource.setUrl("jdbc:mysql://127.0.0.1/user");
        dataSource.setUsername("root");
        dataSource.setPassword("root");
        return dataSource;
    }

    @Bean
    public JdbcTemplate getJdbcTemplate(DataSource dataSource) {
        JdbcTemplate jdbcTemplate = new JdbcTemplate();
        jdbcTemplate.setDataSource(dataSource);
        return jdbcTemplate;
    }

    @Bean
    public DataSourceTransactionManager getDataSourceTransactionManager(DataSource dataSource) {
        DataSourceTransactionManager transactionManager = new DataSourceTransactionManager();
        transactionManager.setDataSource(dataSource);
        return transactionManager;
    }
}
测试
@Test
public void accountMoney3() {
    ApplicationContext context = new AnnotationConfigApplicationContext(TxConfig.class);
    UserService userService = context.getBean("userService", UserService.class);
    userService.accountMoney();
}
十三、Spring5 框架新功能
1、整个 Spring5 框架的代码基于 Java8,运行时兼容 JDK9,许多不建议使用的类和方
法在代码库中删除
2、Spring 5.0 框架自带了通用的日志封装
(1)Spring5 已经移除 Log4jConfigListener,官方建议使用 Log4j2
(2)Spring5 框架整合 Log4j2
<dependency>
    <groupId>org.apache.logging.log4j</groupId>
    <artifactId>log4j-core</artifactId>
    <version>2.13.3</version>
</dependency>

<dependency>
    <groupId>org.apache.logging.log4j</groupId>
    <artifactId>log4j-slf4j-impl</artifactId>
    <version>2.13.3</version>
</dependency>
第二步 创建 log4j2.xml 配置文件
<?xml version="1.0" encoding="UTF-8"?>
<!--日志级别以及优先级排序: OFF > FATAL > ERROR > WARN > INFO > DEBUG > TRACE >
ALL -->
<!--Configuration 后面的 status 用于设置 log4j2 自身内部的信息输出,可以不设置,
当设置成 trace 时,可以看到 log4j2 内部各种详细输出-->
<configuration status="DEBUG">
    <!--先定义所有的 appender-->
    <appenders>
        <!--输出日志信息到控制台-->
        <console name="Console" target="SYSTEM_OUT">
            <!--控制日志输出的格式-->
            <PatternLayout pattern="%d{yyyy-MM-dd HH:mm:ss.SSS} [%t] %-5level %logger{36} - %msg%n"/>
        </console>
    </appenders>
    <!--然后定义 logger,只有定义 logger 并引入的 appender,appender 才会生效-->
    <!--root:用于指定项目的根日志,如果没有单独指定 Logger,则会使用 root 作为
   默认的日志输出-->
    <loggers>
        <root level="info">
            <appender-ref ref="Console"/>
        </root>
    </loggers>
</configuration>
3、Spring5 框架核心容器支持@Nullable 注解
(1)@Nullable 注解可以使用在方法上面,属性上面,参数上面,表示方法返回可以为空,属性值可以为空,参数值可以为空
(2)注解用在方法上面,方法返回值可以为空
@Nullable
String getId();
(3)注解使用在方法参数里面,方法参数可以为空
public <T> void registerBean(@Nullable String beanName, Class<T> beanClass, @Nullable Supplier<T> supplier, BeanDefinitionCustomizer... customizers) {
    this.reader.registerBean(beanClass, beanName, supplier, customizers);
}
(4)注解使用在属性上面,属性值可以为空
@Nullable
private String name;
4、Spring5 核心容器支持函数式风格 GenericApplicationContext
(1)整合 JUnit4
第一步 引入 Spring 相关针对测试依赖
<dependency>
    <groupId>org.springframework</groupId>
    <artifactId>spring-test</artifactId>
    <version>5.3.9</version>
</dependency>

<dependency>
    <groupId>junit</groupId>
    <artifactId>junit</artifactId>
    <version>4.13.1</version>
</dependency>

<dependency>
    <groupId>org.hamcrest</groupId>
    <artifactId>hamcrest-core</artifactId>
    <version>2.2</version>
</dependency>
第二步 创建测试类,使用注解方式完成
@RunWith(SpringJUnit4ClassRunner.class) //单元测试框架
@ContextConfiguration("classpath:spring-transactional2.xml") //加载配置文件
public class JTest4 {
    @Autowired
    private UserService userService;
    @Test
    public void test1() {
        userService.accountMoney();
    }
}
Spring5 整合 JUnit5
第一步 引入 JUnit5 的 jar 包
@ExtendWith(SpringExtension.class)
@ContextConfiguration("classpath: spring-transactional2.xml")
public class JTest5 {
    @Autowired
    private UserService userService;

    @Test
    public void test1() {
        System.out.println("userService = " + userService);
        userService.accountMoney();
    }
}
3)使用一个复合注解替代上面两个注解完成整合
@SpringJUnitConfig(locations = "classpath:spring-transactional2.xml")
public class JTest5 {
    @Autowired
    private UserService userService;

    @Test
    public void test1() {
        System.out.println("userService = " + userService);
        userService.accountMoney();
    }
}


 5844
5844

 被折叠的 条评论
为什么被折叠?
被折叠的 条评论
为什么被折叠?
 到【灌水乐园】发言


