


Spring Cloud版本是
Greenwich.RELEASE
Springboot版本是2.1.9.RELEASE
Spring Cloud Alibaba版本是2.1.0.RELEASE
现在,我们也可以使用dubbo作为rpc框架,来实现服务提供者和服务消费者。
01 和平时使用dubbo一样,创建一个接口jar包
1)创建一个maven应用,编写一个接口
public interface AppService {
    String getPort();
}
2)pom.xml文件也基本没什么配置
<?xml version="1.0" encoding="UTF-8"?>
<project xmlns="http://maven.apache.org/POM/4.0.0"
         xmlns:xsi="http://www.w3.org/2001/XMLSchema-instance"
         xsi:schemaLocation="http://maven.apache.org/POM/4.0.0 http://maven.apache.org/xsd/maven-4.0.0.xsd">
    <parent>
        <artifactId>spring-cloud-alibaba</artifactId>
        <groupId>com.jamie</groupId>
        <version>1.0.0</version>
    </parent>
    <modelVersion>4.0.0</modelVersion>
    <packaging>jar</packaging>

    <artifactId>dubbo-api</artifactId>
</project>
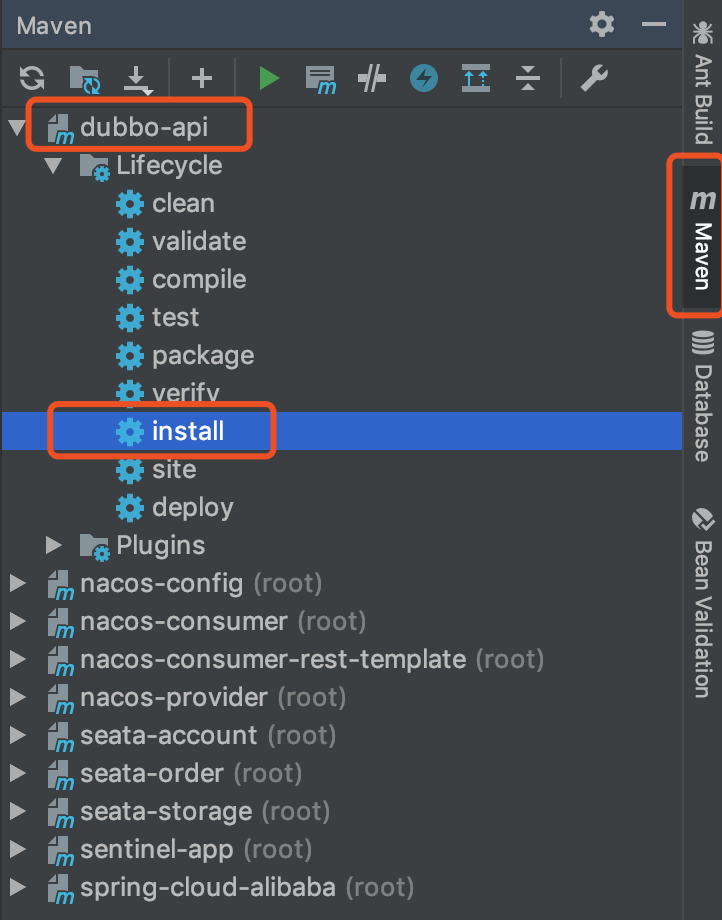
3)将项目install到本地仓库
我这里直接使用IDE的功能,也可以使用mvn命令,都是可以的,只要能达到目的即可。
当然,如果有远程仓库,也可以deploy到远程仓库中。
02 编写provider应用
1)创建一个springboot应用,在pom.xml中导入依赖
<properties>
    <project.build.sourceEncoding>UTF-8</project.build.sourceEncoding>
    <project.reporting.outputEncoding>UTF-8</project.reporting.outputEncoding>
    <java.version>1.8</java.version>
</properties>

<dependencies>
    <dependency>
        <groupId>org.springframework.boot</groupId>
        <artifactId>spring-boot-starter-web</artifactId>
    </dependency>

    <dependency>
        <groupId>com.alibaba.cloud</groupId>
        <artifactId>spring-cloud-starter-alibaba-nacos-discovery</artifactId>
    </dependency>

    <dependency>
        <groupId>com.alibaba.cloud</groupId>
        <artifactId>spring-cloud-starter-dubbo</artifactId>
    </dependency>

    <dependency>
        <groupId>com.jamie</groupId>
        <artifactId>dubbo-api</artifactId>
        <version>1.0.0</version>
    </dependency>

    <dependency>
        <groupId>org.springframework.boot</groupId>
        <artifactId>spring-boot-starter-test</artifactId>
        <scope>test</scope>
    </dependency>
</dependencies>

<dependencyManagement>
    <dependencies>
        <dependency>
            <groupId>org.springframework.cloud</groupId>
            <artifactId>spring-cloud-dependencies</artifactId>
            <version>Greenwich.RELEASE</version>
            <type>pom</type>
            <scope>import</scope>
        </dependency>
        <dependency>
            <groupId>com.alibaba.cloud</groupId>
            <artifactId>spring-cloud-alibaba-dependencies</artifactId>
            <version>2.1.0.RELEASE</version>
            <type>pom</type>
            <scope>import</scope>
        </dependency>
    </dependencies>
</dependencyManagement>
2)在启动类配置服务注册发现的注解
import org.springframework.boot.SpringApplication;
import org.springframework.boot.autoconfigure.SpringBootApplication;
import org.springframework.cloud.client.discovery.EnableDiscoveryClient;

@EnableDiscoveryClient
@SpringBootApplication
public class NacosProviderApplication {

    public static void main(String[] args) {
        SpringApplication.run(NacosProviderApplication.class, args);
    }

}
3)修改配置文件application.properties
spring.application.name=nacos-provider
server.port=8001
spring.cloud.nacos.discovery.server-addr=127.0.0.1:8848

# dubbo的相关配置
dubbo.scan.base-packages=com.jamie.nacos.provider.service
dubbo.protocol.name=dubbo
# -1表示端口随机
dubbo.protocol.port=-1
dubbo.registry.address=spring-cloud://localhost
4)编写接口实现类
这里一定要注意,在类上的注解是dubbo的Service注解,不是spring的Service注解。
import com.jamie.server.AppService;
import org.springframework.beans.factory.annotation.Value;

/**
 * @author 594781919@qq.com
 * @date 2019-10-10
 **/
@org.apache.dubbo.config.annotation.Service
public class AppServiceImpl implements AppService {

    @Value("${server.port}")
    private String port;

    @Override
    public String getPort() {
        return "provider port: " + port;
    }
}
03 编写consumer应用
1)在pom.xml文件导入依赖
<properties>
    <project.build.sourceEncoding>UTF-8</project.build.sourceEncoding>
    <project.reporting.outputEncoding>UTF-8</project.reporting.outputEncoding>
    <java.version>1.8</java.version>
</properties>

<dependencies>
    <dependency>
        <groupId>org.springframework.boot</groupId>
        <artifactId>spring-boot-starter-web</artifactId>
    </dependency>

    <dependency>
        <groupId>com.alibaba.cloud</groupId>
        <artifactId>spring-cloud-starter-alibaba-nacos-discovery</artifactId>
    </dependency>

    <dependency>
        <groupId>com.alibaba.cloud</groupId>
        <artifactId>spring-cloud-starter-dubbo</artifactId>
    </dependency>

    <dependency>
        <groupId>com.jamie</groupId>
        <artifactId>dubbo-api</artifactId>
        <version>1.0.0</version>
    </dependency>

    <dependency>
        <groupId>org.springframework.boot</groupId>
        <artifactId>spring-boot-starter-test</artifactId>
        <scope>test</scope>
    </dependency>
</dependencies>

<dependencyManagement>
    <dependencies>
        <dependency>
            <groupId>org.springframework.cloud</groupId>
            <artifactId>spring-cloud-dependencies</artifactId>
            <version>Greenwich.RELEASE</version>
            <type>pom</type>
            <scope>import</scope>
        </dependency>
        <dependency>
            <groupId>com.alibaba.cloud</groupId>
            <artifactId>spring-cloud-alibaba-dependencies</artifactId>
            <version>2.1.0.RELEASE</version>
            <type>pom</type>
            <scope>import</scope>
        </dependency>
    </dependencies>
</dependencyManagement>
2)在启动类配置服务注册发现的注解
@EnableDiscoveryClient
@SpringBootApplication
public class NacosConsumerApplication {

    public static void main(String[] args) {
        SpringApplication.run(NacosConsumerApplication.class, args);
    }
}
3)修改application.properties配置文件
spring.application.name=nacos-consumer

server.port=9000

spring.cloud.nacos.discovery.server-addr=127.0.0.1:8848
spring.main.allow-bean-definition-overriding=true

dubbo.registry.address=spring-cloud://localhost
dubbo.consumer.check=false
4)调用provider的服务接口
import com.jamie.server.AppService;
import org.apache.dubbo.config.annotation.Reference;
import org.springframework.web.bind.annotation.GetMapping;
import org.springframework.web.bind.annotation.RestController;
import org.springframework.web.client.RestTemplate;

import javax.annotation.Resource;

/**
 * @author 594781919@qq.com
 * @date 2019-10-08
 **/
@RestController
public class ConsumerController {

    @Reference
    private AppService appService;

    @GetMapping("/dubbo")
    public String dubbo() {
        return appService.getPort();
    }
}
04 测试
1)在测试时,我启动了两个provider应用,端口分别为8000和8001。一个consumer应用,端口为9000。
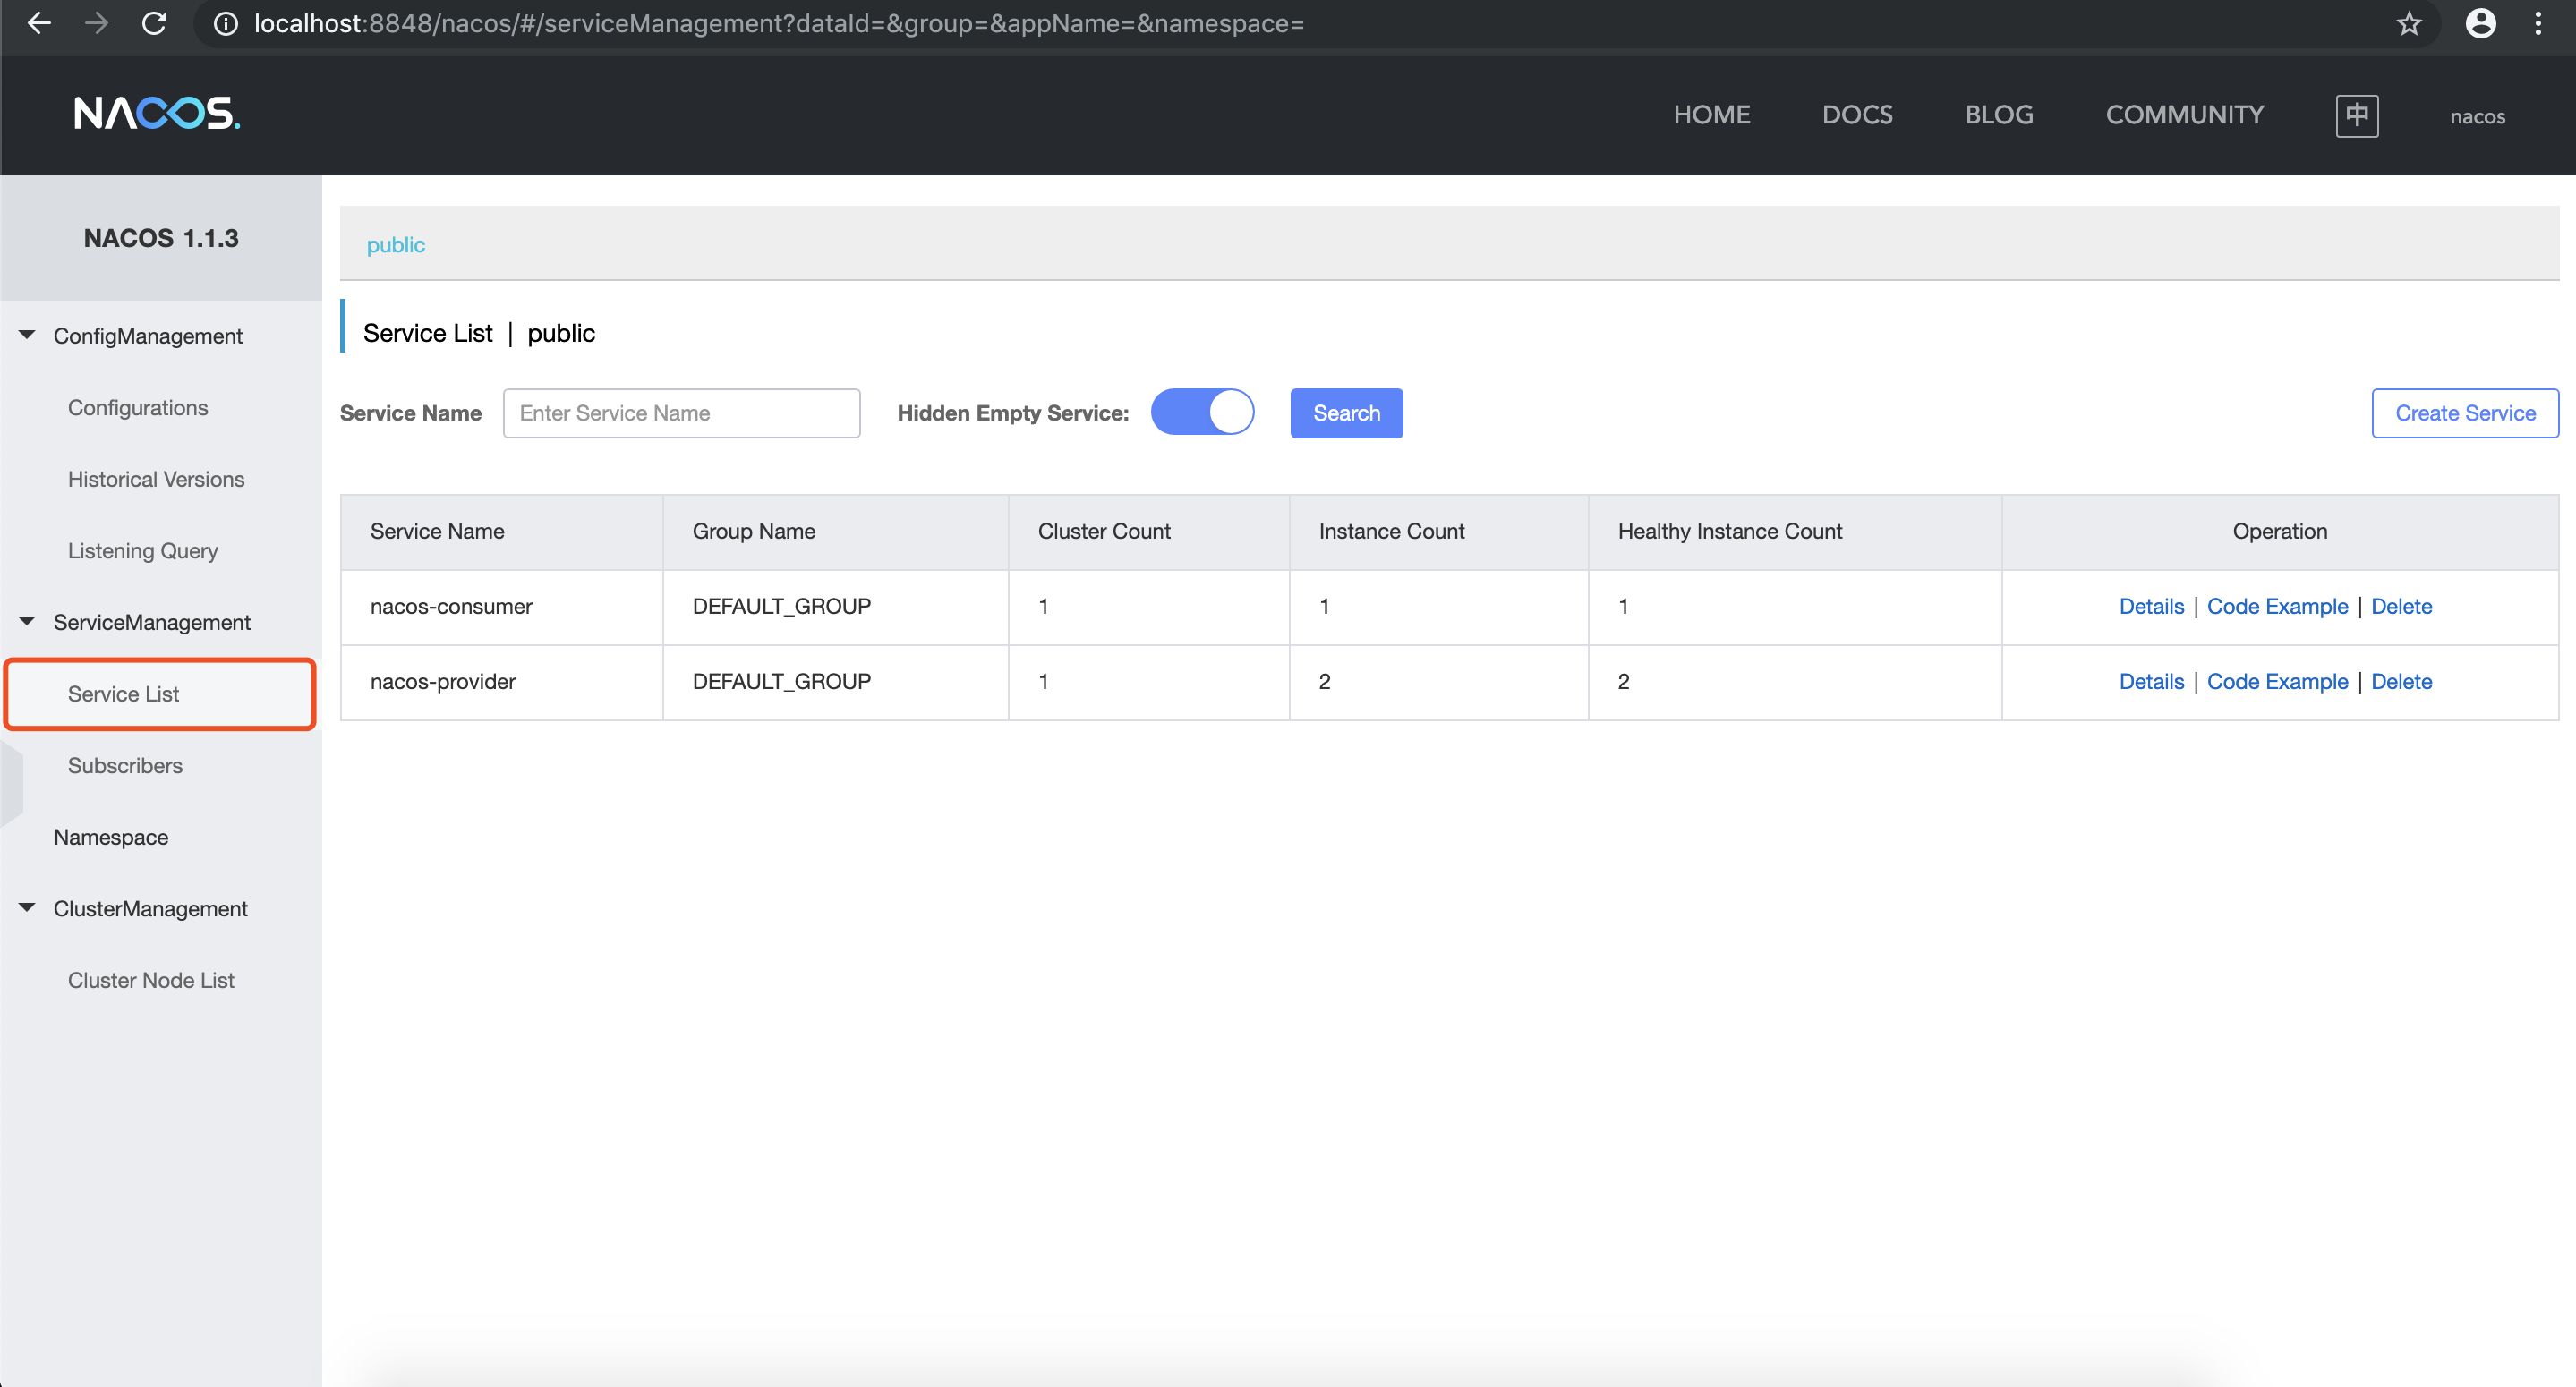
2)启动成功后,我们可以在nacos页面看到注册到nacos的应用
3)测试远程调用
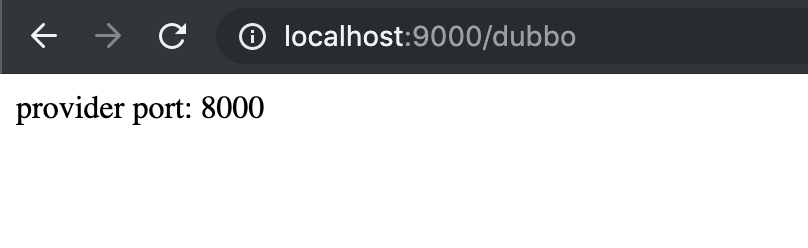
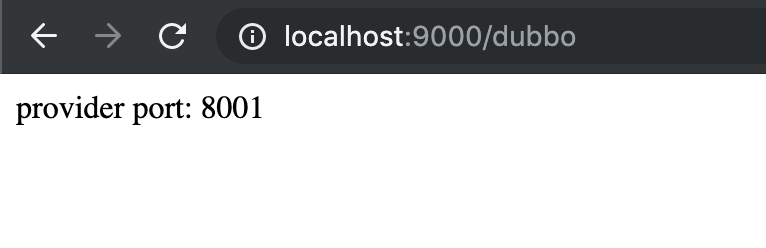
我们可以发现,nacos帮我们自动实现了负载均衡。
源码地址:码云


 2302
2302

 被折叠的 条评论
为什么被折叠?
被折叠的 条评论
为什么被折叠?
 到【灌水乐园】发言


