


 本文详细介绍如何在SSH框架中使用Apache Shiro进行权限管理和认证,包括配置Maven依赖、Shiro核心控制器、自定义Realm及密码比较器等关键步骤。
Shiro具体使用步骤(SSH)
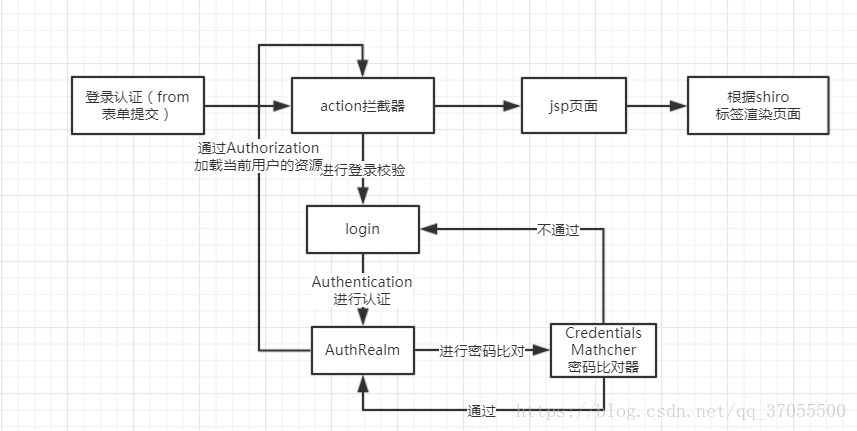
注:以上是我对shiro使用标签授权流程的理解,可能会有不准确的地方,因为也是刚刚接触,努力吧,少年!
一、 导入jar包

Maven工程
<!-- Apache Shiro 权限架构 --> <dependency> <groupId>org.apache.shiro</groupId> <artifactId>shiro-all</artifactId> <version>1.2.3</version> </dependency> |
二、 过滤器配置
Shiro 的核心控制器,一定要放在struts2过滤器之前,不然无法加载action
<!-- Shiro Security filter --> <filter> <filter-name>shiroFilter</filter-name> <filter-class>org.springframework.web.filter.DelegatingFilterProxy</filter-class> <init-param> <param-name>targetFilterLifecycle</param-name> <param-value>true</param-value> </init-param> </filter> <filter-mapping> <filter-name>shiroFilter</filter-name> <url-pattern>/*</url-pattern> </filter-mapping> |
三、 产生代理类的方式
一般放在applicationContext.xml的事务管理器之前
<!--Shiro安全框架产生代理子类的方式:使用cglib方式--> <aop:aspectj-autoproxy proxy-target-class="true"/> |
Shiro的配置文件applicationContext-shiro.xml(红色部分自己实现)
<?xml version="1.0" encoding="UTF-8"?> <beans xmlns="http://www.springframework.org/schema/beans" xmlns:xsi="http://www.w3.org/2001/XMLSchema-instance" xsi:schemaLocation="http://www.springframework.org/schema/beans http://www.springframework.org/schema/beans/spring-beans-3.0.xsd" default-lazy-init="true">
<!--安全管理器--> <!--Realm域配置--> <!--密码比较器的配置--> <!--缓存策略的配置--> <!-- 安全管理 --> <bean id="securityManager" class="org.apache.shiro.web.mgt.DefaultWebSecurityManager"> <!-- Single realm app. If you have multiple realms, use the 'realms' property instead. --> <property name="realm" ref="authRealm"/><!-- 引用自定义的realm --> <!-- 二级缓存 --> <property name="cacheManager" ref="shiroEhcacheManager"/> </bean>
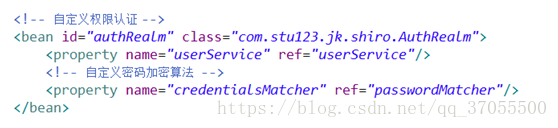
<!-- 自定义权限认证 --> <bean id="authRealm" class="com.stu123.jk.shiro.AuthRealm"> <property name="userService" ref="userService"/> <!-- 自定义密码加密算法 --> <property name="credentialsMatcher" ref="passwordMatcher"/> </bean>
<!-- 设置密码加密策略 md5hash --> <bean id="passwordMatcher" class="com.stu123.jk.shiro.CustomCredentialsMatcher"/>
<!--bean的id要与web.xml文件中的过滤器名相同: <filter-name>shiroFilter</filter-name> --> <bean id="shiroFilter" class="org.apache.shiro.spring.web.ShiroFilterFactoryBean"> <property name="securityManager" ref="securityManager"/> <property name="loginUrl" value="/index.jsp"></property> <!-- 成功 --> <property name="successUrl" value="/home.action"></property> <property name="filterChainDefinitions"> <!-- , roles[admin], perms[document:read]--> <value> /index.jsp* = anon /home* = anon /sysadmin/login/login.jsp* = anon /sysadmin/login/logout.jsp* = anon /login* = anon /logout* = anon /*.* = authc /resource/** = anon </value> </property> </bean>
<!-- 用户授权/认证信息Cache, 采用EhCache 缓存 --> <bean id="shiroEhcacheManager" class="org.apache.shiro.cache.ehcache.EhCacheManager"> <property name="cacheManagerConfigFile" value="classpath:ehcache-shiro.xml"/> </bean>
<!-- 保证实现了Shiro内部lifecycle函数的bean执行 --> <bean id="lifecycleBeanPostProcessor" class="org.apache.shiro.spring.LifecycleBeanPostProcessor"/>
<!-- 生成代理,通过代理进行控制 --> <bean class="org.springframework.aop.framework.autoproxy.DefaultAdvisorAutoProxyCreator" depends-on="lifecycleBeanPostProcessor"> <property name="proxyTargetClass" value="true"/> </bean>
<!-- 安全管理器 --> <bean class="org.apache.shiro.spring.security.interceptor.AuthorizationAttributeSourceAdvisor"> <property name="securityManager" ref="securityManager"/> </bean>
</beans> |
Ehcache 缓存配置文件encache-shiro.xml
<?xml version="1.0" encoding="UTF-8"?> <ehcache updateCheck="false" name="shiroCache">
<defaultCache maxElementsInMemory="10000" eternal="false" timeToIdleSeconds="120" timeToLiveSeconds="120" overflowToDisk="false" diskPersistent="false" diskExpiryThreadIntervalSeconds="120" /> </ehcache> |
四、 在applicationContext.xml 文件中加载shiro配置文件
<import resource="classpath:applicationContext-shiro.xml"></import> |
五、 编写密码比较器
CustomCredentialsMatcher.class
publicclass CustomCredentialsMatcher extends SimpleCredentialsMatcher { //密码比较的方法 token代表用户在界面输入的用户名和密码 info代表从数据库中得到加密数据 publicboolean doCredentialsMatch(AuthenticationToken token, AuthenticationInfo info) { //1.AuthenticationToken是个借口,使用不方便,向下转型为实现类 UsernamePasswordToken upToken=(UsernamePasswordToken) token;
//2.将用户在界面输入的原始密码加密 salt:用户名 Object pwd = Encrypt.md5(new String(upToken.getPassword()), upToken.getUsername());
//3.取出数据库里的密码 Object dbPwd = info.getCredentials();
//4.进行对比 returnthis.equals(pwd, dbPwd); } } |
在spring中去配置
Encrypt.class
publicclass Encrypt {
//高强度加密算法,不可逆 publicstatic String md5(String password, String salt){ returnnew Md5Hash(password,salt,2).toString(); } publicstaticvoid main(String[] args) { System.out.println(new Md5Hash("123456","zhangsan"+"cgx",5).toString()); } } |
六、 编写自定义的Realm
publicclass AuthRealm extends AuthorizingRealm{ //注入service private UserService userService; publicvoid setUserService(UserService userService) { this.userService = userService; } //认证 protected AuthenticationInfo doGetAuthenticationInfo (AuthenticationToken token) throws AuthenticationException { System.out.println("正在执行认证过程。。。"); //1.向下转型 UsernamePasswordToken upToken = (UsernamePasswordToken) token;
//2.调用业务方法,实现根据用户名查询 String hql = "form User where userName=?"; List<User> list = userService.find(hql, User.class, new String[]{upToken.getUsername()}); if(list!=null && list.size()>0){ User user = list.get(0); AuthenticationInfo info = new SimpleAuthenticationInfo (user, user.getPassword(),this.getName()); returninfo;//如果此处返回,就会立即进入密码比较器 } returnnull; } //授权 protected AuthorizationInfo doGetAuthorizationInfo(PrincipalCollection pc) { System.out.println("正在执行授权过程。。。"); //根据对应的realm名字去找对应的realm User user = (User) pc.fromRealm(this.getName()).iterator().next(); Set<Role> roles = user.getRoles(); List<String> permission = new ArrayList<String>(); //遍历每个角色 for (Role role : roles) { //得到每个角色的模块 Set<Module> modules = role.getModules(); for (Module module : modules) { permission.add(module.getName()); } }
SimpleAuthorizationInfo info = new SimpleAuthorizationInfo(); info.addStringPermissions(permission);//添加用户的权限 returninfo; } }
|
七、 将AuthcRealm域配置到spring
八、 登录操作
public String login() throws Exception {
if(UtilFuns.isEmpty(username)){ return"login"; }
try { //1.得到Subject Subject subject = SecurityUtils.getSubject();
//2.调用登录方法 UsernamePasswordToken token = new UsernamePasswordToken(username,password); subject.login(token);//当这行代码执行时,程序立马进入AuthRealm的认证中
//3.登录成功时,就从shiro中取出用户的登录信息 User user = (User)subject.getPrincipal();
//4.将用户放入session域中 session.put(SysConstant.CURRENT_USER_INFO, user); } catch (Exception e) { e.printStackTrace(); request.put("errorInfo", "对不起,用户名或密码错误!"); return"login"; } returnSUCCESS; } |
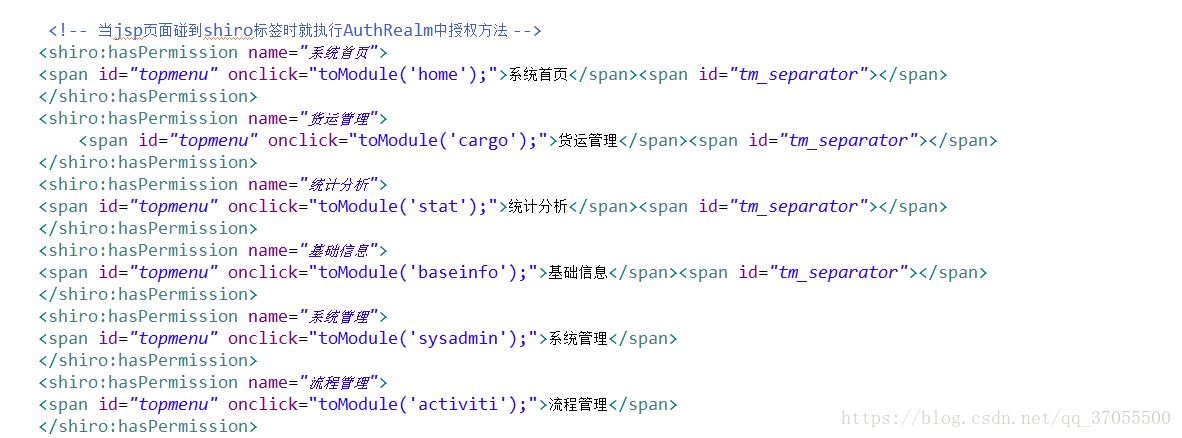
九、jsp页面


 388
388

 被折叠的 条评论
为什么被折叠?
被折叠的 条评论
为什么被折叠?
 到【灌水乐园】发言


