


aop:(Aspect Oriented Programming)面向切面编程
aop底层实现:基于jdk的动态代理和cglib的动态代理,aop根据目标对象是否有接口自动选择是否使用jdk代理
aop的几个概念:
pointcut(切入点):被增强的方法(被代理的目标对象的方法)
advice(通知/增强):封装增强业务逻辑的方法
aspect(切面):切点+通知
weaving(织入):将切点与通知结合的过程
AOP的开发流程:
一、基于XML配置文件的AOP开发
1、创建maven工程导入AOP相关坐标
2、创建目标接口和目标类(内部包含切点)
3、创建切面类(内部有增强方法,即通知)
4、将目标类和切面的对象创建权交给spring(在配置文件中配置两个对象到容器中)
5、在配置文件中配置织入关系
6、测试代码调用
1、创建maven工程导入AOP相关坐标
<dependencies>
        <dependency>
            <groupId>junit</groupId>
            <artifactId>junit</artifactId>
            <version>4.12</version>
            <scope>test</scope>
        </dependency>
        <dependency>
            <groupId>org.springframework</groupId>
            <artifactId>spring-context</artifactId>
            <version>5.0.5.RELEASE</version>
        </dependency>
        <!-- spring单元测试所需依赖 -->
        <dependency>
            <groupId>org.springframework</groupId>
            <artifactId>spring-test</artifactId>
            <version>5.0.5.RELEASE</version>
        </dependency>
        <!-- 配置切面所需依赖 -->
        <dependency>
            <groupId>org.aspectj</groupId>
            <artifactId>aspectjweaver</artifactId>
            <version>1.8.4</version>
        </dependency>
    </dependencies>
2、创建目标接口和目标类(内部包含切点)
// 创建目标接口文件 Target.java
public interface Target {
    public void testTarget();
}
----------------------------------------
// 创建目标接口实现类文件 TargetImpl.java
public class TargetImpl implements Target{
    @Override
    public void testTarget() {
        System.out.println("syx success!!!");
    }
}
3、创建切面类(内部有增强方法,即通知)
// 创建切面类文件Aspect.java
public class Aspect {
	// 前置增强
    public void TargetBefor() {
        System.out.println("Target befor method");
    }
	// 后置增强
    public void TargetAfter() {
        System.out.println("Target after method");
    }
}
4、将目标类和切面的对象创建权交给spring(创建配置文件applicationContext.xml并在配置文件中配置两个对象到容器中)
5、在配置文件中配置织入关系
<?xml version="1.0" encoding="UTF-8"?>
<beans xmlns="http://www.springframework.org/schema/beans"
       xmlns:xsi="http://www.w3.org/2001/XMLSchema-instance" xmlns:aop="http://www.springframework.org/schema/aop"
       xsi:schemaLocation="http://www.springframework.org/schema/beans http://www.springframework.org/schema/beans/spring-beans.xsd http://www.springframework.org/schema/aop http://www.springframework.org/schema/aop/spring-aop.xsd">
<!--4、将目标类和切面的对象创建权交给spring(在配置文件中配置两个对象到容器中)-->
    <!-- 目标对象 -->
    <bean id="TargetImplId" class="com.syx.TargetImpl"/>
    <!-- 切面对象 -->
    <bean id="AspectId" class="com.syx.Aspect"/>
<!--5、在配置文件中配置织入关系-->
    <!-- 配置织入,告诉spring框架 哪些方法需要哪些增强(前置、后置...) -->
    <aop:config> <!-- aop:config标签需要引入aop命名空间,这里IDEA会自动添加命名空间,见第三、四行配置信息 -->
        <!-- 声明切面 -->
        <aop:aspect ref="AspectId">
            <!-- 配置切面:切点(testTarget())+通知(后置通知TargetAfter or 前置通知TargetBefor) -->
            <aop:after method="TargetAfter" pointcut="execution(public void com.syx.TargetImpl.testTarget())"></aop:after>
            <aop:before method="TargetBefor" pointcut="execution(public void com.syx.TargetImpl.testTarget())"></aop:before>
        </aop:aspect>
    </aop:config>
</beans>
6、测试代码调用
// 测试类使用spring提供的内核测试
@RunWith(SpringJUnit4ClassRunner.class)
// 指定配置文件
@ContextConfiguration("classpath:applicationContext.xml")
public class AppTest
{
	// 从容器中拿到Target对象赋给target
    @Autowired
    private Target target;

    @Test
    public void test()
    {
        target.testTarget();
    }
}
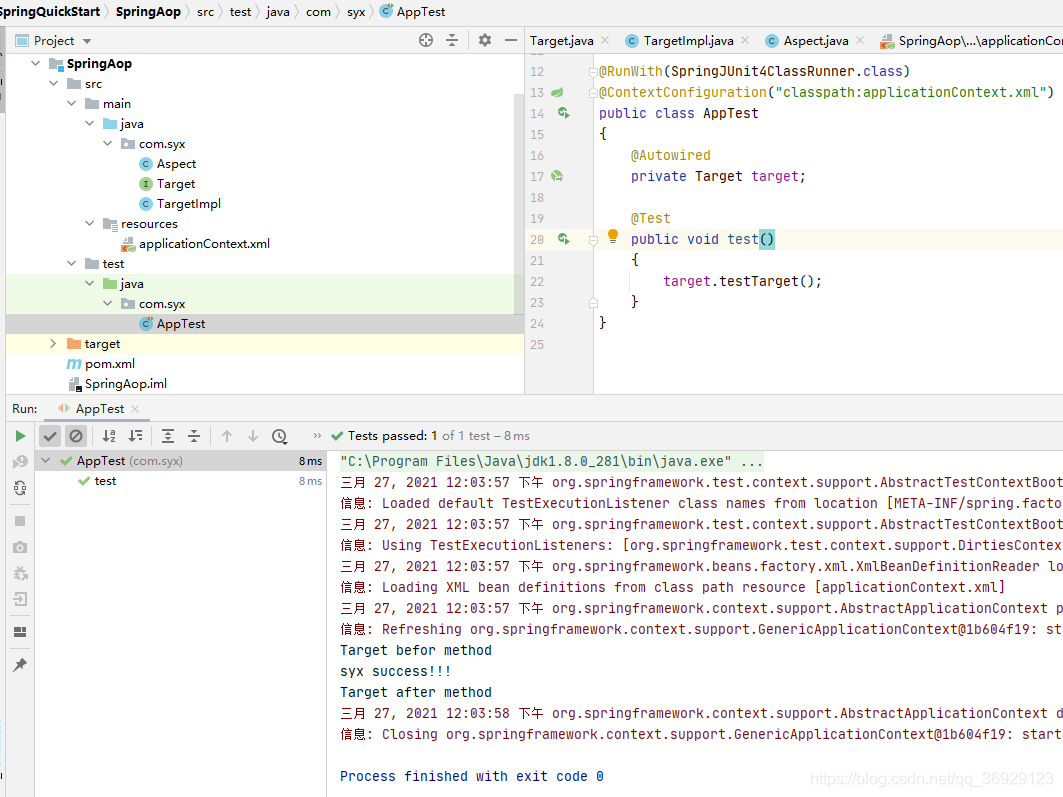
运行结果如下:
二、基于注解的AOP开发
1、创建maven工程导入AOP相关坐标
2、创建目标接口和目标类(内部包含切点)
3、创建切面类(内部有增强方法,即通知)
4、将目标类和切面的对象创建权交给spring(在配置文件中配置两个对象到容器中)
5、在切面文件中使用注解配置织入关系
6、在配置文件中配置开启组件扫描和AOP自动代理
7、测试代码调用
第1、2、3、7步骤与基于XML的开发步骤一致不再赘述,详解第4-6步
4、将目标类和切面的对象创建权交给spring
本步骤在目标实现类TargetImpl.java中添加@Component(“TargetImplId”)注解
@Component("TargetImplId")
public class TargetImpl {
}
在切面类Aspect.java中添加@Component(“AspectId”)
@Component("AspectId")
public class Aspect {
}
5、在切面文件中使用注解配置织入关系
// 配置自动代理,与配置文件中<aop:aspectj-autoproxy></aop:aspectj-autoproxy>语句作用一致
@EnableAspectJAutoProxy
@Component("AspectId")
// 配置该类为切面类
@org.aspectj.lang.annotation.Aspect
public class Aspect {
    // 注解必须依附于方法或对象才有效,这里定义一个空函数pointCutTest()用于被抽取的切点表达式依附
    // @Pointcut用于抽取切点表达式  通过引用pointCutTest()可以引用到切点表达式,引用方式示例如下TargetAfter()和Around()函数
    @Pointcut("execution(public void com.anno.TargetImpl.testTarget())")
    public void pointCutTest(){}
	// 配置前置增强
    @Before("execution(public void com.anno.TargetImpl.testTarget())")
    public void TargetBefor() {
        System.out.println("Target befor method");
    }
    @After("pointCutTest()")
    public void TargetAfter() {
        System.out.println("Target after method");
    }
    @Around("Aspect.pointCutTest()")
    public Object Around(ProceedingJoinPoint pjp) throws Throwable {
        System.out.println("环绕前");
        // 执行切点方法
        Object process = pjp.proceed();
        System.out.println("环绕后");
        return process;
    }
}
6、在配置文件中配置开启组件扫描和AOP自动代理
<?xml version="1.0" encoding="UTF-8"?>
<beans xmlns="http://www.springframework.org/schema/beans"
       xmlns:xsi="http://www.w3.org/2001/XMLSchema-instance" xmlns:aop="http://www.springframework.org/schema/aop"
       xmlns:context="http://www.springframework.org/schema/context"
       xsi:schemaLocation="
       http://www.springframework.org/schema/beans http://www.springframework.org/schema/beans/spring-beans.xsd
       http://www.springframework.org/schema/aop http://www.springframework.org/schema/aop/spring-aop.xsd
       http://www.springframework.org/schema/context http://www.springframework.org/schema/context/spring-context.xsd">

    <!--组件扫描 特别注意组件扫描配置需要添加context命名空间,见4、8行,若果命名空间不正确,组件将不会被扫描-->
    <context:component-scan base-package="com.anno"></context:component-scan>
    <!--自动代理 为spring容器中那些配置@Aaspect切面的bean创建代理,织入切面-->
    <aop:aspectj-autoproxy></aop:aspectj-autoproxy>
</beans>


 被折叠的 条评论
为什么被折叠?
被折叠的 条评论
为什么被折叠?
 到【灌水乐园】发言


