


 本文介绍了在Windows环境下使用Tomcat8.0、JDK8、MyEclipse/Eclipse和MySQL5.5搭建SSM项目的步骤。内容涵盖SSM框架的四大组件:持久对象层、数据访问层、业务逻辑层和服务层的职责。重点讲解了配置文件的理解,包括applicationContext.xml、springmvc-config.xml、mybatis-config.xml、db.properties和log4j.properties的作用。同时提到了web.xml的配置细节,以及作者作为初学者对SSM框架的基础理解。
SSM框架搭建学习总结
#开发环境
1.操作系统:windows
2.web服务器:Tomcat8.0
3.Java开发包:JDK8
4.开发工具:MyEclipse或者Eclipse都可以
5.数据库:MySQL5.5
6.浏览器:火狐或者IE8.0以上版本
7.开发需要的Spring、SpringMVC、mybatis的jar包
对于那些项目的创建过程我就不说了,接下来我们分析一下ssm框架的基本构成。根据系统的功能不同,我们将系统的结构分为四个层次:
- 持久对象层(也就是持久化层,pojo),在这个层次由若干的持久化类(实体类)来构成的,实体化类是与数据库中表字段相对应的。
- 数据访问层(Dao层),就是对数据库进行操作的,由Dao接口(以Dao结尾的命名)以及相对应的mybatis映射文件组成,但是这里要注意的是Dao接口的名称要和映射文件xml的名称相同,否则编译的时候将无法分别文件。
- 业务逻辑层(service层),由若干的Service接口和实现类组成,接口统一以Service结尾,具体的实现类中在接口名后加impl结尾,本层主要是实现系统的业务逻辑。
- web表现层,该层中主要包括springMVC中的Controller类和JSP页面。Controller类主要对JSP返回的请求进行拦截,调用业务逻辑层中的相应业务逻辑方法来处理用户请求,然后再向JSP页面返回结果。
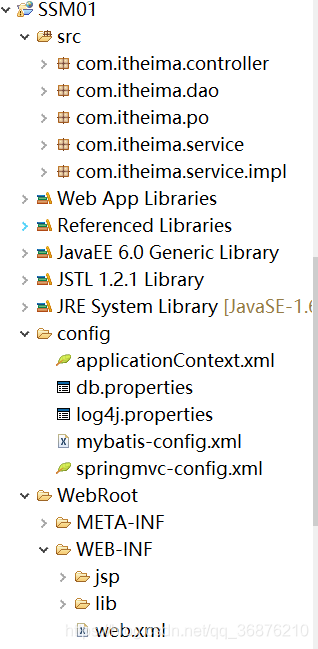
虽然分层上是分为四层,但在具体的搭建实现过程中我还是习惯的把它按文件的类型作用划分,基本的框架内容大致如下:
  SRC文件:
      1.pojo包:持久化类,映射数据库表的对应字段
      2.Dao包:接口文件以及映射文件,用于对数据库操作(借口和映射文件为绑定关系,字段名称必须一致)
      3.Service包:接口文件,大致与Dao中接口文件相对应(我想这里是为了避免业务层直接对数据库进行操作,不安全),以Service字段命名结尾
      4.impl包:用于对Service中接口的具体实现,使用@Autowired将Dao中接口注入来实现,命名以Serviceimpl结尾
      5.Controller包:就是一个控制器的包,来拦截处理用户发过来的各种请求,具体的获取请求的方式我就不多说了,然后将请求的处理结果返回个给JSP界面
关于配置文件的理解
在ssm框架中大致有六个基本的配置文件,分别为
applicationContext.xml(Spring配置文件)
基本内容
1.读取配置文件信息
2.配置数据源
3.配置事务管理器
4.开启事物注解
5.配置mybatis工厂
6.配置maaper扫描器
7.扫描Service
<?xml version="1.0" encoding="UTF-8"?>
<beans xmlns="http://www.springframework.org/schema/beans"
    xmlns:xsi="http://www.w3.org/2001/XMLSchema-instance"
    xmlns:aop="http://www.springframework.org/schema/aop"
    xmlns:tx="http://www.springframework.org/schema/tx"
    xmlns:context="http://www.springframework.org/schema/context"
    xsi:schemaLocation="http://www.springframework.org/schema/beans
    http://www.springframework.org/schema/beans/spring-beans-4.3.xsd
    http://www.springframework.org/schema/tx
    http://www.springframework.org/schema/tx/spring-tx-4.3.xsd
    http://www.springframework.org/schema/context
    http://www.springframework.org/schema/context/spring-context-4.3.xsd
    http://www.springframework.org/schema/aop
    http://www.springframework.org/schema/aop/spring-aop-4.3.xsd">
    <!-- 读取db数据-->
    <context:property-placeholder location="classpath:db.properties"/>
    <!-- 配置数据源 -->
    <bean id = "dataSource" class = "org.apache.commons.dbcp2.BasicDataSource">
        <!--数据库驱动-->
        <property name = "driverClassName" value = "${jdbc.driver}"/>
        <property name = "url" value = "${jdbc.url}"/>
        <property name = "username" value = "${jdbc.username}"/>
        <property name = "password" value = "${jdbc.password}"/>
        <property name = "maxTotal" value = "${jdbc.maxTotal}"/>
        <property name = "maxIdle" value ="${jdbc.maxIdle}"/>
        <property name = "initialSize" value = "${jdbc.initialSize}"/>
    </bean>
    <!-- 事务管理器,依赖于数据源-->
    <bean id = "transactionManager"
                class = "org.springframework.jdbc.dataSource.DataSourceTransactionManager">
    </bean>
    <!--开启事务注解-->
    <tx:annotation-driven transaction-manager= "transactionManager"/>
    <!--配置mybatis工厂-->
    <bean id = "sqlSessionFactory"
                       class = "org.mybatis.spring.SqlSessionFactoryBean">
            <!-- 注入数据源-->
            <property name = "dataSource" ref = "dataSource"/>
            <!-- 指定mybatis配置核心位置-->
            <property name = "configLocation" value= "classpath:mybatis-config.xml"/>
    </bean>
    <bean class="org.mybatis.spring.mapper.MapperScannerConfigurer">
        <property name="basePackage" value="com.itheima.dao"/>
    </bean>
    <context:component-scan base-package="com.itheima.service"/>
</beans>
springmvc-cinfig.xml(springMVC配置文件)
1.配置包扫描器,扫描Controller控制器
2.加载注解驱动
3.配置视图解析器
<beans xmlns="http://www.springframework.org/schema/beans"
  xmlns:xsi="http://www.w3.org/2001/XMLSchema-instance"
  xmlns:mvc="http://www.springframework.org/schema/mvc"
  xmlns:context="http://www.springframework.org/schema/context"
  xmlns:tx="http://www.springframework.org/schema/tx"
  xsi:schemaLocation="http://www.springframework.org/schema/beans
  http://www.springframework.org/schema/beans/spring-beans-4.3.xsd
  http://www.springframework.org/schema/mvc
  http://www.springframework.org/schema/mvc/spring-mvc-4.3.xsd
  http://www.springframework.org/schema/context
  http://www.springframework.org/schema/context/spring-context-4.3.xsd">
  <!--配置包扫描器,扫描@Controller注解的类-->
  <context:component-scan base-package="com.itheima.controller"/>
  <!-- 加载注解驱动-->
  <mvc:annotation-driven />
  <!--配置视图解析器-->
  <bean class = "org.springframework.web.servlet.view.InternalResourceViewResolver">
        <property name = "prefix" value = "/WEB-INF/"/>
        <property name = "suffix" value = ".jsp"/>
  </bean>
</beans>
mybatis-config.xml(mybatis配置文件)
根据pojo类路径配置别名(在applicationContext中已经配置了扫描器,此处可以直接配置别名就好)
<?xml version="1.0" encoding="UTF-8" ?>
<!DOCTYPE configuration PUBLIC "-//mybatis.org//DTD Config 3.0//EN"
"http://mybatis.org/dtd/mybatis-3-config.dtd">
<configuration>
	<!-- 别名定义 -->
	<typeAliases>
		<package name="com.itheima.po" />
	</typeAliases>
</configuration>
db.properties(数据库配置文件)
配置数据库连接的各项信息
jdbc.driver=com.mysql.jdbc.Driver
jdbc.url = jdbc:mysql://localhost:3306/mybatis
jdbc.username = root
jdbc.password = admin
jdbc.maxTotal =30
jdbc.maxIdle = 10
jdbc.initialSize = 5
logi4.properties
# Global logging configuration
log4j.rootLogger=ERROR, stdout
# MyBatis logging configuration...
log4j.logger.com.itheima=DEBUG
# Console output...
log4j.appender.stdout=org.apache.log4j.ConsoleAppender
log4j.appender.stdout.layout=org.apache.log4j.PatternLayout
log4j.appender.stdout.layout.ConversionPattern=%5p [%t] - %m%n
web.xml(前端页面配置信息)
1.配置Spring文件监听器
2.编码过滤器
3.前端控制器
4.请求拦截器
<?xml version="1.0" encoding="UTF-8"?>
<web-app xmlns:xsi="http://www.w3.org/2001/XMLSchema-instance"
  	xmlns="http://xmlns.jcp.org/xml/ns/javaee"
  	xsi:schemaLocation="http://xmlns.jcp.org/xml/ns/javaee
  	http://xmlns.jcp.org/xml/ns/javaee/web-app_3_1.xsd"
  	id="WebApp_ID" version="3.1">

  	<!--配置添加Spring文件的监听器-->
  	<context-param>
   	     <param-name>contextConfigLocation</param-name>
         <param-value>classpath:applicationContext.xml</param-value>
  	</context-param>
  	<listener>
  	      <listener-class>
  	          org.springframework.web.context.ContextLoaderListener
  	      </listener-class>
  	</listener>
  	<!--编码过滤器-->
  	<filter>
  	     <filter-name>encoding</filter-name>
  	     <filter-class>
  	         org.springframework.web.filter.CharacterEncodingFilter
  	     </filter-class>
  	     <init-param>
  	           <param-name>encoding</param-name>
  	           <param-value>UTF-8</param-value>
  	     </init-param>
  	</filter>
  	<filter-mapping>
  	      <filter-name>encoding</filter-name>
  	      <url-pattern>*.action</url-pattern>
  	</filter-mapping>
  	<!--配置Spring MVC前端控制器-->
  	<servlet>
  	    <servlet-name>springmvc</servlet-name>
  	    <servlet-class>
  	        org.springframework.web.servlet.DispatcherServlet
  	    </servlet-class>
  	    <init-param>
  	             <param-name>contextConfigLocation</param-name>
  	             <param-value>classpath:springmvc-config.xml</param-value>
  	    </init-param>
  	    <!--配置服务器启动后立即加载Spring MVC配置文件-->
  	    <load-on-startup>1</load-on-startup>
  	</servlet>
  	<servlet-mapping>
  	    <servlet-name>springmvc</servlet-name>
  	    <!--拦截所有请求(除了jsp)-->
  	    <url-pattern>/</url-pattern>
  	</servlet-mapping>


</web-app>
其中前五个文件可以放在src目录下,也可以单独建立一个文件夹放置,web.xml必须要放置在WEB-INF目录下面
最后
以上就是我对SSM框架的一点点理解总结,如果有不当的地方请批评指正,感激不尽(我也是初学框架的小白,这里只是我对ssm的一点基础的理解)


 1670
1670

 被折叠的 条评论
为什么被折叠?
被折叠的 条评论
为什么被折叠?
 到【灌水乐园】发言


