


路由与生命周期#
1. 路由-常用API#
如何新建页面,如何跳转和回退操作
1)新建页面
pages/DetailPage.ets
1@Entry
2@Component
3struct DetailPage {
4  build() {
5    Column({ space: 15 }) {
6      Text('Detail Page')
7        .fontSize(40)
8      Button('Back')
9    }
10    .height('100%')
11    .width('100%')
12    .justifyContent(FlexAlign.Center)
13  }
14}
src/main/resources/base/profile/main_pages.json
1{
2  "src": [
3    "pages/Index",
4+    "pages/DetailPage"
5  ]
6}
TIP
- 手动新建一个页面(ets)文件,需要在
main_pages.json中手动配置 - 可以自动创建

2)跳转与后退 API
- 跳转
router.pushUrl() - 后退
router.back() - 替换跳转
router.replaceUrl()
1import router from '@ohos.router'
2@Entry
3@Component
4struct Index {
5  build() {
6    Column({ space: 15 }) {
7      Text('Index Page')
8        .fontSize(40)
9      Button('Jump To Detail Page')
10        .onClick(() => {
11          // 1. 跳转,压入页面栈顶部
12          // router.pushUrl({
13          //   url: 'pages/DetailPage'
14          // })
15
16          // 2. 跳转,替换当前页面栈
17          // router.replaceUrl({
18          //   url: 'pages/DetailPage'
19          // })
20
21          // 3. 返回
22          // router.back()
23        })
24    }
25    .height('100%')
26    .width('100%')
27    .justifyContent(FlexAlign.Center)
28  }
29}
TIP
- 页面栈的最大容量为32个页面。如果超过这个限制,可以调用
router.clear()方法清空历史页面栈,释放内存空间。
2. 路由-参数传递#
页面参数传递和获取
1)传参
pages/Index.ets
1import router from '@ohos.router'
2
3class User {
4  name: string
5  age: number
6}
7
8@Entry
9@Component
10struct Index {
11
12  @State
13  user: User = {
14    name: 'jack',
15    age: 18
16  }
17
18  build() {
19    Column({ space: 15 }) {
20      Text('Index Page')
21        .fontSize(40)
22      Button('Jump To Detail Page')
23        .onClick(() => {
24          router.pushUrl({
25            url: 'pages/DetailPage',
26            params: this.user
27          })
28        })
29    }
30    .height('100%')
31    .width('100%')
32    .justifyContent(FlexAlign.Center)
33  }
34}
2)获取
pages/DetailPage.ets
1import router from '@ohos.router'
2import promptAction from '@ohos.promptAction'
3@Entry
4@Component
5struct DetailPage {
6
7  aboutToAppear() {
8    const params = router.getParams()
9    promptAction.showToast({ message: params['name'] + params['age'] })
10  }
11
12  build() {
13    Column({ space: 15 }) {
14      Text('Detail Page')
15        .fontSize(40)
16      Button('Back')
17        .onClick(() => {
18          router.back()
19        })
20    }
21    .height('100%')
22    .width('100%')
23    .justifyContent(FlexAlign.Center)
24  }
25}
3. UIAbility-生命周期#
当用户打开、切换和返回到对应应用时,应用中的UIAbility实例会在其生命周期的不同状态之间转换。
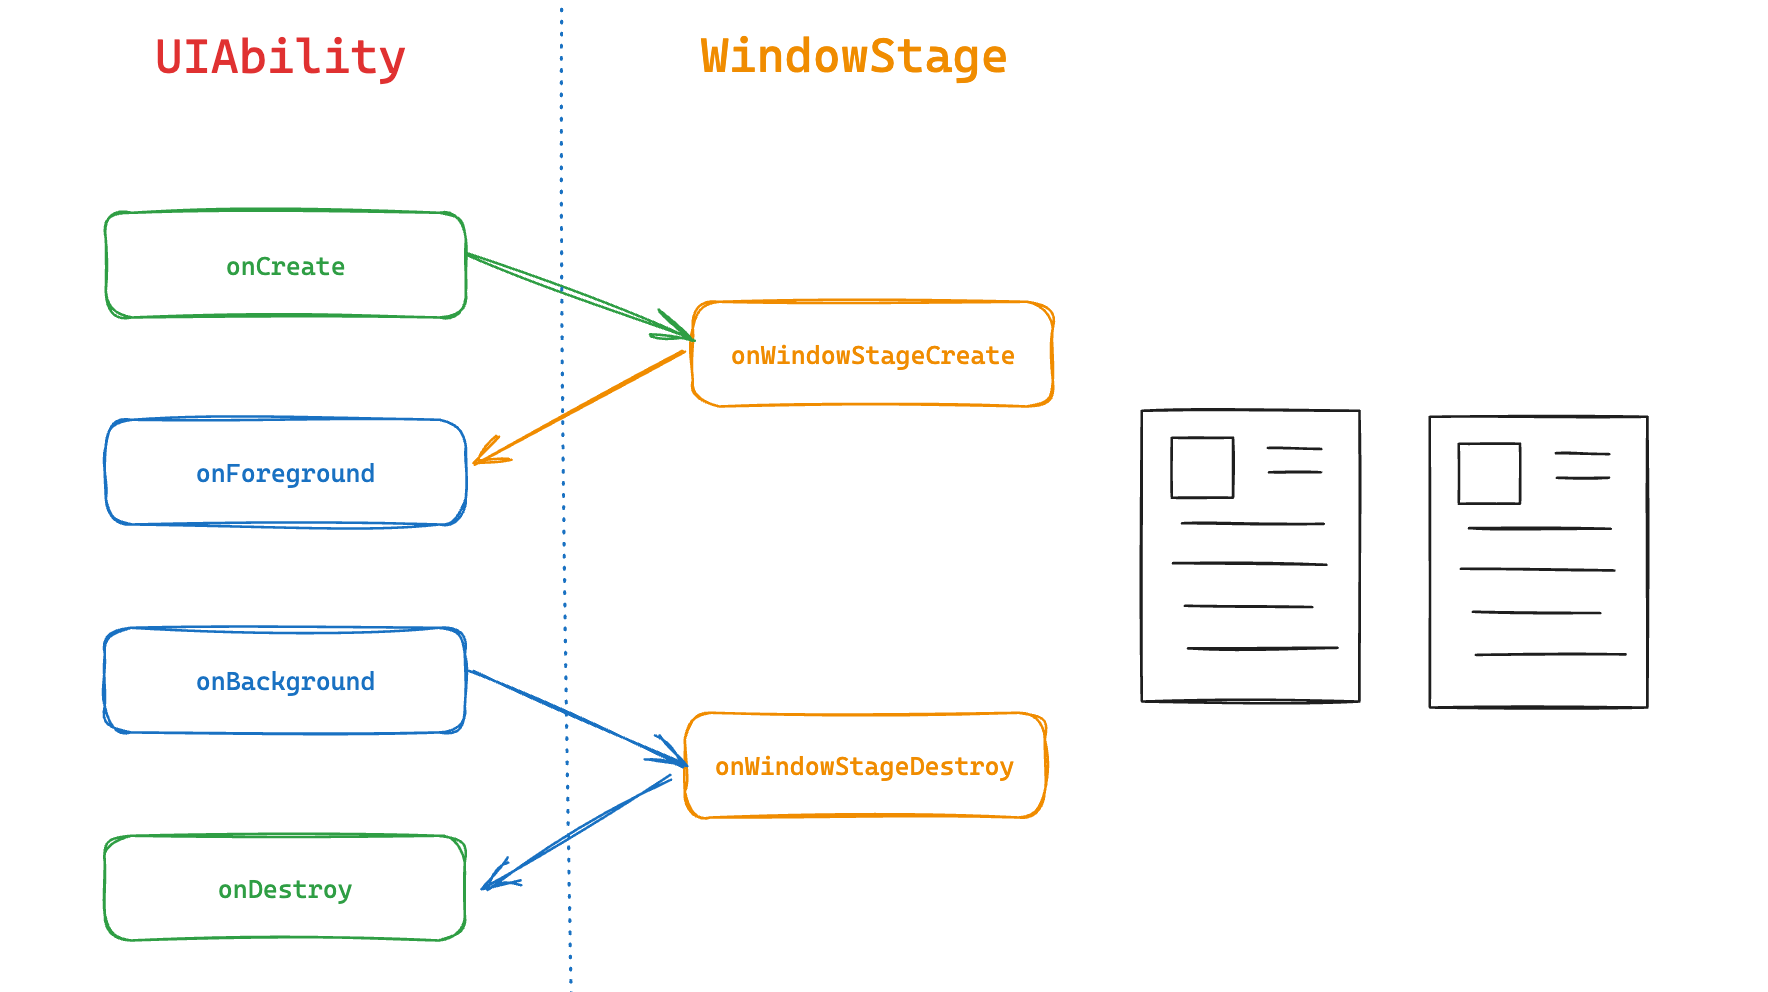
-
UIAbility实例创建完成时触发,系统会调用
onCreate()回调。- 可以在该回调中进行应用初始化操作,例如变量定义资源加载等,用于后续的UI界面展示。
-
onForeground()回调,在 UIAbility 的UI界面可见之前,如 UIAbility 切换至前台时触发。- 可以在 onForeground() 回调中申请系统需要的资源,或者重新申请在 onBackground() 中释放的资源。
-
onBackground()回调,在 UIAbility 的UI界面完全不可见之后,如 UIAbility 切换至后台时候触发。- 可以在 onBackground() 回调中释放UI界面不可见时无用的资源,或者在此回调中执行较为耗时的操作,例如状态保存等
-
Destroy 状态在 UIAbility 实例销毁时触发,系统会调用
onDestroy()回调。-
可以在该回调中进行系统资源的释放、数据的保存等操作。
-
4. 组件-生命周期#
1)任何组件
aboutToAppear
- aboutToAppear 函数在创建自定义组件的新实例后,在执行其 build 函数之前执行。
- 允许在 aboutToAppear 函数中改变状态变量,更改将在后续执行 build 函数中生效。
aboutToDisappear
-
aboutToDisappear 函数在自定义组件析构销毁之前执行。
-
不允许在 aboutToDisappear 函数中改变状态变量,特别是 @Link 变量的修改可能会导致应用程序行为不稳定。
2)仅页面 @Entry 组件
onPageShow
- 页面每次显示时触发一次,包括路由过程、应用进入前后台等场景,仅 @Entry 修饰的自定义组件生效。
onPageHide
- 页面每次隐藏时触发一次,包括路由过程、应用进入前后台等场景,仅 @Entry 修饰的自定义组件生效。
onBackPress
-
当用户点击返回按钮时触发,仅 @Entry 修饰的自定义组件生效。
5. UIAbility跳转#
UIAbility组件是一种包含UI界面的应用组件,主要用于和用户交互
- UIAbility组件是系统调度的基本单元,为应用提供绘制界面的窗口;
- 一个UIAbility组件中可以通过多个页面来实现一个功能模块;
- 每一个UIAbility组件实例,都对应于一个最近任务列表中的任务。
PayAbility
1Button('Jump To PayAbility Page')
2  .onClick(() => {
3    const context = getContext(this) as common.UIAbilityContext
4    const want: Want = {
5      bundleName: 'com.itcast.myapplication',
6      abilityName: 'PayAbility'
7    }
8    context.startAbility(want)
9  })
PayAbility
1Button('Back')
2  .onClick(() => {
3    router.back()
4  })
TIP
- 后续消息通知跳转到应用也需要跳转到对应的 UIAbility 方式类似
使用动画#
1. 属性动画#
组件的某些通用属性变化时,可以通过属性动画实现渐变过渡效果,提升用户体验。
- 支持的属性包括width、height、backgroundColor、opacity、scale、rotate、translate等。
1@Entry
2@Component
3struct Index {
4  @State
5  widthSize: number = 100
6  @State
7  heightSize: number = 40
8
9  build() {
10    Column({ space: 15 }) {
11      Button('元素动画')
12        .width(this.widthSize)
13        .height(this.heightSize)
14        .onClick(() => {
15          this.widthSize = 200
16          this.heightSize = 100
17        })
18        .animation({
19          // 动画时间
20          duration: 1000,
21          // 执行次数
22          iterations: -1,
23          // 动画曲线
24          curve: Curve.Ease,
25          // 延时时间
26          delay: 1000,
27          // 播放模式
28          playMode: PlayMode.Alternate
29        })
30    }
31    .height('100%')
32    .width('100%')
33    .justifyContent(FlexAlign.Center)
34  }
35}
2. 显示动画#
提供全局animateTo显式动画接口来指定由于闭包代码导致的状态变化插入过渡动效。
1@Entry
2@Component
3struct Index {
4  @State
5  heightSize: number = 40
6
7  build() {
8    Column() {
9      Text('一级菜单')
10        .height(40)
11        .onClick(() => {
12          animateTo({
13            duration: 200
14          }, () => {
15            this.heightSize = this.heightSize === 40 ? 0 : 40
16          })
17        })
18      Column() {
19        Text('一级菜单')
20          .height(this.heightSize)
21        Text('一级菜单')
22          .height(this.heightSize)
23      }
24    }
25    .backgroundColor('#069')
26  }
27}
3. 元素共享转场#
当路由进行切换时,可以通过设置组件的
sharedTransition属性将该元素标记为共享元素并设置对应的共享元素转场动效。

Index.ets
1import router from '@ohos.router'
2@Entry
3@Component
4struct Index {
5  build() {
6    Row({ space: 15 }) {
7      Column({ space: 10 }){
8        Image($rawfile('apple.png'))
9          .width('100%')
10          .aspectRatio(1)
11          .sharedTransition('apple', { duration: 500 })
12        Text('鸣春谷 正宗甘肃特产花牛水果苹果 【天水直发】 4.5-5斤中果A(约13-16个)')
13          .sharedTransition('text', { duration: 500 })
14      }
15      .padding(15)
16      .width('50%')
17      .onClick(() => {
18        router.pushUrl({
19          url: 'pages/DetailPage'
20        })
21      })
22    }
23    .width('100%')
24  }
25}
DetailPage.ets
1@Entry
2@Component
3struct DetailPage {
4  build() {
5    Column({ space: 15 }) {
6      Column({ space: 10 }){
7        Image($rawfile('apple.png'))
8          .width('100%')
9          .aspectRatio(1)
10          .sharedTransition('apple', { duration: 500 })
11        Text('鸣春谷 正宗甘肃特产花牛水果苹果 【天水直发】 4.5-5斤中果A(约13-16个)')
12          .fontSize(18)
13          .sharedTransition('text', { duration: 500 })
14      }
15      .padding(15)
16    }
17    .height('100%')
18    .width('100%')
19  }
20}
4. 拖动手势-阻尼和磁吸#
拖动手势(PanGesture)
- 拖动手势用于触发拖动手势事件,滑动达到最小滑动距离(默认值为5vp)时拖动手势识别成功。
实现下拉刷新效果:
- 使用
Stack堆叠下拉刷新容器和列表容器 - 使用手势事件
PanGesture实现拖动列表容器 - 使用
animateTo实现磁吸动画效果 - 拖动距离超出阀值,模拟开启加载效果,控制文字显示和动画
1import promptAction from '@ohos.promptAction'
2@Entry
3@Component
4struct Index {
5  @State
6  translateY: number = 0
7  @State
8  text: string = '下拉即可刷新'
9  @State
10  loading: boolean = false
11
12  ease (originValue: number = 0) {
13    const space = 60
14    const damp = 0.3
15    if ( originValue > space ) {
16      return space + ( originValue - space ) * damp
17    }
18    return originValue
19  }
20
21  build() {
22    Stack({ alignContent: Alignment.Top }) {
23      Row() {
24        if (this.loading) {
25          LoadingProgress()
26            .width(32)
27            .aspectRatio(1)
28        }
29        Text(this.text)
30          .fontColor('#999')
31          .width(100)
32      }
33      .height(100)
34
35      List() {
36
37      }
38      .backgroundColor('#fff')
39      .height('100%')
40      .width('100%')
41      .translate({ y: this.translateY })
42      .gesture(
43        PanGesture()
44          .onActionUpdate((event: GestureEvent) => {
45            this.translateY = this.ease(event.offsetY)
46            if ( this.translateY > 100 ) {
47              this.text = '释放立即刷新'
48            }
49          })
50          .onActionEnd((event: GestureEvent) => {
51            if (this.translateY > 100) {
52              this.loading = true
53              this.text = '正在刷新中...'
54              animateTo({ duration: 300 }, () => {
55                this.translateY = 100
56              })
57              // 加载数据
58              setTimeout(() => {
59                this.loading = false
60                this.text = ''
61                animateTo({ duration: 300, onFinish: () => this.text = '下拉即可刷新' }, () => {
62                  this.translateY = 0
63                })
64                promptAction.showToast({ message: '刷新成功' })
65              }, 2000)
66            } else {
67              animateTo({ duration: 300 }, () => {
68                this.translateY = 0
69              })
70            }
71          })
72      )
73    }
74    .height('100%')
75    .width('100%')
76    .backgroundColor('#f3f4f5')
77  }
78}系统能力#
1. 数据管理-用户首选项#
用户首选项为应用提供
Key-Value键值型的数据处理能力,支持应用持久化轻量级数据,并对其修改和查询。
Key键为 string 类型,要求非空且长度不超过 80 个字节。- 如果
Value值为 string 类型,可以为空,不为空时长度不超过 8192 个字节。 - 内存会随着存储数据量的增大而增大,所以存储的数据量应该是轻量级的,建议存储的数据不超过一万条,否则会在内存方面产生较大的开销。
1)知晓 API 用法
1// 获取首选项实例
2getPreferences(context: Context, name: string): Promise<Preferences>
3
4// 首选项实→获取数据
5get(key: string, defValue: ValueType): Promise<ValueType>
6// 首选项实→设置|修改数据
7put(key: string, value: ValueType): Promise<void>
8// 首选项实→删除数据
9delete(key: string): Promise<void>
2)写一个存储用户的工具
utils/userStore.ets
1import preferences from '@ohos.data.preferences'
2
3export class User {
4  name?: string
5  age?: number
6}
7
8export class UserStore {
9  KEY = 'user-store'
10
11  getStore() {
12    return preferences.getPreferences(getContext(this), 'userStore')
13  }
14
15  async setData(data: User) {
16    const store = await this.getStore()
17    await store.put(this.KEY, JSON.stringify(data))
18    await store.flush()
19  }
20
21  async getData() {
22    const store = await this.getStore()
23    const data = await store.get(this.KEY, '{}') as string
24    return JSON.parse(data) as User
25  }
26
27  async delData() {
28    const store = await this.getStore()
29    await store.delete(this.KEY)
30    await store.flush()
31  }
32
33}
pages/Index.ets
1import router from '@ohos.router'
2import { User, UserStore } from '../utils/userStore'
3
4@Entry
5@Component
6struct Index {
7  userStore: UserStore
8  @State
9  user: User = {}
10
11  aboutToAppear() {
12    this.userStore = new UserStore()
13    this.getUser()
14  }
15
16  async getUser () {
17    const user = await this.userStore.getData()
18    this.user = user
19  }
20
21  build() {
22    Column({ space: 15 }) {
23
24      if ( this.user?.name && this.user?.age ) {
25        Text(`${ this.user.name } 今年 ${ this.user.age } 岁`)
26      }
27
28      Button('设置 User')
29        .onClick(async () => {
30          await this.userStore.setData({ name: 'jack', age: 18 })
31          await this.getUser()
32        })
33
34      Button('修改 User')
35        .onClick(async () => {
36          await this.userStore.setData({ name: 'tom', age: 17 })
37          await this.getUser()
38        })
39
40      Button('删除 User')
41        .onClick(async () => {
42          await this.userStore.delData()
43          await this.getUser()
44        })
45
46      Button('换一页')
47        .onClick(() => {
48          router.pushUrl({
49            url: 'pages/DetailPage'
50          })
51        })
52    }
53    .height('100%')
54    .width('100%')
55    .justifyContent(FlexAlign.Center)
56  }
57}
2. 绘画能力-画布组件#
1)了解 画布 基本用法
1@Entry
2@Component
3struct Index{
4
5  // 抗锯齿设置
6  private settings: RenderingContextSettings = new RenderingContextSettings(true)
7  // 画布实例
8  private context: CanvasRenderingContext2D = new CanvasRenderingContext2D(this.settings)
9
10  build() {
11    Column({ space: 15 }) {
12      // 画布组件
13      Canvas(this.context)
14        .width(252)
15        .aspectRatio(1)
16        .backgroundColor('#ccc')
17        .onReady(() => {
18          // 绘制边框盒子
19          this.context.strokeRect(100, 100, 50, 50)
20          // 绘制填充盒子
21          this.context.fillRect(150, 150, 50, 50)
22        })
23    }
24    .height('100%')
25    .width('100%')
26    .justifyContent(FlexAlign.Center)
27  }
28}
2)绘制表盘和秒针

前置知识:
drawImage(img: ImageBitmap, x, y, w, h)图片需要ImageBitmap格式rotate(angle: number)angle 是弧度,1° = Math.PI / 180,围绕0 0中心旋转
1@Entry
2@Component
3struct Index{
4
5  private settings: RenderingContextSettings = new RenderingContextSettings(true)
6  private context: CanvasRenderingContext2D = new CanvasRenderingContext2D(this.settings)
7  private panImg: ImageBitmap = new ImageBitmap('/images/ic_clock_pan.png')
8  private secondImg: ImageBitmap = new ImageBitmap('/images/ic_second_pointer.png')
9
10
11  build() {
12    Column({ space: 15 }) {
13      Canvas(this.context)
14        .width(252)
15        .aspectRatio(1)
16        .onReady(() => {
17          // 参数:图片、绘制原点x坐标、绘制原点y坐标、图片绘制宽度、图片绘制高度
18          this.context.drawImage(this.panImg, 0 ,0 , 252, 252)
19
20          this.context.translate(126, 126)
21          this.context.rotate(Math.PI / 180 * 180)
22          this.context.translate(-126, -126)
23          this.context.drawImage(this.secondImg, 122, 0, 8, 252)
24        })
25    }
26    .height('100%')
27    .width('100%')
28    .justifyContent(FlexAlign.Center)
29  }
30}
3. 公共事件与通知-通知管理#
本模块提供通知管理的能力,包括发布、取消发布通知,创建、获取、移除通知通道,获取通知的使能状态、角标使能状态,获取通知的相关信息等。
参考文档 链接
1)发送通知和取消通知
1import notificationManager from '@ohos.notificationManager'
2
3@Entry
4@Component
5struct Index {
6  notifyId = 100
7
8  build() {
9    Column({ space: 15 }) {
10      Button('添加通知')
11        .onClick(async () => {
12          const request: notificationManager.NotificationRequest = {
13            id: this.notifyId,
14            content: {
15              contentType: notificationManager.ContentType.NOTIFICATION_CONTENT_BASIC_TEXT,
16              normal: {
17                title: "温馨提示",
18                text: "您的京东快递 100321120341233 快递已经达到北京!",
19                additionalText: "物流提醒"
20              }
21            },
22          }
23          notificationManager.publish(request)
24        })
25      Button('取消通知')
26        .onClick(() => {
27          notificationManager.cancel(this.notifyId)
28        })
29    }
30    .height('100%')
31    .width('100%')
32    .justifyContent(FlexAlign.Center)
33  }
34}
TIP
- 运行上面通知如果遇到闪崩现象,告知 Invalid Parameter 的话,请擦除模拟器数据。
2)通知点击唤起应用
1import wantAgent from '@ohos.app.ability.wantAgent'1// 获取 wantAgent
2const want = await wantAgent.getWantAgent({
3 wants: [
4 {
5 bundleName: 'com.itcast.myapplication',
6 abilityName: 'EntryAbility'
7 }
8 ],
9 operationType: wantAgent.OperationType.START_ABILITY,
10 requestCode: 0
11})1const request: notificationManager.NotificationRequest = {
2 id: this.notifyId,
3 content: {
4 contentType: notificationManager.ContentType.NOTIFICATION_CONTENT_BASIC_TEXT,
5 normal: {
6 title: "温馨提示",
7 text: "您的京东快递 100321120341233 快递已经达到北京!",
8 additionalText: "物流提醒"
9 }
10 },
11 // 跳转应用
12+ wantAgent: want
13}4. 后台任务-后台代理提醒#
应用退到后台或进程终止后,仍然有一些提醒用户的定时类任务,
例如购物类应用抢购提醒等,为满足此类功能场景,系统提供了代理提醒(reminderAgentManager)的能力。
参考文档 链接
- 倒计时类:基于倒计时的提醒功能
- 日历类:基于日历的提醒功能
- 闹钟类:基于时钟的提醒功能
需要开启 ohos.permission.PUBLISH_AGENT_REMINDER 权限
1)闹铃
1import reminderAgentManager from '@ohos.reminderAgentManager'
2import promptAction from '@ohos.promptAction'
3
4@Entry
5@Component
6struct Index {
7  reminderId = null
8
9  build() {
10    Column({ space: 15 }) {
11      Button('添加闹铃')
12        .onClick(async () => {
13          let targetReminderAgent: reminderAgentManager.ReminderRequestAlarm = {
14            // 提醒类型为闹钟类型
15            reminderType: reminderAgentManager.ReminderType.REMINDER_TYPE_ALARM,
16            // 指明提醒的目标时刻
17            hour: 19,
18            // 指明提醒的目标分钟
19            minute: 57,
20            // 指明每周哪几天需要重复提醒
21            daysOfWeek: [],
22            // 设置弹出的提醒通知信息上显示的按钮类型和标题
23            actionButton: [
24              {
25                title: '停止',
26                type: reminderAgentManager.ActionButtonType.ACTION_BUTTON_TYPE_CLOSE
27              },
28            ],
29            // 响铃时长秒
30            ringDuration: 60,
31            // 点击通知跳转的 want
32            wantAgent: {
33              pkgName: 'com.itcast.myapplication',
34              abilityName: 'EntryAbility',
35            },
36          }
37          // 记录id 清理使用
38          this.reminderId = await reminderAgentManager.publishReminder(targetReminderAgent)
39          promptAction.showToast({ message: '添加闹铃成功' })
40        })
41      Button('取消闹铃')
42        .onClick(async () => {
43          // 不能退出应用,否则 this.reminderId 是 null,开发的时候可以持久化
44          await reminderAgentManager.cancelReminder(this.reminderId)
45          promptAction.showToast({ message: '取消闹铃成功' })
46        })
47    }
48    .height('100%')
49    .width('100%')
50    .justifyContent(FlexAlign.Center)
51  }
52}


 2119
2119

 被折叠的 条评论
为什么被折叠?
被折叠的 条评论
为什么被折叠?
 到【灌水乐园】发言


