


 本文详细介绍了如何使用Shiro框架结合JWT和Redis实现登录认证流程。包括Shiro配置、自定义拦截器、登录逻辑、权限验证以及前端请求处理。流程涉及浏览器请求、身份认证、token生成和存储、过期处理等关键步骤,确保了用户身份的安全和有效。
前言
上一篇主要实现前端表单请求加密处理,后端解密的实现,这篇文章将结合shiro来完善登陆认证的流程。
流程
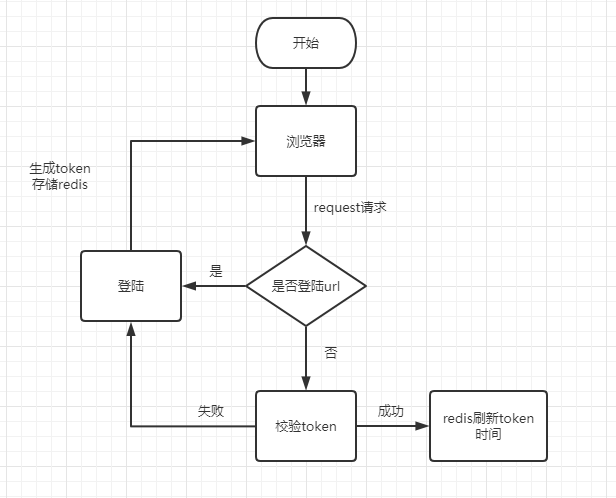
- 浏览器请求接口
- 判断是否是登陆请求
- 是登陆请求执行登陆,否则进行身份认证
- 登陆成功生成token存进redis
- 身份认证通过放行请求, 刷新redis里的token缓存时间
- 认证失败则跳转登陆页重新进行登陆
实现
后端
ShiroConfig.java配置
@Configuration
public class ShiroConfig {

    /**
     * 注入ShiroRealm,自定义的realm 后面的认证和授权全在这里编写
     * @return
     */
    @Bean
    public ShiroRealm shiroRealm() {
        return new ShiroRealm();
    }

    /**
     * 创建SecurityManager
     * @return
     */
    @Bean
    public DefaultWebSecurityManager defaultWebSecurityManager() {
        /**
         * securityManager对象,shiroRealm进行托管
         */
        DefaultWebSecurityManager securityManager = new DefaultWebSecurityManager();
        securityManager.setRealm(shiroRealm());

        /**
         * 禁用session
         */
        DefaultSubjectDAO subjectDAO = new DefaultSubjectDAO();
        DefaultSessionStorageEvaluator defaultSessionStorageEvaluator = new DefaultSessionStorageEvaluator();
        defaultSessionStorageEvaluator.setSessionStorageEnabled(false);
        subjectDAO.setSessionStorageEvaluator(defaultSessionStorageEvaluator);
        securityManager.setSubjectDAO(subjectDAO);

        return securityManager;
    }

    /**
     * 过滤器配置
     * @return
     */
    @Bean
    public ShiroFilterFactoryBean shiroFilterFactoryBean(DefaultWebSecurityManager securityManager) {
        ShiroFilterFactoryBean factoryBean = new ShiroFilterFactoryBean();
        factoryBean.setSecurityManager(securityManager);
        factoryBean.setLoginUrl("/login");
        // 添加自定义过滤器
        Map<String, Filter> filterMap = new HashMap<>(16);
        filterMap.put("tokenFilter", new BearerTokenFilter());
        factoryBean.setFilters(filterMap);

        /**
         * 自定义拦截规则
         */
        Map<String, String> filterRuleMap = new HashMap<>(16);
        // 对swagger相关url请求不进行拦截
        filterRuleMap.put("/doc.html", "anon");
        filterRuleMap.put("/swagger-resources/**", "anon");
        filterRuleMap.put("/v2/**", "anon");
        filterRuleMap.put("/webjars/**", "anon");
        // 其余请求都要经过BearerTokenFilter自定义拦截器
        filterRuleMap.put("/**", "tokenFilter");
        factoryBean.setFilterChainDefinitionMap(filterRuleMap);

        return factoryBean;
    }
}
BearerTokenFilter拦截器
Shiro有很多默认的过滤器
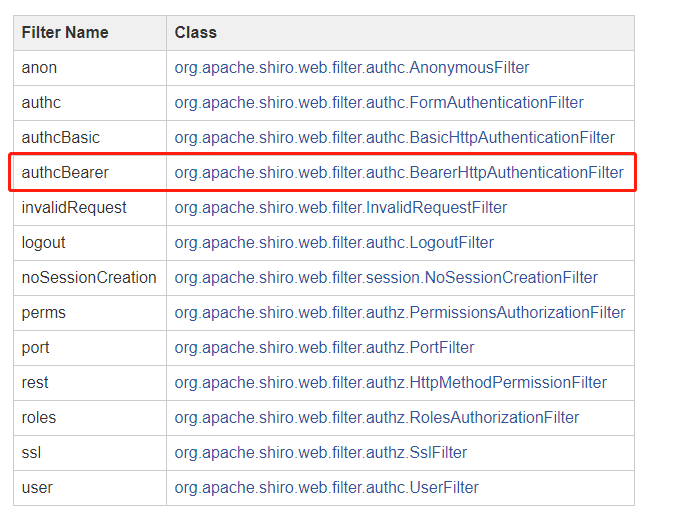
这用token实现,所以选择继承BearerHttpAuthenticationFilter
@Slf4j
public class BearerTokenFilter extends BearerHttpAuthenticationFilter {


    /**
     *  是否允许通过
     * @param request
     * @param response
     * @param mappedValue
     * @return
     */
    @Override
    protected boolean isAccessAllowed(ServletRequest request, ServletResponse response, Object mappedValue) {
        // 如果不是登陆操作,直接进行认证操作
        if (!isLoginAttempt(request, response)) {
            try {
                executeLogin(request, response);
            } catch (Exception e) {
                log.error("认证异常: {}", e);
                // 返回false shiro会自动抛出401 前端接收就好,不用再全局异常捕获。也捕获不到 - -!
                return false;
            }
        }

        return true;
    }


    /**
     * 是否试图登陆操作
     * @param request
     * @param response
     * @return
     */
    @Override
    protected boolean isLoginAttempt(ServletRequest request, ServletResponse response) {
        return getAuthzHeader(request) == null && pathsMatch(getLoginUrl(), request);
    }

    /**
     * 执行登陆操作
     * @param request
     * @param response
     * @return
     */
    @Override
    protected boolean executeLogin(ServletRequest request, ServletResponse response) {
        BearerToken bearerToken = new BearerToken(getAuthzHeader(request));
        getSubject(request, response).login(bearerToken);
        return true;
    }

    /**
     * http请求进行跨域处理
     * @param request
     * @param response
     * @return
     * @throws Exception
     */
    @Override
    protected boolean preHandle(ServletRequest request, ServletResponse response) throws Exception {
        HttpServletRequest httpServletRequest = (HttpServletRequest) request;
        HttpServletResponse httpServletResponse = (HttpServletResponse) response;
        httpServletResponse.setHeader("Access-control-Allow-Origin", httpServletRequest.getHeader("Origin"));
        httpServletResponse.setHeader("Access-Control-Allow-Methods", "GET,POST,OPTIONS,PUT,DELETE");
        httpServletResponse.setHeader("Access-Control-Allow-Headers", httpServletRequest.getHeader("Access-Control-Request-Headers"));
        // 跨域时会首先发送一个option请求,这里我们给option请求直接返回正常状态
        if (httpServletRequest.getMethod().equals(RequestMethod.OPTIONS.name())) {
            httpServletResponse.setStatus(HttpStatus.OK.value());
            return false;
        }
        return super.preHandle(request, response);
    }
}
登陆代码
LoginController.java
@RestController
@Api(tags = "登陆模块")
public class LoginController {

    @Autowired
    private LoginService loginService;

    @PostMapping("/login")
    @ApiOperation(value = "登陆")
    @DynamicParameters(properties = {
            @DynamicParameter(name = "username",value = "用户名",required = true),
            @DynamicParameter(name = "password",value = "密码",required = true),
    })
    public ResResult login(@RequestBody JSONObject user) {
        return loginService.doLogin(BeanUtil.toBean(user, User.class));
    }
}
LoginServiceImpl.java
@Service
@Log4j2
public class LoginServiceImpl implements LoginService {

    @Autowired
    private UserService userService;

    @Autowired
    private RedisUtil redisUtil;

    @Value("${privateKey}")
    private String privateKey;

    @Override
    public ResResult doLogin(User user) {
        if (StrUtil.isEmpty(user.getUsername()) || StrUtil.isEmpty(user.getPassword())) {
            return ResResult.failure(ResResultCode.USERNAME_OR_PASSWORD_ERROR);
        }
        // 验证 用户
        RSA rsa = new RSA(privateKey, null);
        String userName = rsa.decryptStr(user.getUsername(), KeyType.PrivateKey);
        QueryWrapper queryWrapper = new QueryWrapper<User>();
        queryWrapper.eq("username", userName);
        User userTemp = this.userService.getOne(queryWrapper);
        if (userTemp == null) {
            return ResResult.failure(ResResultCode.USERNAME_OR_PASSWORD_ERROR);
        }
        //验证 密码
        // 1、私钥解密rsa 加密的密码
        String password = rsa.decryptStr(user.getPassword(), KeyType.PrivateKey);
        // 2、不可逆加密密码,比较数据库密码
        if (!DigestUtil.bcryptCheck(password, userTemp.getPassword())) {
            return ResResult.failure(ResResultCode.USERNAME_OR_PASSWORD_ERROR);
        }

        // 判断用户是否被禁用
        if (userTemp.getLocked().equals(GlobalEnum.STATUS_LOCK.getCode())) {
            return ResResult.failure("该账号不已被禁用!");
        }

        // 验证成功,生成token存进redis
        String token = JwtUtil.sign(userTemp.getUsername(), userTemp.getPassword());
        redisUtil.set(Constant.LOGIN_PREFIX + userTemp.getId(), token, Constant.TOKEN_EXPIRE);

        Map<String, Object> rs = new HashMap<String, Object>(16);
        rs.put("token", token);

        return ResResult.success(rs);
    }
}
之前只是简单进行RSA解码校验,现完善对比数据库用户进行校验用户名和密码是否正确,校验成功生成token存入redis中。解密密方式用hutool提供的 DigestUtil.bcryptCheck()不可逆加密。 对应的加密方式DigestUtil.bcrypt()。
Constant.java常量类
public class Constant {

    /**
     * token过期时间 15分钟
     */
    public final static long TOKEN_EXPIRE = 60 * 15;

    /**
     * 存放token的header名称
     */
    public final static String TOKEN_HERDER_KEY = "Authorization";

    /**
     * token的前缀
     */
    public final static String TOKEN_PREFIX = "Bearer";

    /**
     * redis存储token的key前缀
     */
    public final static String LOGIN_PREFIX = "LOGIN_";

}
编写ShiroRealm
public class ShiroRealm extends AuthorizingRealm {

    @Autowired
    private UserService userService;

    @Autowired
    private RedisUtil redisUtil;

    /**
     * 授权方法
     * @param principalCollection
     * @return
     */
    @Override
    protected AuthorizationInfo doGetAuthorizationInfo(PrincipalCollection principalCollection) {
        return null;
    }

    /**
     * 认证方法
     * @param authenticationToken
     * @return
     * @throws AuthenticationException
     */
    @Override
    protected AuthenticationInfo doGetAuthenticationInfo(AuthenticationToken authenticationToken) throws AuthenticationException {
        // 获取身份信息
        BearerToken bearerToken = (BearerToken) authenticationToken;
        // 去掉token前缀
        String token = bearerToken.getToken();
        token = token.replace(Constant.TOKEN_PREFIX, "").trim();
        // jwt解析token 获取用户名
        String username = JwtUtil.getUsername(token);
        if (StrUtil.isEmpty(username)) {
            throw new AuthenticationException("token invalid");
        }
        // 查询数据库用户是否存在
        QueryWrapper queryWrapper = new QueryWrapper<User>();
        queryWrapper.eq("username", username);
        User user = userService.getOne(queryWrapper);
        if (user == null) {
            throw new AuthenticationException("User didn't existed!");
        }
        //验证token是否合法
        if (!JwtUtil.verify(token, username, user.getPassword())) {
            throw new AuthenticationException("Username or password error");
        }
        // 验证token 是否过期
        String cacheToken = (String) redisUtil.get(Constant.LOGIN_PREFIX + user.getId());
        if (StrUtil.isEmpty(cacheToken) || !StrUtil.equals(cacheToken, token)) {
            throw new AuthenticationException("token invalid");
        }
        //验证通过刷新token 时间
        redisUtil.expire(Constant.LOGIN_PREFIX + user.getId(), Constant.TOKEN_EXPIRE);

        return new SimpleAuthenticationInfo(bearerToken.getToken(), bearerToken.getToken(), "shiroRealm");

    }
}
对所有请求进行拦截校验,请求header是否携带Authorization,没有则抛出异常。校验成功从redis取出token刷新缓存时间。
前端
封装信息弹出
IMessage.js
import { Message, MessageBox } from 'element-ui'

const IMessage = {
    warn: function (str) {
        Message({
            message: str,
            type: 'warning',
            duration: 1500,
            offset: 300
        })
    },
    info: function (str) {
        Message({
            message: str,
            type: 'info',
            duration: 1500,
            offset: 300
        })
    },
    error: function (str) {
        Message({
            message: str,
            type: 'error',
            duration: 1500,
            offset: 300
        })
    },
    success: function (str) {
        Message({
            message: str,
            type: 'success',
            duration: 1500,
            offset: 300
        })
    },
    /*
     * message:提示消息
     * tip:标题
     * callbackFun:回调方法
    */
    confirm: function (message, tip, callbackFun) {
        MessageBox.confirm(message, tip, {
            confirmButtonText: '确定',
            cancelButtonText: '取消',
            type: 'warning'
        }).then(() => {
            callbackFun()
        }).catch(() => {

        })
    }
}

export default IMessage
封装一个工具类,信息提示可以使用这个类
http请求和响应处理
src/utils/ request.js
import axios from 'axios'
import router from '../router'
import store from '@/store'
import { getToken } from '@/utils/auth'
import IMessage from './IMessage'

// create an axios instance
const service = axios.create({
  baseURL: process.env.VUE_APP_BASE_API, // url = base url + request url
  // withCredentials: true, // send cookies when cross-domain requests
  timeout: 5000 // request timeout
})

// request interceptor
service.interceptors.request.use(
  config => {
    // do something before request is sent

    if (store.getters.token) {
      // let each request carry token
      // ['X-Token'] is a custom headers key
      // please modify it according to the actual situation
      config.headers['Authorization'] = getToken()
    }
    return config
  },
  error => {
    // do something with request error
    console.log(error) // for debug
    return Promise.reject(error)
  }
)

// response interceptor
service.interceptors.response.use(
  /**
   * If you want to get http information such as headers or status
   * Please return  response => response
  */

  /**
   * Determine the request status by custom code
   * Here is just an example
   * You can also judge the status by HTTP Status Code
   */
  response => {
    const res = response.data
    // if the custom code is not 200, it is judged as an error.
    if (res.code !== 200) {
      IMessage.error(res.msg || '网络通讯异常,请稍后再试!')
      return Promise.reject(new Error(res.msg || 'Error'))
    } else {
      return res
    }
  },
  error => {
    if (error.response && error.response.status === 401) {
      IMessage.error('登录失效,请重新登录')
      router.replace({
        path: '/login',
        query: { redirect: router.currentRoute.fullPath }
      })
    }
    // else if (error.response && error.response.status === 403) {
    //   router.replace({
    //     path: '/403',
    //     query: { redirect: router.currentRoute.fullPath }
    //   })
    // }
    else {
      IMessage.error('网络通讯异常,请稍后再试!')
    }

    return Promise.reject(error)
  }
)

export default service
- 发送http请求的时候,添加token
config.headers['Authorization'] = getToken() - response返回不是code=200,一律弹出信息。捕获error的时候具体分析响应编码,401跳转到登录页,携带重定向地址。
路由文件
import Vue from 'vue'
import Router from 'vue-router'

Vue.use(Router)

/* Layout */
import Layout from '@/layout'

/**
 * Note: sub-menu only appear when route children.length >= 1
 * Detail see: https://panjiachen.github.io/vue-element-admin-site/guide/essentials/router-and-nav.html
 *
 * hidden: true                   if set true, item will not show in the sidebar(default is false)
 * alwaysShow: true               if set true, will always show the root menu
 *                                if not set alwaysShow, when item has more than one children route,
 *                                it will becomes nested mode, otherwise not show the root menu
 * redirect: noRedirect           if set noRedirect will no redirect in the breadcrumb
 * name:'router-name'             the name is used by <keep-alive> (must set!!!)
 * meta : {
    roles: ['admin','editor']    control the page roles (you can set multiple roles)
    title: 'title'               the name show in sidebar and breadcrumb (recommend set)
    icon: 'svg-name'/'el-icon-x' the icon show in the sidebar
    breadcrumb: false            if set false, the item will hidden in breadcrumb(default is true)
    activeMenu: '/example/list'  if set path, the sidebar will highlight the path you set
  }
 */

/**
 * constantRoutes
 * a base page that does not have permission requirements
 * all roles can be accessed
 */
export const constantRoutes = [
  {
    path: '/',
    redirect: '/login',
  },
  {
    path: '/login',
    component: () => import('@/views/login/index'),
    hidden: true
  },

  // {
  //   path: '/404',
  //   component: () => import('@/views/404'),
  //   hidden: true
  // },

  {
    path: '/dashboard',
    component: Layout,
    children: [{
      path: 'dashboard',
      name: 'Dashboard',
      component: () => import('@/views/dashboard/index'),
      meta: { title: 'Dashboard', icon: 'dashboard' }
    }]
  },

  // {
  //   path: '/example',
  //   component: Layout,
  //   redirect: '/example/table',
  //   name: 'Example',
  //   meta: { title: 'Example', icon: 'el-icon-s-help' },
  //   children: [
  //     {
  //       path: 'table',
  //       name: 'Table',
  //       component: () => import('@/views/table/index'),
  //       meta: { title: 'Table', icon: 'table' }
  //     },
  //     {
  //       path: 'tree',
  //       name: 'Tree',
  //       component: () => import('@/views/tree/index'),
  //       meta: { title: 'Tree', icon: 'tree' }
  //     }
  //   ]
  // },

  // {
  //   path: '/form',
  //   component: Layout,
  //   children: [
  //     {
  //       path: 'index',
  //       name: 'Form',
  //       component: () => import('@/views/form/index'),
  //       meta: { title: 'Form', icon: 'form' }
  //     }
  //   ]
  // },

  // {
  //   path: '/nested',
  //   component: Layout,
  //   redirect: '/nested/menu1',
  //   name: 'Nested',
  //   meta: {
  //     title: 'Nested',
  //     icon: 'nested'
  //   },
  //   children: [
  //     {
  //       path: 'menu1',
  //       component: () => import('@/views/nested/menu1/index'), // Parent router-view
  //       name: 'Menu1',
  //       meta: { title: 'Menu1' },
  //       children: [
  //         {
  //           path: 'menu1-1',
  //           component: () => import('@/views/nested/menu1/menu1-1'),
  //           name: 'Menu1-1',
  //           meta: { title: 'Menu1-1' }
  //         },
  //         {
  //           path: 'menu1-2',
  //           component: () => import('@/views/nested/menu1/menu1-2'),
  //           name: 'Menu1-2',
  //           meta: { title: 'Menu1-2' },
  //           children: [
  //             {
  //               path: 'menu1-2-1',
  //               component: () => import('@/views/nested/menu1/menu1-2/menu1-2-1'),
  //               name: 'Menu1-2-1',
  //               meta: { title: 'Menu1-2-1' }
  //             },
  //             {
  //               path: 'menu1-2-2',
  //               component: () => import('@/views/nested/menu1/menu1-2/menu1-2-2'),
  //               name: 'Menu1-2-2',
  //               meta: { title: 'Menu1-2-2' }
  //             }
  //           ]
  //         },
  //         {
  //           path: 'menu1-3',
  //           component: () => import('@/views/nested/menu1/menu1-3'),
  //           name: 'Menu1-3',
  //           meta: { title: 'Menu1-3' }
  //         }
  //       ]
  //     },
  //     {
  //       path: 'menu2',
  //       component: () => import('@/views/nested/menu2/index'),
  //       name: 'Menu2',
  //       meta: { title: 'menu2' }
  //     }
  //   ]
  // },

  // {
  //   path: 'external-link',
  //   component: Layout,
  //   children: [
  //     {
  //       path: 'https://panjiachen.github.io/vue-element-admin-site/#/',
  //       meta: { title: 'External Link', icon: 'link' }
  //     }
  //   ]
  // },

  // 404 page must be placed at the end !!!
  { path: '*', redirect: '/404', hidden: true }
]

const createRouter = () => new Router({
  // mode: 'history', // require service support
  scrollBehavior: () => ({ y: 0 }),
  routes: constantRoutes
})

const router = createRouter()

// Detail see: https://github.com/vuejs/vue-router/issues/1234#issuecomment-357941465
export function resetRouter() {
  const newRouter = createRouter()
  router.matcher = newRouter.matcher // reset router
}

export default router
路由跳转控制
permission.js文件调整
import router from './router'
import store from './store'
import { Message } from 'element-ui'
import NProgress from 'nprogress' // progress bar
import 'nprogress/nprogress.css' // progress bar style

NProgress.configure({ showSpinner: false }) // NProgress Configuration

const whiteList = ['/login'] // no redirect whitelist

router.beforeEach(async (to, from, next) => {
  // start progress bar
  NProgress.start()

  // 白名单直接跳转 如果是登陆路由,清空用户token
  if (whiteList.indexOf(to.path) !== -1) {
    next()
  } else {
    //验证是否有token, 有token跳转, 无token或token失效跳转登录页
    const token = store.getters.token
    if (token) {
      next();
    } else {
      // await store.dispatch('user/resetToken')
      Message.error('登陆失效,请重新登陆')
      next(`/login?redirect=${to.path}`)
    }
  }
})

router.afterEach(() => {
  // finish progress bar
  NProgress.done()
})
获取到token信息,直接放行跳转。否则跳转到登陆页面,执行登陆操作获取token。
测试
步骤
- 登陆
- 登陆成功将跳到/dashboard路由
- dashboard页面请求后端接口
- token过期后刷新页面,是否跳转登陆页
准备
方便测试把token过期时间改成3分钟
public final static long TOKEN_EXPIRE = 60 * 3;
UserController.java添加一个请求用户列表的接口
    @GetMapping("/listUser")
    @ApiOperation(value = "用户列表")
    public ResResult listUser() {
        List<User> userList =  this.userService.list();
        return ResResult.success(userList);
    }
vue项目api/user.js添加接口
export function userList() {
  return request({
    url: '/user/listUser',
    method: 'get'
  })
}
dashboard页面加载完成的时候去请求这个接口,返回数据打印到控制台
<script>
import { mapGetters } from "vuex";

import { userList } from "@/api/user";

export default {
  name: "Dashboard",
  computed: {
    ...mapGetters(["name"]),
  },

  methods: {
    getUserList() {
      userList().then((res) => {
        console.log(res.data);
      });
    },
  },
  created() {
    this.getUserList();
  },
};
</script>
验证
登陆
直接掉坑里 哈哈!
org.apache.shiro.authc.pam.UnsupportedTokenException: Realm [com.ify.sampleAdmin.shiro.ShiroRealm@784df14b] does not support authentication token [org.apache.shiro.authc.BearerToken@726c27b8]. Please ensure that the appropriate Realm implementation is configured correctly or that the realm accepts AuthenticationTokens of this type.
大概意思是自定义的shiroRealm不支持BearerToken!打断点确认,发现在报错地方:
getSubject(request, response).login(bearerToken);
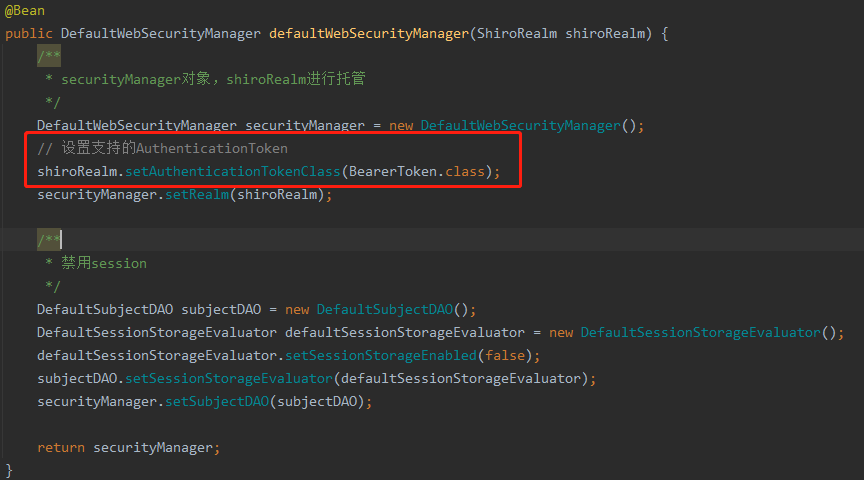
打个断点一步步进去,可以看到一个AuthenticatingRealm类的authenticationTokenClass属性


AuthenticationToken接口实现类有两个,UsernamePasswordToken和BearerToken,如果不进行设置就默认UsernamePasswordToken

问题定位到了就可以解决了,在ShiroConfig.java配置
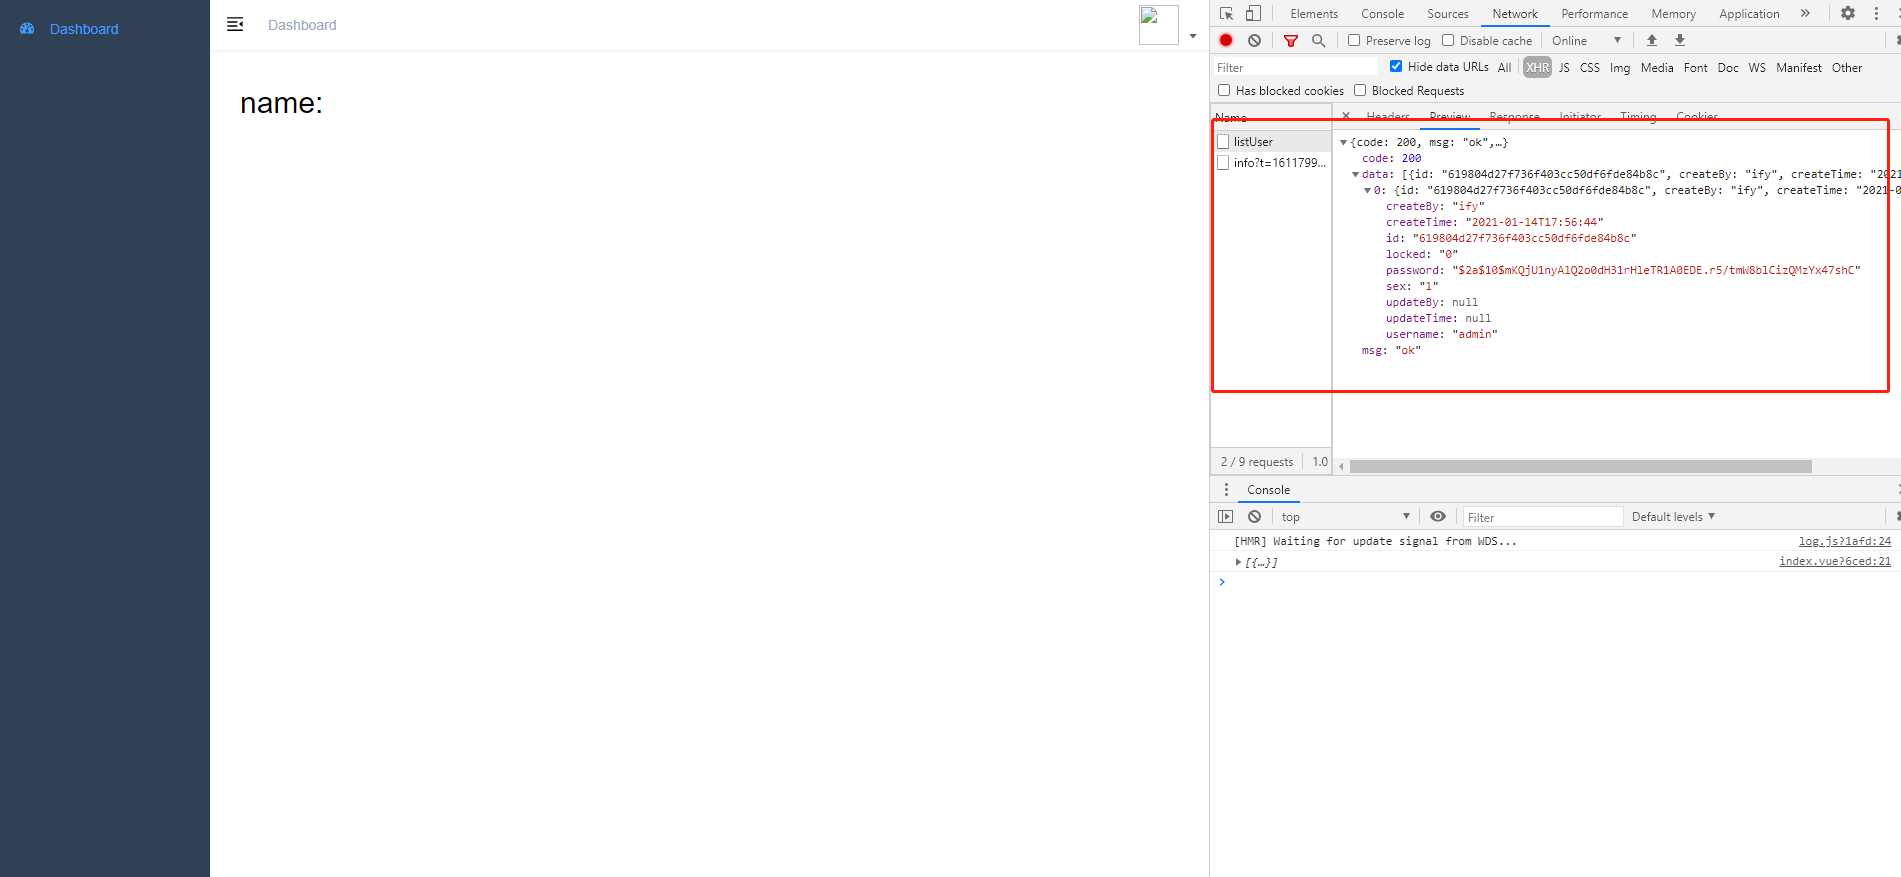
再次尝试,登陆成功,listUser接口也返回数据
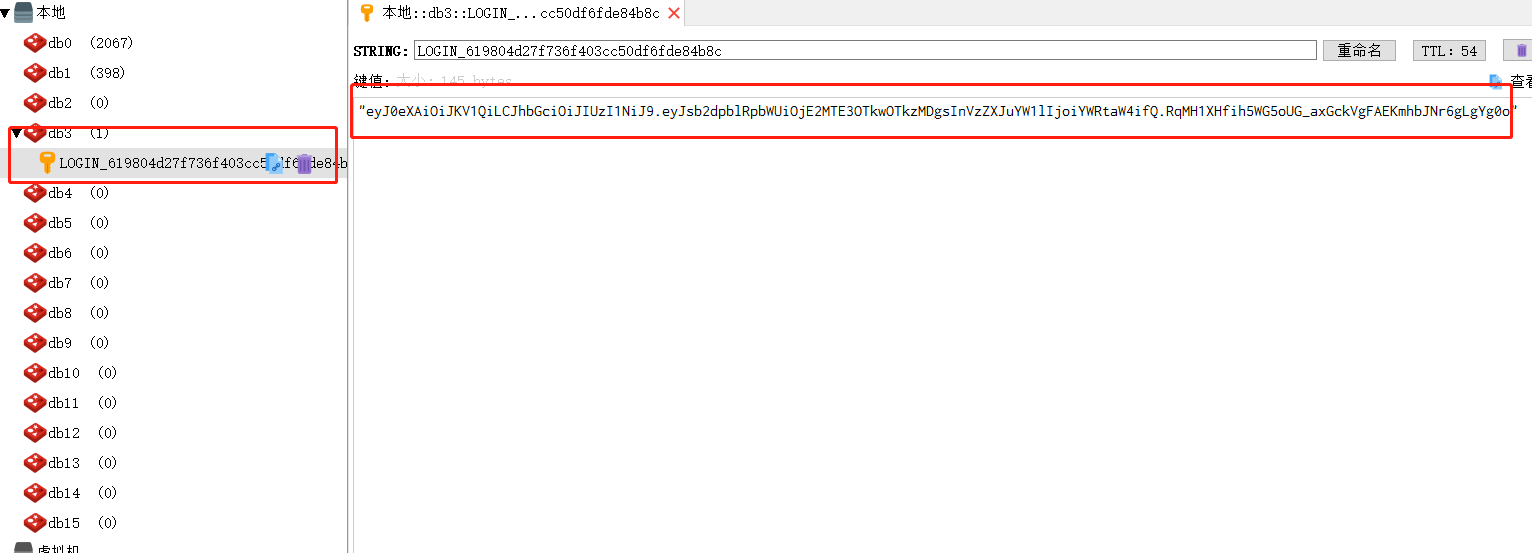
redis里token信息存储进去了。
刷新页面
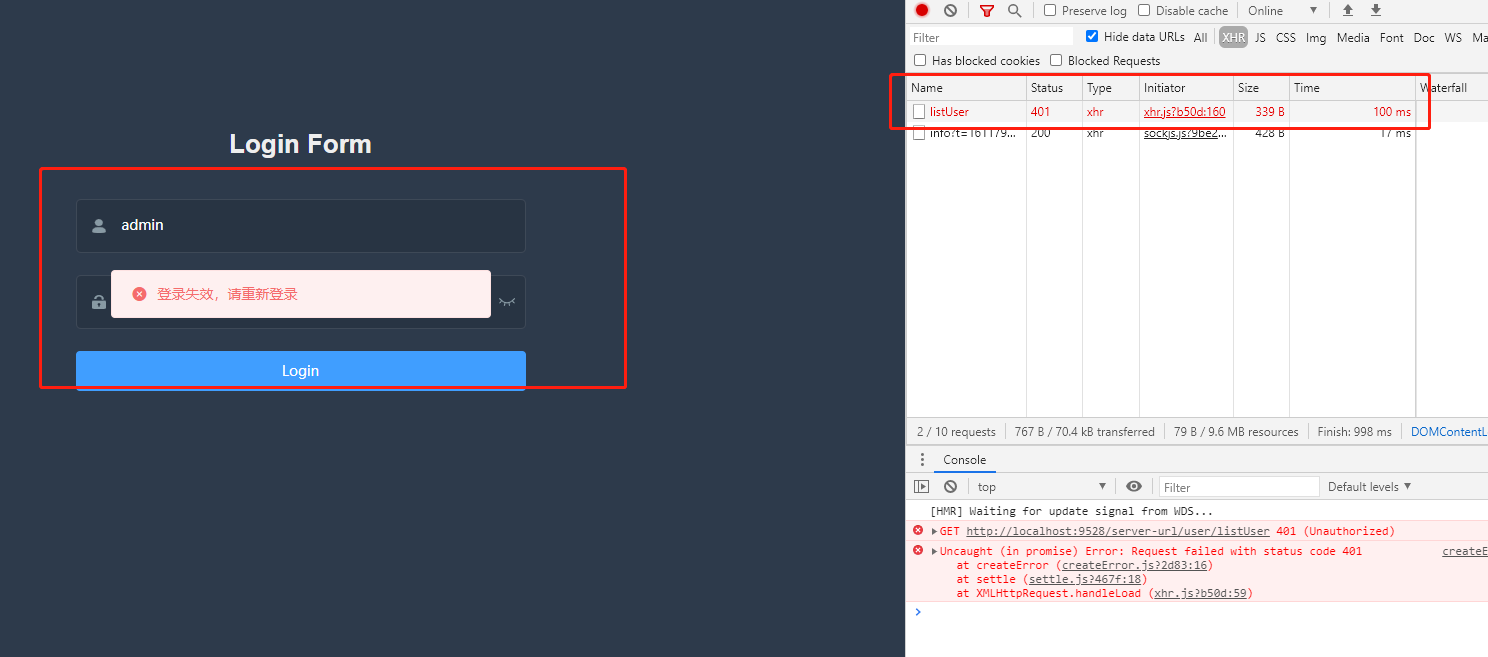
token过期,跳转登陆页,提示重新登陆
总结
这篇文章主要实现用结合shiro + jwt + redis来完善登陆和实现请求身份认证。本来以为会挺顺利的,没想到踩到了一些坑,哈哈哈。


 692
692

 被折叠的 条评论
为什么被折叠?
被折叠的 条评论
为什么被折叠?
 到【灌水乐园】发言


