


本篇主线是做一个坦克大战游戏,其中穿插新的知识点
Java中JFame与JPanel
JFame是一个框架,可以想象成一个窗口
JPanel是一个画板,画板放在框架上,可以画图或其他操作
下图是一个简单的图片表述

代码如下
import javax.swing.*;
import java.awt.*;

class A_DrawCircle extends JFrame{//继承
    public static void main(String[] args) {
        A_DrawCircle aDrawCircle = new A_DrawCircle(); //新建框架new自己
    }

    public A_DrawCircle(){
        this.setSize(200,150);//设窗口大小
        this.setVisible(true);//设窗口可见
        this.setDefaultCloseOperation(JFrame.EXIT_ON_CLOSE);//设窗口关闭时结束程序
        MyPanel myPanel = new MyPanel();//新建一个画板
        this.add(myPanel);//将画板放入框架
    }
}
class MyPanel extends JPanel{//重写其方法
    @Override
    public void paint(Graphics g) {//这个方法在画板加入框架时会被调用
        super.paint(g);//初始画笔
        g.drawOval(1,1,50,50);//画圆形
    }
}
整体逻辑如下
- 创建一个JFame框架
- 在框架的构造器中设置框架属性(大小,可见,关闭结束)
- 给框架添加一个画板对象
- 重写画板的paint方法
- 初始化g的笔,并开始使用它
Paint方法被调用的场景
- 组件第一次显示
- 窗口最小化,再最大化
- 窗口大小发生变化
- repaint方法被调用
Graphics g的方法
此对象是用于画东西,有很多方法,这里不多赘述
image放置位置参考这里
    public void paint(Graphics g) {//这个方法在画板加入框架时会被调用
        super.paint(g);//初始画笔
        g.drawOval(1,1,50,50);//画圆形
        g.drawRect(1,1,10,10);

        g.setColor(Color.BLUE);//给画笔上色
        g.fillRect(20,20,50,50);//填充矩形
        g.setColor(Color.LIGHT_GRAY);
        g.fillOval(50,50,30,50);//填充椭圆

        //图片,需要用Toolkit获取图片/图片需要放在编译后文件所在的根目录
        Image image = Toolkit.getDefaultToolkit().getImage(MyPanel.class.getResource("/wq.jpg"));
        //图片要在Out的production项目下 MYpanel自己的类
        g.drawImage(image,70,10,50,50,this);

        g.setColor(Color.BLACK);
        g.setFont(new Font("正楷",Font.BOLD,13));
        g.drawString("丘比特!!",100,100);//此时是左下角
}
画Tank
/**
* @param x
* @param y
* @param g 画笔
* @param direct 方向
* @param type 坦克类型
*/ public static void DrawTank(int x, int y, Graphics g, int direct, int type)
通过调用这个方法,方法内判断类型,设置颜色
判断方向画出坦克
事件处理
监控键盘按键,对应事件做出相应的处理
让画板实现KeyListener监听器,监听键盘的事件
其中有三个需要实现的方法,并且让框架对象 this.addKeyListener(mp);//因为mp本身实现了KeyListiener接口
窗口JFrame可以监听键盘事件
    @Override //有字符输出时,该方法调用
    public void keyTyped(KeyEvent e) {

    }

    @Override //当某个键按下,该方法触发
    public void keyPressed(KeyEvent e) {

    }

    @Override  //当某个键松开,该方法触发
    public void keyReleased(KeyEvent e) {

    }
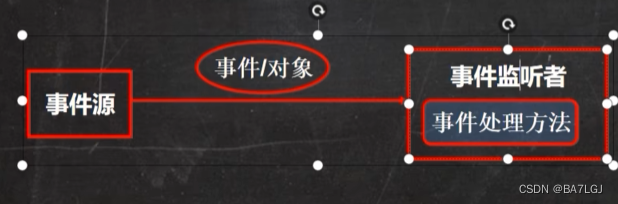
事件处理机制
发生对应的事情调用指定的方法
**事件源 ** 可以产生对象,比如窗口,按钮
事件 事件源发生事件,事前承载事件源状态改变时的对象,当键盘/鼠标/窗口事件发生时,生成一个事件对象,对象保存信息,KeyEvent对象包含按键Code值java.awt.event / javax.swing.event包中包含了各种事件类
事件监听器
事件监听接口
- 当事件源产生一个事件,可以传递给事件
- 事件监听者实际上是一个类,实现了某个事件监听接口,比如MyPanel实现了KeyListener接口,则MyPanel就是一个事件监听者,监听到事件进行处理
- 事件监听者有多种,不同的事件监听者监听不同的事件
多线程
单线程:同一时刻只执行要给线程
多线程:同一时刻多个线程同时运行
并发:同一时刻,多个任务交替执行,但是速度快,给人一种同时运行的错误,单核处理器多任务就是并发
并行:同一时刻,多个任务同时进行,多核cpu可以实现并行。
并行的时候也会出现并发
下面举个例子来体验多线程运行的感觉
首先例子中有一个Cat类,继承Thread线程类,(main中将会调用cat对象的start方法开启新的线程)
并且重写run方法(Thread的run方法实现了Runable接口类),在run方法中循环计时
main类中 实例化一个Cat类并调用对象的start方法(继承Thread的方法),start后自己写一份循环计时
多线程:main开启了了Cat的start方法后(开辟了一个线程),并且继续向下走执行自己的循环即使
cat由于调用了start方法,也开始了自己的计时,两个线程同时运行
ps: 终端中jconsole可以调出线程监控
下面是线程的java代码举例;
package com.hspedu.Thread_;

public class Thread01 {

    public static void main(String[] args) {
        int times = 0;
        Cat cat = new Cat();
        cat.start(); //在这里开启了一个线程
        //同时主线程不停止,继续运行
        while (true) {
            System.out.println("main=" + (++times) + "{" + Thread.currentThread().getName() + "}");
            try {
                Thread.sleep(1000);
            } catch (InterruptedException e) {
                e.printStackTrace();
            }
            if (times == 30) {
                break; // 这里将会结束进程
            }
        }
    }
}


class Cat extends Thread {
    int times = 0;

    @Override
    public void run() {
        super.run();

        while (true) {
            System.out.println("Cat=" + (++times) + "{" + Thread.currentThread().getName() + "}");

            try {
                Thread.sleep(1000);
            } catch (InterruptedException e) {
                e.printStackTrace();
            }

            if (times == 40) {
                break; // 这里将会结束进程
            }
        }
    }
}
此时调用的是start而不是直接调run方法的原因
如果直接调用run方法就是一个串行化的执行,main线程将会执行run方法结束后才会执行下面的代码(串行化)
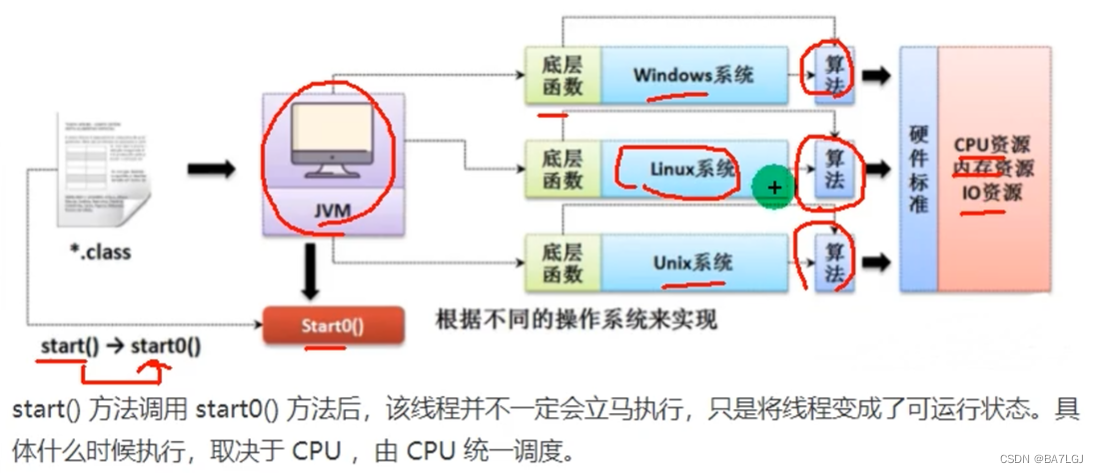
start方法将会调用start0方法private native void start0();是本地方法,jvm机调用
start0方法只是将线程变为可运行,又cpu调动使用
关于Thread.sleep()抛出异常的原因:
假设线程不抛出中断异常的情况,此时线程A睡眠,其他所有的线程将无法唤醒A,因为A对外界没有感知能力。
为什么Sleep会抛出异常
Runable多线程(单继承下多线程的补充)
若一个需要完成多线程的类已经继承了一个父类,又需要做到多线程,此时可以让这个类实现Runnable接口
再new Thread()对象,将多线程对象传入其构造器,通过Thread对象调用start方法完成多线程操作
package com.hspedu.Thread_;

//当类已经继承了其他的类,而又想做到多线程
public class Runnable_ {
    public static void main(String[] args) {
        Dog dog = new Dog();
        Thread thread = new Thread(dog);//新建一个代理对象
        thread.start();//由代理对象调用方法!
    }
}

class Animal {
}

class Dog extends Animal implements Runnable {
    int times = 0;

    @Override
    public void run() {
        while (true) {
            System.out.println("线程" + Thread.currentThread().getName() + "正在运行,Dog汪汪叫了" + (++times) + "次");
            try {
                Thread.sleep(1000);

            } catch (InterruptedException e) {
                e.printStackTrace();
            }
            if (times == 30) {
                break;
            }

        }
    }
}
这里Thread中用到了静态代理设计模式
下面来模拟一下静态代理
先看一下基础的类关系
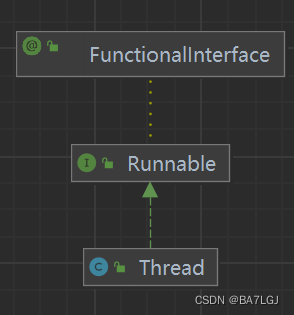
Runnable中只有run方法,想要使用Thread中的start方法,可以通过静态代理模式,将实现了Runnable的目标子类
ThreadProxy和Tiger必须同时实现某个方法
public class Thread02 {
    public static void main(String[] args) {
        Tiger tiger = new Tiger();
        ThreadProxy threadProxy = new ThreadProxy(tiger);
        threadProxy.start();
    }
}

class ThreadProxy implements Runnable{
    Runnable runnable = null;

    public ThreadProxy(Runnable runnable) {
        this.runnable = runnable;
    }

    @Override
    public void run() {
        if (runnable != null){
            runnable.run();
        }
    }

    public void start(){
        start0();
    }
    public void start0(){
        run();
    }

}
继承Thread VS 实现Runnable的区别
Runnable接口更加适合多个线程共享一个资源的 情况,可以创建多个线程,传入同一个对象,同时start
多线程处理单个数据遇到的问题
当多个线程抢一个票源的时候,不对线程进行处理,将会使余票数量为负值(某个时刻两个线程抢了同一张票)
实现Runnable,将一个卖票对象放入多个线程,会超卖
package com.hspedu.Ticket;

public class SellTicket {
    public static void main(String[] args) {
        Sell sell = new Sell();
        Thread thread = new Thread(sell);
        Thread thread1 = new Thread(sell);
        Thread thread2 = new Thread(sell);
        thread.start();
        thread1.start();
        thread2.start();
    }
}


class Sell implements Runnable{
    private static int tickets=100;
    @Override
    public void run() {
        while(true){
            if (tickets >0)
            {
                try {
                    Thread.sleep(50);
                } catch (InterruptedException e) {
                    throw new RuntimeException(e);
                }
                System.out.println("卖出1张" +
                        "\t余票:"+(--tickets));
            }else {
                break;
            }
        }
    }
}

线程终止
- 线程自己结束
- 通过main停止线程
给类设置一个属性,线程监测这个属性是false就结束进程,主进程通过控制属性来让线程结束
package com.hspedu.Thread_;

public class AThread {
    public static void main(String[] args) {
        BThread bThread = new BThread();
        Thread thread = new Thread(bThread);
        Thread thread1 = new Thread(bThread);
        Thread thread2 = new Thread(bThread);
        thread.start();
        thread1.start();
        thread2.start();

        try {
            Thread.sleep(10000);
        } catch (InterruptedException e) {
            throw new RuntimeException(e);
        }
        bThread.setStatus(false);
    }
}

class BThread implements Runnable {
    private boolean status;

    @Override
    public void run() {
        status = true;
        while (status) {
            System.out.println("线程" + Thread.currentThread().getName() + "正在执行");
            try {
                Thread.sleep(50);
            } catch (InterruptedException e) {
                throw new RuntimeException(e);
            }
        }
    }

    public boolean isStatus() {
        return status;
    }

    public void setStatus(boolean status) {
        this.status = status;
    }
}
线程常用方法
- start底层是创新线程调用run方法
- set/get Priority线程优先级范围是 max10 默认5 min1
- interrupt中断线程,是用于中断线程的休眠状态
- sleep 让线程休眠 可能会抛出异常(被唤醒)
- 还有线程的set/get name的方法
package com.hspedu.Thread_;

public class ThreadMethod {
    public static void main(String[] args) {
        Teacher teacher = new Teacher();
        Thread thread = new Thread(teacher);
        System.out.println(thread.getPriority());
        thread.setName("丘比特老师!");
        thread.start();
        System.out.println(thread.getName());
        try {
            Thread.sleep(5000);
        } catch (InterruptedException e) {
            throw new RuntimeException(e);
        }
        thread.interrupt();
    }
}

class Teacher implements Runnable {
    @Override
    public void run() {
        for (int i = 0; i < 100; i++) {
            System.out.println(Thread.currentThread().getName() + "正在运行");
        }

        try {
            System.out.println("睡觉先 轰!20秒");
            Thread.sleep(20000);
        } catch (InterruptedException e) {
            System.out.println(e.getMessage());
        	System.out.println("叫我干什么?");
        }
    }
}
线程常用方法2
- yield静态方法,在并发时先让出一cpu,若资源充足就不让
- join插队 插队的线程一旦插入成功则肯定先执行完插入线程的所有任务再
比如此时cpu在并行运行两个线程,若有一个线程插队,则先只执行这个线程直到完毕 再回来
下面是当main线程达到某个值,让子线程插入运行,结束后再运行主线程
package com.hspedu.Thread_;

import sun.awt.windows.ThemeReader;

public class ThreadJoin {
    public static void main(String[] args) {
        Student student = new Student();
        Thread thread1 = new Thread(student);
        for (int i = 0; i < 20; i++) {
            if (i == 5) {
                try {
                    System.out.println("儿子先自己吃");
                    thread1.start();
                    thread1.join();
                    System.out.println("儿子吃完了爸爸收尾");


                } catch (InterruptedException e) {
                    throw new RuntimeException(e);
                }
            }
            try {
                Thread.sleep(1000);
                System.out.println(Thread.currentThread().getName() + "打工中" + i);
            } catch (InterruptedException e) {
                throw new RuntimeException(e);
            }
        }

    }
}

class Student implements Runnable {
    @Override
    public void run() {
        for (int i = 0; i < 15; i++) {
            try {
                Thread.sleep(1000);
            } catch (InterruptedException e) {
                e.printStackTrace();
            }
            System.out.println("子线程" + Thread.currentThread().getName() + "打工中" + i);
        }
    }
}
用户线程/守护线程
- 用户线程 工作线程,当线程任务结束或通知时结束
- 守护线程 为工作线程服务,当用户线程结束,守护线程自动结束(垃圾回收器)
如何将一个线程设置成守护线程(Daemon),使其无线循环。并且在线程开始之前setDaemon(true);即可,注意是在线程被start之前
线程的生命周期
在Thread.State枚举类中可以看到
- 尚未启动new
- 就绪 ready
- 运行中 runnable
- 线程阻塞中 blocked
- 锁Blocked
- 等待 Waiting
- 超时 TimedWaiting
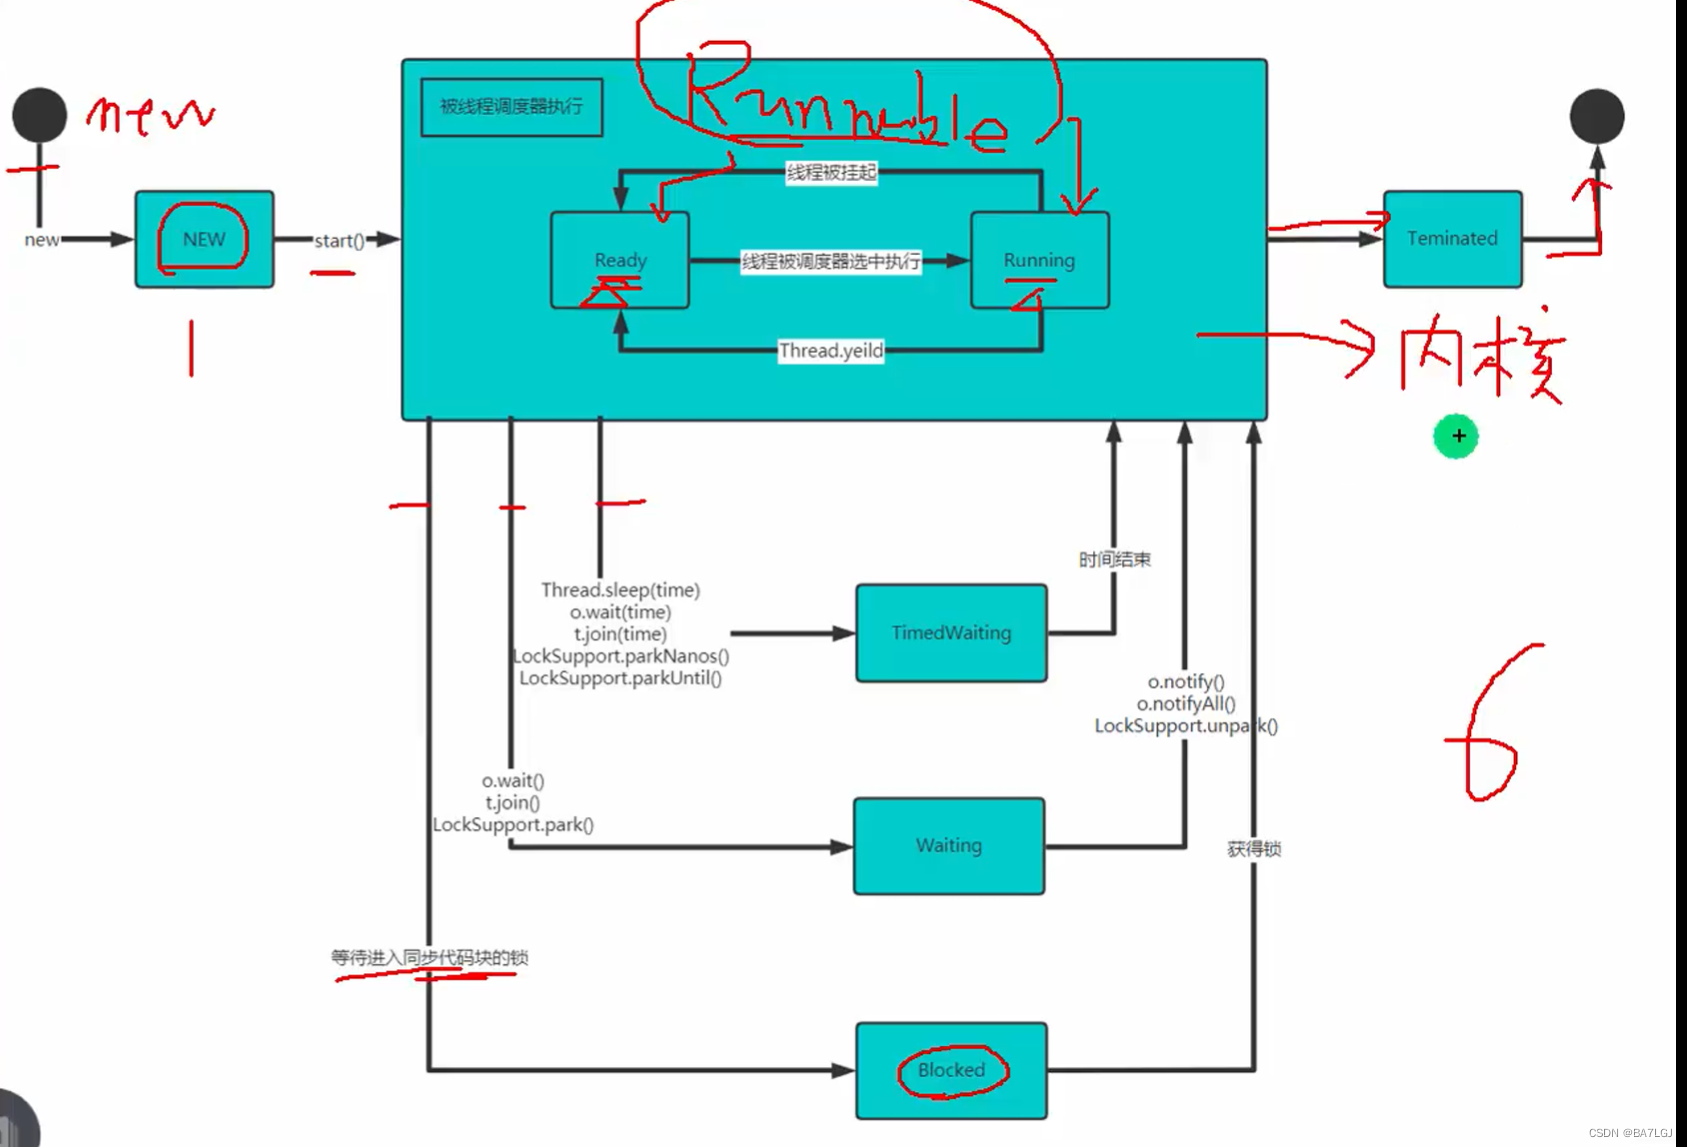
在下面的代码中,不断检测子进程的状态,尝试看到这6种
package com.hspedu.Thread_;
import sun.awt.windows.ThemeReader;
public class ThreadState {
    public static void main(String[] args) {
        T t = new T();
        Thread thread = new Thread(t);
        System.out.println(thread.getState());
        thread.start();
        while (Thread.State.TERMINATED != thread.getState())
        {
            try {
                Thread.sleep(50);
            } catch (InterruptedException e) {
                throw new RuntimeException(e);
            }
            System.out.println(thread.getName() + "状态 =" + thread.getState());
        }
        System.out.println(thread.getName() + "状态 =" + thread.getState());

    }
}

class T implements Runnable{
    @Override
    public void run() {
        while (true){
            for (int i = 0; i < 10; i++) {
                try {
                    Thread.sleep(1000);
                    System.out.println("子线程运行!");
                } catch (InterruptedException e) {
                    throw new RuntimeException(e);
                }
            }
        }
    }
}
Synchronized线程同步
多线程中,一些特殊数据不允许多个线程访问,此时使用同步访问技术,保证该数据在同一时刻,最多有一个线程访问,以保证数据完整!(指定内存地址在同一时刻只会有一个线程操作)
- 将synchronized放在方法声明中,表示整个方法为同步方法(锁单个 方法用)
- 同步代码块 下面互斥锁会演示
下面更新了售票,使用synchronized修饰指定的方法,创新方法的原因是需要让run一直运行
package com.hspedu.Ticket;

public class SellTicket {
    public static void main(String[] args) {
        Sell sell = new Sell();
        Thread thread = new Thread(sell);
        Thread thread1 = new Thread(sell);
        Thread thread2 = new Thread(sell);
        thread.start();
        thread1.start();
        thread2.start();
    }
}


class Sell implements Runnable {
    private static int tickets = 100;
    private static boolean loop = true;

		//此时锁在锁this对象
    private synchronized void sell() {
        if (tickets > 0) {
            try {
                Thread.sleep(50);
            } catch (InterruptedException e) {
                throw new RuntimeException(e);
            }
            System.out.println("卖出1张" +
                    "\t余票:" + (--tickets));
        }else {
            loop =false;
        }
    }

    @Override
    public void run() {
        while (loop) {
            sell();
        }
    }
}
互斥锁
每个对象都有一个互斥锁标记,意味着同一时刻只有一个线程可以访问该对象
- 当修饰静态方法时,锁定的是当前类的 Class 对象
- 当修饰非静态方法时,锁定的是当前实例对象的 this
this对象锁是 非公平锁,a线程拿到后,下次可能还是a抢到锁
同步代码块,拿到某个对象的锁进行操作,同一时刻只有一个线程可以抢到这个锁进行使用,所以只要大家抢的是同一个对象的锁就行了
		// 此时也是锁对象
    private void sell() {
    		// 这里不一定是要锁this,也可锁其他对象(必须是本对象的某个属性的对象)
        synchronized (this) { // 可以放同一个对象属性
            if (tickets > 0) {
                try {
                    Thread.sleep(50);
                } catch (InterruptedException e) {
                    throw new RuntimeException(e);
                }
                System.out.println("卖出1张" +
                        "\t余票:" + (--tickets));
            } else {
                loop = false;
            }
        }
    }


 		//下面是静态方法
 				// 此时也是锁对象
    private static synchronized void sell() {
    		// 这里不一定是要锁this,也可锁其他对象(必须是本对象的某个属性的对象)
        synchronized (当前类名.class) {
            if (tickets > 0) {
                try {
                    Thread.sleep(50);
                } catch (InterruptedException e) {
                    throw new RuntimeException(e);
                }
                System.out.println("卖出1张" +
                        "\t余票:" + (--tickets));
            } else {
                loop = false;
            }
        }
    }
应用互斥锁
- 尽量选择影响范围小的同步代码块
- 需要先分析上锁的代码
- 选择是同步代码块还是同步方法
- 多个线程锁是锁必须同一个对象(不然锁不同的对象,线程操作不同的线程,没有意义),实在不行就要锁类(特殊属性是static)
线程死锁
多个线程都占用了对方的锁资源
两个线程都需要对方的锁,就卡住了
下面程序举例说明了死锁造成的原因,运行一段时间后两线程将会死锁
package com.hspedu.Thread_;

public class DeadLockDemo {
    public static void main(String[] args) {
        DeadLock deadLock1 = new DeadLock(false);
        DeadLock deadLock2 = new DeadLock(true);
        deadLock1.start();
        try {
            Thread.sleep(1);
        } catch (InterruptedException e) {
            throw new RuntimeException(e);
        }
        deadLock2.start();
    }
}
class DeadLock extends Thread{
    static Object o1 = new Object();
    static Object o2 = new Object();
    boolean loop;
    public DeadLock(boolean loop) {
        this.loop = loop;
    }
    @Override
    public void run() {
        while (true){
            if(loop){
                synchronized(o1){
System.out.println(Thread.currentThread().getName()+"线程正在运行1,下一步需要获得o2锁" );
                    synchronized (o2){
System.out.println(Thread.currentThread().getName()+"线程正在运行2,已经获得 02锁" );
                    }
                }
            }else {
                synchronized(o2){
System.out.println(Thread.currentThread().getName()+"线程正在运行3,下一步需要获得o1锁" );
                    synchronized (o1){
System.out.println(Thread.currentThread().getName()+"线程正在运行4,已经获得 01锁" );
                    }
                }
            }
        }
    }
}
执行结果将会卡在下面这一步
Thread-0线程正在运行3,下一步需要获得o1锁
Thread-1线程正在运行1,下一步需要获得o2锁
两线程互掐
释放锁
- 当当前线程的同步代码块或方法结束后
- 在同步代码块或方法中break或return
- 同步代码块或方法中出现了error或exception,导致异常结束
- 线程中执行wait()方法,当前线程暂停,会先释放锁
下面方法不会释放锁
- 程序sleep和yield方法
- 线程执行同步代码块时,其他线程将这个线程挂起,suspend和resume尽量不要用
坦克发射子弹
线程的实际应用,让子弹类实现runnable,创建子弹对象后运行即可
具体 子弹代码如下
public class Shot implements Runnable {
    private int x;
    private int y;
    private int direct;
    private int speed;
    private boolean Live = true;

    public Shot(int x, int y, int direct, int speed) {
        this.x = x;
        this.y = y;
        this.direct = direct;
        this.speed = speed;
    }


    @Override
    public void run() {
        while (Live) {
            try {
                Thread.sleep(100);
            } catch (InterruptedException e) {
                throw new RuntimeException(e);
            }
            switch (direct) {
                case 0:
                    y -= speed;
                    break;
                case 1:
                    x += speed;
                    break;
                case 2:
                    y  += speed;
                    break;
                case 3:
                    x -= speed;
                    break;
            }
            if (x < 0 || x > 1000 || y < 0 || y > 700) {
                Live = false;
                break;
            }
            System.out.println("子弹射击!x=" + x + ",y=" + y);
        }
        System.out.println("子弹线程="+Thread.currentThread().getName()+"终止");
    }

    public int getX() {
        return x;
    }

    public void setX(int x) {
        this.x = x;
    }

    public int getY() {
        return y;
    }

    public void setY(int y) {
        this.y = y;
    }

    public int getDirect() {
        return direct;
    }

    public void setDirect(int direct) {
        this.direct = direct;
    }

    public int getSpeed() {
        return speed;
    }

    public void setSpeed(int speed) {
        this.speed = speed;
    }

    public boolean isLive() {
        return Live;
    }

    public void setLive(boolean live) {
        Live = live;
    }
}
文件操作
保存文件,写入磁盘
java内存 通过 输出流 写入文件
文件 通过 输入流 进入内存
以人为基准,分辨输入输出
常用文件操作
File类线程安全/可对比
new File()此对象有三个构造器
- String 单路径
- File + String 通过已存在的File文件所在的目录+子路径
- String + string 父目录+子目录路径
    public static void createFile(){
        File file = new File("D:\\test.txt");//这里使用的是第一个构造器
        //这里只是将文件对象创建,并没有实际创建对象,需要使用createNewFile创建文件
        try {
        //这里才是实际创建对象,需要使用createNewFile创建文件,会抛出异常
            file.createNewFile();
            System.out.println("文件创建成功");
        } catch (IOException e) {
            throw new RuntimeException(e);
        }
        File file2 = new File(file,"test.txt");//这里使用的是第二个构造器
        File fil3 = new File("D:\\","test2.txt");//这里使用的是第三个构造器


		//常用的属性获得方法
		System.out.println("文件名"+file.getName());
        System.out.println("绝对路径"+file.getAbsolutePath());
        System.out.println("父级目录"+file.getParent());
        System.out.println("文件大小(字节)"+file.length());
        System.out.println("指向的文件/目录是否存在"+file.exists());
        System.out.println("文件?"+file.isFile());
        System.out.println("目录?"+file.isDirectory());

		//删除指定文件
        File file1 = new File(file.getParent(), "test.txt");
        if (file1.exists() && file1.isFile()) { // 判断是否存在,是否是文件
            if (file1.delete()) {
                System.out.println(file1.getName() + "删除成功");
            } else {
                System.out.println(file1.getName() + "删除失败");
            }
        } else {
            System.out.println("文件不存在");
        }

		//连续创建目录
		        String directoryPath = "D:\\demo\\a\\b\\c";
        File file2 = new File(directoryPath);
        if (file2.exists()){
            System.out.println(file2.getAbsolutePath() +
                    "目录已存在");
        }else {
            if (file2.mkdirs()) {
                System.out.println("创建成功");
            }else {
                System.out.println("创建失败");
            }
        }

    }
IO流原理及流分类
Input/Output 用于数据传输 读写文件 网络通讯 声音视频,文件等
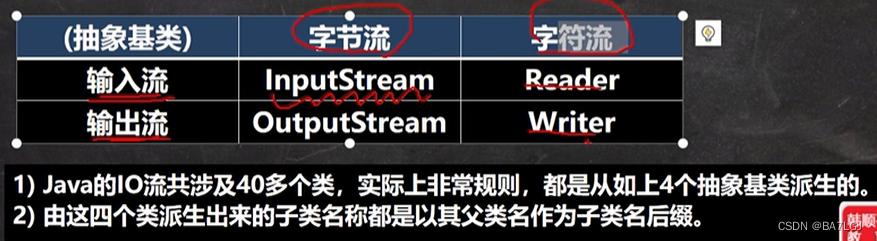
流的分类
按数据单位不同分为
字符流(8bit) 二进制文件常用无损效率稍低 ,字符流(按字符流) 文本文件
按数据流方向 输入 、输出
按流的角色 节点 ,处理流也叫包装流
文件 与 流 的关系
流是将数据运输的过程,文件是一个储存的方式
InputStream字节输入流常用实现子类
FileInputStream 文件字节输入流
FilterInputStream 派生出 BufferedInputStream
ObjectInputStream
FileInputStream
理解:一个 流对象 关联一个文件,就能对这个文件进行操作
有三个构造器
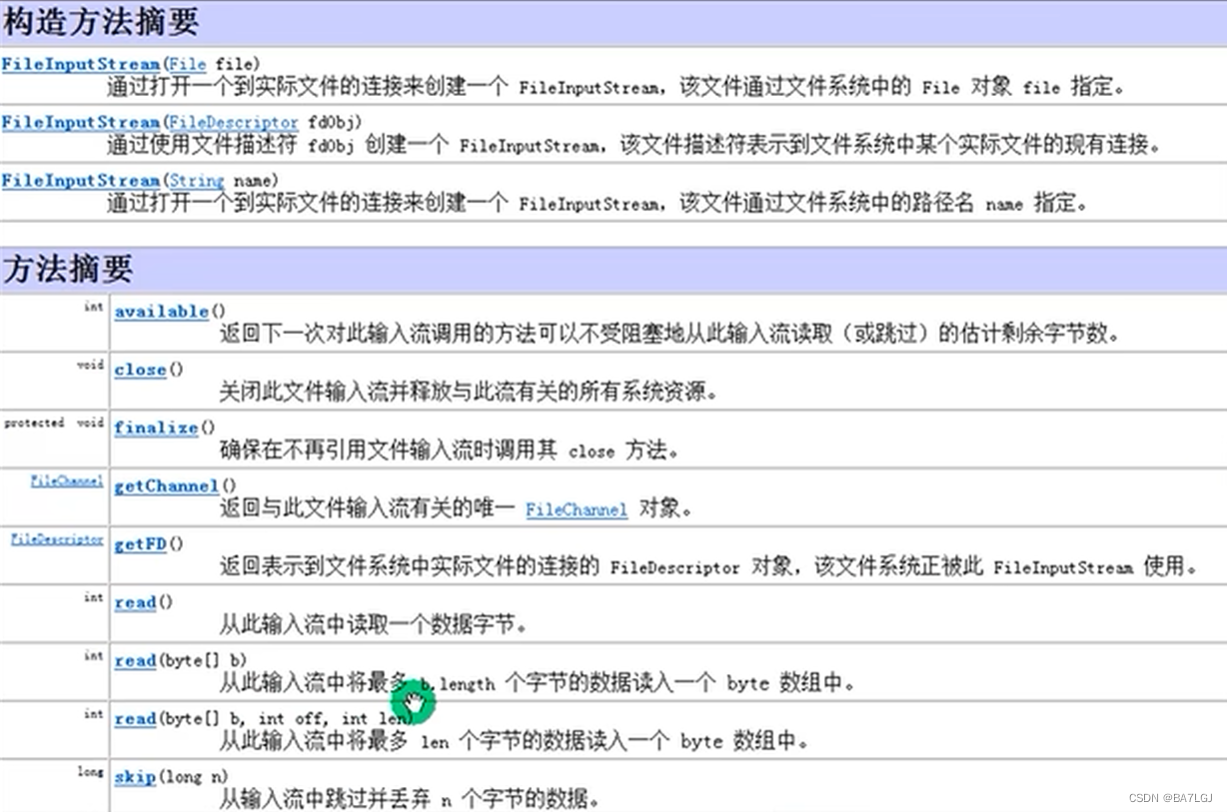
字节流不能用于读取包含中文的内容,会乱码
下面演示使用fileinputStream文件字节输入流的类和方法
注意在带缓存的读取字节流时必须使用下面指定的方法
while ((readline = fileInputStream.read(dataBytes)) != -1) {
System.out.print(new String(dataBytes, 0, readline));
}
不能直接输出缓存的内容
不然有可能在最后一次读取时若长度不足以填满缓存
导致读入上次遗留的数据
	//下面是用read单个字节的方法,效率较低
    public static void main(String[] args) {
        int readData = 0;
        FileInputStream fileInputStream = null;
        try {
            //创建了流对象读取文件
            fileInputStream = new FileInputStream("D:\\test.txt");
            //read读取一个字节数据,如果返回-1则文件读取完毕
            while ((readData = fileInputStream.read()) != -1) {
                System.out.print((char) readData);
            }
        }catch (IOException e) {
            throw new RuntimeException(e);
        }finally {
            //关闭文件流,释放资源
            try {
                fileInputStream.close();
            } catch (IOException e) {
                throw new RuntimeException(e);
            }
        }
    }


		// 下面是指定多少个字节长度缓存读取的例子
		 public static void main(String[] args) {
        FileInputStream fileInputStream = null;
        byte[] dataBytes = new byte[8];
        int readline = 0;
        try {
            //创建了流对象读取文件
            fileInputStream = new FileInputStream("D:\\test.txt");
            //read读取指定缓存大小字节数据,返回值为读取到的byte数组长度,如果返回-1则文件读取完毕
            while ((readline = fileInputStream.read(dataBytes)) != -1) {
                System.out.print(new String(dataBytes, 0, readline));
            }
        }catch (IOException e) {
            throw new RuntimeException(e);
        }finally {
            //关闭文件流,释放资源
            try {
                fileInputStream.close();
            } catch (IOException e) {
                throw new RuntimeException(e);
            }
        }
    }
FileOutputStream 文件字节输出流
- 写构造函数时可以指定输出是覆盖还是续写
- write可以输出单个字节 / 指定字节数组 / 指定字节数组的某几段
    public static void main(String[] args) {
        FileOutputStream fileOutputStream = null;
        try {
            fileOutputStream = new FileOutputStream("D:\\Output.txt", true);
            String s = "hello world\n";
            fileOutputStream.write(s.getBytes());
            System.out.println("写入成功");
        } catch (IOException e) {
            throw new RuntimeException(e);
        } finally {
            try {
                fileOutputStream.close();
            } catch (IOException e) {
                throw new RuntimeException(e);
            }
        }
    }
FileReader / FileWriter字符流
Reader派生出InputStreamReader派生出 FileReader
注意其继承关系
FileReader
构造器通过路径绑定文件
read方法 每次读取单个字符,根据编码方式读取单个字符,末尾-1
read方法(char[]) 每次读取指定长度的字符数组,返回读取字符数量,末尾返回-1
相关需要使用的其他api
new String(char[] ,off,len) 将字符数组指定部分转换为字符串
FileWriter 文件输出流
构造器(file对象/路径,true) 追加方式
write(int)单个字符
write(char[],off,len)/ (string ,off,len)
其他:String类toCharArray 将String转换为char[]
使用对象后必须调用flush或close方法才能真正写入文件
!!!!一定要关流!!!!!
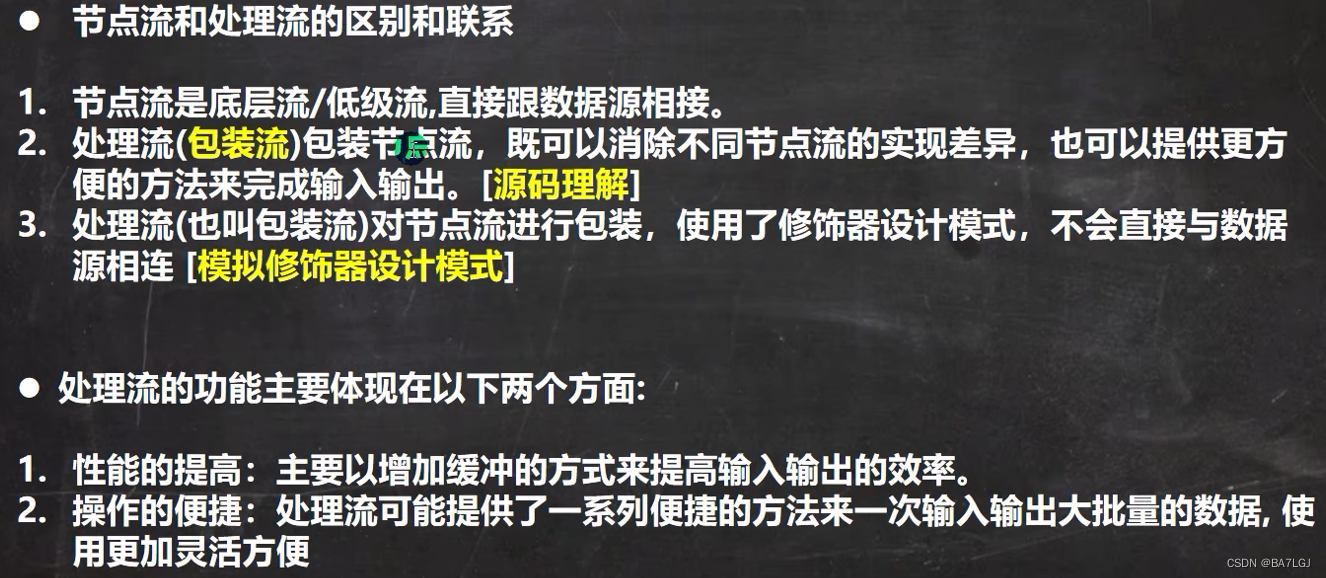
节点流/处理流
- 节点流直接可以对某个 特定的数据源 读写数据 Filereader /writer
灵活性差,功能邵 - 处理流/包装流 对节点流包装,让功能更加强大 BufferedReader
包装流内会预留空间用于 封装 指定节点流的任何子类
比如 BufferedReader包装类可以 封装任何的Reader子类 比如FileReader(此时可以是任意节点流的 数据来源 巧用OOP修饰设计模式)

处理流修饰器设计模式
其实就是两个类,一个基础抽象类,一些实现抽象类的类,一个对实现类 锦上添花,锦上添花可以接收任何基础的的流来源进行优化,增加更多功能,但锦上添花自己不做基础的功能,只是调用
处理流好处
- 可以做到缓存
- 大量操作便捷
BufferedReader/Writer
都属于字符流,尽量操作文本文件,关闭时只需要关闭外层处理流流即可,包装流的close中包含了对节点流的关闭
不要操作二进制文件,不然会损坏
   public static void main(String[] args) {
        BufferedWriter bufferedWriter = null;
        try {
            bufferedWriter = new BufferedWriter(new FileWriter("E:\\fakeKey.txt", true));
            bufferedWriter.write("你好啊!\t韩顺平!");
            bufferedWriter.newLine();//根据对应!系统换行,最好不要用\n!
        } catch (IOException e) {
            throw new RuntimeException(e);
        }finally {
            try {
                bufferedWriter.close();
            } catch (IOException e) {
                throw new RuntimeException(e);
            }
        }
    }
BufferedInputStream / OutputStream 字节包装流
InputStream 派生 FilterInputStream(在此创字段存放节点流) 派生 BufferedInputStream
下图展现了out的类继承图,可以看到存放节点流的位置是在filter过滤器中,并且本身有buf的缓存空间
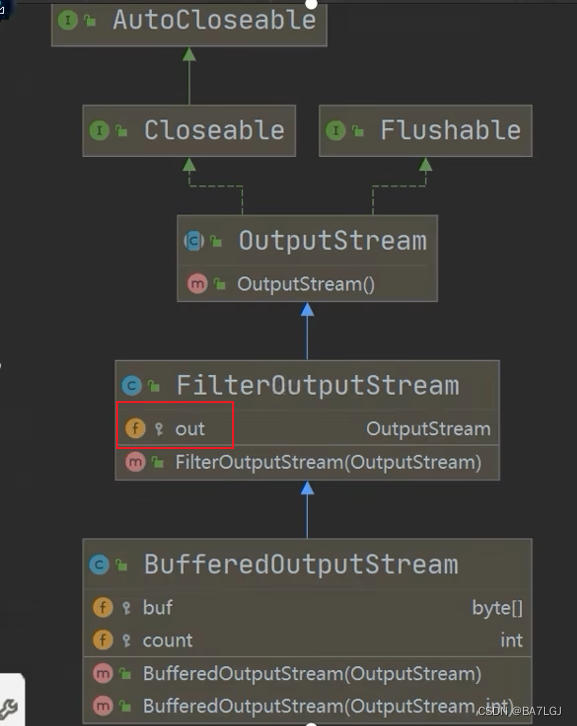
BufferedOutputStream的构造器将传入的 节点流 存入父类的filter中
对象流
数据 保存为文件时 需要同时保存到数据类型,让程序读取时自动加载出对应的数据类型
对应也需要保存 自定义对象的属性 的值和数据类型
保存这个过程叫序列化
反序列化,恢复 数据类型和值
若对象需要支持序列化则需要实现下列两接口之一
- Serializable (是一个标记接口,没有任何方法)
- Externalizable 有方法需要实现,因此一般使用上面的第一个接口
ObjectOutputStream 处理流提供序列化功能
ObjectInputStream 提供反序列化功能
Object处理流
- 依然是使用修饰器设计模式
可以传入OutputStream的子对象
序列化后保存的文本格式是按照一种特殊文件保存的,后缀无所谓
读取时(反序列化)需要和保存数据的顺序一致,读取时返回值并不会恢复成原来的数据类型(若是自定义类型,则需要让读取时反序列化的代码能够访问 自定义类型)
若需要在反序列化后读取调用对象方法,需要向下转型(若要向下转型,则必须要可以访问到 自定义数据类型 的类)
序列化需要注意的细节
- 读写的顺序要一致
- 需要实现支持序列化的接口Serializable
- 序列化的类中需要添加SerialVersionUID ,提高版本兼容性
private static final long serialVersionUID 序列化版本号,可以提高序列化的兼容性,读取到这个值,可以调用到 - 序列化属性不包括static/transient
- 序列化具有继承性,父类支持子类也支持
- 序列化对象时,内属性也需要实现序列化接口,比如Person的name String就必须是支持序列化的,不然会报错
标准输入输出流
标准输入是键盘 System.in class java.io.BufferedInputStream
标准输出是屏幕 System.out class java.io.PrintStream
- System.out.println 这里的out代表的是标准的输出流
- Scanner(System.in) 这里的in代表是标准输入流
转换流 字节转字符
可以将字节流转换为字符流
InputStreamReader仍然属于字符流,是Reader的子类
重要的构造器(InputStream,Charset)可以将字节流指定编码转换为字符流
OutputStreamWriter仍然是字符流, 是Writer的子类
重要的构造器(OutputStream,Charset)可以将字节流指定编码转换为字符流
将一个文本文件用字节流打开发现 中文乱码,现在可以将读入的字节流转换为字符流
默认情况下,BufferReader打开是用UTF-8
当文件打开编码方式错误是错误的就会乱码
编码格式UTF-8
目的:FileInputStream转换为字符流,指定编码gbk/utf-8
打印流
打印流只有输出流没有输入流
PrintStream OutputStream的子类
PrintWriter Writer的子类
可以定义系统的输出的位置
public class SysOut {
    public static void main(String[] args) throws FileNotFoundException {
        System.setOut(new PrintStream("D:\\Downloads\\test.txt"));
        System.out.println("哈哈哈hello,你好");
    }
}
Properties类
父类是HashTable
写配置文件的常用类
load 将配置文件键值加载到对象
list 将数据显示到指定设备
getProperty(key)根据键获取值
setProperty 增加 相同就覆盖
store将properties类中的键值存储,如果包含中文会转换为unicode编码
- properties的值中不能放其他数据类型,只能放String类
IO流应用坦克大战
- 防止敌人坦克重叠运动
遍历敌人每一个坦克,分当前坦克4种方向/上下左右,分别每一个方向遇到敌人坦克的两种形态 横/竖 ,每一个组合都需要判定4种方向的车头两个点,不能到其他坦克所在范围内,若有,则该方向不能移动 - 记录玩家成绩,存盘退出
利用io流写文件 - 记录敌人坦克坐标,存盘退出
用io流写文件,内容是x y direct三个数值 - 玩游戏时,选新开还是继续
bgm使用了现成的类
调用时需要是wav格式,若格式不对则需要转换,不能改文件后缀名!


 928
928


 到【灌水乐园】发言


