


 本文详细介绍Spring框架的基础使用,包括POJO类的创建、Spring配置文件的编写、依赖注入和自动注入的实现过程。通过具体示例展示了如何在Spring中配置Bean,实现属性的注入,以及不同类型的依赖注入方式。
一:创建pojo。
1:在src目录下新建包:pojo。
2:在pojo包下新建pojo类:People
package pojo;

public class People {
	int id;
	String name;
	public int getId() {
		return id;
	}
	public void setId(int id) {
		this.id = id;
	}
	public String getName() {
		return name;
	}
	public void setName(String name) {
		this.name = name;
	}
	public People() {
		super();
	}
	public People(int id, String name) {
		super();
		this.id = id;
		this.name = name;
	}
	@Override
	public String toString() {
		// TODO Auto-generated method stub
		return id+"-->"+name;
	}

}
3:在pojo包下新建pojo类:PeopleUtil
package pojo;

import java.util.ArrayList;
import java.util.HashMap;
import java.util.HashSet;

public class PeopleUtil {
	ArrayList<String> list;
	HashSet<String> set;
	HashMap<Integer,String> map;
	String array[];
	public ArrayList<String> getList() {
		return list;
	}
	public void setList(ArrayList<String> list) {
		this.list = list;
	}
	public HashSet<String> getSet() {
		return set;
	}
	public void setSet(HashSet<String> set) {
		this.set = set;
	}
	public HashMap<Integer, String> getMap() {
		return map;
	}
	public void setMap(HashMap<Integer, String> map) {
		this.map = map;
	}
	public String[] getArray() {
		return array;
	}
	public void setArray(String[] array) {
		this.array = array;
	}
	@Override
	public String toString() {
		// TODO Auto-generated method stub
		for(String attribute : list) {
			  System.out.println(attribute);
		}

		System.out.println("--------------------");

		for(String attribute : set) {
			  System.out.println(attribute);
		}

		System.out.println("--------------------");

		for(String attribute : array) {
			  System.out.println(attribute);
		}

		System.out.println("--------------------");

		for (Integer attribute : map.keySet()) {
			   System.out.println(attribute + "-->" + map.get(attribute));
		}
		return "";
	}

}
二:配置Spring
在src目录下新建文件:applicationContext.xml,并进行如下配置:
<?xml version="1.0" encoding="UTF-8"?>
<beans
xmlns="http://www.springframework.org/schema/beans"
xmlns:xsi="http://www.w3.org/2001/XMLSchema-instance"
xsi:schemaLocation="http://www.springframework.org/schema/beans
http://www.springframework.org/schema/beans/spring-beans.xsd">
<!-- id 表示获取到对象标识
class 创建哪个类的对象
-->

	<!-- 以下是数据赋值(注入) -->

	<!-- 基本数据类型或String等简单的赋值 -->
	<bean id="peo1" class="pojo.People">
		<property name="id" value="123"></property>
		<property name="name" value="张三"></property>
	</bean>
	<!-- 此赋值等效于 以上-->
	<bean id="peo2" class="pojo.People">
		<property name="id">
			<value>123</value>
		</property>
		<property name="name">
			<value>李四</value>
		</property>
	</bean>

	<!-- 如果属性是容器 -->
	<bean id="peo3" class="pojo.PeopleUtil">
		<!-- 如果属性是List -->
		<property name="list">
			<list>
				<value>张三</value>
				<value>李四</value>
				<value>王五</value>
				<value>赵六</value>
			</list>
		</property>
		<!-- 如果属性是Set -->
		<property name="set">
			<set>
				<value>张三</value>
				<value>李四</value>
				<value>王五</value>
				<value>赵六</value>
			</set>
		</property>
		<!-- 如果属性是Map -->
		<property name="map">
			<map>
				<entry key="1" value="张三"></entry>
				<entry key="2" value="李四"></entry>
				<entry key="3" value="王五"></entry>
				<entry key="4" value="赵六"></entry>
			</map>
		</property>
		<!-- 如果属性是数组 -->
		<property name="array">
			<array>
				<value>张三</value>
				<value>李四</value>
				<value>王五</value>
				<value>赵六</value>
			</array>
		</property>
		<!-- 如果属性是Properties
		<property name="demo">
		 	<props>
		 		<prop key="key1">value1</prop>
		 		<prop key="key2">value2</prop>
		 	</props>
		</property>
		 -->
	</bean>
</beans>
三:测试Spring框架的使用
1:在src目录下新建包:mainTest
2:在mainTest包下新建主类:MainTest
package mainTest;

import org.springframework.context.ApplicationContext;
import org.springframework.context.support.ClassPathXmlApplicationContext;


import pojo.PeopleUtil;
import pojo.People;
public class MainTest {

	public static void main(String[] args) {
		// TODO Auto-generated method stub
		ApplicationContext ac = new ClassPathXmlApplicationContext("applicationContext.xml");

		People people1 = ac.getBean("peo1",People.class);
		System.out.println(people1);

		System.out.println("--------------------");

		People people2=ac.getBean("peo2",People.class);
		System.out.println(people2);

		System.out.println("--------------------");

		PeopleUtil people3=ac.getBean("peo3",PeopleUtil.class);
		System.out.println(people3);
	}

}
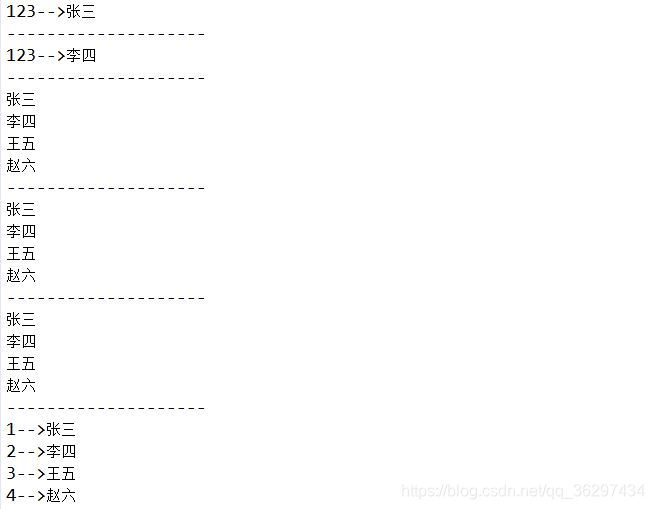
3:运行MainTest,结果如下:
四:依赖注入(DI)
1:DI是Spring的核心功能之一,当一个类(A)需要依赖另一个类(B),把B赋值给A的过程就是依赖注入。
2:代码体现如下
<!-- 以下是依赖注入 -->
	<bean id="peo4" class="pojo.People">
		<property name="desk" ref="desk"></property>
	</bean>

	<bean id="desk" class="pojo.Desk">
		<property name="id" value="123"></property>
		<property name="price" value="100"></property>
	</bean>
五:自动注入(新建一个项目)
首先,自动注入必须是依赖注入
1:bean标签的autowire属性
该属性有五个取值
(1):default
该属性值表示按照全局默认的注入方式(default-autowire),全局默认为no
(2):no
该属性值表示不进行自动注入
(3):byName
通过属性名进行自动注入,即property子标签的name属性=ref属性
(4):byType
通过属性类型进行自动注入,即property子标签的name属性类型=ref属性类型
(5):constructor
被注入的类必须有对应属性的构造函数,而且被该构造函数的参数必须要与注入类bean的id相等
2:项目实验
(1)新建一个包pojo,在包下新建类Teacher,People
(a):Teacher类
package pojo;

public class Teacher {

}
(b):People类
package pojo;

public class People {
	private Teacher teacher;

	public People(Teacher teacher) {
		super();
		this.teacher = teacher;
	}

	public Teacher getTeacher() {
		return teacher;
	}

	public void setTeacher(Teacher teacher) {
		this.teacher = teacher;
	}

}
(2):在src目录下新建applicationContext.xml配置文件
<?xml version="1.0" encoding="UTF-8"?>
<beans
xmlns="http://www.springframework.org/schema/beans"
xmlns:xsi="http://www.w3.org/2001/XMLSchema-instance"
xsi:schemaLocation="http://www.springframework.org/schema/beans
http://www.springframework.org/schema/beans/spring-beans.xsd"
default-autowire="byName">
<!-- id 表示获取到对象标识
class 创建哪个类的对象
-->
<!--
	<bean id="teacher" class="pojo.Teacher"></bean>
	<bean id="people" class="pojo.People" autowire="byName"></bean>
-->
	<bean id="teacher1" class="pojo.Teacher"></bean>
	<bean id="people1" class="pojo.People" autowire="byType"></bean>
<!--
	<bean id="teacher2" class="pojo.Teacher"></bean>
	<bean id="people2" class="pojo.People" autowire="constructor"></bean>
-->
</beans>
(2)新建包mainTest,在包下新建主类MainTest
package mainTest;

import org.springframework.context.ApplicationContext;
import org.springframework.context.support.ClassPathXmlApplicationContext;

import pojo.People;
public class MainTest {

	public static void main(String[] args) {
		// TODO Auto-generated method stub
		ApplicationContext ac = new ClassPathXmlApplicationContext("applicationContext.xml");

//		People people = ac.getBean("people",People.class);
//		System.out.println(people.getTeacher());

		People people1 = ac.getBean("people1",People.class);
		System.out.println(people1.getTeacher());
//
//		People people2 = ac.getBean("people2",People.class);
//		System.out.println(people2.getTeacher());
	}

}
(3)运行MainTest如下


 462
462

 被折叠的 条评论
为什么被折叠?
被折叠的 条评论
为什么被折叠?
 到【灌水乐园】发言


