


 本文介绍如何在苹果广告平台上通过生成公钥、私钥来获取clientId、teamId及keyId,并利用Java代码实现JWT令牌的创建过程,最终获得OAuth token以完成客户端认证。
苹果广告后台获取clientId、teamId、keyId
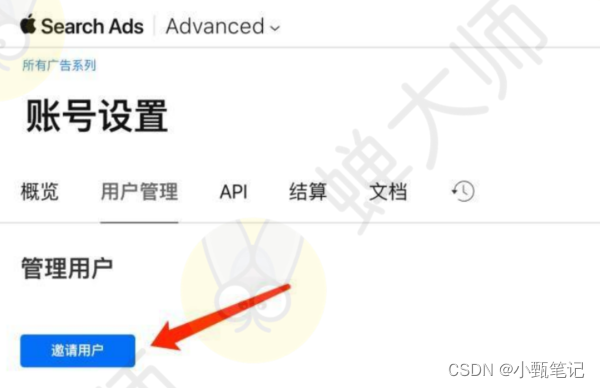
广告账户管理员邀请用户并且授予相应权限,填写用户姓名、姓氏、AppleId并选择需要授予的权限,受邀请用户会收到一封带有安全代码的电子邮件,用户根据邮件激活码激活账户
生成对应的公钥、私钥
上传公钥,生成对应的clientId、teamId、keyId
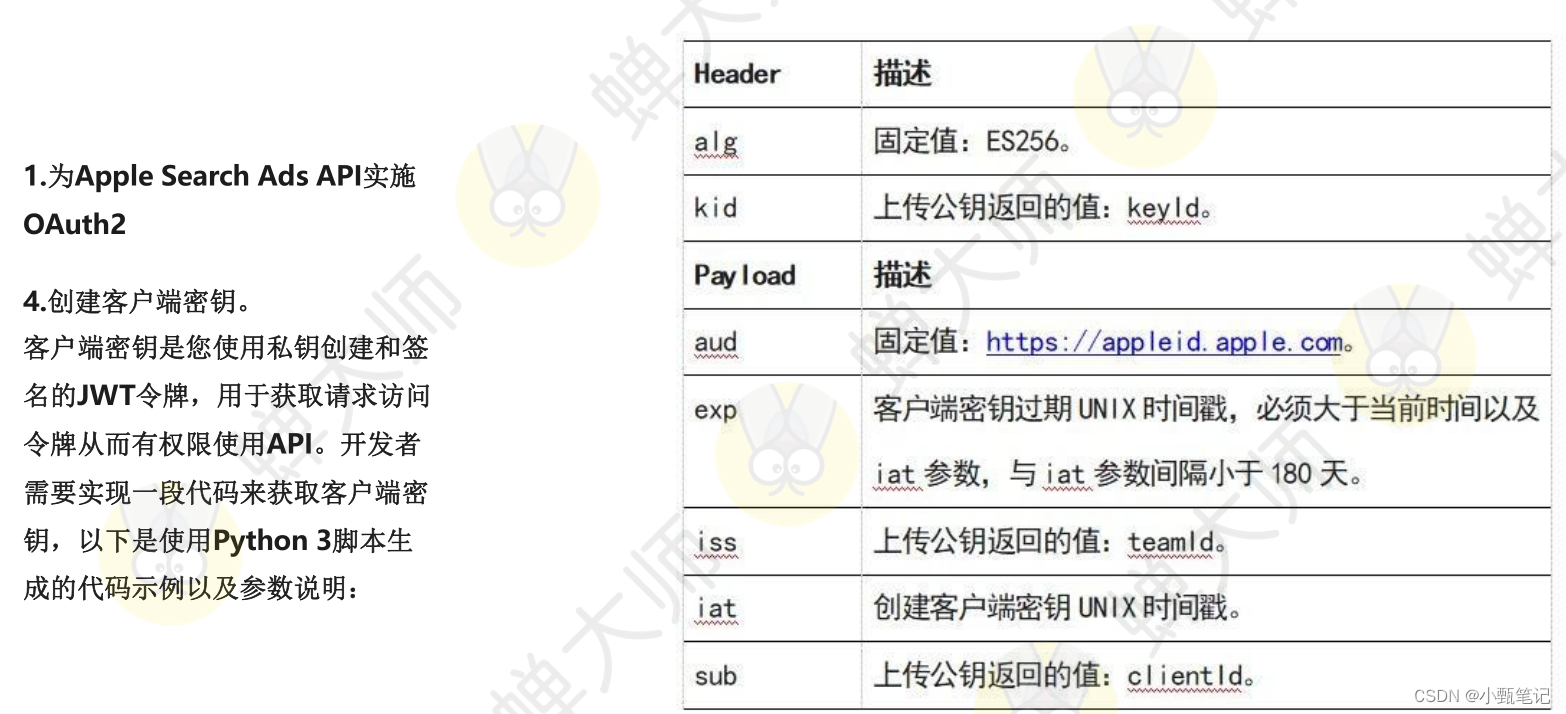
生成客户端秘钥(JWT令牌)、并且获取token
java代码实现:
<dependency>
    <groupId>io.jsonwebtoken</groupId>
    <artifactId>jjwt</artifactId>
    <version>0.9.1</version>
</dependency>
@Override
public String getOAuthToken() {

    PrivateKey privateKey = jwtUtil.loadPrivateKey("私钥");
    String keyId = "";
    String teamId = "";
    String clientId = "";
    String audience = "https://appleid.apple.com";

    JwtParamsReqDto JwtParams = new JwtParamsReqDto();
    JwtParams.setId(keyId);
    JwtParams.setIssuer(teamId);
    JwtParams.setSubject(clientId);
    JwtParams.setSigningKey(privateKey);
    JwtParams.setAudience(audience);
    try {
        // 拿到secret去获取token
        String secret = jwtUtil.createJWT(JwtParams);
        return asaClientHttp.getToken(clientId, secret);
    } catch (IOException e) {
        e.printStackTrace();
    }
    return null;
}

// 以下为获取token
public String getToken(String clientId, String clientSecret)
            throws IOException {
    CloseableHttpClient httpClient = HttpClients.createDefault();

    String url = "https://appleid.apple.com/auth/oauth2/token?";
    HttpPost httpPost = new HttpPost(url);

    // 设置请求的header
    httpPost.addHeader("Content-Type", "application/x-www-form-urlencoded;charset=utf-8");

    // 设置请求的参数
    List<NameValuePair> nvps = new ArrayList<NameValuePair>();
    nvps.add(new BasicNameValuePair("client_id", clientId));
    nvps.add(new BasicNameValuePair("client_secret", clientSecret));
    nvps.add(new BasicNameValuePair("grant_type", "client_credentials"));
    nvps.add(new BasicNameValuePair("scope", "searchadsorg"));

    httpPost.setEntity(new UrlEncodedFormEntity(nvps, "utf-8"));

    // 执行请求
    HttpResponse response = httpClient.execute(httpPost);

    // 打印执行结果
    String resp = EntityUtils.toString(response.getEntity(), "utf-8");

    LOGGER.info("http : {}  ,and response {}", url, resp);
    return resp;
}
JWT工具类
import io.jsonwebtoken.JwtBuilder;
import io.jsonwebtoken.Jwts;
import io.jsonwebtoken.SignatureAlgorithm;
import org.springframework.stereotype.Component;

import java.security.KeyFactory;
import java.security.NoSuchAlgorithmException;
import java.security.PrivateKey;
import java.security.PublicKey;
import java.security.spec.InvalidKeySpecException;
import java.security.spec.PKCS8EncodedKeySpec;
import java.security.spec.X509EncodedKeySpec;
import java.util.Base64;
import java.util.Date;

@Component
public class JwtUtil {

    //Sample method to construct a JWT
    public String createJWT(JwtParamsReqDto jwtParams) {

        //The JWT signature algorithm we will be using to sign the token
        SignatureAlgorithm signatureAlgorithm = SignatureAlgorithm.ES256;

        long nowMillis = System.currentTimeMillis();
        Date now = new Date(nowMillis);

        //We will sign our JWT with our ApiKey secret
        // byte[] apiKeySecretBytes = DatatypeConverter.parseBase64Binary(apiKey.getSecret());
        // Key signingKey = new SecretKeySpec(apiKeySecretBytes, signatureAlgorithm.getJcaName());
        // SecretKey key = Keys.hmacShaKeyFor(Decoders.BASE64.decode(secretString));

        long expMillis = nowMillis + jwtParams.getTtlMillis();
        Date exp = new Date(expMillis);
        //Let's set the JWT Claims
        JwtBuilder builder = Jwts.builder()
                .setId(UUID.randomUUID().toString())//1. 这个是JWT的唯一标识,一般设置成唯一的,这个方法可以生成唯一标识
                .setIssuedAt(new Date())
                .setSubject(jwtParams.getSubject())//2. 签发人,也就是JWT是给谁的
                .setAudience(jwtParams.getAudience())
                .setIssuer(jwtParams.getIssuer())
                .signWith(signatureAlgorithm,jwtParams.getSigningKey())//3.这个地方是生成jwt使用的算法和秘钥
                .setExpiration(exp);

        //Builds the JWT and serializes it to a compact, URL-safe string
        return builder.compact();
    }

    public PrivateKey loadPrivateKey(String privateKeyStr) {
        try {
            final PKCS8EncodedKeySpec keySpec = new PKCS8EncodedKeySpec(Base64.getDecoder().decode(privateKeyStr));
            return KeyFactory.getInstance("EC").generatePrivate(keySpec);
        } catch (NoSuchAlgorithmException | InvalidKeySpecException e) {
            throw new BizException("500", e.getMessage());
        }
    }

    public PublicKey loadPublicKey(String publicKeyStr) {
        try {
            return KeyFactory.getInstance("EC")
                    .generatePublic(new X509EncodedKeySpec(Base64.getDecoder().decode(publicKeyStr)));
        } catch (NoSuchAlgorithmException | InvalidKeySpecException e) {
            throw new BizException("500", e.getMessage());
        }
    }
}


 646
646

 被折叠的 条评论
为什么被折叠?
被折叠的 条评论
为什么被折叠?
 到【灌水乐园】发言


