


文章目录
1、可以防止恶意注册、破解密码、刷票、论坛灌水
2、有效防止某个黑客对某一个特定注册用户用特定程序暴力破解方式进行不断的登陆尝试
一、Awt 实现字符验证码的生成
我们要实现在一个矩形框内生成几个随机字符的验证码,其本质是一张小图片,我们在我们的内存中通过AWT相关函数,绘制好验证码的图片,最后把图片输出给我们的response,用于在网页上显示。
1、随机颜色生成
通过Random对象产生随机数作为颜色的rgb值,以此来生成随机颜色,生成的随机颜色可作为后续字符和背景的颜色。
下面函数的参数fc为rgb的最小取值,bc为rgb的最大量。
public static Color getRandomColor(int fc, int bc) {
    Random random = new Random();
    // 随机颜色,Color(red, green, blue)   0-255
    if(fc > 255) fc = 255;
    if(bc > 255) bc = 255;
    int r = fc + random.nextInt(bc - fc);
    int g = fc + random.nextInt(bc - fc);
    int b = fc + random.nextInt(bc - fc);
    return new Color(r, g, b);
}
2、随机字符生成
从26个英文字母和10个阿拉伯数字中随机生成一个字符。
private static char randomChar() {
    // 1. 定义验证码需要的字母和数字
    String string = "QWERTYUIOPLKJHGFDSAZXCVBNM0123456789";
    // 2. 随机抽取字符
    Random random = new Random();
    return string.charAt(random.nextInt(string.length()));
}
3、生成随机字符的验证码
通过 BufferImage 对象在内容中创建图片缓存区,利用绘制对象 Graphics2D 在缓存区上绘制文字,最后以指定的图片格式返回给response。
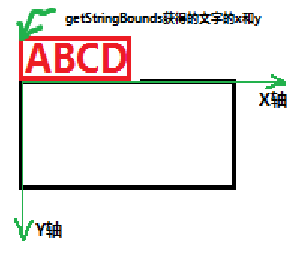
计算文字在图片缓存区的位置解释:
public static String drawImage(HttpServletResponse response) {
    StringBuilder builder = new StringBuilder();

    // 1. 产生4个字符的随机码
    for (int i = 0; i < 4; i++) {
        builder.append(randomChar());
    }
    String code = builder.toString();

    // 2. 建立图片缓存区
    int width = 70;
    int height = 25;
    // 建立bufferedImage对象: 生成的图片在内存里有一个图像缓冲区(指定图片的长度和宽度及色彩),
    // 利用该缓冲区进行图片的操作,对进行大小变换、变灰、设置透明度等。
    BufferedImage bi = new BufferedImage(width, height, BufferedImage.TYPE_3BYTE_BGR);

    // 3. 由BufferedImage 获取Graphics 2D 绘制对象
    Graphics2D g = bi.createGraphics();

    // 4. 设置绘制对象的字体和大小
    Font font = new Font("微软雅黑", Font.PLAIN, 20);
    g.setFont(font);

    // 设置字体的颜色
    Color color = new Color(0, 0, 0);
    g.setColor(color);

    // 5. 绘制图片缓存区的背景色
    // 设置背景
    g.setBackground(new Color(220, 220, 220));
    // 通过使用当前绘图表面的背景色进行填充以清除指定的矩形。
    g.clearRect(0, 0, width, height);


    // 6. 计算文字在图片缓存区的位置
    // 获取此 Graphics2D的 Font 的呈现上下文
    FontRenderContext context = g.getFontRenderContext();
    // public Rectangle2D getStringBounds(String str, FontRenderContext frc)
    // 返回指定 FontRenderContext 中指定 String 的逻辑边界(矩形对象)。
    Rectangle2D bounds = font.getStringBounds(code, context);

    double x = (width - bounds.getWidth()) / 2;
    double y = (height - bounds.getHeight()) / 2;
    double ascent = bounds.getY();
    double baseY = y - ascent;

    // 7. 在图片缓存区上绘制文字
    g.drawString(code, (int)x, (int)baseY);

    // 8. 结束绘制,释放用到的所有系统资源
    g.dispose();

    // 8. 保存绘制结果
    try{
        /*
        HttpServletResponse实例对象获得输出流有两种方式
            ①PrintWriter out = response.getWriter();
                out对象用于输出字符流数据
            ②ServletOutputStream os = response.getOutputStream();
                os用于输出字符流数据或者二进制的字节流数据都可以
         */
        ImageIO.write(bi, "jpg", response.getOutputStream());
        // 刷新响应流
        response.flushBuffer();
    }
    catch (Exception e){
        e.printStackTrace();
    }
    return code;
}

二、AWT生成算术验证码
和生成字符验证码的方式基本一致,扩展可以在图片内画一些干扰线,或者绘制字符的时候偏转一定的角度等等。
public static String drawImageVerificate(HttpServletResponse response) {
    // 定义验证码的宽度和高度
    int width = 100;
    int height = 30;

    // 在内存中创建图片缓存
    BufferedImage image = new BufferedImage(width, height, BufferedImage.TYPE_INT_BGR);
    // 创建图片上下文
    Graphics2D g = image.createGraphics();

    Random random = new Random();
    g.setColor(getRandomColor(240, 250));
    g.setFont(new Font("微软雅黑", Font.PLAIN, 22));
    // 以设定的颜色填充图片
    g.fillRect(0, 0, width, height);

    // 干扰线的绘制,绘制线条到图片中
    g.setColor(getRandomColor(100, 240));
    for (int i = 0; i < 100; i++) {
        int x = random.nextInt(width);
        int y = random.nextInt(height);
        int x1 = random.nextInt(60);
        int y1 = random.nextInt(60);
        g.drawLine(x, y, x1, y1);
    }

    // 生成算术验证码表达式
    int num1 = (int)(Math.random()*10 + 1);
    int num2 = (int)(Math.random()*10 + 1);
    int fuhao = random.nextInt(3); // 产生一个[0, 2]的随机整数
    // 记录符号和验证码的结果
    String fuhaoStr = "";
    int result = 0;
    switch (fuhao){
        case 0: fuhaoStr = "+"; result = num1 + num2; break;
        case 1: fuhaoStr = "-"; result = num1 - num2; break;
        case 2: fuhaoStr = "*"; result = num1 * num2; break;
    }

    // 拼接计算表达式,用于图片显示
    String calc = num1 + " " + fuhaoStr + " " + num2 + " = ?";
    // 设置随机颜色
    g.setColor(new Color(20+random.nextInt(110),
            20+random.nextInt(110),
            20+random.nextInt(110)));

    // 绘制表达式
    g.drawString(calc, 5, 25);
    // 结束绘制
    g.dispose();
    try {
        // 输出图片到页面
        ImageIO.write(image, "JPEG", response.getOutputStream());
        return String.valueOf(result);
    } catch (Exception e) {
        e.printStackTrace();
        return null;
    }
}

三、Kaptcha验证码自动生成
Kaptcha是一个基于SimpleCaptcha的验证码开源项目,能够根据配置生成各种样式的验证码,kaptcha工作的原理是调用com.google.code.kaptcha.servlet.KaptchaServlet 。
1、导包、配置web.xml
在工程中导入jar包:kaptcha-2.3.2.jar
在web.xml中添加如下配置:
<servlet>
    <servlet-name>Kaptcha</servlet-name>
    <servlet-class>com.google.code.kaptcha.servlet.KaptchaServlet</servlet-class>
</servlet>
<servlet-mapping>
    <servlet-name>Kaptcha</servlet-name>
    <url-pattern>/kaptcha</url-pattern>
</servlet-mapping>
此时启动工程,访问地址:【项目地址//kaptcha】便可以得到看到自动生成的图片资源。

2、页面提交
<form action="submit.action">
	<input type="text" name="kaptcha" value="" />
	<img src="kaptcha" />
</form>
3、利用jQuery实现点击刷新
加载到浏览器页面的图片资源会被浏览器暂时缓存,所以需要给资源地址添加后缀避免浏览器不刷新,常使用随机数或时间戳(System.currentTimeMillis())。
<script type="text/javascript">
    $(function() {
      $('#kaptchaImage').click(function() {$(this).attr('src','kaptcha?' + Math.floor(Math.random() * 100));});
    });
  </script>
4、验证码校验
在submit的action方法中进行验证码校验。
//设置编码
request.setCharacterEncoding("UTF-8");
response.setCharacterEncoding("UTF-8");

//获取浏览器输出流对象
PrintWriter out = response.getWriter();
//获取用户传递过来的验证码
String code = request.getParameter("kaptcha");
//获取验证码框架产生的验证码(会话中存储的验证码)
String sessionCode = (String)request.getSession().getAttribute("kaptcha");
if(code!=null&sessionCode!=null) {
	//如果用户输入的验证码和产生在服务器端的验证码一致,那么就告诉用户输入正确
	if (code.equalsIgnoreCase(sessionCode)) {
		//登录逻辑、注册逻辑等相关的业务操作
		out.print("success");
	} else {
		out.print("fail");
	}
}
out.flush();
out.close();
注:确保JDK设置了 -D java.awt.headless=true
5、kaptche 参数配置
如果要显示配置kaptcha,在配置kaptcha对应的Servlet时,在init-param增加响应的参数配置即可。示例如下:
<servlet>
    <servlet-name>Kaptcha</servlet-name>
    <servlet-class>com.google.code.kaptcha.servlet.KaptchaServlet</servlet-class>
    <init-param>
        <param-name>kaptcha.image.width</param-name>
        <param-value>200</param-value>
        <description>Width in pixels of the kaptcha image.</description>
    </init-param>
    <init-param>
        <param-name>kaptcha.image.height</param-name>
        <param-value>50</param-value>
        <description>Height in pixels of the kaptcha image.</description>
    </init-param>
    <init-param>
        <param-name>kaptcha.textproducer.char.length</param-name>
        <param-value>4</param-value>
        <description>The number of characters to display.</description>
    </init-param>
    <init-param>
        <param-name>kaptcha.noise.impl</param-name>
        <param-value>com.google.code.kaptcha.impl.NoNoise</param-value>
        <description>The noise producer.</description>
    </init-param>
</servlet>
更多参见: http://code.google.com/p/kaptcha/wiki/ConfigParameters 或 https://blog.youkuaiyun.com/ElephantBoy/article/details/52795309?utm_source=blogxgwz7


 14万+
14万+

 被折叠的 条评论
为什么被折叠?
被折叠的 条评论
为什么被折叠?
 到【灌水乐园】发言


