


根据封装的思想,把页面上可重用的UI结构封装为组件。组件的后缀是 .vue
Vue 组件三个组成部分
- <template> 组件模板结构
- <script> 组件JavaScrip行为
- <style> 组件的样式
组件注册及使用
//App.vue
<template>
  <div id="app">
    <img alt="Vue logo" src="@/assets/logo.png">
    <TestVue msg="TestVue"/>
  </div>
</template>

<script>
import TestVue from '@/components/Test.vue'

export default {
  name: 'App',
  components: {
    TestVue
  }
}
</script>

<style lang="less">
#app {
  font-family: Avenir, Helvetica, Arial, sans-serif;
  -webkit-font-smoothing: antialiased;
  -moz-osx-font-smoothing: grayscale;
  text-align: center;
  color: #2c3e50;
  margin-top: 60px;
}
</style>
//main.js
import Vue from 'vue'         //导入vue包,得到vue构造函数
import App from './App.vue'   //导入App.vue组件,将App.vue模板渲染到HTML页面中
import Comm from '@/components/Comm.vue'  //公用组件 (全局组件)

Vue.config.productionTip = false
Vue.component('Comm',Comm);   //组成全局组件

//创建Vue 实例对象
new Vue({
  //把render函数指定的组件,渲染到HTML页面中
  render: h => h(App),
}).$mount('#app') //代替el 指定渲染区域
//Test.vue
<template>
    <!--只能存在一个根节点-->
    <div class='test-box'>
        <h3>自定义组件:{{name}}</h3>
        <hr>
        <div class='main-box'>
            <!--③标签形式使用组件-->
            <LeftVue/>
            <RightVue/>
        </div>
    </div>
</template>

<script>
//①导入组件
import LeftVue from '@/components/Left.vue'
import RightVue from '@/components/Right.vue'

//默认导出,固定写法
export default {
    //②注册组件
    components: {
        LeftVue,
        RightVue,
    },
    //.vue 组件中数据不能指向对象  必须是函数
    data(){
        return{
            name:'testVue',
        }
    },

    //事件
    methods:{},
    //侦听器
    watch:{},
    //计算属性
    computed:{},
    //过滤器
    filters:{},
}
</script>

<style lang="less">
.test-box{background-color:pink;width: 100%;position: fixed;}
.main-box{display: flex;}
h3{color:black}
h2{color: red;}
</style>
组件 props
props是组件的自定义属性,在封装通用组件时,提高组件复用性。也可以结合 v-bind 自定义属性值。
props中数据,可以在模板结构中直接使用。props中数据时只读的
通过 default 定义属性的默认值。
通过 type 定义属性的值类型[Number,String,Array,Object]。
通过 required 定义属性的必填项。
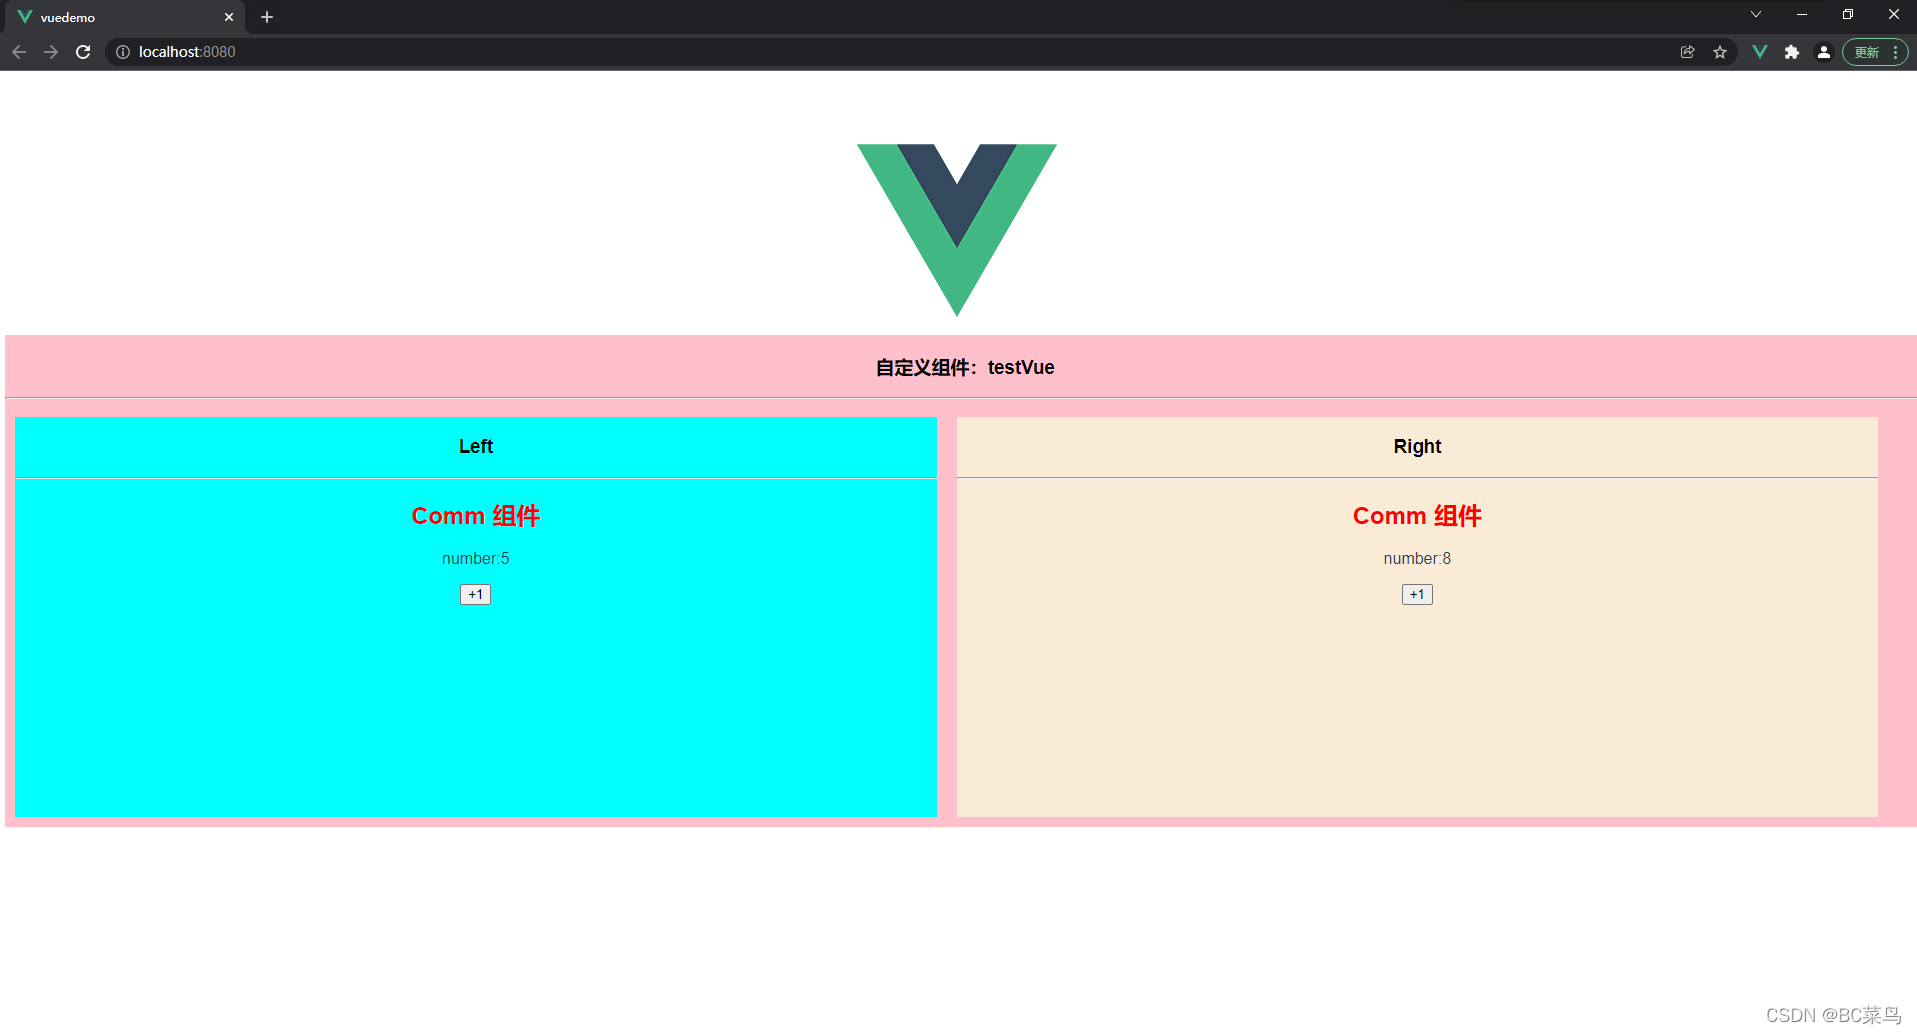
//comm.vue
<template>
  <div>
      <h2>Comm 组件</h2>
      <p>number:{{num}}</p>
      <button @click="num+=1">+1</button>    <!--单行事件函数可以简写-->
  </div>
</template>

<script>
export default {
    //自定义属性 为当前组件指定初始值
    //props:['numInit'],
    props:{
        numInit:{
            default:0,      //设置默认值
            type:Number,    //设置数据类型[Number,String,Array,Object]
            required:true,   //必填项校验,true后 default无效
        }
    },
    data(){
        return{
            num:this.numInit,
        }
    }

    data(){
        return{
           num:this.numInit,
        }
    }
}
</script>

<style>
</style>
///Left.vue///
<template>
<div class='left-box'>
<h3>Left</h3>
<hr>
<Comm :numInit = "5"/>
</div>
</template>
<script>
export default {
}
</script>
<style lang="less">
.left-box{width: 48%;height: 400px; background-color: aqua;margin: 10px;}
</style>
///Right.vue
<template>
<div class='right-box'>
<h3>Right</h3>
<hr>
<Comm :numInit = "8"/>
</div>
</template>
<script>
export default {
}
</script>
<style lang="less">
.right-box{width: 48%;height: 400px;background-color:antiquewhite;margin: 10px;}
</style>组件 样式冲突
默认情况,写在.vue组件中的样式会全局生效,因此容易造成多个组件之间样式冲突。
根本原因:
① 单页面应用程序中,所有组件 DOM 结构,都基于唯一index.html页面呈现
②每个组件中样式,都会影响整个index.html页面的 DOM 元素
解决方法:
<style scoped> scoped 属性:样式仅在当前组件生效
<style> /deep/ :父组件中修改子组件中的样式 例子: /deep/ h5{color:#336F32}
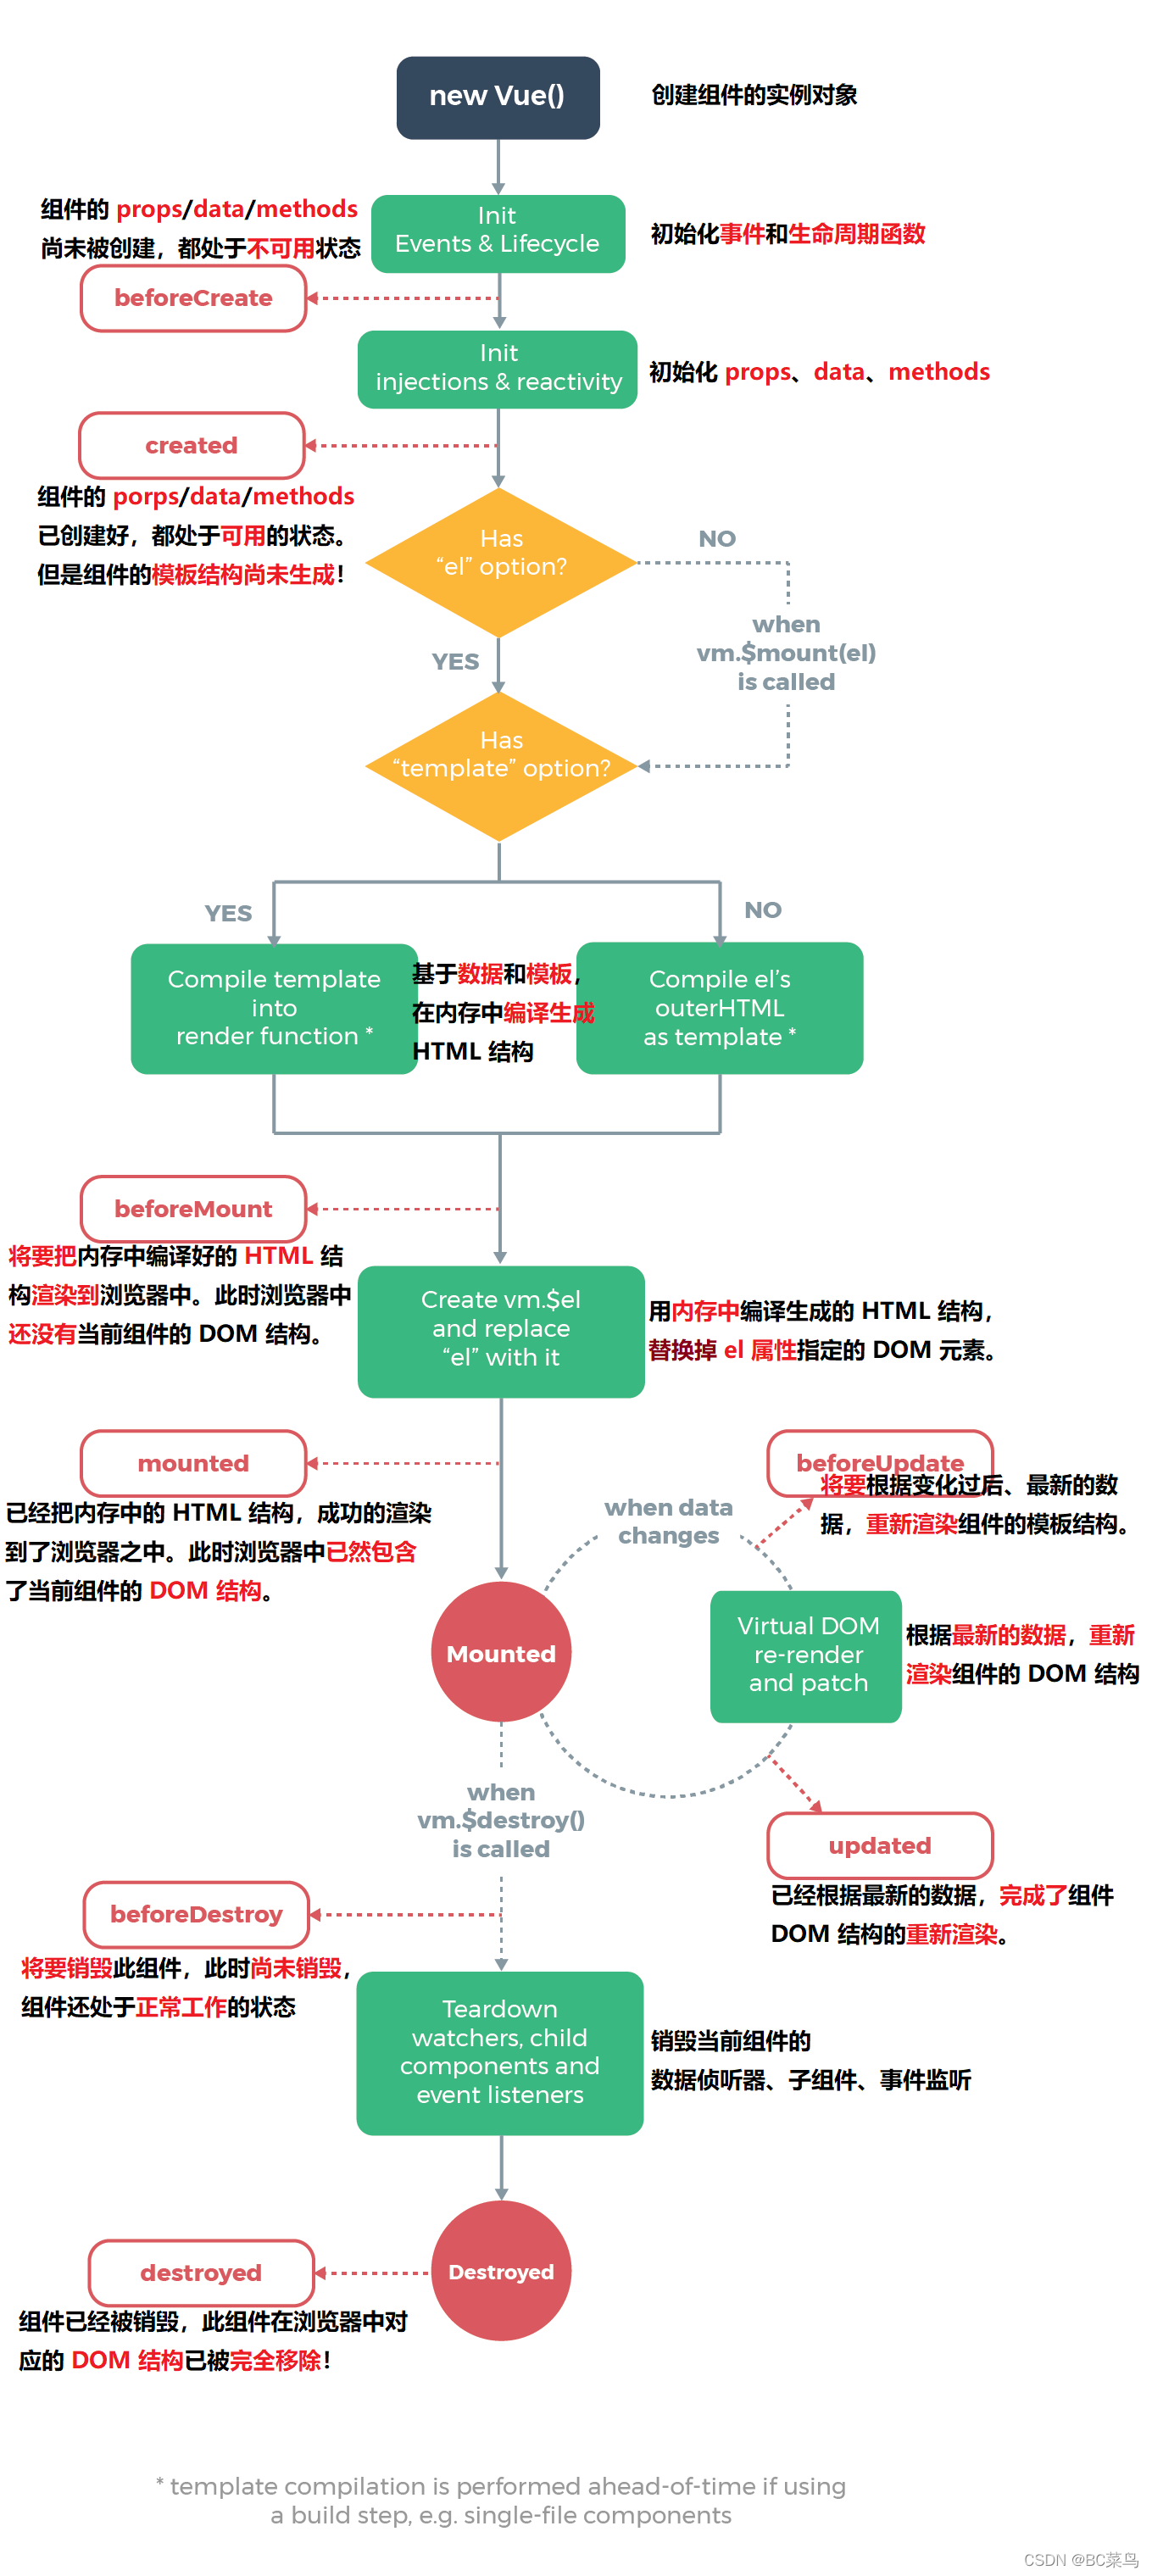
组件的生命周期(Vue2.x)
生命周期: 创建 -> 运行 -> 销毁 整个过程,强调一个时间段。
<template>
  <div>
      <h3>{{number}}</h3>
      <button @click="number+=1">更新</button>
  </div>
</template>

<script>
export default {
    data(){
        return{
            number:0
        }
    },
    methods:{

    },
    ///创建阶段///
    //1.创建前阶段的生命周期(模板结构,props,data,methods尚未创建,不可用)
    beforeCreate() {
        console.log("1.beforeCreate");
    },
    //2.创建后阶段的生命周期(props,data,methods以创建,可用。但模板结构未被创建)
    created() {
        //一般用于调用methods方法,请求服务器数据
        console.log("2.created");
    },
    //3.组件渲染前的生命周期(将要把内存中的HTML结构渲染到浏览器中,尚未有该组件DOM结构)
    beforeMount(){
        console.log("3.beforeMount");
    },
    //4.组件渲染完成的生命周期(HTML结构已渲染到浏览器中,可以获取该组件DOM结构)
    mounted(){
        console.log("4.mounted");
    },
    //运行阶段(可多次执行)//
    //5.数据变化后,将要重新渲染组件模板结构(数据未经渲染到DOM中,DOM界面数据仍是旧数据)
    beforeUpdate() {
         console.log("5.beforeUpdate");
    },
    //6.组件重新渲染已经完成(数据已经渲染到DOM中,DOM操作可以获取获取最新数据)
    updated() {
        console.log("6.beforeUpdate");
    },
    //销毁阶段//
    //7.组件销毁前的生命周期(组件仍在正常工作)
    beforeDestroy() {
         console.log("7.beforeDestroy");
    },
    //8.组件销毁后的生命周期
    destroyed() {
        console.log("8.destroyed");
    },
}
</script>

<style>

</style>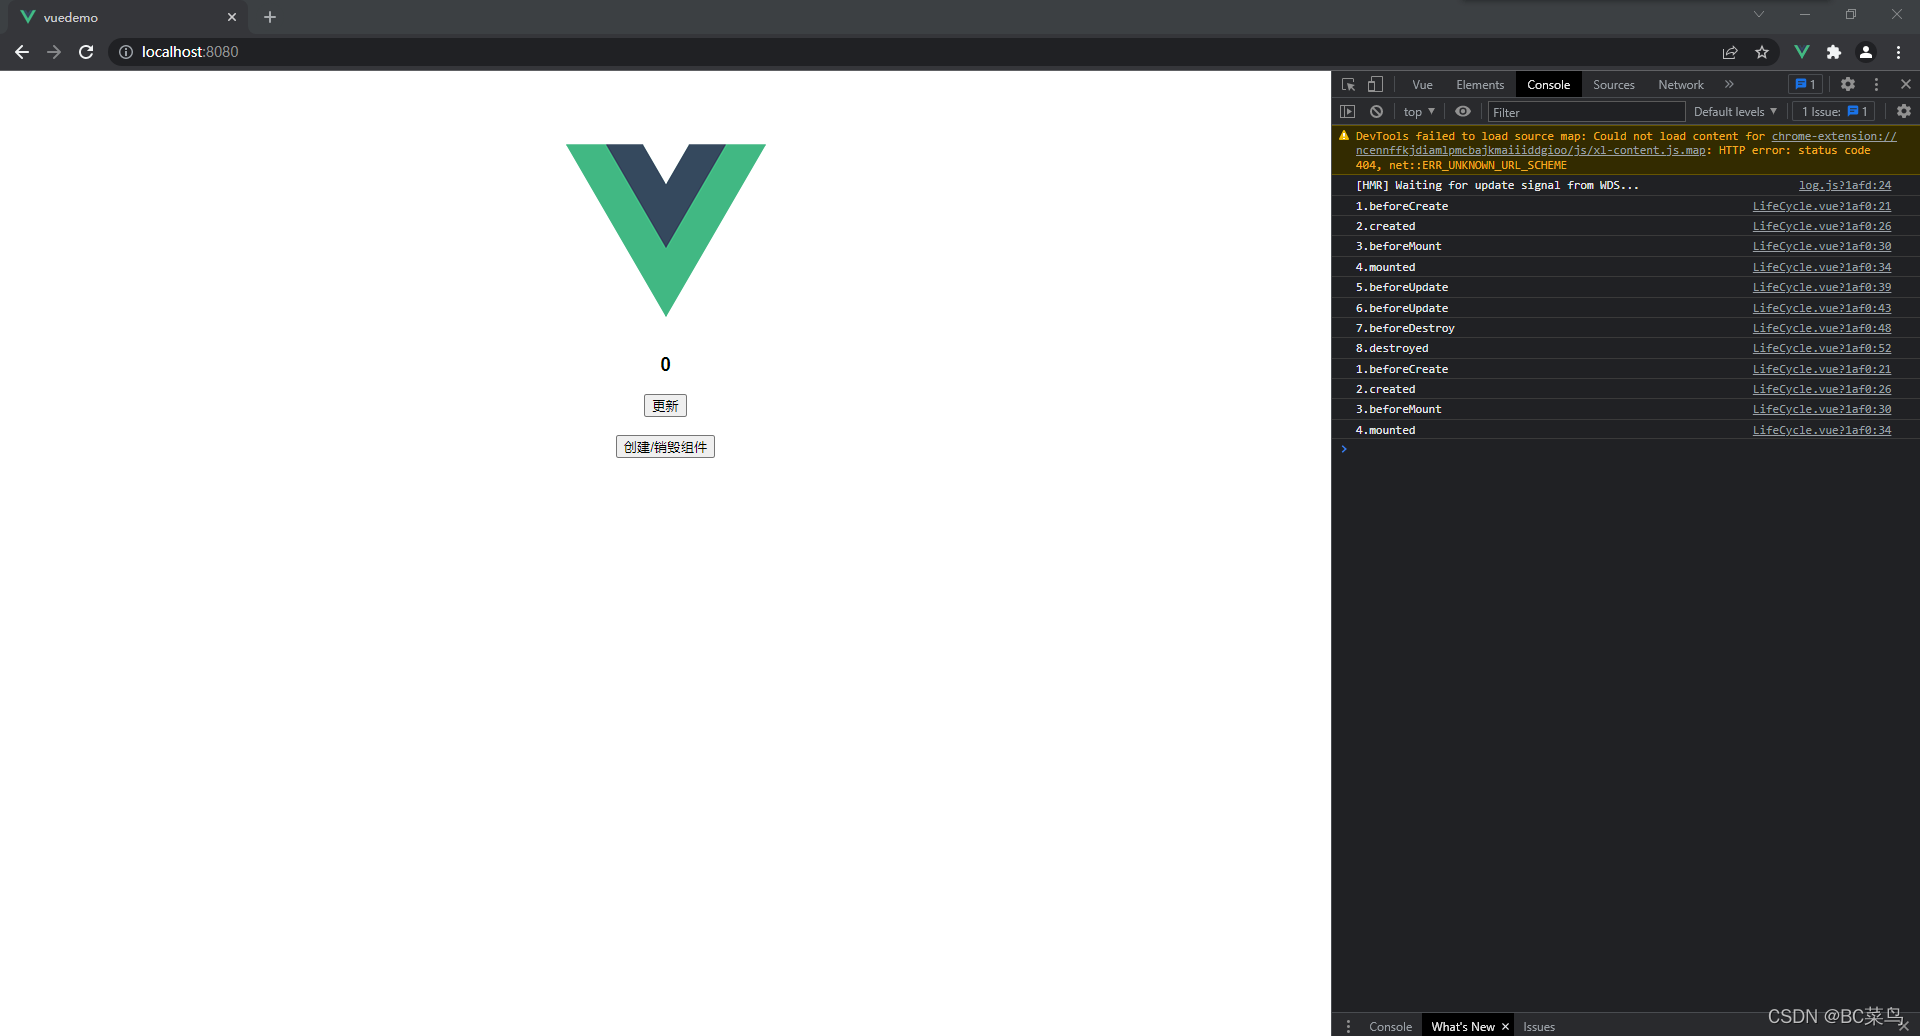
组件间数据共享
父 -> 子:自定义属性 props (子自定义属性不可修改)
$refs 引用 直接修改子组件数据 或调用子组件方法
子 -> 父:自定义事件
兄弟间(跨多级)传值:EvenBus (vue.2x)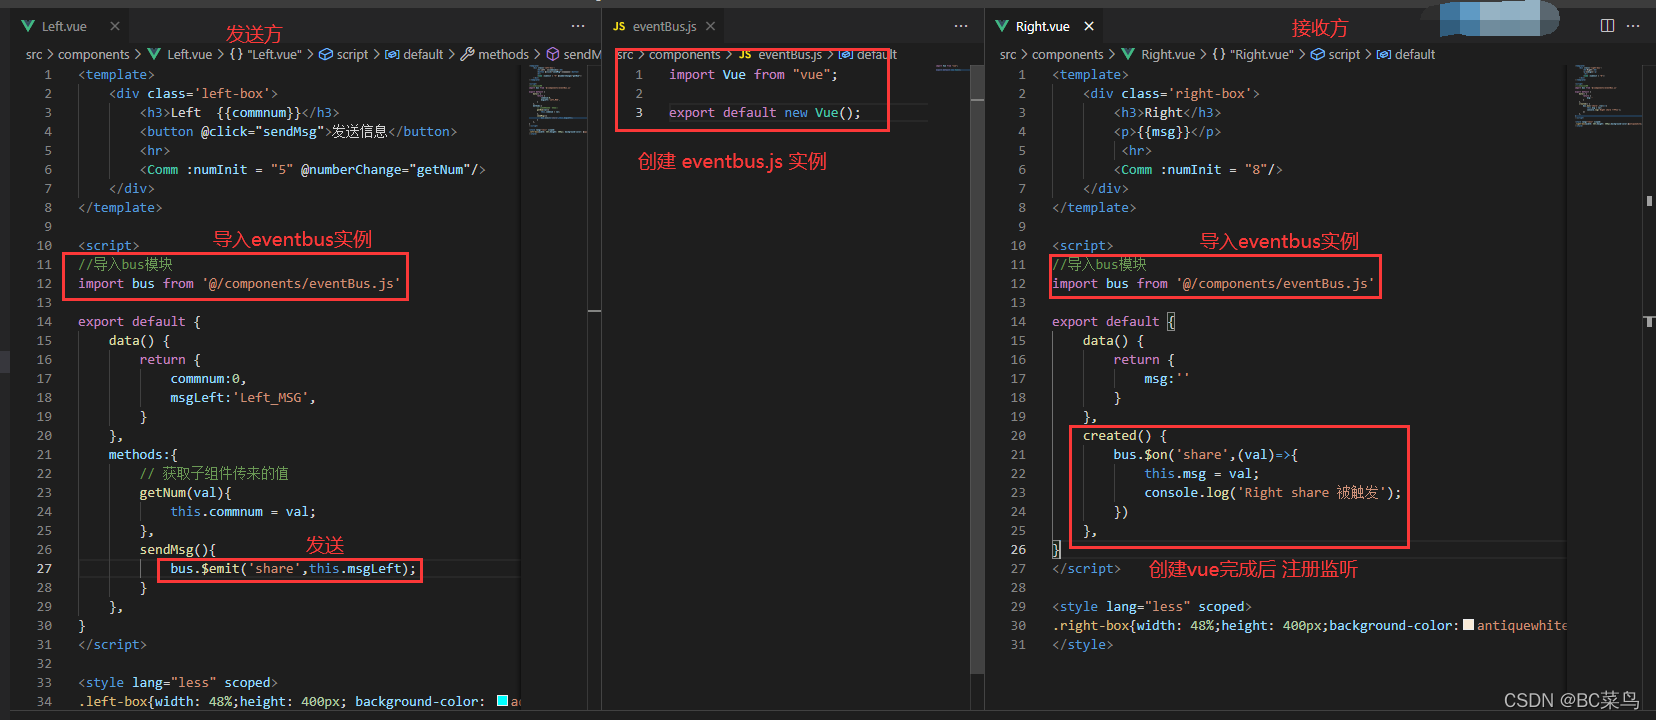 步骤:①创建 eventBus.js 模块,对外共享一个Vue 实例对象
②数据发送方,调用 bus.$emit('事件名称',要发送的数据) 方法触发自定义事件
③数据接收方,调用 bus.$on('事件名称',要处理函数) 方法注册一个自定义事件
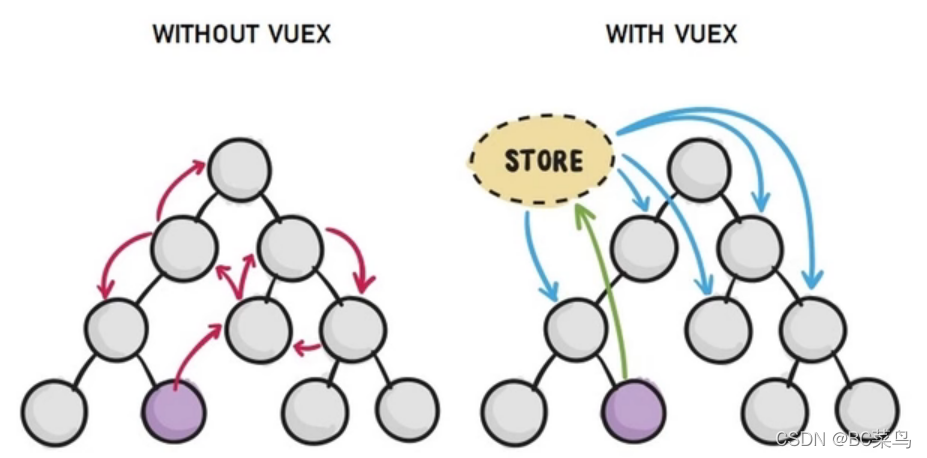
vueX
vueX是终极组件间数据共享方案(全局)。让数据共享更高效,清晰,易维护。
核心概念: Mutation_ Actions_ Getter_
① npm安装: npm i vuex -s
② 项目安装配置

③ 配置调用
///  utils/store.js  //
import Vue from 'vue'
import Vuex from 'vuex'

Vue.use(Vuex)
//创建store对象
const store new  Vuex.Store({
    //state 中存放的就是全局共享数据
    state:{count:0},
    //通过Mutation修改数据
    mutation:{
        add(state,step){state:.count+=step}
        sub(state,step){state:.count-=step}
    },
    //通过Aciton 异步处理任务,必须触发Mutation方式间接更改数据
    Aciton:{
        addAsync(context,step){
            setTime(()=>{
                context.commit('add',step)
            },1000)
        }
    },
    //Getters不会改变Store数据,只进行数据加工。类似计算属性
    getters:{
        showNum:state={
            return '当前值是['+state.count+']'
        }
    }
})

export default store
import Vue from 'vue'
import App from './App.vue'
import Store from '@/utils/store.js'
Vue.config.productionTip = false
new Vue({
Store,
render: h => h(App)
}).$mount('#app')
/GET//
//获取数据方式一
this.$Store.state.全局名称 //例如this.$Store.state.count

//获取数据方法二
import {mapState} from 'vuex'
//映射为当前组件计算属性
computed:{
    ...mapState({'conut'})    //
}
//调用 {{count}}

//SET//
//(不建议直接修改this.$Store里的值,非法)
//通过Mutation 方法一
//调用commit函数
this.$Store.commit('add',3)    //Mutation传参

//通过Mutation 方法二
//映射为methods 函数
import {mapMutation} from 'vuex'
merhods:{
    ...mapMutation(['sub'])
}
 //调用  add(3) sub(3)

/ASYCN/
//方法一
this.$Store.dispatch('addAsync',3)
//方法二
import {mapActions} from 'vuex'
merhods:{
    ...mapActions(['addAsync'])
}
 //调用  addAsync(3)  )

//Getters///
//方法一
this.$Store.getters.showNum
//方法二
import {mapGetters} from 'vuex'
//映射为当前组件计算属性
computed:{
    ...mapGetters(['showNum'])
}
ref 引用
ref 用于辅助开发者再不依赖 jQury的情况下,获取DOM元素或者组件的引用。
每个vue组件中都包含 $refs 对象,里面存储着对应的DOM元素或组件的引用,默认情况下,组件的 $refs指向一个空对象。
this.$nextTick(()=>{ }) 延迟回调函数,等待DOM渲染完成后回调。防止组件为创建,就获取组件元素报错异常。
<template>
    <div class='left-box'>
        <!--定义 ref节点-->
        <h3 ref="Lh3Ref">Left </h3>
        <button @click="sendMsg">发送信息</button>
        <hr>
        <!--定义 ref组件-->
        <Comm ref="commRef" :numInit = "5"/>
    </div>
</template>

<script>
export default {
    methods:{
        sendMsg(){
            //$refs 引用节点
            console.log(this.$refs.Lh3Ref);
            //$refs 引用组件
            console.log(this.$refs.commRef);
        }
    },
}
</script>

<style lang="less" scoped>
</style>


 被折叠的 条评论
为什么被折叠?
被折叠的 条评论
为什么被折叠?
 到【灌水乐园】发言


