


 本文介绍了如何检查MySQL服务状态、重启与防火墙设置,重点在于解决my.cnf文件中bind-address设置问题,确保服务器可以接受远程连接。
1、首先确定数据库在本机可启动,并且开启systemctl restart mysql(重启命令)
systemctl restart mysql   重启
systemctl start mysql   启动
systemctl stop mysql    关闭
systemctl statu mysql   查阅状态
2、再次确定防火墙的问题(我不是这个问题)
sudo ufw status 查看状态
sudo ufw enable 启动
sudo ufw disable 关闭
常用开启端口
sudo ufw allow 22
sudo ufw allow 21
sudo ufw allow 3306
sudo ufw allow 443
sudo ufw allow 80
sudo ufw allow 6379
sudo ufw allow 60100:60200/tcp
开启ip
允许某个IP地址访问本机所有端口
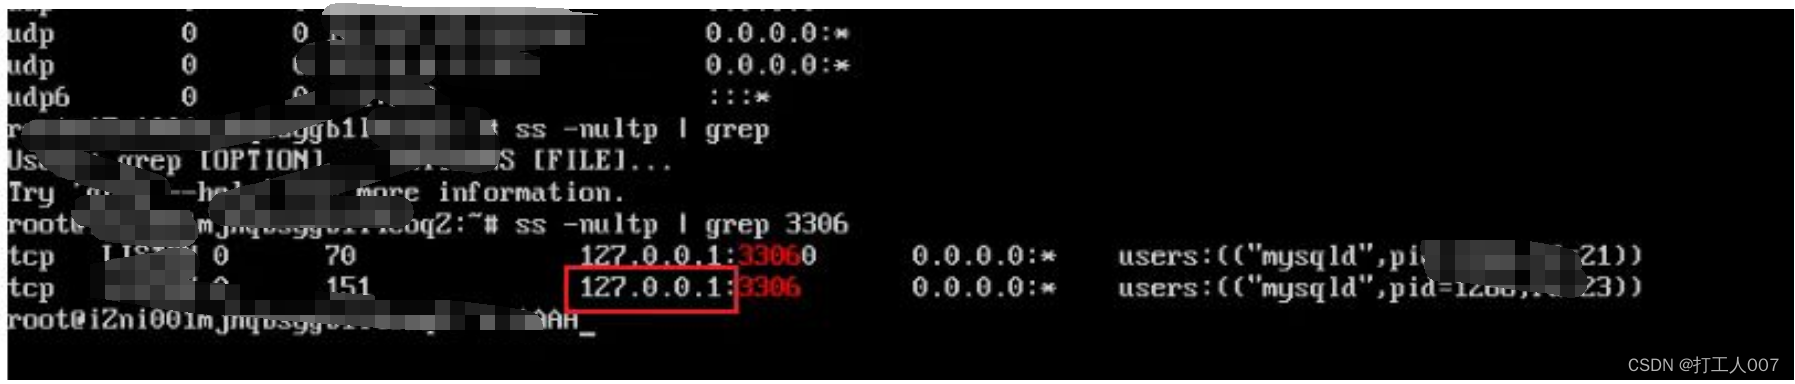
sudo ufw allow from 192.168.0.13、查看了监听(发现了问题)ss -nultp | grep 3306
我这里是127.0.0.1 不是0.0.0.0 或者是制定的ip,所以导致问题无法远程链接
本来解决这个问题就是找到my.cnf文件里面的[mysqld]里面加上这么一句就可以的
bind-address=0.0.0.0
找到my.cnf文件用命令find -name my.cnf
但是因为系统升级my.cnf文件存在异常,目前是这个样子的,导致无法加
#
# The MySQL database server configuration file.
#
# You can copy this to one of:
# - "/etc/mysql/my.cnf" to set global options,
# - "~/.my.cnf" to set user-specific options.
#
# One can use all long options that the program supports.
# Run program with --help to get a list of available options and with
# --print-defaults to see which it would actually understand and use.
#
# For explanations see
# http://dev.mysql.com/doc/mysql/en/server-system-variables.html

#
# * IMPORTANT: Additional settings that can override those from this file!
#   The files must end with '.cnf', otherwise they'll be ignored.
#
!includedir /etc/mysql/conf.d/
!includedir /etc/mysql/mysql.conf.d/
将这个文件删除(my.cnf)
然后在这个位置上重新创建这个文件,内容填充如下
# For advice on how to change settings please see
# http://dev.mysql.com/doc/refman/5.6/en/server-configuration-defaults.html
# *** DO NOT EDIT THIS FILE. It's a template which will be copied to the
# *** default location during install, and will be replaced if you
# *** upgrade to a newer version of MySQL.

[mysqld]

# Remove leading # and set to the amount of RAM for the most important data
# cache in MySQL. Start at 70% of total RAM for dedicated server, else 10%.
# innodb_buffer_pool_size = 128M

# Remove leading # to turn on a very important data integrity option: logging
# changes to the binary log between backups.
# log_bin

# These are commonly set, remove the # and set as required.
# basedir = .....
# datadir = .....
# port = .....
# server_id = .....
# socket = .....
bind-address=0.0.0.0
# Remove leading # to set options mainly useful for reporting servers.
# The server defaults are faster for transactions and fast SELECTs.
# Adjust sizes as needed, experiment to find the optimal values.
# join_buffer_size = 128M
# sort_buffer_size = 2M
# read_rnd_buffer_size = 2M

sql_mode=NO_ENGINE_SUBSTITUTION,STRICT_TRANS_TABLES
重启数据库,解决


 493
493

 被折叠的 条评论
为什么被折叠?
被折叠的 条评论
为什么被折叠?
 到【灌水乐园】发言


