


 本文详细介绍如何在Spring框架中集成Redis,包括配置pom文件依赖、redis配置文件设置、spring-redis.xml配置,以及通过注解实现缓存管理。提供UserService接口和实现类,展示@Cacheable、@CachePut和@CacheEvict注解的使用场景。
spring集成redis
spring集成redis
废话不多说,直接上代码:
pom文件依赖的jar
 <dependency>
        <groupId>org.springframework.data</groupId>
        <artifactId>spring-data-redis</artifactId>
        <version>1.6.1.RELEASE</version>
</dependency>
<dependency>
        <groupId>redis.clients</groupId>
        <artifactId>jedis</artifactId>
        <version>2.7.3</version>
</dependency>
redis配置文件
#redis配置文件
#主机地址
redis.host=localhost
#端口
redis.port=6379
#密码
redis.password=123456
#最大空闲数
redis.maxIdle=100
# 最大连接数
redis.maxTotal=8
# 最大等待时间
redis.maxWaitMillis=20000
# 是否在从池中取出连接前进行检验,如果检验失败,则从池中去除连接并尝试取出另一个
redis.testOnBorrow=true
# 过期时间 单位秒
redis.expiration = 60
spring-redis.xml配置文件
<?xml version="1.0" encoding="UTF-8"?>
<beans xmlns="http://www.springframework.org/schema/beans"
       xmlns:xsi="http://www.w3.org/2001/XMLSchema-instance"
       xmlns:cache="http://www.springframework.org/schema/cache"
       xsi:schemaLocation="http://www.springframework.org/schema/beans
       http://www.springframework.org/schema/beans/spring-beans.xsd
       http://www.springframework.org/schema/cache
       http://www.springframework.org/schema/cache/spring-cache.xsd">

    <bean class="org.springframework.beans.factory.config.PropertyPlaceholderConfigurer">
        <property name="locations">
            <list>
                <value>classpath:redis.properties</value>
            </list>
        </property>
    </bean>

    <!--redis连接池配置-->
    <bean id="poolConfig" class="redis.clients.jedis.JedisPoolConfig" >
        <!--最大空闲连接数-->
        <property name="maxIdle" value="${redis.maxIdle}" />
        <!--最大连接数-->
        <property name="maxTotal" value="${redis.maxTotal}" />
        <!--在获取连接的时候检查有效性, 默认false-->
        <property name="testOnBorrow" value="${redis.testOnBorrow}" />
        <!--最大等待毫秒数-->
        <property name="maxWaitMillis" value="${redis.maxWaitMillis}"/>
    </bean>

    <!--redis工厂类-->
    <bean id="connectionFactory" class="org.springframework.data.redis.connection.jedis.JedisConnectionFactory">
        <property name="poolConfig" ref="poolConfig"/>
        <!--端口-->
        <property name="port" value="${redis.port}"/>
        <!--服务器地址-->
        <property name="hostName" value="${redis.host}"/>
        <!--密码-->
        <property name="password" value="123456"/>
    </bean>

    <bean id="stringRedisSerializer" class="org.springframework.data.redis.serializer.StringRedisSerializer" />

    <!-- 配置RedisTemplate -->
    <bean id="redisTemplate" class="org.springframework.data.redis.core.RedisTemplate">
        <property name="connectionFactory" ref="connectionFactory" />
        <property name="keySerializer" ref="stringRedisSerializer"/>
        <property name="hashKeySerializer" ref="stringRedisSerializer"/>
    </bean>

    <!-- 配置RedisCacheManager -->
    <bean id="redisCacheManager" class="org.springframework.data.redis.cache.RedisCacheManager">
        <constructor-arg name="redisOperations" ref="redisTemplate" />
        <property name="defaultExpiration" value="${redis.expiration}" />
    </bean>

    <!-- 启用缓存注解功能 -->
    <cache:annotation-driven cache-manager="redisCacheManager"/>

</beans>
注意spring-redis.xml里的<cache:annotation-driven cache-manager=“redisCacheManager”/>这个段配置千万不能忘记,切记!
测试action
package com.hanlin.action;

import com.hanlin.bean.ResultData;
import com.hanlin.bean.User;
import com.hanlin.servier.UserService;
import org.springframework.beans.factory.annotation.Autowired;
import org.springframework.stereotype.Controller;
import org.springframework.web.bind.annotation.RequestMapping;
import org.springframework.web.bind.annotation.ResponseBody;

/**
 * @author:hanlin.yuan
 * @date:2019/05/16
 */
@Controller
@RequestMapping("user")
public class UserAction {

    @Autowired
    private UserService userService;


    @RequestMapping("/info.action")
    @ResponseBody
    public Object  info(){
        User user = userService.getUserById(1);
        return new ResultData(user);
    }
}
注意:这里的User是javabean,他必须要实现Serializable接口,提供可序列化功能
UserService
package com.hanlin.servier;

import com.hanlin.bean.User;

/**
 * @author:hanlin.yuan
 * @date:2019/05/16
 */
public interface UserService {

    /**
     * 根据id获取用户
     * @param id
     * @return
     */
    User getUserById(Integer id);
}
package com.hanlin.servier.impl;

import com.hanlin.bean.User;
import com.hanlin.mapper.UserMapper;
import com.hanlin.servier.UserService;
import org.springframework.beans.factory.annotation.Autowired;
import org.springframework.cache.annotation.Cacheable;
import org.springframework.stereotype.Service;

/**
 * @author:hanlin.yuan
 * @date:2019/05/16
 */
@Service
public class UserServiceImpl implements UserService {

    @Autowired
    private UserMapper mapper;

    @Cacheable(value = "user",key = "'user'+#id")
    @Override
    public User getUserById(Integer id) {
        if (id!=null){
            return mapper.getUserById(id);
        }
        return null;
    }
}
相关注解解释:
- @Cacheable注解:可以标记在一个方法上,也可以标记在一个类上。当标记在一个方法上时表示该方法是支持缓存的,当标记在一个类上时则表示该类所有的方法都是支持缓存的。对于一个支持缓存的方法,Spring会在其被调用后将其返回值缓存起来,以保证下次利用同样的参数来执行该方法时可以直接从缓存中获取结果,而不需要再次执行该方法。
- @CachePut注解:可以声明一个方法支持缓存功能。与@Cacheable不同的是使用@CachePut标注的方法在执行前不会去检查缓存中是否存在之前执行过的结果,而是每次都会执行该方法,并将执行结果以键值对的形式存入指定的缓存中。
- @CacheEvict:是用来标注在需要清除缓存元素的方法或类上的。当标记在一个类上时表示其中所有的方法的执行都会触发缓存的清除操作
一般而言,这三个注解是比较常用的:@Cacheable一般与查询,而@CachePut注解一般是用于修改,@CacheEvict一般用于删除。
调用http://localhost:8080/user/info.action后,我们打开redis的客户端,我们可以看到
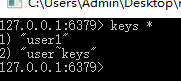
下面我们再次调用http://localhost:8080/user/info.action,会发现UserServiceImpl里的getUserById没有被调用就直接返回了结果,说明我们第二调用的时候,没有再去查数据,而且直接从缓存中拿的结果。大家也可以在getUserById打断点调试一下。
项目源代码:
链接:https://pan.baidu.com/s/1x1farnvU8hNYQ1swZWtHXw
提取码:yiif


 1180
1180

 被折叠的 条评论
为什么被折叠?
被折叠的 条评论
为什么被折叠?
 到【灌水乐园】发言


