 Android ColorPicker组件实现与功能


第一次记录,先看设计搞
一、
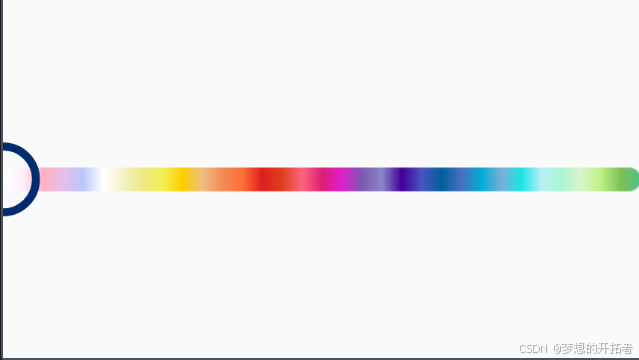
真机显示效果
二、效果描述
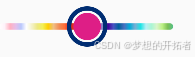
1、滑动时,中间的圈显示背景颜色条的颜色,
2、拖动中可记录位置,以及颜色(看需要,需要恢复位置时需要)
3、可以拖动,也可以点击
三、实现
1、SelectedColorInfo 类
import androidx.compose.ui.geometry.Offset
import androidx.compose.ui.graphics.Color
import com.google.gson.annotations.SerializedName

/**
 * 颜色选择器组件对象
 */
data class SelectedColorInfo(
    @SerializedName("position") val position: Offset = Offset.Zero,
    @SerializedName("color") val color: Color = Color.Transparent
)
2、
ColorPicker的实现
import android.graphics.Bitmap
import android.graphics.BitmapFactory
import androidx.compose.foundation.Canvas
import androidx.compose.foundation.Image
import androidx.compose.foundation.gestures.detectDragGestures
import androidx.compose.foundation.gestures.detectTapGestures
import androidx.compose.foundation.layout.Box
import androidx.compose.foundation.layout.BoxWithConstraints
import androidx.compose.foundation.layout.aspectRatio
import androidx.compose.foundation.layout.fillMaxSize
import androidx.compose.foundation.layout.fillMaxWidth
import androidx.compose.foundation.layout.height
import androidx.compose.foundation.layout.width
import androidx.compose.runtime.Composable
import androidx.compose.runtime.LaunchedEffect
import androidx.compose.runtime.getValue
import androidx.compose.runtime.mutableStateOf
import androidx.compose.runtime.remember
import androidx.compose.runtime.rememberCoroutineScope
import androidx.compose.runtime.setValue
import androidx.compose.ui.Alignment
import androidx.compose.ui.Modifier
import androidx.compose.ui.geometry.Offset
import androidx.compose.ui.graphics.Color
import androidx.compose.ui.graphics.asImageBitmap
import androidx.compose.ui.graphics.drawscope.Stroke
import androidx.compose.ui.input.pointer.pointerInput
import androidx.compose.ui.platform.LocalContext
import androidx.compose.ui.tooling.preview.Preview
import androidx.compose.ui.unit.IntSize
import androidx.compose.ui.unit.dp
import com.njsoft.AtmosphereLights.R
import com.njsoft.AtmosphereLights.data.SelectedColorInfo
import com.njsoft.AtmosphereLights.ui.theme.TabBackgroundColor
import kotlinx.coroutines.Dispatchers
import kotlinx.coroutines.channels.Channel
import kotlinx.coroutines.launch
import kotlinx.coroutines.withContext

private const val TAG = "ColorPicker"

@Composable
fun ColorPicker(
    bitmap: Bitmap,
    selectedColorInfo: SelectedColorInfo,
    onColorInfoChange: (SelectedColorInfo) -> Unit,
    modifier: Modifier = Modifier,
    isEnabled: Boolean = true // 默认启用
) {
    var selectedInfo by remember { mutableStateOf(selectedColorInfo) }
    val colorChannel = remember { Channel<Pair<Offset, Int>>(Channel.UNLIMITED) }
    val coroutineScope = rememberCoroutineScope()

    LaunchedEffect(Unit) {
        withContext(Dispatchers.Default) {
            for ((offset, pixelColor) in colorChannel) {
                val newColor = Color(pixelColor)
                withContext(Dispatchers.Main) {
                    if (newColor != selectedInfo.color) {
                        selectedInfo = selectedInfo.copy(position = offset, color = newColor)
                        onColorInfoChange(selectedInfo)
                    }
                }
            }
        }
    }

    LaunchedEffect(selectedColorInfo) {
        selectedInfo = selectedColorInfo
    }

    BoxWithConstraints(
        modifier = modifier,
        contentAlignment = Alignment.Center // 确保内容在纵向方向上居中
    ) {
        val boxWidth = constraints.maxWidth.toFloat()
        val boxHeight = constraints.maxHeight.toFloat()
        val aspectRatio = bitmap.width.toFloat() / bitmap.height

        Box(
            modifier = Modifier
                .fillMaxWidth()
                .aspectRatio(aspectRatio)
        ) {
            Image(
                bitmap = bitmap.asImageBitmap(),
                contentDescription = null,
                modifier = Modifier
                    .fillMaxWidth()
                    .pointerInput(isEnabled) {
                        if (isEnabled) {
                            detectTapGestures(
                                onTap = { offset ->
                                    coroutineScope.launch {
                                        handleColorSelection(
                                            offset.copy(y = boxHeight / 2),
                                            bitmap,
                                            IntSize(boxWidth.toInt(), boxHeight.toInt()),
                                            colorChannel
                                        )
                                    }
                                }
                            )
                        }
                    }
                    .pointerInput(isEnabled) {
                        if (isEnabled) {
                            detectDragGestures(
                                onDrag = { change, _ ->
                                    val offset = change.position.copy(y = boxHeight / 2)
                                    coroutineScope.launch {
                                        handleColorSelection(
                                            offset,
                                            bitmap,
                                            IntSize(boxWidth.toInt(), boxHeight.toInt()),
                                            colorChannel
                                        )
                                    }
                                }
                            )
                        }
                    }
            )

            selectedInfo.position.let { offset ->
                if (isEnabled) {
                    DrawSelectedCircle(offset.copy(y = boxHeight / 2), selectedInfo.color, 25.dp)
                }
            }
        }
    }
}

private fun handleColorSelection(
    offset: Offset,
    bitmap: Bitmap,
    size: IntSize,
    colorChannel: Channel<Pair<Offset, Int>>
) {
    val x = (offset.x / size.width * bitmap.width).toInt()
    val y = bitmap.height / 2 // 固定 y 轴在图片的中间位置
    if (x in 0 until bitmap.width && y in 0 until bitmap.height) {
        val pixelColor = bitmap.getPixel(x, y)
        colorChannel.trySend(offset.copy(y = (size.height / 2).toFloat()) to pixelColor) // 保持 y 轴位置在中间
    }
}

@Composable
fun DrawSelectedCircle(offset: Offset, color: Color, circleHeight: androidx.compose.ui.unit.Dp) {
    Canvas(modifier = Modifier.fillMaxSize()) {
        val radius = (circleHeight / 2).toPx()
        drawCircle(
            color = TabBackgroundColor,
            radius = radius + 4.dp.toPx(),
            center = offset.copy(y = size.height / 2), // 确保圆圈在 Y 轴上居中
            style = Stroke(width = 4.dp.toPx())
        )
        drawCircle(
            color = color,
            radius = radius,
            center = offset.copy(y = size.height / 2) // 确保圆圈在 Y 轴上居中
        )
    }
}

@Preview(showBackground = true, widthDp = 320, heightDp = 180)
@Composable
fun ColorPickerPreview() {
    val context = LocalContext.current
    val bitmap =
        BitmapFactory.decodeResource(context.resources, R.drawable.custom_color_bg) // 使用你现成的图片
    ColorPicker(
        bitmap = bitmap,
        selectedColorInfo = SelectedColorInfo(),
        onColorInfoChange = {},
        modifier = Modifier
            .width(160.dp)
            .height(50.dp),
        isEnabled = true
    )
}
代码解释:
1. ColorPicker Composable
ColorPicker 是主 UI 组件,它展示了一张图片(bitmap),并允许用户点击或拖动手指来选择颜色。关键点如下:
- 状态管理:
selectedInfo通过remember { mutableStateOf() }保持颜色和位置信息,它是一个可变状态,UI 会根据这个状态自动更新。 - 手势检测:使用了
pointerInput检测用户的点击和拖动操作。detectTapGestures处理点击事件,detectDragGestures处理拖动事件。 - 协程与颜色处理:当用户点击或拖动时,协程会启动并调用
handleColorSelection,该函数会根据用户的点击位置获取对应图片的像素颜色,并通过colorChannel将新颜色发送到主线程更新。
LaunchedEffect(Unit) {
    // 监听 colorChannel 的值变化,并在主线程上更新 selectedInfo
    withContext(Dispatchers.Default) {
        for ((offset, pixelColor) in colorChannel) {
            val newColor = Color(pixelColor)
            withContext(Dispatchers.Main) {
                if (newColor != selectedInfo.color) {
                    selectedInfo = selectedInfo.copy(position = offset, color = newColor)
                    onColorInfoChange(selectedInfo)
                }
            }
        }
    }
}
LaunchedEffect:用于在启动时监听colorChannel并异步处理颜色选择操作。Dispatchers.Default用于后台处理图片像素获取,Dispatchers.Main用于更新 UI。
2. handleColorSelection
- 该函数根据用户的点击位置(
Offset),计算出对应图片的像素位置(x,y),并使用bitmap.getPixel()获取该位置的颜色。 - 颜色和位置通过
colorChannel传递,保持与 UI 的同步。
private fun handleColorSelection(
    offset: Offset,
    bitmap: Bitmap,
    size: IntSize,
    colorChannel: Channel<Pair<Offset, Int>>
) {
    val x = (offset.x / size.width * bitmap.width).toInt()
    val y = bitmap.height / 2 // 固定 y 轴在图片的中间位置
    if (x in 0 until bitmap.width && y in 0 until bitmap.height) {
        val pixelColor = bitmap.getPixel(x, y)
        colorChannel.trySend(offset.copy(y = (size.height / 2).toFloat()) to pixelColor)
    }
}
- 目的:将颜色和偏移量发送到
colorChannel,用于更新用户选择的颜色和位置。
3. DrawSelectedCircle
- 这是一个用于绘制用户选择的颜色点的
Composable函数,它通过Canvas在图片上绘制一个圆圈,表示当前选择的颜色位置。
@Composable
fun DrawSelectedCircle(offset: Offset, color: Color, circleHeight: Dp) {
    Canvas(modifier = Modifier.fillMaxSize()) {
        val radius = (circleHeight / 2).toPx()
        drawCircle(
            color = TabBackgroundColor, // 圆圈的外层背景颜色
            radius = radius + 4.dp.toPx(),
            center = offset.copy(y = size.height / 2),
            style = Stroke(width = 4.dp.toPx())  // 外圈为描边
        )
        drawCircle(
            color = color,  // 圆圈的内部颜色,即用户选择的颜色
            radius = radius,
            center = offset.copy(y = size.height / 2)
        )
    }
}
- 绘制逻辑:首先绘制外层的背景圆圈(使用
TabBackgroundColor),然后再绘制内层的颜色圆圈(使用用户选择的颜色)。这样用户可以看到颜色选择的效果。
4. ColorPickerPreview
- 这是用于在 Android Studio 中预览组件的
@Preview函数,它使用一张图片作为颜色选择器的背景,并设置了一些默认的 UI 状态。
@Preview(showBackground = true, widthDp = 320, heightDp = 180)
@Composable
fun ColorPickerPreview() {
    val context = LocalContext.current
    val bitmap = BitmapFactory.decodeResource(context.resources, R.drawable.custom_color_bg)
    ColorPicker(
        bitmap = bitmap,
        selectedColorInfo = SelectedColorInfo(),
        onColorInfoChange = {},
        modifier = Modifier
            .width(160.dp)
            .height(50.dp),
        isEnabled = true
    )
}
- 该预览使用一张示例图片并初始化颜色选择器,用于在 Android Studio 中进行设计时预览。
总结:
- ColorPicker 组件的主要功能是通过用户的点击或拖动从图片中获取颜色,并将选择的颜色显示给用户。
- 使用了 Jetpack Compose 的许多特性,如
Canvas绘制、手势检测、状态管理(remember和mutableStateOf)、协程(LaunchedEffect和rememberCoroutineScope)等。 Channel用于异步传递颜色选择事件,确保后台任务与 UI 更新同步。
这个实现适合需要在 UI 上直观选择颜色的场景,例如调色板、图片分析工具等


 4506
4506

 被折叠的 条评论
为什么被折叠?
被折叠的 条评论
为什么被折叠?
 到【灌水乐园】发言


