


 博客给出了解码流程图相关代码,且代码中包含每一步的解释,聚焦信息技术领域的解码流程代码展示。
解码流程图:
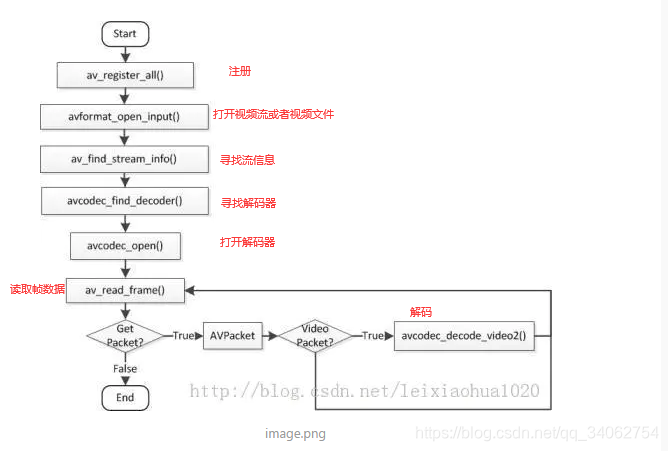
直接上代码,里面有每一步的解释
void CTestYUV::decode()
{
	/*
	av_register_all初始化所有组件,只有调用了该函数才能使用复用器和解码器。
	*/
	av_register_all();
	avformat_network_init();
	//AVFormatContext设备上下文
	/*

	*/
	AVFormatContext* pFormatContext = NULL;
	const char* path = "D://1.mp4";
	//AVDictionary* opt = NULL;//设置选项
	//av_dict_set(&opt, "rtsp_transport","tcp",0);
	//av_dict_set(&opt,"max_delay","550",0);//设置延迟时间
	int ret=avformat_open_input(&pFormatContext, path,NULL,NULL);//打开文件
	//int ret=avformat_open_input(&pFormatContext, path,NULL,&opt);//打开网络流
	if (ret)
	{
		//打开失败
		return;
	}
	//打开成功
	//寻找解码器信息,h264还是h265,
	ret=avformat_find_stream_info(pFormatContext,NULL);
	if (ret)
	{
		//寻找解码器失败
		return;
	}
	int time = pFormatContext->duration;
	int mbitime = (time / 1000000)/60;
	cout << "时间" << mbitime;
	//打印输出或者输入格式的详细信息,比如持续时间,比特率,编解码器,编码格式
	av_dump_format(pFormatContext, NULL, path, 0);

	//寻找流
	int VideoStream = -1, AudioStream = -1;
	VideoStream=av_find_best_stream(pFormatContext, AVMEDIA_TYPE_VIDEO, -1, -1,NULL,0);


	AVCodecContext* pCodecContext = NULL;

	pCodecContext = avcodec_alloc_context3(NULL);
	avcodec_parameters_to_context(pCodecContext, pFormatContext->streams[VideoStream]->codecpar);

	//寻找一个解码器
	AVCodec* cCodec=avcodec_find_decoder(pCodecContext->codec_id);
	if (!cCodec)
	{
		return;//寻找器失败
	}
	//pFormatContext->streams[VideoStream]->codec已经被否决
	ret=avcodec_open2(pCodecContext, cCodec,NULL);
	//解码视频
	AVFrame* frame = av_frame_alloc();//申请原始空间或者帧空间
	AVFrame* frameYUV = av_frame_alloc();//创建yuv空间

	int width= pCodecContext->width;
	int height= pCodecContext->height;
	int fmt = pCodecContext->pix_fmt;
	//分配空间,进行图像转换
	//int nSize=avpicture_get_size(AV_PIX_FMT_YUV420P, width,height);//已经被否决
	int nSize = av_image_get_buffer_size(AV_PIX_FMT_YUV420P, width, height, 1);
	uint8_t* buff = NULL;
	buff=(uint8_t*)av_malloc(nSize);//分配空间

	//一帧图像
	//被否决avpicture_fill((AVPicture*)frameYUV, buff, AV_PIX_FMT_YUV420P, width, height);
	av_image_fill_arrays(frameYUV->data, frameYUV->linesize, buff, AV_PIX_FMT_YUV420P, width, height, 1);


	//av_malloc与c语言malloc等价
	AVPacket* packet = (AVPacket*)av_malloc(sizeof(AVPacket));

	//转换上下文
	SwsContext* swsCtx = NULL;
	swsCtx=sws_getContext(width, height, (AVPixelFormat)fmt,width,height, AV_PIX_FMT_YUV420P,SWS_BICUBIC,NULL,NULL,NULL);

	//读帧
	int ss = 0;
	int nFrameCount = 0;
	//ss=av_read_frame(pFormatContext, packet);
	while (av_read_frame(pFormatContext, packet)>=0)
	{
		if (packet->stream_index== VideoStream)
		{
			/*
			//这个刚刚返回-1094995529,是解码器上下文不匹配,
			packet->stream_index== VideoStream,没有进行筛选,有可能为音频,视频,字幕,需要用到对应的解码器
			*/
			ret = avcodec_send_packet(pCodecContext, packet);
			if (ret < 0) {

			}
			while (ret >= 0) {
				ret = avcodec_receive_frame(pCodecContext, frame);//这个返回-11,是因为刚刚av_packet_unref没有释放packet。
				if (ret == AVERROR(EAGAIN) || ret == AVERROR_EOF) {
					break;
				}
				else if (ret < 0) {
				//	goto end;  //end处进行资源释放等善后处理
				}
				if (ret >= 0) {
					sws_scale(swsCtx, (const uint8_t**)frame->data, frame->linesize, 0,
						height, frameYUV->data, frameYUV->linesize);
					nFrameCount++;
					cout << "帧数:" << nFrameCount<<"\n"<<endl;
				}
			}
		}
		av_packet_unref(packet);
	}
	sws_freeContext(swsCtx);
	av_frame_free(&frame);
	av_frame_free(&frameYUV);
	avcodec_close(pCodecContext);
	avformat_close_input(&pFormatContext);
}


 2万+
2万+

 被折叠的 条评论
为什么被折叠?
被折叠的 条评论
为什么被折叠?
 到【灌水乐园】发言


