


 本文涵盖SpringBoot项目中常见的安装、配置、依赖管理和运行时问题,包括插件下载、Maven依赖错误、端口冲突、页面访问失败、MyBatis参数绑定异常及调试技巧,提供实用的解决步骤。
1)在这里下载对应版本的插件https://spring.io/tools3/sts/all
注意后缀一定要是updatesite的
否则会出现No software site found at jar的错误
2)安装时出现
An error occurred while collecting items to be installed session context was:(profile=SDKProfile, phase=org.eclipse.equinox.internal.p2.engine.phases.Collect, operand=, action=).
No repository found containing: osgi.bundle,org.codehaus.jackson.core,1.9.13
No repository found containing: osgi.bundle,org.codehaus.jackson.mapper,1.9.13
错误
repository仓库
解决方法:先看一下自己的Eclipse->Window->Preference->Install/Update下
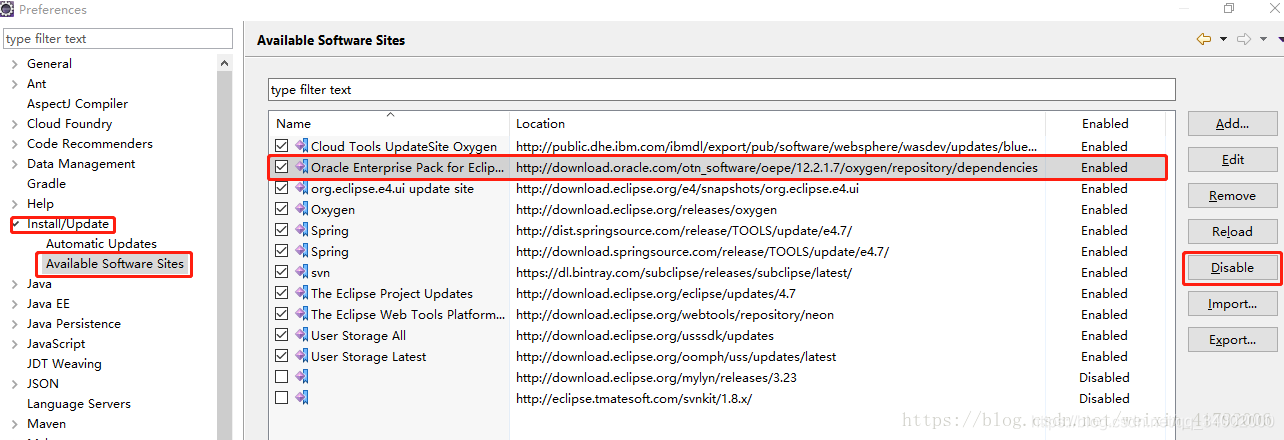 根据红色框标识改为Disable
(3)pom.xml文件第一二行出错
Failure to transfer org.apache.maven.plugins:maven-surefire-plugin:pom:2.18.1 from https://repo.maven.apache.org/maven2 was cached in the local repository, resolution will not be reattempted until the update interval of central has elapsed or updates are forced. Original error: Could not transfer artifact org.apache.maven.plugins:maven-surefire-plugin:pom:2.18.1 from/to central (https://repo.maven.apache.org/maven2): The operation was cancelled.
原理:Maven包出错,在.m库中找到对应的包,删除。
再用update更新一下。
cached 藏起
assign分配归属
(4)启动后:Address already in use: bind
把8080强制关闭。
(5)springboot启动项目后不能访问templates下的页面
1)update一下
2)我的配置文件里是对jsp的支持,不是对thymeleaf的支持。
6)server.context-path= # Context path of the application. 应用的上下文路径,也可以称为项目路径,是构成url地址的一部分。
默认可以不配置,直接在controller层通过@RequestMapping来设定url的地址路径。
@controller和@restcontroller的区别
7)Resolved exception caused by Handler execution: org.mybatis.spring.MyBatisSystemException: nested exception is org.apache.ibatis.binding.BindingException: Parameter ‘password’ not found. Available parameters are [0, 1, param1, param2]
参数没有找到。
传入多个值时,mybatis会自动将这些值转成类似map形式的值,以0,1,2…的序列为keyName。
@Select(“select * from fruitsell where f_id=#{f_id} and u_id=#{u_id}”)
public Fruitsell finbyfruitsell(@Param(“f_id”) Long f_id,@Param(“f_id”) Long u_id);
加一个@Param注解就可以了
8)springboot单点调试
修改pom.xml
	<plugin>
				<groupId>org.springframework.boot</groupId>
				<artifactId>spring-boot-maven-plugin</artifactId>
				<configuration>
					<fork>false</fork>
	                <jvmArguments>
	                	-Xdebug -Xrunjdwp:transport=dt_socket,server=y,suspend=y,address=5005
	                </jvmArguments>
            	</configuration>
			</plugin>
添加一个false,就搞定了。


 2万+
2万+

 被折叠的 条评论
为什么被折叠?
被折叠的 条评论
为什么被折叠?
 到【灌水乐园】发言


