


 文章详细介绍了如何将AOP与Spring整合,通过XML配置实现切面操作。设计中利用BeanPostProcessor的扩展性,将动态代理融入Bean生命周期。关键类如DefaultAdvisorAutoProxyCreator处理AOP代理,结合MethodBeforeAdviceInterceptor实现方法前置拦截。测试部分展示了如何配置和使用这些组件,确保拦截器在Bean实例化后生效。
文章目录
目标
AOP和spring的整合,最终能通过在 Spring xml配置的方式完成切面的操作
设计
怎么凭借 BeanPostProcessor 把动态代理融入到 Bean 的生命周期中,
如何组装各项切点、拦截、前置的功能和适配对应的代理器。
整体设计结构如下图:

为了可以让对象创建过程中,能把xml中配置的代理对象也就是切面的一些类对象实例化,就需要用到 BeanPostProcessor 提供的方法,因为这个类的中的方法可以分别作用与 Bean 对象执行初始化前后修改 Bean 的对象的扩展信息。
但这里需要集合于 BeanPostProcessor 实现新的接口和实现类,这样才能定向获取对应的类信息。
但因为创建的是代理对象不是之前流程里的普通对象,所以我们需要前置于其他对象的创建,所以在实际开发的过程中,需要在 **AbstractAutowireCapableBeanFactory#createBean 优先完成 Bean 对象的判断,**是否需要代理,有则直接返回代理对象。在Spring的源码中会有 createBean 和 doCreateBean 的方法拆分
项目结构
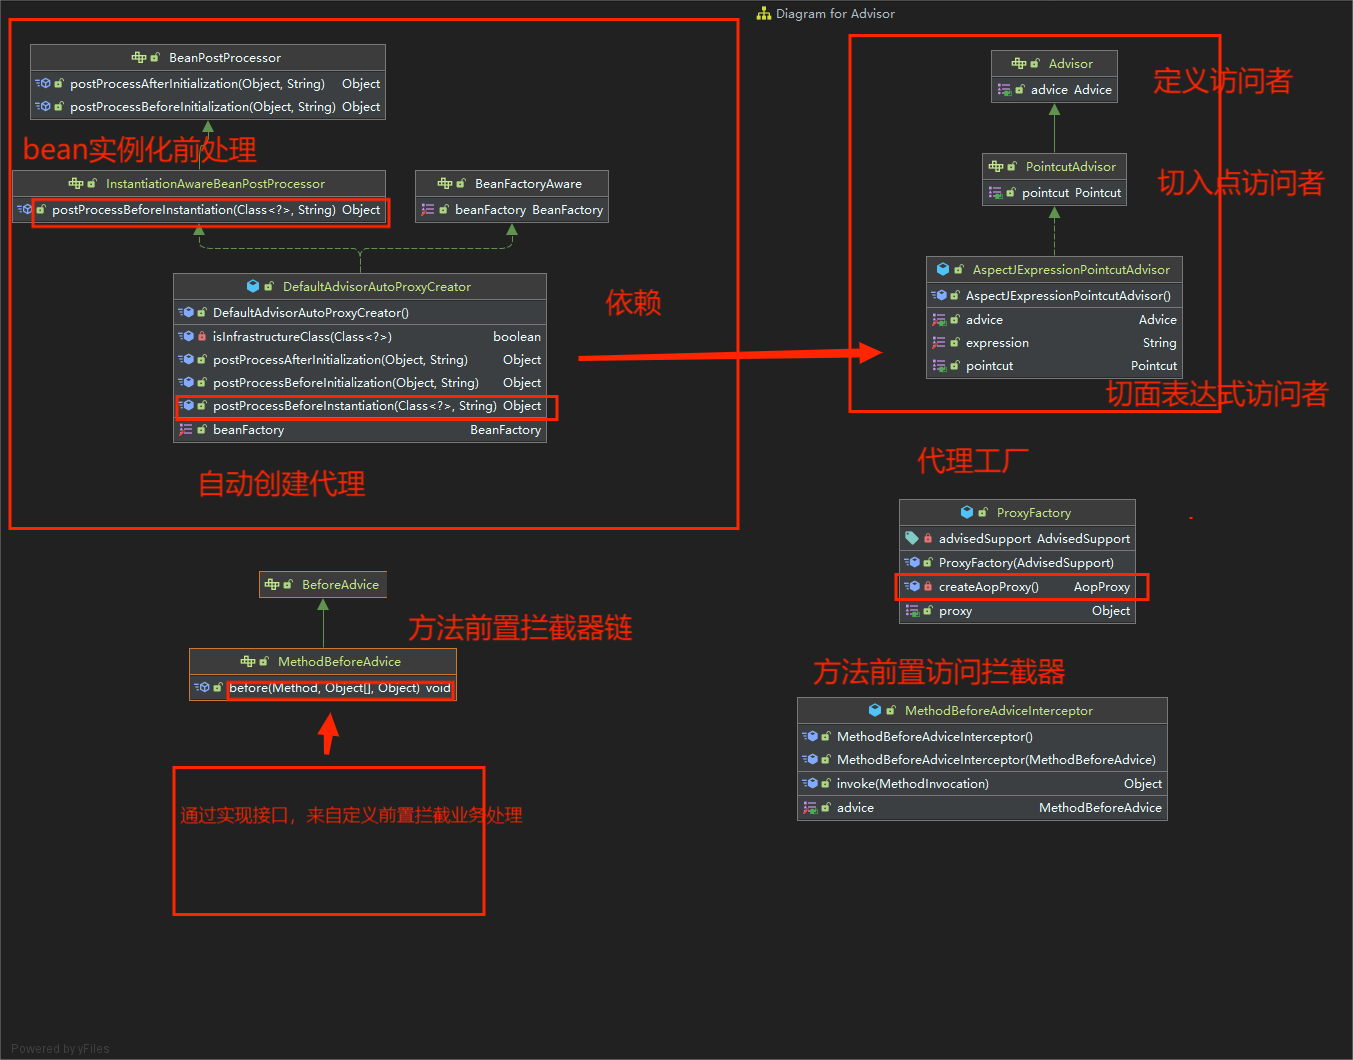
整个类关系图中可以看到,在以 BeanPostProcessor 接口实现继承的 InstantiationAwareBeanPostProcessor 接口后,做了一个自动代理创建的类 DefaultAdvisorAutoProxyCreator,这个类的就是用于处理整个 AOP 代理融入到 Bean 生命周期中的核心类。
DefaultAdvisorAutoProxyCreator 会依赖于拦截器、代理工厂和Pointcut与Advisor的包装服务, AspectJExpressionPointcutAdvisor,由它提供切面、拦截方法和表达式。
Spring 的 AOP 把 Advice 细化了 BeforeAdvice、AfterAdvice、AfterReturningAdvice、ThrowsAdvice,目前我们做的测试案例中只用到了 BeforeAdvice,这部分可以对照 Spring 的源码进行补充测试。
四、实现
1、定义Advice拦截器链
/**
 * @desc Advice前置拦截器链
 */
public interface BeforeAdvice extends Advice {
}
/**
 * @desc Advice方法前置拦截器链
 */
public interface MethodBeforeAdvice extends BeforeAdvice {


    void before(Method method, Object[] args, Object target) throws Throwable;

}
在 Spring 框架中,Advice 都是通过方法拦截器 MethodInterceptor 实现的。环绕 Advice 类似一个拦截器的链路,Before Advice、After advice等,不过暂时我们需要那么多就只定义了一个 MethodBeforeAdvice 的接口定义
2、定义Advisor访问者
public interface Advisor {


    Advice getAdvice();

}
/**
 * @desc 切入点访问者
 */
public interface PointcutAdvisor extends Advisor {

    Pointcut getPointcut();
}
PointcutAdvisor 承担了 Pointcut 和 Advice 的组合,Pointcut 用于获取 JoinPoint,而 Advice 决定于 JoinPoint 执行什么操作。
/**
 * @desc 表达式切入点访问者
 */
public class AspectJExpressionPointcutAdvisor implements PointcutAdvisor {

    // 切面
    private AspectJExpressionPointcut pointcut;

    // 具体的拦截方法
    private Advice advice;

    // 表达式
    private String expression;

    public void setExpression(String expression) {
        this.expression = expression;
    }

    @Override
    public Advice getAdvice() {
        return advice;
    }

    @Override
    public Pointcut getPointcut() {
        if (pointcut == null) {
            pointcut = new AspectJExpressionPointcut(expression);
        }
        return pointcut;
    }

    public void setAdvice(Advice advice) {
        this.advice = advice;
    }


}
AspectJExpressionPointcutAdvisor 实现了 PointcutAdvisor 接口,把切面 pointcut、拦截方法 advice 和具体的拦截表达式包装在一起。这样就可以在 xml 的配置中定义一个 pointcutAdvisor 切面拦截器了。
3、方法前置拦截器——MethodBeforeAdviceInterceptor
/**
 * @desc 方法前置访问拦截器
 */
public class MethodBeforeAdviceInterceptor implements MethodInterceptor {

    private MethodBeforeAdvice advice;

    public MethodBeforeAdviceInterceptor(MethodBeforeAdvice advice) {
        this.advice = advice;
    }

    public MethodBeforeAdviceInterceptor() {
    }

    public MethodBeforeAdvice getAdvice() {
        return advice;
    }

    public void setAdvice(MethodBeforeAdvice advice) {
        advice = advice;
    }

    @Override
    public Object invoke(MethodInvocation methodInvocation) throws Throwable {
        this.advice.before(methodInvocation.getMethod(),methodInvocation.getArguments(),methodInvocation.getThis());
        return methodInvocation.proceed();
    }
}
MethodBeforeAdviceInterceptor 实现了 MethodInterceptor 接口,在 invoke 方法中调用 advice 中的 before 方法,传入对应的参数信息。
而这个 advice.before 则是用于自己实现 MethodBeforeAdvice 接口后做的相应处理。
其实可以看到具体的 MethodInterceptor 实现类,其实和我们之前做的测试是一样的,只不过现在交给了 Spring 来处理
4、代理工厂——ProxyFactory
/**
 * @desc 代理工厂
 */
public class ProxyFactory {

    private AdvisedSupport advisedSupport;

    public ProxyFactory(AdvisedSupport advisedSupport) {
        this.advisedSupport = advisedSupport;
    }

    public Object getProxy(){
        return createAopProxy().getProxy();
    }

    private AopProxy createAopProxy(){
        if (advisedSupport.isProxyTargetClass()) {
            return new Cglib2AopProxy(advisedSupport);
        }
        return new JdkDynamicAopProxy(advisedSupport);
    }
}
其实这个代理工厂主要解决的是关于 JDK 和 Cglib 两种代理的选择问题,有了代理工厂就可以按照不同的创建需求进行控制。
5、融入Bean生命周期的自动代理创建者——InstantiationAwareBeanPostProcessor 、DefaultAdvisorAutoProxyCreator
定义bean实例化前接口,凭借BeanPostProcessor实现aop,继承spring的关键
public interface InstantiationAwareBeanPostProcessor extends BeanPostProcessor {

    /**
     * 在 Bean 对象执行初始化方法之前,执行此方法
     *
     * @param beanClass
     * @param beanName
     * @return
     * @throws BeansException
     */
    Object postProcessBeforeInstantiation(Class<?> beanClass, String beanName) throws BeansException;

}
/**
 * @desc 融入Bean生命周期的自动代理创建者
 */
public class DefaultAdvisorAutoProxyCreator implements InstantiationAwareBeanPostProcessor, BeanFactoryAware {

    private DefaultListableBeanFactory beanFactory;


    @Override
    public void setBeanFactory(BeanFactory beanFactory) throws BeansException {
        this.beanFactory = (DefaultListableBeanFactory) beanFactory;
    }

    /**
     * @desc: 在 Bean 对象执行初始化方法之前,执行此方法(这个类最核心的方法)
     **/
    @Override
    public Object postProcessBeforeInstantiation(Class<?> beanClass, String beanName) throws BeansException {
        if(isInfrastructureClass(beanClass)){
            return null;
        }
        Collection<AspectJExpressionPointcutAdvisor> advisors  = beanFactory.getBeansOfType(AspectJExpressionPointcutAdvisor.class).values();
        for (AspectJExpressionPointcutAdvisor advisor : advisors) {
            ClassFilter classFilter = advisor.getPointcut().getClassFilter();
            if(!classFilter.matches(beanClass)){
                continue;
            }
            // 切面包装类初始化
            AdvisedSupport advisedSupport = new AdvisedSupport();
            TargetSource targetSource = null;
            try {
                // 实例化beanClass
                targetSource = new TargetSource(beanClass.getDeclaredConstructor().newInstance());
            } catch (Exception e) {
                e.printStackTrace();
            }
            // 设置代理模式
            advisedSupport.setProxyTargetClass(false);
            // 被代理的对象
            advisedSupport.setTargetSource(targetSource);
            // 方法拦截器
            advisedSupport.setMethodInterceptor((MethodInterceptor) advisor.getAdvice());
            // 方法匹配器
            advisedSupport.setMethodMatcher(advisor.getPointcut().getMethodMatcher());
            return new ProxyFactory(advisedSupport).getProxy();
        }
        return null;
    }


    /**
     * @desc: 是否为基础设施类,底层C实现
     **/
    private boolean isInfrastructureClass(Class<?> beanClass) {
        return Advice.class.isAssignableFrom(beanClass) || Pointcut.class.isAssignableFrom(beanClass) || Advisor.class.isAssignableFrom(beanClass);
    }

    @Override
    public Object postProcessBeforeInitialization(Object bean, String beanName) throws BeansException {
        return bean;
    }

    @Override
    public Object postProcessAfterInitialization(Object bean, String beanName) throws BeansException {
        return bean;
    }
这个 DefaultAdvisorAutoProxyCreator 类的主要核心实现在于 postProcessBeforeInstantiation 方法中,从通过 beanFactory.getBeansOfType 获取 AspectJExpressionPointcutAdvisor 开始。
获取了 advisors 以后就可以遍历相应的 AspectJExpressionPointcutAdvisor 填充对应的属性信息,包括:目标对象、拦截方法、匹配器,之后返回代理对象即可。
那么现在调用方获取到的这个 Bean 对象就是一个已经被切面注入的对象了,当调用方法的时候,则会被按需拦截,处理用户需要的信息。
6、融入到Bean的生命周期
public abstract class  AbstractAutowireCapableBeanFactory extends AbstractBeanFactory implements AutowireCapableBeanFactory {

    private InstantiationStrategy instantiationStrategy = new CglibSubclassingInstantiationStrategy();

    /**
     * 创建bean
     */
    @Override
    protected Object createBean(String beanName, BeanDefinition beanDefinition, Object[] args) throws BeansException {
        Object bean = null;
        try {
            // 判断是否返回代理bean对象(新增代码)
            bean = resolveBeforeInstantiation(beanName,beanDefinition);
            if(bean != null){
                return bean;
            }

            bean = createBeanInstance(beanName,beanDefinition,args);
            // 属性填充
            applyPropertyvalues(beanName,bean,beanDefinition);
            // 执行 Bean 的初始化方法和 BeanPostProcessor 的前置和后置处理方法
            bean = initializeBean(beanName, bean, beanDefinition);
        } catch (Exception e) {
            throw new BeansException("Instantiation of bean failed", e);
        }
        // 注册实现了 DisposableBean 接口的 Bean 对象
        registerDisposableBeanIfNecessary(beanName, bean, beanDefinition);

        // 判断 SCOPE_SINGLETON,SCOPE_PROTOTYPE
        if(beanDefinition.isSingleton()){
            registerSingleton(beanName,bean);
        }
        return bean;
    }

    // 在实例化前应用Bean后处理器 ——新增方法,与 “applyBeanPostProcessorBeforeInitialization” 是两个方法
    public Object applyBeanPostProcessorBeforeInstantiation(Class<?> beanClass, String beanName) throws BeansException {
        for (BeanPostProcessor processor : getBeanPostProcessors()) {
            // 在 Bean 对象执行初始化方法之前,执行此方法
            if (processor instanceof InstantiationAwareBeanPostProcessor) {
                Object result = ((InstantiationAwareBeanPostProcessor) processor).postProcessBeforeInstantiation(beanClass, beanName);
                if (result != null) {
                    return result;
                }
            }
        }
        return null;
    }

    // 新增方法,解析实例化前处理
    protected Object resolveBeforeInstantiation(String beanName, BeanDefinition beanDefinition) {
        // 实例化前处理
        Object bean = applyBeanPostProcessorBeforeInstantiation(beanDefinition.getBeanClass(), beanName);
        if (bean != null) {
            // 如果是代理对象,则直接进行初始化后处理
            bean = applyBeanPostProcessorsAfterInitialization(bean,beanName);
        }
        return bean;
    }

	// 省略与本章节无关代码


}
因为创建的是代理对象,不是之前流程里的普通对象,所以我们需要前置于其他对象的创建,即需要在 AbstractAutowireCapableBeanFactory#createBean 优先完成 Bean 对象的判断,是否需要代理,有则直接返回代理对象,且执行出初始化后的逻辑。
二、测试
1、准备
public class UserService implements IUserService {

    public String queryUserInfo() {
        try {
            Thread.sleep(new Random(1).nextInt(100));
        } catch (InterruptedException e) {
            e.printStackTrace();
        }
        return "ljc,100001,上海";
    }

    public String register(String userName) {
        try {
            Thread.sleep(new Random(1).nextInt(100));
        } catch (InterruptedException e) {
            e.printStackTrace();
        }
        return "注册用户:" + userName + " success!";
    }
}
后面我们的测试过程,会给这个两个方法添加我们的拦截处理
2、自定义拦截方法
public class UserServiceBeforeAdvice implements MethodBeforeAdvice {

    @Override
    public void before(Method method, Object[] args, Object target) throws Throwable {
        System.out.println("拦截方法:" + method.getName());
    }
}
与上一章节的拦截方法相比,我们不再是实现 MethodInterceptor 接口,而是实现 MethodBeforeAdvice 环绕拦截。
在这个方法中我们可以获取到方法的一些信息,如果还开发了它的 MethodAfterAdvice 则可以两个接口一起实现
3、spring.xml 配置 AOP
<?xml version="1.0" encoding="UTF-8"?>
<beans>

    <bean id="userService" class="springframework.test.bean.UserService"/>

    <bean class="cn.ljc.springframework.aop.framework.autoproxy.DefaultAdvisorAutoProxyCreator"/>

    <bean id="beforeAdvice" class="springframework.test.bean.UserServiceBeforeAdvice"/>

    <bean id="methodInterceptor" class="cn.ljc.springframework.aop.framework.adapter.MethodBeforeAdviceInterceptor">
        <property name="advice" ref="beforeAdvice"/>
    </bean>

    <bean id="pointcutAdvisor" class="cn.ljc.springframework.aop.aspectj.AspectJExpressionPointcutAdvisor">
        <property name="expression" value="execution(* springframework.test.bean.IUserService.*(..))"/>
        <property name="advice" ref="methodInterceptor"/>
    </bean>

</beans>
这回再使用 AOP 就可以像 Spring 中一样,通过在 xml 中配置即可。因为我们已经把 AOP 的功能融合到 Bean 的生命周期里去了,你的新增拦截方法都会被自动处理。
4、单元测试
@Test
public void test_aop() {
    ClassPathXmlApplicationContext applicationContext = new ClassPathXmlApplicationContext("classpath:spring.xml");
    IUserService userService = applicationContext.getBean("userService", IUserService.class);
    System.out.println("测试结果:" + userService.queryUserInfo());
}
在单元测试中你只需要按照正常获取和使用 Bean 对象即可,不过这个时候如果被切面拦截了,那么其实你获取到的就是对应的代理对象里面的处理操作了。
测试结果
拦截方法:queryUserInfo
测试结果:ljc,100001,上海
通过测试结果可以看到,我们已经让拦截方法生效了,也不需要自己手动处理切面、拦截方法等内容。
总结
到此,实现了aop切面和spring的整合,只需要配置xml,就可以了,不需要手动处理
实现的关键点则是依赖于beanPostProcessor,实例化前进行代理的处理


 4481
4481

 被折叠的 条评论
为什么被折叠?
被折叠的 条评论
为什么被折叠?
 到【灌水乐园】发言


