


补充点
1.消费者在消费消息时发生异常,rabbitmq会发生什么现象?

会出现死循环的重试,消费者一直重试消费消息。

解决方式:

1.控制重发的次数
如果重试次数达到满层,并且是自动ACK,如果没有配置死信队列,那么消息会被丢失。

2.try+catch+手动ack+死信队列


#配置rabbitmq服务
spring:
  rabbitmq:
    host: ip
    port: 5672
    virtual-host: /
    username: admin
    password: admin
    listener:
      simple:
        acknowledge-mode: manual  #这里是开启手动ACK
        retry:
          enabled: true #开启重试
          max-attempts: 3 #重试最大次数
          initial-interval: 2000ms #重试间隔时间
1.消息中间件
本质:它是一种接受数据、接受请求、存储数据、发送数据等功能的技术服务。


核心组成部分:
1.消息的协议
2.消息的持久化机制
3.消息的分发策略
4.消息的高可用,高可靠
5.消息的容错机制


好处:
使用中间件可以使系统架构设计更加灵活(系统的不同模块可以使用不同的语言开发,比较支付模块Java,订单
模块GO语言,用户模块PHP,那么模块之间的通信就可以使用中间件进行互通)


应用场景:
1.异步数据传输
2.任务调度场景
3.日志管理场景
4.分布式事务场景
2.单体架构
单体架构的特点:就是把所有的业务和模块,静态资源等文件都放在一个工程中,如果其中的一个模块升级
或者迭代发生一个很小变动都会重新编译和重新部署项目。这种架构存在的问题就是:
1.耦合度太高
2.运行的成本太高
3.不易维护
3.分布式系统
将业务模块拆分成多个独立的服务部署运行,一个请求由服务器端的多个服务协同处理完成。

优点:
1.合理分配服务器资源,不造成服务器资源的浪费。
2.系统独立维护和部署,耦合度降低。
3.弹性部署,不会造成平台因部署造成的瘫痪和停服的状态。
4.协议
消息中间件采用的不是HTTP协议,而常见的消息中间件协议有:OpenWire、AMQP、MQTT、OpenMessage协议。

补充:
为什么消息中间件不直接使用HTTP协议呢?
没有必要,对于一个消息而言,它其实就是负责数据传递、存储、分发就行了,追求的是高性能,尽量简介
快速。而HTTP请求报文头和响应报文头是比较复杂的,包含了cookie,状态码,响应码等附加的功能所以说
没有必要使用HTTP协议。


AMQP
AMQP,即Advanced Message Queuing Protocol,一个提供统一消息服务的应用层标准高级消息队列协议,
是应用层协议的一个开放标准,为面向消息的中间件设计。基于此协议的客户端与消息中间件可传递消息,并不
受客户端/中间件不同产品,不同的开发语言等条件的限制。Erlang中的实现有RabbitMQ等。

AMQP协议的支持者:
RabbitMQ和ActiveMQ


特性:
1.分布式事务支持
2.消息的持久化支持
3.高性能和高可靠的消息处理优势

MQTT
MQTT协议(Message Queuing Telemetry Transport)是IBM开放的一个即时通讯协议,物联网系统架构中的
重要组成部分。

MQTT协议支持者:
RabbitMQ和ActiveMQ

特点:
1.轻量
2.结构简单
3.传输快,不支持事务
4.没有持久化设计


协议:是在tcp/ip协议基础上构建的一种约定成俗的规范和机制,它的主要目的是让客户端进行通讯和沟通。
并且这种协议必须具有持久性,高可用,高可靠的性能。
5.持久化
就是将数据存入硬盘中,而不是存储在内存中,使数据能够永久保存。| ActiveMQ | RabbitMQ | Kafka | RocketMQ | |
| 文件存储 | 支持 | 支持 | 支持 | 支持 |
| 数据库 | 支持 | / | / | / |
6.RabbitMQ入门及安装
RabbitMQ是一个开源的遵循AMQP协议实现的基于Erlang语言编写,支持多种客户端(语言)。用于在分布式系统
中存储消息,转发消息,具有高可用,高可扩性,易用性等特征。

下载地址:https://www.rabbitmq.com/download.html


安装RabbitMQ

RabbitMQ是采用Erlang语言开发的,所以系统环境必须提供Erlang环境,第一步就是安装Erlang。

查看RabbitMQ版本对应的Erlang语言环境版本要求
https://www.rabbitmq.com/which-erlang.html

Erlang语言下载地址:https://www.erlang-solutions.com/downloads/#


RabbitMQ和Erlang资源已经打包上传优快云了,下载地址如下:
https://download.youkuaiyun.com/download/qq_33274797/21516953
开始安装

在/usr/local/目录下建立rabbitmq目录

mkdir rabbitmq

上传erlang-solutions-2.0-1.noarch.rpm和rabbitmq-server-3.8.13-1.el8.noarch.rpm.


先安转erlang环境

1.解压

rpm -Uvh erlang-solutions-2.0-1.noarch.rpm

2.安装erlang

yum install -y erlang

3.检测是否安装成功

erl -v 查看erlang版本如果出现以下内容表示安装成功。

Erlang/OTP 24 [erts-12.0.3] [source] [64-bit] [smp:1:1] [ds:1:1:10] [async-threads:1] [jit]

Eshell V12.0.3  (abort with ^G)
1>

4.安装socat插入(RabbitMQ安装需要这个插件)

yum install -y socat


----------------------------------------------------------------
erlang环境和socat插件安装完毕,开始安装rabbitMQ

1.解压

rpm -Uvh rabbitmq-server-3.8.13-1.el8.noarch.rpm

2.安装rabbitmq

yum install -y rabbitmq-server

3.启动rabbitMQ

systemctl start rabbitmq-server

4.查看rabbitMQ状态

systemctl status rabbitmq-server

5.设置为开机自启动(可选)

systemctl enable rabbitmq-server
7.RabbitMQ-Web管理界面及授权登录
默认情况下,rabbitmq是没有安装web端的客户端插件,需要安装才可以生效。

rabbitmq-plugins enable rabbitmq_management

[root@blcyy0fnejtj8m7f rabbitmq]# rabbitmq-plugins enable rabbitmq_management
Enabling plugins on node rabbit@blcyy0fnejtj8m7f:
rabbitmq_management
The following plugins have been configured:
  rabbitmq_management
  rabbitmq_management_agent
  rabbitmq_web_dispatch
Applying plugin configuration to rabbit@blcyy0fnejtj8m7f...
Plugin configuration unchanged.


注意:rabbitmq有一个默认账号和密码:guest。但是这个账号只能在本机访问也就是localhost,如果你是在
远程服务器上安装的rabbitmq,那么guest账号是无法使用的。我们需要添加一个远程可以访问的账号。
访问的WEB服务器端口为15672。


1.添加远程访问用户
rabbitmqctl add_user 账号 密码

2.设置用户分配操作权限
rabbitmqctl set_user_tags 账号 administrator

用户级别:
administrator:可以登录控制台、查看所有信息、可以对rabbitmq进行管理。
monitoring:监控者 登录控制台 查看所有信息
policymaker:策略制定者 登录控制台 指定策略
managment:普通管理员 登录控制台

3.为用户添加资源权限
rabbitmqctl set_permissions -p / 用户 ".*" ".*" ".*"

额外补充命令:
修改密码
rabbitmqctl change_password 用户名 新密码
删除用户
rabbitmqctl delete_user 用户名
查看用户清单
rabbitmqctl list_users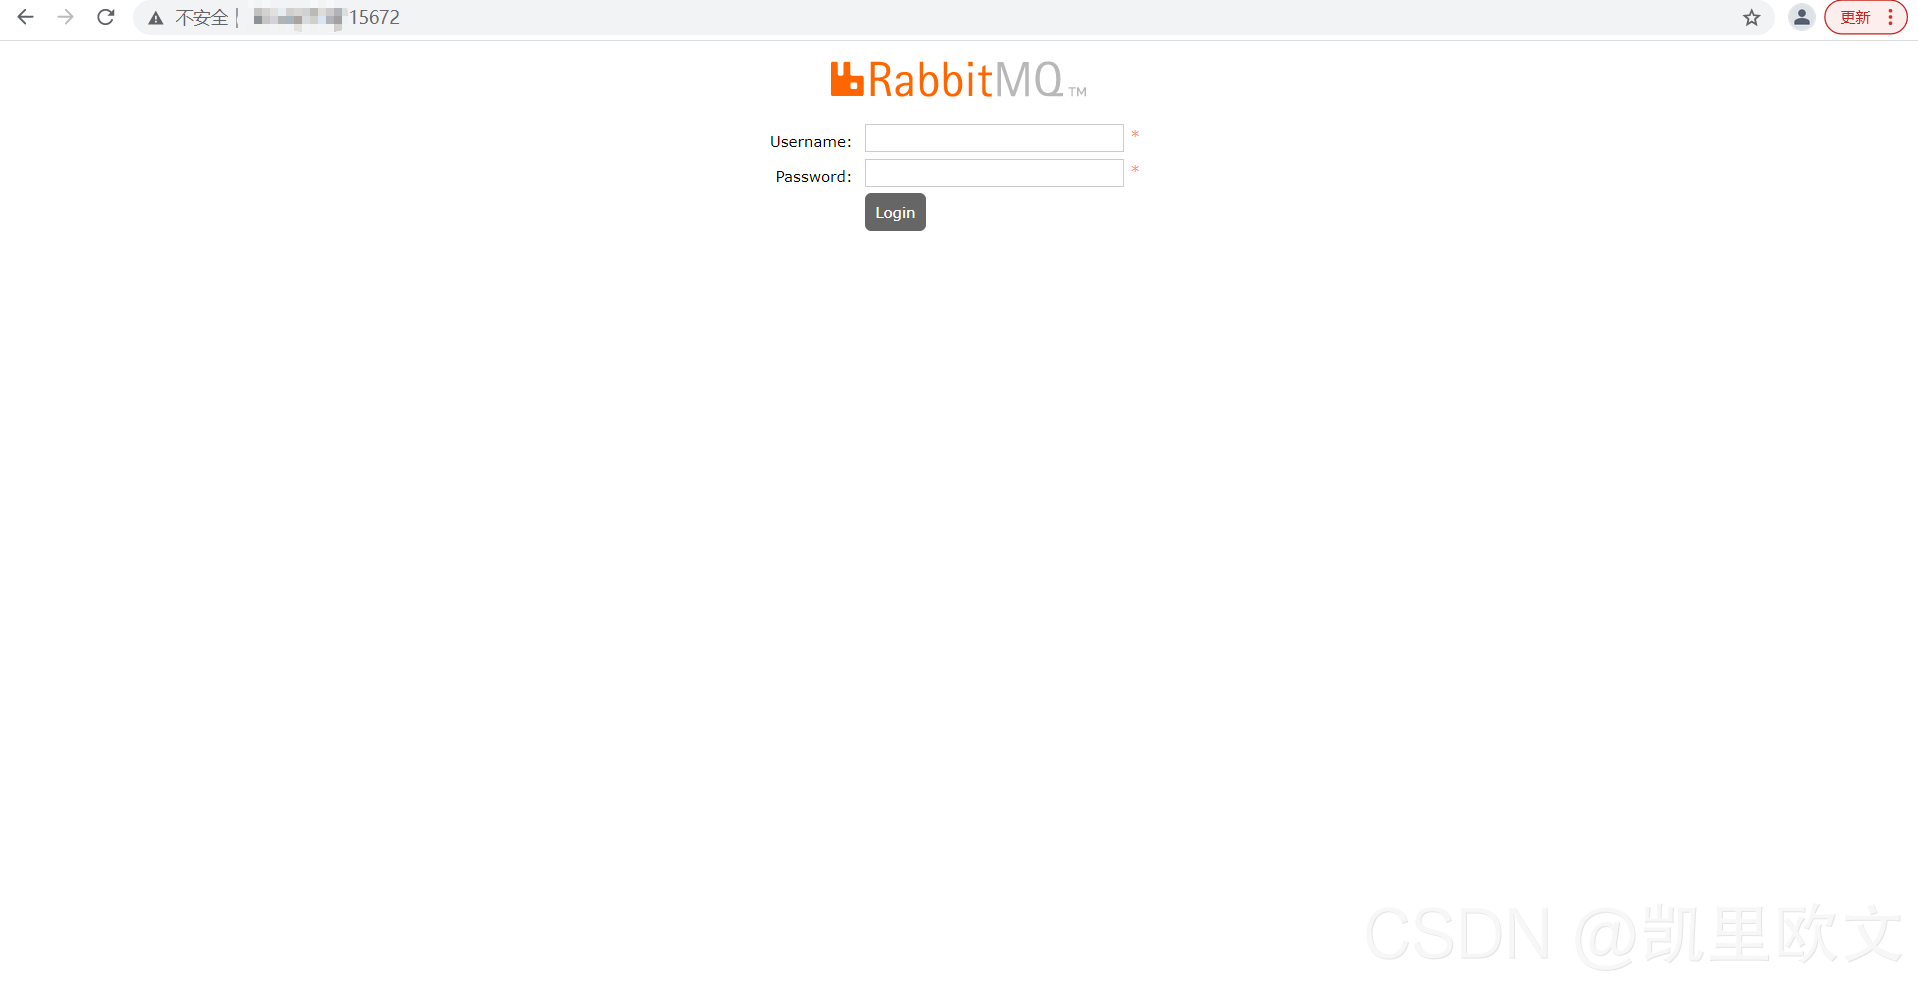
8.RabbitMQ-Java入门案例
1.构建一个普通的Maven项目

2.导入rabbitmq的Java原生依赖

<dependency>
  <groupId>com.rabbitmq</groupId>
  <artifactId>amqp-client</artifactId>
  <version>5.10.0</version>
</dependency>
队列简单案例
package com.ldd.rabbitmq.simple;
import com.rabbitmq.client.Channel;
import com.rabbitmq.client.Connection;
import com.rabbitmq.client.ConnectionFactory;
/**
* @author 小李同学
* @pageage com.ldd.rabbitmq.simple
* @date
* @week 生产者
* @action
*/
public class Producer {
public static void main(String[] args) {
//1.创建连接工厂
ConnectionFactory connectionFactory = new ConnectionFactory();
connectionFactory.setHost("ip");
connectionFactory.setPort(5672);
connectionFactory.setUsername("admin");
connectionFactory.setPassword("admin");
connectionFactory.setVirtualHost("/");
Connection connection = null;
Channel channel = null;
try {
//2.创建连接
connection = connectionFactory.newConnection();
//3.通过连接获取通道
channel = connection.createChannel();
//4.声明队列
String queueName = "queue1";
/*
params1 队列的名称
params2 是否要持久化 false非持久化 true持久化
params3 排他性 是否是独占独行
params4 是否自动删除队列,最后一个消费者消费完毕消息后是队列是否自动删除
params5 携带附属参数
*/
channel.queueDeclare(queueName, false, false, false, null);
//5.准备消息内容
String message = "Hello RabbitMq";
//6.发送消息给队列
channel.basicPublish("", queueName, null, message.getBytes());
System.out.println("消息发送成功");
} catch (Exception e) {
e.printStackTrace();
} finally {
//7.关闭通道
if (channel != null && channel.isOpen()) {
try {
channel.close();
} catch (Exception e) {
e.printStackTrace();
}
}
//8.关闭连接
if (connection != null && connection.isOpen()) {
try {
connection.close();
} catch (Exception e) {
e.printStackTrace();
}
}
}
}
}
package com.ldd.rabbitmq.simple;

import com.rabbitmq.client.*;

import java.io.IOException;

/**
 * @author 小李同学
 * @pageage com.ldd.rabbitmq.simple
 * @date   消费者
 * @week
 * @action
 */
public class Consumer {

    public static void main(String[] args) {

        //1.创建连接工厂
        ConnectionFactory connectionFactory = new ConnectionFactory();
        connectionFactory.setHost("ip");
        connectionFactory.setPort(5672);
        connectionFactory.setUsername("admin");
        connectionFactory.setPassword("admin");
        connectionFactory.setVirtualHost("/");

        Connection connection = null;
        Channel channel = null;
        try {
            //2.创建连接
            connection = connectionFactory.newConnection();
            //3.通过连接获取通道
            channel = connection.createChannel();
            //4.消费消息
            String queueName = "queue1";
            channel.basicConsume(queueName, true, new DeliverCallback() {
                @Override
                public void handle(String s, Delivery delivery) throws IOException {
                    System.out.println("收到的消息是:" + new String(delivery.getBody(), "UTF-8"));
                }
            }, new CancelCallback() {
                @Override
                public void handle(String s) throws IOException {
                    System.out.println("接受失败了");
                }
            });
        } catch (Exception e) {
            e.printStackTrace();
        } finally {
            //7.关闭通道
            if (channel != null && channel.isOpen()) {
                try {
                    channel.close();
                } catch (Exception e) {
                    e.printStackTrace();
                }
            }
            //8.关闭连接
            if (connection != null && connection.isOpen()) {
                try {
                    connection.close();
                } catch (Exception e) {
                    e.printStackTrace();
                }
            }
        }
    }
}
消息持久化是将消息保存在磁盘上,并且消息服务器重启消息依然在磁盘上,不会丢失。如果选择非持久化
消息也会保存在磁盘上,但是当消息服务器重启后,消息将会在磁盘上丢失。
9.RabbitMQ的核心组件组成
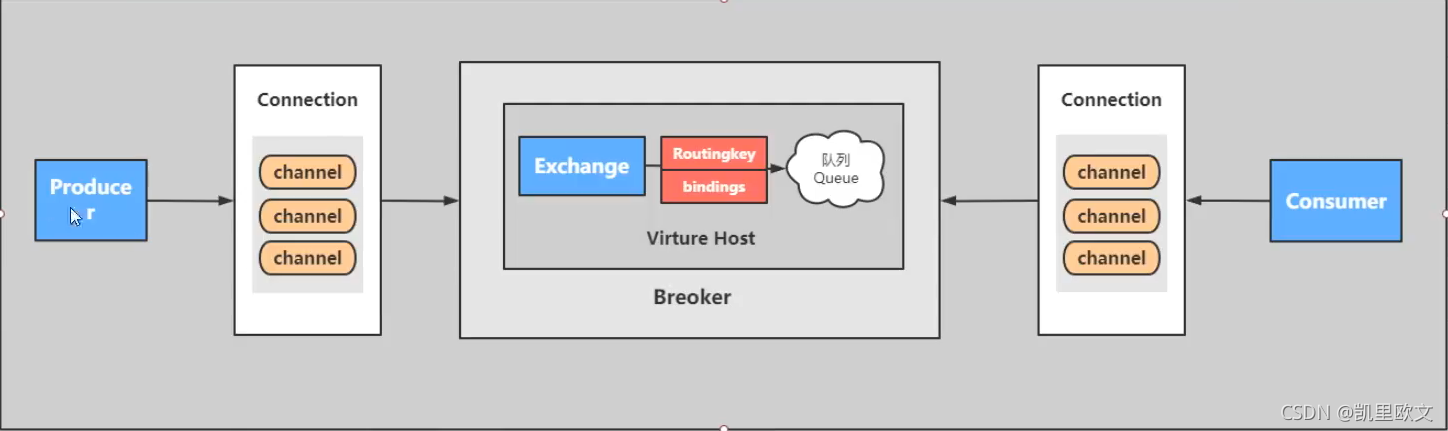
Server:又称Broker,接受客户端的连接,实现AMQP实体服务。也就是安装的rabbitmq-server
Connection:连接,应用程序与Broker的网络连接TCP/IP三次握手和四次挥手
Channel:网络信道,几乎所有的操作都在Channel中进行,Channel是进行消息读写的通道,每个Channel代表
一个会话任务。
Message:消息,服务与应用程序之间传递的数据,由Properties和body组成,Properties可以对消息进行修
饰,比如消息的优先级,延迟等高级特性,Body则就是消息体的内容。
Virtual Host:虚拟地址,用于进行逻辑隔离,最上层的消息路由,一个虚拟主机可以有若干个Exhange和
Queue,同一个虚拟逐渐里面不能有相同名字的Exchange
Exchange:交换机,接受消息,根据路由键发送消息到绑定的队列。(==不具备消息存储能力)
Bindings:Exchange和Queue之间的虚拟连接,binding中可以保护多个routing key。
Routing key:是一个路由规则,虚拟机可以用它来确定如何路由一个特定消息。
Queue:队列,也是Message Queue消息队列,保存消息并将他们转发给消费者.

注意:
1.如果队列没有指定交换机,那么会自动绑定默认交换机。
2.消息不是直接发送到队列的,而是由交换机将消息发送到对应绑定的队列。
10.RabbitMQ-Java入门案例-fanout模式
类型:fanout
特定:Fanout---发布与订阅模式,是一种广播机制,它是没有路由key的模式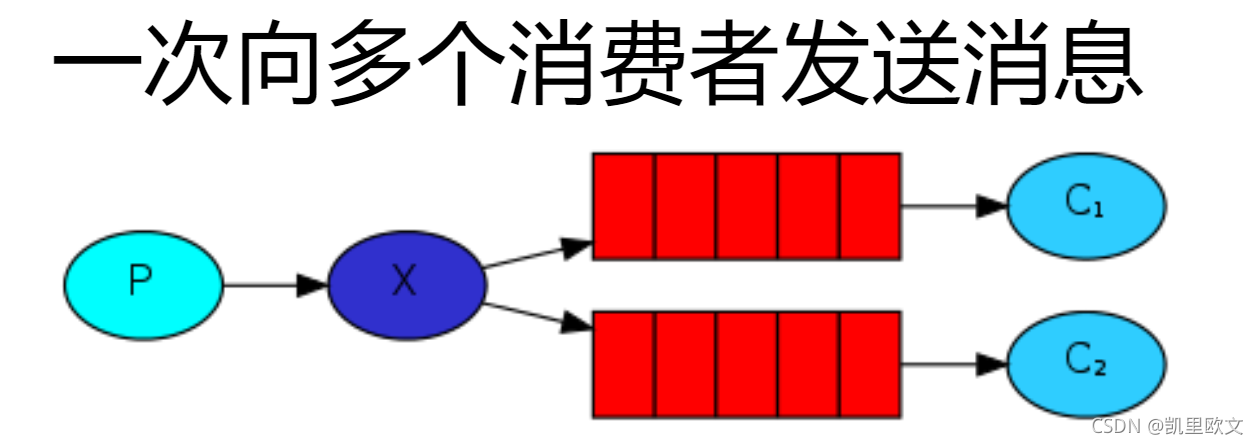
package com.ldd.rabbitmq.fanout;

import com.rabbitmq.client.Channel;
import com.rabbitmq.client.Connection;
import com.rabbitmq.client.ConnectionFactory;

/**
 * @author 小李同学
 * @pageage com.ldd.rabbitmq.simple
 * @date
 * @week
 * @action
 */
public class Producer {

    public static void main(String[] args) {

        //1.创建连接工厂
        ConnectionFactory connectionFactory = new ConnectionFactory();
        connectionFactory.setHost("ip");
        connectionFactory.setPort(5672);
        connectionFactory.setUsername("admin");
        connectionFactory.setPassword("admin");
        connectionFactory.setVirtualHost("/");

        Connection connection = null;
        Channel channel = null;
        try {
            //2.创建连接
            connection = connectionFactory.newConnection();
            //3.通过连接获取通道
            channel = connection.createChannel();
            //4.声明交换机
            String exchangeName = "fanout_message_exchange";
            //交换机类型 direct|topic|fanout|headers
            String exchangeType = "fanout";
            channel.exchangeDeclare(exchangeName, exchangeType, true);
            //5.声明队列
            channel.queueDeclare("fanout1", false, false, false, null);
            channel.queueDeclare("fanout2", false, false, false, null);
            //6.绑定队列和交换机的关系
            channel.queueBind("fanout1", exchangeName, "");
            channel.queueBind("fanout2", exchangeName, "");
            //7.准备消息内容
            String message = "Hello RabbitMq";
            //8.发送消息给队列
            channel.basicPublish(exchangeName, "", null, message.getBytes());
            System.out.println("消息发送成功");
        } catch (Exception e) {
            e.printStackTrace();
        } finally {
            //7.关闭通道
            if (channel != null && channel.isOpen()) {
                try {
                    channel.close();
                } catch (Exception e) {
                    e.printStackTrace();
                }
            }
            //8.关闭连接
            if (connection != null && connection.isOpen()) {
                try {
                    connection.close();
                } catch (Exception e) {
                    e.printStackTrace();
                }
            }
        }
    }
}
package com.ldd.rabbitmq.fanout;

import com.rabbitmq.client.*;

import java.io.IOException;

/**
 * @author 小李同学
 * @pageage com.ldd.rabbitmq.simple
 * @date
 * @week
 * @action
 */
public class Consumer {


    public static void main(String[] args) {

        //1.创建连接工厂
        ConnectionFactory connectionFactory = new ConnectionFactory();
        connectionFactory.setHost("49.7.209.76");
        connectionFactory.setPort(5672);
        connectionFactory.setUsername("admin");
        connectionFactory.setPassword("admin");
        connectionFactory.setVirtualHost("/");

        Connection connection = null;
        Channel channel = null;
        try {
            //2.创建连接
            connection = connectionFactory.newConnection();
            //3.通过连接获取通道
            channel = connection.createChannel();
            //4.消费消息
            String queueName = "fanout1";
            channel.basicConsume(queueName, true, new DeliverCallback() {
                @Override
                public void handle(String s, Delivery delivery) throws IOException {
                    System.out.println("fanout1收到的消息是:" + new String(delivery.getBody(), "UTF-8"));
                }
            }, new CancelCallback() {
                @Override
                public void handle(String s) throws IOException {
                    System.out.println("接受失败了");
                }
            });
        } catch (Exception e) {
            e.printStackTrace();
        } finally {
            //7.关闭通道
            if (channel != null && channel.isOpen()) {
                try {
                    channel.close();
                } catch (Exception e) {
                    e.printStackTrace();
                }
            }
            //8.关闭连接
            if (connection != null && connection.isOpen()) {
                try {
                    connection.close();
                } catch (Exception e) {
                    e.printStackTrace();
                }
            }
        }
    }
}
11.RabbitMQ-Java入门案例-Direct模式
类型:direct
特定:Direct---fanout路由模式,增加了RoutingKey路由。交换机和队列绑定对应的路由,发送消息时
可以发送到指定的路由地址。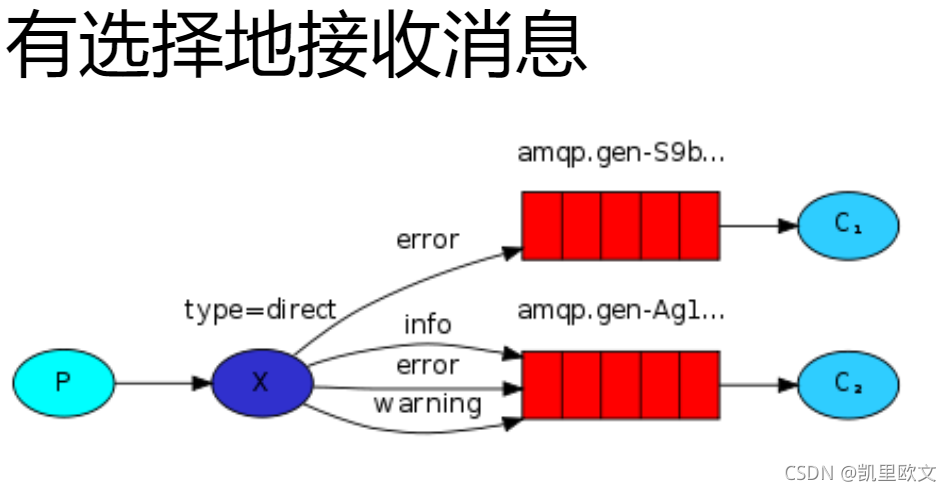
package com.ldd.rabbitmq.fanout;

import com.rabbitmq.client.Channel;
import com.rabbitmq.client.Connection;
import com.rabbitmq.client.ConnectionFactory;

/**
 * @author 小李同学
 * @pageage com.ldd.rabbitmq.simple
 * @date
 * @week
 * @action
 */
public class Producer {

    public static void main(String[] args) {

        //1.创建连接工厂
        ConnectionFactory connectionFactory = new ConnectionFactory();
        connectionFactory.setHost("49.7.209.76");
        connectionFactory.setPort(5672);
        connectionFactory.setUsername("admin");
        connectionFactory.setPassword("admin");
        connectionFactory.setVirtualHost("/");

        Connection connection = null;
        Channel channel = null;
        try {
            //2.创建连接
            connection = connectionFactory.newConnection();
            //3.通过连接获取通道
            channel = connection.createChannel();
            //4.声明交换机
            String exchangeName = "direct_message_exchange";
            //交换机类型 direct|topic|fanout|headers
            String exchangeType = "direct";
            channel.exchangeDeclare(exchangeName, exchangeType, true);
            //5.声明队列
            channel.queueDeclare("direct1", false, false, false, null);
            channel.queueDeclare("direct2", false, false, false, null);
            //6.绑定队列和交换机的关系
            channel.queueBind("direct1", exchangeName, "user");
            channel.queueBind("direct2", exchangeName, "order");
            //7.准备消息内容
            String message = "Hello RabbitMqUser";
            //8.发送消息给队列 交换机发送消息给路由为user的队列
            channel.basicPublish(exchangeName, "user", null, message.getBytes());
            System.out.println("消息发送成功");
        } catch (Exception e) {
            e.printStackTrace();
        } finally {
            //7.关闭通道
            if (channel != null && channel.isOpen()) {
                try {
                    channel.close();
                } catch (Exception e) {
                    e.printStackTrace();
                }
            }
            //8.关闭连接
            if (connection != null && connection.isOpen()) {
                try {
                    connection.close();
                } catch (Exception e) {
                    e.printStackTrace();
                }
            }
        }
    }
}
12.RabbitMQ-Java入门案例-Topic模式
类型:Topic
特定:Topic---路由支持模糊匹配规则交换机和队列绑定对应的路由,发送消息时
可以发送到指定的路由地址。

注意:
1.#表示0个或多个。
2.*表示1个。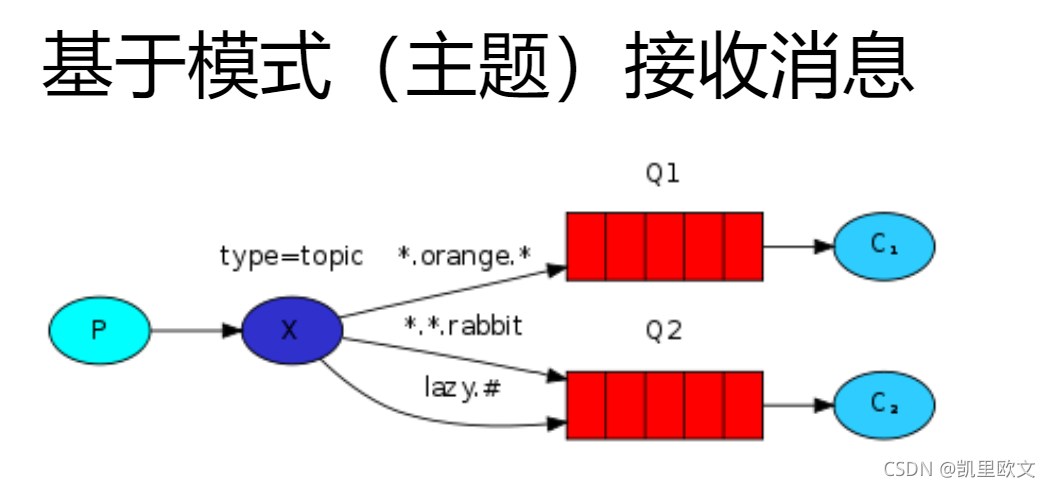
package com.ldd.rabbitmq.fanout;

import com.rabbitmq.client.Channel;
import com.rabbitmq.client.Connection;
import com.rabbitmq.client.ConnectionFactory;

/**
 * @author 小李同学
 * @pageage com.ldd.rabbitmq.simple
 * @date
 * @week
 * @action
 */
public class Producer {

    public static void main(String[] args) {

        //1.创建连接工厂
        ConnectionFactory connectionFactory = new ConnectionFactory();
        connectionFactory.setHost("49.7.209.76");
        connectionFactory.setPort(5672);
        connectionFactory.setUsername("admin");
        connectionFactory.setPassword("admin");
        connectionFactory.setVirtualHost("/");

        Connection connection = null;
        Channel channel = null;
        try {
            //2.创建连接
            connection = connectionFactory.newConnection();
            //3.通过连接获取通道
            channel = connection.createChannel();
            //4.声明交换机
            String exchangeName = "topic_message_exchange";
            //交换机类型 direct|topic|fanout|headers
            String exchangeType = "topic";
            channel.exchangeDeclare(exchangeName, exchangeType, true);
            //5.声明队列
            channel.queueDeclare("topic1", false, false, false, null);
            channel.queueDeclare("topic2", false, false, false, null);
            //6.绑定队列和交换机的关系
            channel.queueBind("topic1", exchangeName, "#.user");
            channel.queueBind("topic2", exchangeName, "order.*");
            //7.准备消息内容
            String message = "Hello RabbitMqUser";
            //8.发送消息给队列
            channel.basicPublish(exchangeName, "order.a", null, message.getBytes());
            System.out.println("消息发送成功");
        } catch (Exception e) {
            e.printStackTrace();
        } finally {
            //7.关闭通道
            if (channel != null && channel.isOpen()) {
                try {
                    channel.close();
                } catch (Exception e) {
                    e.printStackTrace();
                }
            }
            //8.关闭连接
            if (connection != null && connection.isOpen()) {
                try {
                    connection.close();
                } catch (Exception e) {
                    e.printStackTrace();
                }
            }
        }
    }
}
13.RabbitMQ-Java入门案例-Work模式
多个消费者消费同一个队列里面的消息,有两种模式可以选择。

1.轮询模式。
2.公平分配

轮询模式:
类型:无
特定:当有多个消费者接入时,消息的分配模式是轮询消费,一个消费者消费一条消息,接着另外一个消费者
消费一条消息,直到消息消费完毕。


注意:一个队列多个消费者默认就是轮询模式。
package com.ldd.rabbitmq.work.polling;
import com.rabbitmq.client.Channel;
import com.rabbitmq.client.Connection;
import com.rabbitmq.client.ConnectionFactory;
/**
* @author 小李同学
* @pageage com.ldd.rabbitmq.simple
* @date
* @week
* @action
*/
public class Producer {
public static void main(String[] args) {
//1.创建连接工厂
ConnectionFactory connectionFactory = new ConnectionFactory();
connectionFactory.setHost("49.7.209.76");
connectionFactory.setPort(5672);
connectionFactory.setUsername("admin");
connectionFactory.setPassword("admin");
connectionFactory.setVirtualHost("/");
Connection connection = null;
Channel channel = null;
try {
//2.创建连接
connection = connectionFactory.newConnection();
//3.通过连接获取通道
channel = connection.createChannel();
//4.声明队列
String queueName = "polling";
/*
params1 队列的名称
params2 是否要持久化 false非持久化 true持久化
params3 排他性 是否是独占独行
params4 是否自动删除队列,最后一个消费者消费完毕消息后是队列是否自动删除
params5 携带附属参数
*/
channel.queueDeclare(queueName, false, false, false, null);
for (int i = 1; i <= 20; i++) {
//5.准备消息内容
String message = "Hello Work轮询" + i;
//6.发送消息给队列
channel.basicPublish("", queueName, null, message.getBytes());
}
System.out.println("消息发送成功");
} catch (Exception e) {
e.printStackTrace();
} finally {
//7.关闭通道
if (channel != null && channel.isOpen()) {
try {
channel.close();
} catch (Exception e) {
e.printStackTrace();
}
}
//8.关闭连接
if (connection != null && connection.isOpen()) {
try {
connection.close();
} catch (Exception e) {
e.printStackTrace();
}
}
}
}
}
package com.ldd.rabbitmq.work.polling;

import com.rabbitmq.client.*;

import java.io.IOException;

/**
 * @author 小李同学
 * @pageage com.ldd.rabbitmq.simple
 * @date
 * @week
 * @action
 */
public class work1 {

    public static void main(String[] args) {

        //1.创建连接工厂
        ConnectionFactory connectionFactory = new ConnectionFactory();
        connectionFactory.setHost("ip");
        connectionFactory.setPort(5672);
        connectionFactory.setUsername("admin");
        connectionFactory.setPassword("admin");
        connectionFactory.setVirtualHost("/");

        Connection connection = null;
        Channel channel = null;
        try {
            //2.创建连接
            connection = connectionFactory.newConnection();
            //3.通过连接获取通道
            channel = connection.createChannel();
            //4.消费消息
            String queueName = "polling";
            channel.basicConsume(queueName, true, new DeliverCallback() {
                @Override
                public void handle(String s, Delivery delivery) throws IOException {
                    System.out.println("work1收到的消息是:" + new String(delivery.getBody(), "UTF-8"));
                    try {
                        Thread.sleep(200);
                    } catch (InterruptedException e) {
                        e.printStackTrace();
                    }
                }
            }, new CancelCallback() {
                @Override
                public void handle(String s) throws IOException {
                    System.out.println("接受失败了");
                }
            });
            System.in.read();
        } catch (Exception e) {
            e.printStackTrace();
        } finally {
            //7.关闭通道
            if (channel != null && channel.isOpen()) {
                try {
                    channel.close();
                } catch (Exception e) {
                    e.printStackTrace();
                }
            }
            //8.关闭连接
            if (connection != null && connection.isOpen()) {
                try {
                    connection.close();
                } catch (Exception e) {
                    e.printStackTrace();
                }
            }
        }
    }
}

work1收到的消息是:Hello Work轮询2
work1收到的消息是:Hello Work轮询4
work1收到的消息是:Hello Work轮询6
work1收到的消息是:Hello Work轮询8
work1收到的消息是:Hello Work轮询10
work1收到的消息是:Hello Work轮询12
work1收到的消息是:Hello Work轮询14
work1收到的消息是:Hello Work轮询16
work1收到的消息是:Hello Work轮询18
work1收到的消息是:Hello Work轮询20
package com.ldd.rabbitmq.work.polling;

import com.rabbitmq.client.*;

import java.io.IOException;

/**
 * @author 小李同学
 * @pageage com.ldd.rabbitmq.simple
 * @date
 * @week
 * @action
 */
public class work2 {

    public static void main(String[] args) {

        //1.创建连接工厂
        ConnectionFactory connectionFactory = new ConnectionFactory();
        connectionFactory.setHost("ip");
        connectionFactory.setPort(5672);
        connectionFactory.setUsername("admin");
        connectionFactory.setPassword("admin");
        connectionFactory.setVirtualHost("/");

        Connection connection = null;
        Channel channel = null;
        try {
            //2.创建连接
            connection = connectionFactory.newConnection();
            //3.通过连接获取通道
            channel = connection.createChannel();
            //4.消费消息
            String queueName = "polling";
            channel.basicConsume(queueName, true, new DeliverCallback() {
                @Override
                public void handle(String s, Delivery delivery) throws IOException {
                    System.out.println("work2收到的消息是:" + new String(delivery.getBody(), "UTF-8"));
                    try {
                        Thread.sleep(1000);
                    } catch (InterruptedException e) {
                        e.printStackTrace();
                    }
                }
            }, new CancelCallback() {
                @Override
                public void handle(String s) throws IOException {
                    System.out.println("接受失败了");
                }
            });
            System.in.read();
        } catch (Exception e) {
            e.printStackTrace();
        } finally {
            //7.关闭通道
            if (channel != null && channel.isOpen()) {
                try {
                    channel.close();
                } catch (Exception e) {
                    e.printStackTrace();
                }
            }
            //8.关闭连接
            if (connection != null && connection.isOpen()) {
                try {
                    connection.close();
                } catch (Exception e) {
                    e.printStackTrace();
                }
            }
        }
    }
}

work2收到的消息是:Hello Work轮询1
work2收到的消息是:Hello Work轮询3
work2收到的消息是:Hello Work轮询5
work2收到的消息是:Hello Work轮询7
work2收到的消息是:Hello Work轮询9
work2收到的消息是:Hello Work轮询11
work2收到的消息是:Hello Work轮询13
work2收到的消息是:Hello Work轮询15
work2收到的消息是:Hello Work轮询17
work2收到的消息是:Hello Work轮询19
l
公平分发模式:
类型:无
特定:根据消费者的消费能力进行公平分发,处理快的处理的多,处理慢的处理的少,按劳分配。
package com.ldd.rabbitmq.work.polling;
import com.rabbitmq.client.Channel;
import com.rabbitmq.client.Connection;
import com.rabbitmq.client.ConnectionFactory;
/**
* @author 小李同学
* @pageage com.ldd.rabbitmq.simple
* @date
* @week
* @action
*/
public class Producer {
public static void main(String[] args) {
//1.创建连接工厂
ConnectionFactory connectionFactory = new ConnectionFactory();
connectionFactory.setHost("ip");
connectionFactory.setPort(5672);
connectionFactory.setUsername("admin");
connectionFactory.setPassword("admin");
connectionFactory.setVirtualHost("/");
Connection connection = null;
Channel channel = null;
try {
//2.创建连接
connection = connectionFactory.newConnection();
//3.通过连接获取通道
channel = connection.createChannel();
//4.声明队列
String queueName = "polling";
/*
params1 队列的名称
params2 是否要持久化 false非持久化 true持久化
params3 排他性 是否是独占独行
params4 是否自动删除队列,最后一个消费者消费完毕消息后是队列是否自动删除
params5 携带附属参数
*/
channel.queueDeclare(queueName, false, false, false, null);
for (int i = 1; i <= 20; i++) {
//5.准备消息内容
String message = "Hello Work轮询" + i;
//6.发送消息给队列
channel.basicPublish("", queueName, null, message.getBytes());
}
System.out.println("消息发送成功");
} catch (Exception e) {
e.printStackTrace();
} finally {
//7.关闭通道
if (channel != null && channel.isOpen()) {
try {
channel.close();
} catch (Exception e) {
e.printStackTrace();
}
}
//8.关闭连接
if (connection != null && connection.isOpen()) {
try {
connection.close();
} catch (Exception e) {
e.printStackTrace();
}
}
}
}
}
package com.ldd.rabbitmq.work.polling;

import com.rabbitmq.client.*;

import java.io.IOException;

/**
 * @author 小李同学
 * @pageage com.ldd.rabbitmq.simple
 * @date
 * @week
 * @action
 */
public class work1 {

    public static void main(String[] args) {

        //1.创建连接工厂
        ConnectionFactory connectionFactory = new ConnectionFactory();
        connectionFactory.setHost("ip");
        connectionFactory.setPort(5672);
        connectionFactory.setUsername("admin");
        connectionFactory.setPassword("admin");
        connectionFactory.setVirtualHost("/");

        Connection connection = null;
        Channel channel = null;
        try {
            //2.创建连接
            connection = connectionFactory.newConnection();
            //3.通过连接获取通道
            channel = connection.createChannel();
            //4.消费消息
            //每次从队列取出一个消息进行消费
            channel.basicQos(1);
            final Channel finalChannel = channel;
            String queueName = "polling";
            channel.basicConsume(queueName, false, new DeliverCallback() {
                @Override
                public void handle(String s, Delivery delivery) throws IOException {
                    System.out.println("work1收到的消息是:" + new String(delivery.getBody(), "UTF-8"));
                    try {
                        //消费者1 阻塞200
                        Thread.sleep(200);
                    } catch (InterruptedException e) {
                        e.printStackTrace();
                    }
                    //手动签收
                    finalChannel.basicAck(delivery.getEnvelope().getDeliveryTag(), false);
                }
            }, new CancelCallback() {
                @Override
                public void handle(String s) throws IOException {
                    System.out.println("接受失败了");
                }
            });
            System.in.read();
        } catch (Exception e) {
            e.printStackTrace();
        } finally {
            //7.关闭通道
            if (channel != null && channel.isOpen()) {
                try {
                    channel.close();
                } catch (Exception e) {
                    e.printStackTrace();
                }
            }
            //8.关闭连接
            if (connection != null && connection.isOpen()) {
                try {
                    connection.close();
                } catch (Exception e) {
                    e.printStackTrace();
                }
            }
        }
    }
}

work1收到的消息是:Hello Work轮询2
work1收到的消息是:Hello Work轮询3
work1收到的消息是:Hello Work轮询4
work1收到的消息是:Hello Work轮询5
work1收到的消息是:Hello Work轮询6
work1收到的消息是:Hello Work轮询8
work1收到的消息是:Hello Work轮询9
work1收到的消息是:Hello Work轮询10
work1收到的消息是:Hello Work轮询11
work1收到的消息是:Hello Work轮询13
work1收到的消息是:Hello Work轮询14
work1收到的消息是:Hello Work轮询15
work1收到的消息是:Hello Work轮询16
work1收到的消息是:Hello Work轮询17
work1收到的消息是:Hello Work轮询19
work1收到的消息是:Hello Work轮询20

work1消费能力更强,因为只阻塞200毫秒,基于公平分发模式,谁的消费能力强谁多消费。

注意:公平分发模式不能使用autoAck:true,必须手动签收。
package com.ldd.rabbitmq.work.polling;

import com.rabbitmq.client.*;

import java.io.IOException;

/**
 * @author 小李同学
 * @pageage com.ldd.rabbitmq.simple
 * @date
 * @week
 * @action
 */
public class work2 {

    public static void main(String[] args) {

        //1.创建连接工厂
        ConnectionFactory connectionFactory = new ConnectionFactory();
        connectionFactory.setHost("ip");
        connectionFactory.setPort(5672);
        connectionFactory.setUsername("admin");
        connectionFactory.setPassword("admin");
        connectionFactory.setVirtualHost("/");

        Connection connection = null;
        Channel channel = null;
        try {
            //2.创建连接
            connection = connectionFactory.newConnection();
            //3.通过连接获取通道
            channel = connection.createChannel();
            //4.消费消息
            String queueName = "polling";
            //每次从队列取出一个消息进行消费
            channel.basicQos(1);
            final Channel finalChannel = channel;
            channel.basicConsume(queueName, false, new DeliverCallback() {
                @Override
                public void handle(String s, Delivery delivery) throws IOException {
                    System.out.println("work2收到的消息是:" + new String(delivery.getBody(), "UTF-8"));
                    try {
                        Thread.sleep(1000);
                    } catch (InterruptedException e) {
                        e.printStackTrace();
                    }
                    //手动签收
                    finalChannel.basicAck(delivery.getEnvelope().getDeliveryTag(),false);
                }
            }, new CancelCallback() {
                @Override
                public void handle(String s) throws IOException {
                    System.out.println("接受失败了");
                }
            });
            System.in.read();
        } catch (Exception e) {
            e.printStackTrace();
        } finally {
            //7.关闭通道
            if (channel != null && channel.isOpen()) {
                try {
                    channel.close();
                } catch (Exception e) {
                    e.printStackTrace();
                }
            }
            //8.关闭连接
            if (connection != null && connection.isOpen()) {
                try {
                    connection.close();
                } catch (Exception e) {
                    e.printStackTrace();
                }
            }
        }
    }
}

work2收到的消息是:Hello Work轮询1
work2收到的消息是:Hello Work轮询7
work2收到的消息是:Hello Work轮询12
work2收到的消息是:Hello Work轮询18

work2消费能力比work1消费能力弱,所以work2消费少。
14.SpringBoot整合RabbitMQ-fanout模式
1.引入POM依赖

<dependency>
	<groupId>org.springframework.boot</groupId>
	<artifactId>spring-boot-starter-amqp</artifactId>
</dependency>
2.配置application.yml文件
#配置rabbitmq服务
spring:
rabbitmq:
host: ip
port: 5672
virtual-host: /
username: admin
password: admin3.生产者配置交换机和绑定队列
package com.ldd.springbootrabbitmq.config;
import org.springframework.amqp.core.Binding;
import org.springframework.amqp.core.BindingBuilder;
import org.springframework.amqp.core.FanoutExchange;
import org.springframework.amqp.core.Queue;
import org.springframework.context.annotation.Bean;
import org.springframework.context.annotation.Configuration;
/**
* @author 小李同学
* @pageage com.ldd.springbootrabbitmq.config
* @date
* @week
* @action
*/
@Configuration
public class RabbitMqConfig {
/*
1.声明注册fanout模式
*/
@Bean
public FanoutExchange fanoutExchange() {
return new FanoutExchange("fanout_order_exchange", true, false);
}
/*
2.声明队列 sms.fanout.queue
*/
@Bean
public Queue smsQueue() {
return new Queue("sms.fanout.queue", true);
}
/*
3.声明队列 note.fanout.queue
*/
@Bean
public Queue noteQueue() {
return new Queue("note.fanout.queue", true);
}
/*
4.sms.fanout.queue队列绑定交换机
*/
@Bean
public Binding smsBingding() {
return BindingBuilder.bind(smsQueue()).to(fanoutExchange());
}
/*
5.note.fanout.queue队列绑定交换机
*/
@Bean
public Binding noteBingding() {
return BindingBuilder.bind(noteQueue()).to(fanoutExchange());
}
}
4.生产者模拟发送消息

package com.ldd.springbootrabbitmq.service;

import org.springframework.amqp.rabbit.core.RabbitTemplate;
import org.springframework.beans.factory.annotation.Autowired;
import org.springframework.stereotype.Service;

/**
 * @author 小李同学
 * @pageage com.ldd.springbootrabbitmq.config
 * @date
 * @week
 * @action
 */
@Service
public class OrderService {

    @Autowired
    public RabbitTemplate rabbitTemplate;


    public void makeOrder() {
        String exChangeName = "fanout_order_exchange";
        String routingKey = "";
        rabbitTemplate.convertAndSend(exChangeName, routingKey, "消息内容");
    }
}
5.消费者模拟接受消息(另一起一个SpringBoot项目)

package com.ldd.springbootrabbitmqconsumer.consumer;

import org.springframework.amqp.rabbit.annotation.RabbitHandler;
import org.springframework.amqp.rabbit.annotation.RabbitListener;
import org.springframework.stereotype.Component;

/**
 * @author 小李同学
 * @pageage com.ldd.springbootrabbitmqconsumer.consumer
 * @date
 * @week
 * @action
 */
@Component
@RabbitListener(queues = {"sms.fanout.queue"})
public class FanoutSmsConsumer {

    @RabbitHandler
    public void reviceMessage(String message) {
        System.out.println("sms fanout---接收到了消息:" + message);
    }
}
package com.ldd.springbootrabbitmqconsumer.consumer;

import org.springframework.amqp.rabbit.annotation.RabbitHandler;
import org.springframework.amqp.rabbit.annotation.RabbitListener;
import org.springframework.stereotype.Component;

/**
 * @author 小李同学
 * @pageage com.ldd.springbootrabbitmqconsumer.consumer
 * @date
 * @week
 * @action
 */
@Component
@RabbitListener(queues = {"note.fanout.queue"})
public class FanoutNoteConsumer {

    @RabbitHandler
    public void reviceMessage(String message) {

        System.out.println("note fanout---接收到了消息:" + message);
    }
}
15.SpringBoot整合RabbitMQ-direct模式
只有交换机和队列绑定需要指定路由key,和发送消息是指定路由key。其他代码内容参照fanout模式。

package com.ldd.springbootrabbitmq.config;

import org.springframework.amqp.core.*;
import org.springframework.context.annotation.Bean;
import org.springframework.context.annotation.Configuration;

/**
 * @author 小李同学
 * @pageage com.ldd.springbootrabbitmq.config
 * @date
 * @week
 * @action
 */
@Configuration
public class DirectRabbitMqConfig {

    /*
      1.声明注册direct模式
     */
    @Bean
    public DirectExchange directExchange() {
        return new DirectExchange("direct_order_exchange", true, false);
    }

    /*
      2.声明队列 sms.direct.queue
     */
    @Bean
    public Queue directSmsQueue() {
        return new Queue("sms.direct.queue", true);
    }

    /*
      3.声明队列 note.direct.queue
     */
    @Bean
    public Queue directNoteQueue() {
        return new Queue("note.direct.queue", true);
    }

    /*
      4.sms.direct.queue队列绑定交换机
      with指定路由key
     */
    @Bean
    public Binding directSmsBingding() {
        return BindingBuilder.bind(directSmsQueue()).to(directExchange()).with("sms");
    }

    /*
      5.note.direct.queue队列绑定交换机
        with指定路由key
     */
    @Bean
    public Binding directNoteBingding() {
        return BindingBuilder.bind(directNoteQueue()).to(directExchange()).with("note");
    }
}
16.SpringBoot整合RabbitMQ-topic模式
也可以直接在消费者配置交换机和队列并绑定关系,然后生产者直接发送消息即可。

package com.ldd.springbootrabbitmqconsumer.consumer;

import org.springframework.amqp.core.ExchangeTypes;
import org.springframework.amqp.rabbit.annotation.*;
import org.springframework.stereotype.Component;

/**
 * @author 小李同学
 * @pageage com.ldd.springbootrabbitmqconsumer.consumer
 * @date
 * @week
 * @action
 */
@Component
@RabbitListener(bindings = @QueueBinding(value = @Queue(value = "sms.topic.queue", durable = "true", autoDelete = "false"),
        exchange = @Exchange(value = "topic_order_exchange", type = ExchangeTypes.TOPIC), key = "#.sms.#"))
public class TopicSmsConsumer {

    @RabbitHandler
    public void reviceMessage(String message) {
        System.out.println("sms topic---接收到了订单信息:" + message);
    }
}
17.RabbitMQ高级-过期时间TTL
过期时间TTL表示可以对消息设置预期时间,在这个时间内都可以被消费者接收获取;过了之后消息自动被删
除。RabbitMQ可以对消息和队列设置TTL。目前有两种方式可以设置:
第一种方式:通过队列属性设置,队列中的所有消息都有相同的过期时间。
package com.ldd.springbootrabbitmq.config;
import org.springframework.amqp.core.Binding;
import org.springframework.amqp.core.BindingBuilder;
import org.springframework.amqp.core.FanoutExchange;
import org.springframework.amqp.core.Queue;
import org.springframework.context.annotation.Bean;
import org.springframework.context.annotation.Configuration;
import java.util.HashMap;
import java.util.Map;
/**
* @author 小李同学
* @pageage com.ldd.springbootrabbitmq.config
* @date
* @week
* @action
*/
@Configuration
public class TtlRabbitMqConfig {
/*
1.声明注册fanout模式
*/
@Bean
public FanoutExchange ttlFanoutExchange() {
return new FanoutExchange("ttl_fanout_order_exchange", true, false);
}
/*
2.声明队列 ttl.sms.fanout.queue
*/
@Bean
public Queue ttlSmsQueue() {
Map<String, Object> args = new HashMap<>();
//表示设置队列中消息过期时间为5秒
args.put("x-message-ttl", 5000);
return new Queue("ttl.sms.fanout.queue", true, false, false, args);
}
/*
4.sms.fanout.queue队列绑定交换机
*/
@Bean
public Binding ttlSmsBingding() {
return BindingBuilder.bind(ttlSmsQueue()).to(ttlFanoutExchange());
}
}
第二种:设置每个消息的过期时间,不需要设置队列整体的过期时间了。

public void makeOrderOrdinary() {
	String exChangeName = "fanout_order_exchange";
	String routingKey = "";

	//给消息设置过期时间
	MessagePostProcessor messagePostProcessor = new MessagePostProcessor() {
		@Override
		public Message postProcessMessage(Message message) throws AmqpException {
            //设置消息过期时间5秒
			message.getMessageProperties().setExpiration("5000");
			message.getMessageProperties().setContentEncoding("UTF-8");
			return message;
		}
	};
	rabbitTemplate.convertAndSend(exChangeName, routingKey, "消息内容", messagePostProcessor);
}
注意:如果同时设置了队列的过期时间,也设置了消息的过期时间,那么消息具体的过期时间是选择这两个
的最低值。18.RabbitMQ高级-死信队列
DLX,全称为Dead-Letter-Exchange,可以称之为死信交换机,也可以称为死信邮箱。当消息在一个队列中变成
死信(dead message)之后,它能被重新发送到另一个交换机中,这个交换机就是DLX,绑定DLX的队列就称之为
死信队列。

消息变成死信,可能是由于以下的原因:
1.消息被拒绝(消费者拒绝签收消息)
2.消息过期
3.队列到达最大长度(具体如果队列的长度是5,而发送了11个消息,那么后面6个消息会进入死信队列中)


死信交换机也是一个正常的交换机,和一般的交换机没有区别。它能在任何的队列上被绑定。实际上就是设置某
个队列的属性,当这个队列中存在死信时,RabbitMq就会自定地将这个消息重新发布到设置的死信交换机上去,
进而被路由到另外一个队列,即死信队列。

要想使用死信队列,只需要在定义队列的时候设置队列参数,x-dead-letter-exchange指定交换机即可。
死信队列也是一个队列,先构建死信队列。
package com.ldd.springbootrabbitmq.config;
import org.springframework.amqp.core.Binding;
import org.springframework.amqp.core.BindingBuilder;
import org.springframework.amqp.core.FanoutExchange;
import org.springframework.amqp.core.Queue;
import org.springframework.context.annotation.Bean;
import org.springframework.context.annotation.Configuration;
/**
* @author 小李同学
* @pageage com.ldd.springbootrabbitmq.config
* @date
* @week
* @action
*/
@Configuration
public class DeadRabbitMqConfig {
/*
1.声明注册fanout模式
*/
@Bean
public FanoutExchange deadFanoutExchange() {
return new FanoutExchange("dead_fanout_order_exchange", true, false);
}
/*
2.声明队列 dead.fanout.queue
*/
@Bean
public Queue deadQueue() {
return new Queue("dead.fanout.queue", true);
}
/*
3.dead.fanout.queue队列绑定交换机
*/
@Bean
public Binding deadSmsBingding() {
return BindingBuilder.bind(deadQueue()).to(deadFanoutExchange());
}
}
其他队列配置死信队列,消息如果被拒收、过期或者无法存入队列,都将发送到死信队列。

package com.ldd.springbootrabbitmq.config;

import org.springframework.amqp.core.Binding;
import org.springframework.amqp.core.BindingBuilder;
import org.springframework.amqp.core.FanoutExchange;
import org.springframework.amqp.core.Queue;
import org.springframework.context.annotation.Bean;
import org.springframework.context.annotation.Configuration;

import java.util.HashMap;
import java.util.Map;

/**
 * @author 小李同学
 * @pageage com.ldd.springbootrabbitmq.config
 * @date
 * @week
 * @action
 */
@Configuration
public class TtlRabbitMqConfig {

    /*
      1.声明注册fanout模式
     */
    @Bean
    public FanoutExchange ttlFanoutExchange() {

        return new FanoutExchange("ttl_fanout_order_exchange", true, false);
    }

    /*
      2.声明队列 ttl.sms.fanout.queue
     */
    @Bean
    public Queue ttlSmsQueue() {
        Map<String, Object> args = new HashMap<>();
        //表示设置队列中消息过期时间为5秒
        args.put("x-message-ttl", 5000);
        //设置死信交换机 死信交换机绑定了死信队列
        args.put("x-dead-letter-exchange", "dead_fanout_order_exchange");
        //死信队列如果是fanout不需要配置路由
        //args.put("x-dead-letter-routing-key","dead");
        return new Queue("ttl.sms.fanout.queue", true, false, false, args);
    }


    /*
      4.sms.fanout.queue队列绑定交换机
     */
    @Bean
    public Binding ttlSmsBingding() {
        return BindingBuilder.bind(ttlSmsQueue()).to(ttlFanoutExchange());
    }
}
19.RabbitMQ高级-内存磁盘的监控
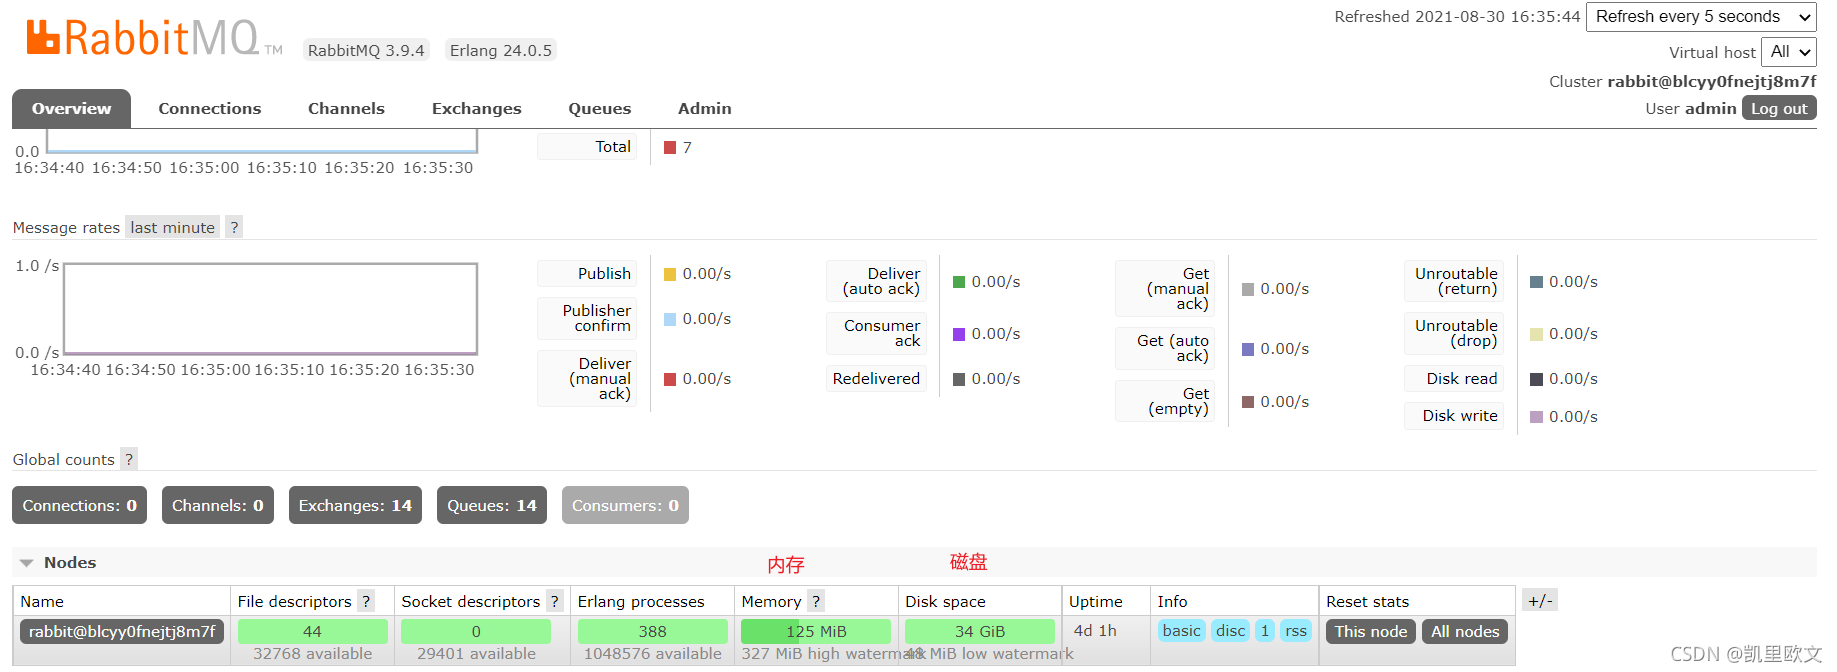
命令设置rabbitmq内存

1.绝对设置rabbitmq的内存
rabbitmqctl set_vm_memory_high_watermake absolute 20KB|MB|GB

2.相对设置rabbitmq的内存
rabbitmqctl set_vm_memory_high_watermake 0.4  物理内存*0.4
20.RabbitMQ高级-内存换页
RabbitMq在默认情况下,内存使用到达阈值50%时就会换页处理。
也就是说,在默认情况下该内存的阈值是0.4的情况下,当内存超过0.4*0.5=0.2时,会进行换页动作。

其中持久化和非持久化的消息都会写入磁盘中,其中持久化的消息本身就在磁盘中有一个副本,所以在转移
的过程中持久化的消息会先从内存中清除掉。

比如有1000MB内存,当内存的使用率达到400MB(1000*0.4)时,已经到达极限。但是因为配置的换页内存是
0.5,这个时候会在到达极限400MB之前(达到200MB的时候),会把内存中200MB(400 * 0.5)的数据转移到磁盘,从而达到稳健的运
行。

命令行设置
rabbitmqctl set_vm_memory_high_watermark_pagin_ratio 0.5
21.RabbitMQ高级-集群搭建
22.RabbitMQ高级-分布式事务
分布式事务是指事务的操作位于不同的节点上,需要保证事务的ACID特性。


 839
839

 被折叠的 条评论
为什么被折叠?
被折叠的 条评论
为什么被折叠?
 到【灌水乐园】发言


