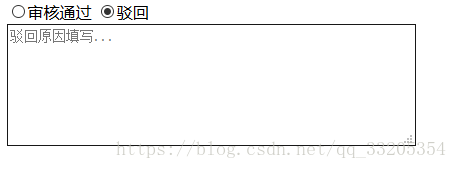
点击不同单选按钮出现不同内容

本文介绍了一种基于jQuery的实现方案,该方案允许用户在选择审核通过时隐藏文本输入域,在选择审核不通过时显示文本输入域以供填写驳回原因。

摘要生成于 C知道 ,由 DeepSeek-R1 满血版支持, 前往体验 >

就我个人来说,我要实现的东西是,审核某个东西,如果通过则不需要填写理由,如果审核不通过则需要填写理由,出现一个文本域

<!DOCTYPE html>

<html>
<head>
<meta charset="utf-8" />
<title></title>
<script src="js/jquery.min.js"></script>
</head>
<body>
    <div style="font-size:18px;">
        <input type="radio" name="test" value="0" >审核通过
        <input type="radio" name="test" value="1">驳回
    </div>    
    <div id="test">
        <div> </div>
        <div><textarea style="width:450px;height:130px" placeholder="驳回原因填写..."></textarea></div>
    </div>

</body>
<script>
    $("#test div:last").hide(); // 先隐藏第二组文本框
    $(":radio").click(function() {
        var num = $(this).val();  // 当前按钮的value值对应需要显示文本框的位置
        $("#test div").hide();    // 先隐藏所有文本框
        $("#test div").eq(num).show(); // 然后显示对应的文本框
    });
    </script>

</html>

效果图如下:


还有一种更易理解的方法

<!DOCTYPE html>
<html>
<head>
<meta charset="utf-8" />
<title></title>
<script src="js/jquery.min.js"></script>
</head>
<body>
    <div style="font-size:18px;" >
        <input type="radio" name="test" onclick="ch('yes')">审核通过
        <input type="radio" name="test" onclick="ch('no')">驳回
    </div>    
    <div>
        <div id="0"></div>
        <div id="1"><textarea style="width:450px;height:130px" placeholder="驳回原因填写..."></textarea></div>
    </div>

</body>
<script>
    function ch(tag){
        var a=document.getElementById("0");
        var b=document.getElementById("1");
        if(tag=='yes'){
            a.style.display="block";
            b.style.display="none";
        }
        else{
            a.style.display="none";
            b.style.display="block";
        }
    }
</script>

</html>

在Java Swing中,`JRadioButton`通常用于创建单选按钮组,用户只能选择其中的一个。如果你想通过单击不同的`JRadioButton`来动态地改变`JPanel`的内容,你可以这样做: 1. 创建一个`JPanel`容器,它将包含所有需要切换的内容组件。 2. 添加多个`JRadioButton`到一个`ButtonGroup`,这保证了它们之间可以互斥选择。 3. 每个`JRadioButton`关联一个监听器,当用户点击按钮时触发事件处理程序。 4. 在事件处理程序中,根据`JRadioButton`的状态(如isSelected()返回值),更新对应的`JPanel`内容。比如,你可以使用`CardLayout`、`BorderLayout`或者其他布局管理器,依据不同选中状态切换展示的面板。 示例代码片段如下: ```java import javax.swing.*; import java.awt.*; import java.awt.event.ActionEvent; import java.awt.event.ActionListener; public class RadioButtonDemo extends JFrame { private JPanel mainPanel; private JPanel panel1, panel2; // 两个不同的面板 private ButtonGroup buttonGroup; private JRadioButton radioButton1, radioButton2; public RadioButtonDemo() { initUI(); } private void initUI() { setLayout(new BorderLayout()); mainPanel = new JPanel(); // 创建面板并添加到mainPanel panel1 = createPanel1(); // 面板1的内容... panel2 = createPanel2(); // 面板2的内容... buttonGroup = new ButtonGroup(); radioButton1 = new JRadioButton("选项1"); radioButton2 = new JRadioButton("选项2"); radioButton1.addActionListener(e -> showPanel(panel1)); radioButton2.addActionListener(e -> showPanel(panel2)); buttonGroup.add(radioButton1); buttonGroup.add(radioButton2); mainPanel.add(radioButton1, BorderLayout.WEST); mainPanel.add(radioButton2, BorderLayout.EAST); add(mainPanel, BorderLayout.NORTH); setDefaultCloseOperation(JFrame.EXIT_ON_CLOSE); setSize(400, 300); setVisible(true); } private JPanel createPanel1() { ... } // 返回面板1的实现 private JPanel createPanel2() { ... } // 返回面板2的实现 private void showPanel(JPanel panel) { mainPanel.removeAll(); mainPanel.add(panel, BorderLayout.CENTER); revalidate(); repaint(); } // 你可以根据实际需求修改createPanel1和createPanel2方法,分别设置面板的内容 }
评论 1
添加红包

请填写红包祝福语或标题

红包个数最小为10个

红包金额最低5元

当前余额3.43前往充值 >
需支付:10.00
成就一亿技术人!
领取后你会自动成为博主和红包主的粉丝 规则
hope_wisdom
发出的红包
实付
使用余额支付
点击重新获取
扫码支付
钱包余额 0

抵扣说明:

1.余额是钱包充值的虚拟货币,按照1:1的比例进行支付金额的抵扣。
2.余额无法直接购买下载,可以购买VIP、付费专栏及课程。

余额充值