


 本文深入讲解SpringBoot事件监听、模板引擎、web容器更换、静态资源管理、servlet API使用、拦截器配置、异常处理、事务管理、AOP开发流程、日志级别配置及日志组件替换等关键功能。
SpringBoot事件监听
1、自定义事件,一般是继承ApplicationEvent抽象类
2、定义事件监听器,一般是实现ApplicationListener接口
3、配置监听器,启动的时候,需要把监听器加入到Spring容器中
3、发布事件,使用ApplicationContext.publishEvent发布事件
配置监听器有4种方法
1、SpringApplication.addListeners 添加监听器
2、把监听器纳入到spring容器中
3、使用context.listener.classes配置(详细内容参照DelegatingApplicationLister)
4、使用@EventListener注解,在方法上面加入@EventListener注解,且该类需要纳入到spring容器中管理(详细内容参照EventListenerMethodProcessor,EventListenerFactory)
SpringBoot使用freemarker模板
第一步:在pom.xml里面加入如下依赖
<!--添加支持freemarker模块的依赖-->
<dependency>
<groupId>org.springframework.boot</groupId>
<artifactId>spring-boot-starter-freemarker</artifactId>
</dependency>
第二步:默认的freemarker的模板文件在classpath:/templates/,下,默认的文件扩展名为:.ftl
如果想修改模板的默认文件路径,可以在配置文件中设置:例如,设置到classpath:/ftl/下,则如下所示:
spring.freemarker.templateLoaderPath=classpath:/ftl
多个的话用都好隔开
SpringBoot更换web容器
SpringBoot web默认使用的是tomcat作为web容器,可以更换为jetty
第一步:排除tomcat
 <exclusions>
              <exclusion>
                    <groupId>org.springframework.boot</groupId>
                    <artifactId>spring-boot-starter-tomcat</artifactId>
               </exclusion>
    </exclusions>
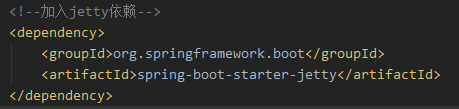
第二步:加入jetty依赖
完成
<dependency>
        <groupId>org.springframework.boot</groupId>
        <artifactId>spring-boot-starter-jetty</artifactId>
</dependency>
Springboot默认保存静态资源的位置有四个:
classpath:/META-INF/resources/,
classpath:/resources/,
classpath:/static/,
classpath:/public/
如果想修改,可以通过spring.resources.staticLocations来修改默认保存静态资源的位置例如:spring.resources.staticLocations=classpath:/html/
SpringBoot中使用servlet的API
方法一(servlet3可以使用这种方法):
1、编写servlet,然后加上相应的注解
2、需要启用@ServletComponentScan注解
方法二(servlet2.5及以下可以使用这种方法):
1、编写servlet
2、装配相应的bean到spring容器中
servlet->ServletRegistrationBean
filter->FilterRegistrationBean
listener->ServletListenerRegistrationBean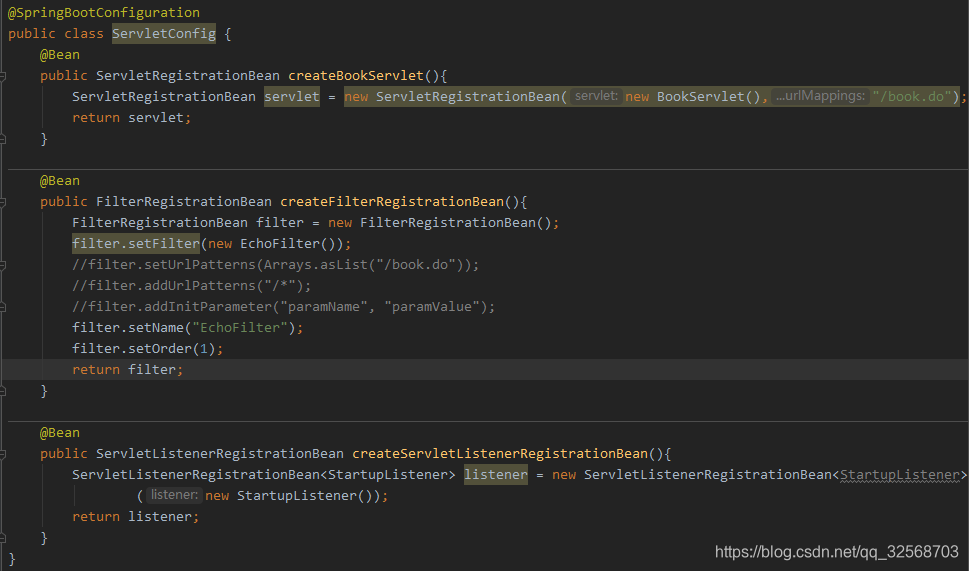
SpringBoot使用拦截器的步骤
1、写一个拦截器,实现HandlerInterceptor接口
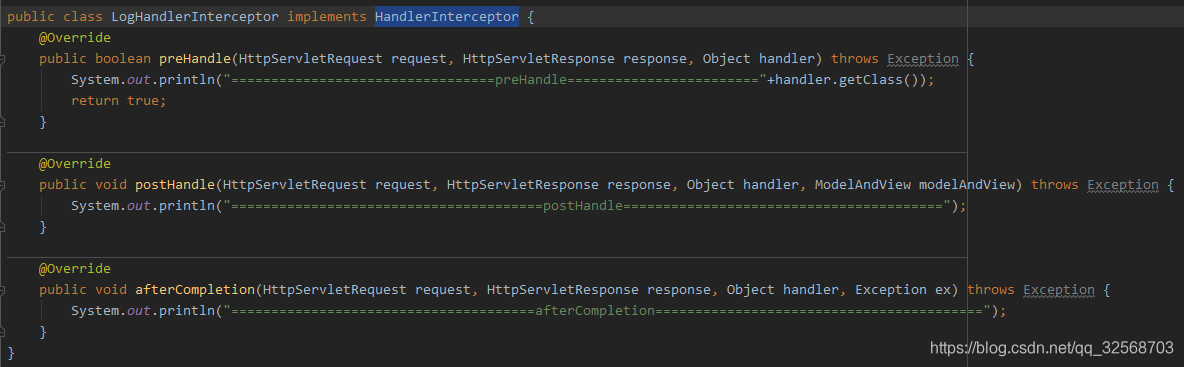
HandlerInterceptor接口
preHandle:controller执行之前调用
postHandle:controller执行之后,且页面渲染之前调用
afterCompletion:页面渲染之后调用,一般用于资源清理操作
2、写一个类,集成WebMvcConfigurerAdapter抽象类,然后重写addInterceptor方法,并调用registry.addInterceptor把上一步的拦截器加进去

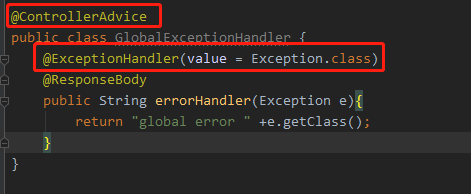
springboot异常处理
如何去掉SpringBoot默认的异常处理
@SpringBootApplication(exclude = ErrorMvcAutoConfiguration.class)
自定义错误页面

全局错误处理
springboot使用事务
1、首先需要在类上使用@EnableTransactionManagement注解启用对事务的支持
2、在需要使用事务的方法上加上@Transactional注解
注意:默认只会对运行时异常进行事务回滚,非运行时异常不会回滚
rollbackFor可以设置对哪些异常进行回滚,默认是运行时异常
noRollbackFor可以设置对哪些异常不进行回滚,默认是非运行时异常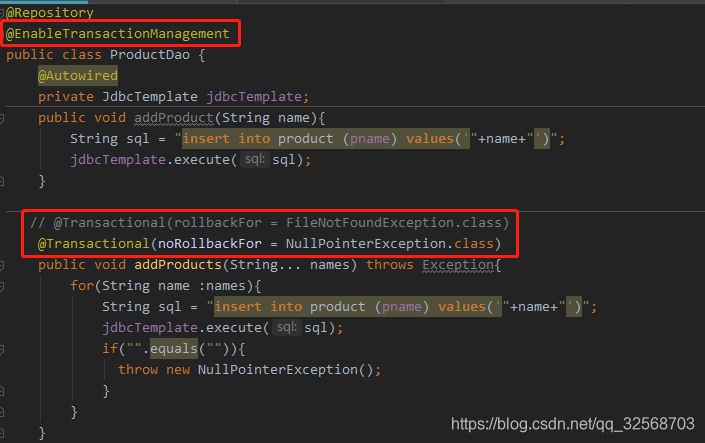
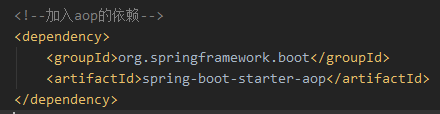
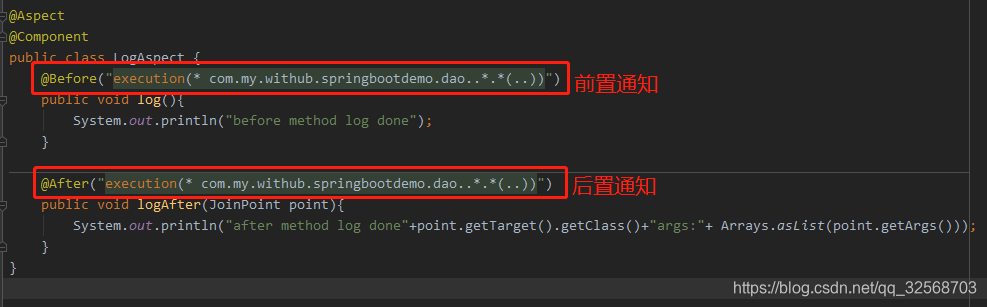
SpringBoot aop 的开发流程
1、首先加入aop的依赖,默认就开启了aop的支持
2、写一个Aspect,封装横切关注点(日志、监控等到),需要配置通知(前置通知、后置通知等到)和切入点(那些包的哪些类的哪些方法等等)
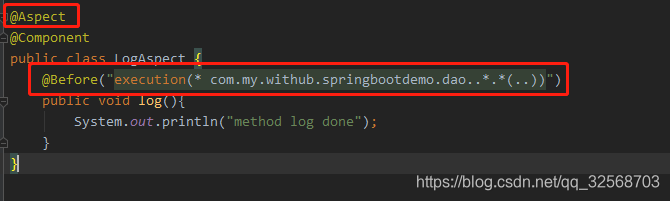
3、这个Aspect需要纳入到spring容器管理@Component,并且需要加入@Aspect注解
spring.aop.auto配置项决定是否启用Aop,默认是启用的
SpringBoot默认是使用基于JDK的动态代理来实现AOP的
spring.aop.proxy-target-class=false或者不配置,表示使用JDK的动态代理
=true时表示cglig代理,如果配置了false,而类没有接口,则依然使用cglib
在springboot中默认的日志级别是info,可以通过logging.level.*=debug来配置日志,*可以是包,也可以是个类。日志级别包括:TRACE、 DEBUG、 INFO、 WARN、 ERROR、 FATAL、 OFF七种可以设置
springboot使用其他的日志组件的步骤:
1、排除掉默认的日志组件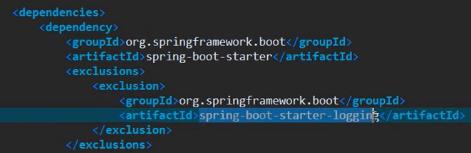
2、加入新的日志路径依赖
3、把相应的配置文件加入到classpath下


 7537
7537

 被折叠的 条评论
为什么被折叠?
被折叠的 条评论
为什么被折叠?
 到【灌水乐园】发言


