


 本文介绍Spring Cloud Config在微服务架构中的应用,包括统一配置管理的重要性、ConfigServer与ConfigClient的搭建步骤及Git仓库配置详解。
一、为什么要统一管理微服务配置
对于传统的单体应用而言,常使用配置文件来管理所有配置,比如SpringBoot的application.yml文件,但是在微服务架构中全部手动修改的话很麻烦而且不易维护。
微服务的配置管理一般有以下需求:
- 集中配置管理,一个微服务架构中可能有成百上千个微服务,所以集中配置管理是很重要的。
- 不同环境不同配置,比如数据源配置在不同环境(开发,生产,测试)中是不同的。
- 运行期间可动态调整。
- 配置修改后可自动更新。
二、Spring Cloud Config介绍
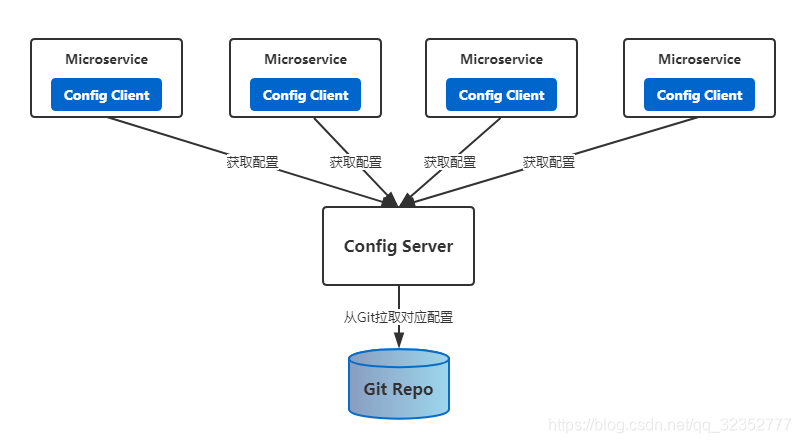
Spring Cloud Config主要是为了分布式系统的外部配置提供了服务器端和客户端的支持,只要体现为Config Server和Config Client两部分。由于Config Server和Config Client都实现了对Spring Environment和PropertySource抽象的映射,因此Spring Cloud Config很适合Spring应用程序。
Config Server是一个可横向扩展的,集中式的配置服务器,它用于集中管理应用程序各个环境下配置,默认使用Git存储配置内容。
Config Client是一个Config Server的客户端,用于操作存储在Config Server上的配置属性,所有微服务都指向Config Server,启动的时候会请求它获取所需要的配置属性,然后缓存这些属性以提高性能。
三、编写Config Server
1、在远程Git仓库中新建一个配置文件
application-dev.properties
application.properties
application-dev.properties内容如下:
profile=dev-1.0application.properties内容如下:
profile=default-1.0- 这里使用的是码云的Git仓库
- Git仓库地址:https://gitee.com/jie_harris/config-server,开源仓库可供大家练习使用。
2、创建项目config-server
pom.xml如下:
<?xml version="1.0" encoding="UTF-8"?>
<project xmlns="http://maven.apache.org/POM/4.0.0" xmlns:xsi="http://www.w3.org/2001/XMLSchema-instance"
         xsi:schemaLocation="http://maven.apache.org/POM/4.0.0 http://maven.apache.org/xsd/maven-4.0.0.xsd">
    <modelVersion>4.0.0</modelVersion>
    <parent>
        <groupId>org.springframework.boot</groupId>
        <artifactId>spring-boot-starter-parent</artifactId>
        <version>2.1.6.RELEASE</version>
        <relativePath/> <!-- lookup parent from repository -->
    </parent>
    <groupId>com.springclouddemo</groupId>
    <artifactId>config-server</artifactId>
    <version>0.0.1-SNAPSHOT</version>
    <name>config-server</name>
    <description>Config Server</description>

    <properties>
        <java.version>1.8</java.version>
        <spring-cloud.version>Greenwich.SR2</spring-cloud.version>
    </properties>

    <dependencies>
        <dependency>
            <groupId>org.springframework.cloud</groupId>
            <artifactId>spring-cloud-config-server</artifactId>
        </dependency>

        <dependency>
            <groupId>org.springframework.boot</groupId>
            <artifactId>spring-boot-starter-test</artifactId>
            <scope>test</scope>
        </dependency>
    </dependencies>

    <dependencyManagement>
        <dependencies>
            <dependency>
                <groupId>org.springframework.cloud</groupId>
                <artifactId>spring-cloud-dependencies</artifactId>
                <version>${spring-cloud.version}</version>
                <type>pom</type>
                <scope>import</scope>
            </dependency>
        </dependencies>
    </dependencyManagement>

    <build>
        <plugins>
            <plugin>
                <groupId>org.springframework.boot</groupId>
                <artifactId>spring-boot-maven-plugin</artifactId>
            </plugin>
        </plugins>
    </build>

</project>
3、在启动类添加@EnableConfigServer注解
package com.springclouddemo.configserver;

import org.springframework.boot.SpringApplication;
import org.springframework.boot.autoconfigure.SpringBootApplication;
import org.springframework.cloud.config.server.EnableConfigServer;

/**
 * @author 何昌杰
 */
@EnableConfigServer
@SpringBootApplication
public class ConfigServerApplication {

    public static void main(String[] args) {
        SpringApplication.run(ConfigServerApplication.class, args);
    }

}
4、编写application配置文件
server.port=7400
spring.application.name=config-server
spring.cloud.config.server.git.uri=https://gitee.com/jie_harris/config-server
#spring.cloud.config.server.git.username=
#spring.cloud.config.server.git.password=
这样,一个Config Server就完成了。
测试:
- 运行项目config-server
- 访问http://localhost:7400/application-dev.yml,得到如下响应:

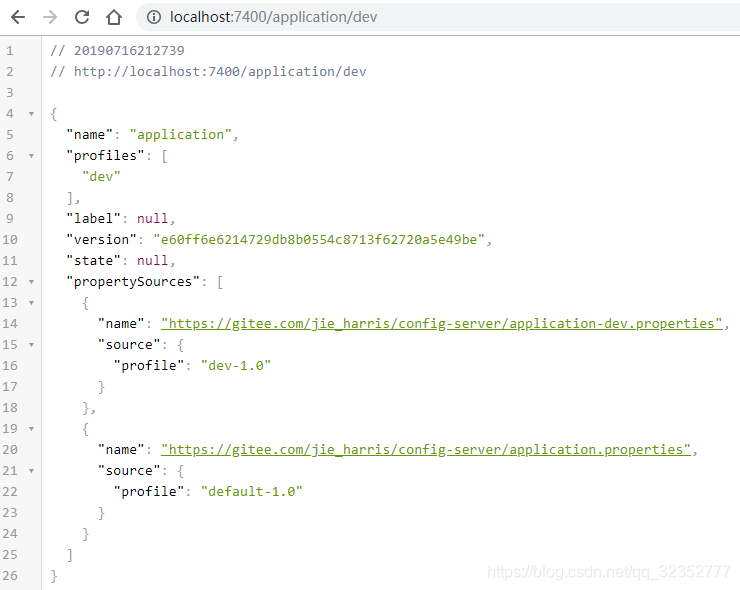
- 访问http://localhost:7400/application/dev,得到如下响应:
四、Config Server的端点
我们可以使用Config Server的端点获取配置内容。端点与配置文件的映射规则如下:
/{application}/{profile}[/{label}]

/{application}-{profile}.yml

/{label}/{application}-{profile}.yml

/{application}-{profile}.properties

/{label}/{application}-{profile}.properties-
application: 表示微服务的虚拟主机名,即配置的spring.application.name
-
profile: 表示当前的环境,dev,test or production?
-
label: 表示git仓库分支,master or relase or others repository name?默认是master
-
如果没有找到,就会找默认的
例如:
http://localhost:7400/application/dev
五、编写Config Client
我们已经知道如何使用Config Server端点获取配置内容,这一节我们讨论微服务如何获取配置信息。
1、创建项目config-client
pom.xml如下:
<?xml version="1.0" encoding="UTF-8"?>
<project xmlns="http://maven.apache.org/POM/4.0.0" xmlns:xsi="http://www.w3.org/2001/XMLSchema-instance"
         xsi:schemaLocation="http://maven.apache.org/POM/4.0.0 http://maven.apache.org/xsd/maven-4.0.0.xsd">
    <modelVersion>4.0.0</modelVersion>
    <parent>
        <groupId>org.springframework.boot</groupId>
        <artifactId>spring-boot-starter-parent</artifactId>
        <version>2.1.6.RELEASE</version>
        <relativePath/> <!-- lookup parent from repository -->
    </parent>
    <groupId>com.springclouddemo</groupId>
    <artifactId>config-client</artifactId>
    <version>0.0.1-SNAPSHOT</version>
    <name>config-client</name>
    <description>Config Client</description>

    <properties>
        <java.version>1.8</java.version>
        <spring-cloud.version>Greenwich.SR2</spring-cloud.version>
    </properties>

    <dependencies>
        <dependency>
            <groupId>org.springframework.cloud</groupId>
            <artifactId>spring-cloud-starter-config</artifactId>
        </dependency>

        <dependency>
            <groupId>org.springframework.boot</groupId>
            <artifactId>spring-boot-starter-test</artifactId>
            <scope>test</scope>
        </dependency>
    </dependencies>

    <dependencyManagement>
        <dependencies>
            <dependency>
                <groupId>org.springframework.cloud</groupId>
                <artifactId>spring-cloud-dependencies</artifactId>
                <version>${spring-cloud.version}</version>
                <type>pom</type>
                <scope>import</scope>
            </dependency>
        </dependencies>
    </dependencyManagement>

    <build>
        <plugins>
            <plugin>
                <groupId>org.springframework.boot</groupId>
                <artifactId>spring-boot-maven-plugin</artifactId>
            </plugin>
        </plugins>
    </build>

</project>
2、编写application配置文件
server.port=7401
3、编写bootstrap.properties配置文件
spring.application.name=application
spring.cloud.config.uri=http://localhost:7400/
spring.cloud.config.profile=dev
spring.cloud.config.label=master- spring.application.name:对应Config Server所获取的配置文件中的{application}
- spring.cloud.config.uri:指定Config Server的地址,默认http://localhost:8888
- spring.cloud.config.profile:对应Config Server所获取的配置文件的{profile}
- Spring.cloud.config.label:对应Git仓库的分支,对应Config Server所获取配置文件的{label}
- 特别注意这里是bootstrap配置文件
第三步属性配置应在bootstrap上,而不是application中。如果在applicaton中该部分配置将不能正常工作。
Spring Cloud有一个“引导上下文”的概念,这里是主应用程序的父上下文。引导上下文负责从配置服务器加载配置属性,以及解密外部配置文件中的属性。和主应用程序加载的application.*中的属性不同,引导上下文加载bootstrap.*中的属性。配置在bootstrap.*中的属性有更高的优先级,因此默认情况下他们不能被本地覆盖。
4、编写controller
编写controller/DemoController.java
package com.springclouddemo.configclient.controller;

import org.springframework.beans.factory.annotation.Value;
import org.springframework.web.bind.annotation.GetMapping;
import org.springframework.web.bind.annotation.RestController;

/**
 * @author 何昌杰
 */
@RestController
public class DemoController {
    @Value("${profile}")
    private String profile;

    @GetMapping("/demo")
    public String demo(){
        return this.profile;
    }
}
- @Value注解绑定Git仓库配置文件中的profile属性
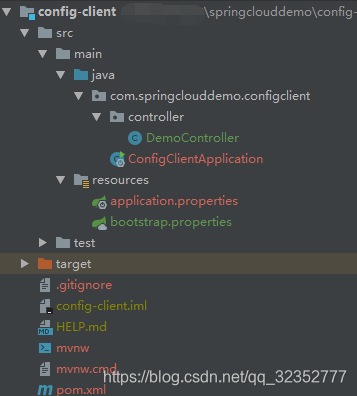
项目结构:
测试:
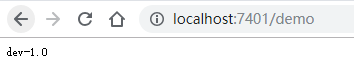
- 启动项目config-server、config-client
- 访问http://localhost:7401/demo,得到响应如下:
六、Config Server的Git仓库配置详解
前文中,使用spring.cloud.config.server.git.uri指定一个Git仓库,事实上,该属性非常灵活
1、占位符支持
Config Server的占位符支持{application}、{profile}、{label}
例如:
server.port=7400
spring.application.name=config-server
spring.cloud.config.server.git.uri=https://gitee.com/jie_harris/{application}
使用这种方式,即可轻松支持一个应用对应一个Git仓库。同理,也可支持一个profile对应一个Git仓库
2、模式匹配
模式匹配指的是带有通配符的{application}/{profile}名称的列表。如果{application}/{profile}不匹配任何模式,将使用这个配置项spring.cloud.config.server.git.url定义的URL。
spring.cloud.config.server.git.uri=https://gitee.com/jie_harris/config-server
spring.cloud.config.server.git.repos.simple=https://gitee.com/simpler/config-server
spring.cloud.config.server.git.repos.special.pattern=special*/dev,*special*/dev*
spring.cloud.config.server.git.repos.special.uri=https://gitee.com/simpler/config-server
对simple仓库,它匹配所以配置文件。对special仓库,它只匹配所以配置文件中名为special的配置文件。
3、搜索目录
很多场景下,可能吧配置文件放在Git仓库的子目录下,此时可以使用search-path指导,search-path同样支持占位符
spring.cloud.config.server.git.uri=https://gitee.com/jie_harris/config-server
spring.cloud.config.server.git.search-paths=app,bar*
这样Config Server就会在Git仓库跟目录,app目录,以及所有bar开头的子目录查找配置文件
4、启动时加载配置文件
默认情况下,在配置被首次请求时,Config Server才会clone Git仓库,也可以让Config Server在启动时就clone Git仓库。
spring.cloud.config.server.git.uri=https://gitee.com/jie_harris/config-server
spring.cloud.config.server.git.repos.simple.uri=https://gitee.com/simpler/config-server
spring.cloud.config.server.git.repos.simple.pattern=application-*
spring.cloud.config.server.git.repos.simple.clone-on-start=true
这样就可以在Config Server启动时clone指定Git仓库了,当然也可以使用spring.cloud.config.server.git.repos.clone-on-start=true进行全局配置。


 1357
1357

 被折叠的 条评论
为什么被折叠?
被折叠的 条评论
为什么被折叠?
 到【灌水乐园】发言


