


Spring Security 基础登录查看这篇:Spring Security 简单应用
-
Maven 加上 Oauth2 的依赖
   <dependency>
       <groupId>org.springframework.security.oauth.boot</groupId>
       <artifactId>spring-security-oauth2-autoconfigure</artifactId>
</dependency>- 编写 Oauth2 的配置类
@Configuration
@EnableAuthorizationServer
public class AuthorizationServerConfig extends AuthorizationServerConfigurerAdapter {

    @Autowired
    private TokenStore tokenStore;
    @Autowired
    private ClientDetailsService clientDetailsService;
    @Autowired
    private AuthenticationManager authenticationManager;
    @Autowired
    private AuthorizationCodeServices authorizationCodeServices;

    /**
     * 用来配置客户端详情服务(ClientDetailsService),
     * 客户端详情信息在这里进行初始化,你能够把客户端详情信息写死在这里或者是通过数据库来存储调取详情信息。
     * @param clients
     * @throws Exception
     */
    @Override
    public void configure(ClientDetailsServiceConfigurer clients) throws Exception {
        clients.inMemory()
                .withClient("provider1")//客户端ID
                .secret(new BCryptPasswordEncoder().encode("provider1"))//客户端密钥
                .resourceIds("provider1")//资源列表
                .authorizedGrantTypes("authorization_code","password","client_credentials","implicit","refresh_token")//
                .scopes("all")//允许授权范围
                .autoApprove(false)// false 跳转到授权页面
                .redirectUris("http://localhost:7092/");//回调url
    }

    /**
     * 用来配置授权(authorization)以及令牌(token)的访问端点和令牌服务(token services)。
     * @param endpoints
     * @throws Exception
     */
    @Override
    public void configure(AuthorizationServerEndpointsConfigurer endpoints) throws Exception {
        endpoints
                .authenticationManager(authenticationManager)//密码模式需要
                .authorizationCodeServices(authorizationCodeServices)//授权码模式需要
                .tokenServices(tokenServices())//令牌管理服务
                .allowedTokenEndpointRequestMethods(HttpMethod.POST);//支持post提交
    }

    /**
     * 用来配置令牌端点(Token Endpoint)的安全约束.
     * @param security
     * @throws Exception
     */
    @Override
    public void configure(AuthorizationServerSecurityConfigurer security) throws Exception {
        security
                .tokenKeyAccess("permitAll()")//oauth/token_key公开
                .checkTokenAccess("permitAll()")//oauth/check_token公开
                .allowFormAuthenticationForClients();//表单认证,申请令牌
    }

    /**
     * 令牌服务:授权码模式
     * @return
     */
    @Bean
    public AuthorizationServerTokenServices tokenServices(){
        DefaultTokenServices services = new DefaultTokenServices();
        services.setClientDetailsService(clientDetailsService);//客户端信息服务
        services.setSupportRefreshToken(true);//是否产生刷新令牌
        services.setTokenStore(tokenStore);//令牌存储策略
        services.setAccessTokenValiditySeconds(7200);//令牌默认有效期2小时
        services.setRefreshTokenValiditySeconds(259200);//刷新令牌默认有效期3天
        return services;
    }

}
在 Spring Security Configuration 配置 Bean authenticationManager 和 authorizationCodeServices 不然会报找不到
    @Bean
    @Override
    public AuthenticationManager authenticationManagerBean() throws Exception {
        return super.authenticationManagerBean();
    }

    @Bean
    public AuthorizationCodeServices authorizationCodeServices(){
        return new InMemoryAuthorizationCodeServices();
    }
测试:启动服务
- 第一步:获取请求码,需要认证(登录)选择Approve(同意),地址:http://localhost:7902/oauth/authorize?client_id=provider1&response_type=code&scope=all&redirect_uri=http://localhost:7092/
回调uri会携带请求码,例:http://localhost:7092/?code=O5NGRR
- 第二步:获取令牌(Token),地址:http://localhost:7902/oauth/token?client_id=provider1&client_secret=provider1&grant_type=authorization_code&code=O5NGRR&redirect_uri=http://localhost:7092/
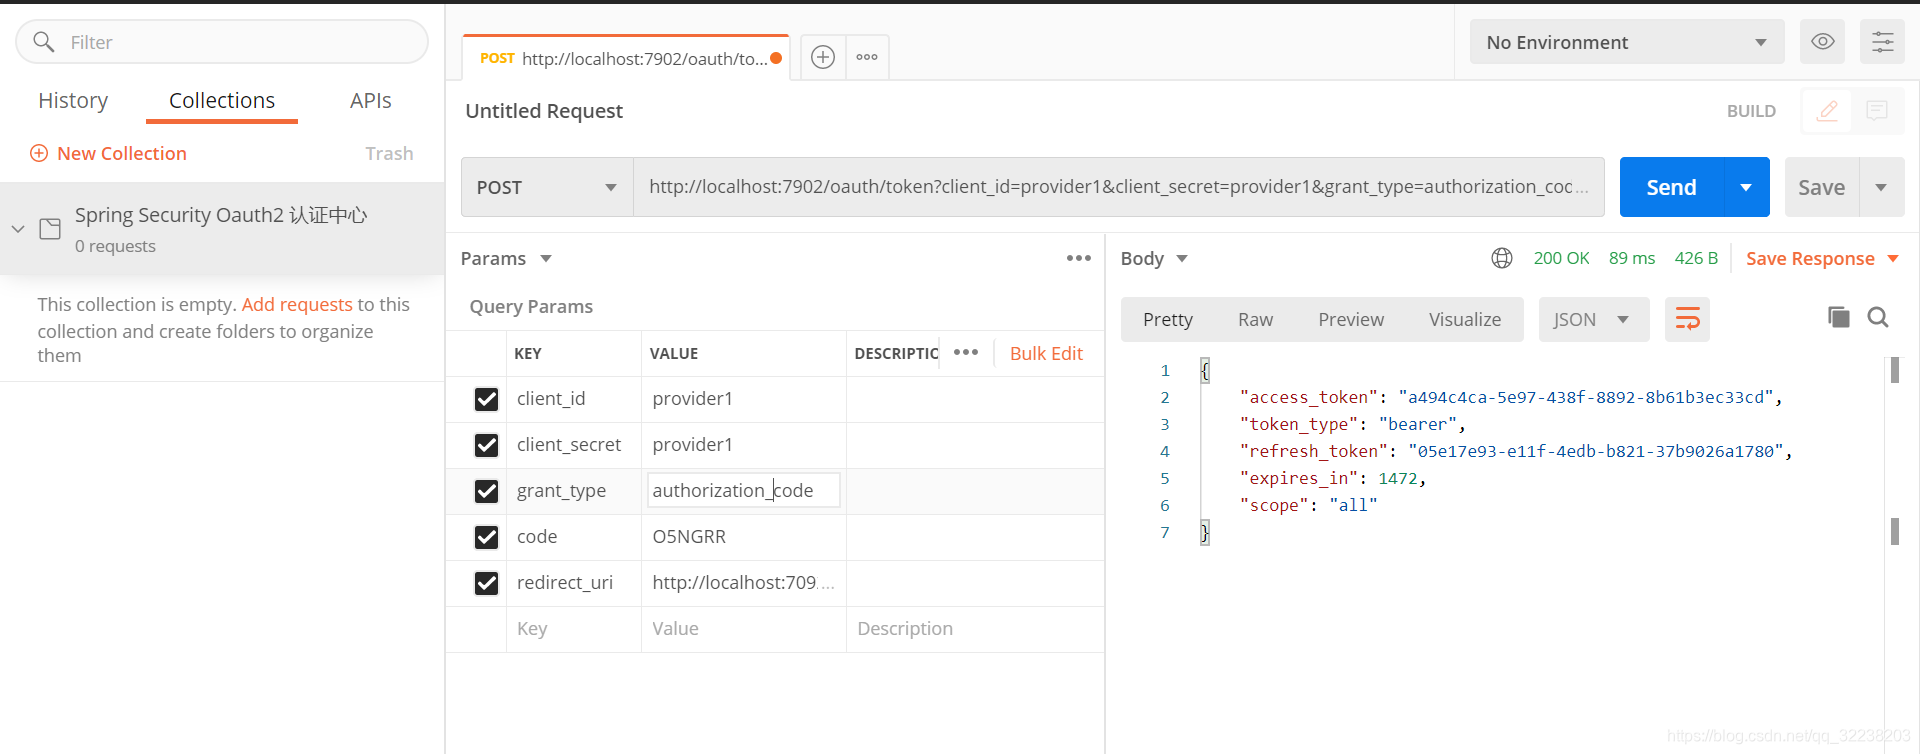
授权码模式是四种模式更最安全的一种模式。一般用于client是Web服务器端应用或第三方的原生App调用资源服务的时候。因为在这种模式中access_token不会经过浏览器或移动端的App,而是直接从服务端去交换,这样就最大限度的减小了令牌泄漏的风险。
-
简化模式,把响应类型改成Token(response_type=token)
一般来说,简化模式用于没有服务器端的第三方单页面应用,因为没有服务器端就无法接收授权码。
-
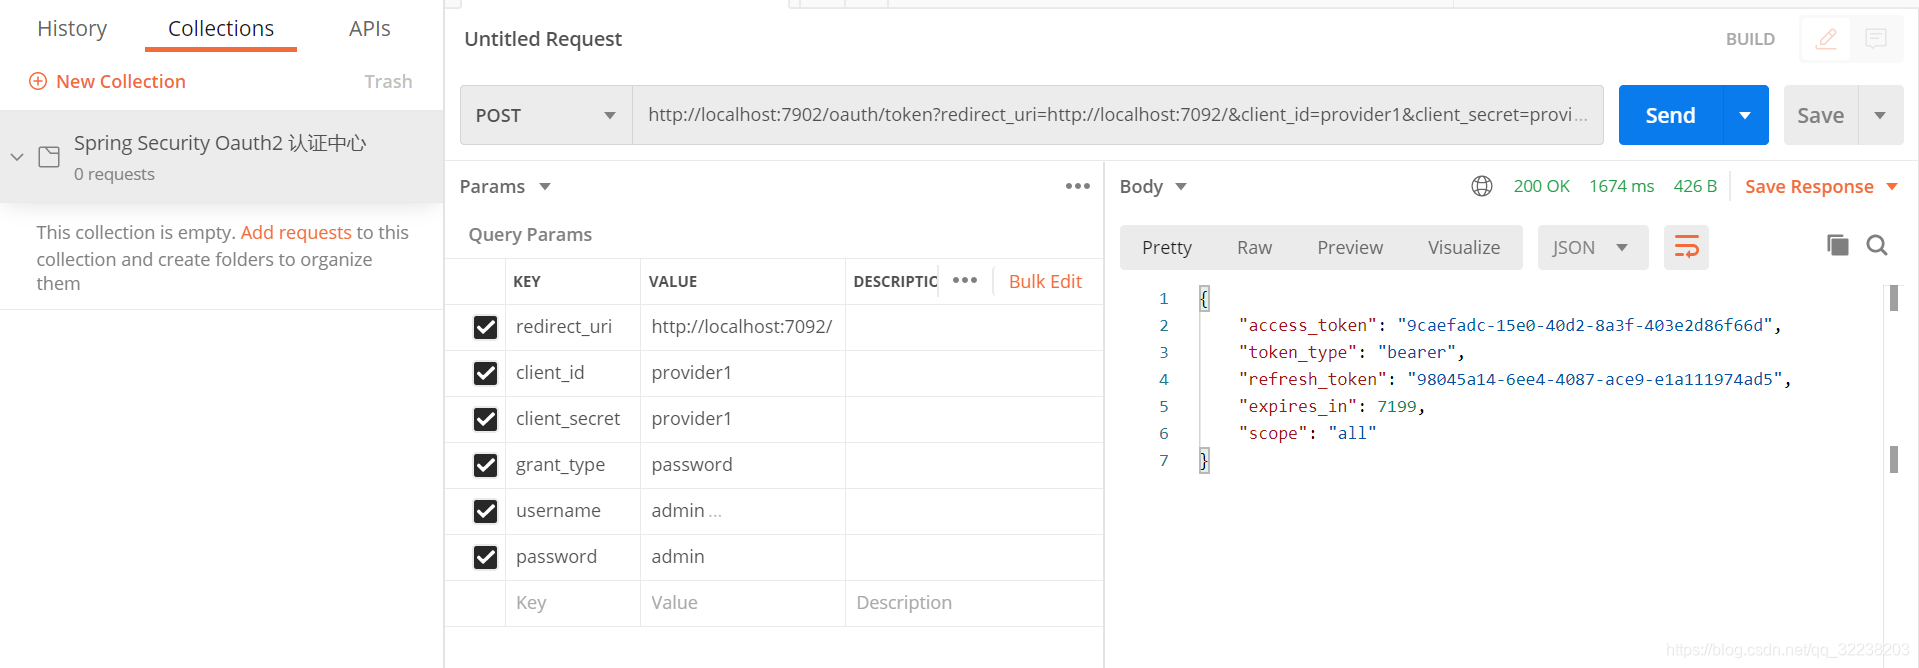
密码模式
这种模式十分简单,但是却意味着直接将用户敏感信息泄漏给了cient,因此这就说明这种模式只能用于client是我们自己开发的情况下。因此密码模式一般用于我们自己开发的,第一方原生App或第一方单页面应用。
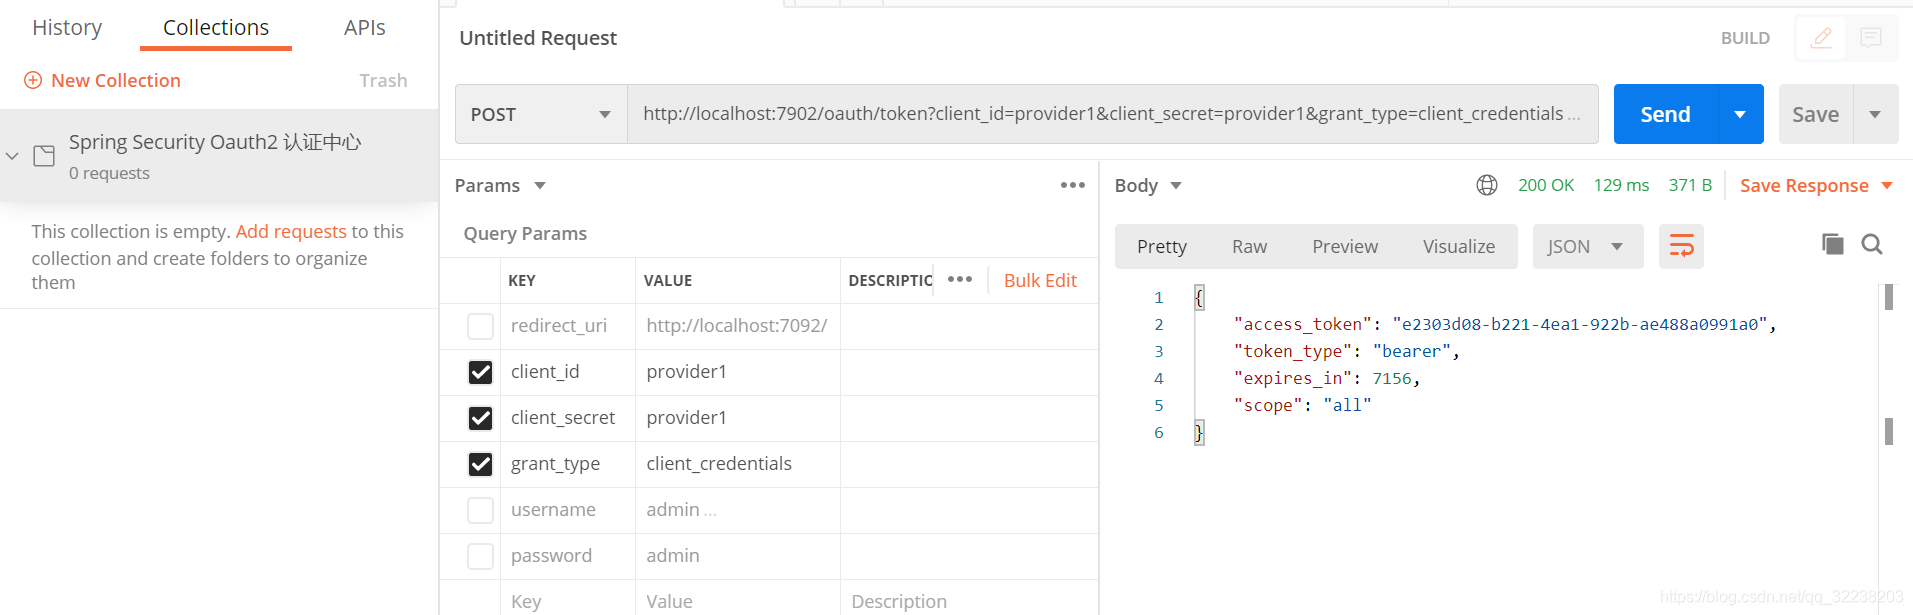
- 客户端模式
这种模式是最方便但最不安全的模式。因此这就要求我们对client完全的信任,而client本身也是安全的。因此这种模式一般用来提供给我们完全信任的服务器端服务。比如,合作方系统对接,拉取一组用户信息。
- 资源服务器配置
- Maven 依赖
        <dependency>
            <groupId>org.springframework.boot</groupId>
            <artifactId>spring-boot-starter-security</artifactId>
        </dependency>
        <dependency>
            <groupId>org.springframework.boot</groupId>
            <artifactId>spring-boot-starter-oauth2-client</artifactId>
        </dependency>
        <dependency>
            <groupId>org.springframework.security.oauth.boot</groupId>
            <artifactId>spring-security-oauth2-autoconfigure</artifactId>
</dependency>- 资源服务器配置(ResourceServerConfigurer)
@Configuration
@EnableResourceServer
public class ResourceServerConfig extends ResourceServerConfigurerAdapter {

    @Override
    public void configure(ResourceServerSecurityConfigurer resources) throws Exception {
        resources.resourceId("provider1")
                .tokenServices(tokenServices())
                .stateless(true);
    }

    @Override
    public void configure(HttpSecurity http) throws Exception {
        http.authorizeRequests()
                .antMatchers("/**").access("#oauth2.hasAnyScope('all')")
                .and().csrf().disable()
                .sessionManagement().sessionCreationPolicy(SessionCreationPolicy.STATELESS);
    }

    /**
     * 远程调用令牌服务
     * @return
     */
    @Bean
    public RemoteTokenServices tokenServices(){
        RemoteTokenServices services = new RemoteTokenServices();
        services.setCheckTokenEndpointUrl("http://localhost:7902/oauth/check_token");
        services.setClientId("provider1");
        services.setClientSecret("provider1");
        return services;
    }

}
到此为此可以获取token令牌,但是可以访问所有的权限,@PreAuthorize("hasAuthority('list')") 需要生效配置WebSecurityConfigurer
@Configuration
@EnableGlobalMethodSecurity(securedEnabled = true,prePostEnabled = true)
public class WebSecurityConfig extends WebSecurityConfigurerAdapter {

    /**
     * 安全拦截机制
     * @param http
     * @throws Exception
     */
    @Override
    protected void configure(HttpSecurity http) throws Exception {
        http.csrf().disable()
                .authorizeRequests()
                .antMatchers("/**").authenticated()//所有页面必需认证通过
                .anyRequest().permitAll();//除了/**,其他可以访问
    }
}
但是这种普通停牌比较麻烦,每次访问都需要到认证服务器检验,使用Jwt则解决了这个问题,在认证中心添加代码
    /**
     * 令牌存储
     * @return
     */
    @Bean
    public TokenStore tokenStore(){
        //令牌存储方案
//        return new InMemoryTokenStore();
        return new JwtTokenStore(accessTokenConverter());
    }

    @Bean
    public JwtAccessTokenConverter accessTokenConverter(){
        JwtAccessTokenConverter converter = new JwtAccessTokenConverter();
        converter.setSigningKey("cork");//对称秘钥,资源服务器使用该秘钥来验证
        return converter;
    }
在认证服务配置里做令牌增强
    @Autowired
    private JwtAccessTokenConverter accessTokenConverter;

    /**
     * 令牌服务
     * @return
     */
    @Bean
    public AuthorizationServerTokenServices tokenServices(){
        DefaultTokenServices services = new DefaultTokenServices();
        services.setClientDetailsService(clientDetailsService);//客户端信息服务
        services.setSupportRefreshToken(true);//是否产生刷新令牌
        services.setTokenStore(tokenStore);//令牌存储策略

        //令牌增强
        TokenEnhancerChain tokenEnhancerChain = new TokenEnhancerChain();
        tokenEnhancerChain.setTokenEnhancers(Arrays.asList(accessTokenConverter));
        services.setTokenEnhancer(tokenEnhancerChain);

        services.setAccessTokenValiditySeconds(7200);//令牌默认有效期2小时
        services.setRefreshTokenValiditySeconds(259200);//刷新令牌默认有效期3天
        return services;
    }
在生产者项目对资源服务配置也添加令牌服务进行解码,这样就可以实现令牌检验了
@Configuration
@EnableResourceServer
public class ResourceServerConfig extends ResourceServerConfigurerAdapter {

    @Override
    public void configure(ResourceServerSecurityConfigurer resources) throws Exception {
        resources.resourceId("provider1")
//                .tokenServices(tokenServices())
                .tokenStore(tokenStore())
                .stateless(true);
    }

    /**
     * 远程调用令牌服务
     * @return
     */
//    @Bean
//    public RemoteTokenServices tokenServices(){
//        RemoteTokenServices services = new RemoteTokenServices();
//        services.setCheckTokenEndpointUrl("http://localhost:7902/oauth/check_token");
//        services.setClientId("provider1");
//        services.setClientSecret("provider1");
//        return services;
//    }

    /**
     * 令牌存储
     * @return
     */
    @Bean
    public TokenStore tokenStore(){
        return new JwtTokenStore(accessTokenConverter());
    }

    @Bean
    public JwtAccessTokenConverter accessTokenConverter(){
        JwtAccessTokenConverter converter = new JwtAccessTokenConverter();
        converter.setSigningKey("cork");//对称秘钥,资源服务器使用该秘钥来验证
        return converter;
    }

}
到此单点登录已经完成了,接下来就是资源服务的优化了,毕竟不止是一个服务需要认证,配置起来还是比较麻烦。


 3791
3791

 被折叠的 条评论
为什么被折叠?
被折叠的 条评论
为什么被折叠?
 到【灌水乐园】发言


