


执行代码时报如下错误:

解决方案:
安装包版本:Python-3.7.4、make-4.3、glibc-2.29
(1)、安装Python-3.7.4
yum update -y
wget https://www.python.org/ftp/python/3.7.4/Python-3.7.4.tgz
tar xzf Python-3.7.4.tgz
cd Python-3.7.4
./configure

yum install -y gcc
再次:./configure
           yum install libffi-devel  zlib*  -y
           vim  Modules/Setup
           #zlib zlibmodule.c -I$(prefix)/include -L$(exec_prefix)/lib -lz   (去掉注释)
           make && make install
(2)、升级gcc与make
yum -y install centos-release-scl
# 1. 安装GCC-8
如果使用arm64的系统这里需要换源,x86此步骤不用
baseurl=http://mirrors.aliyun.com/centos-altarch/releasever/sclo/releasever/sclo/releasever/sclo/basearch/sclo/
          yum install -y devtoolset-8-gcc devtoolset-8-gcc-c++ devtoolset-8-binutils
        # 设置环境变量
           echo 'source /opt/rh/devtoolset-8/enable' >> /etc/profile
          source /etc/profile
#升级 make
wget https://ftp.gnu.org/gnu/make/make-4.3.tar.gz
tar -xzvf make-4.3.tar.gz && cd make-4.3/
#安装到指定目录
./configure --prefix=/usr/local/make
make && make install
#创建软链接
cd /usr/bin/ && mv make make.bak
ln -sv /usr/local/make/bin/make /usr/bin/make
(3)、编译 glibc
wget http://ftp.gnu.org/gnu/glibc/glibc-2.29.tar.gz
tar xf glibc-2.29.tar.gz
cd glibc-2.29/ && mkdir build
cd build && …/configure --prefix=/usr --disable-profile --enable-add-ons --with-headers=/usr/include --with-binutils=/usr/bin

yum install bison -y
make && make install
#日志最后会出现如下问题
primary library!
make[1]: *** [Makefile:111: install] Error 1
make[1]: Leaving directory ‘/root/glibc-2.28’
make: *** [Makefile:12: install] Error 2
出现上面问题不用管,接着安装
yum install libstdc++.so.6 -y
#下载需要的版本库,之后软连接到运行系统上,这里如果是arm64记得下载arm包
wget http://ftp.de.debian.org/debian/pool/main/g/gcc-8/libstdc++6_8.3.0-6_amd64.deb
ar -x libstdc++6_8.3.0-6_amd64.deb
tar -xvf data.tar.xz
cp usr/lib/x86_64-linux-gnu/libstdc++.so.6.0.25 /usr/lib64/
find / -name "libstdc++"
#删除低版本库的软连接
rm -rf /usr/lib64/libstdc++.so.6
ll /usr/lib64/libstd
ln -s /usr/lib64/libstdc++.so.6.0.25 /usr/lib64/libstdc++.so.6
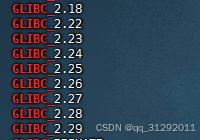
验证是否生效
strings /lib64/libc.so.6 |grep GLIBC_
解决中文乱码问题
cd /root/glibc-2.29/build && make localedata/install-locales
shell一键解决
#!/bin/bash
# 定义颜色变量
RED='\033[0;31m'
GREEN='\033[0;32m'
YELLOW='\033[0;33m'
BLUE='\033[0;34m'
PURPLE='\033[0;35m'
CYAN='\033[0;36m'
WHITE='\033[0;37m'
RESET='\033[0m'
# ----------------------------------------
# 更新系统并安装必要的工具
# ----------------------------------------
echo -e "${BLUE}安装依赖...${RESET}"
yum install -y wget gcc vim bison binutils
# ----------------------------------------
# 安装 Python 3.7.4
# ----------------------------------------
echo -e "${CYAN}安装 Python 3.7.4...${RESET}"
# 下载并解压 Python 3.7.4
cd /usr/local/src
wget https://www.python.org/ftp/python/3.7.4/Python-3.7.4.tgz
tar xzf Python-3.7.4.tgz
cd Python-3.7.4
# 配置并安装 Python
echo -e "${GREEN}配置 Python...${RESET}"
./configure
# 安装必要的库
yum install -y libffi-devel zlib-devel
# 编辑 Setup 文件,启用 zlib 模块
echo -e "${YELLOW}启用 zlib 模块...${RESET}"
echo -e "${GREEN}去掉 zlibmodule.c 行的注释${RESET}"
sed -i 's/^#\(zlib zlibmodule.c.*\)$/\1/' "Modules/Setup"
# 编译并安装 Python
echo -e "${GREEN}编译并安装 Python...${RESET}"
make && make install
if [ $? == 0 ]
then
echo -e "${YELLOW}Python编译完成${RESET}"
else
echo -e "${YELLOW}Python编译失败。。。。${RESET}"
exit 1
fi
# 返回到上级目录
cd ..
# ----------------------------------------
# 升级 GCC 与 Make
# ----------------------------------------
echo -e "${CYAN}安装 GCC-8...${RESET}"
# 安装 devtoolset-8 (用于升级 GCC)
yum -y install centos-release-scl
# 文件路径
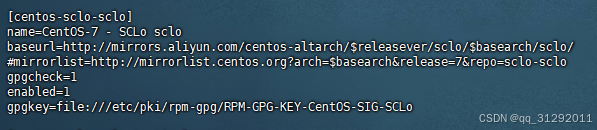
REPO_FILE_SCL="/etc/yum.repos.d/CentOS-SCLo-scl.repo"
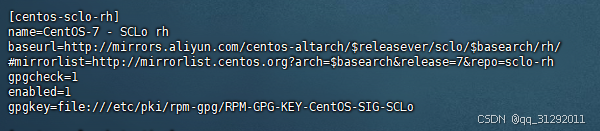
REPO_FILE_SCL_RH="/etc/yum.repos.d/CentOS-SCLo-scl-rh.repo"
# 1. 修改 CentOS-SCLo-scl.repo
# 先去掉 #baseurl 行的 #,再将其替换为阿里云的源地址
sed -i '/^# baseurl/s/^#//' "$REPO_FILE_SCL" # 去掉#号
sed -i 's|^[[:space:]]*baseurl=http://mirror.centos.org|baseurl=http://mirrors.aliyun.com|' "$REPO_FILE_SCL" # 替换为阿里云源
sed -i 's|^[[:space:]]*mirrorlist=http:\/\/mirrorlist\.centos\.org|#mirrorlist=http://mirrorlist.centos.org|g' "$REPO_FILE_SCL" # 注释掉mirrorlist
# 2. 修改 CentOS-SCLo-scl-rh.repo
sed -i '/^#baseurl/s/^#//' "$REPO_FILE_SCL_RH" # 去掉#号
sed -i 's|^[[:space:]]*baseurl=http://mirror.centos.org|baseurl=http://mirrors.aliyun.com|' "$REPO_FILE_SCL_RH" # 替换为阿里云源
sed -i 's|^[[:space:]]*mirrorlist=http:\/\/mirrorlist\.centos\.org|#mirrorlist=http://mirrorlist.centos.org|g' "$REPO_FILE_SCL_RH" # 注释掉mirrorlist
echo "配置已更新:"
echo "CentOS-SCLo-scl.repo -> baseurl 已修改为阿里云源,mirrorlist 已注释。"
echo "CentOS-SCLo-scl-rh.repo -> baseurl 已修改为阿里云源,mirrorlist 已注释。"
yum install -y devtoolset-8-gcc devtoolset-8-gcc-c++ devtoolset-8-binutils
# 配置环境变量
echo -e "${GREEN}配置环境变量...${RESET}"
echo 'source /opt/rh/devtoolset-8/enable' >> /etc/profile
source /etc/profile
# 升级 Make 到 4.3
echo -e "${CYAN}安装 Make 4.3...${RESET}"
cd /usr/local/src
wget https://ftp.gnu.org/gnu/make/make-4.3.tar.gz
tar -xzvf make-4.3.tar.gz
cd make-4.3/
# 安装 Make
echo -e "${GREEN}配置并安装 Make...${RESET}"
./configure --prefix=/usr/local/make
make && make install
if [ $? == 0 ]
then
echo -e "${YELLOW}Make编译完成${RESET}"
else
echo -e "${YELLOW}Make编译失败。。。。${RESET}"
exit 1
fi
# 创建软链接
echo -e "${GREEN}创建 Make 的软链接...${RESET}"
cd /usr/bin/ && mv make make.bak
ln -sv /usr/local/make/bin/make /usr/bin/make
# ----------------------------------------
# 安装 glibc-2.29
# ----------------------------------------
echo -e "${CYAN}安装 glibc 2.29...${RESET}"
# 下载并解压 glibc 2.29
cd /usr/local/src
wget http://ftp.gnu.org/gnu/glibc/glibc-2.29.tar.gz
tar xf glibc-2.29.tar.gz
cd glibc-2.29/
mkdir build
# 配置并安装 glibc
echo -e "${GREEN}配置并安装 glibc...${RESET}"
cd build && ../configure --prefix=/usr --disable-profile --enable-add-ons --with-headers=/usr/include --with-binutils=/usr/bin
make && make install
# 如果遇到错误,忽略并继续
echo -e "${YELLOW}如果遇到 'make: *** [Makefile:111: install] Error 1' 错误,请忽略并继续...${RESET}"
# 安装 libstdc++6
echo -e "${CYAN}安装 libstdc++6...${RESET}"
#yum install -y libstdc++.so.6
# 下载并解压需要的 libstdc++ 版本
cd /usr/local/src
wget http://ftp.de.debian.org/debian/pool/main/g/gcc-8/libstdc++6_8.3.0-6_amd64.deb
ar -x libstdc++6_8.3.0-6_amd64.deb
tar -xvf data.tar.xz
cp usr/lib/x86_64-linux-gnu/libstdc++.so.6.0.25 /usr/lib64/
# 创建软连接
echo -e "${GREEN}创建 libstdc++ 软连接...${RESET}"
mv /usr/lib64/libstdc++.so.6 /usr/lib64/libstdc++.so.6_back
ln -s /usr/lib64/libstdc++.so.6.0.25 /usr/lib64/libstdc++.so.6
# 验证 glibc 安装是否生效
echo -e "${GREEN}验证 glibc 安装是否生效...${RESET}"
strings /lib64/libc.so.6 | grep "^GLIBC_2.*"
# ----------------------------------------
# 解决中文乱码问题
# ----------------------------------------
echo -e "${CYAN}解决中文乱码问题...${RESET}"
cd /usr/local/src/glibc-2.29/build
make localedata/install-locales
# ----------------------------------------
# 安装完成,退出
# ----------------------------------------
echo -e "${GREEN}安装完成!所有步骤已执行完毕。${RESET}"


 1万+
1万+

 被折叠的 条评论
为什么被折叠?
被折叠的 条评论
为什么被折叠?
 到【灌水乐园】发言


