


一、为什么要统一管理微服务配置
对于传统的单体应用,通常使用配置文件管理所有配置。比如Spring Boot开发的单体应用,配置内容可以放在application.yml文件,需要切换环境的话可以设置多个Profile并在启动应用时指定spring.pfofiles.active={profile}。
然而,在微服务架构中,配置管理一般有以下需求
- 集中管理配置:一个使用微服务架构的应用系统可能会包含成千上万个微服务,因此集中管理配置是非常有必要的。
- 不同环境不同配置:例如,数据源配置在不同的环境(开发、测试、预发布、生产等)中是不同的。
- 运行期间可动态调整:例如,可根据各个微服务的负载情况,动态调整数据源连接池大小或熔断阈值,并且在调整配置时不停止微服务。
- 配置修改后可自动更新。如配置内容发生变化,微服务能够自动更新配置。
所以,对于微服务架构而言,一个通用的配置管理机制是必不可少的,常见做法是使用配置服务器管理配置。
二、Spring Cloud Config简介
Spring Cloud Config为分布式系统外部化配置提供了服务端和客户端的支持,它包括Config Server和Config Client两部分。
Config Server是一个可横向扩展、集中式的配置服务器,它用于集中管理应用程序各个环境下的配置,默认使用Git存储配置内容(也可使用Subversion、本地文件系统或Vault存储配置),因此可以很方便地实现对配置的版本控制与内容审计。
Config Client是Config Server的客户端,用于操作存储在Config Server中的配置属性。
Spring Cloud Config的架构图如下
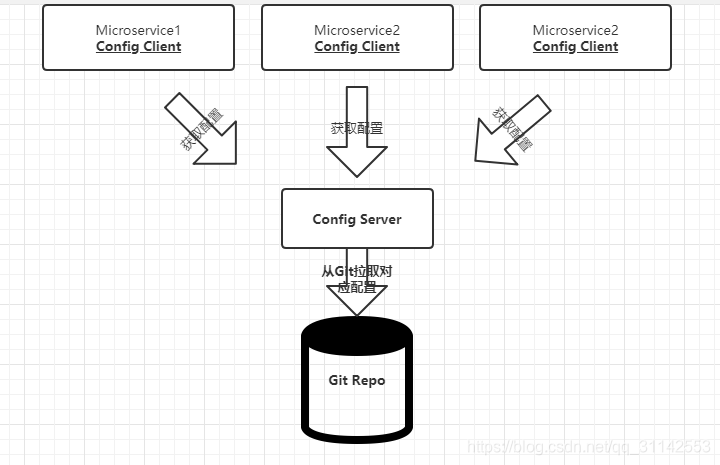
所有微服务都指向Config Server。各个微服务在启动时,会请求Config Server以获取所需要的配置属性,然后缓存这些属性以提高性能。
三、编写Config Server
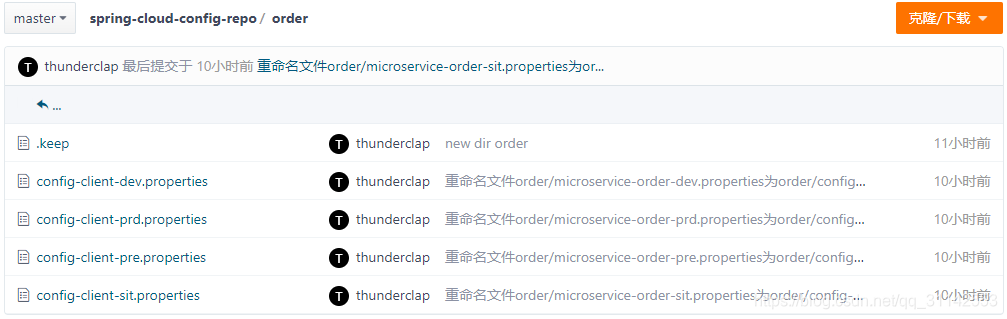
1)在码云仓库https://gitee.com/thunderclap/spring-cloud-config-repo中新建一个文件夹order,在里面新建几个配置文件。
通常,配置文件的名称格式为“服务名称-环境.properties”(或者“服务名称-环境.yml”),其中环境常用的有以下几种
- dev:开发
- prd:生产
- pre:预发布
- sit:测试
例如
config-client-dev.properties
config-client-prd.properties
config-client-pre.properties
config-client-sit.properties
其中config-client为服务名称。
内容分别是
prifile=dev-1.0
prifile=prd-1.0
prifile=pre-1.0
prifile=sit-1.0
效果如下
2)创建一个maven工程microservice-config-server,pom.xml文件添加如下依赖
<?xml version="1.0" encoding="UTF-8"?>
<project xmlns="http://maven.apache.org/POM/4.0.0"
         xmlns:xsi="http://www.w3.org/2001/XMLSchema-instance"
         xsi:schemaLocation="http://maven.apache.org/POM/4.0.0 http://maven.apache.org/xsd/maven-4.0.0.xsd">
    <modelVersion>4.0.0</modelVersion>

    <groupId>cn.zhh</groupId>
    <artifactId>microservice-config-server</artifactId>
    <version>1.0</version>

    <!-- Spring Boot依赖  -->
    <parent>
        <groupId>org.springframework.boot</groupId>
        <artifactId>spring-boot-starter-parent</artifactId>
        <version>2.0.1.RELEASE</version>
    </parent>

    <!-- Spring Cloud管理依赖  -->
    <dependencyManagement>
        <dependencies>
            <dependency>
                <groupId>org.springframework.cloud</groupId>
                <artifactId>spring-cloud-dependencies</artifactId>
                <version>Finchley.M7</version>
                <type>pom</type>
                <scope>import</scope>
            </dependency>
        </dependencies>
    </dependencyManagement>

    <dependencies>
        <!-- config-server -->
        <dependency>
            <groupId>org.springframework.cloud</groupId>
            <artifactId>spring-cloud-config-server</artifactId>
        </dependency>
		<!-- eureka-client -->
        <dependency>
            <groupId>org.springframework.cloud</groupId>
            <artifactId>spring-cloud-starter-netflix-eureka-client</artifactId>
        </dependency>
    </dependencies>

    <!-- 注意: 这里必须要添加, 否则各种依赖有问题  -->
    <repositories>
        <repository>
            <id>spring-milestones</id>
            <name>Spring Milestones</name>
            <url>https://repo.spring.io/libs-milestone</url>
            <snapshots>
                <enabled>false</enabled>
            </snapshots>
        </repository>
    </repositories>

    <build>
        <plugins>
            <plugin>
                <groupId>org.springframework.boot</groupId>
                <artifactId>spring-boot-maven-plugin</artifactId>
            </plugin>
        </plugins>
    </build>

</project>
为了利用服务发现组件的优势,需要将该服务注册到Eureka Server上。
3)编写配置文件application.yml,并在其中添加如下内容
server:
  port: 8085
spring:
  application:
    # 服务名称,客户端需要使用此名称查询配置中心服务端
    name: config-server
  cloud:
    config:
      server:
        git:
          # 配置码云仓库地址
          uri: https://gitee.com/thunderclap/spring-cloud-config-repo.git
          # 搜索路径(文件夹,可以多个)
          search-paths:
          - order
      # 分支
      label: master
# eureka server
eureka:
  client:
    serviceUrl:
      defaultZone: http://localhost:8080/eureka/
因为是测试,所以没有设置用户名密码。
4)在启动类上添加注解@EnableConfigServer,声明这是一个Config Server,同时也要加上@EnableDiscoveryClient,将服务注册到Eureka Server。
@SpringBootApplication
@EnableDiscoveryClient
@EnableConfigServer
public class MicroserviceConfigServerApplication {

	public static void main(String[] args) {
		SpringApplication.run(MicroserviceConfigServerApplication.class, args);
	}

}
这样,一个Config Server就完成了。
下面讲一下Config Server的端点
可以使用Config Server的端点获取配置文件的内容。端点与配置文件的映射规则如下
/{application}/{profile}/[{label}]
/{application}-{profile}.yml
/{label}/{application}-{profile}.yml
/{application}-{profile}.properties
/{label}/{application}-{profile}.properties
以上端点都可以映射到{application}-{profile}.properties这个配置文件,{application}表示微服务的名称,{label}表示仓库分支,默认是master,{profile}表示环境。
启动服务,访问http://localhost:8085/config-client/dev得到如下结果
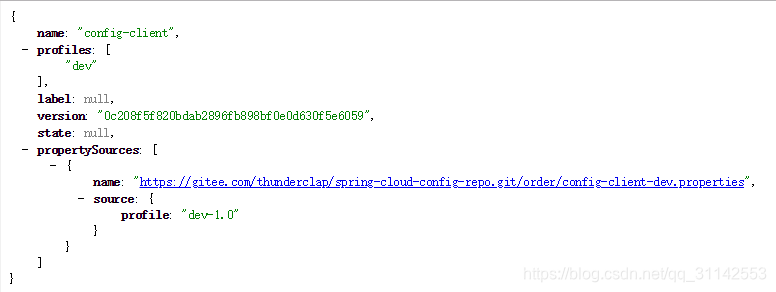
可以直观地看到应用名称、项目profile、仓库分支、仓库版本、配置文件URL、配置详情等信息。
访问http://localhost:8085/config-client-dev.properties,返回配置文件中的属性
![]()
四、编写Config Client
1)创建一个maven工程microservice-config-client,pom.xml文件添加如下依赖
<?xml version="1.0" encoding="UTF-8"?>
<project xmlns="http://maven.apache.org/POM/4.0.0"
         xmlns:xsi="http://www.w3.org/2001/XMLSchema-instance"
         xsi:schemaLocation="http://maven.apache.org/POM/4.0.0 http://maven.apache.org/xsd/maven-4.0.0.xsd">
    <modelVersion>4.0.0</modelVersion>

    <groupId>cn.zhh</groupId>
    <artifactId>microservice-config-client</artifactId>
    <version>1.0</version>

    <!-- Spring Boot依赖  -->
    <parent>
        <groupId>org.springframework.boot</groupId>
        <artifactId>spring-boot-starter-parent</artifactId>
        <version>2.0.1.RELEASE</version>
    </parent>

    <!-- Spring Cloud管理依赖  -->
    <dependencyManagement>
        <dependencies>
            <dependency>
                <groupId>org.springframework.cloud</groupId>
                <artifactId>spring-cloud-dependencies</artifactId>
                <version>Finchley.M7</version>
                <type>pom</type>
                <scope>import</scope>
            </dependency>
        </dependencies>
    </dependencyManagement>

    <dependencies>
    	<!-- web -->
        <dependency>
        	<groupId>org.springframework.boot</groupId>
        	<artifactId>spring-boot-starter-web</artifactId>
        </dependency>
        <!-- config -->
        <dependency>
            <groupId>org.springframework.cloud</groupId>
            <artifactId>spring-cloud-starter-config</artifactId>
        </dependency>
		<!-- eureka-client -->
        <dependency>
            <groupId>org.springframework.cloud</groupId>
            <artifactId>spring-cloud-starter-netflix-eureka-client</artifactId>
        </dependency>
    </dependencies>

    <!-- 注意: 这里必须要添加, 否则各种依赖有问题  -->
    <repositories>
        <repository>
            <id>spring-milestones</id>
            <name>Spring Milestones</name>
            <url>https://repo.spring.io/libs-milestone</url>
            <snapshots>
                <enabled>false</enabled>
            </snapshots>
        </repository>
    </repositories>

    <build>
        <plugins>
            <plugin>
                <groupId>org.springframework.boot</groupId>
                <artifactId>spring-boot-maven-plugin</artifactId>
            </plugin>
        </plugins>
    </build>

</project>2)编写配置文件application.yml,并在其中添加如下内容
server:
  port: 8086
3)编写配置文件bootstrap.yml,并在其中添加如下内容
spring:
  application:
    name: config-client
  cloud:
    config:
      # 环境
      profile: pre
      # 分支
      label: master
      discovery:
        enabled: true
        service-id: config-server
# eureka server
eureka:
  client:
    serviceUrl:
      defaultZone: http://localhost:8080/eureka/
Config Client必须在bootstrap.yml或bootstrap.properties中配置。
原因:Spring Cloud有一个“引导上下文”的概念,这是主应用程序的父上下文,负责从配置服务器加载配置属性,以及解密外部配置文件中的属性。引导上下文加载bootstrap.*中的属性,比主应用程序加载application.*中的属性有更高的优先级,并且默认情况下不能被本地配置覆盖。
4)在启动类上添加@EnableDiscoveryClient,将服务注册到Eureka Server。
@SpringBootApplication
@EnableDiscoveryClient
public class MicroserviceConfigClientApplication {

	public static void main(String[] args) {
		SpringApplication.run(MicroserviceConfigClientApplication.class, args);
	}

}
5)添加一个读取配置的Controller类用来测试。
@RestController
public class ConfigClientController {

	@Value("${profile}")
	private String profile;

	@GetMapping("profile")
	public String getProfile() {
		return profile;
	}
}
6)先启动Eureka Server和Config Server,然后启动该应用。访问http://localhost:8086/profile,返回以下结果
![]()
说明获得了仓库中配置文件的信息。
五、Config Server的仓库配置详解
1、占位符支持
Config Server的占位符支持{application}、{profile}和{label}。
如spring.cloud.config.server.git.uri:https://gitee.com/thunderclap/{application}.git。
2、模式匹配
模式匹配指的是带有通配符的{application}/{profile}名称的列表。
3、搜索目录
spring:
  cloud:
    config:
      server:
        git:
          uri: https://gitee.com/thunderclap/spring-cloud-config-repo.git
          # 搜索路径(文件夹,可以多个),支持占位符如bar*
          search-paths:
          - order
4、启动时加载配置文件
spring:
  cloud:
    config:
      server:
        git:
          # 配置码云仓库地址
          uri: https://gitee.com/thunderclap/spring-cloud-config-repo.git
          clone-on-start: true
以上是全局配置,可以单个仓库独自配置的。
六、Config Server的健康状况指示器
// TODO
七、配置内容的加解密
// TODO
八、使用/refresh端点手动刷新配置
很多场景下,如果配置发生了修改,需要微服务在运行期间动态刷新调整。
怎么做呢?利用spring-boot-starter-actuator的/refresh端点可以做到,其原理是重新将bean注册到IOC容器。
1)pom.xml文件引入actuator的依赖。
        <dependency>
        	<groupId>org.springframework.boot</groupId>
        	<artifactId>spring-boot-starter-actuator</artifactId>
        </dependency>
2)application.yml配置文件开启所有服务端点权限。
management:
  endpoints:
    web:
      exposure:
        # 开启所有服务端点权限
        include: "*"
3)注入配置属性的类上面增加注解@RefreshScope。
@RestController
@RefreshScope
public class ConfigClientController {

	@Value("${profile}")
	private String profile;

	@GetMapping("profile")
	public String getProfile() {
		return profile;
	}
}4)修改仓库上的配置属性,post请求方式调用http://localhost:8086/actuator/refresh接口。
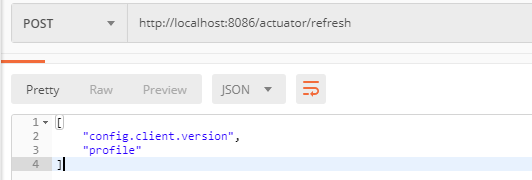
5)重新访问http://localhost:8086/profile,可以看到配置的值发生了改变。
![]()
九、使用Spring Cloud Bus自动刷新配置
使用/refresh端点手动刷新配置,只能刷新单个JVM的,每个微服务都这么去搞,工作量很大。随着系统的不断扩张,越来越难维护。这时候,实现配置的自动刷新就很有必要了。Spring Cloud Bus可以做到这些。
1、Spring Cloud Bus简介
Spring Cloud Bus使用轻量级的消息代理(例如RabbitMQ、Kafka等)连接分布式系统的节点,这样就可以广播传播状态的更改(例如配置的更新)或者其它的管理命令。可将Spring Cloud Bus想象成一个分布式的Spring Boot Actuator。是哟个Spring Cloud Bus后的架构如下图所示。
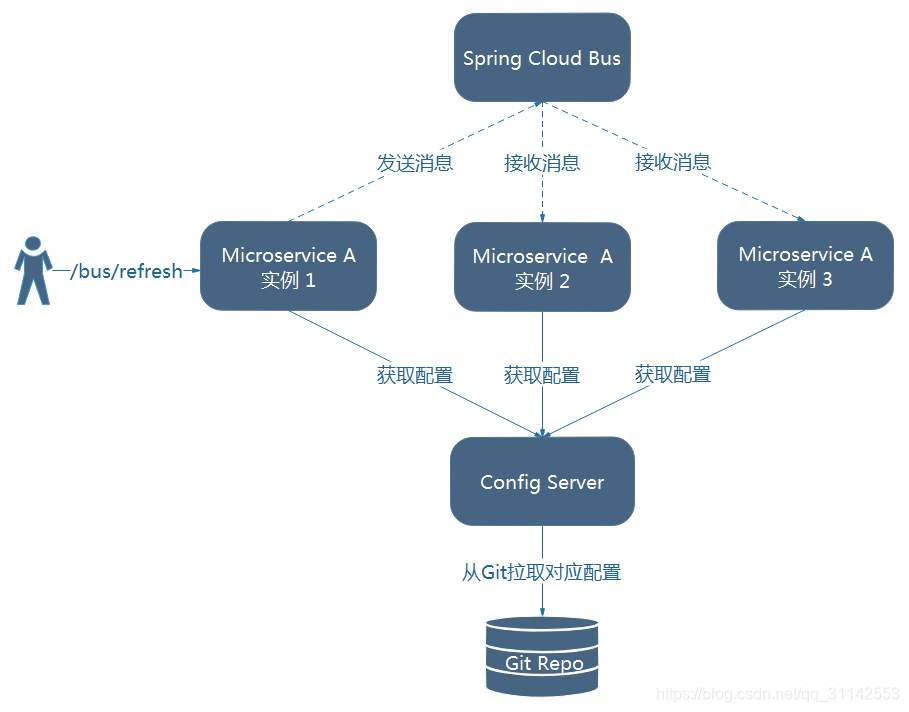
由图可知,微服务A的所有实例都通过消息总线连接到了一起,每个实例都会订阅配置更新事件。当其中一个微服务节点的/bus/refresh端点被请求时,该实例就会向消息总线发送一个配置更新时间,其它实例获得该事件后也会更新配置。
2、实现自动刷新
安装RabbitMQ,参考教程https://www.cnblogs.com/ericli-ericli/p/5902270.html。
1)pom.xml文件添加以下依赖
        <dependency>
        	<groupId>org.springframework.cloud</groupId>
        	<artifactId>spring-cloud-starter-bus-amqp</artifactId>
        </dependency>
2)bootstrap.yml配置文件中添加以下内容
spring
  rabbitmq:
    host: localhost
    port: 5672
    username: guest
    password: guest
3)启动项目,然后修改端口再启动一次。修改仓库文件内容后,发送POST请求到其中一个Config Client实例的/bus/refresh端点,然后访问两个Config Client节点的/profile端点,会发现两个节点都会返回修改后的值,说明配置内容已被刷新。
如果使用Git仓库,可以借助WebHooks监听文件变化自动发送请求,轻松实现配置的自动更新。
3、局部刷新
某些场景下(例如灰度发布等),若只想刷新部分微服务的配置,可通过/bus/refresh端点的destination参数来定位要刷新的应用程序。
例如:/bus/refresh?destination=consumers:9000,这样消息总线上的微服务实例就会根据destination参数的值来判断是否需要刷新。其中,consumers:9000指的是各个微服务的ApplicationContextID。
destination参数也可以用来定位特定的微服务。例如:/bus/refresh?destination=consumers:**,这样就可以触发customers微服务所有实例的配置刷新。
配置的局部刷新与ApplicationContextID有关。默认情况下,ApplicationContextID是spring.application.name:server.port。
4、架构改进
通过请求某个微服务/bus/refresh端点来实现配置刷新的方式并不优雅。原因如下
破坏了微服务的职责是单一原则。业务微服务只应关心自身业务,不应承担配置刷新的职责。
破坏了微服务各节点的对等性。
有一定的局限性。例如,微服务在迁移时,网络地址经常会发生变化。此时如果想自动刷新配置,就要修改WebHook的配置。
如果将Config Server也加入到消息总线中,并使用Config Server的/bus/refresh端点来实现配置的刷新。这样,各个微服务只需要关心自身的业务,而不再承担配置刷新的职责。
5、跟踪总线事件
一些场景下如果希望知道Spring Cloud Bus事件传播的细节,可以跟踪总线事件(RemoteApplicationEvent的子类都是总线事件)。
只需设置spring.cloud.bus.trace.enabled=true,就可以在/bus/refresh端点被请求后,访问/trace端点获得事件的传播细节了。
十、Spring Cloud Config的用户认证
在Config Server添加以下依赖
        <dependency>
            <groupId>org.springframework.boot</groupId>
            <artifactId>spring-boot-starter-security</artifactId>
        </dependency>
在application.yml添加以下配置
security:
    basic:
        enabled: true    # 开启基于HTTP basic的认证
    # 如果不设置,账号默认是user,密码是一个随机值,该值会在启动时打印出来
    user:
        name: user    # 配置登录的账号是user
        password: 123456    # 配置登录的密码是123456
Config Client连接需要认证的Config Server
方式一:使用curl风格的URL,例如
spring:
    cloud:
        config:
            url: http://user:123456@localhost:8080/
方式二:指定Config Server的账号与密码,例如
spring:
    cloud:
        config:
            url: http://localhost:8080/
            username: user
            password: 123456
方式二的优先级比方式一高。
十一、Config Server的高可用
1、Git仓库的高可用
1)使用第三方Git仓库。比如使用GitHub、BitBucket、get@osc、Coding等提供的仓库托管服务。
2)自建Git仓库管理系统。
2、Rabbit MQ的高可用
使用消息总线实现自动刷新时用到的消息中间件也需要保证高可用。
3、Config Server自身的高可用
1)借助一个负载均衡器来实现:各个微服务将请求发送到负载均衡器(比如Nginx),负载均衡器将请求转发到其代理的其中一个Config Server节点。
2)Config Server注册到Eureka Server上:将多个配置服务节点注册到Eureka。


 1846
1846

 被折叠的 条评论
为什么被折叠?
被折叠的 条评论
为什么被折叠?
 到【灌水乐园】发言


