


 本文详细介绍如何使用Kubernetes和GlusterFS构建一个无单点故障、高可用且可动态扩展的MongoDB集群。涵盖从安装GlusterFS客户端、配置StorageClass到创建StatefulSet的全过程,以及Heketi服务的部署,实现动态存储资源供应。
昨天的内容,大家了解概念就好,至于实例,我们后面service章节详细来做。
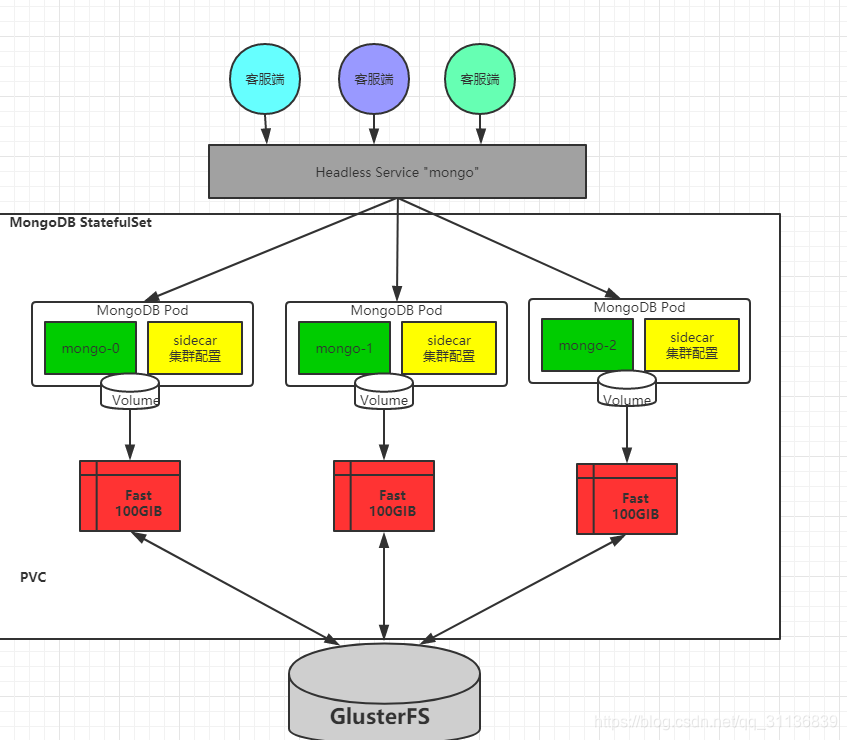
本节以MongoDB为例,使用StatefulSet 完成MongoDB集群的创建,为每个MongoDB实例在共享存储中(这里采用GlusterFs)都申请一篇存储空间,以实现一个无单点故障、高可用、可动态扩展的MongoDB集群。部署架构如下图:
前提条件
在创建StatefulSet 之前,需要确保在Kubernetes集群中管理员已经创建好共享存储,并能够与StorageClass对接,以实现动态存储供应的模式。
动态存储管理实战:GlusterFS
从定义StorageClass、创建GlusterFS和Heketi服务、用户申请PVC到创建Pod使用存储资源,对StorageClass和动态资源分配进行详细说明,进一步剖析Kubernetes的存储机制。
准备工作
为了能够使用GlusterFS,首先在计划用于GlusterFS的各Node上安装GlusterFS客户端:
yum install glusterfs glusterfs-fuse
GlusterFS管理服务容器需要一特权模式运行,在kube-apiserver的启动参数中增加:
![]()
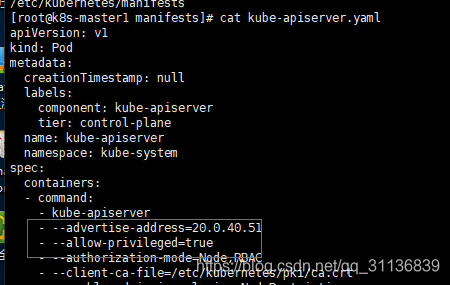
--allow-privileged=true
给要部署GlusterFS管理服务的节点打上“storagenode=glusterfs”的标签,是为了将GlusterFS容器定向部署到安装了GlusterFS 的Node上:
kubectl label node k8s-node1 storagenode=glusterfs
kubectl label node k8s-node2 storagenode=glusterfs
kubectl label node k8s-node3 storagenode=glusterfs
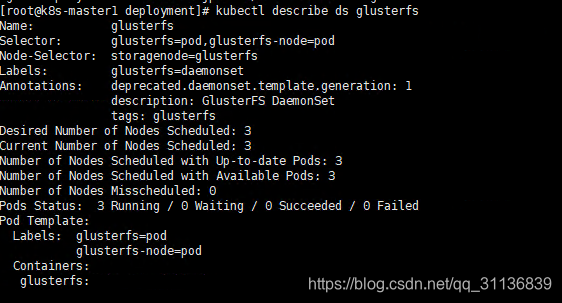
创建GlusterFS管理服务容器集群
GlusterFS管理容器以DaemonSet的方式进行部署,确保在每个Node上都运行一个GlusterFS管理服务。
glusterfs-daemonset.yank的内容如下:
kind: DaemonSet
apiVersion: extensions/v1beta1
metadata:
  name: glusterfs
  labels:
    glusterfs: daemonset
  annotations:
    description: GlusterFS DaemonSet
    tags: glusterfs
spec:
  template:
    metadata:
      name: glusterfs
      labels:
        glusterfs: pod
        glusterfs-node: pod
    spec:
      nodeSelector:
        storagenode: glusterfs
      hostNetwork: true
      containers:
      - image: gluster/gluster-centos:latest
        name: glusterfs
        imagePullPolicy: IfNotPresent
        volumeMounts:
        - name: glusterfs-heketi
          mountPath: "/var/lib/heketi"
        - name: glusterfs-run
          mountPath: "/run"
        - name: glusterfs-lvm
          mountPath: "/run/lvm"
        - name: glusterfs-etc
          mountPath: "/etc/glusterfs"
        - name: glusterfs-logs
          mountPath: "/var/log/glusterfs"
        - name: glusterfs-config
          mountPath: "/var/lib/glusterd"
        - name: glusterfs-dev
          mountPath: "/dev"
        - name: glusterfs-misc
          mountPath: "/var/lib/misc/glusterfsd"
        - name: glusterfs-cgroup
          mountPath: "/sys/fs/cgroup"
          readOnly: true
        - name: glusterfs-ssl
          mountPath: "/etc/ssl"
          readOnly: true
        securityContext:
          capabilities: {}
          privileged: true
        readinessProbe:
          timeoutSeconds: 3
          initialDelaySeconds: 60
          exec:
            command:
            - "/bin/bash"
            - "-c"
            - systemctl status glusterd.service
        livenessProbe:
          timeoutSeconds: 3
          initialDelaySeconds: 60
          exec:
            command:
            - "/bin/bash"
            - "-c"
            - systemctl status glusterd.service
      volumes:
      - name: glusterfs-heketi
        hostPath:
          path: "/var/lib/heketi"
      - name: glusterfs-run
      - name: glusterfs-lvm
        hostPath:
          path: "/run/lvm"
      - name: glusterfs-etc
        hostPath:
          path: "/etc/glusterfs"
记得在安装有glusterfs的node上加载dm_thin_pool核心
modprobe dm_thin_pool
lsmod | grep thin


创建Heketi服务
Hekeit是一个提供RESTful API管理GlusterFS卷的框架,并能够在OpenStack、Kubernetes、OpenShift等云平台上实现动态存储资源供应,支持GlusterFS多集群管理,便于管理员对GlusterFS进行操作。
在部署Heketi服务之前,需要为它创建一个ServiceAccount对象:
heketi-service-account.yaml
apiVersion: v1
kind: ServiceAccount
metadata:
  name: heketi-service-account
部署Heketi服务:
---
kind: Service
apiVersion: v1
metadata:
  name: deploy-heketi
  labels:
    glusterfs: heketi-service
    deploy-heketi: support
  annotations:
    description: Exposes Heketi Service
spec:
  selector:
    name: deploy-heketi
  ports:
  - name: deploy-heketi
    port: 8080
    targetPort: 8080
---
kind: Deployment
apiVersion: extensions/v1beta1
metadata:
  name: deploy-heketi
  labels:
    glusterfs: heketi-deployment
    deploy-heketi: heket-deployment
  annotations:
    description: Defines how to deploy Heketi
spec:
  replicas: 1
  template:
    metadata:
      name: deploy-heketi
      labels:
        glusterfs: heketi-pod
        name: deploy-heketi
    spec:
      serviceAccountName: heketi-service-account
      containers:
      - image: heketi/heketi
        imagePullPolicy: IfNotPresent
        name: deploy-heketi
        env:
        - name: HEKETI_EXECUTOR
          value: kubernetes
        - name: HEKETI_FSTAB
          value: "/var/lib/heketi/fstab"
        - name: HEKETI_SNAPSHOT_LIMIT
          value: '14'
        - name: HEKETI_KUBE_GLUSTER_DAEMONSET
          value: "y"
        ports:
        - containerPort: 8080
        volumeMounts:
        - name: db
          mountPath: "/var/lib/heketi"
        readinessProbe:
          timeoutSeconds: 3
          initialDelaySeconds: 3
          httpGet:
            path: "/hello"
            port: 8080
        livenessProbe:
          timeoutSeconds: 3
          initialDelaySeconds: 30
          httpGet:
            path: "/hello"
            port: 8080
      volumes:
      - name: db
        hostPath:
          path: "/heketi-data"
create:需要注意的是,Heketi的DB数据需要持久化保存,建议使用hostPath或其他共享存储进行保存:
![]()
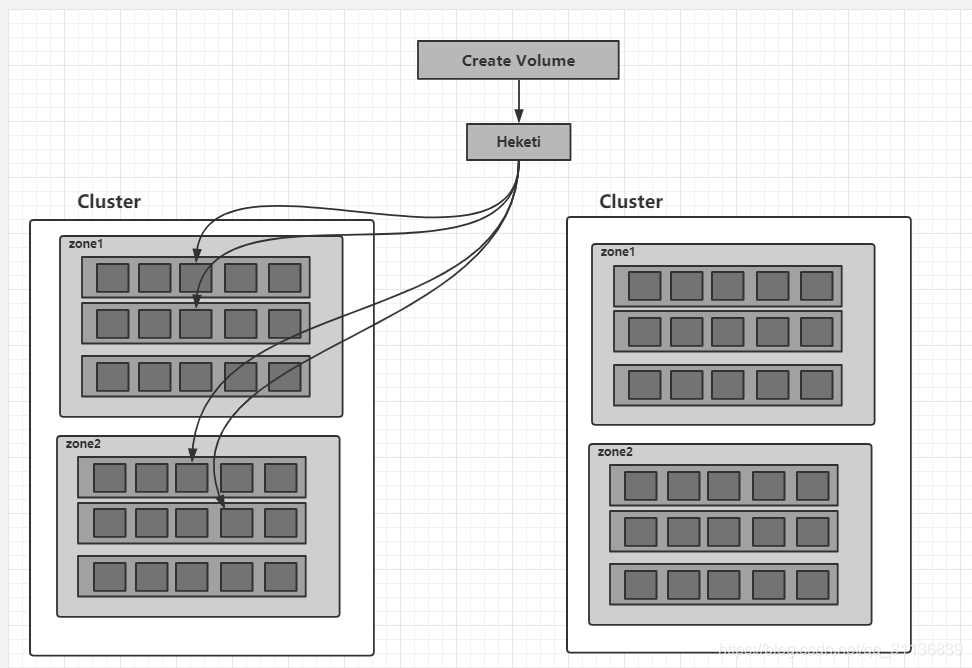
为Heketi设置GlusterFS集群
在Heketi能够管理GlusterFS集群之前,首先要为其设置GlusterFS集群的信息。可以用一个topology.json配置文件来完成各个GlusterFS节点和设备的定义。Heketi要求在一个GlusterFS集群中至少有3个节点。在topology.json配置文件hostnmaes字段的manage上填写主机名,在storage上填写IP地址,devices要求为未创建文件系统的裸设备(可以有多块盘),以供Heketi自动完成PV(Physical Volume)、VG(Volume Group)和LV(Logical Volume)的创建。topology.json文件内容如下:
这是我的集群角色

{
  "clusters": [
    {
      "nodes": [
        {
          "node": {
            "hostnames": {
              "manage": [
                "k8s-master2"
              ],
              "storage": [
                "20.0.40.52"
              ]
            },
            "zone": 1
          },
          "devices": [
            "/dev/sdb1"
          ]
        },
        {
          "node": {
            "hostnames": {
              "manage": [
                "k8s-master3"
              ],
              "storage": [
                "20.0.40.53"
              ]
            },
            "zone": 1
          },
          "devices": [
            "/dev/sdb1"
          ]
        },
        {
          "node": {
            "hostnames": {
              "manage": [
                "k8s-node3"
              ],
              "storage": [
                "20.0.40.56"
              ]
            },
            "zone": 1
          },
          "devices": [
            "/dev/sdb1"
          ]
        }
      ]
    }
  ]
}
进入容器Heketi容器,使用命令行工具heketi-cli完成GlusterFS集群的创建之前需要做下面的操作。
1.必须建立该服务帐户控制gluster pod的能力。我们通过为新创建的服务帐户创建集群角色绑定来实现此目的。
kubectl create clusterrolebinding heketi-gluster-admin --clusterrole=edit --serviceaccount=default:heketi-service-account
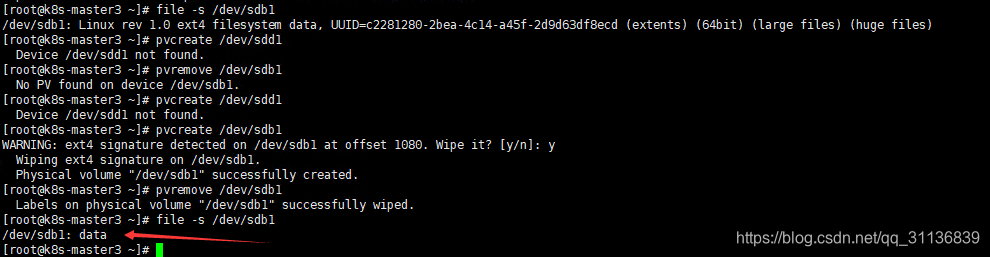
2.添加新的硬盘,使其成为原始块设备(ps:自行百度这里)
3.进入Heketi容器(ps:记得查找pod name【kubectl get pod】):
kubectl exec -it deploy-heketi-7bdd64b4f9-fm2qx -c deploy-heketi bash
4.创建 topology.json文件
 5.添加环境变量并添加硬盘
export HEKETI_CLI_SERVER=http://localhost:8080
heketi-cli topology load --json=topology.json


经过这些操作,Heketi完成了GlusterFS集群的创建,同时在GlusterFS集群的各个节点的/dav/sdb1盘上成功创建了PV和VG。
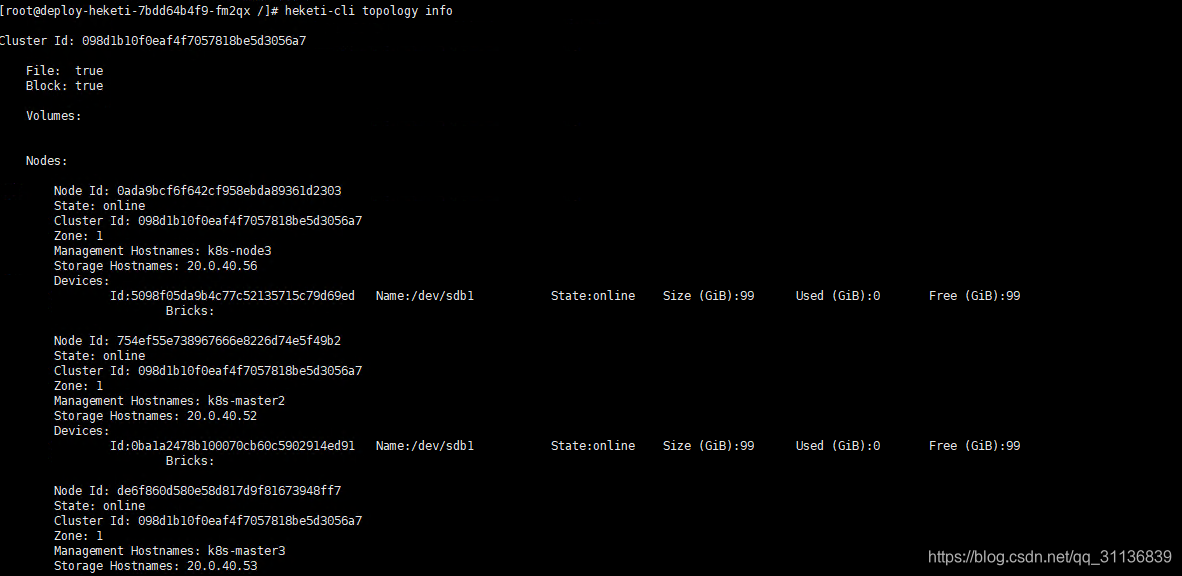
查看Heketi的topology信息,可以看到Node和Device的详细信息,包括磁盘空间的大小和剩余空间,此时Volume和Brick还未创建:
小结:
今天的内容就先到这里了,明天继续接着进行讲解。
谢谢大家的支持,多多点关注哦。


 24
24

 被折叠的 条评论
为什么被折叠?
被折叠的 条评论
为什么被折叠?
 到【灌水乐园】发言


