


1 说明
在 Kubernetes 中使用 Helm 安装 Harbor 可以简化部署过程。以下是详细的安装步骤:
版本要求:
- Kubernetes cluster 1.20+
- Helm v3.2.0+
2 安装helm
curl https://raw.githubusercontent.com/helm/helm/master/scripts/get-helm-3 | bash
3 添加 Harbor Helm 仓库
首先,需要添加 Harbor 的 Helm 仓库:
helm repo add harbor https://helm.goharbor.io
helm repo update
查看版本列表:
helm search repo harbor --versions
下载指定版本到本地:
helm pull harbor/harbor --version 1.15.0
4 配置 values.yaml 文件
这边只罗列主要修改的地方,其他配置请根据自己集群的实际情况选择性配置即可:
1 选择访问方式和关闭tls证书
expose:
  # Set how to expose the service. Set the type as "ingress", "clusterIP", "nodePort" or "loadBalancer"
  # and fill the information in the corresponding section
  # 访问 Harbor服务的方式。本示例使用 nodePort。
  type: nodePort
  tls:
    # Enable TLS or not.
    # Delete the "ssl-redirect" annotations in "expose.ingress.annotations" when TLS is disabled and "expose.type" is "ingress"
    # Note: if the "expose.type" is "ingress" and TLS is disabled,
    # the port must be included in the command when pulling/pushing images.
    # Refer to https://github.com/goharbor/harbor/issues/5291 for details.
    # tls:指定是否启用 HTTPS。多数情况下设置为 false,这里我们使用的是false
    enabled: false
2 配置externalURL
# If Harbor is deployed behind the proxy, set it as the URL of proxy
# 暴露给租户的 URL。替换你的服务器IP,
#请指定 externalURL,如果您访问 Harbor有问题,该字段会对解决问题非常有用。
#请确保在本教程中使用 HTTP协议和其对应的nodePort
externalURL: http://xx.xx.xx.xx:30002
3 配置存储storageClass
persistence:
  enabled: true
  # Setting it to "keep" to avoid removing PVCs during a helm delete
  # operation. Leaving it empty will delete PVCs after the chart deleted
  # (this does not apply for PVCs that are created for internal database
  # and redis components, i.e. they are never deleted automatically)
  resourcePolicy: "keep"
  persistentVolumeClaim:
    registry:
      # Use the existing PVC which must be created manually before bound,
      # and specify the "subPath" if the PVC is shared with other components
      existingClaim: ""
      # Specify the "storageClass" used to provision the volume. Or the default
      # StorageClass will be used (the default).
      # Set it to "-" to disable dynamic provisioning
      storageClass: "localpath" # 根据kubectl get sc 选择你这边需要的storageClass
      subPath: ""
4 修改镜像(由于网络原因等诸多因素请配置你的镜像地址)
grep 'repository: ' values.yaml
    repository: ccr.ccs.tencentyun.com/xxxxxx/nginx-photon
    repository: ccr.ccs.tencentyun.com/xxxxxx/harbor-portal
    repository: ccr.ccs.tencentyun.com/xxxxxx/harbor-core
    repository: ccr.ccs.tencentyun.com/xxxxxx/harbor-jobservice
      repository: ccr.ccs.tencentyun.com/xxxxxx/registry-photon
      repository: ccr.ccs.tencentyun.com/xxxxxx/harbor-registryctl
    repository: ccr.ccs.tencentyun.com/xxxxxx/trivy-adapter-photon
      repository: ccr.ccs.tencentyun.com/xxxxxx/harbor-db
      repository: ccr.ccs.tencentyun.com/xxxxxx/redis-photon
    repository: ccr.ccs.tencentyun.com/xxxxxx/harbor-exporter
5 配置admin的secret(安全考虑)
创建admin用户的密码对应的secret
kubectl create secret generic harbor-admin-secret \
  --from-literal=HARBOR_ADMIN_PASSWORD=密码 \
  -n harbor
existingSecretAdminPassword: "harbor-admin-secret"  #选择secret
existingSecretAdminPasswordKey: HARBOR_ADMIN_PASSWORD  #选择对应的key
5 安装harbor
cd harbor/  #进入到values.yaml同级目录
helm install harbor -n harbor .
harbor为helm创建的应用名称
-n:指定命名空间(例如 harbor),如果命名空间不存在,可以加--create-namespace 会自动创建。
-f values.yaml:指定自定义配置文件 values.yaml,此出之际.指定即当前目录的默认values.yaml。
安装完毕:
helm list -n harbor
NAME  	NAMESPACE	REVISION	UPDATED                                	STATUS  	CHART        	APP VERSION
harbor	harbor   	2       	2024-11-13 14:49:24.015848301 +0800 CST	deployed	harbor-1.15.0	2.11.0
6 验证安装
安装完成后,可以通过以下命令检查所有 Harbor 组件是否正常运行:
kubectl  get pod -n harbor
NAME                                 READY   STATUS    RESTARTS   AGE
harbor-core-59794977f5-dmjhd         1/1     Running   0          29m
harbor-database-0                    1/1     Running   0          35m
harbor-jobservice-5696c7c865-tkxj8   1/1     Running   0          29m
harbor-nginx-7dc98bb7f-6qg9n         1/1     Running   0          35m
harbor-portal-747449d7bd-4w4z7       1/1     Running   0          35m
harbor-redis-0                       1/1     Running   0          35m
harbor-registry-7d79b788f4-whwpm     2/2     Running   0          29m
harbor-trivy-0                       1/1     Running   0          35m
7 访问平台
通过配置的externalURL访问即可
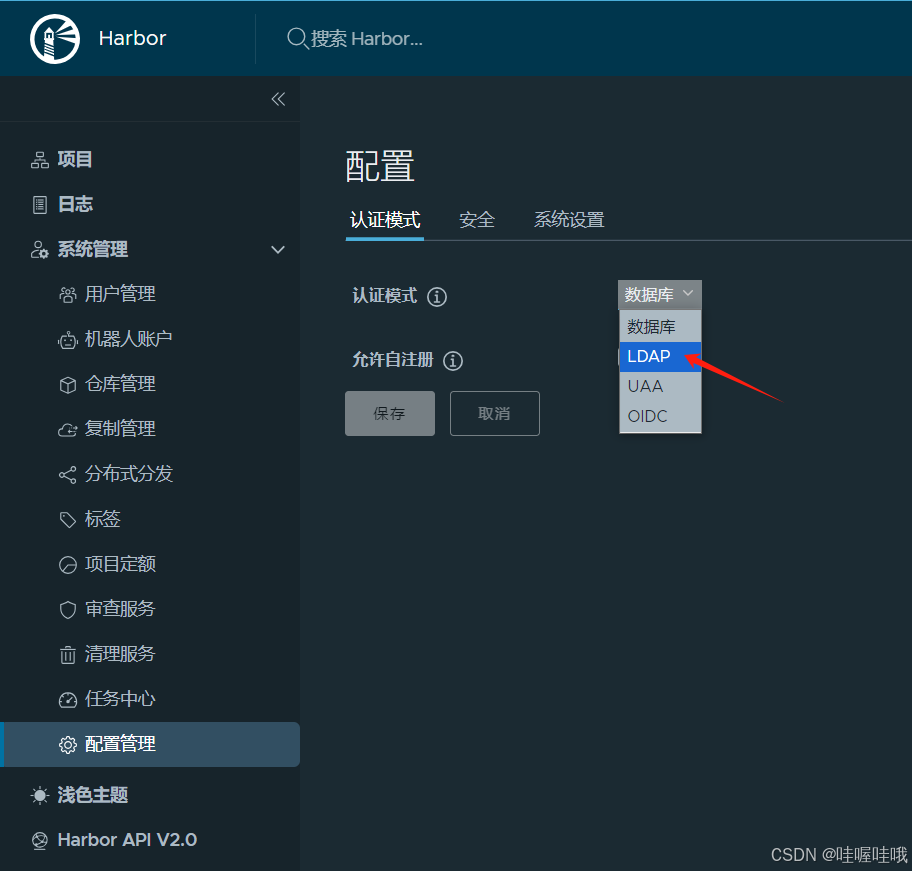
8 配置ldap登录


 412
412

 被折叠的 条评论
为什么被折叠?
被折叠的 条评论
为什么被折叠?
 到【灌水乐园】发言


