


1. SpringBoot依赖管理
1.1 父依赖
    <parent>
        <groupId>org.springframework.boot</groupId>
        <artifactId>spring-boot-starter-parent</artifactId>
        <version>2.7.8</version>
        <relativePath/>
    </parent>
点击进去,看父依赖的父依赖
  <parent>
    <groupId>org.springframework.boot</groupId>
    <artifactId>spring-boot-dependencies</artifactId>
    <version>2.7.8</version>
  </parent>
再点击进去,会看到全局的版本管理,声明了开发中几乎所有常用jar包的版本
spring-boot-dependencies里面规定当前依赖的版本 用的 key
  <properties>
    <activemq.version>5.16.5</activemq.version>
    <antlr2.version>2.7.7</antlr2.version>
    <appengine-sdk.version>1.9.98</appengine-sdk.version>
    <artemis.version>2.19.1</artemis.version>
    <aspectj.version>1.9.7</aspectj.version>
    <assertj.version>3.22.0</assertj.version>
    <atomikos.version>4.0.6</atomikos.version>
........
    <mysql.version>8.0.32</mysql.version>
........
  </properties>
1.2 修改jar的版本
比如,如何修改mysql版本呢?当前版本是8.0.32,那么改成8.0.31?
        <dependency>
            <groupId>com.mysql</groupId>
            <artifactId>mysql-connector-j</artifactId>
            <scope>runtime</scope>
</dependency>![]()
根据全局的版本管理中的mysql的key进行设置
    <properties>
        <mysql.version>8.0.31</mysql.version>
</properties>![]()
注意:
1、引入依赖默认都可以不写版本
2、引入非版本仲裁的jar,要写版本号
2. 容器功能
2.1 组件添加
2.1.1 @Configuration
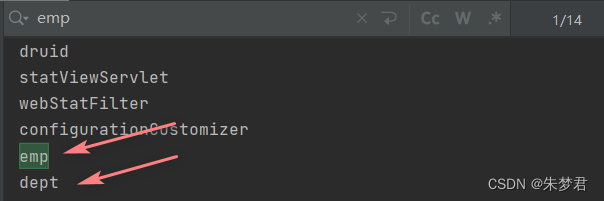
@Configuration //告诉Springboot这是一个配置类,它本身也是一个组件
public class MyTestConfig {
    //给容器中添加组件。以方法名作为组件的id。返回类型就是组件类型。
    //返回的值,就是组件在容器中的实例
    @Bean
    public Employee emp(){
        Employee zhangsan = new Employee(1,"zhangsan", 18,"zs@126.com",1);
        //emp组件依赖了dept组件
        zhangsan.setDepartment(dept());
        return zhangsan;
    }

    @Bean("dept")
    public Department dept(){
        return new Department(1,"dept001");
    }
}
@MapperScan("com.zmj.springboot.mapper")
@SpringBootApplication
public class SpringbootApplication {
public static void main(String[] args) {
//1、返回我们IOC容器
ConfigurableApplicationContext run = SpringApplication.run(SpringbootApplication.class, args);
//2、查看容器里面的组件
String[] beanDefinitionNames = run.getBeanDefinitionNames();
for (String beanDefinitionName : beanDefinitionNames) {
System.out.println(beanDefinitionName);
}
//3、从容器中获取组件
Employee emp = run.getBean("emp", Employee.class);
System.out.println("emp:"+emp);
MyTestConfig bean = run.getBean(MyTestConfig.class);
Employee emp1 = bean.emp();
Employee emp2 = bean.emp();
System.out.println("是否是单例:"+(emp1 == emp2));
}
}服务启动后,会在日志里面打印出来,刚才在配置类的两个Bean
组件默认是单例的

原因是@Configuration的proxyBeanMethods属性默认是true,也就是Full 模式,保证每个@Bean方法被调用多少次返回的组件都是单实例的。
配置类组件之间有依赖关系,方法会被调用得到之前单实例组件,用Full模式。
配置类组件之间无依赖关系用Lite模式,加速容器启动过程,减少判断。
@Configuration(proxyBeanMethods=false) //告诉Springboot这是一个配置类,它本身也是一个组件
public class MyTestConfig {
    @Bean //给容器中添加组件。以方法名作为组件的id。返回类型就是组件类型。返回的值,就是组件在容器中的实例
    public Employee emp(){
        Employee zhangsan = new Employee(1,"zhangsan", 18,"zs@126.com",1);
        return zhangsan;
    }

    @Bean("dept")
    public Department dept(){
        return new Department(1,"dept001");
    }
}
重启后,再次查看结果,就不再是单例了

2.1.2 @Import 自动导入组件
@Import({DOMObjectHelper.class})
@Configuration
public class MyTestConfig {
}
@MapperScan("com.zmj.springboot.mapper")
@SpringBootApplication
public class SpringbootApplication {
public static void main(String[] args) {
//1、返回我们IOC容器
ConfigurableApplicationContext run = SpringApplication.run(SpringbootApplication.class, args);
DOMObjectHelper bean2 = run.getBean(DOMObjectHelper.class);
System.out.println(bean2);
}
}启动后,查看结果发现可以获取到
2.1.3 @Conditional
条件装配:满足Conditional指定的条件,则进行组件注入
@ConditionalOnBean(Department.class) 存在这个Bean才生效;@ConditionalOnMissingBean(name = "dept") 不存在这个Bean才生效
@Configuration
//只有存在Bean为Department,这个配置类才生效
@ConditionalOnBean(Department.class)
public class MyTestConfig {
    @Bean
    public Employee emp(){
        Employee zhangsan = new Employee(1,"zhangsan", 18,"zs@126.com",1);
        return zhangsan;
    }
}
启动后,查看结果为 是否包含EmployeeBean:false
2.1.4 @ImportResource
@ImportResource("classpath:beans.xml") 导入Spring的配置文件
2.2 配置绑定
2.2.1 方式一
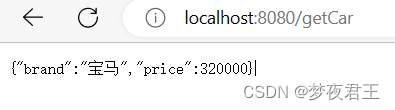
@Component + @ConfigurationProperties(prefix = "mycar")
@Component //只有在容器中的组件,才会拥有SpringBoot提供的强大功能
@ConfigurationProperties(prefix = "mycar")
public class Car {
    private String brand;
    private Integer price;
//省去setter/getter方法
}
application.yml中内容追加
mycar:
  brand: 宝马
  price: 320000
@RestController
public class HelloController {
@Autowired
private Car car;
@GetMapping("/getCar")
public Car getCar(){
return car;
}
}
2.2.2 方式二
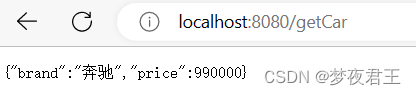
@EnableConfigurationProperties(Car.class) + @ConfigurationProperties(prefix = "car")
@ConfigurationProperties(prefix = "car")
public class Car {
    private String brand;
    private Integer price;
    //省略setter/getter方法
}
@Configuration
@EnableConfigurationProperties(Car.class)
public class MyTestConfig {
}application.yml内容里面追加
car:
  brand: 奔驰
  price: 990000
@RestController
public class HelloController {
@Autowired
private Car car;
@GetMapping("/getCar")
public Car getCar(){
return car;
}
}
3. SpringBoot自动配置原理
3.1 @SpringBootApplication
@SpringBootApplication
public class SpringbootDataJdbcApplication {
    public static void main(String[] args) {
        SpringApplication.run(SpringbootDataJdbcApplication.class, args);
    }
}
点击 @SpringBootApplication注解进去发现,实际上它是三个注解的组合
@SpringBootConfiguration
@EnableAutoConfiguration
@ComponentScan(
    excludeFilters = {@Filter(
    type = FilterType.CUSTOM,
    classes = {TypeExcludeFilter.class}
), @Filter(
    type = FilterType.CUSTOM,
    classes = {AutoConfigurationExcludeFilter.class}
)}
)
public @interface SpringBootApplication {...}
3.2 @SpringBootConfiguration
点击 @SpringBootConfiguration注解进去发现,它其实就是一个配置类
@Configuration
public @interface SpringBootConfiguration {...}
3.3 @ComponentScan
指定扫描哪些包,默认是扫描启动类所在包及其子包
3.4 @EnableAutoConfiguration
这个注解由另外两个注解组成
@AutoConfigurationPackage
@Import({AutoConfigurationImportSelector.class})
public @interface EnableAutoConfiguration {...}
3.5 @AutoConfigurationPackage
@Import({Registrar.class})
public @interface AutoConfigurationPackage {...}Registrar类会给容器导入非常多的组件,启动类下的所有
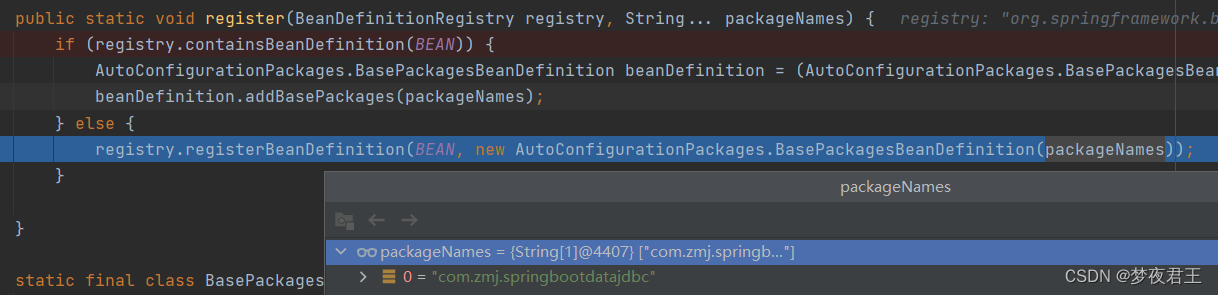
3.6 @Import({AutoConfigurationImportSelector.class})
获取所有自动配置的集合
1、利用getAutoConfigurationEntry(annotationMetadata);给容器中批量导入一些组件
2、调用List<String> configurations = getCandidateConfigurations(annotationMetadata, attributes)获取到所有需要导入到容器中的配置类
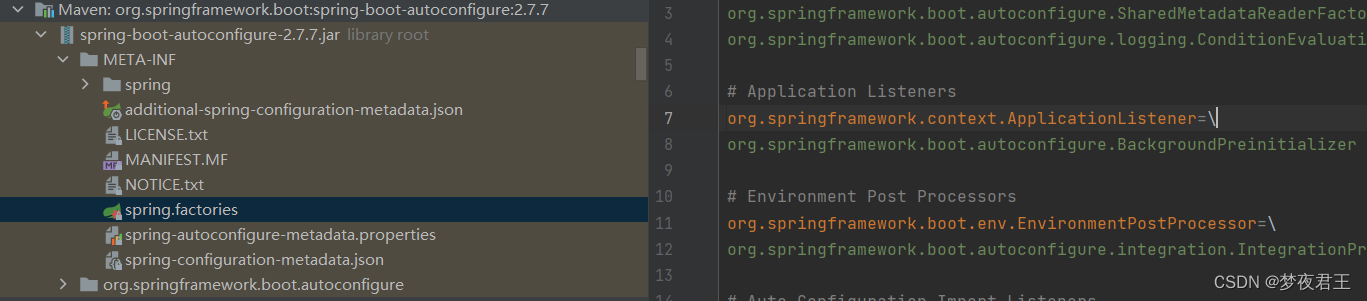
3、利用工厂加载 Map<String, List<String>> loadSpringFactories(@Nullable ClassLoader classLoader);得到所有的组件
4、从META-INF/spring.factories位置来加载一个文件。
默认扫描我们当前系统里面所有META-INF/spring.factories位置的文件
spring-boot-autoconfigure-2.7.7.jar包里面也有META-INF/spring.factories5、按需加载
protected List<String> getCandidateConfigurations(AnnotationMetadata metadata, AnnotationAttributes attributes) {
        List<String> configurations = new ArrayList(SpringFactoriesLoader.loadFactoryNames(this.getSpringFactoriesLoaderFactoryClass(), this.getBeanClassLoader()));
        ImportCandidates.load(AutoConfiguration.class, this.getBeanClassLoader()).forEach(configurations::add);
        Assert.notEmpty(configurations, "No auto configuration classes found in META-INF/spring.factories nor in META-INF/spring/org.springframework.boot.autoconfigure.AutoConfiguration.imports. If you are using a custom packaging, make sure that file is correct.");
        return configurations;
    }
3.7 总结
总结:
1. SpringBoot先加载所有的自动配置类 xxxxxAutoConfiguration
2. 每个自动配置类按照条件进行生效,默认都会绑定配置文件指定的值。xxxxProperties里面拿。xxxProperties和配置文件进行了绑定
3. 生效的配置类就会给容器中装配很多组件
4. 只要容器中有这些组件,相当于这些功能就有了
5. 定制化配置
- 用户直接自己@Bean替换底层的组件
- 用户去看这个组件是获取的配置文件什么值就去修改。
xxAutoConfiguration ---> 组件 ---> xxProperties里面拿值 ---> application.properties
4. 开发技巧
4.1 参照文档
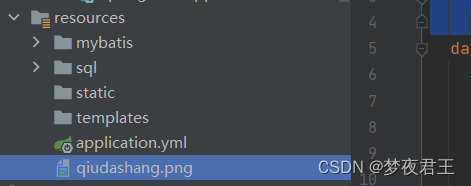
比如:我们想修改下面的启动图标
文档:Common Application Properties
![]()
application.yml追加内容
spring:
  banner:
    image:
      location: classpath:qiudashang.png
4.2 Lombok
简化JavaBean开发
        <dependency>
            <groupId>org.projectlombok</groupId>
            <artifactId>lombok</artifactId>
</dependency>| 注解 | 位置 | 释义 |
@Data | 注解在类上 | 提供类所有属性的 getting 和 setting 方法,此外还提供了equals、canEqual、hashCode、toString 方法 |
| @NoArgsConstructor | 注解在类上 | 为类提供一个无参的构造方法 |
| @AllArgsConstructor | 注解在类上 | 为类提供一个全参的构造方法 |
@Slf4j | 注解在类上 | 为类提供一个 属性名为log 的 Slf4j 日志对象 |
| @Setter | 注解在属性上 | 为属性提供 setting 方法 |
| @Getter | 注解在属性上 | 为属性提供 getting 方法 |
4.3 IDEA配置JRebel热部署
5.SpringBoot2.x整合Druid
5.1 导入Maven依赖
		<dependency>
            <groupId>com.alibaba</groupId>
            <artifactId>druid-spring-boot-starter</artifactId>
            <version>1.1.23</version>
        </dependency>
        <dependency>
            <groupId>org.springframework.boot</groupId>
            <artifactId>spring-boot-starter-jdbc</artifactId>
        </dependency>
5.2 application.yml
spring:
  datasource:
    url: jdbc:mysql://localhost:3306/mytest
    username: root
    password: 123456
    driver-class-name: com.mysql.cj.jdbc.Driver
    druid:
      aop-patterns: com.zmj.admin.*  #监控SpringBean
      filters: stat,wall,slf4j    # 底层开启功能,stat(sql监控),wall(防火墙)
      stat-view-servlet:   # 配置监控页功能
        enabled: true
        login-username: admin
        login-password: admin
        reset-enable: false
      web-stat-filter:    # 监控web 用于采集web-jdbc关联监控的数据
        enabled: true
        url-pattern: /*
        exclusions: '*.js,*.gif,*.jpg,*.png,*.css,*.ico,/druid/*'
      filter:
        stat:     # 对上面filters里面的stat的详细配置
          slow-sql-millis: 1000   # 设置只要超过1000毫秒的,都为慢查询
          logSlowSql: true
          enabled: true
        wall:
          enabled: true
          config:
            drop-table-allow: false
5.3 Controller层
@RestController
public class HelloController {
    @Autowired
    private JdbcTemplate jdbcTemplate;

    @GetMapping("/queryDB")
    public String queryDB(){
        Long ret = jdbcTemplate.queryForObject("select count(*) from employee",Long.class);
        return ret.toString();
    }
}
5.5 测试
登录druid监控页面
http://localhost:8080/druid/sql.html
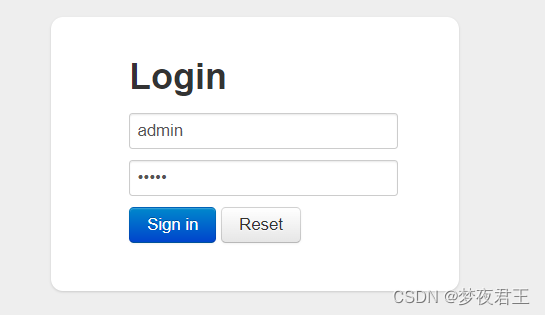
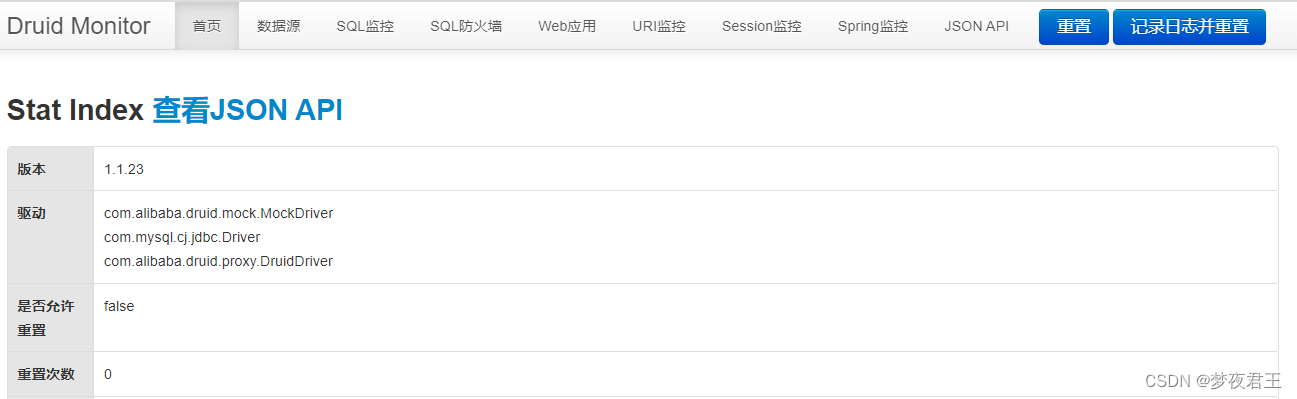
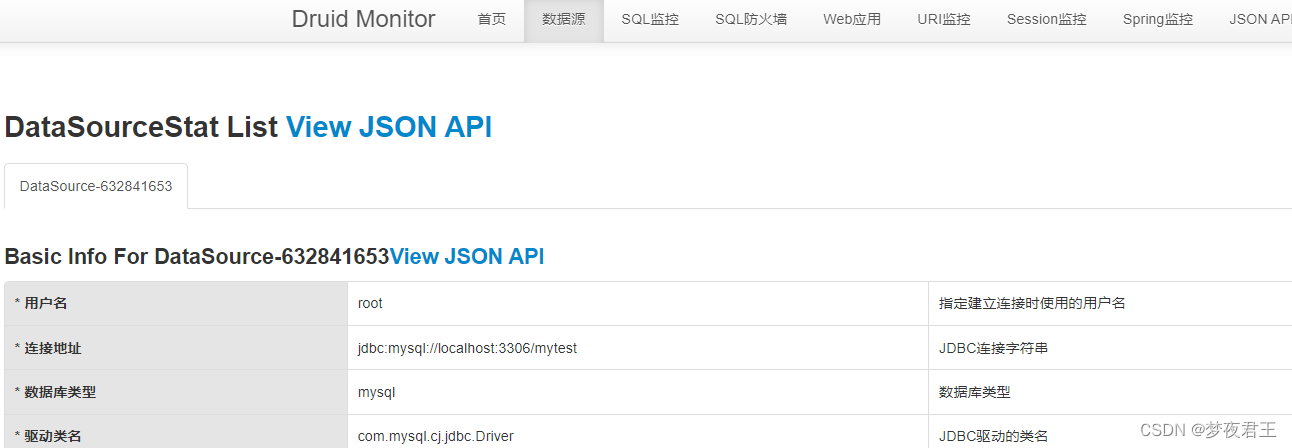

页面访问下数据库

6.SpringBoot2.x整合MyBatis
6.1 导入Maven依赖
        <dependency>
            <groupId>org.mybatis.spring.boot</groupId>
            <artifactId>mybatis-spring-boot-starter</artifactId>
            <version>2.3.0</version>
        </dependency>
6.2 Mapper和Mapper.xml
public interface EmployeeMapper {
    Employee getEmp(Integer id);
}
mybatis/mapper/EmployeeMapper.xml
<?xml version="1.0" encoding="UTF-8" ?>
<!DOCTYPE mapper
        PUBLIC "-//mybatis.org//DTD Mapper 3.0//EN"
        "https://mybatis.org/dtd/mybatis-3-mapper.dtd">
<mapper namespace="com.zmj.springboot.mapper.EmployeeMapper">
    <select id="getEmp" resultType="com.zmj.springboot.entity.Employee">
        select * from employee where id = #{id}
    </select>
</mapper>
6.3 Service和Controller
@Service
public class EmployeeService {
    @Autowired
    private EmployeeMapper employeeMapper;

    public Employee getEmpById(Integer id){
        Employee emp = employeeMapper.getEmp(id);
        return emp;
    }
}
@RestController
public class EmployeeController {
@Autowired
private EmployeeService employeeService;
@GetMapping("/getEmp/{id}")
public Employee getEmpById(@PathVariable("id") Integer id){
Employee emp = employeeService.getEmpById(id);
return emp;
}
}6.4 application.yml
mybatis: # 配置mybatis规则
  mapper-locations: classpath:mybatis/mapper/*.xml  # 指定sql映射文件的位置
  configuration:  # 指定mybatis的全局配置
    map-underscore-to-camel-case: true   # 驼峰命名
6.5 启动类
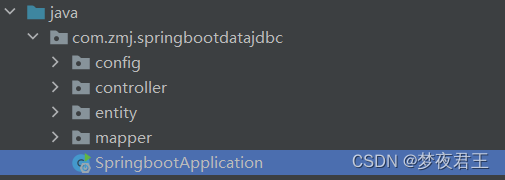
@MapperScan("com.zmj.springboot.mapper")
@SpringBootApplication
public class SpringbootApplication {
    public static void main(String[] args) {
        SpringApplication.run(SpringbootApplication.class, args);
    }
}
6.6 页面访问
http://localhost:8080/getEmp/1
{"id":1,"lastName":"张三","email":"sas@email.com","gender":1,"did":1}
7.SpringBoot2.x整合MyBatisPlus
7.1 导入依赖
        <dependency>
            <groupId>com.baomidou</groupId>
            <artifactId>mybatis-plus-boot-starter</artifactId>
            <version>3.4.1</version>
        </dependency>
7.2 xxxMapper
public interface UserMapper  extends BaseMapper<User> {
//只要继承了BaseMapper,就可以拥有简单的增删改查,不用写mapper.xml
}
7.3 测试
@Slf4j
@SpringBootTest
class SpringbootWebJspApplicationTests {
    @Autowired
    private UserMapper userMapper;

    @Test
    void testUserMapper() {
        User user = userMapper.selectById(1);
        log.info("用户信息:{}",user);
        //用户信息:User(id=1, name=Jone, age=18, email=test1@baomidou.com)
    }

}
8.SpringBoot2.x整合Redis
8.1 Maven依赖
        <dependency>
            <groupId>org.springframework.boot</groupId>
            <artifactId>spring-boot-starter-data-redis</artifactId>
        </dependency>
8.2 application.yml
spring:
  redis:
    port: 6379
    host: 127.0.0.1
8.3 测试
@Slf4j
@SpringBootTest
class SpringbootWebJspApplicationTests {
    @Autowired
    private RedisTemplate redisTemplate;

    @Autowired
    private StringRedisTemplate stringRedisTemplate;
    @Test
    void testRedis() {
        ValueOperations operations = redisTemplate.opsForValue();
        operations.set("key1","hello world");
        String key1 = (String) operations.get("key1");
        System.out.println(key1);//hello world
        ValueOperations<String, String> operations2 = stringRedisTemplate.opsForValue();
        operations2.set("key2","你好");
        String key2 = operations2.get("key2");
        System.out.println(key2);//你好
    }
}
8.4 如果使用Jedis
<dependency>
    <groupId>redis.clients</groupId>
    <artifactId>jedis</artifactId>
</dependency>
application.yml
spring:
  redis:
    port: 6379
    host: 127.0.0.1
    client-type: jedis
9. Springboot2.4以上的单元测试
9.1 导入Maven依赖
使用的Junit5
        <dependency>
            <groupId>org.springframework.boot</groupId>
            <artifactId>spring-boot-starter-test</artifactId>
            <scope>test</scope>
        </dependency>
9.2 JUnit5常用注解
@Test :表示方法是测试方法。但是与JUnit4的@Test不同,
    它的职责非常单一不能声明任何属性,拓展的测试将会由Jupiter提供额外测试
@ParameterizedTest :表示方法是参数化测试,下方会有详细介绍
@RepeatedTest :表示方法可重复执行,下方会有详细介绍
@DisplayName :为测试类或者测试方法设置展示名称
@BeforeEach :表示在每个单元测试之前执行
@AfterEach :表示在每个单元测试之后执行
@BeforeAll :表示在所有单元测试之前执行
@AfterAll :表示在所有单元测试之后执行
@Tag :表示单元测试类别,类似于JUnit4中的@Categories
@Disabled :表示测试类或测试方法不执行,类似于JUnit4中的@Ignore
@Timeout :表示测试方法运行如果超过了指定时间将会返回错误
@ExtendWith :为测试类或测试方法提供扩展类引用
10. 断言机制
10.1 简单断言
@Slf4j
@SpringBootTest
class SpringbootWebJspApplicationTests {
    @DisplayName("测试简单断言")
    @Test
    void testSimpleAssertions() {
        int cal = 2+3;
        Assertions.assertEquals(6,cal,"业务逻辑计算失败");//期望是6,实际是5,报错
        /*org.opentest4j.AssertionFailedError: 业务逻辑计算失败 ==>
        Expected :6
        Actual   :5*/
    }
}| 方法 | 说明 |
| assertEquals | 判断两个对象或两个原始类型是否相等 |
| assertNotEquals | 判断两个对象或两个原始类型是否不相等 |
| assertSame | 判断两个对象引用是否指向同一个对象 |
| assertNotSame | 判断两个对象引用是否指向不同的对象 |
| assertTrue | 判断给定的布尔值是否为 true |
| assertFalse | 判断给定的布尔值是否为 false |
| assertNull | 判断给定的对象引用是否为 null |
| assertNotNull | 判断给定的对象引用是否不为 null |
10.2 组合断言
@Slf4j
@SpringBootTest
class SpringbootWebJspApplicationTests {
    @DisplayName("测试组合断言")
    @Test
    void testAllAssertions() {
        Assertions.assertAll("test",()->Assertions.assertTrue(true && true,"结果不为true"),
                () -> Assertions.assertEquals(1,2,"结果不是1"));
        /*结果不是1 ==> expected: <1> but was: <2>
                Comparison Failure:
        Expected :1
        Actual   :2*/
    }
}
10.3 异常断言
@Slf4j
@SpringBootTest
class SpringbootWebJspApplicationTests {
    @Test
    @DisplayName("异常测试")
    public void exceptionTest() {
        ArithmeticException exception = Assertions.assertThrows(
                ArithmeticException.class, () -> System.out.println(1 % 0));//断定有异常
    }
}
11.Profile环境切换
11.1 默认情况下
@RestController
public class HelloController {

    @Value("${employee.lastName:无名}")
    private String lastName;
    @Value("${MAVEN_HOME}")
    private String mavenHome;
    @Value("${os.name}")
    private String osName;

    @GetMapping("/msg")
    public String msg(){
        return "Hello " + lastName + ",mavenHome="+mavenHome+",osName="+osName;
    }
}
11.2 增加一个生产配置文件一个测试配置文件
#application-prod.yml
employee:
  lastName: prod-zhangsan
#application-test.yml
employee:
lastName: test-zhangsan#application.yml
spring:
profiles:
active: test #指定激活的环境,test是测试;prod是生产如果是test,则显示 Hello test-zhangsan;如果是prod,则显示 Hello prod-zhangsan
#可以命令中设置取哪个配置文件
java -jar springboot-web-jsp-0.0.1-SNAPSHOT.jar --spring.profiles.active=prod

#可以命令中设置取哪个配置文件,还可以再设置某个具体的属性值
java -jar springboot-web-jsp-0.0.1-SNAPSHOT.jar --spring.profiles.active=prod --employee.lastName=cmd
11.3 外部化配置
可以在jar包所在目录下,或者/config目录下放入一个yml文件
持续更新中.................


 749
749

 被折叠的 条评论
为什么被折叠?
被折叠的 条评论
为什么被折叠?
 到【灌水乐园】发言


