


 本文详细探讨了Vue框架中父子组件的生命周期顺序,包括加载渲染、更新和销毁过程。在加载阶段,父组件先执行beforeCreate、created等生命周期,随后初始化子组件并按顺序执行相应生命周期。更新过程中,根据是否影响到父组件或子组件,有不同的执行顺序。而在销毁阶段,组件按父→子的顺序进行销毁。通过实例代码展示了各组件状态的打印,揭示了组件实例的初始化与挂载顺序。
父子组件生命周期顺序
1. 加载渲染过程
父组件 beforeCreate -> 父组件 created -> 父组件 beforeMount -> 子组件 beforeCreate -> 子组件 created -> 子组件 beforeMount -> 子组件 mounted -> 父组件 mounted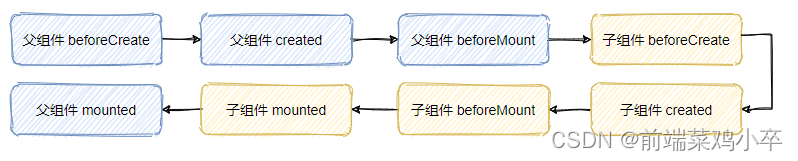
2. 更新过程
子组件更新,影响到父组件的情况
父组件 beforeUpdate -> 子组件 beforeUpdate -> 子组件 updated -> 父组件 updated

子组件更新,不影响到父组件的情况
子组件beforeUpdate -> 子组件updated
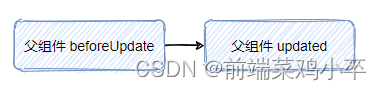
父组件更新,不影响到 子组件的情况
父组件 beforeUpdate -> 父组件 updated
父组件更新影响到子组件的情况
父组件beforeUpdate -> 子组件beforeUpdate -> 子组件updated -> 父组件updated
3. 销毁过程
父组件 beforeDestroy -> 子组件 beforeDestroy -> 子组件 destroyed -> 父组件 destroyed

父兄子组件各个生命周期执行的顺序
父组件
<template>
  <div class="father">
    <component-A class="son_A"></component-A>
    <component-B class="son_B"></component-B>
  </div>
</template>
<script>

import ComponentA from '../components/ComponentA.vue'
import ComponentB from '../components/ComponentB.vue'

export default{
  name: "FatherAll",
  components: {
    ComponentA,
    ComponentB
  },
  beforeCreate() {
		console.group("%c%s", "color:black", "beforeCreate 创建前状态-->>>>父组件");
	},
	created() {
		console.group("%c%s", "color:black", "created 创建完毕状态-->>>>父组件");
	},
	beforeMount() {
		console.group("%c%s", "color:black", "beforeMount 挂载前状态-->>>>父组件");
	},
	mounted() {
		console.group("%c%s", "color:black", "mounted 挂载完毕状态-->>>>父组件");
	},
	beforeUpdate() {
		console.group("%c%s", "color:black", "beforeUpdate 更新前状态-->>>>父组件");
	},
	updated() {
		console.group("%c%s", "color:black", "updated 更新后状态-->>>>父组件");
	},
	beforeDestroy() {
		console.group(	"%c%s",	"color:black","beforeDestroy 组件销毁前状态-->>>>父组件");
	},
	destroyed() {
		console.group("%c%s","color:black","destroyed 组件销毁后状态-->>>>父组件");
	}
}
</script>


子组件A
<template>
	<div>SonA</div>
</template>
<script>

export default{
  name: "ComponentA",
  beforeCreate() {
		console.group("%c%s", "color:red", "beforeCreate 创建前状态-->>>>兄弟组件A");
	},
	created() {
		console.group("%c%s", "color:red", "created 创建完毕状态-->>>>兄弟组件A");
	},
	beforeMount() {
		console.group("%c%s", "color:red", "beforeMount 挂载前状态-->>>>兄弟组件A");
	},
	mounted() {
		console.group("%c%s", "color:red", "mounted 挂载完毕状态-->>>>兄弟组件A");
	},
	beforeUpdate() {
		console.group("%c%s", "color:red", "beforeUpdate 更新前状态-->>>>兄弟组件A");
	},
	updated() {
		console.group("%c%s", "color:red", "updated 更新后状态-->>>>兄弟组件A");
	},
	beforeDestroy() {
		console.group(	"%c%s",	"color:red","beforeDestroy 组件销毁前状态-->>>>兄弟组件A");
	},
	destroyed() {
		console.group("%c%s","color:red","destroyed 组件销毁后状态-->>>>兄弟组件A");
	}
}
</script>

子组件B
<template>
	<div>SonB</div>
</template>
<script>

export default{
  name: "ComponentB",
  beforeCreate() {
		console.group("%c%s", "color:green", "beforeCreate 创建前状态-->>>>兄弟组件B");
	},
	created() {
		console.group("%c%s", "color:green", "created 创建完毕状态-->>>>兄弟组件B");
	},
	beforeMount() {
		console.group("%c%s", "color:green", "beforeMount 挂载前状态-->>>>兄弟组件B");
	},
	mounted() {
		console.group("%c%s", "color:green", "mounted 挂载完毕状态-->>>>兄弟组件B");
	},
	beforeUpdate() {
		console.group("%c%s", "color:green", "beforeUpdate 更新前状态-->>>>兄弟组件B");
	},
	updated() {
		console.group("%c%s", "color:green", "updated 更新后状态-->>>>兄弟组件B");
	},
	beforeDestroy() {
		console.group(	"%c%s",	"color:green","beforeDestroy 组件销毁前状态-->>>>兄弟组件B");
	},
	destroyed() {
		console.group("%c%s","color:green","destroyed 组件销毁后状态-->>>>兄弟组件B");
	}
}
</script>
运行结果:
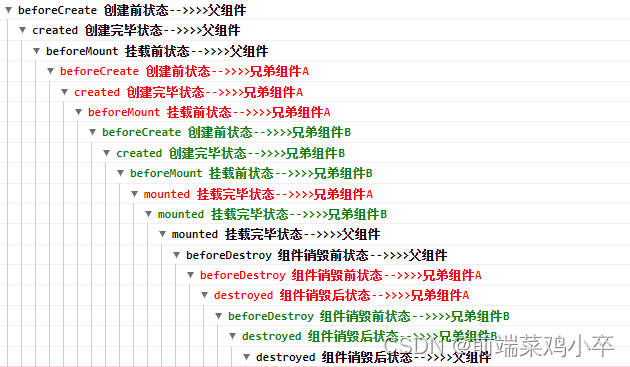
从图中我们发现,各个组件生命周期不是按照从上到下依次执行,执行完一个生命周期再执行另一个生命周期,父组件在执行到beforeMount就开始初始化兄弟组件A,兄弟组件A同样执行到beforeMount就初始化兄弟组件B,当兄弟组件B执行beforeMount完的时候,兄弟组件A才开始挂载。在父兄子组件挂载前,各组件的实例已经初始化完成。


 被折叠的 条评论
为什么被折叠?
被折叠的 条评论
为什么被折叠?
 到【灌水乐园】发言


