


前言
先放代码(41091改成你自己的代理端口,代码最后加上需要下载的包):
pip3 install --default-timeout=1000 --proxy 127.0.0.1:41091
-
本人是新手,如有错误还请指正。
-
本文建立在已知需要下载的PyTorch版本并下载好了CUDA、CUDnn等,以及如何使用代理的基础上。
-
电脑是Win10系统,conda环境也可以使用pip下载。因为直接下载速度非常缓慢,考虑使用代理来提高下载速度。
-
更新:本人在Ubuntu20.04下也安装成功了,步骤几乎完全一致。
查看PyTorch官网
首先,需要查看官网确认自己需要下载的PyTorch版本的命令:
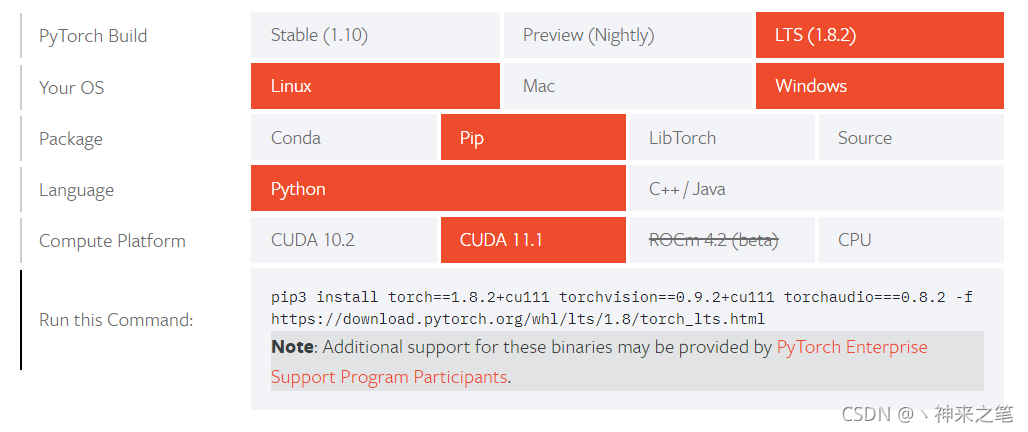
pip3 install torch==1.8.2+cu111 torchvision==0.9.2+cu111 torchaudio===0.8.2 -f https://download.pytorch.org/whl/lts/1.8/torch_lts.html
查看代理服务器地址、端口

可以在代理软件的设置中找到,之后的代码请根据你自己的地址和端口进行修改!
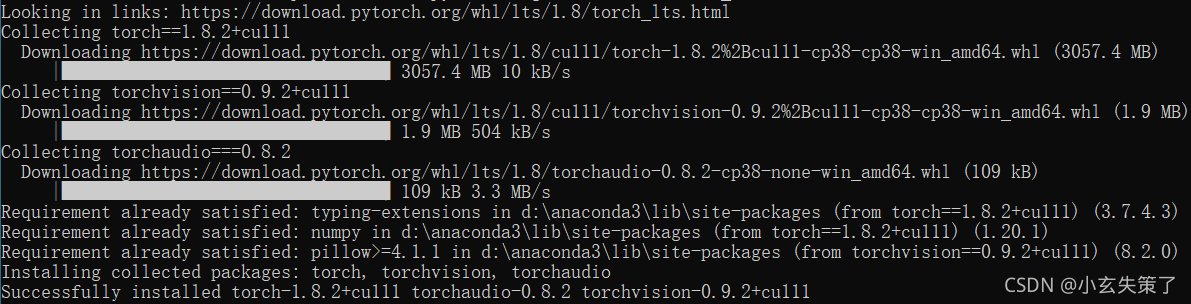
使用pip下载
需要使用pip/pip3的--proxy选项:
127.0.0.1:41091是我的代理服务器地址和端口,请根据你自己的地址和端口进行修改!
pip3 --proxy 127.0.0.1:41091 install torch==1.8.2+cu111 torchvision==0.9.2+cu111 torchaudio===0.8.2 -f https://download.pytorch.org/whl/lts/1.8/torch_lts.html
可能出现的错误
1. ReadTimeoutError
超时出错,考虑加大超时时间(在以上代码中加入--default-timeout=1000):
pip3 --default-timeout=1000 --proxy 127.0.0.1:41091 install torch==1.8.2+cu111 torchvision==0.9.2+cu111 torchaudio===0.8.2 -f https://download.pytorch.org/whl/lts/1.8/torch_lts.html
2. zipfile.BadZipFile: File is not a zip file
这个问题比较奇怪,目前我没有发现较好的解决方法。可能是下载文件出错导致的,和网络和线路的稳定性有关,只能重试一次,也可尝试切换不同的线路。
成功图片和测试代码
图片如下:
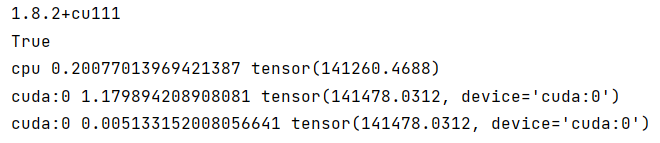
测试代码:
转自:https://blog.youkuaiyun.com/luoshiyong123/article/details/107221694/
import torch
# 以下代码只有在PyTorch GPU版本上才会执行
import time

print(torch.__version__)
print(torch.cuda.is_available())
a = torch.randn(10000, 1000)
b = torch.randn(1000, 2000)
t0 = time.time()
c = torch.matmul(a, b)
t1 = time.time()
print(a.device, t1 - t0, c.norm(2))

device = torch.device('cuda')
a = a.to(device)
b = b.to(device)
t0 = time.time()
c = torch.matmul(a, b)
t1 = time.time()
print(a.device, t1 - t0, c.norm(2))

t0 = time.time()
c = torch.matmul(a, b)
t1 = time.time()
print(a.device, t1 - t0, c.norm(2))
结果为:


 被折叠的 条评论
为什么被折叠?
被折叠的 条评论
为什么被折叠?
 到【灌水乐园】发言


